


MICROLINE
790/791
Printer Handbook
Every effort has been made to ensure that the information in this document is complete, accurate and up-to-date. OKI assumes no responsibility for the results of errors beyond its control. OKI also cannot guarantee that changes in software and equipment made by other manufacturers, and referred to in this handbook, will not affect the applicability of the information in this manual. Mention of software products manufactured by other companies does not necessarily constitute endorsement by OKI.
OKI and MICROLINE are registered trademarks of OKI Electric Industry Company, Ltd..
IBM and PC are registered trademarks of International Business Machines Corporation.
Epson is a registered trademark of Seiko Epson Corp. Lotus and 1-2-3 are registered trademarks of Lotus Development Corporation. Microsoft and MS-DOS are registered trademarks and Windows is a trademark of Microsoft Corporation.
WordPerfect is a registered trademark of WordPerfect Corporation.
Important Safety Instructions
Your OKI printer has been carefully designed to give you years of safe, reliable performance. As with all electrical equipment, however, there are a few basic precautions you should take to avoid hurting yourself or damaging the unit:
•Read the setup and operation instructions in this manual carefully. Be sure to save it for future reference.
•Read and follow all warning and instruction labels on the printer itself.
•Unplug the printer before you clean it. Use only a damp cloth; do not use liquid or aerosol cleaners.
•Place your printer on a firm, solid surface. If you put it on something unsteady, it might fall and be damaged; if you place it on a soft surface, such as a rug, sofa, or bed, the vents may be blocked, causing it to overheat.
•To protect your printer from overheating, make sure no openings on the printer are blocked. Don’t put the printer on or near a heat source, such as a radiator or heat register. If you put the printer in any kind of enclosure, make sure it is well ventilated.
•Do not put anything into the ventilation slots on the sides of printer, you could get a shock or cause a fire.
•The printhead can get quite hot when it has been printing for a length of time. Do not touch the printhead untill it has had a chance to cool off.
•Do not use your printer near water, or spill liquid of any kind into it.
•Be certain that your power source matches the rating listed on the back of the printer. If you’re not sure, check with your dealer or with your local power company.
•Your printer has a grounded plug as a safety feature, and it will only fit into a grounded outlet. If you can’t plug it in, chances are you have a non-grounded ontlet; contact an electrician to have it replaced with a grounded outlet. Do not use an adapter to defeat the grounding.
•To avoid damaging the power cord, don’t put anything on it or place it where it will be walked on. If the cord becomes damaged or frayed, replace it immediately.
•If you’re using an extension cord or power strip with the printer, make sure that the total of the amperes required by all the equipment on the extension is less than the extension’s rating. Generally, the total ratings of all equipment plugged into any one power line should not exceed 15 amperes. Don’t exceed this unless you know that the power line your equipment is plugged into has a rating above 15 amperes.
•Aside from the routine maintenance described in this handbook, don’t try to service the printer yourself; opening the cover may expose you to shocks or other hazards. Don’t make any adjustments other than those outlined in the manual – you might cause damage requiring extensive repair work.
•If anything happens that indicates that your printer is not working properly or has been damaged, unplug it immediately and follow the procedures in Chapter 5. These are some of the things to look for:
The power cord or plug is frayed or damaged.
Liquid has been spilled into the housing, or the printer has been exposed to water.
The printer has been dropped or its cabinet has been damaged.
The printer doesn’t function normally when you’re following the operating instructions.
•Screen jitter on your CRT may occur in an environment where the space between your printer and CRT is narrow (200 mm or less). In such cases, open up the space.

Contents
Introduction ............................................................................................................. |
1 |
Chapter 1: Installation ........................................................................................... |
3 |
Unpacking ................................................................................................................... |
3 |
Removing Shipping Retainers........................................................................ |
4 |
Installing Ribbon Cartridge ...................................................................................... |
5 |
Making Connections .................................................................................................. |
6 |
Connection with Computer ............................................................................ |
6 |
Connection with Power................................................................................... |
8 |
Chapter 2: Loading Paper ...................................................................................... |
9 |
Loading Single-Sheet Paper .................................................................................... |
11 |
Loading Rear-Feed Paper ........................................................................................ |
14 |
Paper Handling......................................................................................................... |
21 |
Tear Feature ..................................................................................................... |
21 |
Forms Tear-off Feature .................................................................................. |
22 |
Paper Park Feature ......................................................................................... |
22 |
Switching Paper Paths ................................................................................... |
23 |
Chapter 3: Operation ............................................................................................ |
25 |
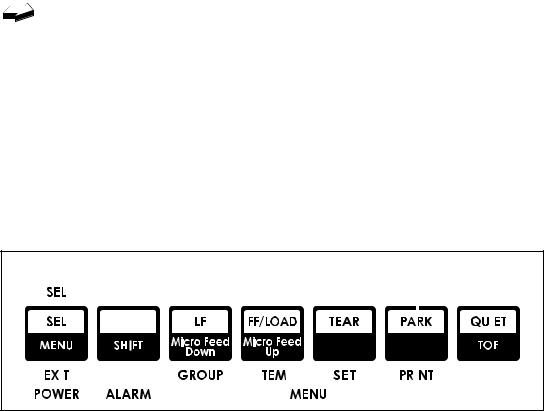
Control Panel............................................................................................................. |
25 |
Print Mode ................................................................................................................. |
27 |
Indicator Lights .............................................................................................. |
27 |
Buttons ............................................................................................................. |
28 |
Menu Mode ............................................................................................................... |
32 |
Sample Menu .................................................................................................. |
33 |
Summary of Menu Settings .......................................................................... |
34 |
Menu Mode Indicator Lights ....................................................................... |
37 |
Menu Mode Buttons ...................................................................................... |
37 |
Resetting Menu to Factory Defaults ............................................................ |
38 |
Performing Basic Tasks ............................................................................................ |
39 |
Selecting Print Quality .................................................................................. |
39 |
Selecting Character Pitch .............................................................................. |
40 |
Testing Your printer ....................................................................................... |
42 |
Resetting Top of Form ................................................................................... |
45 |
Using Bar codes .............................................................................................. |
45 |
Chapter 4: Working with Software .................................................................... |
49 |
Basic Terminology .................................................................................................... |
49 |
Printer Commands ......................................................................................... |
49 |
Emulations ...................................................................................................... |
50 |
Printer Drivers .......................................................................................................... |
50 |
Compatible Printer Drivers (DOS) .............................................................. |
50 |
Windows Printer Drivers .............................................................................. |
51 |
Chapter 5: Problem Solving, Maintenance, & Service................................... |
53 |
Problem Solving ....................................................................................................... |
53 |
Maintenance .............................................................................................................. |
57 |
Replacing the Ribbon Cartridge................................................................... |
57 |
Clearing Paper Jams ...................................................................................... |
59 |
Cleaning the Housing .................................................................................... |
63 |
Accessories ................................................................................................................ |
64 |
Replacement Parts.......................................................................................... |
66 |
Appendix A: Specifications ................................................................................ |
67 |
Appendix B: Menu Selections ............................................................................ |
71 |
Explanation of Menu Items ..................................................................................... |
74 |
Appendix C: Commands–Epson Emulation .................................................... |
81 |
Appendix D: Commands–IBM Emulation .................................................... |
101 |
Appendix E: ASCII Character Codes .............................................................. |
119 |
ASCII Character Sets .............................................................................................. |
119 |
Code Page ................................................................................................................ |
123 |
Appendix F: Interfacing .................................................................................... |
125 |
Pin Assignments for Parallel Interface Signals .................................................. |
125 |
Universal Serial Bus (USB) .................................................................................... |
126 |
Installing the Serial Interface ................................................................................ |
127 |
Pin Assignments for Serial Interface Signals ...................................................... |
129 |

Introduction
This Guide is arranged to help you get your new MICROLINE 790 or 791 printer set up and running quickly as well as providing you with more detailed information for future reference. Here’s how it’s organised:
•Chapter 1 (Installation) shows you how to get your printer ready to run and how to connect it to your computer.
•Chapter 2 (Loading Paper) explains how to load paper for any of the two methods of paper feed.
•Chapter 3 (Operation) describes how to control your printer from the front panel. It also explains how to change the defaults, how to test your printer and how to use bar codes.
•Chapter 4 (Working with Software) gives you information on selecting a driver and installing your printer on popular software packages.
•Chapter 5 (Problem Solving/Maintenance/Service) gives helpful hints on how to solve common printer problems and how to maintain your printer in tip-top shape.
•Appendices A through E contain a variety of reference material, including specifications, menu listings, lists of printer programming commands and ASCII characters.
ML790/791 Printer Handbook |
1 |

2 |
Introduction |

Chapter 1: Installation
This chapter explains how to unpack and install your new printer.
Unpacking
Unpack your printer and make sure you have the following items. If you are missing any of these items, contact your dealer immediately for a replacement.
• Printer
• Ribbon cartridge
• AC cord
It is not included in case of some models.
• Printer Handbook & Software on CD-ROM.
Interface cable and paper are sold separately.
ML790/791 Printer Handbook |
3 |
Removing Shipping Retainers
Tab |
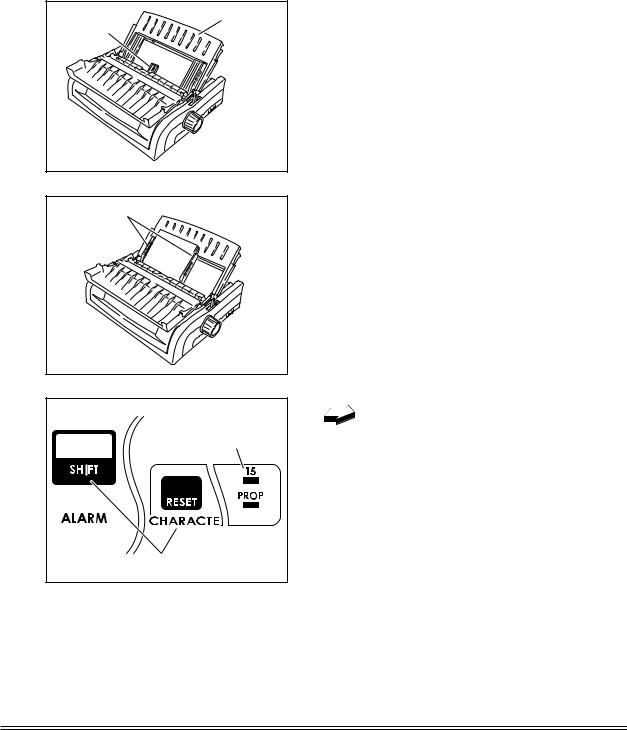
1. Open access cover by grasping tabs at |
|
either end and lifting. |
|
|
Shipping retainer |
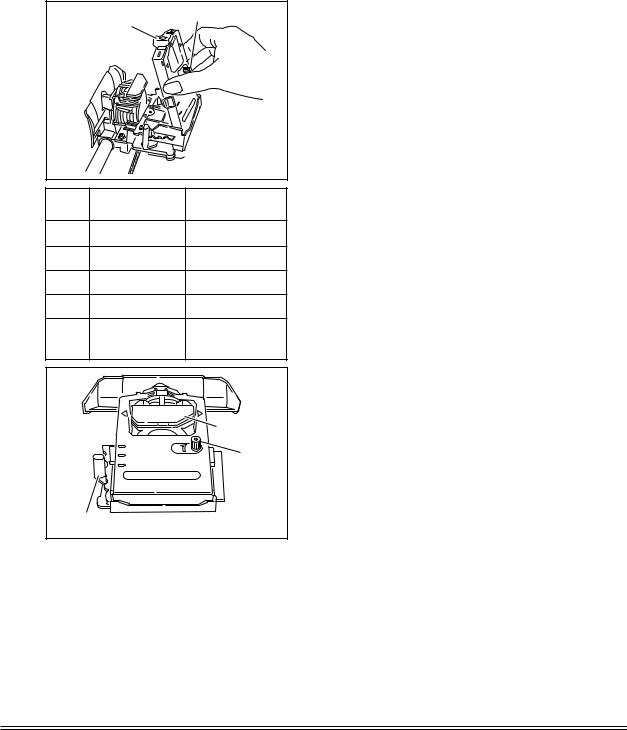
2.Remove printhead shipping retainer (leave cover open for installation of ribbon).
4 |
Installation |

Knob
Paper separator
" "mark
"mark
Protictive
material
3.Hold the knob and remove the paper separator.
4.Remove the protective material.
Paper separator
5.Set and attach the post to the“∆ ”mark of the upper cover and the paper sepa-
rator.
" |
"mark |
Protictive |
6. Remove the protective material from |
material |
the pull-up roller assembly. |
 Pull-up roller assembly
Installing Ribbon Cartridge
Center printhead on platen
1.With access cover open, grasp printhead and slide it until it is centered on platen.
2.Remove ribbon cartridge from its packaging.
Important! Leave the clear plastic ribbon shield on the cartridge!
ML790/791 Printer Handbook |
5 |
Ribbon |
Knob |
shield |
|
Setting Headgap lever |
Number of |
|
|
position |
sheets |
1 |
1 |
1 |
2 |
2 |
2 |
3 |
3 |
3 |
4 |
4 |
4 |
5 |
5 |
envelopes or |
|
|
extra-thick paper |
|
M |
|
|
|
Printhead |
|
1 |
Knob |
|
2 |
|
|
3 |
|
Headgap lever |
|
|
3.Holding ribbon cartridge with knob facing up and ribbon sheild facing platen, fit grooves on either side at back end of cartridge over pins on ribbon plate.
4.Lower front of cartridge over printhead until it snaps into place, then turn knob in direction of arrow (clockwise) to take up ribbon slack.
5.The headgap lever by the side of cartridge adjusts for different paper thicknesses. Set it for the number of sheets in the forms you’re using from 1 to 4; use setting 5 for envelopes or extra-thick paper. Adjust the setting up or down for the best print quality.
Note: When the setting is set at 2~5, the printer automatically slows down for better print quality with thicker multipart forms.
Important! Be sure to use only ribbons specifically for use with MICROLINE 790 series.
For best results, use genuine OKI ribbons.
Making Connections
Connection with Computer
There instructions are for the standard parallel interface and USB interface. Instructions for installation/connection of a serial interface are included with the serial interface accessory. For more information on the serial interface accessory, see Chapter 5.
6 |
Installation |
Pin assignments for the parallel, USB and the serial interfaces are listed in appendix E.
You must supply the cable for connecting your printer to your computer.
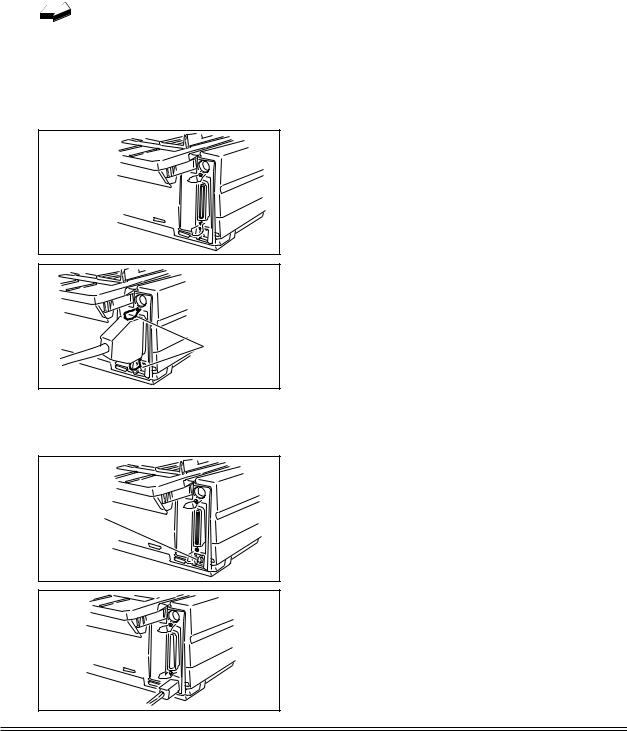
a. In the case of parallel interface cable
1. Make sure both printer and computer are OFF.
2. Locate interface port on back of printer.
Interface
port
3. Plug parallel interface cable into port and secure it in place with wire loops.
Wire loops
b. In the case of USB interface cable
1. Make sure both printer and computer are OFF.
2. Locate interface port on back of printer.
USB port
3. Plug USB interface cable into port.
ML790/791 Printer Handbook |
7 |
Connection with Power
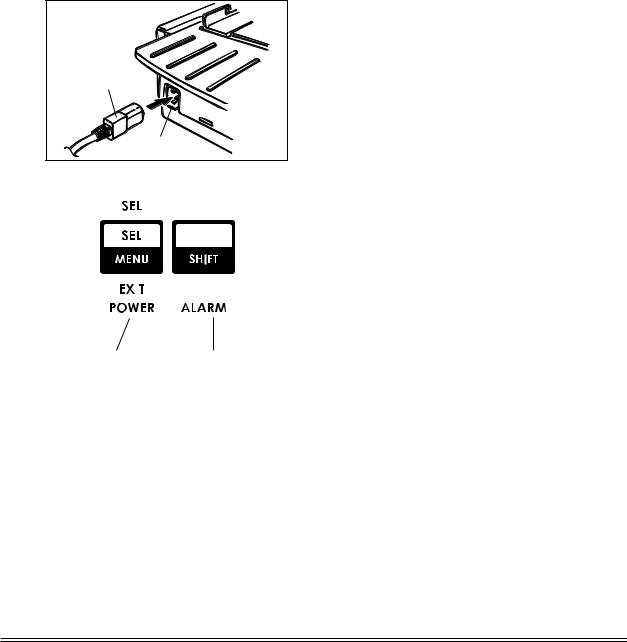
Power cord
Socket
|
|
|
|
|
|
Power light |
Alarm light |
|
|
|
|
1.Make sure both printer and computer are OFF.
2.Plug power cord into back of printer. Plug other end into grounded outlet.
3.Turn printer on. Printhead will cross back and forth along platen, and POWER light will come on. ALARM light will also come on, but don’t be concerned: it’s just telling you that there is no paper loaded.
You’re now ready to load paper—proceed to Chaper2.
8 |
Installation |

Chapter 2: Loading Paper
Your printer has provision for single-sheet paper feed from the top and for continu- ous-form paper feed from the rear. You can also install options: the Cut Sheet Feeder, which holds a stack of 100 sheets for feeding from the top and the Push and/or Pull Tractors for feeding continuous-form labels, heavy card stock or multi-part forms from the bottom. See Chapter 5 for more information on these options.
Top Feed
•Single sheets (basis weight 14 to 24 lbs)
•Single envelopes
–24-lb maximum
–6.5” to 9.5” wide
•Transparencies (8.5 x 11”)
Rear feed (continuous forms only, thickness to 0.014” [0.36 mm])
•Single-part continuous forms
–12 to 24 lb.
–Minimum 3” wide (*1)
•Carbonless, multi-part forms
–Original, plus 3 copies
–9 to 11 lb
–Minimum 3” wide (*1)
•Interleaf, multi-part forms (with carbon paper)
–Original, plus 4 copies
–10 to 12 lb paper, with 9 lb carbon
–Minimum 3” wide (*1)
(*1) Please change mentioned below centering Position within a set-up group following indication of 32 pages when a form of 3” wide is used by Rear Feed.
In the case of ML790 “Mode 1”. In the case of ML791 “Mode 2”.
ML790/791 Printer Handbook |
9 |

Bottom feed (continuous forms only, thickness to 0.017” [0.44mm])
•Single-part continuous forms
–12 to 24 lb
–Minimum 3” wide (*2)
•Carbonless, multi-part forms
–Original, plus 4 copies
–9 to 11 lb
–Minimum 3” wide (*2)
•Interleaf, multi-part forms (with carbon paper)
–Original, plus 4 copies
–10 to 12 lb paper, with 9 lb carbon
–Minimum 3” wide (*2)
•Continuous-feed envelopes
–24 lb maximum
–6.5” to 9.5” wide (envelope itself)
•Labels
–minimum 3” wide (*2)
–maximum 10”(ML790) or 16” (ML791) wide
•Card stock: papers up to 120 lb maximum
(*2) Please change mentioned below centering Position within a set-up group following indication of 32 pages when a form of 3” wide is used by Bottom Feed.
In the case of ML790 “Mode 1”. In the case of ML791 “Mode 2”.
10 |
Loading Paper |
Loading Single-Sheet Paper
The single-sheet paper path is best for letterhead stationery, memos, and envelopes. We also recommend it for printing graphs and charts because it provides the most accurate control of the paper.
To load in single sheets of paper:
If you have any continuous-form paper in the paper path, you must press the
PARK button on the front panel to remove it from the path before lading single sheets.
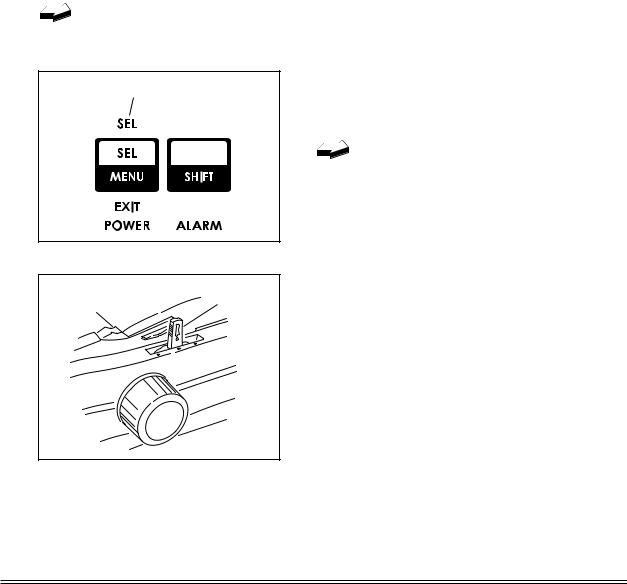
SEL light
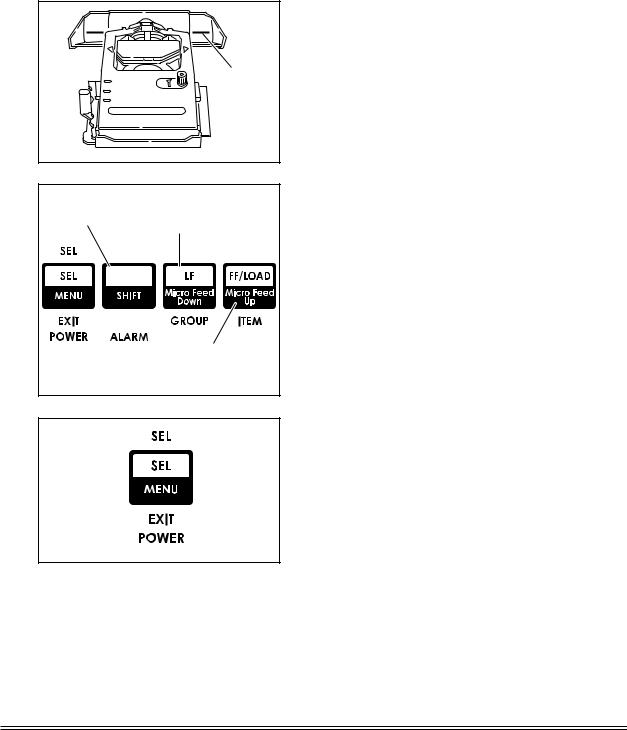
1.Make sure printer is turned ON and deselected (SEL light off – press SEL button to deselect it necessary).
The ALARM light will remain on until paper is loaded.
Move |
2. Move paper lever to position marked |
|
“TOP”. |
||
to"TOP" |
||
|
ML790/791 Printer Handbook |
11 |
Wire feed |
Paper |
|
separator |
||
guide |
||
|
3.Grasp back of paper separator and unsnap it from housing, then swing it up into single-sheet feed position, making sure that wire feed guide is nestled in separator.
Paper feed guides
4.Adjust paper feed guides for width of paper and drop sheet of paper into separator. Paper will automatically feed into printer.
Flashes |
Press |
If the sheet of paper doesn’t feed in properly, the “15” light in the Character Pitch section at the bottom right of the control panel will begin flashing. To correct this, press the SHIFT and RESET buttons simultaneously, then reload the sheet.
12 |
Loading Paper |
M
1
2
3
5.Baseline for Top of Form (TOF) on paper is indicated by red line on clear plas-
tic paper shield.
Baseline
Press to feed
Hold paper down in micro increments
Press to feed paper up in micro increments
6.If desired, change TOF setting using control panel:
to set TOF further down on page, hold SHIFT button while pressing FF/ LOAD button: this will advance paper up in micro increments
to move TOF further up on page, hold SHIFT button while pressing LF button: this will advance paper down in micro increments
7.Press SEL button (SEL light will come on).
ML790/791 Printer Handbook |
13 |
Loading Rear-Feed Paper
The rear-feed paper path is recommended for single-thickness, continuous fan-fold paper when printing spreadsheets, long reports, etc. For graphics or charts, it’s best to use the single-sheet paper path.
To load continuous-form paper from the rear:
Position "Rear"
1.If you have paper in paper path, be sure to remove it before installing rear-feed paper. To remove single sheet, press FF/ LOAD button. To remove bottom-feed paper, press PARK button.
2.Move paper lever to position marked “REAR”.
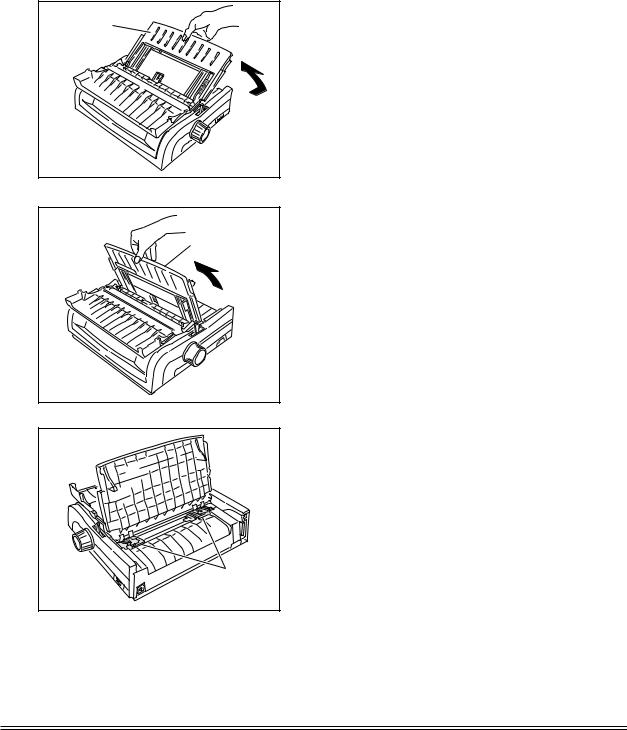
3. Open the access cover.
Paper separator
14 |
Loading Paper |
Paper |
separator |
Pull-up roller
assembly
4.Hold up the middle part of the paper separator and pull upwards.
5.Rotate the paper separator forward and stand against pull-up rolller assembly.
6. Locate tractors.
Tractors
ML790/791 Printer Handbook |
15 |
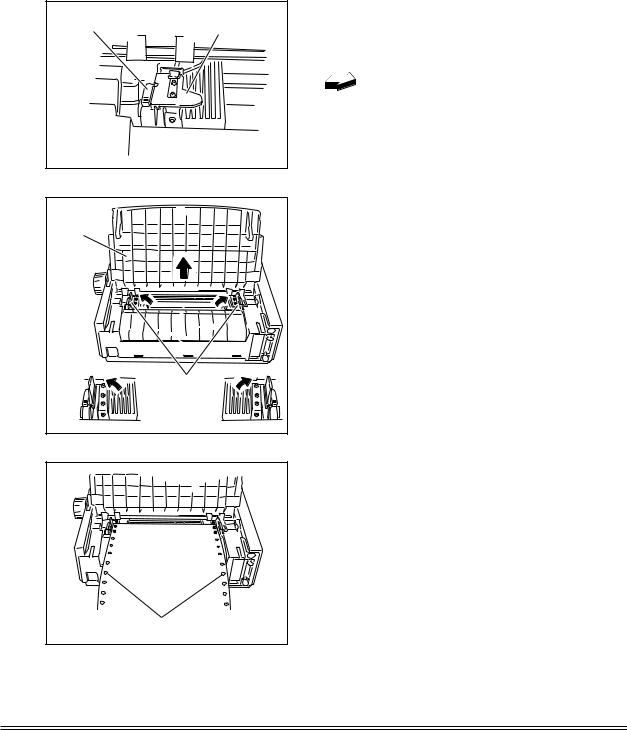
Lock lever |
Tractor cover |
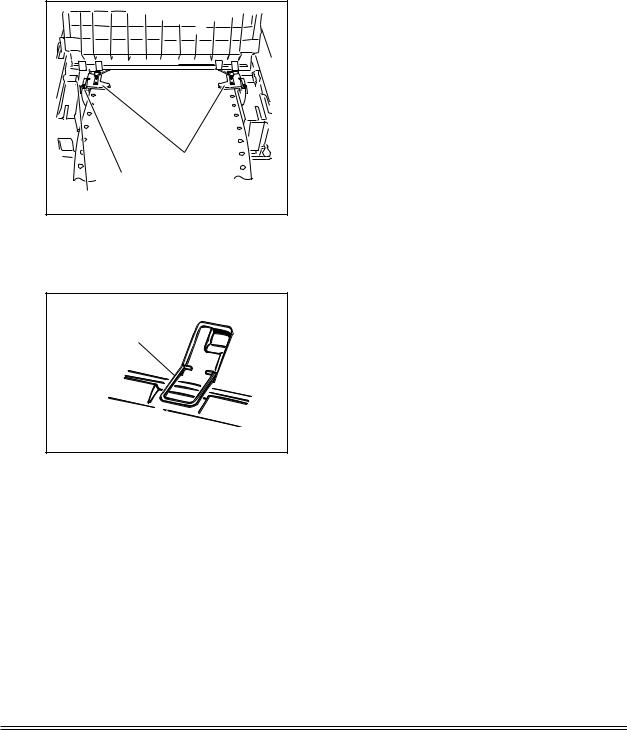
7. Pull up on lock levers to release trac- |
tors. Position right-hand tractor for |
||
|
|
width of paper you’re loading. |
The movement of the left tractor is limited to ensure that the paper will always contact the paper sensor when loaded.
Paper |
separator |
Tractor cover |
Paper holes on pins |
8.Open the tractor cover, and raise the paper separator.
9.Pull paper, and place first two holes on each side over tractor pins.
Please note that an equal number of paper holes must be engaged on either tractor in order to ensure proper paper feed.
16 |
Loading Paper |

|
10.Replace the paper separator and insert |
Paper |
until the paper separator and upper |
separator |
cover marks align. |
Upper cover

 "
" "mark
"mark
" "mark
"mark
ML790/791 Printer Handbook |
17 |
Tractor covers |
Lock lever |
Reference marks |
11.Close tractor covers and adjust left tractor to position edge of paper: reference marks on printer indicate left edge position for the two most common paper sizes. When paper is properly aligned, lock left tractor in place by pushing back on lock lever.
12.Adjust right tractor so that paper holes are centered on pins(careful – if paper is stretched too tight or left too loose, it can jam and cause problems), then lock right tractor in place by pushing back on lock lever.
13.Set Paper separator and swing wire feed guide over to rest on pull-up roller as- Wire feed guide  sembly to prevent from curling back
into printer.
18 |
Loading Paper |
M
1
2
3
Baseline
14.Push FF/LOAD button. Paper will automatically feed into printer and ALARM light will go out.
15.Baseline for top of Form(TOF) on paper is indicated by red line on clear plastic paper shield.
Press to hold the |
Press to bring |
paper before |
the paper down |
releasing the TEAR |
to the print |
button. |
position. |
|
|
|
|
|
|
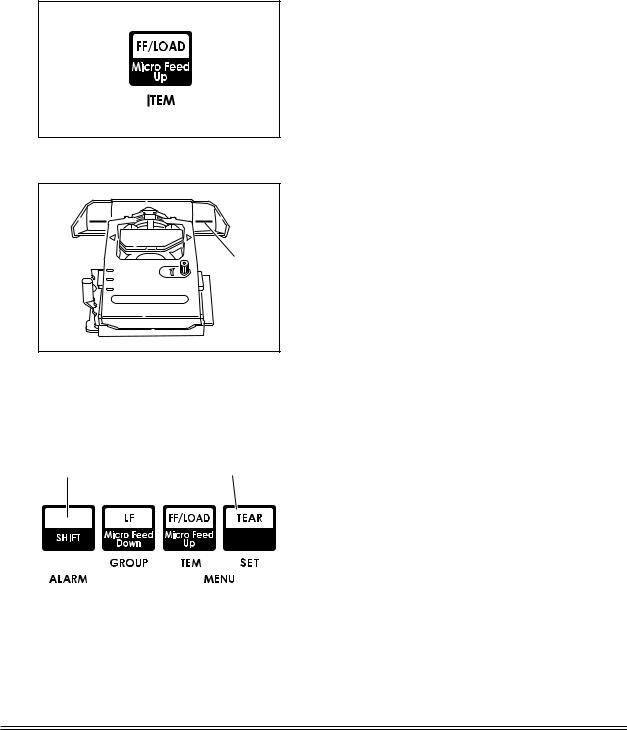
16.If desired, change TOF setting using control panel:
If form tear off is being selected in the printer menu, press the TEAR button to bring the paper down to the print position. Hold down the SHIFT button and release the TEAR button.
to set TOF further down on page, hold SHIFT button while pressing FF/ LOAD button: this will advance paper up in micro increments
ML790/791 Printer Handbook |
19 |
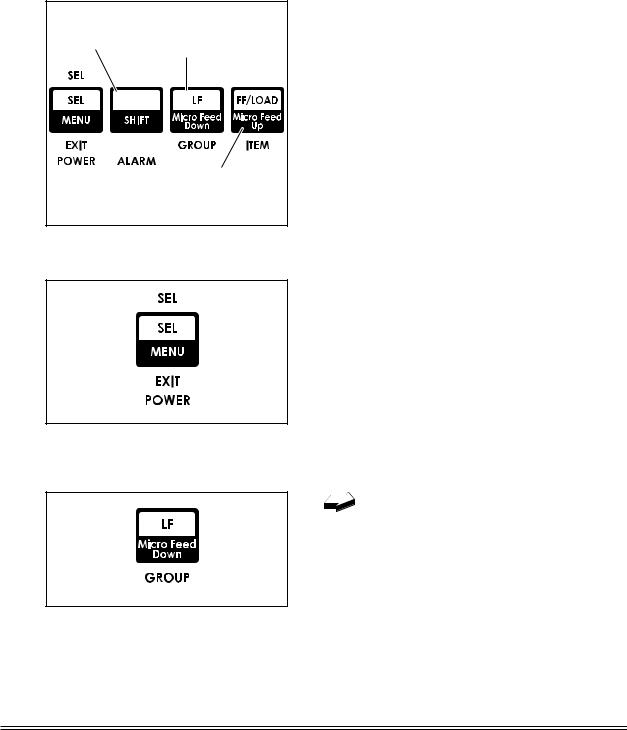
Press to feed
Hold paper down in micro increments
Press to feed paper up in micro increments
to move TOF further up on page, hold SHIFT button while pressing LF button: this will advance paper down in micro increments
17.Press SEL button (SEL light will come on).
To temporarily change the Top of
Form setting for a particular print job, deselect the printer and press the LF button until you reach the TOF position you want to use. The printer will retain this setting until you turn it off.
20 |
Loading Paper |
Paper Handling
Your printer has several handy paper handling features:
•Tear
•Form Tear-off
•Paper Park
Tear Feature
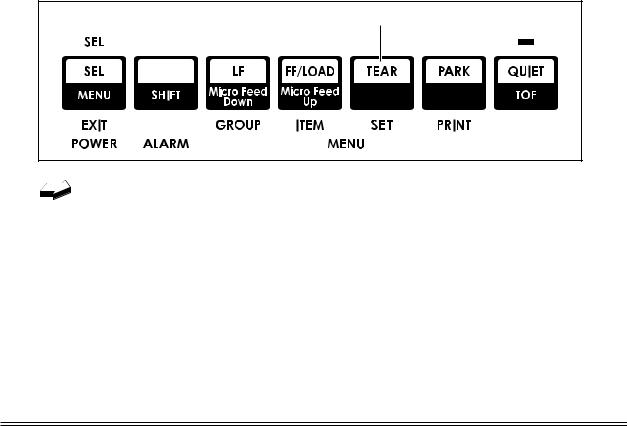
When you’re using continuous forms with either the built-in rear-feed tractor or the optional bottom-feed push tractor, you can use this feature to advance the forms up to the tear position so you can easily tear off a printed sheet without wasting paper or readjusting the printer. To do this, simply press the TEAR button on the front panel.
Press
The tear feature can not be used when the optional pull tractor is installed.
ML790/791 Printer Handbook |
21 |
Forms Tear-off Feature
Caution! Do not engage Forms Tear-off when printing on labels!
The Forms Tear-off feature can be engaged to automatically move the paper up to the tear position after the selected interval (500 milliseconds, one second, or two seconds). The page will stay in the tear-off position until the printer receives data. It will then move down to the initial printing position.
This feature is normally turned off. To activate it, enter the printer menu (see Menu Mode in Chapter3) and choose one of the intervals.
Some programs, such as high resolution graphics packages, pause occasionally while sending data to the printer. If the pause lasts more than the selected interval, the paper will advance to the tear-off position until more data is received. No data will be lost, but this extra paper movement can cause uneven print registration in graphics. If you have this problem, use the menu to deactivate Forms Tear-off.
Paper Park Feature
If you have continuous-form paper loaded and you wish to switch to another paper path, first tear off the printed pages, then simply press the PARK button. The continu- ous-form paper will immediately retract from the paper path.
Press
|
|
|
|
|
|
|
|
|
|
|
|
|
|
|
|
|
|
|
|
|
|
|
|
|
|
|
|
|
|
|
|
|
|
|
|
|
|
|
|
|
|
|
|
|
|
|
|
|
|
|
|
|
|
22 |
|
|
|
|
Loading Paper |

Switching Paper Paths
To switch from continuous-form feed from the rear or bottom (optional push or pull tractor installed) of the printer to single-sheet feed from the top:
1.Tear off printed pages.
2.Press PARK button.
3.Swing wire guide up into paper separator, then pivot separator to upright position.
4.Move paper lever to position marked “TOP”.
5.Load single sheet paper into paper separator.
To switch from top feed to continuous-form tear or bottom (optional push or pull tractor installed) feed:
1.Make sure no sheet is in paper path (press FF/LOAD to remove single sheet from path).
2.Lower paper separator to continuous forms position and swing wire guide over onto pull-up roller assembly.
3.Move paper lever to position marked “REAR” or “BOT”, as appropriate.
4.Press FF/LOAD button. Continuous-form paper will advance into print position.
ML790/791 Printer Handbook |
23 |
 Loading...