


NV-MP Music Port
Installation Guide

FCC Radio Frequency Interference Statement Warning
This equipment has been tested and found to comply with the limits for a Class B digital device, pursuant to Part 15 of the FCC Rules. These limits are designed to provide reasonable protection against harmful interference in a residential installation. This equipment generates, uses, and can radiate radio frequency energy and, if not installed and used in accordance with the instructions, it may cause harmful interference to radio communications. However, there is no guarantee that interference will not occur in a particular installation. If this equipment does cause harmful interference to radio or television reception, which can be determined by turning the equipment off and on, the user is encouraged to try to correct the interference by one or more of the following measures:
-Reorient or relocate the receiving antenna.
-Increase the separation between the equipment and receiver.
-Connect the equipment into an outlet on a circuit different from that to which the receiver is connected.
-Consult the dealer or an experienced radio/TV technician for assistance.
This device complies with Part 15 of the FCC Rules. Operation is subject to the following two conditions: (1) This device may not cause harmful interference, and (2) this device must accept any interference received, including interference that may cause undesired operation.
EN55022 Class-B
EN55024
IC Statement
This Class B digital apparatus complies with Canadian ICES-003.

Introduction
The Music Port is a unique collaboration between NuVo Technologies and Autonomic
Controls. It is a compact package of hardware and software that enables home desktop and laptop PC's to act both as sources and controllers in a NuVo Grand Concerto or Essentia E6G or future NuVoNet capable multi-room audio systems. Music Port consists of the NV-MP, a small hardware device which can be installed on-wall, inrack, or otherwise hidden from view, and PC software. You can install Music Port as an upgrade to an existing system or as part of a brand new NuVo multi-room audio system. Music Port software is installed via a user-friendly interface, and works with Windows XP, Windows Vista and Windows Home Server, as well as most existing PC sound cards.
Music Port delivers two primary functions. The first is to transform a host PC into a full-fledged multi-output source for a NuVo system. The second primary function of the Music Port is to enable any desktop PC, laptop PC, or portable tablet PC that is connected to the home network to serve as a controller for a NuVo distributed audio system, much like the NuVo OLED Control Pads already do. Through the Music Port Client, the user can browse their music library with full album art and control their home's music from anywhere in the home via hard-wired or wireless devices.
Table of Contents
I. Getting Started |
Page 3 |
II. Hardware Installation |
Page 3 |
III. Establishing Music Port in the I8G and E6G Confgurator Software |
Page 5 |
IV. Installing the Media Control Server on the Host PC |
Page 6 |
V. Configuring the Media Control Server on the Host PC |
Page 10 |
VI. Advanced Server Configuration |
Page 17 |
VII. Recommended Music Port Host PC Settings |
Page 19 |
VIII. Transferring Files from Client PC to Host PC |
Page 23 |
IX. Installing the Music Port Client |
Page 30 |
X. Using the Music Port Client Interface |
Page 33 |
XI. Music Port Control from the NuVo Control Pad |
Page 39 |
Specifications |
Page 42 |

I. Getting Started
The Media Control Server (MCS) is designed to run on a computer that is equipped with
Windows XP Home Service Pack 2 or Vista Service Pack 1. It should have 1 GB RAM and at least a 1 GHz x86 based processor. It is recommended that you dedicate a computer or server to get the best performance as a NuVoNet audio source. The PC that runs the
MCS will be referred to as the host PC.
The Music Port Client can then be installed on any of the home's networked PCs or touch screens for music control. The Music Port Client provides the ability to control audio playback in any zone in the home.
II. Hardware Installation of the Music Port
Making the Audio Connections (Fig. 1)
PC sound cards typically use a stereo mini, 3.5mm audio jack. The Music Port allows access to stereo, 5.1 or 7.1 surround audio cards on the host PC as multiple independent stereo audio streams. Use a 3.5mm to RCA cable to connect the PC's audio outputs to the appropriate source inputs on theGrand Concerto or Essentia E6G. If you are going to use a 5.1 sound card, for example to convert the PC into a threeoutput music server, you will have to make three connections. You would connect the
Front Left/Right (L/R) jack to one source input on the amplifier, Surround Left/Right
(LS/RS) to a second input, and Center/Low Frequency Effects (C/LFE) to a third input. Consult the documentation for your particular sound card to determine which audio jack corresponds to which pair of channels. Once the connections are made, make note of which sound card output is connected to which amplifier source input, as this information will be needed when configuring the Media Control Server.
3
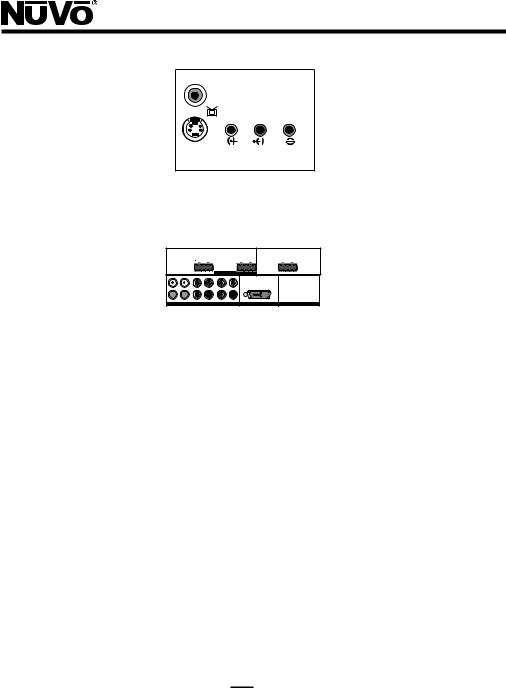
Figure 1- Audio Connections
|
VARIABLE |
|
|
|
VARIABLE |
|
|
VARIABLE |
|
|
VARIABLE |
|
OUTPUT |
SPEAKER |
|
OUTPUT |
SPEAKER |
OUTPUT |
SPEAKER |
OUTPUT |
|||
|
TIP=L |
40W/6 OHMS X 2 |
|
TIP=L |
40W/6 OHMS X 2 |
TIP=L |
40W/6 OHMS X 2 |
TIP=L |
|||
|
RING=R |
LEFT |
RIGHT |
|
RING=R |
LEFT |
RIGHT |
RING=R |
LEFT |
RIGHT |
RING=R |
|
FIXED |
|
|
|
FIXED |
|
|
FIXED |
|
|
FIXED |
|
OUTPUT |
|
|
|
OUTPUT |
|
|
OUTPUT |
|
|
OUTPUT |
|
ZONE 1 |
|
|
ZONE 2 |
|
ZONE 3 |
|
|
ZONE 4 |
||
1 |
2 |
3 |
4 |
5 |
6 |
|
CONNECT TO |
|
1 |
2 |
3 |
|
L |
|
L |
|
L |
|
NV-I8X |
|
|
|
|
|
|
|
|
USE NV-SLC1 |
|
|
|
|
|||
|
|
|
|
|
|
|
CABLE |
|
|
|
|
|
R |
|
R |
|
R |
|
|
|
|
|
|
1 |
2 |
3 |
4 |
5 |
6 |
|
|
|
4 |
5 |
6 |
|
|
SOURCE INPUTS |
|
|
|
SOURCE LINK |
|
SOURCE STATUS |
|||
Making the Connections to the Music Port Hardware (Fig. 2)
To install the Music Port hardware, connect the DB9 serial port output on the host PC (this may require the installation of a serial card in the host) using a standard nine pin serial cable. This connection is made at the side of the Music Port box labeled
Controller. Connect a standard network CAT5 cable from the NuVoNet RJ-45 port on the Music Port hardware to one of the Device connections on either the Essentia E6G Allport or the Grand Concerto EZ Port. When connected, the blue Power LED will light.
A second “RS232” DB9 port allows the Music Port Client to access specific Zone and
Source control through NuVoNet. When this serial cable is connected, “Zone” and “Source” buttons will appear at the top of the PC Interface application. From those buttons, any zone or source can be accessed and controlled. This second serial cable is only required if the Music Port Client is going to be used, see section X. Using the Music Port Client Interface, pg. 33.
4
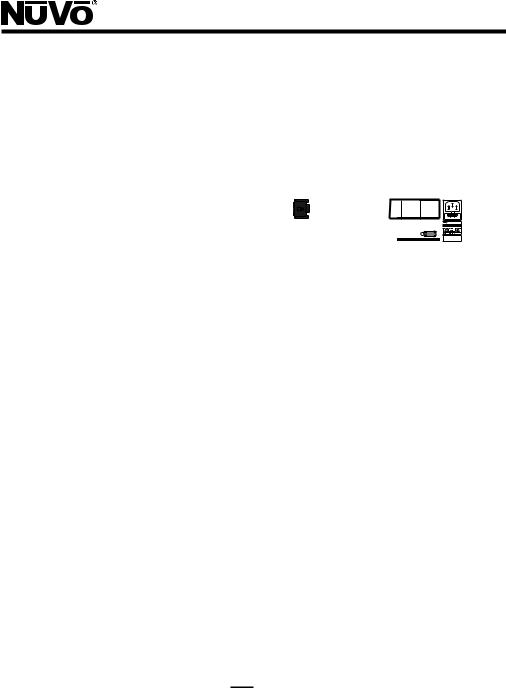
Figure 2: –Music Port Hardware Connections
POWER |
|
|
|
|
|
NuVoNet |
|
|
Address |
||
1 |
2 |
3 |
4 |
5 |
6 |
|
NuVoNet Source Address |
|
|||
SIR |
3:09 PM |
SR 86 (P101) |
|
Sirius Pops
Jozef Kossovit
Hungaria
|
RS-232 |
ZONE 7&8 |
PROGRAM |
SYSTEM NETWORK |
DIGITAL LINK |
III. Establishing Music Port in the I8G and E6G Configurator Software (Fig. 3)
The I8G and E6G Configurator Software is an optional setup tool for establishing sources and zone control of the Grand Concerto and Essentia E6G Audio Distribution Systems. The Source tab within the software allows each of the six available source inputs to be established.
To establish desired inputs within the I8G and E6G Configurator, within the “Source” tab of the Configurator, double click on an available source input 1-6. This will open a “Source Select” window. There, you can establish a name for the Music Port sources within the “Display Name” window (Note that unless you check the box “Always Use
Display Name (ignore name sent by NuVoNet Device)”, the Music Port will automatically place a name in the Source menu. Create a three-character abbreviation for each of the Music Port sources in the “Short Name” window. Scroll to NuVo as a manufacturer and select NV-MP and double click. Repeat these steps for each of the
Music Port sources being established.
5
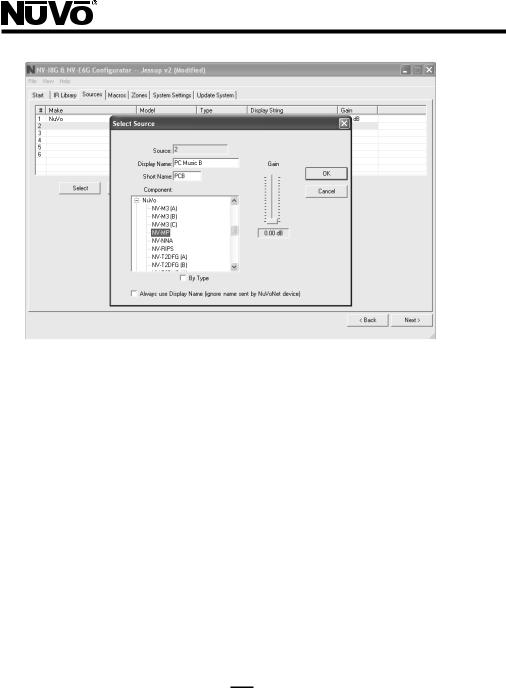
Figure 3 – Establishing Music Port in the I8G and E6G Congifurator Software
IV. Installing the Media Control Server on the Host PC
Installing the Media Control Server (Fig. 4)
To begin, insert the included CD and make sure you have an Internet connection. The
Media Control Server installation wizard will allow you to register and install the Music
Port Configuration tool on the host computer. It will also check for software upgrades. Click on the Next button to proceed to registration.
Registering Media Control Server (Fig. 5)
To register your product, simply complete the Name, Organization, and Email Address fields in the Customer Registration window. Click next to continue.
Activating Media Control Server (Fig. 6)
Your Music Port Package has an important 26-character License Key printed on the install CD case. Once the License Key fields are completed in the Activation window, the installation application will verify the activation key via the Internet and complete the installation.
6
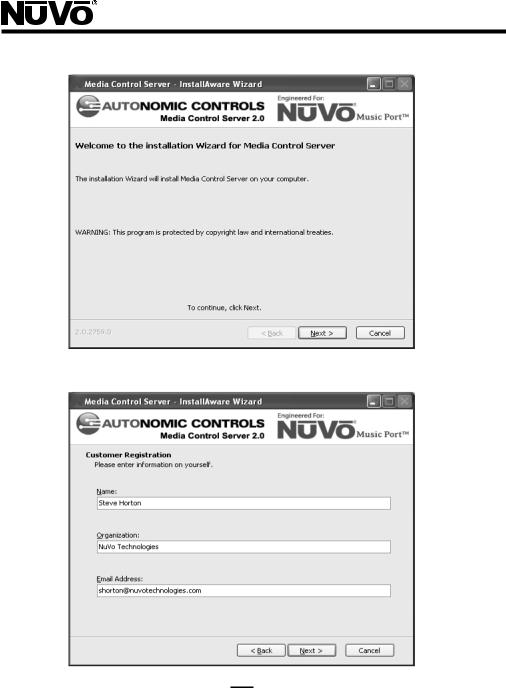
Figure 4 – Installing the Media Control Server
Figure 5 – Registering the Media Control Server
7
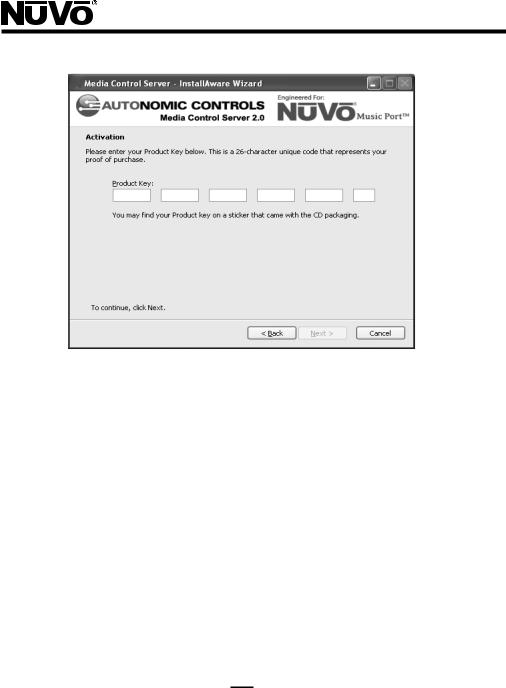
Figure 6 – Activating Media Control Server
Setup (Fig. 7)
The installer wizard will automatically install two applications. The Media Control
Server (MCS) provides access to the music library on the PC and manages its audio outputs. The NuVo Bridge is used to make the MCS accessible to the NuVo distributed audio system. The installer has the ability to disable one or both of the applications. Most installations require that both applications are installed. To complete the installation in its default format, click the Next button.
Completing the Media Control Server Installation (Fig. 8)
To complete the installation, click on the Next button. The wizard will finish the installation and prompt you to restart the computer when it is complete.
8

Figure 7 – Setup
Figure 8 – Completing the Media Control Server Installation
9
V. Configuring the Media Control Server on the Host PC
Once the Media Control Server (MCS) is installed, it can be accessed by going to Start-
>All Programs->Autonomic Controls->Media Control Server->MCS Configuration.
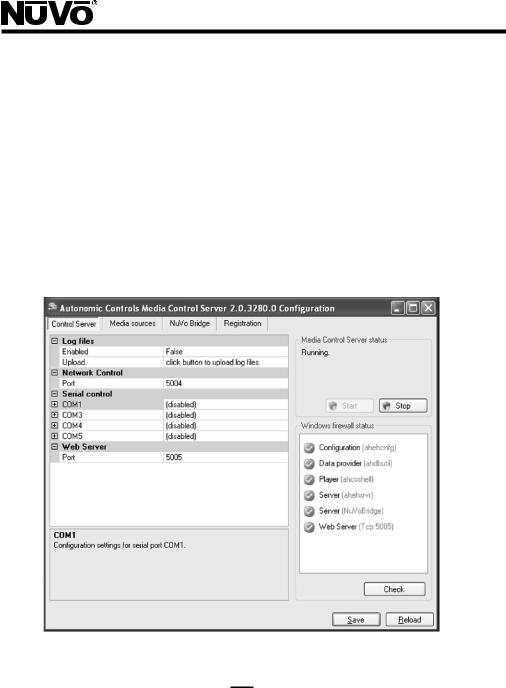
Control Server Tab (Fig. 9)
The Control Server tab displays the status of the MCS. The Media Control Server status in the upper right hand side of the tab should indicate that the MCS is running. It is rare that any changes will have to be made to the settings in this tab. If changes are necessary, see section VI. Advanced Server Configuration, pg. 17.
Figure 9 – Control Server Tab
10
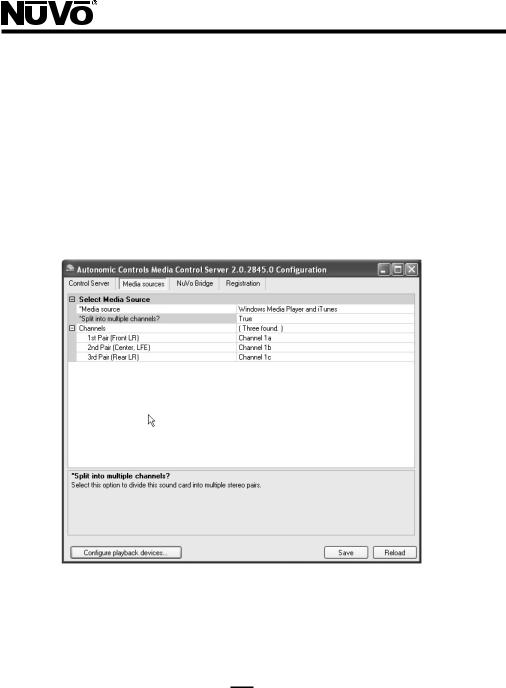
Media Sources Tab (Fig. 10)
Media Sources define the music files available to the user and the configuration of the audio outputs from the host PC. Windows Media Player is the resident music archiving software and is included with XP, Vista, or Window's XP Media Center operating systems. That will appear by default under the Select Media Source header. If you have downloaded iTunes, it will appear as well. If you intend to use more than 1 audio output from the PC, make sure that “Split in Multiple Channels?” is set at “True”. This will convert the audio output configuration from surround to multiple stereo streams.
Figure 10 – Media Sources
11

Configure Playback Devices (Fig. 11)
The Configure Playback Devices button at the bottom of the Media Sources tab will open an Audio Devices Properties window. The actual appearance of this window will vary depending on the manufacturer of the PC sound card being used. The “Advanced
Speaker Settings” window will let you establish the type of card within a drop-down menu. This is an important step. The output choice you make needs to match the number of sources you intend to setup for NuVoNet. For example, if you have a 5.1 surround card in the host PC, but you intend on using only two of the three available outputs, you should select quadraphonic within Advanced Speaker Settings. This will establish two independent stereo audio streams for NuVoNet. If you intend on using all three of the available audio outputs on the 5.1 surround card, select 5.1 within the “Advanced Speaker Settings”. A 7.1 surround card would represent four stereo audio streams for the NuVo System.
Once you have selected the appropriate number of outputs, return to the “Media
Sources” tab. When this is complete, two new columns will appear, Channels and the number of channels discovered. For example, if you are configuring a 5.1 surround card, you will see (three found). Each channel listed in this column can be given a specific name, (i.e. PC Music A or PC A), to match the appropriate output, Fig. 12. The names entered here will appear as the source names within the Sources menu on the
NuVoNet Control Pads.
Note that many surround audio cards require an audio cable to be plugged into at least one output before any information appears in the “Media Sources” tab. It is recommended that you plug in your audio cables from the host PC to the NuVo system prior to configuring the MCS, see section II, “Making the Audio Connections”, pg. 3.
12
 Loading...