


NuTone NS130WW, NS130BL, NS136BL, NS136WW, NS136SS User Manual
...models Ns130Bl • Ns130ss • Ns130WW Ns136Bl • Ns136ss • Ns136WW
NS Series
Range Hood
Page
read and save these instructions
for domestic cooking only
warning
TO REDUCE THE RISK OF FIRE, ELECTRIC SHOCK, OR INJURY TO PERSONS, OBSERVE THE FOLLOWING:
1.Use this unit only in the manner intended by the manufacturer. If you have questions, contact the manufacturer at the address or telephone number listed in the warranty.
2.Before servicing or cleaning unit, switch power off at service panel. Lock or tag service panel to prevent power from being switched on accidentally.
3.Installation work and electrical wiring (including switch location) must be done by a qualified person(s) in accordance with all applicable codes and standards, including fire-rated construction.
4.Provide sufficient air for proper combustion and exhausting of gases through the flue (chimney) of fuel burning equipment to prevent backdrafting. Follow the combustion equipment standards such as those published by the National Fire Protection Association (NFPA), the American Society for Heating, Refrigeration and Air Conditioning Engineers (ASHRAE), and local codes.
5.This product may have sharp edges. Be careful to avoid cuts and abrasions during installation and cleaning.
6.When cutting or drilling into wall or ceiling, do not damage electrical wiring and other hidden utilities.
7.Ducted fans must always be vented to the outdoors.
8.Use only metal ductwork.
9.Do not use this fan with any solid-state speed control device.
10.As an alternative, this product may be installed with the ULapproved cord kit designated for the product, following instructions packed with the cord kit.
11. This unit must be grounded.
TO REDUCE THE RISK OF A RANGE TOP GREASE FIRE:
1.Never leave greasy cooking unattended. Oil, butter, lard, etc. can ignite in a few minutes.
warning
TO REDUCE THE RISK OF INJURY TO PERSONS IN THE EVENT OF A RANGE TOP GREASE FIRE, OBSERVE THE FOLLOWING:*
1.SMOTHER FLAMES with a close-fitting lid, cookie sheet, or metal tray, then turn off the burner. BE CAREFUL TO
PREVENT BURNS. If the flames do not go out immediately,
EVACUATE AND CALL THE FIRE DEPARTMENT.
2.NEVER PICK UP A FLAMING PAN — You may be burned or spread the fire.
3.DO NOT USE WATER, including wet dishcloths or towels
-violent steam explosion will result.
4.Use an extinguisher ONLY if:
A.You know you have a Class ABC extinguisher and you already know how to operate it.
B.The fire is small and contained in the area where it started.
C.The fire department is being called.
D.You can fight the fire with your back to an exit.
* Based on “Kitchen Fire Safety Tips” published by NFPA.
caution
1.For general ventilating use only. Do not use to exhaust hazardous or explosive materials and vapors.
2.For best capture of cooking impurities, range hood should be mounted so that the top of the hood is 24”-30” [or applicable dimension depending on hood height and test height] above the cooking surface.
3.Read specification label on product for information and requirements.
2.Always turn hood ON when cooking at high heat or when cooking flaming foods.
3.Always use cookware appropriate for the size of the surface element.
NOTE |
If hood is to be installed non-ducted:
Purchase a set of (2) non-ducted filters from your local distributor or retailer and attach them to the aluminum mesh filters.
Installer: Leave this manual with the homeowner.
Homeowner: Cleaning, Maintenance and Operating instructions on page 2.

models Ns130Bl • Ns130ss • Ns130WW Ns136Bl • Ns136ss • Ns136WW
cleaning & Maintenance
For performance, appearance, and health reasons, clean filter, fan and grease-laden surfaces. Use only a clean cloth and mild detergent solution on stainless and painted surfaces. Clean allmetal filters in the dishwasher.
The motor is permanently lubricated and never needs oiling. If the motor bearings make excessive or unusual noise, replace the motor with the exact service motor. The impeller should also be replaced.
Use 120 V, 50 W, shielded halogen bulbs - MR16 or PAR16 with GU10 base. Purchase bulbs separately.
tab |
The grease filters, bottom panel, and blower wheel should be cleaned frequently. Use a warm detergent solution. The grease filters and blower wheel are dishwasher safe.
Note: Some minerals, when in contact with dishwasher soap additives, may cause filters to discolor. This discoloration is not covered by the warranty.
To remove blower wheel: Pull wheel straight down and off of motor.
When reinstalling blower wheel, make sure tab on wheel fits into one hole on motor.
operation
Always turn the hood ON before cooking in order to establish an air flow in the kitchen.After turning off the range, let the hood run for a few minutes to clear the air.
Operate the hood as follows:
 Blower Switch
This 3-position rocker switch turns blower ON and OFF and controls blower speed.
Press left side of rocker (1) to turn blower ON to low speed. Press right side of rocker (2) to turn blower ON to high speed. Set rocker to middle position (0) to turn blower OFF.
Page
 light switch
This 3-position rocker switch turns lights ON and OFF and controls their intensity.
Press left side of rocker (1) to turn lights ON to low intensity. Press right side of rocker (2) to turn lights ON to high intensity. Set rocker to middle position (0) to turn lights OFF.
prepare hood location
ROOF CAP |
3¼" X 10" or |
|
7" ROUND DUCT |
|
(For vertical |
|
discharge) |
SOFFIT |
|
|
|
HOUSE WIRING |
|
CABINET |
(Top or Back of hood) |
|
|
WALL CAP |
|
HOOD |
|
|
24" - 30" ABOVE |
3¼" X 10" DUCT |
|
COOKING SURFACE |
||
(For horizontal discharge) |
||
|
||
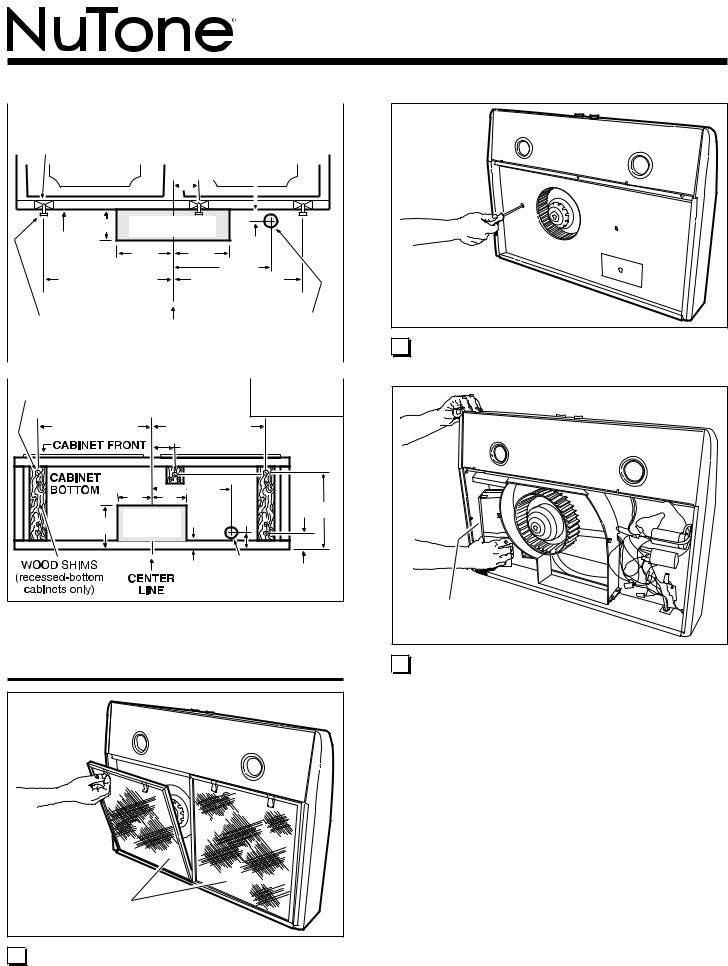
1 Determine whether hood will discharge vertically (3¼” x |
||
10” or 7” Round), or horizontally (3¼” x 10” only). For ver- |
||
tical or horizontal discharge, run ductwork between the |
||
hood location and a roof cap or wall cap. For best results, |
||
use a minimum number of transitons and elbows. |
||
2 Use the proper diagram below, for placement of ductwork |
||
and electrical cutout in cabinet or wall. For a non-ducted |
||
installation, DO NOT cut a duct access hole. |
||
*Note the extra wood shim and mounting screw near the cabinet front, 2-3/8” to the right of the cabinet center line.
|
|
|
|
|
3¼” X 10” |
|
HOOD MOUNTING SCREWS (5) |
|
VERTICAL DUCTING |
||||
12¼" (30" hood) |
|
12¼" (30" hood) |
|
|||
15¼" (36" hood) |
|
15¼" (36" hood) |
|
|||
CABINET FRONT |
23/8" |
* |
|
|||
CABINET |
|
|
107/8" |
|
||
BOTTOM |
|
5¼" |
|
|||
|
5¼" |
|
|
17/8" |
103/4" |
|
4½" ¾" |
VERTICAL DUCT |
|
|
|||
ACCESS HOLE |
|
|
|
|||
|
|
|
|
17/8" |
||
WOOD SHIMS |
|
|
|
|
ELECTRICAL |
|
CENTER |
|
ACCESS HOLE |
|
|||
(recessed-bottom |
(in cabinet bottom) |
|
||||
|
LINE |
|
|
|||
cabinets only) |
|
|
|
|
|
|
|
|
|
|
|
|
|
WOOD SHIMS |
|
|
|
|
3¼” X 10” |
|
(recessed-bottom |
|
|
|
horizontAL DUCTING |
||
cabinets only) |
|
|
|
|
|
|
CABINET FRONT |
3 |
/4" |
||||
|
23/8" * |
|||||
|
|
|||||
|
|
|
|
|
|
|
3½" |
HORIZONTAL DUCT |
|||
ACCESS HOLE |
||||
CABINET |
|
|||
|
5¼" |
5¼" |
||
BOTTOM |
|
|||
12¼" |
(30" hood) |
107/8" |
||
12¼" (30" hood) |
||||
15¼" |
(36" hood) |
|||
15¼" (36" hood) |
||||
|
|
|
||
HOOD |
CENTER |
ELECTRICAL |
|
MOUNTING |
|||
SCREWS (5) |
LINE |
ACCESS HOLE |
|
|
|
(in wall) |
|
|
|
|
|
|
|
|
|
HOOD MOUNTING SCREWS (5) |
|
7-in. round |
|
|
|
|
DUCTING |
12¼" (30" hood) |
12¼" (30" hood) |
|
15¼" (36" hood) |
15¼" (36" hood) |
|
|
|
23/8" * |
5" |
5" |
107/8" |
|
||
|
7-IN. ROUND |
17/8" |
103/4" |
73/4" |
DUCT ACCESS |
|
|
|
HOLE ** |
|
17/8" |
3/ " ELECTRICAL
4 ACCESS HOLE (in cabinet bottom)
**Note that the 7-in. round duct will need to be squeezed into an oval shape to connect to the 7-in. oval duct plate on the hood.
PREPARE THE HOOD
models Ns130Bl • Ns130ss • Ns130WW Ns136Bl • Ns136ss • Ns136WW
Page
↑ |
↑ |
↑ |
|
↑ |
|||
↑ |
|||
|
|||
|
|
4 Remove Bottom Cover held in place with five (5) screws.
damper / |
duct connector |
5 Remove Damper / Duct Connector from inside the  hood.
hood.
FOR DUCTED INSTALLATIONS - Skip to Step 10.
|
↑ |
|
(2)↑ |
||
lift |
(1) |
|
out |
||
pull |
||
|
||
|
down |
|
|
aluminum |
|
|
filters |
|
3  Remove the Aluminum Filters from the hood.
models Ns130Bl • Ns130ss • Ns130WW Ns136Bl • Ns136ss • Ns136WW
recirculation scroll wall
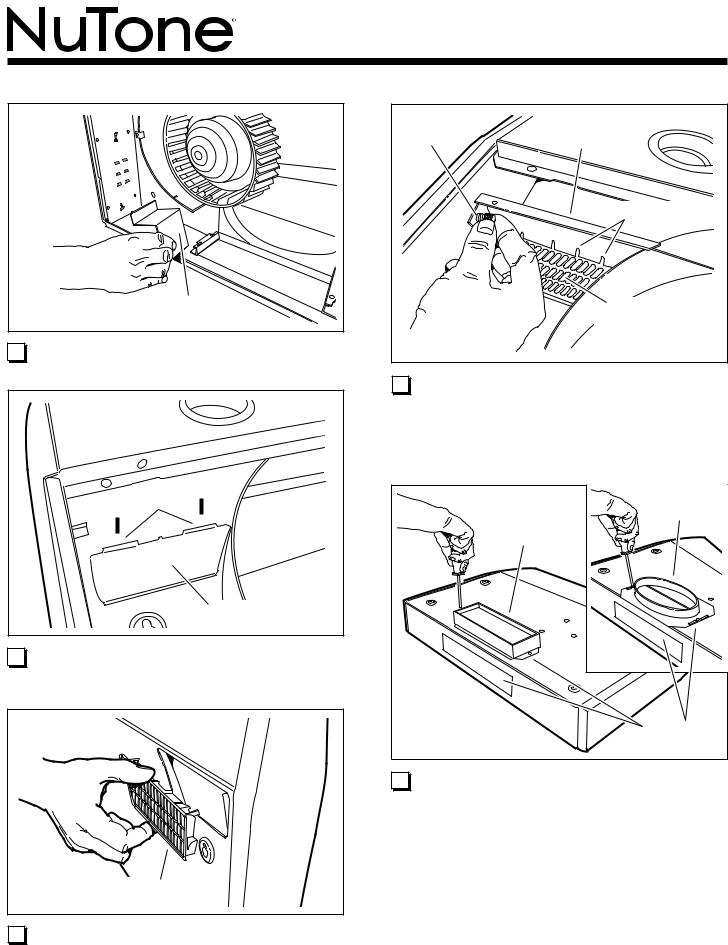
6 Non-Ducted Installation Only:
Remove Recirculation Scroll Wall from inside the hood.
tabs |
▼ |
▼ |
recirculation |
cover |
7 Non-Ducted Installation Only:
Depress the Tabs on the Recirculation Cover and push cover out through top of hood to remove it.
recirculation grille
Page
thumb |
recirculation |
|
screw |
||
plate |
||
|
||
|
slots & tabs |
|
|
recirculation |
|
|
grille |
9 Non-Ducted Installation Only:
Remove Recirculation Plate and Thumb Screw from plastic bag. Slide plate down onto Recirculation Grille so that Slots in plate fit into Tabs on grille. Secure plate with thumb screw.
3¼” x 10” |
7” OVAL |
damper / |
duct plate ** |
duct |
|
connector |
|
|
knockout |
|
openings |
10 |
Ducted Installation Only: |
|
Remove vertical or horizontal duct knockout. Attach 3¼” |
|
x 10” Damper/Duct Connector (if using 3¼” x 10” duct) |
|
or 7” Oval Duct Plate ** (if using 7-inch round duct) |
|
over the knockout opening. |
**Note that the 7-in. round duct will need to be squeezed into an oval shape to connect to the 7-in. oval duct plate on the hood.
8 Non-Ducted Installation Only:
Remove Recirculation Grille from plastic bag and snap it into the opening in the top of the hood.
models Ns130Bl • Ns130ss • Ns130WW Ns136Bl • Ns136ss • Ns136WW
Install the hood
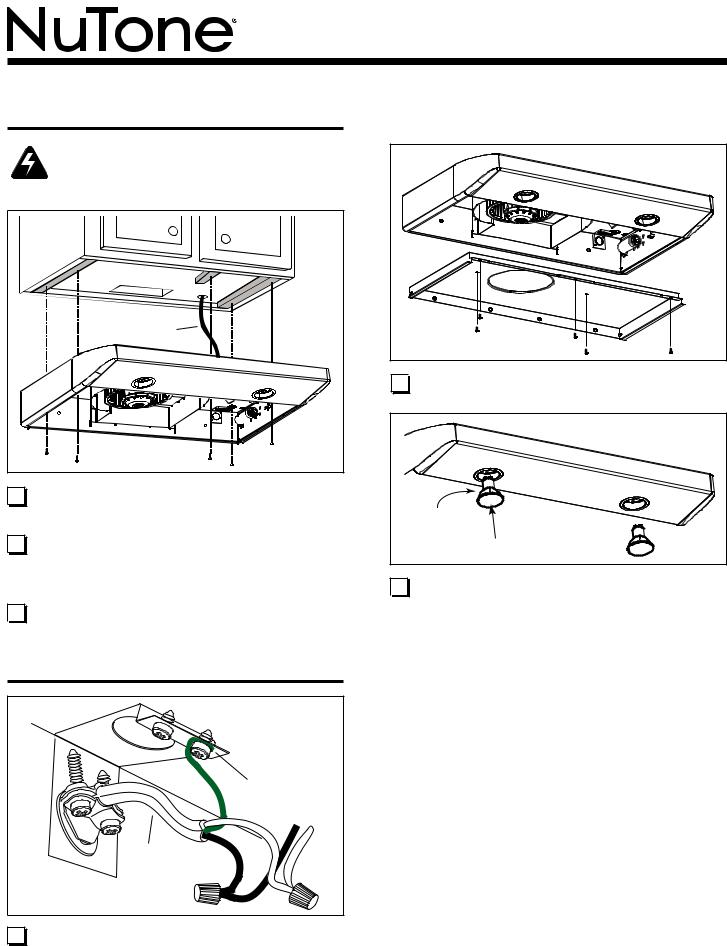
WARNING
To reduce the risk of electrical shock, switch power off at service panel. Lock or tag service panel to prevent power from being switched on accidentally.
house |
power cable |
HD0154 |
11 |
Run House Power Cable between service panel and |
|
hood location. Attach power cable to hood using appropri- |
|
ate connector. |
12 |
Hold the hood in position under the cabinet. |
For ducted installations: Make sure the damper / duct connector enters the ductwork and that the damper opens and closes freely.
13 Tighten all 5 mounting screws completely to secure the  hood to the cabinet.
connect the wiring
green |
ground |
screw |
house |
power |
cable |
HE0059 |
14 |
Connect House Power Cable to range |
hood |
wiring |
|
- BLACK to BLACK, WHITE to WHITE, and GREEN or |
||
|
BARE WIRE to GREEN Ground Screw. |
|
|
Page
complete installation
HO0059 |
15 
 Reinstall Bottom Cover using 5 screws.
(2) rotate |
|
clockwise |
|
HO0060 |
(1) push in |
16 Install Halogen Bulbs. Use 120 V, 50 W, shielded halo-  gen bulbs - MR16 or PAR16 with GU10 base. Purchase
bulbs separately.
models Ns130Bl • Ns130ss • Ns130WW Ns136Bl • Ns136ss • Ns136WW
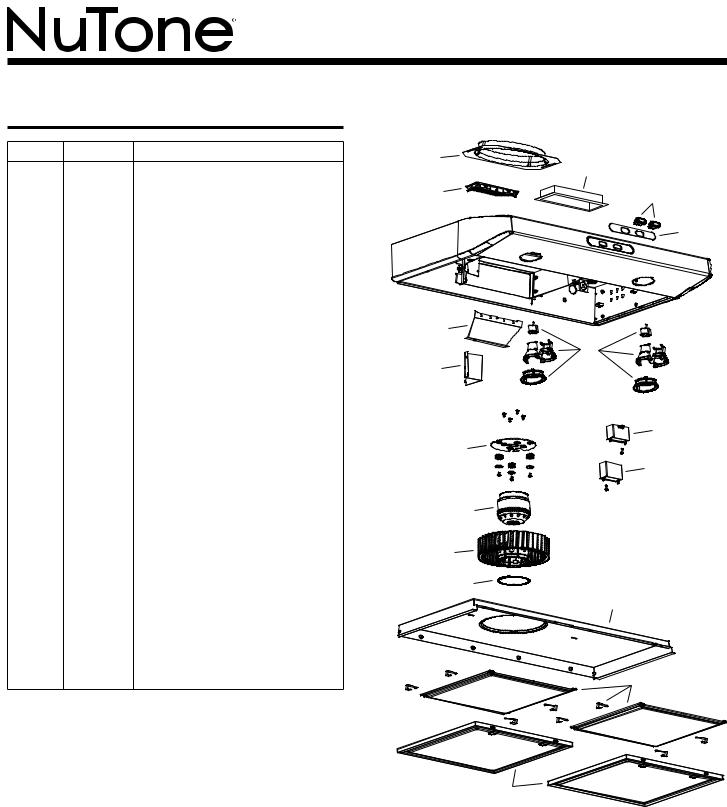
service parts
Key No. Part No. |
description |
197017397 3¼” X 10” Damper/Duct Connector *
297017398 7” Oval Duct Plate *
399526174 Recirculation Cap, Black
99526175 Recirculation Cap, White
99526146 Recirculation Grille, Black
99526147 Recirculation Grille, White
497017399 Rocker Switch, Black (2 Switches)
97017400 Rocker Switch, White (2 Switches)
599526148 Nameplate, Black
99526149 Nameplate, White
697017434 Recirculation Deflector for 30” Hood,
Black *
97017435 Recirculation Deflector for 30” Hood,
White *
97017436 Recirculation Deflector for 36” Hood,
Black *
97017437 Recirculation Deflector for 36” Hood,
White *
799526176 Recirculation Scroll Wall, Black
99526177 Recirculation Scroll Wall, White
897017403 Lamp Socket Holder Kit (Includes RH
&LH Socket Holder, Trim Ring, Socket, & Splice Connectors)
997017404 Motor Mounting Bracket *
10 |
97017405 Motor * |
1197017406 High Speed Motor Capacitor *
1297017407 Low Speed Motor Capacitor *
1397017408 Blower Wheel (Includes Mounting
Ring)
1499526154 Blower Wheel Mounting Ring
1597017409 Bottom Cover, Black, for 30” Hood *
97017410 Bottom Cover, White, for 30” Hood *
97017411 Bottom Cover, Black, for 36” Hood *
97017412 Bottom Cover, White, for 36” Hood *
1697017413 Non-duct Filter Kit for 30” Hood
(2 Filters & 8 Filter Clips) 97017414 Non-duct Filter Kit for 36” Hood
(2 Filters & 8 Filter Clips)
1797017415 Filter Kit for 30” Hood (2 Filters)
97017416 Filter Kit for 36” Hood (2 Filters)
** |
97017417 Parts Bag |
*Includes hardware
**Not illustrated
Order replacement parts by PART NO. - not by KEY NO.
Replacement parts can now be ordered on our website. Please visit us at www.nutone.com.
Page
2
1
3 |
4 |
5
6
8
7
11
9
12
10
13
14
15
16
17

models Ns130Bl • Ns130ss • Ns130WW Ns136Bl • Ns136ss • Ns136WW
Page
warranty |
99526145B
 Loading...