


VJ01
I
Quick Start Owner’s Manual
BOX CONTENTS
• DVD Main Unit
• Power Cable
• RCA Video Cables
Manual de inicio rápido del usuario (ESPAŃOL)
CONTENIDOS DE LA CAJA
• Unidad DVD
• Cable de alimentación
• Cables de video RCA
Kurzbedienungsanleitung (DEUTSCH)
NHALT DER VERPACKUNG
• DVD gerät
• Stromkabel
• RCA Videokabel
Guide d’utilisation simplifié (FRANÇAIS)
CONTENU DE LA BOÎTE
• Lecteur DVD
• Câble d’alimentation
• Câbles vidéo RCA
Manuale rapido di utilizzazione (ITALIANO)
CONTENUTI DELLA CONFEZIONE
• Unità DVD
• Cavo di alimentazione
• cavi video RCA
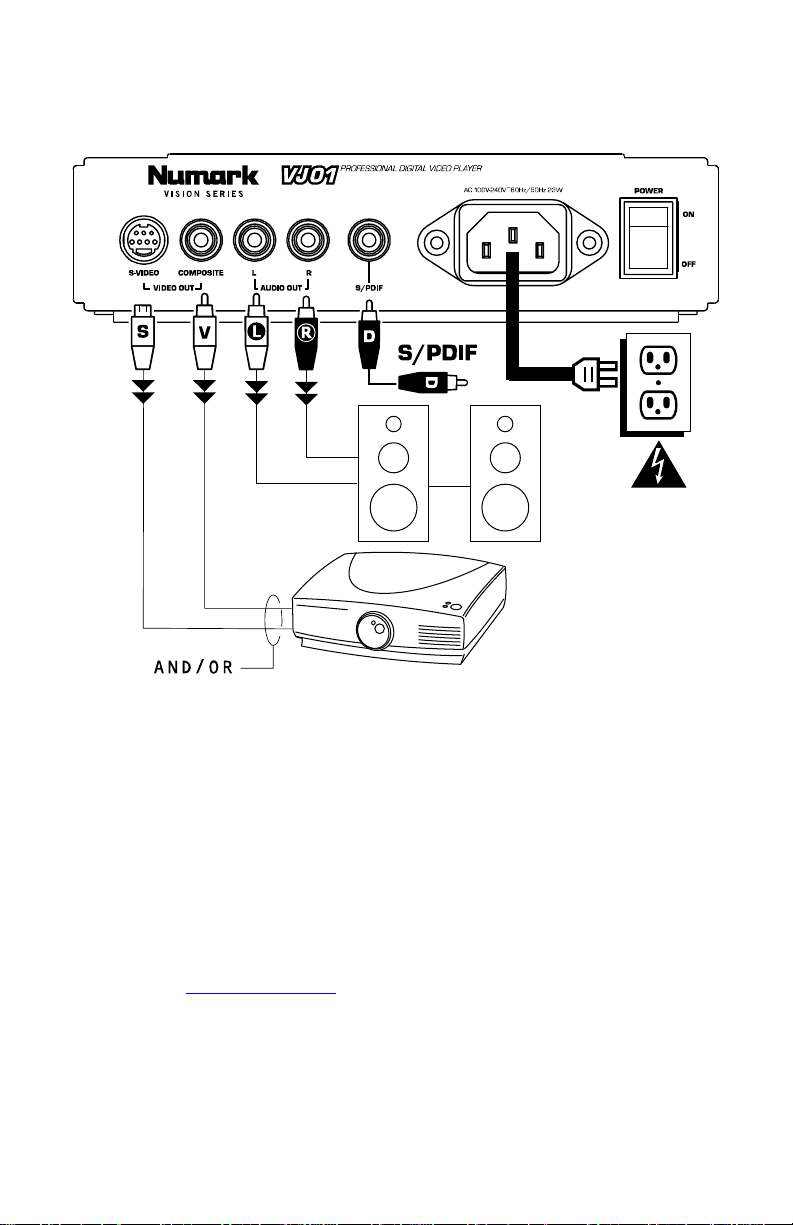
Quick Setup Guide
1. Make sure all items listed on the front of this guide are included in the box.
2. READ SAFETY INSTRUCTION BOOKLET BEFORE USING THE PRODUCT
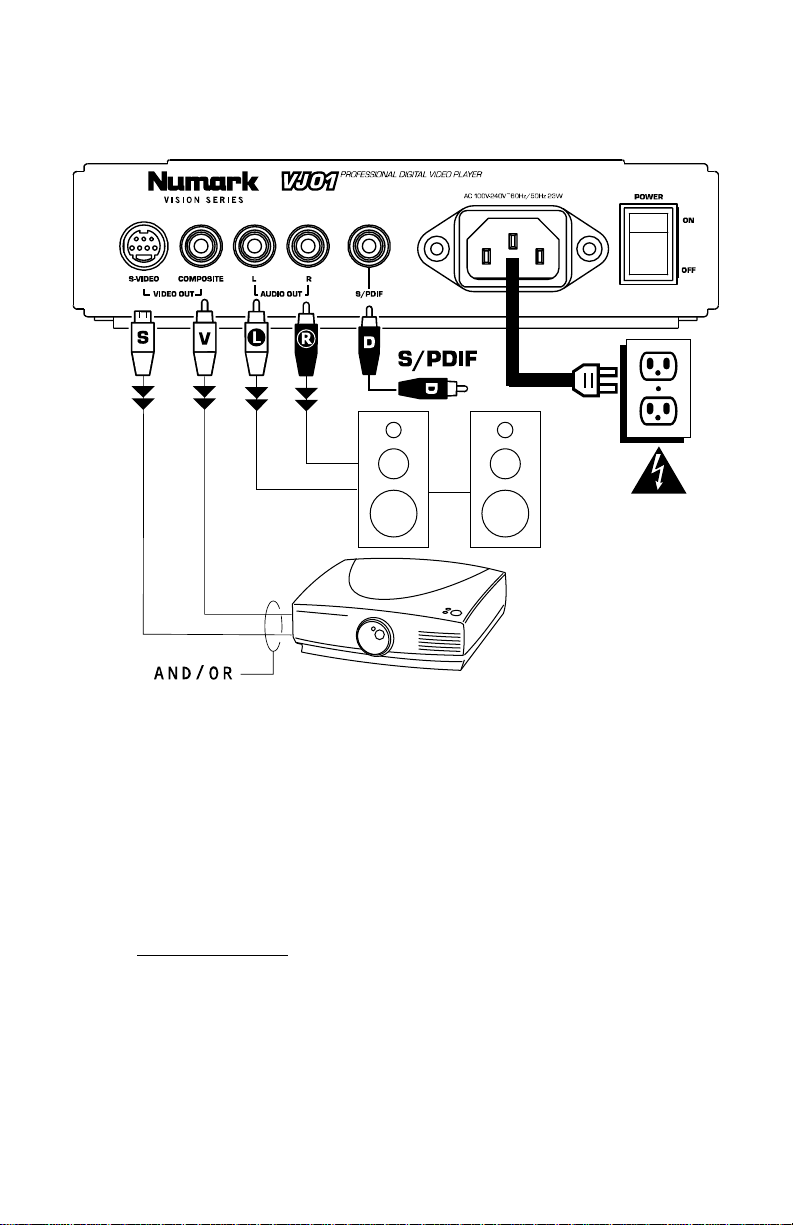
3. Study this setup diagram. There are various ways to use the product. The diagram shows ways in
which you can utilize the features of this product.
4. Place device in an appropriate position for operation.
5. Make sure all devices are turned off.
6. Connect the outputs to audio devices and video monitors.
7. Make sure that all faders on external devices are set at zero.
8. Plug your device and other devices into AC power.
9. Switch everything on in the following order.
• This device.
• Any monitors and audio devices.
10. When turning off, always reverse this operation by turning everything off in the following order:
• Any monitors and audio devices.
• This device.
11. Go to http://www.numark.com and register your product.
2
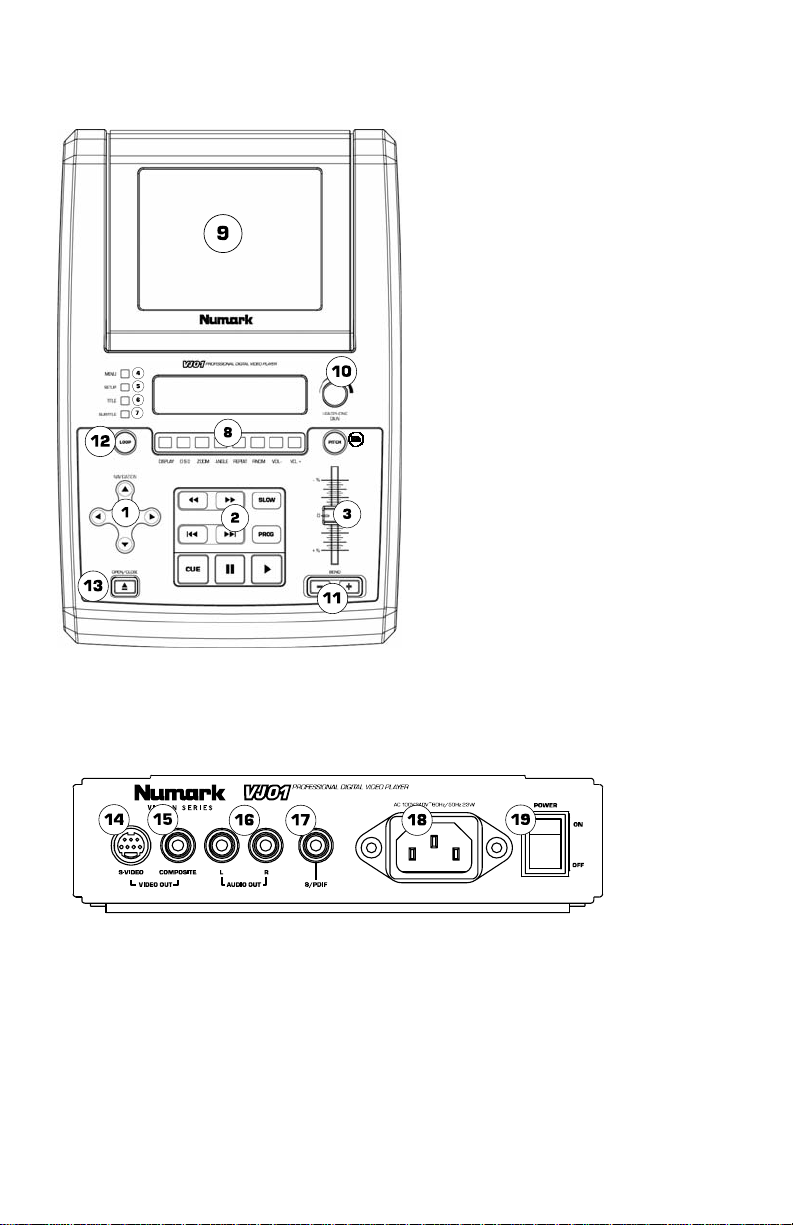
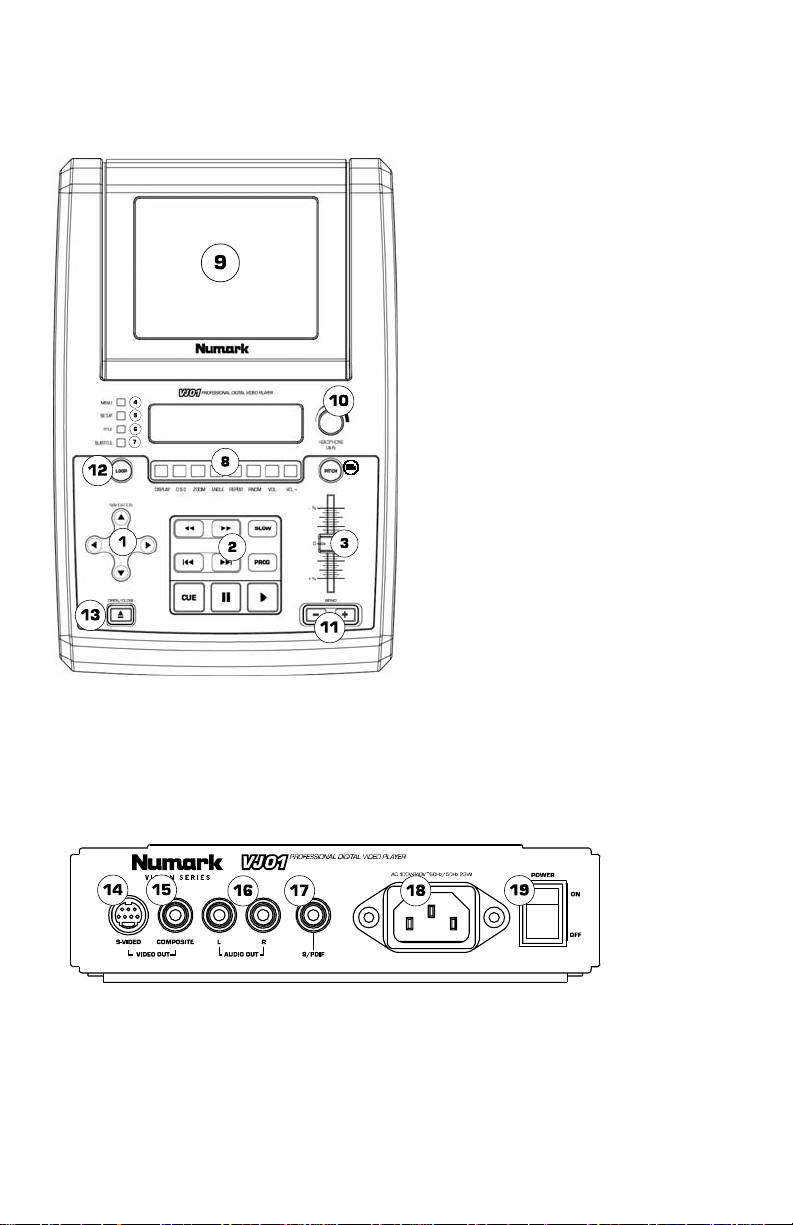
Front Panel
1. Menu Navigation Controls: Controls to
navigate through the menus on a DVD.
2. Playback control: Contains Play,
Pause, Cue, Fast Forward, Rewind, Next
Track, Previous Track, Slow Motion and
the Program Function.
3. Pitch Fader: Adjusts the playback
pitch/tempo. This feature can be
disabled by pressing the Pitch button
located at (3b).
4. Menu: Opens the menu system of a
compatible DVD.
5. Setup: This button will enter the DVD
player setup mode on the screen which
can be navigated by the ‘Menu
Navigation Controls.
6. Title: Goes to the title menu of
compatible DVD discs.
7. Subtitle: Turn subtitles on and off.
8. Function buttons: These features add
functionality to the DVD Player and are
described later in this manual.
9. Display: The DVD is displayed here.
10. Headphone Gain: Use this knob to
adjust headphone volume.
11. Pitch Bend: Use these buttons to
momentarily change the speed of a DVD.
12. Loop: This button allows you to loop a
section of a DVD. Press it once to set
the beginning of the loop, then press it
again to set the end point of the loop.
13. Open/Close: Opens and closes Disk
Tray. BE SURE TO ALWAYS USE
BUTTON TO OPEN AND CLOSE.
Rear Panel
14. S-Video Output: Output to compatible S-Video monitoring device.
15. Composite Video Output: Output to compatible video monitoring device.
16. RCA Audio Stereo Output: Plug into audio mixer or amplifier.
17. Coaxial Digital Audio Output: Commonly known as SPDIF, connect to compatible SPDIF decoder.
18. IEC Power Connector: Connect your supplied power cable here.
19. Power Switch: Use this to turn the unit on and off.
3
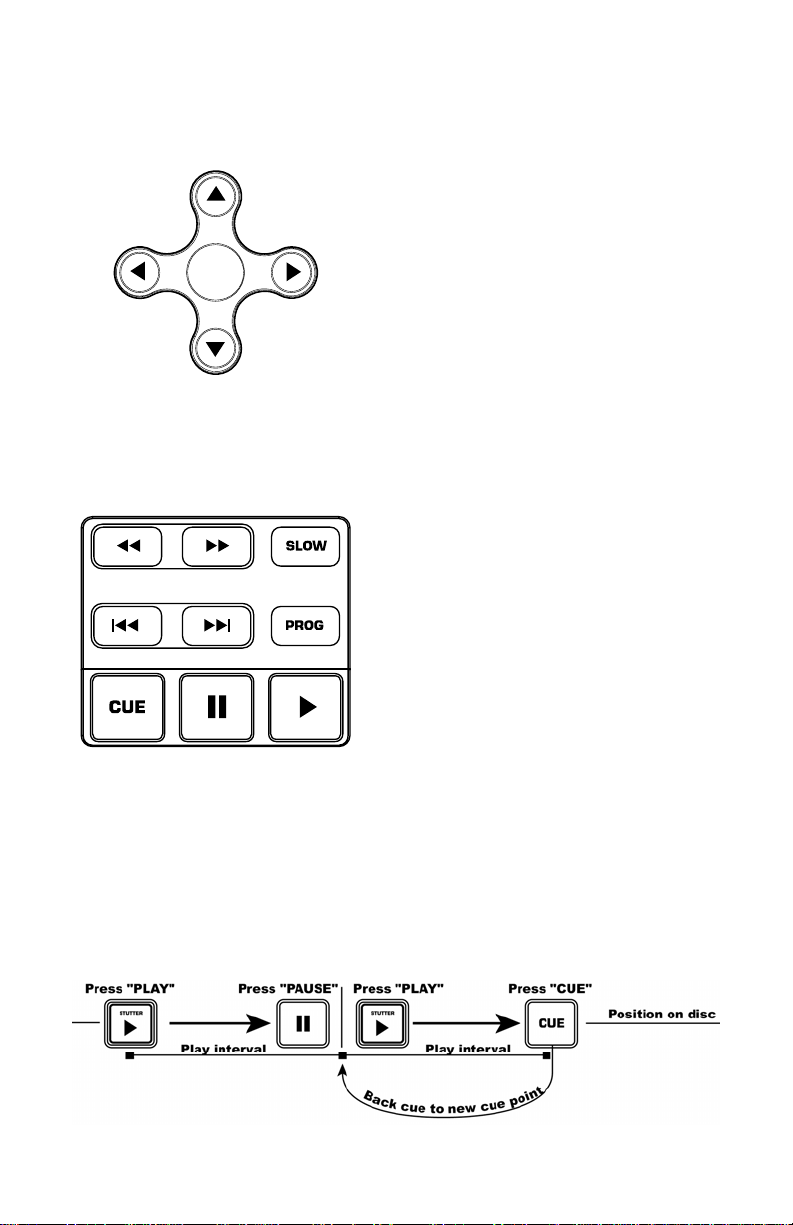
Menu Navigation Controls
ENTER
Playback Controls
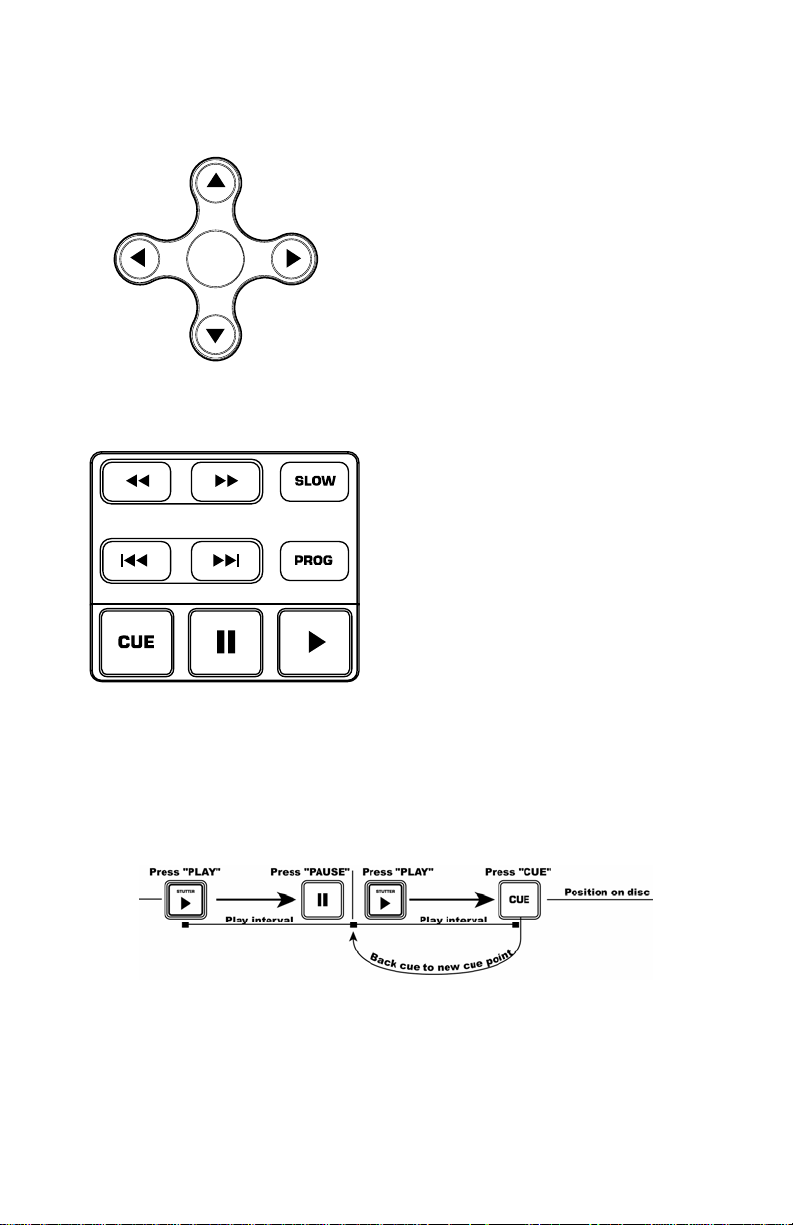
Play: To play any section of the DVD press
the play button on the bottom right. The
pause button is located to its left.
Pressing “Play” to start, then pressing “Pause”
and then “Play” again, a new cue point will be
set. Pressing “Cue” will return to the last
pause position and will be the new cue point
Pressing the ‘MENU’ button will bring the DVD
into its menu section if one exists. To select
an item on the screen press the ‘ENTER’
button.
Many DVD’s have menus where the arrows will
move to corresponding sections on the screen.
When the picture is zoomed, the viewed
section of the zoomed video can be moved
with the Menu Navigation Buttons.
Slow: When activated, there are four different
speed settings which are displayed on the
monitor. Press the OSD button to the on
screen display on or off.
Program: To use the program function, press
the ‘PROGRAM’ button and a menu will come
up on screen where you can select the desired
tracks, or chapter (for DVDs) and put them in
the desired playback order listed on the left
side of your monitor. Use the ‘Menu
Navigation Controls’ to scroll through the
program order and the track/chapter order.
First select the desired program position by
highlighting the program number. Press the
right arrow on the ‘Menu Navigation Controls’
to then select the desired track to play by
pressing ‘ENTER’.
Fast Forward/Rewind: The fast forward and
rewind features set the speed that the media
can be searched while playing. The speeds are
X2, X4, X8, X16, and X32.
Track Forward/Back: The track change
buttons will move the media to the next track
or chapter. Pressing the ‘Back’ button will
bring the current track to the beginning. Press
‘Back’ again to go to a previous track.
4
Setup Menu
• Language Setup: (Note: Some of the settings can only be changed when the device is not
currently paying media)
o OSD: On Screen Display Language Selection.
o Menu: Language of the Menu System.
o Audio: Default Audio Language.
• Screen Setup:
• Audio Setup:
• Custom Setup:
o Subtitle: Default Subtitle Language.
o TV Type:
o Screen Saver: ON/OFF.
o TV System: Select your monitor style. (usually depends on your country)
o Brightness Control:
o Contrast Control.
o Digital Out Settings: Your device has a digital out for each player. The settings for this
o Angle Mark.
4:3 PS: Select if you have a regular television and to view 16:9 software in
the pan and scan style.
4:3 LB: Select if you have regular television and to view 16:9 in the
letterbox style.
16:9: Select if using a wide screen television.
NTSC. (mostly in Americas)
PAL. (use if NTSC doesn’t work)
Auto Select.
Normal.
Bright.
Soft.
digital out have three options. Note: The SPDIF can not be used as a stereo audio
output. It must go to a compatible decoder.
SPDIF/PCM: Sends information to compatible decoder.
SPDIF/RAW: Separate format for sending audio information to compatible
decoder.
Off.
Viewing Angles Change Option Toggle.
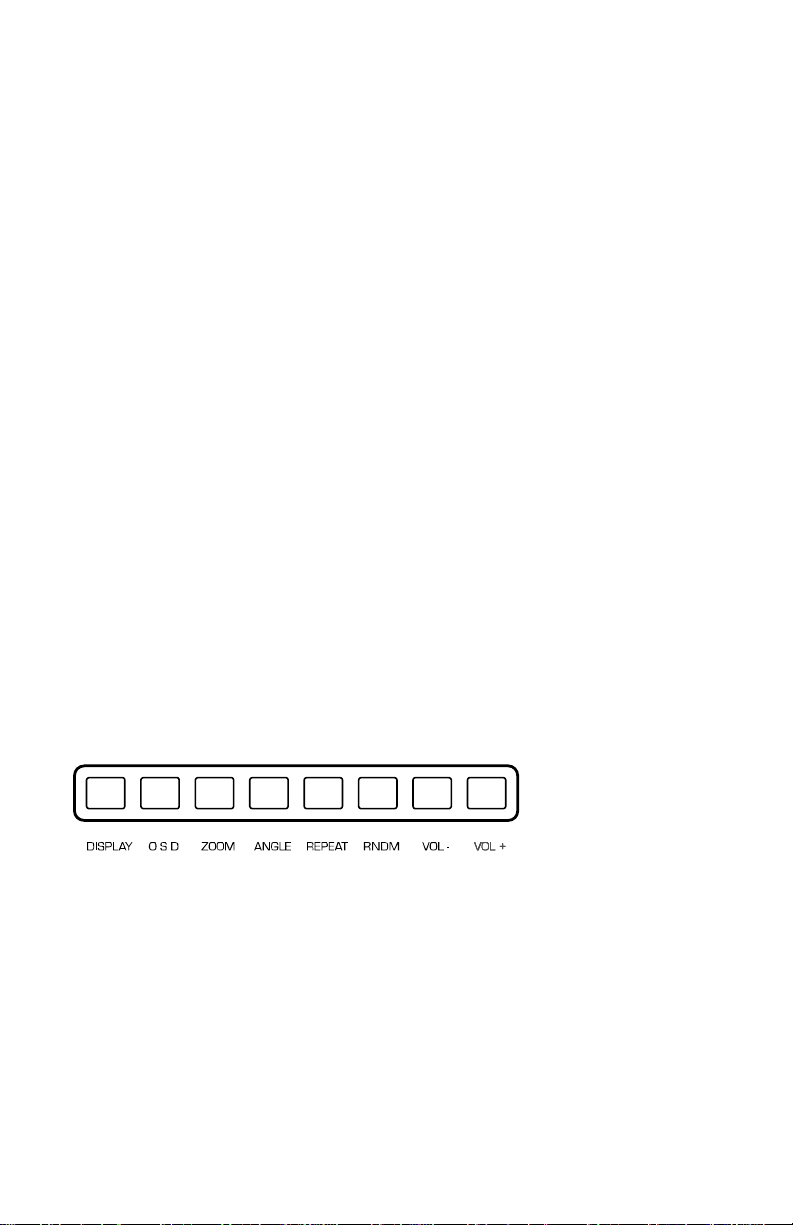
Function Buttons
NOTE: Not all of the functions can be used with every DVD.
DISPLAY: Shows current disc information on the screen.
OSD: Toggles the on screen display on and off. When the display settings are changed while OSD is on,
the changes are indicated through the video outputs as well as on the built in display.
ZOOM: This feature allows the picture to be enlarged by a factor of x2 or x4. Pressing ‘ZOOM’ will cycle
between x2 zoom, x4 zoom and regular mode (no zoom).
ANGLE: Changes the camera angle of DVDs. The DVD must be recorded with multiple angles to use this
feature.
REPEAT: Repeats either the title, chapter, or the entire disc. The mode is shown in the ‘DISPLAY’ as well
as on screen if the on screen display ‘OSD’ is ‘ON’. The three modes are: chapter, title, disc, and off.
RNDM: Toggles random play. Plays the DVD tracks in a random order.
VOL -/+: Adjusts the output volume of the VJ01.
5
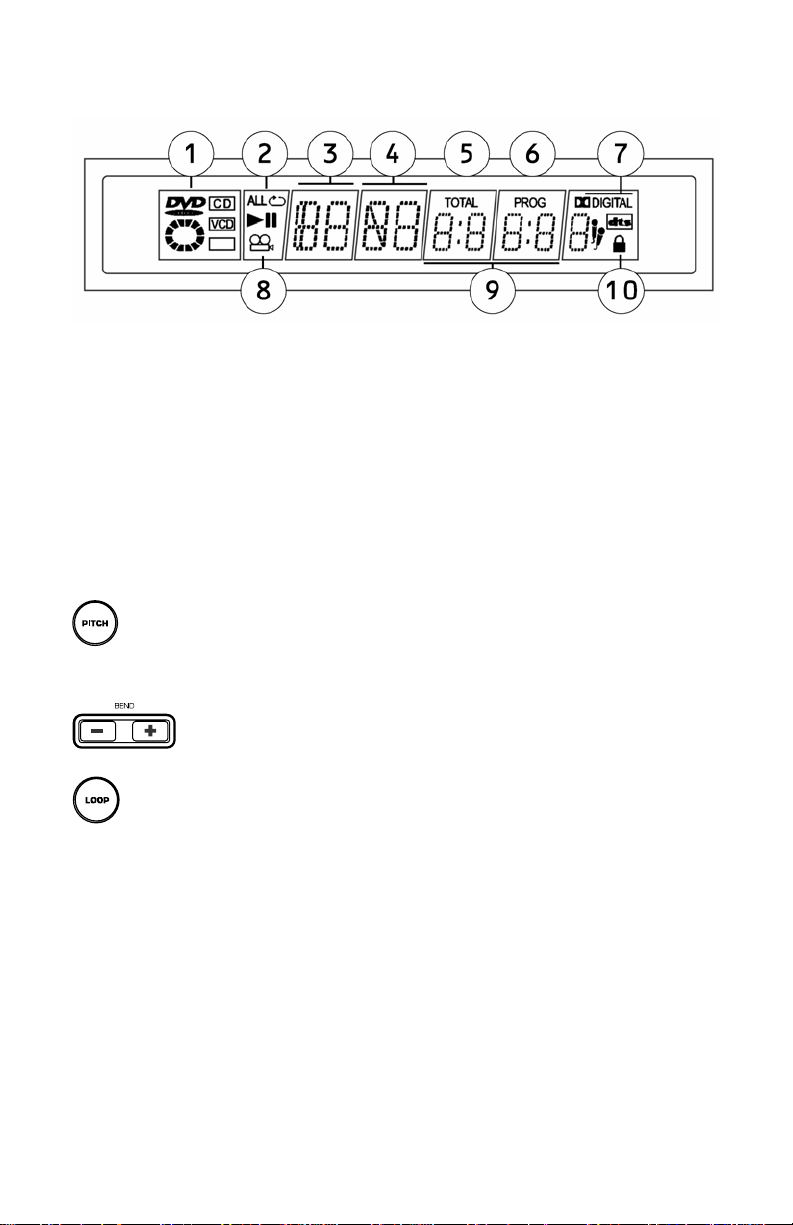
Display
1. Media Type Indicator: Displays the type of media in the player: DVD, CD, VCD.
2. Play Mode Indicator: Displays if the unit is playing, paused, and also shows the repeat
modes that are currently in use. If the unit is stopped the entire screen will display “STOP”.
3. Title Number Indicator: Shows the title number of the current media being played.
4. Chapter or Track Number Indicator: Shows the current chapter or track number.
5. Total Indicator: Indicates if the time is the total elapsed time on the media or track/chapter.
6. Program Indicator: Indicates if the unit is currently in a set program.
7. Dolby Digital and DTS indicator: Shows if a DVD has Dolby Digital or DTS audio used.
8. Angle Indicator: Indicates if a separate angle is in use while media is playing.
9. Elapsed Time Indicator: Indicates the elapsed time for the media.
10. Parental Lock Indicator: If the parental locking feature is engaged, the lock will be
displayed.
Pitch Control and Looping
Pitch: While the DVD is in the ‘PLAY’ mode, the pitch may be adjusted by the ‘PITCH FADER’
which as shown in the ‘Control Panel Overview’ earlier in this manual. The ‘PITCH FADER’ can be turned
off by pressing the pitch button.
+/- Buttons: The pitch can also be bent for fine tuning by using the ‘+’ and ‘–‘ buttons.
Loop Button: To start a loop, press the Loop button to set the start point. Press the Loop button
again to set the end point and start the loop. At this point, the video will be continuously looping until the
Loop button is pressed again.
6
Guía de instalación rápida (ESPAŃOL)
1. Asegúrese de que todos los artículos incluidos al inicio de este manual estén incluidos en la
caja.
2. LEA EL FOLLETO DE INSTRUCCIONES DE SEGURIDAD ANTES DE UTILIZAR EL
PRODUCTO.
3. Estudie este diagrama de instalación. Hay varias maneras en que puede usar el producto. El
diagrama muestra la maneras en que puede usar las características de este producto.
4. Coloque el dispositivo en una posición adecuada para su funcionamiento.
5. Asegúrese de que todos los dispositivos estén apagados.
6. Conecte las salidas a los dispositivos de audio y a los monitores de video.
7. Asegúrese de que todos los faders de los dispositivos externos estén en la posición de cero.
8. Enchufe su dispositivo y otros dispositivos a la alimentación de corriente alterna.
9. Encienda todo en el siguiente orden:
10. Al apagar, realice siempre esta operación en sentido inverso apagando todo en el orden
11. Visite http://www.numark.com y registre su producto.
• Este dispositivo.
• Los monitores y dispositivos de audio.
siguiente:
• Los monitores y dispositivos de audio.
• Este dispositivo.
7
Características del panel frontal
1. Controles de navegación de menús:
2. Control de reproducción: Contiene Play
3. Fader de pitch: Ajusta la relación
4. Menú: Abre el sistema de menús de un
5. Ajuste: Este botón activa el modo de
6. Título: Activa en menú de títulos de los
7. Subtítulo: Activa y desactiva los
8. Botones de funciones: Estos botones dan
9. Visualizador: El DVD se visualiza aquí.
10. Nivel de auriculares: Ajusta el volumen de
11. Pitch Bend (inflexión de pitch): Use estos
12. Loop (ciclo): Este botón le permite hacer
13. Abrir/cerrar: Abre y cierra la bandeja para
Controles para navegar por los menús de
un DVD.
(Reproducir), Pause (Pausa), Cue
(Señalizar), Fast Forward (Avance rápido),
Rewind (Rebobinar), Next Track (Pista
siguiente), Previous Track (Pista anterior),
Slow Motion (Movimiento lento) y la
función Program (Programa).
pitch/tempo de la reproducción. Esta
característica se puede desactivar
pulsando el botón Pitch ubicado en (3b).
DVD compatible.
ajuste del reproductor de DVD en la
pantalla, que es posible navegar con los
'controles de navegación de menús.
discos DVD compatibles.
subtítulos.
funcionalidad al reproductor de DVD y se
describen más adelante en este manual.
auriculares.
botones para variar momentáneamente la
velocidad del DVD.
un ciclo con una sección del DVD. Púlselo
una vez para establecer el comienzo del
ciclo y otra vez para establecer el unto
final del mismo.
discos. ASEGÚRESE DE USAR SIEMPRE EL
BOTÓN PARA ABRIR Y CERRAR LA
UNIDAD.
Panel posterior
1. Salida de S-Video: Salida para dispositivo de monitoreo de S-Video compatibles.
2. Salida de video compuesto: Salida para dispositivos de monitoreo de video compatibles.
3. Salida de audio estéreo RCA: Para enchufar en el mezclador o amplificador de audio.
4. Salida de audio digital coaxial: Conocida comúnmente como SPDIF, para conectar a
decodificadores SPDIF compatibles.
5. Conector de alimentación IEC: Conecte aquí el cable de alimentación provisto.
6. Interruptor de encendido: Use este interruptor para encender y apagar la unidad.
8
Botones de navegación del menú
Botón del menú: Presionando el botón del
menú, accederá a la sección de menú del DVD,
si existe.
Botones de flechas: Use estos botones para
navegar por el sistema de menú del DVD.
Muchos DVD’s cuentan con menús en los que
ENTER
las flechas se moverán hacia las secciones
correspondientes en la pantalla. Además,
cuando la imagen esté ampliada con zoom, la
sección del video visualizada puede moverse
con los botones de flechas.
Botón Enter (Aceptar): Para realizar una
selección en pantalla, presione el botón Enter.
Botones de Playback
luego Play. De esta forma se establece un punto de
Cue (señalización) donde presionó Pause.
Botón Cue: Vuelve al último punto de Cue.
Botón de movimiento lento: Selecciona el playback
en “cámara lenta”. Hay cuatro diferentes ajustes de
velocidad que pueden seleccionarse presionando este
botón varias veces. Puede suprimir la visualización del
texto en la pantalla presionando el botón OSD.
Botón de programa: Visualiza un menú en la
pantalla donde puede seleccionar las pistas o capítulos
que desea (en los DVD) y colocarlos en el orden de
reproducción indicado en el lado izquierdo de la
pantalla. Use los controles de navegación del menú
para visualizar el orden de los programas y el orden
de las pistas/capítulos.
Primero, seleccione la posición deseada para el
programa resaltando el número del programa. Luego,
Botón Play (reproducir): Comienza el playback del
DVD. Este botón se ubica en la parte inferior derecha
y está marcado por el triángulo.
Botón de pausa: Produce una pausa en la
reproducción del DVD. Este botón se ubica a la
izquierda del botón Play.
Ajuste de los puntos de Cue: Para establecer un
punto de Cue mientras el DVD está reproduciendo,
simplemente presione Pause en el punto deseado y
presione el botón de flecha derecha en los controles de
navegación del menú. Seleccione la pista deseada a
reproducir presionando Enter.
Botones de avance rápido/retroceso: Use estos
botones para buscar hacia delante o hacia atrás a alta
velocidad durante la reproducción. Las velocidades
son X2, X4, X8, X16, y X32.
Pista adelante/atrás: Estos controles seleccionan la
pista o capítulo a reproducir. Presione el botón de
pista atrás (Back) para iniciar la reproducción al
comienzo de la pista actual. Presionándolo otra vez
pasará a la pista anterior.
Este diagrama le muestra como establecer un punto de Cue.
9
 Loading...