


iCDMIX 2
DUAL CD PERFORMANCE SYSTEM
WITH UNIVERSAL DOCK FOR iPod
QUICKSTART GUIDE
ENGLISH ( 3 – 6 )
GUÍA DE INICIO RÁPIDO
ESPAÑOL ( 7 – 10 )
GUIDE D’UTILISATION RAPIDE
FRANÇAIS ( 11 – 14 )
GUIDA RAPIDA
ITALIANO ( 15 – 18 )
KURZANLEITUNG
DEUTSCH ( 19 – 22 )
BOX CONTENTS
iCDMIX 2 CD player
Power cable
Stereo RCA cable
Quickstart Guide
Safety & Warranty Information Booklet
REGISTRATION
Please go to http://www.numark.com to register your iCDMIX 2. Registering your product ensures that we can keep you up- to-date with any new product developments and provide you with world-class technical support, should you run into any problems.
GROUND RULES
1.Make sure all items listed in the BOX CONTENTS section are included in the box.
2.READ SAFETY & WARRANTY INFORMATION BOOKLET BEFORE USING THE PRODUCT.
3.Study the connection diagram in this guide.
4.Place mixer in an appropriate position for operation.
5.Make sure all devices are turned off and all faders and gain knobs are set to “zero.”
6.Connect all stereo input sources as indicated in the diagram.
7.Connect the stereo outputs to power amplifier(s), tape decks, and/or other audio sources.
8.Plug all devices into AC power.
9.Switch everything on in the following order:
•Audio input sources (i.e. turntables, CD players, etc.)
•Mixer
•Last, any amplifiers or output devices
10.When turning off, always reverse this operation by turning off:
•Amplifiers
•Mixer
•Last, any input devices
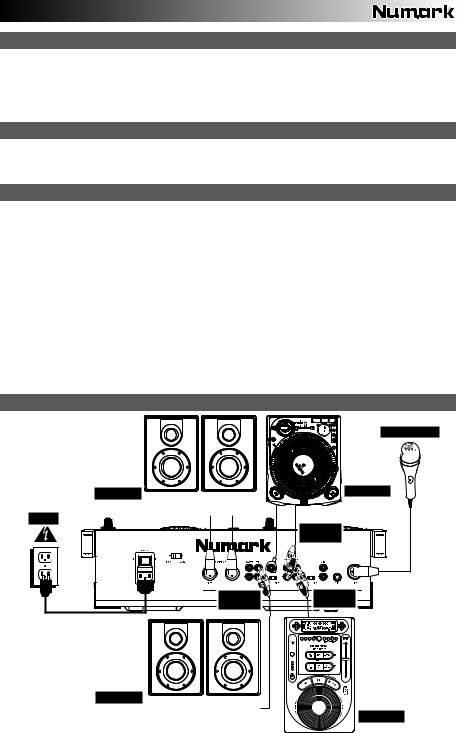
CONNECTION DIAGRAM
POWER |
HOUSE AMP
AUDIO |
CABLES |
MICROPHONE
TURNTABLE
AUDIO |
CABLES |
AUDIO |
CABLES |
BOOTH AMP
CD PLAYER
3

TOP PANEL FEATURES
1 |
|
|
|
|
|
36 |
1 |
|
|
|
|
6 |
|
|
|
|
6 |
|
|
|
|
|
|||
|
|
|
|
|
|
|
|
|
|
|
||
|
|
17 |
|
|
7 |
|
|
|
17 |
|
|
7 |
4 |
|
8 9 |
10 14 |
|
35 |
4 |
|
8 |
9 1014 |
|
||
|
|
|
|
|
|
|
|
|
|
|||
|
5 |
11 12 13 |
15 |
|
|
5 |
11 12 13 |
15 |
||||
|
|
|
|
|
37 |
|
|
|
|
|
||
|
|
|
|
|
|
|
|
|
|
|
|
|
|
|
3 |
2 |
|
|
37 37 |
37 |
|
|
3 |
2 |
|
|
|
|
16 |
37 |
|
|
|
16 |
||||
|
|
|
|
|
|
|
|
|
|
|
|
|
28 |
24 |
18 |
24 |
18 |
|
18 |
|
24 |
34 |
|
|
|
19 |
20 |
19 |
20 |
19 |
31 |
19 |
|
20 |
33 |
|
25 |
|
|
|
|
||||||||||
20 |
21 |
|
21 |
|
|
30 |
|
|
21 |
|
|
26 |
|
|
|
|
|
|
|
|
|
|
|
|
|
|
|
23 |
|
23 |
|
23 |
|
|
32 |
|
|
|
22 |
22 |
|
22 |
|
|
|
|
|
22 |
|
|
|
|
|
|
|
|
|
29 |
|
|
|
|
|
27 |
|
|
|
|
|
|
|
|
|
|
|
|
|
1.EJECT – Pressing will open or close the disc tray. This unit is designed to play commercially available CDs and properly burned and finalized CD-Rs. Due to variances on the specification of certain CD burners and CDs, some homemade CDs may not play properly. We recommend burning CDs at the minimum speed possible for the best performance.
2.PLAY / PAUSE – Plays or pauses the track. Pausing the track will create a cue point at that location (which can be adjusted with the JOG WHEEL in Search Mode).
3.CUE – During playback, pressing CUE will return to the most recent point where playback was started and will pause the track. Holding down CUE will start playback from this point, and releasing CUE will cause it to return to that point and will pause the track. Also, if the track is paused, you can use the JOG WHEEL to locate a new cue point.
4.SEARCH – Pressing this button allows you to use the JOG WHEEL to rapidly scan through the music. The LED indicator will be red when Search Mode is active. (Note: If the JOG WHEEL is not used for five seconds, Search Mode will be deactivated.)
5.JOG WHEEL – The jog wheel serves many functions depending on its current mode.
a)If a track is not playing, the JOG WHEEL will search slowly through a track's frames. To set a new cue point, rotate the JOG WHEEL then begin playback when you have determined the proper position. Press CUE to return to that cue point.
b)If a track is playing, the JOG WHEEL will temporarily bend the pitch of the track. Rotating the JOG WHEEL clockwise temporarily speeds it up while rotating it counterclockwise slows it down. This is a useful tool for beatmatching (see MATCHING TEMPOS & BEATS).
c)When the SEARCH button has been activated, rotating the JOG WHEEL will scan rapidly through the track.
6.TRACK KNOB – Turn this knob to select a track to play.
7.+10 – Press this button to skip through your track listing 10 tracks at a time.
8.PROGRAM – This button helps you create a program – a sequence of tracks to play continuously. To create a program, press PROGRAM when the CD player is paused. To enter a track into the program, use the TRACK KNOB to select the desired track then press PROGRAM to enter it. Repeat this process for each track you want to enter (in the order you want them to play). When you have finished, press PLAY / PAUSE to start playing the program. The tracks will play in the order you entered them, and "PROGRAM" will be shown on the LCD. To cancel your program as it is playing, press and hold PROGRAM for three seconds so "PROGRAM" disappears from the LCD.
9.TIME – Switches the time display between elapsed playing time, remaining time on the track, and total remaining time on the entire CD.
10.SINGLE – Press this button to toggle between Single Play (the deck will stop at the end of each track) or Continuous Play (the entire disc will be played without interruption).
11.LOOP IN – Sets a new cue point or the start point of a loop (a "Loop In" point) during playback.
12.LOOP OUT – Sets the end point of a loop (a "Loop Out" point) and starts playing the loop. While playing a loop, press LOOP OUT to release it from the loop and continue normal playback.
13.RELOOP – Plays the track immediately from the beginning of a loop (and reactivates the loop).
14.PITCH – Adjusts the range of the PITCH FADER (±4%, 8%, and 16%) or deactivates it. The current range will be indicated on the LCD and by different LED colors.
4

15.PITCH FADER – The pitch can be changed by pressing the PITCH button so a PITCH LED is lit, then moving the sliding fader. The pitch will not be changed if the PITCH LED is off.
16.PITCH BEND -/+ – You can use these two pitch bend buttons to temporarily adjust the pitch and tempo of the music up to -/+ 4% from the current pitch setting.
17.LCD – Indicates all the functions, as they are occurring, with the CD.
18.INPUT SELECTOR – Selects the input source to be routed to the corresponding channel. Input jacks are located on the rear panel.
19.CHANNEL GAIN – Adjusts the channel’s pre-fader and pre-EQ gain level.
20.CHANNEL TREBLE – Adjusts the high (treble) frequencies of the corresponding channel.
21.CHANNEL MID – Adjusts the mid-range frequencies of the corresponding channel.
22.CHANNEL BASS – Adjusts the low (bass) frequencies of the corresponding channel.
23.CHANNEL FADER – Adjusts the audio level on the corresponding channel.
24.CHANNEL CUE – Sends pre-fader audio to the Cue Channel for headphone monitoring.
25.CUE MIX – Turn to mix between Cue and Program in the Headphone channel. When all the way to the left, only channels routed to CUE will be heard. When all the way right, only the Program mix will be heard.
26.CUE GAIN – Adjusts the audio level of the Cue channel.
27.HEADPHONES – Connect your 1/4" or 1/8" headphones to this output for cueing and mix monitoring.
28.MIC ON / OFF – Mutes and unmutes the microphone signal. When muted,
the microphone signal will not be routed to the Master mix.
29.CROSSFADER – Blends audio playing between Channels 1 and 2. Sliding this to the left plays Channel 1 and sliding to the right plays Channel 2.
Note: When connecting microphones, make sure the mic channel's gain knob is at the lowest setting (or turn the mic channel off) before connecting it.
30.FADER START – When fader start is "ON," moving the CROSSFADER to a side will cause that deck to start playing automatically (if it is paused). When fader start is "OFF," you will need to start playback on each deck manually.
31.STEREO LEVEL INDICATOR – Displays the audio level of the Program mix.
32.MASTER VOLUME – Adjusts the output volume of the Program mix.
33.ZONE VOLUME – Controls the audio level of the Zone output.
34.MONO / STEREO – Adjusts the Program mix for stereo or mono operation.
35.DOCK – Connect your iPod here. Gently rock the iPod back and forth over the connector when attaching or removing it.
36.DOCK ADJUSTER – Turn this knob accordingly so your docked iPod rests against the support.
37.iPod CONTROLS & JOG WHEEL – Functions as the controls for your iPod’s menus and Touchwheel while it is plugged into the mixer.
5

REAR PANEL FEATURES
|
1 |
|
|
|
|
|
|
|
3 |
|
|
|
|
|
|
|
|
2 |
10 |
11 12 |
6 |
4 |
4 |
7 |
9 |
8 |
|
|
|
|
|
|
|
||
|
|
|
5 |
|
|
5 |
|
|
1.VOLTAGE SELECTOR -- Set this switch to the voltage for your location.
2.POWER PLUG CONNECTOR – Plug your supplied power cord in here.
3.POWER SWITCH – Turn the machine on and off with this button. The unit should always be shut down with this button first before any external power is removed. Typically it is recommended that the CD player is powered on before amplifiers and powered off after amplifiers.
4.LINE | PHONO INPUTS (RCA) – Connect your audio sources to these inputs. These inputs can accept both line and phono-level signals.
5.LINE | PHONO SWITCH – Flip this switch to the appropriate position, depending on the device connected to the LINE | PHONO INPUTS. If you are using phono-level turntables, set this switch to “PHONO” to provide the additional amplification needed for phono-level signals. If using a line-level device, such as a CD player or sampler, set this switch to “LINE.”
6.GROUNDING TERMINAL – If using phono-level turntables with a grounding wire, connect the grounding wire to these terminals. If you experience a low “hum” or “buzz”, this could mean that your turntables are not grounded.
Note: Some turntables have a grounding wire built into the RCA connection and, therefore, nothing needs to be connected to the grounding terminal.
7.AUX INPUT (RCA) – Connect an additional line-level audio source to this input. To route the AUX signal to the mix, you will need to flip the AUX channel's INPUT SELECTOR (located on the top panel) to "AUX."
8.MIC 1 INPUT – Connect a microphone to this input with an XLR or 1/4”
cable.
9.MIC 2 INPUT – If you would like to use an additional 1/4” microphone on Channel 2, connect it to this input. To route the MIC2 signal to the mix, you will need to flip the AUX channel's INPUT SELECTOR (located on the top panel) to "MIC2."
Note: When connecting microphones, make sure the mic channel's gain knob is at the lowest setting, or turn the mic channel off, before connecting it.
10.MASTER OUTPUT (XLR) – Connect this low-impedance XLR output to a PA system or powered monitors. The level of this output is controlled with the MASTER fader on the top panel.
11.MASTER OUTPUT (RCA) – Use standard RCA cables to connect this output to a speaker or amplifier system. The level of this output is controlled by the MASTER knob on the top panel.
12.ZONE OUTPUT (RCA) – Connect this output to an external monitoring device, such as a PA system, powered monitors, or a home stereo. The level of this output with the ZONE knob on the top panel.
LCD FEATURES
1.PLAY / PAUSE – This shows when the unit is playing or paused.
2.CUE – Flashing when the unit is setting a cue point. Lit continuously when the unit is paused at a cue point.
3.TRACK NUMBER – Shows the current track number.
4.MINUTES – Shows the minutes elapsed or remaining depending on mode setting.
5.SECONDS – Shows the seconds elapsed or remaining depending on mode setting.
12 |
9 |
10 |
7 |
|
|
|
|
|
|
|
|
|
|||||||||||||
1 |
|
|
|
|
|
|
|
|
|
|
|
|
|
|
|
|
|
|
|
|
|
|
|
|
11 |
2 |
|
|
|
|
|
|
|
|
|
|
|
|
|
|
|
|
|
|
|
|
|
|
|
13 |
|
|
|
|
|
|
|
|
|
|
|
|
|
|
|
|
|
|
|
|
|
|
|
|
|||
|
|
|
|
|
|
|
|
|
|
|
|
|
|
|
|
|
|
|
|
|
|
|
|||
3 |
|
|
|
|
|
|
|
|
|
|
|
|
|
|
|
|
|
|
|
|
|
|
|
|
|
|
|
|
|
|
|
|
|
|
|
|
|
|
|
|
|
|
|
|
|
|
|
|
|
||
|
|
|
|
|
|
|
|
|
|
|
|
|
|||||||||||||
4 |
5 |
|
6 8 |
13 |
|
|
|
|
|||||||||||||||||
6.FRAMES – The CD player breaks down a second into 75
frames for accurate cueing. This shows the frames elapsed or remaining depending on mode setting.
7.TIME MODE – Indicates whether the time shown on the LCD is the elapsed time for the track, remaining time for the track, or total remaining time for the entire CD.
8.TIME BAR – Shows either time remaining or elapsed depending on the setting of the TIME button.
9.PROGRAM – Indicates that a program is playing.
10.SINGLE – Shows when the unit is set to play just one track at a time (Single Play Mode). This function is controlled by the TIME button.
11.CONTINUE – Shows when the unit is set to play tracks continuously, without stopping (Continuous Play Mode). This function is controlled by the TIME button.
12.LOOP – Indicates when a loop is programmed. When the indicator is flashing, a loop is currently playing. When "IN / OUT" is shown, a loop is programmed but not currently playing.
13.PITCH – Shows the percentage change in pitch.
6

CONTENIDO DE LA CAJA
iCDMIX 2
Cable de alimentación
Cables conectores RCA
Guía de inicio rápido
Folleto de información sobre la seguridad y la garantía
REGISTRO
Visite http://www.numark.com y registre su iCDMIX 2. El registro de su producto asegura que podamos mantenerle actualizado con los nuevos desarrollos de productos y brindarle apoyo técnico de categoría mundial en caso de que tenga algún problema.
REGLAS BÁSICAS
1.Asegúrese de que todos los artículos indicados en “Contenido de la caja" estén incluidos en la caja.
2.LEA EL FOLLETO DE INFORMACIÓN SOBRE LA SEGURIDAD Y LA GARANTÍA ANTES DE UTILIZAR EL PRODUCTO.
3.Estudie el diagrama de conexión incluido en esta guía.
4.Coloque el mezclador en una posición adecuada para su funcionamiento.
5.Asegúrese que todos los dispositivos estén apagados y que todos los faders y perillas de ganancia estén en posición «cero».
6.Conecte todas las fuentes de entrada estéreo como se indica en el diagrama.
7.Conecte las salidas estéreo a los amplificadores de potencia, bandejas de cinta magnética y/o otras fuentes de audio.
8.Enchufe todos los dispositivos al suministro de corriente alterna.
9.Encienda todo en el siguiente orden:
y fuentes de entrada de audio (por ejemplo, giradiscos, reproductores de CD, etc.) y el mezclador
y por último, cualquier amplificador o dispositivo de salida
10.Al apagar, realice siempre esta operación en sentido inverso: y apague los amplificadores
y el mezclador
y por último, cualquier dispositivo de entrada
DIAGRAMA DE CONEXIÓN
GIRADISCOS


 MICRÓFONO AMPLIFICADOR


DE AUDITORIO
CABLES |
CONECTORES (RCA) |
CABLES |
CONECTORES (RCA) |
FUENTE DE ALIMENTACIÓN
AMPLIFICADOR |
REPRODUCTEUR |
|
DE CABINA |
||
DE CD |
||
|
7

CARACTERÍSTICAS DEL PANEL FRONTAL
1 |
|
|
|
|
|
36 |
1 |
|
|
|
|
6 |
|
|
|
|
6 |
|
|
|
|
|
|||
|
|
|
|
|
|
|
|
|
|
|
||
|
|
17 |
|
|
7 |
|
|
|
17 |
|
|
7 |
4 |
|
8 9 10 14 |
|
35 |
4 |
|
8 |
9 1014 |
|
|||
|
|
|
|
|
|
|
|
|
|
|||
|
5 |
11 12 13 |
15 |
|
|
5 |
11 12 13 |
15 |
||||
|
|
|
|
|
37 |
|
|
|
|
|
||
|
|
|
|
|
|
|
|
|
|
|
|
|
|
|
3 |
2 |
|
|
37 37 |
37 |
|
|
3 |
2 |
|
|
|
|
16 |
37 |
|
|
|
16 |
||||
|
|
|
|
|
|
|
|
|
|
|
|
|
28 |
24 |
18 |
24 |
18 |
|
18 |
|
24 |
34 |
|
|
|
19 |
20 |
19 |
20 |
19 |
31 |
19 |
|
20 |
33 |
|
25 |
|
|
|
|
||||||||||
20 |
21 |
|
21 |
|
|
30 |
|
|
21 |
|
|
26 |
|
|
|
|
|
|
|
|
|
|
|
|
|
|
|
23 |
|
23 |
|
23 |
|
|
32 |
|
|
|
22 |
22 |
|
22 |
|
|
|
|
|
22 |
|
|
|
|
|
|
|
|
|
29 |
|
|
|
|
|
27 |
|
|
|
|
|
|
|
|
|
|
|
|
|
1.EJECT – Al presionar se abrirá o cerrará la bandeja que transporta el disco.
2.REPRODUCIR / PAUSA – Reproduce o pone en pausa la pista. Al poner la pista en pausa se crea un punto de cue en ese lugar (que se puede ajustar con la RUEDA DE AVANCE POR PASOS en modo de búsqueda).
3.CUE – Durante la reproducción, al pulsar CUE se vuelve al punto más reciente donde se inició la reproducción y la pista se pone en pausa. Manteniendo pulsado CUE, la reproducción comienza desde este punto y, al soltarlo, vuelve a ese punto y la pista se pone en pausa. Asimismo, si la pista está en pausa, es posible usar la RUEDA DE AVANCE POR PASOS para localizar un nuevo punto de cue.
4.BUSCAR – Si pulsa este botón, es posible usar la RUEDA DE AVANCE POR PASOS para explorar rápidamente la música. Cuando el modo de búsqueda está activo, el LED indicador se ilumina con luz roja. (Nota: Si la RUEDA DE AVANCE POR PASOS no se usa durante cinco segundos, el modo de búsqueda se desactiva.)
5.RUEDA DE AVANCE POR PASOS – Esta rueda cumple numerosas funciones que dependen del modo en que se encuentra.
a)Si no se está reproduciendo una pista, la RUEDA DE AVANCE POR PASOS busca lentamente a lo largo de los frames de la pista. Para determinar un nuevo punto de cue, gire la RUEDA y comience a reproducir una vez que haya determinado la posición adecuada. Pulse CUE para volver a ese punto de cue.
b)Si se está reproduciendo una pista, la RUEDA inflexiona temporalmente el pitch de la misma. Al girar la RUEDA en sentido horario, se la acelera temporalmente, mientras que si se gira en sentido antihorario se la desacelera. Ésta es una herramienta útil para igualar el beat (consulte CÓMO IGUALAR TEMPOS Y BEATS).
c)Cuando está activado el botón SEARCH (Buscar), al girar la RUEDA DE AVANCE POR PASOS se explora rápidamente la pista.
6.PERILLA DE PISTA – Gire esta perilla para seleccionar una pista a reproducir.
7.+10 – Pulse este botón para saltar por la lista de pistas de a 10 pistas por vez.
8.PROGRAMA – Este botón le ayuda a crear un programa —una secuencia de pistas a reproducir continuamente. Para crear un programa, pulse PROGRAM mientras el reproductor de CD está en pausa. Para incluir una pista en el programa, use la PERILLA DE PISTA para seleccionar la pista deseada y luego pulse PROGRAM para ingresarla. Repita este proceso para cada pista que desee incluir (en el orden en que desee que se reproduzcan). Cuando termine, pulse REPRODUCIR / PAUSA para comenzar a reproducir el programa. Las pistas se reproducen en el orden en que las ingresó y aparece "PROGRAM" en la pantalla LCD. Para cancelar el programa mientras se está reproduciendo, pulse y mantenga pulsado PROGRAM durante tres segundos, de modo que desaparezca "PROGRAM" de la pantalla LCD.
9.SNGL – Para fijar el modo de operación en solo o continuo.
10.TIME – Cambia la visualización del tiempo entre el tiempo de reproducción transcurrido y el tiempo restante en la pista y el tiempo restante en todo el CD.
11.ENTRADA AL LOOP – Establece un nuevo punto de cue o el punto inicial de un loop (punto "Loop In") durante la reproducción.
12.SALIDA DEL LOOP – Establece el punto final de un loop (punto "Loop Out") y comienza a reproducir dicho loop. Mientras se reproduce un loop, pulse LOOP OUT para liberarlo del loop y continuar la reproducción normal.
13.REPETICIÓN DE LOOP – Reproduce la pista inmediatamente desde el comienzo de un loop (y reactiva dicho loop).
14.PITCH – Ajusta el rango del FADER DE PITCH (±4%, 8% y 16%) o lo desactiva. El rango vigente se indica en la pantalla LCD y mediante diferentes colores del LED.
8
 Loading...