


PROFESSIONAL DJ MIXER
Quick Start Owner’s Manual
BOX CONTENTS
•MIXER
•POWER SUPPLY
Manual de inicio rápido para el usuario
(ESPAÑOL)
CONTENIDOS DE LA CAJA
•MEZCLADOR
•FUENTE DE ALIMENTACIÓN
Schnellbedienungsanleitung (DEUTSCH)
SCHACHTELINHALT
•MISCHPULT
•STROMKABEL
Manuel d’utilisation du propriétaire
(FRANÇAIS)
CONTENU DE LA BOÎTE
•MIXER
•BLOC D’ALIMENTATION
Manuale rapido di utilizzazione (ITALIANO)
CONTENUTO DELLA CONFEZIONE
•MIXER
•CAVI DI ALIMENTAZIONE
1

HOUSE/CLUB AMP
TO AMP
BOOTH AMP |
|
|
|
|
|
|
|
|
|
|
|
TO FADER |
|
|
|
|
|
TO PHONO |
|
TO AMP |
|
|||
|
START |
|
|
|
|
|
|
||
|
|
|
|
|
OR
|
|
|
|
TO MIC |
TO LINE |
|
TO LINE |
|
|
|
|
|
||
|
|
|
|
|
CD BURNER
FROM
FADER
START
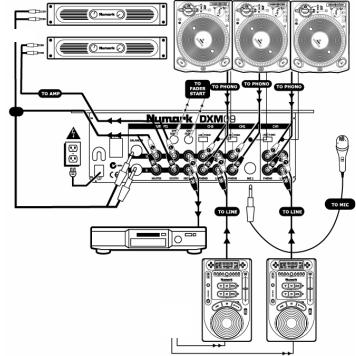
MIXER QUICK SETUP GUIDE (ENGLISH)
Make sure all items listed on the front of this guide are included in the box.
1.READ SAFETY INSTRUCTION BOOKLET BEFORE USING THE PRODUCT
2.Study this setup diagram.
3.Place mixer in an appropriate position for operation.
4.Make sure all devices are turned off and all faders are at “zero”
5.Connect all stereo input sources as indicated in the diagram.
6.Connect the stereo outputs to the power amplifier(s), tape decks, and/or audio sources.
7.Plug your mixer and other devices into AC power.
8.Switch everything on in the following order.
•audio input sources (i.e. turntables or CD players)
•your mixer
•last, any amplifiers
9.When turning off, always reverse this operation by,
•turning off amplifiers
•your mixer
•last, any input devices
10.Go to http://www.numark.com for product registration.
2
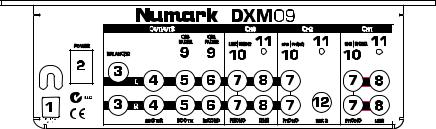
REAR PANEL CONNECTIONS
1.AC In: This mixer is designed to work with the power supply assembly that comes with the unit. While the power is switched off, plug the power supply into the mixer first, and then plug it into the outlet.
2.Power Switch: Use this switch to turn on the mixer after all input devices are already connected to prevent damage to your equipment. Turn the mixer on before you turn on amplifiers and turn of amplifiers before you turn off the mixer.
3.Master Balanced Output: Connect these balanced 1/4” outputs to a PA system or recording device.
4.Master Output: This is your main mixer output. Connect it to a PA system, powered monitors or a home stereo with a RCA stereo input. The level of this output signal is controlled by the master volume knob.
5.Booth Output: Connect this output to a monitor system such as a DJ booth or floor monitor.
6.Record Output: Connect this output a recording device such as a tape deck or CD recorder. The level of the record output is based upon pre-master levels.
7.Phono/Line Input: Connect this input to your audio sources. To connect a turntable with phono-level outputs, set the LINE/PHONO switch (10) to the PHONO position.
To connect a CD player or other line-leve device, set the LINE/PHONO switch to the LINE position.
8.Line Input: Connect this input to line-level devices like CD players.
9.Fader Start Output: Attach 1/8” fader start cables to compatible media players such as CD Players with fader start inputs.
10.Line/Phono Switch: Phono/Line Source Switch: This switch activates and deactivates the sensitive RIAA phono preamplifiers. Only turntables with phono level output should be used when the switch is in the phono position.
11.Ground Connection: Connect this grounding screw to the ground wire of any turntable or other device that has a ground wire.
12.MIC2 Input: Connect this input to a microphone with a 1/4” connector into Channel 2. To use MIC2, switch the INPUT SELECTOR SWITCH of Channel 2 to MIC located on the face panel.
3
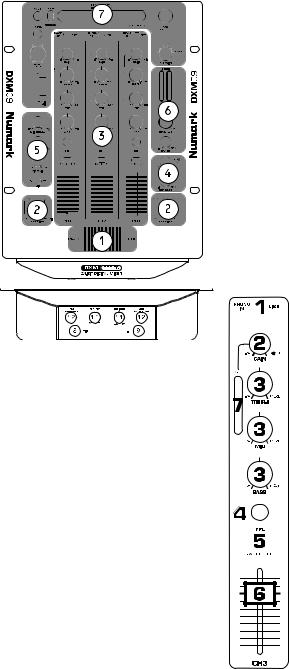
FRONT PANEL FEATURES
1.Crossfader: This replaceable crossfader fades between channels assigned to CFA and CFB. The fader can be replaced by a Numark “D-Type” or “CP-Pro” fader. Call Numark customer service for information.
2.EQ Kills: Eliminates High, Mid, or Low frequencies for a unique effect. Each set of three switches will only affect audio routed through the crossfader.
3.3 Audio Channels: The mixer contains three audio channels which are described in detail in the Audio Channel section in this manual.
4.Headphone Monitoring: This section contains the CUE GAIN knob to adjust the headphone volume, and the CUE BLEND knob to mix between the master and the channels selected by the PFL buttons on each channel. Pressing the CUE BLEND button activates a split cue mode.
Push the knob to engage a split cuing mode which sends all audio channels with the CUE Assign button engaged to the left side of the headphones and the MASTER output to the right side of the headphones. This mode is an excellent way to mix when booth monitoring is not available.
5.Microphone Adjustments: The MIC GAIN knob controls the level of the microphone input on the front panel. There are also a MIC BASS knob and a MIC TREBLE knob to control the sound of the microphone input.
To turn the microphone on, move the MIC switch to the ON position.
6.Output Levels: The master level output is controlled by the MASTER knob. The booth output level is controlled by the BOOTH knob.
7.Beat Synced Effects: The mixer has a highly customizable beat-synced effect system which is described in further detail in the Effects Section in this manual.
8.Microphone Input: This 1/4" input is for the microphone controlled by the Microphone Adjustments (#5).
9.Headphone Output: Connect your headphones to this 1/4” output.
10.Crossfader Slope Adjustment: This knob adjusts the slope of the crossfader from a smooth fade (mixing) to a sharp cut (scratching).
11.Cue Tone: This knob adjusts the tone of the headphone output without affecting any other output. This can be used to help mix while in a loud environment.
12.Cross Fader Start: Both sides of the crossfader have a FADER START switch which can be used to trigger external devices which have a fader start input.
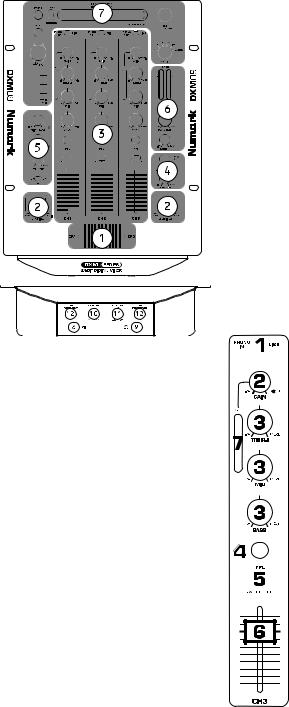
AUDIO CHANNEL SELECTION
1. Input Selector: Selects the
desired input source.
2.GAIN Knob: Adjusts the channel audio level pre-fader
and pre-EQ.
3. EQ Knobs: Adjusts the treble, mid and bass frequencies. The level of each frequency can be set all the way down to zero (killed).
4.PFL Cue: Sends the prefader level of the audio to
the cue section for headphone monitoring.
5. Crossfader Assign: Routes the audio in the channel to one side of the crossfader. The OFF position bypasses the crossfader.
6. Channel Line Fader:
Controls the level of the output signal post EQ into the crossfader (if assigned) or MASTER.
4
To Properly Adjust Each Audio Channel:
1.Toggle the Input Selection Switch to the desired input source.
2.Press “PLAY” on your source audio device (CD Player, Turntable, MP3 Player, etc.)
3.Set all EQ Knobs to the 12 o’clock position.
4.Adjust the GAIN knob such that the audio level is reading around 0dB as shown in the PFL meter.
5.Move the Channel Line Fader to about 70% of maximum.
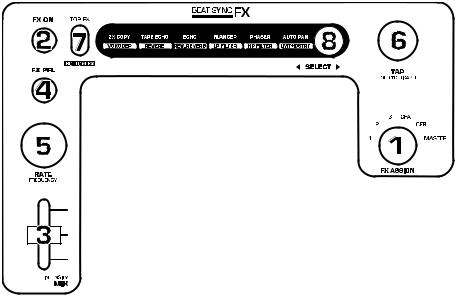
EFFECT DIAGRAM
1.FX ASSIGN: This knob selects the audio source to modify with the effects processor. Channels 1, 2, and 3 can be independently selected. CFA and CFB represent side A and B of the crossfader. Switching to master will provide effects on the final mix before going to the output. Note: to use the effects on a microphone only,
attach the microphone into MIC2 on Channel 2. Select FX ASSIGN to Channel 2.
2. FX ON: This button turns the effects on.
3. INTENSITY MIX FADER: This fader controls the mix of the effect. With this fader is down, no effect sound will be audible through the assigned sound source (1). With the fader all the way up, only the processed sound will be sent to the assigned sound source (1).
4.FX PFL: This button sends the effect sound to the headphone cue regardless if FX ON is turned on (2). To preview effects, set the FX ASSIGN (1) to the desired
channel, make sure that FX ON (2) is off (the light will not be on), and turn on the FX PFL button (4). The button will illuminate indicating that the FX PFL is on. Make sure that the headphone CUE BLEND is adjusted such that the PFL cue can be heard. Adjust all of the settings for the effect. Turn on the FX ON button (2) to activate the effect over the main outputs.
5.RATE FREQUENCY: This knob sets the rate of beat-synced effects.
6.TAP: In order to align the effects with the beat, tap the beat sync to the rhythm 3-4 times on the beat. If it has trouble syncing, try again. The beat sync often works best when tapping to half the tempo. For example, try tapping on just the snare drums (typically the “2” and “4” count). If the beat tap loses sync slightly, you may not need to tap again because the FX will likely still maintain sync. Otherwise, you can tap on beat once to re-sync.
When in beat sync, effects below denoted with an asterisk (*) will have rates or times which are related to the tempo. Use the RATE/FREQUENCY knob to adjust the multiple of the tempo (1x,2x,4x, etc.).
To disable beat sync and have continuous control over the rate/time of an effect, simply press and hold the beat sync button until it remains lit. Now the RATE/FREQUENCY knob will allow you to precisely tune a rate or frequency. To re-enable beat sync, tap out the beat again.
7.Effect Shift: This switch selects between the top and bottom effect that is illuminated on the display. For example, if “FLANGER AND LP FILTER” is illuminated with the effect shift switch to the TOP FX position, FLANGER is selected. However if the BOTTOM FX position of the effect shift switch is set, the LP FILTER is selected.
8.SELECT Switch: This flip switch is used to select effects. The effect selected will illuminate as the flip switch is toggled. Use the Effect Switch (7) to determine if the top or bottom effect illuminated is selected.
5
EFFECTS DESCRIPTION
WARNING: Adjust slowly while learning these effects. These effects are dangerously fun to play with. When you’re playing alone, go nuts. When you play live, remember that your crowd sometimes just wants to hear the song. Be subtle!
2XCOPY*: A copy of the signal is delayed by a defined time. Pro DJs will often keep 2 copies of a record so they can do beat juggling tricks like this. Try using this effect with the beat tap sync and move the INTENSITY/MIX fader up and down to the tempo. Now try it with different multiples of the tempo using the RATE knob. You’re having fun, we know… when you’re done annoying everyone, read on. There’s more!
VOCODER: Square Wave Vocoder with Sibilance. Robot voice sound straight from the early days of electronic music. RATE/FREQUENCY controls the pitch of the vocoder. INTENSITY/MIX mixes between your voice and the vocoder sound.
TAPE ECHO*: A much sought after echo sound developed in the 1960s. No reggae, jungle, house, techno, hip hop or soul DJ should be without one. In beat synch mode, the RATE/FREQUENCY controls the tempo multiple. When beat synch is disabled, the RATE/FREQUENCY will continuously control the delay time. The INTENSITY/MIX fader controls the input into the echo. This makes it very useful for selecting a phrase, vocal word or beat to echo. Simply turn up the mix momentarily during the snippet of music you wish to emphasize and bring it back down. You’ll notice how the audio which was playing during that time will now echo away. Now, try turning up the INTENSITY/MIX fader for a measure, then cutting out the music with the phono/line switch. Let it echo for a bit, then bring down the MIX fader and cut the music back in… Congratulations! you are now a remix artist. WARNING! This tape echo, like its inspirations, will saturate and have high feedback gain when the INTENSITY/MIX fader is set high. By carefully riding the INTENSITY/MIX fader you can synthesize sounds; the trick is to tame them.
REVERB: Hall Reverberation Simulator. RATE/FREQUENCY controls the decay (size of the room), INTENSITY/MIX controls the wet/dry mix of the reverb effect.
REV. REVERB: This effect samples the audio and plays it in reverse while adding reverb. This is a very cool if you stab into the effect by cutting the sound immediately using the channel line fader while this effect is on. This effect can also be used to create a driving feeling with the music.
ECHO*: Regular echo effect. The configuration of this echo is a little different. This time, the INTENSITY/MIX fader controls the output of echo. When the fader is up, it will echo. Push the fader further, and it will feedback heavily_ just like the tape echo. When the fader is at the bottom, the echo effect is cut out completely. This effect is very useful for juggling beats and emphasizing musical phrases.
FLANGER*: Sweeping flanger effect. In beat synch mode, the RATE/FREQUENCY controls the sweep rate as a multiple of the tempo. When beat synch is disabled, the RATE/FREQUENCY will continuously control the sweep rate. The INTENSITY/MIX controls the intensity of the flange effect.
PHASER*: Sweeping phase shifter effect. It is similar to the flanger effect, except that a flanger has a more pronounced harmonic sound, reminiscent of a jet engine passing overhead. A phase shifter is enharmonic, and has a more “swooshing” sound. In beat synch mode, the RATE/FREQUENCY controls the sweep rate as a multiple of the tempo. When beat synch is disabled, the RATE/FREQUENCY will continuously control the sweep rate. The INTENSITY/MIX controls the intensity of the phase shifter effect.
LP and HP FILTER: Low Pass and High Pass Filter. The RATE/FREQUENCY controls the corner frequency of the filter. The INTENSITY/MIX fader controls the resonance (Q) of the filter. Low pass will filter out any frequency above the parameter settings. High pass will filter out frequencies below the parameter settings.
AUTO PAN*: This effect will automatically pan the audio when the TAP function is enabled. If the TAP function is disabled by holding down the button, the RATE/FREQUENCY can be used to manually pan from left to right.
LMT+DISTORT: Band limited Distortion. Shout out your favorite crowd exciter with this effect using the MIC. The crowd will definitely get the point! RATE/FREQUENCY controls the distortion amount; INTENSITY/MIX controls the wet/dry mix of the distortion effect.
(*): When in beat sync, effects denoted with an asterisk (*) will have rates or times which are related to the tempo. Use the RATE/FREQUENCY knob to adjust the multiple of the tempo (1x,2x,4x, etc.).
6
AMPLIFICADOR CASERO O DE CLUB
A AMP
AMPLIFICADOR DE LA CABINA |
|
|
|
|
|
|
|
|
|
|
|
A FADER |
|
|
|
|
|
A PHONO |
|
A AMP |
|
|||
|
START |
|
|
|
|
|
|
||
|
|
|
|
|
O
|
|
|
|
A MIC |
A LINE |
|
A LINE |
|
|
|
|
|
||
|
|
|
|
|
QUEMADOR DE CD
DE
FADER
START
GUÍA DE INSTALACIÓN RÁPIDA DEL MEZCLADOR (ESPAÑOL)
Asegúrese que todos los artículos incluidos al inicio de este manual estén incluidos en la caja.
1.LEA EL FOLLETO DE INSTRUCCIONES DE SEGURIDAD ANTES DE UTILIZAR EL PRODUCTO.
2.Estudie este diagrama de instalación.
3.Coloque el mezclador en una posición adecuada para su funcionamiento.
4.Asegúrese que todos los dispositivos estén apagados y que todos los faders estén en la posición «cero».
5.Conecte todas las fuentes de entrada estéreo como se indica en el diagrama.
6.Conecte las salidas estéreo a los amplificadores de alimentación, unidades de cinta magnética, y/o fuentes de audio.
7.Enchufe su mezclador y otros dispositivos a la alimentación de corriente alterna.
8.Encienda todo en el siguiente orden:
•fuentes de entrada de audio (por ejemplo, giradiscos o reproductores de CD)
•su mezclador
•por último, cualquier amplificador
9.Al apagar, realice siempre esta operación en sentido inverso:
•apague los amplificadores
•su mezclador
•por último, cualquier dispositivo de entrada
10.Visite http://www.numark.com para registrar el producto.
7

CONEXIONES DEL PANEL TRASERO
1.Entrada de corriente alterna: Este mezclador está diseñado para trabajar con el conjunto de fuente de alimentación que acompaña a la unidad. Con la alimentación apagada, enchufe primero la fuente de alimentación al mezclador y luego a la toma de corriente.
2.Interruptor de encendido: Use este interruptor para encender el mezclador después que todos los dispositivos de entrada hayan sido conectados para evitar daños a su equipo. Encienda el mezclador antes que los amplificadores y apague los amplificadores antes que el mezclador.
3.Salida maestra balanceada: Conecte estas salidas balanceadas de 1/4" a un sistema de amplificador para altavoces o dispositivo magnetofónico.
4.Salida maestra: Esta es la salida principal de su mezclador. Conéctelo a un sistema de amplificador para altavoces, monitores con potencia o un estéreo casero con una entrada estereofónica de RCA. El nivel de esta señal de salida está controlado por el botón de volumen maestro.
5.Salida para cabina: Conecte esta salida a un sistema de monitoreo tal como una cabina de DJ o un monitor de piso.
6.Salida para grabación: Conecte esta salida a un dispositivo de registro tal como una unidad de cinta magnética o un quemador de CD. El nivel de la salida de registro se basa en los niveles del pre-maestro.
7.Entrada fonográfica y de línea: Conecte esta entrada a su fuente de audio. Para conectar un giradiscos con salidas de niveles fonográficos, fije el interruptor de entrada de línea/fonográfica (10) a la posición PHONO. Para conectar un reproductor de CD u otro dispositivo de nivel de entrada, fije el interruptor de entrada de línea/fonográfica a la posición LINE.
8.Entrada de línea: Conecte esta entrada a los dispositivos de nivel de línea tales como reproductores de CD.
9.Salida de Fader Start: Conecte los cables del fader start de 1/8" a los reproductores de medios compatibles como reproductores de CD con entradas de fader start.
10.Interruptor de entrada de línea/fonográfica: Interruptor de fuente fonográfica/de línea: Este interruptor activa y desactiva los preamplificadores fonográficos sensibles RIAA. Sólo deben usarse giradiscos con salida de nivel fonográfico cuando el interruptor está en la posición de entrada fonográfica.
11.Conexión a tierra: Conecte este tornillo de conexión a tierra al cable de tierra de cualquier giradiscos u otro dispositivo que tenga cable de tierra.
12.Entrada de MIC2: Conecte esta entrada a un micrófono con conector de 1/4" en el Canal 2. Para usar MIC2, cambie el INTERRUPTOR DE SELECCIÓN DE ENTRADA del Canal 2 a MIC localizado en el panel frontal.
8
CARACTERÍSTICAS DEL PANEL FRONTAL
1.Crossfader: Este crossfader reemplazable se desvanece entre los canales asignados a CFA y CFB. El fader puede reemplazarse por un fader "tipo D" o "CP-Pro" de Numark. Llame a servicio al cliente de Numark para obtener información.
2.Eliminadores de ecualizador: Eliminan las frecuencias altas, medias o bajas para dar un efecto único. Cada juego de tres interruptores sólo afectará el audio dirigido a través del crossfader.
3.3 Canales de audio: El mezclador contiene tres canales de audio que se describen en detalle en la sección Canal de audio en este manual.
4.Monitoreo con auriculares: Esta sección contiene la perilla de ganancia de “cue” para ajustar el volumen del auricular, y la perilla de mezcla de “cue” para mezclar entre el maestro y los canales seleccionados por los botones de PFL en cada canal. Al presionar el botón de combinación de “cue”, se activa el modo de señal dividida.
Presione la perilla para activar el modo de señal dividida que envía todos los canales de audio con el botón de asignación de “cue” activado al lado izquierdo de los auriculares y la salida del maestro al lado derecho de los mismos. Este modo es una manera excelente de mezclar cuando el monitoreo de la cabina no esté disponible.
5.Ajustes del micrófono: El botón de ganancia de micrófono controla el nivel de entrada del micrófono en el panel frontal. Hay también una perilla de graves y una de
agudos de micrófono para controlar el sonido de la entrada del micrófono. Para encender el micrófono, mueva el interruptor de micrófono a la posición de ON.
6.Niveles de salida: La salida del nivel del maestro se controla con la perilla MASTER. La salida del nivel de la cabina se controla con el botón BOOTH.
7.Efectos sincronizados con el ritmo: El mezclador tiene un sistema de efectos sincronizados con el ritmo muy personalizable que se describe con mayor detalle en la sección Efectos en este manual.
8.Entrada de micrófono: Esta entrada de 1/4" es para el micrófono, controlada por los ajustes del micrófono (#5).
9.Salida de auriculares: Conecte sus auriculares a esta salida de 1/4".
10.Ajuste de pendiente del crossfader: Esta perilla ajusta la pendiente del crossfader desde un desvanecimiento suave (mezcla) hasta un corte agudo (rayado).
11.Tono de la señal: Esta perilla ajusta el tono de la salida del auricular sin afectar cualquier otra salida. Esto puede usarse para ayudar en la mezcla cuando existe un ambiente de alta sonoridad.
12.Inicio del Cross Fader: Ambos lados del crossfader tienen un interruptor de inicio de fader que puede usarse para activar los dispositivos externos que tienen una entrada de fader start.
SELECCIÓN DEL CANAL DE AUDIO
1. Selector de entrada:
Selecciona la fuente de entrada deseada.
2.Perilla de ganancia:
Ajusta el predesvanecimiento y la preecualización del nivel de audio del canal.
3.Perillas de
ecualización: Ajusta las frecuencias agudas, medias y graves. El nivel de cada frecuencia puede ajustarse hasta el final y hasta cero (eliminado).
4.Señal de PFL: Envía el
nivel de predesvanecimiento del audio a la sección de la señal para el monitoreo del auricular.
5.Asignación del crossfader: Dirige el
audio del canal a un lado del crossfader. En la posición OFF puentea el crossfader.
6.Fader de línea de
canal: Controla el nivel de la señal de salida del post-ecualizador en el crossfader (si se asigna) o el maestro.
9
 Loading...