


Contents Index
COPYRIGHT INFORMATION |
Copyright © 1996–1999 by ScanSoft, Inc.. All rights reserved. No part of |
|
this publication may be transmitted, transcribed, reproduced, stored in |
|
any retrieval system or translated into any language or computer |
|
language in any form or by any means, mechanical, electronic, magnetic, |
|
optical, chemical, manual, or otherwise, without the prior written |
|
consent of ScanSoft, Inc., 9 Centennial Drive, Peabody, Massachusetts |
|
01960. Printed in the United States of America. |
|
The software described in this book is furnished under license and may |
|
be used or copied only in accordance with the terms of such license. |
IMPORTANT NOTICE |
ScanSoft, Inc. provides this publication “as is” without warranty of any |
|
kind, either express or implied, including but not limited to the implied |
|
warranties of merchantability or fitness for a particular purpose. Some |
|
states or jurisdictions do not allow disclaimer of express or implied |
|
warranties in certain transactions; therefore, this statement may not |
|
apply to you. ScanSoft reserves the right to revise this publication and to |
|
make changes from time to time in the content hereof without obligation |
|
of ScanSoft to notify any person of such revision or changes. |
TRADEMARKS AND CREDITS |
TextBridge is a registered trademark, and Pagis is a trademark, of |
|
ScanSoft, Inc. The Stylized X is a trademark of Xerox Corp. |
|
Excel, Word, and Windows are trademarks of Microsoft Corp. |
|
WordPerfect is a registered trademark of WordPerfect Corp. |
|
Other terms used in this manual are the trademarks of their respective |
|
holders. |
|
Portions of this product copyright © 1990–1999, Pixel Translations, Inc. |
|
Portions of this product copyright © 1994–1999, Mastersoft Corp. |
|
Portions of this product copyright © 1999, Adobe Systems, Inc.. |
|
Verity Topic® Search Technology copyrighted by Verity, Inc. |
|
AccuSoft Redlining® Toolkit copyrighted by AccuSoft Corp. |
|
Authors: Jim Cahill and Sadie DeSimone |
|
© SCANSOFT, INC. |
|
9 Centennial Drive |
|
Peabody, Massachusetts 01960 |
|
Pagis Pro 3.0 User’s Guide |
|
Part Number 00–094520–00 |
|
May 1999 |

Index
 CONTENTS
PREFACE
|
About this User’s Guide.............................. |
xiii |
|
Typographic conventions used in this manual .......... |
xiv |
|
Related Documents ................................. |
xv |
1 |
INTRODUCTION |
|
|
What is Pagis Pro?................................. |
1–1 |
|
What Comes with Pagis Pro ......................... |
1–2 |
|
Pagis Pro Features ................................ |
1–3 |
|
Where to Go From Here............................. |
1–9 |
2 |
INSTALLING PAGIS PRO |
|
|
System Requirements .............................. |
2–1 |
|
Installing and Testing Your Scanner ................... |
2–2 |
|
Installing Pagis Pro Software ........................ |
2–3 |
|
If you already have TextBridge .................... |
2–3 |
|
Upgrading from an earlier Pagis version ............. |
2–3 |
|
Uninstalling the old Pagis software ................. |
2–4 |
|
Running the Pagis Pro setup program ............... |
2–4 |
|
Upgrading old Pagis search database .............. |
2–12 |
|
Where to Go From Here............................ |
2–14 |
|
Uninstalling Pagis Pro ............................ |
2–15 |
Pagis Pro User’s Guide |
iii |

Index
3 |
LEARNING PAGIS PRO |
|
|
Pagis Inbox — the Pagis control center ................. |
3–2 |
|
Pagis ToolBar ................................. |
3–3 |
|
Pagis SendTo Bar .............................. |
3–5 |
|
Pagis Folders.................................. |
3–6 |
|
Scanning a Document .............................. |
3–6 |
|
Copying a Document .............................. |
3–10 |
|
Faxing a Document ............................... |
3–13 |
|
E-mailing a XIF image ............................ |
3–16 |
|
Refining and Annotating a Document ................. |
3–19 |
|
Scanning and Typing Into a Form .................... |
3–23 |
|
Scanning a document into a text application ............ |
3–26 |
|
Searching for a Document .......................... |
3–28 |
|
Running OCR on a Document ....................... |
3–32 |
|
Where to Go From Here............................ |
3–34 |
4 |
USING PAGIS PRO |
|
|
Pagis Inbox ...................................... |
4–1 |
|
Pagis Inbox menus and commands ................. |
4–2 |
|
Pagis commands in the File menu ............... |
4–3 |
|
Pagis commands added to the View menu ......... |
4–3 |
|
Pagis menu ................................ |
4–4 |
|
Document thumbnails ........................... |
4–5 |
|
Pagis ToolBar ................................. |
4–7 |
|
Modifying the Pagis ToolBar ................... |
4–7 |
|
Pagis SendTo Bar .............................. |
4–9 |
|
Changing SendTo Bar options .................. |
4–9 |
|
Adding a program to the SendTo Bar............ |
4–10 |
|
Removing a program from the SendTo Bar ....... |
4–12 |
|
Changing the Pagis Inbox location in your file system .. |
4–13 |
iv |
Pagis Pro User’s Guide |

Index
Pagis Folders.................................... |
4–14 |
Creating a Pagis Folder...................... |
4–14 |
Removing Pagis Folder attributes .............. |
4–14 |
Pagis Folders and Pagis Search Databases ....... |
4–15 |
Working with Pagis Files in Windows™ ............... |
4–15 |
About Pagis (XIF) files.......................... |
4–16 |
Enhanced context menu ........................ |
4–18 |
Stacking documents......................... |
4–18 |
Unstacking documents ...................... |
4–20 |
Converting to other image formats ............. |
4–20 |
Adding files to the Pagis Search Database........ |
4–23 |
Defining keywords and other properties for a file...... |
4–24 |
Defining Title, Author, and Keywords for a file .... |
4–24 |
Viewing and printing documents with Pagis Document |
|
Viewer................................ |
4–26 |
Working with the Pagis Document Viewer........ |
4–26 |
File menu ................................ |
4–28 |
Edit menu ................................ |
4–29 |
View menu ............................... |
4–30 |
Scan Tool (Scanner, Copier, Fax) ..................... |
4–31 |
Setting up your scanner or digital camera to work |
|
with Pagis ............................. |
4–32 |
About scanners and scanner drivers ............ |
4–32 |
Running the Scanner Setup Wizard............. |
4–33 |
Changing default properties for scanned documents ... |
4–36 |
Specifying scanner properties ................. |
4–37 |
Specifying page refinements .................. |
4–40 |
Specifying auto save properties ................ |
4–43 |
Specifying keyword properties................. |
4–45 |
Table of Contents |
v |

Index
4 USING PAGIS PRO (CONT.)
Scanning documents ........................... |
4–46 |
Scanning a single-sided document to a XIF file .... |
4–46 |
Scanning a double-sided document to a XIF file.... |
4–50 |
Scanning directly to an application ............. |
4–52 |
Acquiring an image from a digital camera ........ |
4–54 |
Using Prescan to scan part of a document ........ |
4–57 |
Copying documents ............................ |
4–59 |
Select a printer ............................ |
4–60 |
Set up the copy job.......................... |
4–61 |
Make copies............................... |
4–63 |
Faxing documents ............................. |
4–65 |
Select a fax printer ......................... |
4–65 |
Set up the fax job........................... |
4–67 |
Fax a document............................ |
4–68 |
Pagis Editor .................................... |
4–70 |
Menus and Commands in the Pagis Editor .......... |
4–71 |
File menu ................................ |
4–71 |
Edit menu ................................ |
4–74 |
View menu ............................... |
4–76 |
Insert menu............................... |
4–78 |
Tools menu ............................... |
4–78 |
Page menu................................ |
4–80 |
Annotate menu ............................ |
4–82 |
Forms menu .............................. |
4–84 |
Toolbars in the Pagis Editor ..................... |
4–86 |
Standard toolbar ........................... |
4–86 |
Annotation toolbar.......................... |
4–87 |
Image toolbar ............................. |
4–87 |
vi |
Pagis Pro User’s Guide |

Index
Inserting New Pages into an Open Document ........ |
4–88 |
Scanning new pages into an open document ...... |
4–88 |
Pasting images from other applications .......... |
4–90 |
Inserting a blank page....................... |
4–90 |
Inserting an image file....................... |
4–90 |
Re-ordering pages in a document............... |
4–91 |
Image Editing and Refinement ................... |
4–92 |
Auto refinement ........................... |
4–93 |
Manual refinement ......................... |
4–93 |
Straightening pages ........................ |
4–95 |
Rotating pages............................. |
4–96 |
Cropping pages ............................ |
4–96 |
Adjusting brightness and contrast.............. |
4–97 |
Resizing pages............................. |
4–98 |
Changing resolution ........................ |
4–98 |
Converting color depth ...................... |
4–98 |
Removing background tint.................... |
4–99 |
Making Annotations in a Pagis document .......... |
4–100 |
Basic annotation procedure .................. |
4–100 |
Specifying annotation options ................ |
4–101 |
Filling Out Forms ............................ |
4–103 |
Specify form field options.................... |
4–103 |
Analyze and fill out the form ................. |
4–104 |
Preparing a XIF Document for Printing............ |
4–106 |
Exporting XIF to Other Image Formats............ |
4–107 |
Specify Save/Export preferences .............. |
4–107 |
Using the Export command .................. |
4–108 |
Using the SendTo command ................. |
4–109 |
Using OCR To Capture Text from the Editor........ |
4–110 |
Table of Contents |
vii |

Index
4 USING PAGIS PRO (CONT.)
Web Capture Tool ............................... |
4–112 |
Creating a web site shortcut .................... |
4–112 |
Editing a web site thumbnail.................... |
4–114 |
Using a weblink shortcut....................... |
4–114 |
Pagis Search Database Manager and Update Tool....... |
4–115 |
About search databases ........................ |
4–116 |
Exploring the Pagis Search Database Manager ...... |
4–117 |
Create Search Database command............. |
4–118 |
Configure Search Database command .......... |
4–119 |
Delete Search Database command............. |
4–120 |
Change Schedule command .................. |
4–120 |
Update Search Database command ............ |
4–121 |
Attach to Search Database command........... |
4–122 |
Detach from Search Database command ........ |
4–123 |
Properties command ....................... |
4–123 |
Exit command ............................ |
4–123 |
Search Database toolbar .................... |
4–123 |
Creating and defining a search database ........... |
4–124 |
Updating a search database for removable media .... |
4–128 |
Sharing search databases in a networked |
|
environment .......................... |
4–130 |
Search Tool .................................... |
4–131 |
Basic search steps ............................ |
4–132 |
Defining a search string ....................... |
4–134 |
Simple searches........................... |
4–135 |
Proximity searches ........................ |
4–136 |
Natural language searches .................. |
4–136 |
Search by example......................... |
4–137 |
viii |
Pagis Pro User’s Guide |

Index
Other search properties........................ |
4–137 |
Keywords tab ............................ |
4–137 |
Date tab ................................ |
4–138 |
Name and Type tab ........................ |
4–139 |
Advanced tab............................. |
4–139 |
Finding out what files a database contains ...... |
4–142 |
File menu .................................. |
4–143 |
Open Selected Document command ............ |
4–143 |
Properties command ....................... |
4–143 |
Open Containing Folder command............. |
4–144 |
Save Search command...................... |
4–144 |
Exit command ............................ |
4–144 |
Edit menu .................................. |
4–144 |
Copy command ........................... |
4–145 |
Select All command ........................ |
4–145 |
Invert Selection command ................... |
4–145 |
View menu ................................. |
4–145 |
Large Icons command ...................... |
4–145 |
Small Icons command ...................... |
4–146 |
List command ............................ |
4–146 |
Details command.......................... |
4–146 |
Arrange Items command .................... |
4–146 |
Database menu .............................. |
4–146 |
Update Search Databases command ........... |
4–147 |
Manage Search Databases command........... |
4–147 |
Working with found documents .................. |
4–147 |
Viewing search hits in found documents ........... |
4–149 |
Where to Go From Here........................... |
4–150 |
Table of Contents |
ix |

Index
5 EXAMPLES AND ADVANCED FEATURES
Sample Uses of Pagis Pro ........................... |
5–1 |
Scan manuscripts and photographs for a newsletter .... |
5–2 |
Scan a document and edit it in a word processor ....... |
5–3 |
Scan a spreadsheet and edit it in a spreadsheet |
|
application.............................. |
5–3 |
Create a library of company documents .............. |
5–4 |
Use annotations to comment on scanned design |
|
drawings ............................... |
5–5 |
Scan invoices and e-mail them to customers .......... |
5–6 |
Scan and fax reports to clients..................... |
5–6 |
Scan, organize, and retrieve articles and research |
|
information ............................. |
5–7 |
Eliminate office clutter .......................... |
5–8 |
Scan receipts and other financial documents for tax |
|
purposes .............................. |
5–10 |
Scan a picture, add keywords, and add it to a search |
|
database .............................. |
5–10 |
Scan photos of possessions for insurance purposes..... |
5–11 |
Tips and Techniques .............................. |
5–12 |
Using the Pagis Print Driver to create XIF documents.. |
5–12 |
Downloading the Pagis Viewer ................... |
5–17 |
Sending XIF files as e-mail attachments ............ |
5–18 |
America Online ............................ |
5–18 |
Eudora Pro and Eudora Lite .................. |
5–19 |
Lotus cc:Mail and Lotus Notes................. |
5–20 |
MS Outlook Express and MS Outlook ........... |
5–20 |
Netscape Mail ............................. |
5–21 |
Registering Netscape and Netscape Mail......... |
5–22 |
x |
Pagis Pro User’s Guide |
Index
Dragging XIF files to open applications ............. |
5–27 |
Using TextBridge Pro as a standalone application..... |
5–27 |
Where to Go From Here............................ |
5–29 |
ASUPPORTED PROGRAMS AND FILE FORMATS
Supported Drag-and-Drop Programs ................... |
A–1 |
Image Formats that Pagis Pro Supports ................ |
A–6 |
GLOSSARY OF TERMS
INDEX
Table of Contents |
xi |

Contents Index
 PREFACE
Welcome to Pagis Pro from ScanSoft, Inc. Pagis Pro is your all- in-one scanning suite running in Microsoft® Windows™ 95, Windows 98, and Windows NT 4.0.
Please read this preface before going on to install and use Pagis
Pro. It discusses the following topics:
About this user’s guide
Related documents
ABOUT THIS USER’S GUIDE
This user’s guide provides all the information you need to successfully install, learn, and use Pagis Pro in the chapters sections.
The “Glossary of Terms” provides definitions of all of the technical terms used in this manual, and the “Index” gives page numbers for all of the topics described.
Appendix A, "“Supported Programs and File Formats”, lists the programs that Pagis Pro supports for drag-and-drop operations. It also lists the file formats Pagis can import and export.
Please note that this user’s guide does not teach you about your Windows operating system. It assumes that you know how to operate and manage your computer and its operating system software.
Pagis Pro User’s Guide |
xiii |

Contents Index
Typographic conventions used in this manual
This manual uses bold, italic, and other typographic styles to highlight different types of information in the text (Table P–1).
Table P–1. Documentation Conventions
bold |
Introduces a new term, or the first use of an |
|
|
important term in a chapter; also sometimes |
|
|
used to denote strong in-line emphasis. |
|
|
|
|
italic |
Denotes titles of other manuals or books. Also |
|
|
denotes generic file name entries, for example, |
|
|
filename |
|
|
|
|
monospace |
Denotes examples, menu text, and file names or |
|
|
messages that appear on the computer screen. |
|
|
|
|
“ ” (quotes) |
Denotes titles of chapters and sections in this |
|
|
manual. |
|
Introduces tips that provide useful information about a procedural step or system function.
Note |
Introduces information of special note about the |
|
current topic. There are borders above and |
|
below the noted text. |
xiv |
Pagis Pro User’s Guide |

Contents Index
RELATED DOCUMENTS
In addition to the printed Pagis Pro User’s Guide, refer to the following documents for more information related to Pagis Pro:
Release Notes—Read the on-line Release Notes (Relnote.rtf) first. This document provides late-breaking information about Pagis Pro. You can access the Release Notes at installation time, and after installation in the Pagis Pro 3.0 installation directory.
On-line Help—From Pagis Pro software, you can access context sensitive help, including topics about the menus, commands, and tools. Using the standard Windows winhelp utility, you can also access Pagis help via Contents, Index, and Search screens.
Pagis Activity Guide—This is an interactive guide which allows you to choose an activity (such as Scan a document into your word processor, or Scan and fill out a form) and get step-by-step instructions on your screen.
Pagis Pro User’s Guide—A longer version of the Pagis Pro User's Guide is provided in PDF format. The PDF version includes all the chapters in the printed version as well as: Chapter 4, "Using Pagis Pro", Chapter 5, "Examples and Advanced Features", and Appendix A, "Supported Programs and File Formats".
TextBridge Pro User’s Guide—Provided in PDF format, the
TextBridge Pro User’s Guide covers all aspects of the optical character recognition (OCR) technology built into Pagis Pro software. TextBridge Pro software also contains its own extensive on-line help system.
The PDF versions of the Pagis Pro User's Guide and the
TextBridge Pro User's Guide can be opened by going to the Windows Start menu, then opening the Documentation folder in the Pagis program group.
Preface |
xv |

Contents Index
1
INTRODUCTION
Welcome to Pagis™ Pro, your all-in-one scanning suite from ScanSoft, Inc. Read this chapter for information about the following topics:
What is Pagis Pro?
What comes with Pagis Pro
Pagis Pro features
Where to go from here
To get started quickly, go directly to Chapter 2, “Installing Pagis Pro,” for installation instructions.
WHAT IS PAGIS PRO?
Pagis Pro is a value-packed color scanning suite for Microsoft
Windows™ 95, Windows 98, and Windows NT 4.0.
Pagis Pro enables you to scan, copy, fax, view and edit, search and otherwise manage electronic documents (articles, photos, forms, and so on) on your Windows desktop.
In addition to documents on your personal computer, Pagis Pro enables you to manage documents on removable media, such as Jaz™ and Zip™ drives, and to locate documents on CD-ROMs.
Pagis Pro User’s Guide |
1–1 |

Contents Index
WHAT COMES WITH PAGIS PRO
Pagis Pro includes a CD-ROM that contains the following items:
Pagis Pro installation program and application software
TextBridge® Pro OCR software
Pagis Pro multimedia product tour
On-line manuals for Pagis Pro and TextBridge Pro in Adobe® Portable Document Format (PDF).
Adobe Acrobat™ Reader
Sample XIF (eXtended Image Format) image files
Pagis MiniViewer
Pagis Pro Release Notes
Note Be sure to register your copy of Pagis Pro software. As a registered user, you will be kept up to date on new software releases, special offers, and other important product information.
Also, please read the Pagis Pro Release Notes (relnote.rtf) on the CD-ROM for information about other items that may be included with Pagis Pro.
1–2 |
Pagis Pro User’s Guide |
Contents Index
PAGIS PRO FEATURES
Pagis Pro tools are designed to improve your work flow, productivity, and organization. Please read this section for highlights of the many features and benefits Pagis Pro provides.
The Pagis Inbox
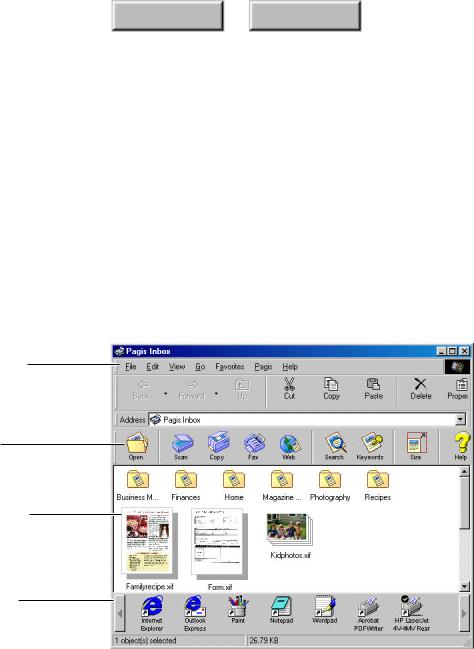
The Pagis Inbox (Figure 1–1) is the main control center for Pagis Pro operations and the default location for scanned documents. It is a special folder with a unique look that is placed on your Windows desktop during installation.
Standard Menu bar (Pagis menu is added)
Pagis ToolBar
Enhanced Explorer view with document thumbnails
Pagis SendTo Bar with shortcuts to other programs
Figure 1–1. Pagis Inbox with document thumbnails
Think of the Pagis Inbox as a supercharged Windows folder. It includes all the menu items of a Windows Explorer view as well as a Pagis menu, a Pagis ToolBar, and a SendTo Bar for drag- and-drop operations.
Introduction |
1–3 |

Contents Index
For organizing your scanned documents, the Pagis Inbox provides several sample Pagis Folders—Business Materials, Finances, Home, Magazine Articles, Photographs, and Recipes. You can change the names of these folders or delete them if you wish.
Pagis Folders
There is only one Pagis Inbox (which is actually a Pagis Folder). However, you can convert any standard Windows folder into a Pagis Folder, which has all the features of the Pagis Inbox.
From the Pagis Inbox or Pagis Folders, you can arrange and organize your scanned documents, launch Pagis tools, and drag documents to the icons on the SendTo Bar where they will open installed applications for word processing, e-mailing, image editing, and other activities.
Pagis ToolBar
The Pagis ToolBar is a standard feature of the Pagis Inbox and all Pagis Folders. It provides access to all the major document management tools and commands in the product.
SendTo Bar
The SendTo Bar is a standard feature of the Pagis Inbox and all Pagis Folders. It shows shortcuts to your favorite applications. and can hold an unlimited number of shortcuts. During installation, Pagis detects the applications on your computer and adds shortcuts for them on the SendTo Bar.
You can then drag and drop a scanned document onto the application's shortcut on the SendTo Bar, or just click the shortcut icon, to open the document in that application.
For example, when you click the MS Word icon, or drag and drop a scanned document onto the MS Word shortcut, Pagis performs OCR (optical character recognition) on the document, launches Word, and places the recognized text and graphics in an open Word document.
1–4 |
Pagis Pro User’s Guide |

Contents Index
SendTo Bar drag and drop to registration wizard
You can add applications to the SendTo Bar at anytime. Simply drag and drop the application shortcut onto the SendTo bar. This opens the Drag and Drop Registration Wizard so you can register the application with Pagis Pro.
Scanner Setup Wizard
The Pagis Scanner Setup Wizard helps you set up your scanner for use with Pagis and TextBridge, and helps diagnose and solve incompatibilities. You can start the wizard from the Pagis Scan Tool.
Scan and capture high quality color images in extremely compact file sizes
Only Pagis Pro offers the XIF (eXtended Image File) format, which enables you to store high quality color scans in extremely compact file sizes.
A typical color magazine page, for example, can use less than 100 kilobytes when scanned to XIF. By contrast, a JPEG version of the same file could be as much as five times the size.
Pagis Pro achieves its high compression levels by segmenting scanned images into four layers in the XIF file: the binary (black and white) text layer; the color text layer; the background tint layer; and the color image layer. Each layer is then appropriately compressed.
Scan to and read many popular image formats
In addition to XIF, Pagis Pro can read and write many popular image formats, including BMP, FlashPix, JPEG, and TIFF. For a complete list of supported image formats, see Appendix A, “Supported Programs and File Formats.”
Introduction |
1–5 |

Contents Index
Web Capture Tool
Pagis allows you to specify a URL address for an Internet shortcut which is saved in your Pagis Inbox or a Pagis Folder, and rendered as a URL Thumbnail. By double-clicking the thumbnail, you launch your browser and go right to the URL address.
Direct scanning to many popular applications
Pagis Pro allows you to scan documents directly into many applications. A partial list includes Microsoft Office Suite applications (such as Word and Excel); Adobe applications (such as PageMaker, PhotoDeluxe, and PhotoShop); Corel WordPerfect Suite applications (such as WordPerfect, Draw, and Quattro Pro); Lotus Smart Suite applications. For a complete list, see Appendix A, “Supported Programs and File Formats.”
Electronic Thumbnails
Pagis allows you to view enhanced thumbnails of your scanned documents in the Pagis Inbox and Pagis Folders. A small icon of the associated application type is displayed in the lower right corner of each thumbnail. You can also choose to show or hide other attributes, such as the name and size of the document, if you wish.
Multimedia Thumbnails
Pagis allows you to browse certain multimedia files within the Pagis Inbox and Pagis Folders. A Play button appears when you select the multimedia thumbnails. You just press the Play button on the thumbnail to play the multimedia file.
The supported multimedia formats are: Audio Interchange File Format (AIFF), Microsoft Sound (WAV), MIDI (MID), MPEG 1 Video (MPG) NeXt/Sun Audio (AI), QuickTime Movie (MOV) and Video for Windows (AVI).
1–6 |
Pagis Pro User’s Guide |
Contents Index
URL Thumbnails
Pagis allows you to save shortcuts to Internet addresses using the Web Capture tool. These shortcuts are rendered as thumbnails in the Pagis Inbox and Pagis Folders. You can annotate and edit by double-clicking the thumbnail to open it in the Pagis Editor. You can browse to the associated website by double-clicking on the Browse button.
Pagis MiniViewer
Pagis includes a free MiniViewer which you can use to e-mail XIF image files to your friends who use a PC with Windows, but don't yet have Pagis Pro. All they have to do is double-click on the EXE file to open the MiniViewer and display the file.
Color copying
With Pagis Pro and your color scanner, you can scan paper documents into your computer as high-quality color images, then send them to your color printer to make color copies.
Fax your scanned documents
With Pagis Pro, a modem and fax software, you can quickly and conveniently fax text documents, forms, photos and so on. To achieve the best quality image, Pagis Pro enhances the scanned document before it is faxed. Some of the fax applications supported by Pagis Pro are Delrina WinFax and Eclipse Fax. For a complete list of supported fax applications, see Appendix A, “Supported Programs and File Formats.”
View and clean up scanned documents
Using the Pagis Editor, you can view and perform a number of operations on scanned XIF documents. You can zoom, rotate, enhance colors, remove specks and lines, straighten, crop, and reorder scanned pages.
Introduction |
1–7 |

Contents Index
Add searchable annotations to scanned documents
The Pagis Editor enables you to add comments and draw emphasis to key parts of your scanned documents before distributing them. Some of the annotation tools include margin note, sticky note, highlighter, arrow, line, circle, rectangle, and stamp. You can later search by any text annotations you add.
Edit scanned images
The Pagis Editor includes integrated image editing tools (Windows Paint or other integrated software). These tools enable you to edit scanned images with familiar objects such as eraser, pencil, brush, line, and curve.
Scan a form and fill in the fields
The Pagis Editor enables you to scan forms, fill them in, then print them out. A forms detection tool in the Editor finds the fields, highlights them, then lets you easily navigate to, and type information in each field.
Search and retrieve all documents on your system
The Pagis Search Tool enables you to perform a full text search of the scanned documents and electronic documents, such as Word or Excel, on your system. You can also add keywords to scanned XIF image files so you can easily find them.
Search on the text in annotations
If you add text annotations (such as margin notes and sticky notes) to a XIF image file, you can use the Search Tool to find the documents based on these annotations.
1–8 |
Pagis Pro User’s Guide |

Contents Index
Search network drives and removable media
Pagis allows you to search and retrieve information not only on your local system, but on network drives, Jaz™ drives, Zip™ drives, floppy disks, and CD-ROMs.
Create and manage multiple search databases
The Pagis Search Database Manager allows you to create and manage Pagis search databases on your system and removable media. The Search Database Manager shows the date and time each was last updated, the update schedule, and the directories and file types in each search database. You can update your search databases manually or you can schedule to automatically update them.
OCR documents with exceptional accuracy
Pagis Pro includes TextBridge Pro, ScanSoft’s award-winning OCR (optical character recognition) software. TextBridge Pro is a full-featured, highly accurate and easy to use application. The advantage of pro level OCR is that it maintains the original formatting of scanned documents (text, columns, pictures, and tables).
You can access TextBridge Pro from Pagis Pro, or directly as a standalone application.
WHERE TO GO FROM HERE
Proceed to Chapter 2 of this manual for detailed instructions to install and register Pagis Pro software, and to select your scanner.
Chapter 2 also describes how to uninstall Pagis Pro.
Introduction |
1–9 |
Contents Index
2
INSTALLING PAGIS PRO
This chapter describes the Pagis Pro software installation and setup procedures. Specifically, it covers these topics:
System requirements
Installing and testing your scanner
Installing Pagis Pro software
Where to go from here
Uninstalling Pagis Pro software
Please read through the first three sections before proceeding with software installation. However, if you are ready to begin software installation, please turn to page 2–3.
SYSTEM REQUIREMENTS
To install and run Pagis Pro, your PC must be set up to run
Microsoft Windows™ 95, Windows 98, or Windows NT 4.0. Your
PC must be equipped with the following:
200 Mhz Pentium™ or compatible microprocessor
256 Color Video, 800x600 minimum resolution
CD-ROM Drive
60 Mb (megabytes) of Disk Space
32 Mb of RAM (random access memory) minimum (48 Mb recommended)
The more RAM you have, the more efficiently Pagis Pro runs, particularly when you are scanning and editing large documents.
Pagis Pro User’s Guide |
2–1 |

Contents Index
INSTALLING AND TESTING YOUR SCANNER
Pagis Pro works with many popular desktop scanners. With its support of the TWAIN standard, Pagis Pro can work with scanners and other devices, such as digital cameras, that provide their own TWAIN drivers.
Note Check the Pagis Pro home page on the World Wide Web for the latest list of supported scanners and digital cameras:
http://www.scansoft.com
Scanners require a TWAIN source driver, which is provided by the scanner or interface card manufacturer. Consult the scanner documentation for details about installing your scanner, interface card, and driver.
The basic steps for installing a scanner are to:
1.Install the correct scanner interface card (if one is necessary) in the PC bus. Note that many scanners simply plug into the PC’s standard serial, USB port, or parallel port.
2.Hook up the scanner to the interface card or standard port with the correct cable, and power up the scanner and the PC.
3.Install the TWAIN source driver on your PC hard disk, as directed by the scanner documentation.
4.Test the scanner using software tools provided by the manufacturer. If your scanner runs without Pagis Pro, you can be sure that it is functioning correctly. After the scanner is working, you can install Pagis Pro and link it your scanner to it.
Pagis Pro's Scanner Wizard guides you through the process of linking your scanner to Pagis. Refer to “Running the Scanner Setup Wizard” in chapter 4 for instructions.
2–2 |
Pagis Pro User’s Guide |

Contents Index
INSTALLING PAGIS PRO SOFTWARE
After you have installed and tested your scanner, you are ready to install Pagis Pro software. This section covers these topics:
If you already have TextBridge
Upgrading from an earlier Pagis version
Running the Pagis Pro setup program
If you are a new Pagis user, go directly to “Running the Pagis Pro setup program” in this chapter.
If you already have TextBridge
If you have any version of TextBridge installed on your system, you should uninstall it before installing Pagis Pro software. Pagis Pro includes its own full-featured version of TextBridge Pro.
Refer to "Uninstalling TextBridge" in the documentation that came with the software.
Note that if you have saved any training files or recognized text files in the TextBridge Pro folder, they will not be uninstalled.
Upgrading from an earlier Pagis version
It is very easy to upgrade from an earlier version of Pagis, but you should be aware of a couple of things:
First, you cannot have two versions of Pagis on your system. You can either uninstall the old Pagis before installing this version, or just allow the new version to overwrite the old one during installation.
Installing Pagis Pro |
2–3 |

Contents Index
Second, you can keep your old Pagis search databases and use them with this new version of Pagis Pro. An Upgrader program is provided for this purpose. See the subsection, “Upgrading an old Pagis search database,” for information about how to do this.
Uninstalling the old Pagis software
You cannot have two versions of Pagis on your computer at one time. However, it is not necessary to uninstall your old software, since Pagis has simplified this for you. During installation, at your direction, Pagis will install this new version of Pagis Pro over the old software.
If, however, you decide to uninstall an earlier version of Pagis yourself, just follow the instructions that came with the software.
Running the Pagis Pro setup program
To install this new version of Pagis Pro software for Windows 95,
Windows 98, or Windows NT 4.0:
1.It is strongly recommended that you close all the programs and toolbars on your Windows taskbar before inserting the Pagis CD.
2.Insert the Pagis Pro CD into your CD-ROM drive.
An autorun program on the CD-ROM launches the Pagis setup program automatically. An install shield dialog box displays, then the Pagis Main Install screen provides several options such as Install Pagis, View Multimedia Tutorial, and View Release Notes.
If your system is set up to ignore autorun commands, use Windows Explorer to navigate to the Pagis CD-ROM. At the top-level of the CD-ROM, double-click the Autorun.exe program and display the initial setup screen.
2–4 |
Pagis Pro User’s Guide |
Contents Index
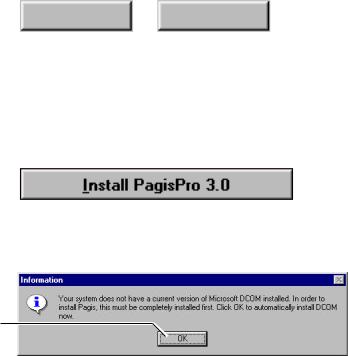
3.On the Pagis Main Install Window, click Install Pagis Pro.
Depending on your system, a message might inform you that Microsoft DCOM is not installed on your system Figure 2–1).
Click to install Microsoft DCOM if this message displays
Figure 2–1. Microsoft DCOM Information Screen
4.If the Microsoft DCOM Information Screen displays, click OK. Otherwise, go to step 6.
Microsoft DCOM is then installed on your system and you will be asked if you wish to restart your computer.
5.Click Yes to restart your computer.
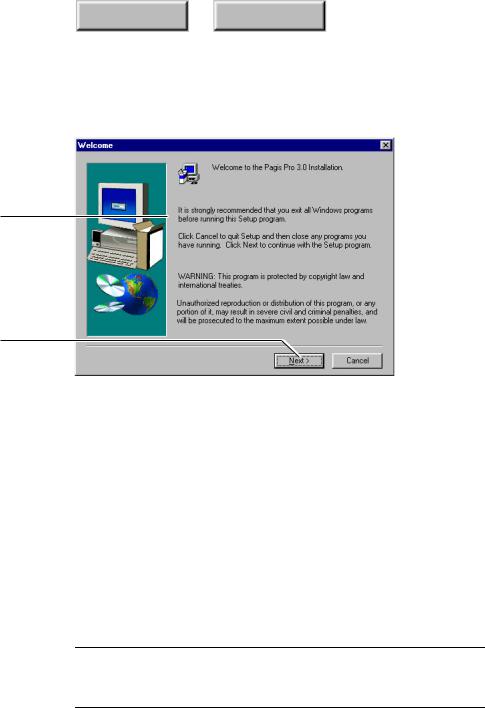
After you restart your computer and logon again the necessary drivers are installed and the Pagis Pro Welcome screen is displayed (Figure 2–2).
Installing Pagis Pro |
2–5 |
Contents Index
Read the instructions
Click Next to proceed
Figure 2–2. Welcome dialog box
6.Click Next in the Welcome dialog box.
Pagis checks your system requirements.
If your system does not meet the minimum necessary requirements, a report is displayed and asks whether you wish to continue anyway.
Click No, if you do not wish to continue installing Pagis at this time. Pagis Pro setup will close.
Click Yes if you wish to continue without meeting the minimum system requirements.
Note Check "Systems Requirements" on page 2–1 for the minimum and recommended disk space, memory and other information for successfully running Pagis Pro.
2–6 |
Pagis Pro User’s Guide |
Contents Index
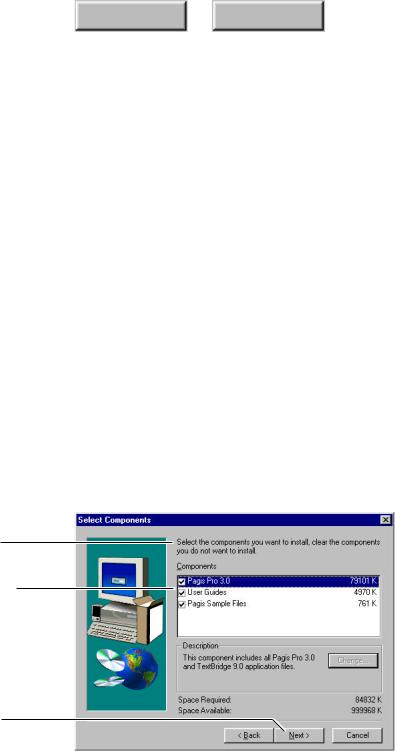
Read the instructions
Uncheck the box beside any component you do not want to install
Click Next to proceed
If your system meets the minimum requirements, or if you choose to continue installing Pagis without meeting the minimum requirements, the Pagis Pro Software License Agreement is displayed in a scrolling window.
7.Read the license agreement, then:
Click No if you do not accept the license agreement. Pagis Pro setup will close.
Click Yes to proceed with installation. The next screen lets you specify the Setup Type—Typical or Custom.
8.Specify the Setup Type—Typical or Custom—then click Next.
∙Select Typical to install all Pagis Pro components. This is recommended. After you click Next, go directly to Step 10.
∙If you have limited space on your hard drive, you can choose Custom. After you click Next, the Select Components dialog box appears (Figure 2–3).
Figure 2–3. Select components to install
Installing Pagis Pro |
2–7 |
 Loading...