


 Loading...
OmniPage® Pro
User’s Manual

Caere Corporation
100 Cooper Court
Los Gatos, California
95032-7603 USA
Caere GmbH
Innere Wiener Strasse 5
81667 München, Germany
Caere UK Information Centre
Abbey House
4 Abbey Orchard Street
Westminster, London SW1P 2JJ
Centre d’informations Caere
72, rue Baratte-Cholet 94100 Saint-Maur, France
Please Note
To use this program, you should know how to work in the Microsoft Windows environment. Please refer to Windows documentation if you have questions about how to use menu commands, dialog boxes, scroll bars, edit boxes, and so on.
OmniPage Pro for Windows
Version 10
Registration Number:
Copyright© 1999 by Caere Corporation. All rights reserved. The Caere logo, Caere, OmniPage, OmniPage Pro, PageKeeper, PageKeeper Pro, AutoOCR Toolbar, True Page, and OCR Proofreader are registered trademarks of Caere Corporation.
All other trademarks are the property of their respective companies.
ii |
800-1319-030A |
|

Table of Contents
Welcome |
|
Using This Manual .............................................................................................................. |
vi |
Getting Online Help .......................................................................................................... |
vii |
Help Menu ................................................................................................................... |
vii |
Context-Sensitive Help............................................................................................... |
vii |
Product Support ................................................................................................................ |
viii |
Chapter 1 Installation and Setup |
|
Minimum System Requirements......................................................................................... |
2 |
Installing OmniPage Pro ..................................................................................................... |
2 |
Setting Up Your Scanner With OmniPage Pro ................................................................. |
3 |
Starting OmniPage Pro ......................................................................................................... |
4 |
Registering Your Software ................................................................................................... |
5 |
Chapter 2 Introduction to OmniPage Pro |
|
What Is Optical Character Recognition (OCR)?................................................................ |
8 |
OmniPage Pro’s OCR Capabilities .............................................................................. |
8 |
Basic Steps of OmniPage Pro OCR ............................................................................. |
9 |
The OmniPage Pro Desktop ............................................................................................. |
10 |
OmniPage Toolbox....................................................................................................... |
11 |
Standard Toolbar.......................................................................................................... |
13 |
Image Toolbar............................................................................................................... |
13 |
Chapter 3 Processing Documents |
|
Different Ways to Process Documents ............................................................................. |
16 |
Converting Images to Text................................................................................................. |
17 |
Processing Documents Using the OCR Wizard....................................................... |
19 |
Automatic Processing.................................................................................................. |
20 |
Manual Processing ....................................................................................................... |
21 |
Processing Documents In Other Applications......................................................... |
22 |
Improving OCR Results ..................................................................................................... |
23 |
Adjusting Page Images Before OCR.......................................................................... |
23 |
Changing Zone Properties.......................................................................................... |
24 |
Matching Original Document Fonts.......................................................................... |
25 |
iii

Proofreading OCR Results ......................................................................................... |
25 |
Checking Recognized Text Against Original Text.................................................. |
27 |
Working with OmniPage Documents ............................................................................. |
28 |
Resizing a Page View ................................................................................................. |
29 |
Changing Pages ........................................................................................................... |
29 |
Reordering Pages ........................................................................................................ |
30 |
Deleting Pages ............................................................................................................. |
30 |
Printing a Document .................................................................................................. |
31 |
Closing a Document ................................................................................................... |
31 |
Chapter 4 Settings and Commands |
|
The OmniPage Toolbox...................................................................................................... |
34 |
AutoOCR Toolbar ........................................................................................................ |
34 |
Manual OCR Toolbar .................................................................................................. |
34 |
OCR Wizard.................................................................................................................. |
34 |
Setting Toolbar Commands........................................................................................ |
35 |
Activating Toolbar Commands.................................................................................. |
38 |
Selecting OmniPage Pro Settings...................................................................................... |
39 |
OCR Settings ........................................................................................................................ |
40 |
Scanner Settings................................................................................................................... |
40 |
Tables Settings ..................................................................................................................... |
41 |
Direct OCR Settings ............................................................................................................ |
42 |
Process Settings ................................................................................................................... |
43 |
Chapter 5 Saving and Exporting |
|
Saving a Document ............................................................................................................. |
45 |
Copying a Document to the Clipboard ........................................................................... |
48 |
Sending a Document as a Mail Attachment ................................................................... |
48 |
Converting Text to Speech................................................................................................. |
49 |
Chapter 6 Technical Information |
|
General Troubleshooting Solutions ................................................................................. |
52 |
Solutions to Try First ................................................................................................... |
52 |
Testing OmniPage Pro ................................................................................................ |
53 |
Low Memory Problems............................................................................................... |
54 |
Low Disk Space Problems .......................................................................................... |
54 |
Supported File Types.......................................................................................................... |
55 |
OCR Problems ..................................................................................................................... |
57 |
System Crash During OCR......................................................................................... |
57 |
Text Does Not Get Recognized Properly.................................................................. |
58 |
Problems With Fax Recognition ................................................................................ |
59 |
Uninstalling the Software .................................................................................................. |
60 |
iv

Welcome
Welcome to OmniPage Pro, and thank you for using our software! The following documentation has been provided to help you learn about OmniPage Pro.
This User’s Manual
This manual introduces you to the basics of using OmniPage Pro. It includes installation and setup instructions, an introduction to OmniPage Pro, task-oriented instructions, ways to customize processing, and technical information.
Online Help
OmniPage Pro’s online Help contains basic and advanced information on features, settings, and procedures. The online Help is provided in HTML format, and has been designed for quick and easy information retrieval. Please see “Getting Online Help” on page ix for more information.
Readme File
The Readme file contains last-minute information about the software. Please read it before using OmniPage Pro. To open this HTML file, choose Readme in the Help menu after OmniPage Pro has been installed.
Scanner Setup Notes
The Scanner Setup Notes contains detailed information about supported scanners and related issues. To open this HTML file, choose Scanner Setup Notes in the Help menu after OmniPage Pro has been installed.
v

Using This Manual
Using This Manual
This manual is written with the assumption that you know how to work in the Microsoft Windows environment. Please refer to your Windows documentation if you have questions about how to use dialog boxes, menu commands, scroll bars, drag and drop functionality, shortcut menus, and so on.
The following conventions are used in this manual.
Convention |
Purpose |
|
|
Italicized text |
• Emphasizes menu commands, |
|
dialog box options, labeled |
|
buttons, and file names |
|
For example: |
|
“Choose Open... in the File |
|
menu.” |
|
• Emphasizes new terms the |
|
first time they are used |
|
• Emphasizes important words |
|
in a sentence |
|
|
Note symbol |
Introduces a tip or an item of |
|
note |
|
|
Warning symbol |
Introduces important |
|
information |
|
|
vi
Getting Online Help
Getting Online Help
In addition to using this manual, you can use OmniPage Pro’s online Help to learn about features, settings, and procedures. Online Help is available after you install OmniPage Pro.
Help Menu
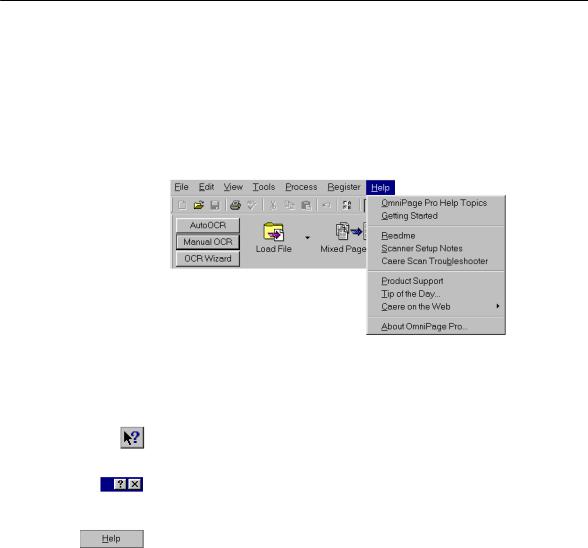
One way to open OmniPage Pro’s online Help is to choose commands in the Help menu.
Context-Sensitive Help
You can get on-the-spot information about a particular OmniPage Pro command, toolbar button, or dialog box option in the following ways:
•Click the Help button in the Standard toolbar and then click any toolbar button, menu command, or area of the OmniPage Pro desktop to display a Help topic explaining that item.
• Click the question-mark button in the upper-right corner of a dialog box and then click an item in the dialog box to get a popup explanation for that item.
•Some dialog boxes have a Help button. Click Help to get information about that dialog box.
vii

Product Support
Product Support
For the fastest and easiest way to get help, please look for solutions in this manual or in the online Help. See “General Troubleshooting Solutions” on page 52 for troubleshooting tips.
If you need additional help, please use the following resources:
•Caere on the World Wide Web
Go to Caere’s World Wide Web site for common questions and answers, updates, patches, troubleshooting procedures, and product information. Caere’s Web site address is www.caere.com. You can also connect to Caere’s Web site by choosing Caere on the Web in the Help menu.
•OmniPage Pro Readme File
Read the OmniPage Pro Readme file for last-minute information about the software. You can view a text version of the Readme file from the first installation screen during installation of OmniPage Pro. To open an HTML version of the file after OmniPage Pro has been installed, choose Readme in the Help menu.
•Caere Scan Troubleshooter
Use the Caere Scan Troubleshooter to set up a scanner that is not listed in Caere Scan Manager or to resolve problems using your scanner with OmniPage Pro. The Caere Scan Troubleshooter has been provided to you in HTML format. Start Caere Scan Troubleshooter by choosing it from the Help menu of either Caere Scan Manager or OmniPage Pro.
•Caere Product Support document
Read the Caere Product Support document to get a list of support telephone numbers, including ones for international product support. This document has been provided to you as an electronic document in HTML format. To open this document, choose Product Support in the Help menu.
viii

Chapter 1
Installation and Setup
This chapter provides information on installing and starting OmniPage Pro.
This chapter contains the following topics:
•Minimum System Requirements
•Installing OmniPage Pro
•Setting Up Your Scanner with OmniPage Pro
•Starting OmniPage Pro
•Registering Your Software
1

Minimum System Requirements
Minimum System Requirements
You need the following setup, at minimum, to install and run OmniPage
Pro:
•Computer with a Pentium or higher processor
•Microsoft Windows 95, Windows 98, Windows 2000, or Windows NT 4.0
•32MB of memory (RAM)
•50MB of free hard disk space to install application files and Caere Scan Manager
•SVGA monitor with 256 colors
•Windows-compatible pointing device
•CD-ROM drive for installation
•A compatible scanner if you plan to scan documents
Please see the Scanner Setup Notes for a list of tested scanners.
Performance and speed will be enhanced if your computer’s processor, memory, and available disk space exceed the minimum requirements.
Installing OmniPage Pro
OmniPage Pro’s Setup program takes you through installation with instructions on every screen.
Before installing OmniPage Pro:
•Make sure your scanner is connected, turned on, and compatible with your system.
•Close all other applications, especially anti-virus programs.
•Log into your computer with administrator privileges if you are installing on Windows 2000 or Windows NT.
If you own a previous version of OmniPage Pro, or if you are upgrading from OmniPage Limited Edition, it is strongly recommended that you uninstall that product first and then restart your computer.
2 |
Chapter 1 |
Setting Up Your Scanner With OmniPage Pro
To install OmniPage Pro:
1Insert OmniPage Pro’s CD-ROM in the CD-ROM drive. The Setup program should start automatically. If it does not start, locate your CD-ROM drive in Windows Explorer and double-click the Setup.exe program at the top-level of the CD-ROM.
2Follow the instructions on each screen to install the software.
During installation, you may be prompted to enter a serial number. You can find your serial number on the label of the CD-ROM envelope.
Setting Up Your Scanner With OmniPage Pro
Caere Scan Manager is installed during OmniPage Pro installation. This sets up your scanner so you can use it with OmniPage Pro. During installation, Caere Scan Manager prompts you to select your scanner manufacturer and model.
Read the Scanner Setup Notes for more information on Caere Scan
Manager and supported scanners. Choose Scanner Setup Notes in the
Help menu after OmniPage Pro has been installed.
After installation, you can use Caere Scan Manager to set up additional scanners with OmniPage Pro and change various scanner settings. Caere Scan Manager is located in the Windows Control Panel.
To open Caere Scan Manager:
1Click Start in the Windows taskbar and choose Settings !
Control Panel.
2Double-click the Caere Scan Manager icon.
Installation and Setup |
3 |
Starting OmniPage Pro
Starting OmniPage Pro
To start Omnipage Pro, click Start in the Windows taskbar and choose Programs!Caere OmniPage Pro 10.0. Or, double-click the OmniPage Pro icon located in the folder where you installed OmniPage Pro.
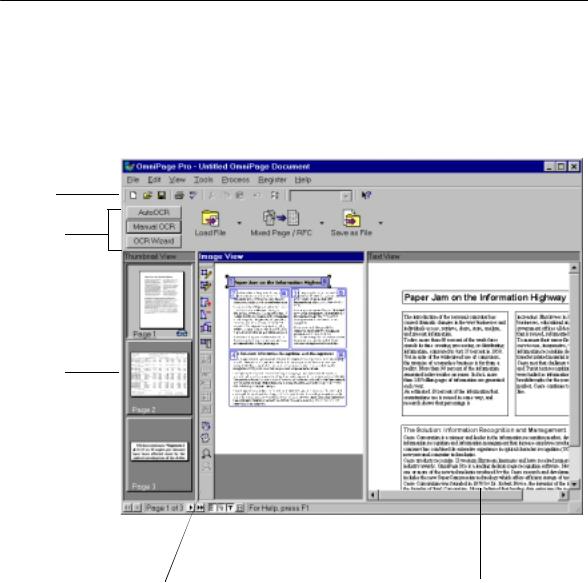
OmniPage Pro’s desktop appears when you open OmniPage Pro. See “The OmniPage Pro Desktop” on page 10 for an introduction to OmniPage Pro’s user interface.
Standard toolbar
OmniPage
Toolbox
The thumbnail view displays the pages in an open document.
|
|
|
Image |
The image view |
|
toolbar |
displays the current |
|
|
page’s original image. |
|
The text view displays the current page’s recognized text and retained graphics.
4 |
Chapter 1 |

Registering Your Software
Registering Your Software
Register your copy of OmniPage Pro with Caere Corporation to receive notification of special offers and the best prices on product upgrades.
If you purchased your product directly from Caere, you may not need to register again. Your version of OmniPage Pro will not display a Register menu if you do not need to register it.
To register OmniPage Pro:
1Click the Register menu to open the Register dialog box.
2Click Register Now.
3Fill out the information requested on the screen and then click
Next.
4Follow the instructions on the screen.
You can use your modem, FTP, or HTTP connections to transmit your registration information directly. Or, you can call Caere’s registration phone number or print out and mail in your registration information.
After registration is complete, you will be given a registration number. Be sure to write that number down and keep it handy in case you need to use it for reinstallation. If you reinstall OmniPage Pro using your registration number on the same computer, you will not have to go through the entire registration process again to reregister it.
To reregister OmniPage Pro after reinstallation:
1Click the Register menu to open the Register dialog box.
2Click Reregister.
3Type in your registration number and click OK.
Installation and Setup |
5 |
6 |
Chapter 1 |

Chapter 2
Introduction to
OmniPage Pro
You probably use your computer for most business correspondence and other written projects. The challenge is that certain sources of information cannot be used immediately on a computer.
For example, if you want to incorporate information from a magazine article into a document in your word processor, you somehow have to get the text from the article into your computer. Painstakingly retyping the article is not an appealing solution.
OmniPage Pro offers a smart solution to increase your work productivity. OmniPage Pro’s optical character recognition (OCR) technology accurately and easily converts scanned paper documents and image files into editable text for use in your favorite computer applications. OmniPage Pro eliminates the need for manual retyping.
Please continue reading this chapter for information on these topics:
•What Is Optical Character Recognition (OCR)?
•The OmniPage Pro Desktop
7

What Is Optical Character Recognition (OCR)?
What Is Optical Character Recognition (OCR)?
Optical character recognition (OCR) is the process of turning an image into computer-editable text. An image is an electronic picture of text such as a scanned paper document or an electronic fax file. Images do not have editable text characters; they have many tiny dots (pixels) that together form a picture of text.
During OCR, OmniPage Pro analyzes an image and defines characters to produce editable text. After OCR, you can save the resulting text to a variety of word-processing, page layout, and spreadsheet applications.
OmniPage Pro’s OCR Capabilities
In addition to text recognition, OmniPage Pro can retain the following elements of a document during OCR.
Graphics
Photos, logos, and drawings are examples of graphics.
Text formatting
Font types, font sizes, and font styles (such as bold or italic) are examples of text formatting.
Page formatting
Column structure, paragraph spacing, table formats, and placement of graphics are examples of page formatting.
The graphics, text formatting, and page formatting elements that OmniPage Pro retains are determined by the settings you select. Refer to the Settings Guidelines in the online Help for more information about selecting settings.
OmniPage Pro only recognizes machine-printed characters such as laser-printed or typewritten text. However, it can retain handwritten text, such as a signature, as a graphic.
8 |
Chapter 2 |

What Is Optical Character Recognition (OCR)?
Basic Steps of OmniPage Pro OCR
These are the basic steps of OmniPage Pro’s OCR process.
1Bring a document image into OmniPage Pro.
You can scan a paper document or load an image file. The resulting image appears in OmniPage Pro’s image view.
2Perform OCR to convert text information into editable text characters.
During OCR, OmniPage Pro creates zones around areas that will be processed, and then interprets text characters or graphics in each zone. After OCR, you can check and correct errors in the document using the OCR Proofreader.
3Export the document to the desired location.
You can save your document to a specified file format, place it on the Clipboard, or send it as a mail attachment. You can also listen to your document before saving it by having OmniPage Pro read the text out loud.
There are different ways to start the OCR process. See “Different Ways to Process Documents” on page 16 for more information.
Introduction to OmniPage Pro |
9 |

The OmniPage Pro Desktop
The OmniPage Pro Desktop
OmniPage Pro’s desktop displays the pages of an open document in its thumbnail view, image view, and text view. You can use the Standard, AutoOCR, Manual OCR, and Image toolbars to perform various tasks on the document, or the OCR Wizard to walk you through the entire process.
Standard toolbar
OmniPage toolbox
The thumbnail view displays a picture of each page in the document.
The current page is highlighted  with a light border around it.
|
|
|
|
|
|
|
|
|
|
|
|
Drag this splitter to the |
||
Image |
||||
left or right to resize a |
||||
toolbar |
||||
|
|
view. |
||
The image view displays the current page’s original image.
The text view displays the current page’s recognized text and retained graphics.
10 |
Chapter 2 |
The OmniPage Pro Desktop
OmniPage Toolbox
The OmniPage Toolbox contains the AutoOCR® toolbar, the Manual OCR toolbar, and the OCR Wizard.
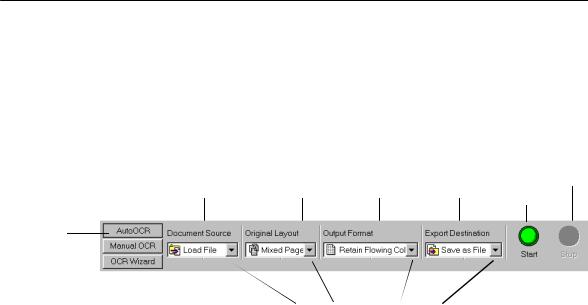
AutoOCR Toolbar
The AutoOCR toolbar contains drop-down lists where you can select process commands, and buttons to start, stop, finish, and continue automatic processing.
Document |
Original |
Output |
Export |
Start, |
Stop |
Source |
Layout |
Format |
Destination |
Finish, |
|
|
|
|
|
Additional |
|
AutoOCR tab
Click the down arrow to display the commands in the drop-down list.
You can set different commands in the AutoOCR toolbar drop-down lists for the operations you want to perform. Click the Start button to process your document from start to finish according to the selected settings and commands.
•The Document Source drop-down list allows you to set how you want OmniPage Pro to retrieve your document. You can bring in images by scanning or loading pages.
•The Original Layout drop-down list allows you to select the setting that describes the appearance of your original document.
•The Output Format drop-down list allows you to select how much of your document’s original formatting you want to keep.
•The Export Destination drop-down list allows you to select whether you want to save, copy, send your recognized document as a mail attachment, or have recognized text read out loud.
Introduction to OmniPage Pro |
11 |
The OmniPage Pro Desktop
Manual OCR tab
Wizard tab
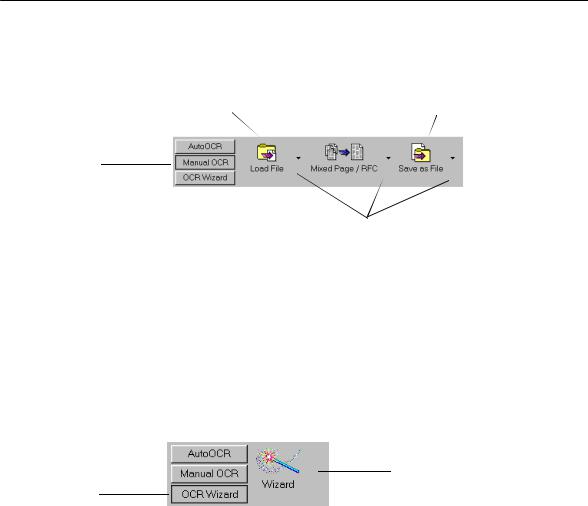
Manual OCR Toolbar
The Manual OCR toolbar contains buttons that can activate each step of the OCR process individually.
Document |
Original Layout |
Export |
||
Source |
& Output Format |
Destination |
||
|
|
|
|
|
|
|
|
|
|
|
|
|
|
|
Click the down arrow to display the commands in a button’s drop-down list.
You can set commands in the Manual OCR toolbar buttons’ drop-down lists for the operations you want to perform. Click each button to process your document step-by-step.
OCR Wizard
The OCR Wizard guides you through the entire OCR process by asking you questions about your document and selecting the appropriate settings for you. Click the OCR Wizard tab in the OmniPage Toolbox to display the Wizard button. Click the button to open the first Wizard screen.
Click the Wizard button to display the first Wizard screen.
12 |
Chapter 2 |
The OmniPage Pro Desktop
Standard Toolbar
The Standard toolbar contains buttons and a drop-down list for performing standard tasks.
New Save Proofread Copy Undo |
Zoom |
||||||||
|
|
OCR |
|
|
|
|
|
|
|
|
|
|
|
|
|
||||
|
|
|
|
|
|
|
|
|
|
|
|
|
|
|
|
|
|
|
|
|
|
|
|
|
|
|
|
|
|
Open |
Cut |
Paste |
Options |
Help |
Image Toolbar
The Image toolbar contains buttons that allow you to work with zones in an image, rotate or straighten an image, or zoom in and zoom out on an image. The Image toolbar can be moved anywhere on the desktop, and docked anywhere within the image view.
|
|
|
|
|
|
|
|
|
|
|
Remove/ |
|
|
||
|
|
|
|
|
|
Move Row |
|
|
Replace All |
|
|
||||
|
|
|
|
|
|
or Column |
|
|
|
Row and |
|
|
|||
Draw |
Add to |
Reorder |
Dividers |
Insert |
|
Column |
Zoom |
||||||||
Rectangular |
Zone |
|
|
Row |
|
Dividers |
Out |
||||||||
Zones |
|
|
|
|
|
|
|||||||||
Zones |
|
|
|
Dividers |
|
Straighten |
|
|
|||||||
|
|
|
|
|
|
||||||||||
|
|
|
|
|
|
|
|
||||||||
|
|
|
|
|
|
|
|
|
|
|
|
Image |
|
|
|
|
|
|
|
|
|
|
|
|
|
|
|
|
|||
|
|
|
|
|
|
|
|
|
|
|
|
|
|
|
|
|
|
|
|
|
|
|
|
|
|
|
|
|
|
|
|
|
|
|
|
|
|
|
|
|
|
|
|
|
|
|
|
|
Zone |
|
Remove |
|
|
|
|
||
Draw |
Subtract Properties |
|
Row or |
|
|
Zoom |
||||||
|
Rotate |
|||||||||||
Irregular |
from |
|
Insert |
Column |
Image |
In |
||||||
Zones |
Zone |
|
Column |
Dividers |
|
|
|
|
||||
Dividers
Introduction to OmniPage Pro |
13 |
14 |
Chapter 2 |
Loading...