Nostalgia Electrics RHM-800 User Manual

Nostalgia Products Group LLC
1471 Partnership Dr.
Green Bay, WI 54304-5685
Visit Us Online at
www.nostalgiaelectrics.com
©2009 Nostalgia Products Group LLC
Rev. 6/18/09

RETRO CHOCOLATE HEAVEN™
RHM-800
FOR HOUSEHOLD USE ONLY
Read These Instructions Before Using This Unit!
Save These Instructions!
POUR UTILISATION PRIVEE UNIQUEMENT
Lire Ces Instructions Avant Utilisation De Cet Appareil!
Conserver Ces Instructions!
SÓLO PARA USO DOMÉSTICO
Lea Las Instrucciones Antes De Usar El Aparato
Conserve Este Manual!

ENGLISH |
1 |
RETRO CHOCOLATE HEAVEN™
FOR HOUSEHOLD USE ONLY
Read These Instructions Before Using This Unit
Save These Instructions!
Appliance Specifications:
120 Volts
70 Watts
60 Hertz
IMPORTANT SAFEGUARDS
When using electrical appliances, basic safety precautions should always be followed, including the following:
1.Read all instructions before operating this appliance.
2.Keep hands and foreign objects out of the metal pot while operating.
3.To protect against electrical shock do not immerse cord, plug, or any part of the main base of this unit in water or other liquids.
4.Close supervision is necessary when any appliance is used by or near children.
5.Unplug from outlet when not in use and before removing parts and before cleaning.
6.DO NOT operate any appliance with a damaged cord or plug or if the appliance has been damaged in any manner. Return the appliance to the nearest repair shop for examination or repair or send back to company as stated in this booklet in the warranty.
7.The appliance manufacturer does not recommend the use of accessory attachments. This may cause injuries.
8.HOUSEHOLD USE ONLY. DO NOT use outdoors.
9.Position this unit near outlet to prevent any hazard of injury due to tripping over cord.
10.Extreme caution must be used when moving this appliance.
11.DO NOT use the appliance for other than its intended use.
12.DO NOT place on or near a hot gas or electric burner or in a heated oven.
13.Keep cord away from any hot surfaces.
14.A unit that is plugged into an outlet should not be left unattended while in operation.
15.Check the RETRO CHOCOLATE HEAVEN™ heating pot for presence of foreign objects prior to use.
16.DO NOT USE HEATING BASE WITHOUT METAL POT. DO NOT HANDLE METAL POT WHILE HOT. LET COOL FOR CLEANING.
17.A short power supply cord is provided to reduce the risk resulting from becoming entangled or tripping over a long cord.
18.Longer detachable power supply cords can be used if care is exercised in their use.
19.The marked electrical rating of an extension cord should be at least as great as the electrical rating of the appliance. Electrical extension cords can be used if care is exercised in their use.
20.This appliance has a polarized plug (one blade is wider than the other). To reduce the risk of shock, this plug is intended to fit into a polarized outlet only one way.
B/ 1 Plastic Dipping
Spoon

ENGLISH |
2 |
IMPORTANT PRECAUTIONS TO REMEMBER
A.NEVER immerse the main base in water.
B.NEVER use near water.
C.NEVER use an abrasive sponge or cloth on the painted exterior of the unit.
D.NEVER use a scouring pad on the painted exterior of the unit.
E.NEVER leave unit unattended while in use.
F.Unplug unit from outlet when not in use and when cleaning.
G.DO NOT operate this appliance with a damaged cord or plug or in the event the appliance ever malfunctions.
I.DO NOT put in dishwasher, microwave or oven.
J.Keep out of reach of children.
K.This appliance is NOT A TOY.
L.This appliance is not intended for use by young children or infirm persons without supervision.
M.Young children should be supervised to ensure that they do not play with this appliance.
MPORTANT FEATURES
Your RETRO CHOCOLATE HEAVEN™ is easy to use and requires no assembly. Enjoy Chocolate Fondue fun with your RETRO CHOCOLATE HEAVEN™. Your kit includes two dipping forks. Enjoy dipping marshmallows, cookies, fruit, and more!
Make candy using the small Chocolate Molds included with your kit. Enjoy hours of fun creating tasty candy pieces or lollypops for sharing as gifts. Your RETRO CHOCOLATE HEAVEN™ kit also includes two ramekins (dessert cups). Follow the instructions in this manual for making chocolate, and you can create a Chocolate dessert cup for your special event. Fill with your favorite ingredients for a special treat.
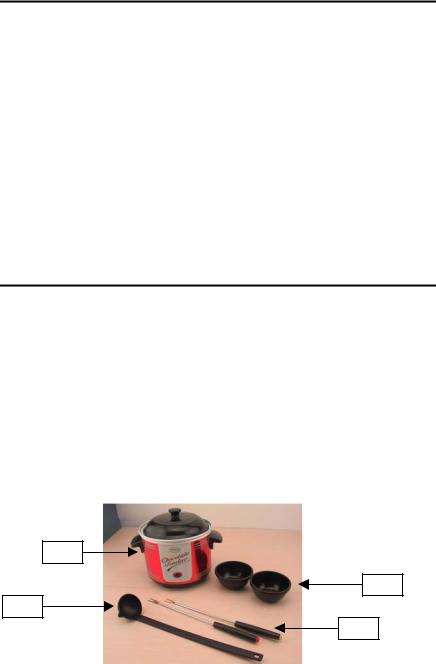
KIT BREAKDOWN
A)Retro Chocolate heaven Unit with Removable Mixing Pot and Lid
B)1 Plastic Dipping Spoon
C)2 Plastic Ramekin Bowls
D)2 Fondue Dipping Forks
E)Plastic Molds (Not Pictured)
A
C
B
D

ENGLISH |
3 |
INSTRUCTIONS FOR USING YOUR RETRO CHOCOLATE HEAVEN™ FOR FONDUE FUN
First, find a stable surface near an electrical outlet before starting. (Make sure your cord is away from any water source. If needed, it is acceptable to use an extension cord.)
1.Plug the unit in. The red power light on the front of the unit should come on.
2.Add 2 tablespoons of oil (vegetable oil, coconut oil, whichever oil you prefer).
3.Add 1-1/2 cups (fill to 3/4 of ceramic pot) of chocolate chips, stir.
4.Place the lid on the unit. Let melt for 5 minutes.
5.Remove lid, and stir.
6.Continue checking and stirring the chips periodically.
7.For best consistency, add more oil, a tablespoon at a time, if necessary.
8.Within 15 to 20 minutes, your chocolate delight should be smooth and creamy, and ready for dipping your favorite snacks.
9.When your fondue session is over, unplug the unit to turn off the power.
10.Let the ceramic pot cool before cleaning.
This is an interactive dessert to be enjoyed with friends and family, ANYTIME!
INSTRUCTIONS FOR USING YOUR RETRO CHOCOLATE HEAVEN™ FOR CANDY MAKING
First, find a stable surface near an electrical outlet before starting. (Make sure your cord is away from any water source. If needed, it is acceptable to use an extension cord.)
A.Plug the unit in. The red power light on the front of the unit should come on.
B.Add 2 tablespoons of oil (vegetable oil, coconut oil, whichever oil you prefer).
C.Add 1-1/2 cups (fill to 3/4 of ceramic pot) of chocolate chips, stir.
D.Place the lid on the unit. Let melt for 5 minutes.
E.Remove lid, and stir.
F.Continue checking and stirring the chips periodically.
G.For best consistency, add more oil, a tablespoon at a time, if necessary.
H.Within 15 to 20 minutes, your chocolate delight should be smooth and creamy, and ready to make candies and lollipops.
I.Choose the mold or molds you wish to use for candy pieces.
J.You can add chopped nuts, mini marshmallows, cherries or whatever you choose, to the mold before adding the melted chocolate.
K.Once you have inserted your additions to the mold, then you can use a spoon filled with chocolate, and carefully fill the molds with melted chocolate.
L.Once filled, let the molds sit until the chocolate has become solid again.
M.When cool and solid, turn the molds upside down over a piece of waxed or parchment paper or a plate and gently press on the mold to remove the candies.

ENGLISH |
4 |
MAKING LOLLIPOPS
Follow instruction above (1 – 10)
Place any addition you choose to the lollipop mold, then lay the lollipop stick in the mold, where there is a notch for the stick.
Using a spoon, filled with chocolate, fill the lollipop mold with chocolate.
Follow instructions 13 & 14 above.
When candy and or lollipop-making session is completed, let the ceramic pot cool before cleaning.
Use your lollypop or candy creation as a small gift at each place setting for your next holiday gathering!
MAKING DESSERT CUPS
1.Follow instructions 1 – 9 in the CANDY MAKING section.
2.Fill the dessert cup mold with the chocolate of your choice using a spoon to fill.
3.Let the dessert cup sit until the chocolate is solid again.
4.Once the dessert cup chocolate is cool and solid, turn the dessert cup over, on a piece of wax paper or a plate, and gently press the mold to remove the chocolate dessert cup.
5.Turn the chocolate dessert cup right side up and fill with your favorite ingredients, such as candy, whipped cream, fruit, and more! You can create the dream dessert cup by adding your favorite ingredients. Create a dessert cup for that someone special by adding their favorite ingredients.
TROUBLESHOOTING
You can use the molds over and over again, creating something more delicious than the last ones. It’s just that easy!
Power light does not come on |
Check electrical plug to insure it is fully and |
OR Chocolate is not melting |
properly plugged in. |
Chocolate is too thick |
Add more oil, only as necessary. Do not thin it out |
|
too much as candies will take a long time to |
|
become solid again. |
CLEANING
Make sure the unit is unplugged before cleaning. Allow metal pot to COOL to the touch.
When entire unit is cool, remove metal pot, remove excess chocolate and dispose in garbage – NOT IN THE SINK.
Wash the metal pot and lid with hot or warm soapy water, rinse thoroughly and dry.
Wipe off the exterior of the painted melting pot unit with a damp non abrasive cloth or sponge, then dry. DO NOT IMMERSE IN WATER!
You’re ready for the next chocolate melting session!
 Loading...