


En
Instruction Manual


 Contents


Before You Begin ............................................................................................. |
2-14 |
Introduction ....................................................................................................... |
4-5 |
Nomenclature/Controls .................................................................................... |
6-14 |
Camera body............................................................................................... |
6-7 |
Top LCD panel ................................................................................................ |
8 |
Viewfinder display........................................................................................... |
9 |
Rear LCD panel (shooting data display) ......................................................... |
10 |
Rear LCD panel (menu display) ..................................................................... |
11 |
Command Dials and operating buttons ................................................... |
12-13 |
Multi-selector................................................................................................ |
14 |
Basic Operation ........................................................................................... |
15-36 |
1. Installing Batteries.................................................................................... |
16-17 |
2. Checking Battery Power .......................................................................... |
18-19 |
3. Mounting a Lens ..................................................................................... |
20-21 |
4. Loading Film and Setting Film Advance Mode ......................................... |
22-23 |
5. Setting Focus Mode, AF Area Mode and Focus Area................................ |
24-25 |
6. Setting Metering System and Exposure Mode.......................................... |
26-27 |
7. Holding the Camera and Focusing........................................................... |
28-29 |
8. Confirming Indications in Viewfinder and Releasing the Shutter .............. |
30-31 |
9. Rewinding the Film.................................................................................. |
32-33 |
Setting Language and Date/Time ................................................................... |
34-36 |
Detailed Operation ..................................................................................... |
37-86 |
Lens Compatibility.......................................................................................... |
36-42 |
CPU Nikkor ................................................................................................... |
38 |
Non-CPU Nikkor ........................................................................................... |
39 |
Using a non-CPU Nikkor lenses..................................................................... |
40 |
Using a non-AI lenses .............................................................................. |
41-42 |
Film ............................................................................................................... |
43-47 |
Aligning frame counter and number of frame on the film/ |
|
Confirming film advance status..................................................................... |
43 |
Setting and confirming film speed ................................................................ |
44 |
Selecting film advance mode ........................................................................ |
45 |
Film rewinding with button operation........................................................... |
46 |
Rewinding film using the film rewind crank .................................................. |
47 |
Autofocus ...................................................................................................... |
48-59 |
Selecting AF Servo ................................................................................... |
48-49 |
Selecting focus area................................................................................. |
50-51 |
Selecting AF Area mode .......................................................................... |
52-53 |
Combinations of AF functions (Single Servo AF: AF-S) ............................. |
54-55 |
Combinations of AF functions (Continuous Servo AF: AF-C) .................... |
56-57 |
Focus lock................................................................................................ |
58-59 |
Situations Where Autofocus May Not Work As Expected .................................... |
60 |
Manual Focus...................................................................................................... |
61 |
Exposure Metering System ............................................................................. |
62-63 |
Shooting in Each Exposure Mode ................................................................... |
64-71 |
Programmed Auto ................................................................................... |
64-65 |
2

Shutter-Priority Auto ................................................................................ |
66-67 |
Aperture-Priority Auto ............................................................................. |
68-69 |
Manual.................................................................................................... |
70-71 |
Auto Exposure Lock ....................................................................................... |
72-73 |
Exposure Compensation...................................................................................... |
74 |
Auto Exposure Bracketing .............................................................................. |
75-79 |
Long Time Exposure ............................................................................................ |
80 |
Diopter Adjustment/LCD Illuminator.................................................................... |
81 |
Self-Timer Operation ........................................................................................... |
82 |
Depth-of-Field Preview/Film Plane Indicator ......................................................... |
83 |
Mirror Up Photography ....................................................................................... |
84 |
Changing Focusing Screens ................................................................................. |
85 |
Self-Diagnostic Shutter System ............................................................................ |
86 |
Menu Guide ............................................................................................... |
87-148 |
Operation in Menu (all menus)....................................................................... |
88-89 |
Custom Setting Menu.................................................................................. |
90-110 |
Setup Menu ............................................................................................... |
111-124 |
Recording Shooting Data ..................................................................... |
112-124 |
Shooting Menu .......................................................................................... |
125-143 |
Imprinting Shooting Data .................................................................... |
126-137 |
Multiple Exposure ................................................................................ |
138-139 |
Interval Timer Photography.................................................................. |
140-143 |
Non-CPU lens............................................................................................. |
144-146 |
Two-Button Reset .............................................................................................. |
147 |
Recorded/imprinted exposure compensation/flash exposure |
|
compensation value .................................................................................... |
148 |
Flash Photography .................................................................................. |
149-163 |
Creative Lighting System ............................................................................ |
150-153 |
Non-CLS supporting Speedlight......................................................................... |
154 |
Non-TTL fash modes ......................................................................................... |
155 |
Accessory shoe.................................................................................................. |
156 |
Sync terminal .................................................................................................... |
156 |
Ready-light........................................................................................................ |
156 |
Flash sync mode......................................................................................... |
157-158 |
Usable optional Speedlights ....................................................................... |
159-161 |
Using Speedlight ........................................................................................ |
162-163 |
About Depth of Field......................................................................................... |
164 |
Miscellaneous .......................................................................................... |
165-191 |
Optional Accessories .................................................................................. |
166-171 |
Camera Care.............................................................................................. |
172-173 |
Notes on Batteries............................................................................................. |
174 |
Troubleshooting ......................................................................................... |
176-180 |
Specifications ............................................................................................. |
181-187 |
Index.......................................................................................................... |
188-191 |
Miscellaneous Flash Photography Menu Guide Detailed Operation Basic Operation Before You Begin
3


 Introduction


Thank you for purchasing the Nikon F6.
Get to know your F6 camera, and be sure to read this manual thoroughly before using it. We recommend that you keep this manual handy.
Main features of the F6:
•Nikon’s exclusive new 11-area autofocus sensor (Multi-CAM2000) system, including 9 cross-type sensors, achieves superior performance in continuous high-speed shooting and enables sharp focus even on erratically moving subjects.
•Exclusive 3D Color Matrix Metering with a 1,005-pixel RGB sensor provides a correct exposure in diverse shooting situations.
•Various settings feature a menu list displayed on the large-sized LCD panel on camera back, Custom Settings feature customized combinations of various functions/modes, and two Command Dials and a multi-selector provide access to more versatile functions.
•Various accessory systems including interchangeable lenses. When used with an optional Nikon Speedlight that features the Creative Lighting System (CLS), new levels of flash performance, including i-TTL, Auto FP High-Speed Sync and Advanced Wireless Lighting, can be achieved.
•Shooting data such as shutter speed, aperture or lens’ focal length can be stored in the camera and saved on a CompactFlash™ (CF) memory card (with the optional Data Reader MV-1).
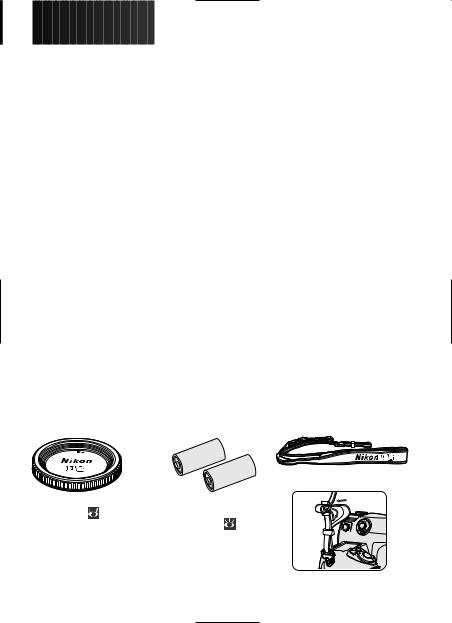
Supplied accessories
Strap*
Body cap ( 21) |
Two 3V lithium |
|
batteries ( 16) |
Attaching strap
* Strap is not supplied in the U.S.A. and Canada.
4

•Take test shots
Before taking pictures on important occasions (for example, at wedding or before taking the camera with you on a trip), take a test shot to ensure that the camera is functioning normally. Nikon will not be held liable for damages or lost profits that may result from product malfunction.
•Have Nikon spot-check your camera regularly
Nikon recommends that you have your camera serviced by an authorized dealer or service center at least once every two years.
•Using your camera correctly
Nikon F6 performance has been optimized for use with Nikon brand accessories. Accessories made by other manufacturers may not meet Nikon’s criteria for specifications, and nonconforming accessories could damage F6 components. Nikon cannot guarantee the performance of the F6 when it is used with anything other than Nikon brand accessories.
Marks used in this manual
This icon indicates cautions, information that should be read before use to prevent damage to the camera.
This icon indicates notes, information that should be read before using the camera.
This icon indicates tips, additional information that may be helpful when using the camera.
This icon indicates that more information is available elsewhere in this manual.
Before You Begin
CSM 00: This icon indicates settings that can be fine-tuned from the Custom Settings menu.
Life-Long Learning
As part of Nikon’s Life-Long Learning commitment to ongoing product support and education, continually-updated information is available on-line at the following sites:
•For users in the U.S.A.: http://www.nikonusa.com/
•For users in Europe: http://www.europe-nikon.com/support
•For users in Asia, Oceania, the Middle East, and Africa: http://www.nikon-asia.com/ Visit these sites to keep up-to-date with the latest product information, tips, answers to
frequently-asked questions (FAQs), and general advice on photography. Additional information may be available from the Nikon representative in your area. See the URL below for contact information:
http://nikonimaging.com/
5


 Nomenclature/Controls


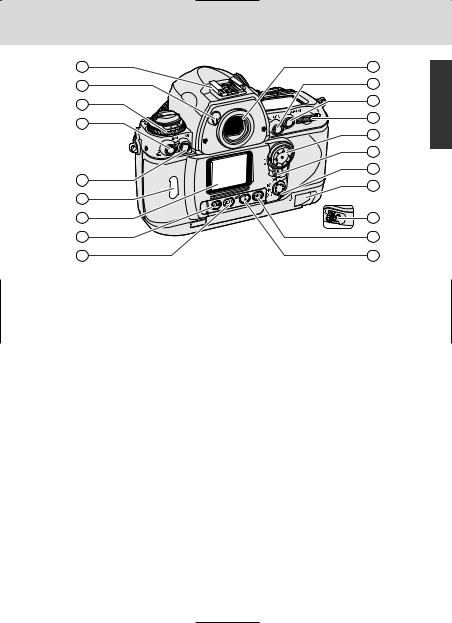
• Camera body
1 |
|
2 |
12 |
3 |
13 |
4 |
14 |
5 |
15 |
6
7
8
9
10
11
6
16
17
18
19
20
21
22
23
6
24
25
26
27
28
29
30
31
32
1 Metering system selector |
|
|
lock release ........................ |
x 26, 62 |
|
2 Diopter adjustment knob.......... |
x |
81 |
3 Metering system selector.... |
x 26, |
62 |
4 Top LCD panel ............................ |
x 8 |
|
5 Exposure mode button ..x 26, 64-71 6 Camera strap eyelet
7 Exposure compensation button
................................................ |
|
|
x 74 |
8 Shutter release button .............. |
|
x 18 |
|
9 Power switch...................... |
|
x 26, 19 |
|
!p Sub-Command Dial |
............. |
x 12-13 |
|
!q Depth-of-field preview button |
..x 83 |
||
!w Film rewind crank ..................... |
|
|
x 47 |
!e Film rewind knob ......... |
|
x 22, 32, 47 |
|
!r Self-timer indicator LED |
............ |
x 82 |
|
!t Film advance mode selector lock |
|||
release ................... |
x 22, 45, 82, 84 |
||
!y Sync terminal.......................... |
|
|
x 156 |
!u 10-pin terminal....................... |
|
|
x 171 |
!i Terminal cap |
|
|
|
!o Lens release button |
.................. |
|
x 20 |
@p Focus mode selector........... |
x 48, 61 |
||
@q Function button ..... |
x 108, 146, 152 |
||
@w Tripod socket .......................... |
|
|
x 187 |
@e Battery holder release knob ...... |
x 16 |
||
|
|
33 |
|
|
|
34 |
|
|
|
35 |
|
|
|
36 |
|
|
|
37 |
|
|
|
38 |
|
|
|
39 |
|
|
|
40 |
|
|
|
41 |
|
|
|
42 |
|
|
|
43 |
|
@r Accessory shoe ....................... |
|
|
x 156 |
@t Eyepiece shutter lever......... |
|
x 81, 82 |
|
@y Film advance mode selector |
|
||
.................................... |
|
x 22, 45, 84 |
|
@u Auto Exposure Bracketing button |
|||
................................................ |
|
|
x 75 |
Film rewind (R2) button |
............ |
x 46 |
|
@i Command lock button ....... |
x 67, 69 |
||
@o Film confirmation window ........ |
x 23 |
||
#p Rear LCD panel......................... |
|
|
x 10 |
#q MENU button............. |
x 11, 88, 147 |
||
#w Film speed (ISO) button |
............ |
x 44 |
|
#e Eyepiece DK-17 ........................ |
|
|
x 81 |
#r AE/AF-L (Auto Exposure/Autofocus |
|||
lock) button ................. |
|
x 58, 72, 99 |
|
#t AF start button................... |
|
x 49, 95 |
|
#y Main-Command Dial ........... |
|
|
x 12-13 |
#u Multi-selector ........................... |
|
|
x 14 |
#i Multi-selector lock lever |
x 24, 51, 88 |
||
.................................... |
|
||
#o AF Area mode selector .x 24, 50, 52 $p Film rewind (R1) button cover
................................................ |
|
x 46 |
|
$q Film rewind (R1) button |
............x 46 |
||
$w INFO button ........... |
x 122, 145, |
147 |
|
$e Flash sync mode button.......... |
x |
157 |
|
Before You Begin
7


 Nomenclature/Controls—continued


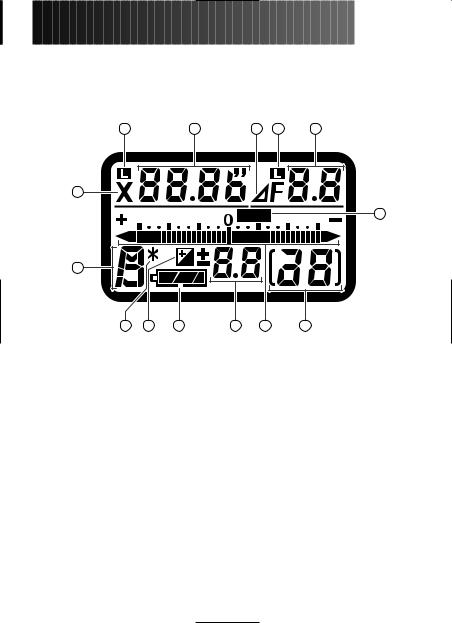
•Top LCD panel
1 |
2 |
3 |
4 |
5 |
6 |
|
|
|
|
|
|
|
|
|
|
8 |
7 |
|
|
|
|
|
9 |
10 |
11 |
12 |
13 |
14 |
1 Shutter speed lock |
....................x 67 |
2 Shutter speed............... |
x 66, 70, 80 |
3 Aperture stop ..................... |
x 21, 40 |
4 Aperture lock ........................... |
x 69 |
5 Aperture............................. |
x 68, 70 |
6 Sync speed ............................. |
x 104 |
7 Exposure mode ............. |
x 26, 64-71 |
8 Auto Exposure Bracketing.........x 75 |
|
9 Flexible program ....................... |
x 64 |
!p Exposure compensation ............ |
x 74 |
!q Battery power........................... |
x 19 |
!w Exposure compensation value... |
x 74 |
!e Electronic analog exposure display |
|
................................................ |
x 71 |
Exposure compensation value |
x 74 |
................................................ |
|
Auto Exposure Bracketing status |
|
................................................ |
x 75 |
!r Frame counter .......................... |
x 22 |
8
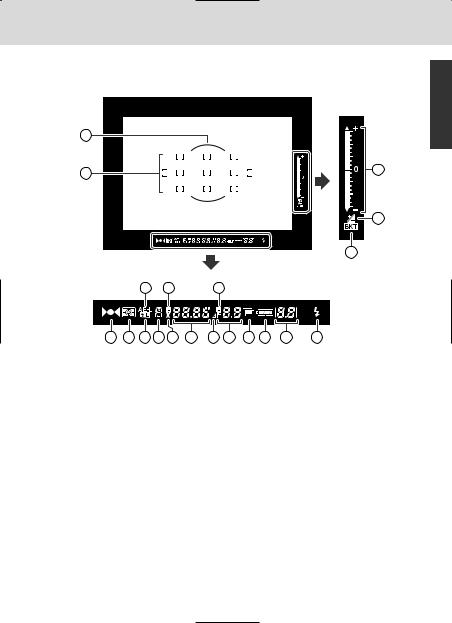
• Viewfinder display
1 |
|
|
|
|
|
|
|
|
|
|
2 |
|
|
|
|
|
|
|
|
|
3 |
|
|
|
|
|
|
|
|
|
|
|
|
|
|
|
|
|
|
|
|
|
4 |
|
|
|
|
|
|
|
|
|
|
5 |
|
|
6 |
7 |
|
8 |
|
|
|
|
|
9 |
10 |
11 12 13 |
14 |
15 |
16 |
17 |
18 |
19 |
20 |
|
Before You Begin
1 12mm-dia. reference circle for Center-Weighted Metering area
................................................ |
x 63 |
2 Focus area (focus brackets) ....... |
x 50 |
Spot Metering area................... |
x 63 |
3 Electronic analog exposure display |
|
................................................ |
x 71 |
Exposure compensation value... |
x 74 |
Auto Exposure Bracketing status |
|
................................................ |
x 75 |
4 Exposure compensation ............ |
x 74 |
5 Auto Exposure Bracketing......... |
x 75 |
6 Auto Exposure Lock.................. |
x 72 |
7 Shutter speed lock.................... |
x 67 |
8 Aperture lock ........................... |
x 69 |
9 Focus indicators.................. |
x 28, 29 |
!p Metering system................. |
x 26, 62 |
!q FV lock ................................... |
x 152 |
!w Exposure mode ............. |
x 26, 64-71 |
!e Sync speed ............................. |
x 104 |
!r Shutter speed............... |
x 66, 70, 80 |
!t Aperture stop ..................... |
x 21, 40 |
!y Aperture............................. |
x 68, 70 |
!u Multiple exposure ................... |
x 138 |
!i Battery power........................... |
x 19 |
!o Frame counter .......................... |
x 22 |
Exposure compensation value...x 74 |
|
@p Flash ready-light ..................... |
x 156 |
9


 Nomenclature/Controls—continued


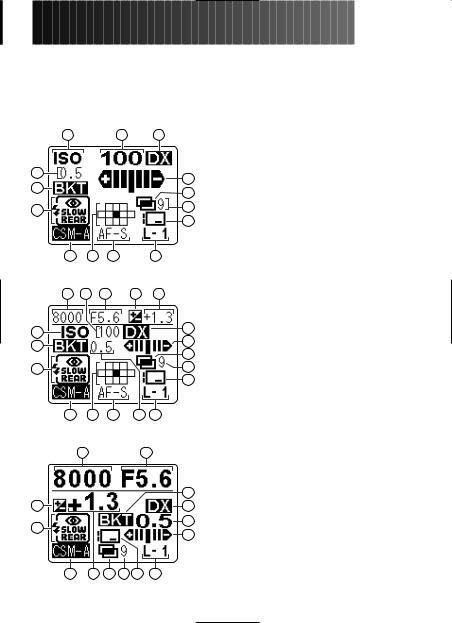
•Rear LCD panel (shooting data displays)
•At the default setting, shooting data is displayed in normal mode. It can be changed to detailed or large display by selecting “Detailed” or “Large” in Custom Setting “d7: Rear panel info” (x 103).
4
5
6
1
5
6
1 |
|
|
2 |
3 |
1 ISO................................................... |
|
x 44 |
|
|
|
|
|
2 Film speed........................................ |
|
x 44 |
|
|
|
|
|
3 DX ................................................... |
|
x 23 |
|
|
|
|
7 |
4 EV steps in Auto Exposure Bracketing |
||
|
|
|
|
........................................................ |
|
x 75 |
|
|
|
|
|
8 |
5 Auto Exposure Bracketing ................ |
|
x 75 |
|
|
|
|
9 |
6 Flash sync mode............................. |
|
x 157 |
|
|
|
|
10 |
7 Auto Exposure Bracketing status |
......x 75 |
|
|
|
|
|
|
8 Multiple exposures ......................... |
|
x 138 |
|
|
|
|
|
9 Number of shots in multiple exposure |
||
11 |
12 |
13 |
|
14 |
...................................................... |
|
x 138 |
|
Normal display |
|
!p Data imprint........................... |
x 128, 133 |
|||
|
|
|
|
|
!q Custom Setting ................................ |
|
x 91 |
15 |
2 |
16 |
17 |
18 |
!w Focus area........................................ |
|
x 50 |
|
|
|
|
|
!e AF servo mode ................................. |
|
x 48 |
|
|
|
|
3 |
!r Lens number .................................. |
|
x 145 |
|
|
|
|
!t Shutter speed |
x |
66, 70, 80 |
|
|
|
|
|
7 |
|||
|
|
|
|
!y Aperture |
|
x 68, 70 |
|
|
|
|
|
8 |
|
||
|
|
|
|
!u Exposure compensation |
|
x 74 |
|
|
|
|
|
9 |
|
||
|
|
|
|
!i Exposure compensation value |
x 74 |
||
|
|
|
|
10 |
|||
|
|
|
|
|
|
|
|
11 12 13
Detailed display
15 |
16 |
17
6
11 18 8 9 10 14
Large display
10
•Rear LCD panel (menu displays)
•Press the MENU button (if shooting data is displayed) to display the MENU. The
shooting data is displayed by pressing the MENU button again.
•Five types of menu—Custom Setting, Setup, Shooting, Non-CPU lens and Language—are available with the F6.
• Custom Setting menu (x 90)
• Setup menu (x 111)
•Shooting menu (x 125)
•Non-CPU lens (x 144)
•Language (x 34)
Before You Begin
11


 Nomenclature/Controls—continued
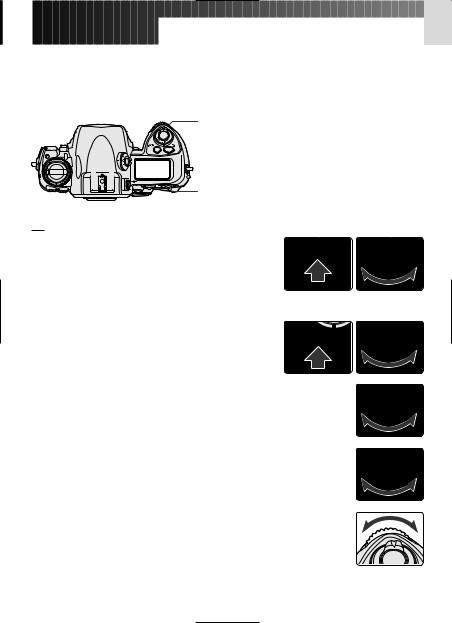
•Command Dials and operating buttons
•The F6’s Mainand Sub-Command Dials can be used alone or in combination with
other buttons to select and set various functions and modes.
Sub-Command Dial
Main-Command Dial
• Film
• Setting ISO film speed (x 44)
• Exposure
• Selecting exposure mode (x 26, 64-71)
• Performing Flexible Program in Programmed Auto
exposure mode (x 64)
• Setting the shutter speed in Shutter-Priority Auto or Manual exposure mode*1 (x 66, 70)
•Setting the aperture in Aperture-Priority Auto or Manual exposure mode*1 (x 68, 70)
12
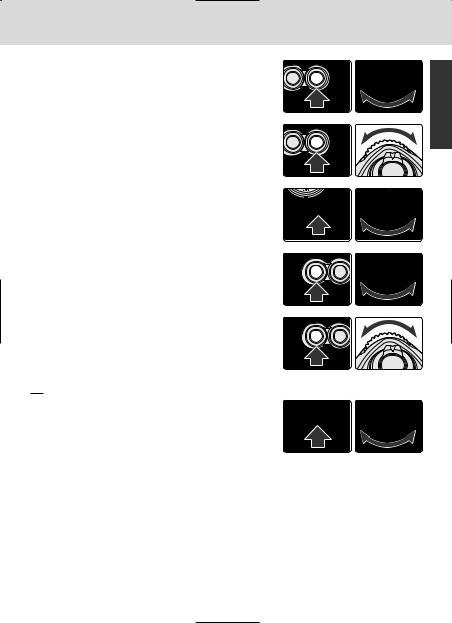
• Locking/unlocking shutter speed*1 (x 67, 70)
• Locking/unlocking aperture*1 (x 69, 70)
• Setting exposure compensation value*2 (x 74)
• Setting the number of shots in Auto Exposure Bracketing*3 (x 75)
• Setting an EV compensation value in Auto Exposure Bracketing*3 (x 75)
• Flash
• Selecting flash sync mode (x 157)
*1 CSM f4: The shutter speed can be set to change with the SubDial and the aperture with the Main-Command Dial (x 109).
*2 CSM b3: Exposure compensation can be set to be activated or Sub-Command Dial without having to press the exposure button (x 97).
*3 CSM e8: Auto Exposure Bracketing can be set to turn on/off Command Dial, while the Sub-Command Dial can be used to number of shots and EV compensation value (x 106).
Before You Begin
13

Nomenclature/Controls—continued


• Multi-selector
•Use the multi-selector to select focus area (x 50), operate menu (x 88), or display shooting data (x 122).
• When “Activate meter” is selected in Custom Setting “f2: Multi selector”, exposure meter can be activated with the multi-selector (when exposure meter is off) (x 107). (Or, by selecting “Initiate AF”, Autofocus can be activated.)
• Focus area selection
P (Top) |
: Select top focus area or focus area group*1 |
{ (Bottom) : Select bottom focus area or focus area group*1 |
|
> (Right) |
: Select right focus area or focus area group*1 |
< (Left) |
: Select left focus area or focus area group*1 |
U (Center) |
: Select center focus area or focus area group*2 |
• Menu operation |
|
P (Top) |
: Select option item or set option such as a number*3 |
{ (Bottom) : Select option item or set option such as a number*3 |
|
> (Right) |
: Set selection or go to next page*3 |
< (Left) |
: Cancel selection or go back one page*3 |
U (Center) |
: Set or go to next page*3 |
• Shooting data display |
|
P (Top) |
: Display film number or frame data |
{ (Bottom) : Display film number or frame data |
|
> (Right) |
: Set film number or go back to film number selection display |
< (Left) |
: Go back to shooting data display or film number selection display |
*1 CSM a6: Focus area position can be set to change continuously in the same horizontal or vertical direction. With this option, the focus area can be switched to the opposite position without pressing the opposite position on the multi-selector (x 96).
*2 CSM f1: Your selected focus area can be set to be highlighted when the center of the multi-selector is pressed. Also, any operation can be canceled when the center of the multi-selector is pressed (x 107).
*3 CSM f4: You can also activate menu operation with the Command Dials (x 110).
14

Basic Operation


 Basic Operation
Shooting modes/functions explained in this section are as follows:
Lens attached |
G/D-type AF Nikkor |
x 20 |
Film speed |
s |
x 23 |
Film advance mode |
S (Single frame) |
x 22 |
Focus mode |
S (Single Servo AF) |
x 24 |
AF area mode |
g (Single Area AF) |
x 24 |
Exposure metering |
” (3D Color Matrix Metering) x 26 |
|
Exposure mode |
¡ (Programmed Auto) |
x 26 |
Custom Setting |
Initial (default) settings |
x 90 |
|
|
|
15


 1.
1.
 Installing
 Batteries


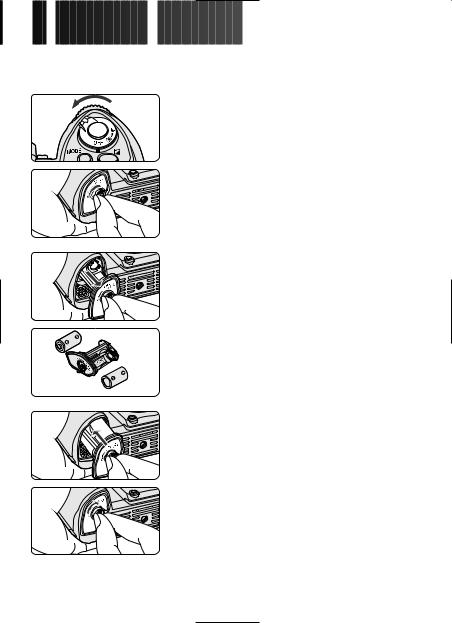
Use two 3V lithium batteries.
1 Turn the power switch off, then turn the battery holder (MS-41) release knob toward the ◊ icon to release the lock.
• When replacing batteries, be sure to turn the power switch off and replace both batteries at the same time. Always use fresh batteries of the same brand and type.
2Remove the battery holder and insert two
3V lithium batteries with the “+” and “–” ends positioned as marked on the battery holder.
• Incorrect positioning of the batteries’ + and – poles may damage the camera.
3 Return battery holder to the battery chamber and turn the battery holder release knob away from the ◊ icon to lock the holder.
16

 Note on storing batteries
Keep the batteries out of children’s reach. If swallowed, contact a doctor immediately. (For “Notes on Batteries”, x 174.)
 Backup battery
The F6 is equipped with a built-in backup battery for the camera’s clock. This charges in approximately 48 hours when 3 V lithium or the optional Multi Power Battery Pack MB-40 (x 166) is supplying power to the F6. When the built-in battery is fully charged, it is able to supply the F6’s built-in clock with power for approx. 4 months.
 When camera’s built-in clock has been reset
When power installed for the BEEN RESET. panel (the display or Command (x 35).
•The camera functions normally without setting the date and time cannot be recorded (date and time) (x 112) or imprinted
and time) (x 126) correctly and interval timer (x 140) cannot correctly.
•If the camera power switch is turned on after the clock data has and time start from 2004, January 1st, 0 hour 0 minute. If date unset, the clock data will be lost every time the power switch is
For number of film rolls that can be shot with fresh 185.
 Power source other than 3V lithium batteries
Eight AA-type batteries or optional Rechargeable Li-ion Batteries optional Battery Chamber Cover BL-3) can be used to power the Multi Power Battery Pack MB-40 (x 166) attached.
 We recommend that you take spare batteries with you, traveling.
Basic Operation
17


 2.
2.
 Checking
 Battery
 Power
Power


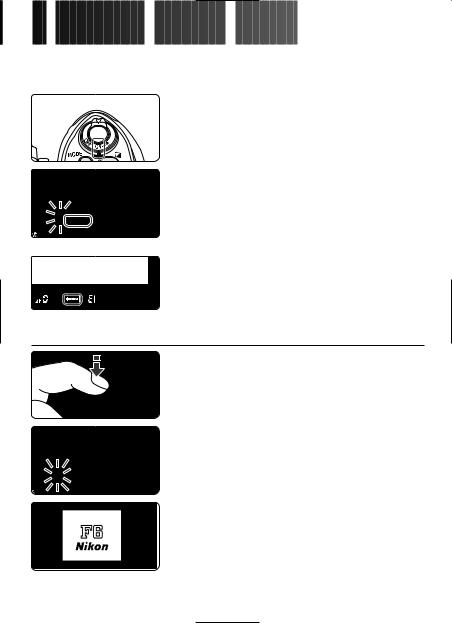
Battery power can be checked in the top LCD panel and viewfinder.
 1
1
Top LCD panel
Viewfinder
Turn the power switch on and confirm battery power with the N indication.
•If N appears, battery power is sufficient. If any other indication appears, see table on the next page.
•When the power switch is turned on, exposure meter turns on.
• Shutter release button operation and exposure meter
• Some indicators in the top and rear LCD panels and all indicators in the viewfinder turn off after approx. 8 sec. if the power switch is turned on and no operation is performed (exposure meter off). To reactivate the indicators (exposure meter on), lightly press the shutter release button.
• “F6 Nikon” is displayed in the rear LCD panel when exposure meter is off under following conditions:
- Film speed: s
- AF area mode: g (Single Area AF) - Focus area: center
-Exposure mode: ¡ (Programmed Auto)
-Exposure compensation: 00 (no compensation)
- Auto Exposure Bracketing: no setting - Data imprint: no setting (all off)
- Flash sync mode: Front-Curtain Sync
CSM c4: It is possible to change the duration before automatic meter switch-off occurs (x 100).
18

 Indications and battery status
Battery indications and corresponding battery power status are as follows:
Top LCD panel |
Viewfinder |
Battery status |
(Camera’s meter on) |
||
(appears) |
(appears) |
Sufficient battery power. |
|
||
|
|
|
(appears) |
(appears) |
Battery power has begun to decline. |
|
||
|
|
|
|
|
Batteries are nearing exhaustion. Have a fresh |
(appears) |
(appears) |
set ready. |
|
|
|
|
|
Batteries are exhausted. Replace batteries. |
(blinks) |
(blinks) |
(Shutter locks and rear LCD panel turns off.) |
|
||
|
|
|
•Battery life depends on the battery brand and temperatures. Low battery power indication M appears or blinks relatively soon at low temperatures. However, battery power may recover and the indication returns to ˜ or N when the temperature returns to normal.
 Indications when the camera
When the power switch is turned off installed), only the frame counter is LCD panel.
Basic Operation
 For setting language and date,
•Set language (x 34) for rear LCD panel displays. In Spanish, French, Chinese (simplified) and Japanese are
•Set date and time (x 35) for recording/imprinting Interval Timer photography (x 140).
19


 3.
3.
 Mounting
 a
a
 Lens
Lens


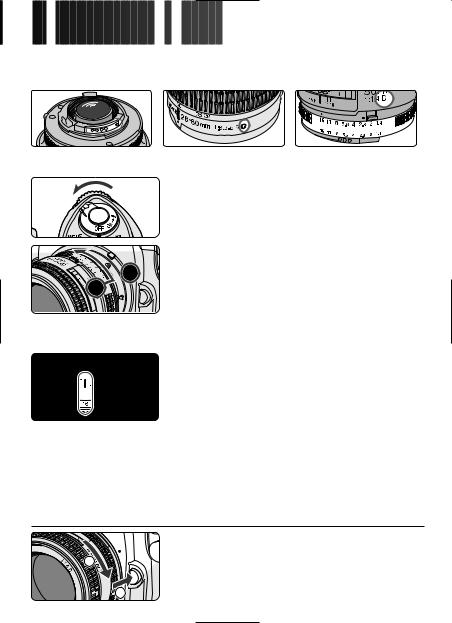
Nikon recommends using a G- or D-type CPU lens to take full advantage of the features the camera offers.
CPU Nikkor lenses have |
G-type Nikkor lens |
D-type Nikkor lens |
CPU contacts |
|
|
1 Turn the power switch off.
• Turn the power switch off before mounting or detaching lenses.
2Mount the lens to the camera body.
• Position lens in the camera’s bayonet mount so that the mounting indexes on the lens and camera body are aligned, then twist the lens counterclockwise until it locks into place.
• Be sure not to touch the lens release button.
 3
3
• Detaching the lens
Lock aperture at the minimum setting.
•With a CPU Nikkor lens other than G-type, set the lens to its minimum aperture (smallest f/stop) and lock. When a CPU Nikkor lens other than G-type is not set to its smallest aperture setting and the power switch is turned on, ƒEE will blink in the top LCD panel and viewfinder and the shutter cannot be released.
•G-type Nikkor lenses have no aperture ring. Unlike other CPU Nikkor lenses, aperture does not need to be set to minimum.


 1
1
20
 Attaching/detaching the lens
•Make sure to turn the power switch off before attaching/detaching the lens.
•Avoid direct sunlight when attaching/detaching the lens.
 When camera is left unattended without a lens
If you leave the camera unattended without a lens attached, be sure to attach the supplied body cap (x 4), or optional body cap BF-1A. (BF-1 body cap cannot be used.)
 For details on lens compatibility, see page 38.
 Non-CPU Nikkor lens
With a non-CPU Nikkor lens attached, the aperture indication shows the number of EV steps from the maximum aperture (e.g. ∂2: two steps from the maximum aperture). However, by specifying the focal length and maximum aperture using ”specifying lens data“ (x 144), functions available with a CPU lens, such as aperture indication or Color Matrix Metering, can be used. Non-AI lenses cannot be attached without modification; see page 41 before attaching a non-AI lens.
Basic Operation
21


 4.
4.
 Loading
 Film
Film
 and
and Setting
 Film
Film Advance
 Mode
Mode

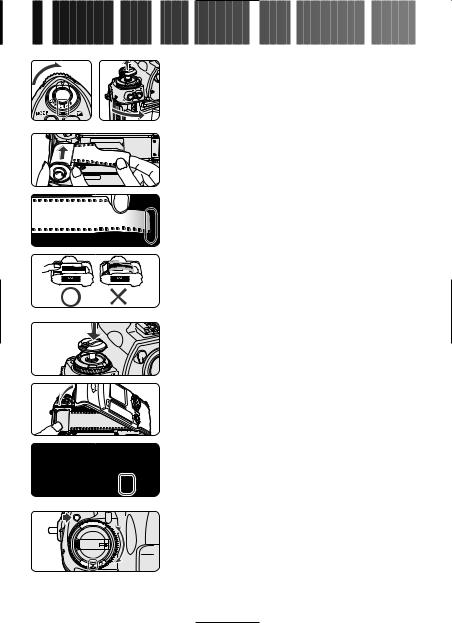
1 Turn the power switch on and lift the film rewind knob. The camera back will pop open.
and pull film leader out as far as index mark.
cartridge can be loaded smoothly if from the top.
sure to insert the film cartridge all the
• Make sure to align the film leader to the red index mark; if the film leader is not properly aligned to the index mark (short of or beyond the mark), film may not load properly.
• Hold the film cartridge down to ensure that the film is properly positioned with no slack.
3 Press the film rewind knob down to its original position and gently close camera back until it locks. Film automatically advances to the first frame.
• When 1 appears on the top LCD panel, the film has advanced to the first frame.
• If Err and E blink in the top LCD panel and viewfinder, and “FILM LOAD ERROR” is displayed in the rear LCD panel, the film is not properly installed. Open the camera back again and reload film.
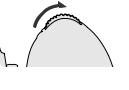
4Set the film advance mode selector to S (single-frame shooting) while pressing the  film advance mode selector lock release.
22
 Loading/removing film
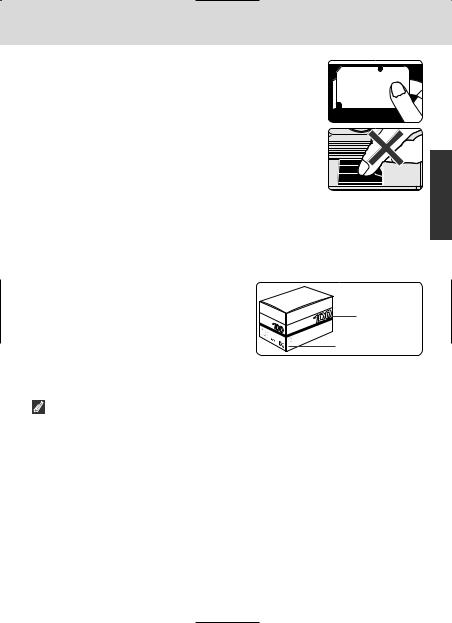
•When loading film for the first time, remove the shutter curtain’s protective cover .
•Shutter curtains are very thin. Do not touch the shutter curtains with your finger or the film leader.
•Avoid direct sunlight when changing film.
 Film slack
Do not turn the film rewind crank to reduce film slack, because may come off and film will not advance properly. It could also curtain.
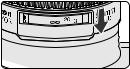
 DX-coded film
When the camera’s film speed is set to s and DX-coded film is loaded, film speed will be set automatically (ISO 25-5000). When a non-DX-
coded film is loaded with the camera film speed set to s, Err blinks in the top LCD panel and viewfinder and “DX ERR” is
displayed in the rear LCD panel, and the shutter locks. In this case, set film speed manually (x 44).
You can check the number of available exposures on the film cartridge confirmation window.
 Film rewind knob
No lock is available for the film rewind knob on this camera. accidentally open the camera back.
 For details on film advance mode, see page 45.
CSM d1: Camera can be set to advance the film
frame by pressing the shutter release button (x 101).
ISO
(film speed)
DX mark
Basic Operation
23


 5.
5.
 Set
Set Focus
Focus
 Mode,
Mode,
 AF
AF
 Area
Area Mode
Mode
 and
and
 Focus
Focus Area
Area

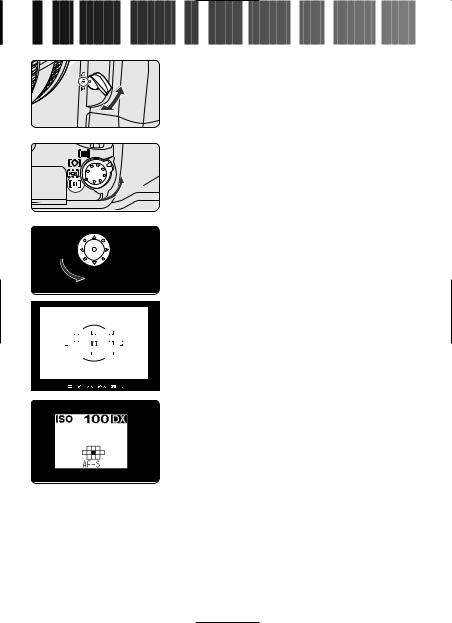
1 Set the focus mode selector to S (Single Servo AF).
• Make sure the focus mode selector clicks properly into position.
2Set the AF Area mode selector to g.
• In Single Area AF mode, you can select your desired focus area from 11 possible choices (x 52).
3 Rotate the multi-selector lock lever to release the lock and select the center focus area with the multi-selector.
• Lightly press the shutter release button and press the multi-selector up/down/right/left to shift the focus area in your desired direction. (Press the center of the multi-selector to select center focus area.)
• The selected focus area will be highlighted in the rear LCD panel (in normal and detailed display) and indicated in red in the viewfinder.
In normal display
24

 Focus mode set to S or C
Do not attempt to rotate the lens focus ring manually while the focus mode is set to S or C, unless the lens is an AF-S or AF-I type AF Nikkor and is set to M/A mode.
 For situations where autofocus may not work as expected, see page 60.
 Characteristics of AF Area modes
|
AF Area mode |
Characteristic |
|
g Single Area AF Mode |
Focus is obtained at your selected focus area out |
||
of 11 possible choices. |
|||
|
|
||
|
|
|
|
|
|
You designate the primary sensor (the first to |
|
|
|
detect the subject), then if the detected subject |
|
h |
Dynamic AF Mode |
moves, Dynamic AF automatically shifts to the |
|
next sensor that detects the subject, following it |
|||
|
|
||
|
|
by shifting among a progression of sensors as |
|
|
|
the subject moves. |
|
|
|
|
|
|
|
A group of neighboring focus areas at the |
|
|
Group Dynamic AF |
center, top, bottom, left and right areas of the |
|
f |
frame can be selected. Group Dynamic AF Mode |
||
|
Mode |
automatically maintains a focus on the subject |
|
|
|
located closest to one of the focus areas within a |
|
|
|
group. |
|
|
|
|
|
|
Dynamic AF Mode |
Automatically selects one of 11 focus areas in |
|
|
which the closest subject is located. If the subject |
||
jwith Closest-Subject moves from the selected focus area, the camera
Priority |
will automatically focus on the subject using data |
|
from the other focus areas. |
For details regarding focus mode, focus area and AF Area mode, see pages 48-61.
Basic Operation
25


 6.
6.
 Setting
 Metering
 System
 and
and
 Exposure
 Mode
Mode

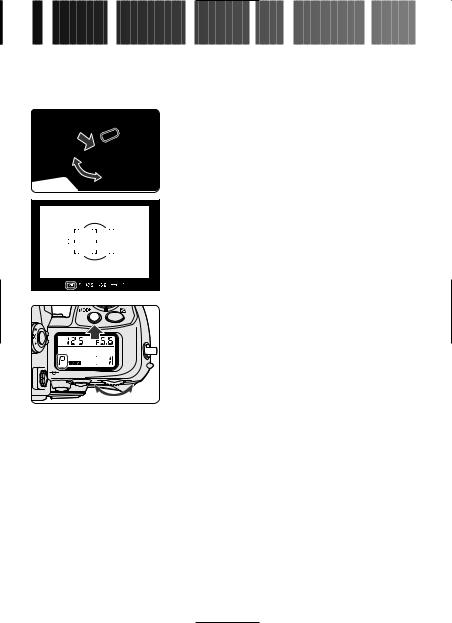
Set metering system to ” (3D Color Matrix Metering) and exposure mode to ¡ (Programmed Auto).
Set the metering system selector to ” Metering) while pressing the
metering system selector lock release.
Matrix Metering indication q appears in viewfinder.
Exposure data from the 1,005-pixel RGB sensor, well as scene brightness, contrast, subject distance (Distance Information) and the scene’s
are accounted for in order to provide an accurate exposure in 3D Color Matrix Metering
62).
2Rotate the Main-Command Dial while pressing the exposure mode button to set the exposure mode to ¡ (Programmed Auto).
• When the shutter release button is lightly pressed, the correct shutter speed and aperture—as automatically determined by the camera—appear in the top and rear (in large and detailed display) LCD panel and viewfinder.
26

 Metering Systems
Since brightness and film sensitivity determine the proper combination of shutter speed and aperture for correct exposure, measuring subject brightness is very important.
The F6 provides three metering systems. With Matrix Metering (x 62), brightness data is detected using the 1,005-pixel Matrix sensor. With Center-Weighted Metering (x 63), brightness is detected in the central area of the viewfinder. With Spot Metering (x 63), sensitivity is concentrated in one of the 11 available focus areas.
 Exposure
Light from the subject passes through the lens and exposes the film. Shutter speed and aperture control how much light reaches the film. The correct combination of shutter speed and aperture results in a correct exposure—a result provided by the F6’s four exposure modes: Programmed Auto, Shutter-Priority Auto, Aperture-Priority Auto and Manual.
 Characteristics of exposure modes
Symbol Exposure mode Shooting situations
Camera controls shutter speed and aperture
¡Programmed automatically, while allowing you to make other Auto P. 64 settings, such as Flexible Program (x 64) or
|
|
exposure compensation (x 74). |
|
|
|
|
|
™ |
Shutter-Priority |
You set your desired shutter speed, and the camera |
|
selects the correct aperture. Allows you to “freeze” |
|||
Auto P. 66 |
|||
|
|
the motion of a moving subject using a fast shutter |
|
|
|
speed or blur the subject using a slower speed. |
|
|
|
|
|
|
|
You set the desired aperture, and the camera |
|
|
|
selects the correct shutter speed. This lets you |
£Aperture-Priority determine the depth of the in-focus area (x 164), Auto P. 68 so you can choose whether near or distant subjects
are in sharp focus, or whether foreground or background should be blurred.
¢ |
Manual P. 70 |
Shutter speed and aperture are set manually. Long |
|
Time Exposure (Bulb) can also be selected. |
|||
|
|
Basic Operation
27


 7.
7.
 Holding
 the
the
 Camera
 and
and
 Focusing


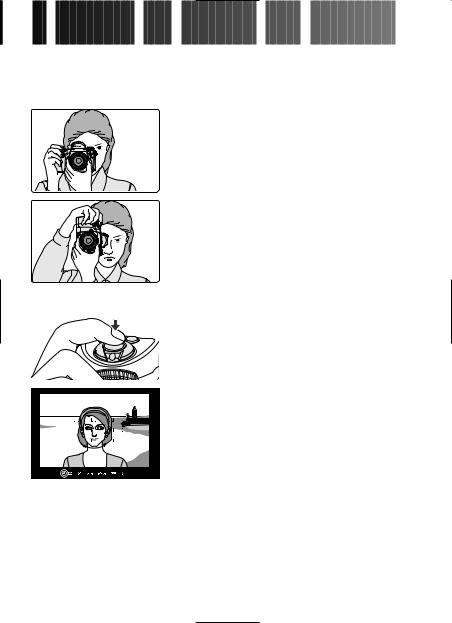
Lightly pressing the shutter release button automatically focuses the camera on the subject.
1
 2
2
Hold the camera properly.
•Keep your elbow propped against your body for support.
•Stand with one foot a half step forward keeping your upper body as still as possible.
•Use your right hand to grasp the camera handgrip and your left hand to cradle the lens.
Compose your shot.
•Center the focus brackets on your subject and lightly press the shutter release button.
•Lightly pressing the shutter release button automatically focuses the camera on the subject (focus brackets flicker momentarily) and when the subject is in focus, / appears in the viewfinder.
28

 Camera shake
Camera shake is likely to occur when the camera is not held steadily and/or when using a slow shutter speed. In general, you should set the shutter speed faster than ‘1/focal length of your lens sec. (Example: when using a 50mm lens, set the shutter speed faster than 1/50 sec.) Use of a tripod or VR lens is recommended for shooting at slower shutter speeds.
 Composing frame
The F6’s viewfinder frame shows approximately 100% of the image actually exposed on the film frame. Please be aware that most processing labs partially crop the edges of film.
 Focus indications
•Focus indicators appear or blink as follows:
/appears: Subject is in focus.
< appears: |
Camera is focused on an area between the camera and the |
|
subject. |
> appears: |
Camera is focused on an area behind the subject. |
? blinks: |
Unable to focus using autofocus. |
Diopter adjustment (x 81) enables you to see more clearly through the viewfinder.
To take a picture of a subject outside the focus area use focus lock (x 58).
 In situations where autofocus may not work as expected, x 60.
 Multi Power Battery Pack MB-40
Multi Power Battery Pack MB-40 (optional, x 166) features a shutter release button for shooting in vertical position.
CSM a4: Autofocus detection can be set to start by pressing the AF start button (rather than lightly pressing the shutter release button) (x 95).
Basic Operation
29
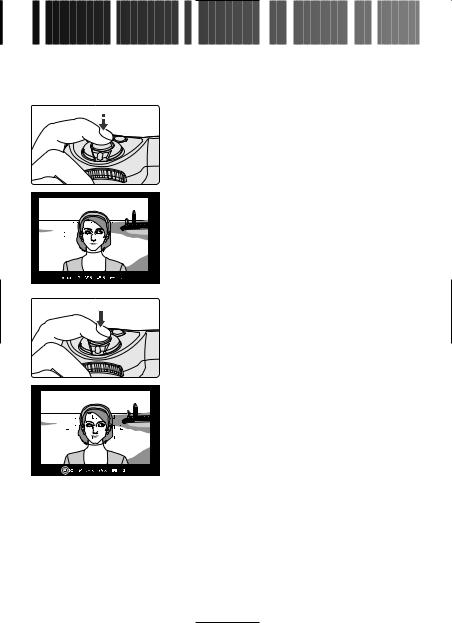


 8.
8. Confirming
 Indications
 in
in Viewfinder
 and
and Releasing
 the
the Shutter

Confirm that / (in-focus indicator) appears in the viewfinder, then slowly, fully depress the shutter release button.
viewfinder while button. shown in 1/3
in the LCD
/ appears and release button. the film
the next frame and
30
 Loading...