


 Loading...
ReadyNAS Pro
Business Edition User
Guide
NETGEAR, Inc.
350 E Plumeria Drive
San Jose, CA 95134 USA
202-10406-01
v1.3
November 2008

© 2008 by NETGEAR, Inc. All rights reserved.
Technical Support
Registration on the website or over the phone is required before you can use our telephone support service. The phone numbers for worldwide regional customer support centers are on the Warranty and Support Information card that came with your product.
Go to http://kbserver.netgear.com for product updates and Web support.
Trademarks
NETGEAR, the NETGEAR logo, ReadyNAS, X-RAID, X-RAID2, FrontView, RAIDar, RAIDiator, Network Storage Processor, and NSP are trademarks or registered trademarks of NETGEAR, Inc. Microsoft, Windows, Windows NT and Vista are registered trademarks of Microsoft Corporation. Other brand and product names are registered trademarks or trademarks of their respective holders.
Statement of Conditions
In the interest of improving internal design, operational function, and/or reliability, NETGEAR reserves the right to make changes to the products described in this document without notice.
NETGEAR does not assume any liability that may occur due to the use or application of the product(s) or circuit layout(s) described herein.
Certificate of the Manufacturer/Importer
It is hereby certified that the ReadyNAS Pro Network Attached Storage System Business Edition has been suppressed in accordance with the conditions set out in the BMPT-AmtsblVfg 243/1991 and Vfg 46/1992. The operation of some equipment (for example, test transmitters) in accordance with the regulations may, however, be subject to certain restrictions. Please refer to the notes in the operating instructions.
The Federal Office for Telecommunications Approvals has been notified of the placing of this equipment on the market and has been granted the right to test the series for compliance with the regulations.
Bestätigung des Herstellers/Importeurs
Es wird hiermit bestätigt, daß dasReadyNAS Pro Network Attached Storage System Business Edition gemäß der im BMPT-AmtsblVfg 243/1991 und Vfg 46/1992 aufgeführten Bestimmungen entstört ist. Das vorschriftsmäßige Betreiben einiger Geräte (z.B. Testsender) kann jedoch gewissen Beschränkungen unterliegen. Lesen Sie dazu bitte die Anmerkungen in der Betriebsanleitung.
Das Bundesamt für Zulassungen in der Telekommunikation wurde davon unterrichtet, daß dieses Gerät auf den Markt gebracht wurde und es ist berechtigt, die Serie auf die Erfüllung der Vorschriften hin zu überprüfen.
Voluntary Control Council for Interference (VCCI) Statement
This equipment is in the Class B category (information equipment to be used in a residential area or an adjacent area thereto) and conforms to the standards set by the Voluntary Control Council for Interference by Data Processing Equipment and Electronic Office Machines aimed at preventing radio interference in such residential areas. When used near a radio or TV receiver, it may become the cause of radio interference. Read instructions for correct handling.
ii
v1.3, November 2008

Product and Publication Details
Model Number: |
|
Publication Date: |
November 2008 |
Product Family: |
Network Storage |
Product Name: |
ReadyNAS Pro Network Attached Storage System Business Edition |
Home or Business Product: |
Business |
Language: |
English |
Publication Part Number: |
202-10406-01 |
Publication Version Number: |
1.3 |
iii
v1.3, November 2008

iv
v1.3, November 2008

Contents
About This Manual |
|
Conventions, Formats, and Scope ................................................................................... |
ix |
How to Use This Manual ................................................................................................... |
x |
How to Print This Manual .................................................................................................. |
x |
Revision History ................................................................................................................ |
xi |
Chapter 1 |
|
Getting Acquainted |
|
What is the ReadyNAS Pro? .......................................................................................... |
1-1 |
What Are the Benefits of X-RAID and X-RAID2? ........................................................... |
1-2 |
X-RAID Is Expandable RAID .................................................................................... |
1-2 |
X-RAID2 Is Even More Flexible ............................................................................... |
1-3 |
Introducing the Status Displays, Ports, and Drive Bay ................................................... |
1-4 |
Front and Side Panel ............................................................................................... |
1-4 |
Drive Bay .................................................................................................................. |
1-5 |
Rear Panel ............................................................................................................... |
1-6 |
Choosing a Location for a ReadyNAS Pro ..................................................................... |
1-7 |
Initial Setup ..................................................................................................................... |
1-7 |
Default IP Address, Login Name, and Password ..................................................... |
1-8 |
The RAIDar Setup Utility ................................................................................................ |
1-8 |
The FrontView Management Console ............................................................................ |
1-9 |
NETGEAR ReadyNAS Community .............................................................................. |
1-10 |
Chapter 2 |
|
Setting Up and Managing Your ReadyNAS Pro |
|
Customizing Network Settings ........................................................................................ |
2-1 |
Ethernet Interfaces ................................................................................................... |
2-2 |
Global Network Settings ........................................................................................... |
2-5 |
WINS ........................................................................................................................ |
2-6 |
DHCP ....................................................................................................................... |
2-7 |
Route: A Manual Routing Table ............................................................................... |
2-7 |
v
v1.3, November 2008

Updating the Admin Password ....................................................................................... |
2-8 |
Selecting Services for Share Access .............................................................................. |
2-9 |
Standard File Protocols ............................................................................................ |
2-9 |
Streaming Services ................................................................................................ |
2-11 |
Discovery Services ................................................................................................. |
2-12 |
Understanding Volume Management ........................................................................... |
2-12 |
Overview of RAID Levels and X-RAID2 ................................................................. |
2-13 |
Volume Management for Flex-RAID ...................................................................... |
2-15 |
Volume Management for X-RAID2 ......................................................................... |
2-18 |
Volume Maintenance .............................................................................................. |
2-19 |
Changing between X-RAID2 and Flex-RAID Modes .............................................. |
2-20 |
Working with USB Volumes ................................................................................... |
2-20 |
Setting Up Printers ....................................................................................................... |
2-22 |
Print Shares over CIFS/SMB ................................................................................. |
2-22 |
IPP Printing ............................................................................................................ |
2-22 |
Managing Print Queues ......................................................................................... |
2-23 |
Adjusting System Settings ............................................................................................ |
2-24 |
Clock, System Time, and NTP Options .................................................................. |
2-24 |
Alerts, Alert Contacts, Alert Settings, SNMP, and SMTP ....................................... |
2-25 |
Language Settings ................................................................................................. |
2-27 |
Updating ReadyNAS Pro Business Edition ............................................................ |
2-28 |
Configuration Backup ................................................................................................... |
2-31 |
Chapter 3 |
|
Managing User Access |
|
Understanding Disk Share Security Access Modes ....................................................... |
3-2 |
User Security Mode .................................................................................................. |
3-3 |
Domain Security Mode ............................................................................................. |
3-4 |
Setting Up User and Group Accounts ............................................................................ |
3-5 |
Changing User Passwords ............................................................................................. |
3-9 |
Managing Your Shares ................................................................................................. |
3-10 |
Adding Shares ........................................................................................................ |
3-11 |
Managing Shares ................................................................................................... |
3-11 |
Web Browser ................................................................................................................ |
3-16 |
FTP/FTPS ..................................................................................................................... |
3-18 |
Rsync ............................................................................................................................ |
3-19 |
|
|
vi |
Contents |
v1.3, November 2008

Networked DVD Players and UPnP AV Media Adapters .............................................. |
3-20 |
Remote Access ............................................................................................................ |
3-20 |
Remote FTP Access .............................................................................................. |
3-21 |
Remote HTTP Access ............................................................................................ |
3-22 |
Chapter 4 |
|
Securing Your Data |
|
Configuring Backup Jobs ................................................................................................ |
4-1 |
Adding a New Backup Job ....................................................................................... |
4-1 |
Viewing the Backup Schedule .................................................................................. |
4-6 |
Programming the Backup Button ............................................................................. |
4-7 |
Viewing the Backup Log ........................................................................................... |
4-8 |
Editing a Backup Job ............................................................................................... |
4-8 |
Snapshots ....................................................................................................................... |
4-8 |
Backing Up the ReadyNAS to a USB Drive .................................................................. |
4-12 |
Chapter 5 |
|
Optimizing Performance |
|
Performance ................................................................................................................... |
5-1 |
Adding a UPS for Performance ...................................................................................... |
5-2 |
Power Management ....................................................................................................... |
5-3 |
Disk Spin-Down Option ............................................................................................ |
5-3 |
Power Timer ............................................................................................................. |
5-4 |
UPS Configuration ................................................................................................... |
5-4 |
Wake-On-LAN .......................................................................................................... |
5-4 |
Chapter 6 |
|
Managing Levels of Service |
|
Viewing System Status ................................................................................................... |
6-1 |
Health ....................................................................................................................... |
6-1 |
Logs ......................................................................................................................... |
6-2 |
Replacing a Failed Disk .................................................................................................. |
6-3 |
Choosing a Replacement Disk ................................................................................. |
6-3 |
Replacing a Failed Disk ........................................................................................... |
6-3 |
Resynchronizing the Volume .................................................................................... |
6-5 |
Using the System Diagnostic Menu ................................................................................ |
6-5 |
Use the OS REINSTALL Option to Re-install the Firmware ..................................... |
6-6 |
Configuring RAID ............................................................................................................ |
6-7 |
|
|
Contents |
vii |
v1.3, November 2008

Shutdown ........................................................................................................................ |
6-8 |
Appendix A |
|
Share Access from MAC and Linux Systems |
|
MAC OS X ..................................................................................................................... |
A-1 |
AFP over Bonjour .................................................................................................... |
A-2 |
AFP over AppleTalk ................................................................................................. |
A-3 |
MAC OS 9 ..................................................................................................................... |
A-5 |
Accessing Shares from Linux/Unix ................................................................................ |
A-7 |
Appendix B |
|
Related Documents |
|
Index
viii |
Contents |
v1.3, November 2008
About This Manual
The NETGEAR® ReadyNAS Pro Business Edition User Guide describes how to configure and troubleshoot a ReadyNAS Pro Business Edition system. The information in this manual is intended for readers with intermediate computer and networking skills.
Conventions, Formats, and Scope
The conventions, formats, and scope of this manual are described in the following paragraphs:
• Typographical Conventions. This manual uses the following typographical conventions:
Italic |
Emphasis, books, CDs, file and server names, extensions |
|
|
Bold |
User input, IP addresses, GUI screen text |
|
|
Fixed |
Command prompts, CLI text, code |
italic |
URL links |
|
|
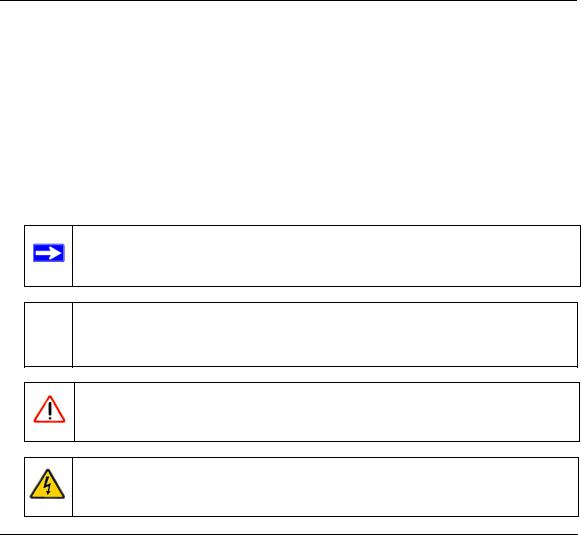
• Formats. This manual uses the following formats to highlight special messages:
Note: This note highlights information of importance or special interest.
 Tip: This note highlights a procedure that will save time or resources.
Warning: This note warns against a malfunction or damage to the equipment.
Danger: This safety warning warns against personal injury or death.
ix
v1.3, November 2008

ReadyNAS Pro Business Edition User Guide
•Scope. This manual is written for the ReadyNAS Pro Business Edition according to these specifications:
Product Version |
1.3 |
|
|
Manual Publication Date |
November 2008 |
|
|
How to Use This Manual
The HTML version of this manual includes the following:
•Buttons,  and
and  , for browsing forward or backward through the manual one page at a time.
•A  button that displays the table of contents and a
  button that displays an index. Double-click on a link in the table of contents or index to navigate directly to where the topic is described in the manual.
•A  button to access the full NETGEAR, Inc. online knowledge base for the product model.
•Links to PDF versions of the full manual and individual chapters.
How to Print This Manual
To print this manual, you can choose one of the following options, according to your needs.
•Printing a page from HTML. Each page in the HTML version of the manual is dedicated to a major topic. Select File > Print from the browser menu to print the page contents.
•Printing from PDF. Your computer must have the free Adobe Acrobat Reader installed for you to view and print PDF files. The Acrobat Reader is available on the Adobe website at http://www.adobe.com.
–Printing a PDF chapter. Use the PDF of This Chapter link at the top left of any page.
•Click the PDF of This Chapter link at the top left of any page in the chapter you want to print. The PDF version of the chapter you were viewing opens in a browser window.
•Click the print icon in the upper left corner of your browser window.
x |
About This Manual |
v1.3, November 2008
ReadyNAS Pro Business Edition User Guide
–Printing a PDF version of the complete manual. Use the Complete PDF Manual link at the top left of any page.
•Click the Complete PDF Manual link at the top left of any page in the manual. The PDF version of the complete manual opens in a browser window.
•Click the print icon in the upper left corner of your browser window.
Tip: If your printer supports printing two pages on a single sheet of paper, you can save paper and printer ink by selecting this feature.
Revision History
Part Number |
Version |
Date |
Description |
Number |
|||
|
|
|
|
202-10406-01 |
1.0 |
November |
First publication |
|
|
2008 |
|
202-10406-01 |
1.1 |
October |
Correct errors in v1.0 about supported features and technical |
|
|
2008 |
parameters. |
202-10406-01 |
1.2 |
October |
Add remote FTP and HTTP access, and file system consistency |
|
|
2008 |
check topics. |
202-10406-01 |
1.3 |
November |
Fix broken cross references. |
|
|
2008 |
|
|
|
|
|
About This Manual |
xi |
v1.3, November 2008

ReadyNAS Pro Business Edition User Guide
xii |
About This Manual |
v1.3, November 2008

ReadyNAS Pro Business Edition User Guide
Chapter 1
Getting Acquainted
This chapter provides an overview of the features and capabilities of the ReadyNAS Pro Business Edition. It also covers the unit’s physical features, main software, and initial setup steps.
Topics discussed in this chapter include:
•“What is the ReadyNAS Pro?”
•“What Are the Benefits of X-RAID and X-RAID2?”
•“Introducing the Status Displays, Ports, and Drive Bay”
•“Choosing a Location for a ReadyNAS Pro”
•“Initial Setup”
•“The RAIDar Setup Utility”
•“The FrontView Management Console”
•“NETGEAR ReadyNAS Community”
What is the ReadyNAS Pro?
NETGEAR ReadyNAS Pro gigabit network storage products provide small and medium sized businesses with easy-to-use, high-performance network attached storage solutions to share and protect critical data. Housed in a compact desktop form factor, the ReadyNAS Pro products support up to six SATA I or SATA II hard drives via six lockable, hot-swappable disk trays. Three USB 2.0 ports enable the connection of USB drives or printers. Based on current drive capacities, the ReadyNAS Pro provides up to 9TB of network attached storage that can easily be expanded as larger capacity drives become available.
The ReadyNAS Pro enables users across the LAN, WAN, or over the Internet to back up and share data from Windows, Macintosh, and Linux systems. ReadyNAS Pro offers extensible robust highavailability data protection. Its fail-safe features include dual redundant Gigabit Ethernet ports and support for RAID 0, 1, 5, RAID 5 plus hot spare, RAID 6, and NETGEAR’s proprietary X-RAID2TM for automatic volume expansion.
In addition to a Web based graphical user interface (GUI) and setup wizard for ease-of-use and setup, ReadyNAS Pro features an LCD display that provides quick and intuitive system status readings and incorporates an active system monitoring capability which continually monitors the
Getting Acquainted |
1-1 |
v1.3, November 2008

ReadyNAS Pro Business Edition User Guide
entire system for abnormal situations or part failures and e-mails system alerts to the network administrator. In addition, the Frontview Add-on SDK provides developers the tools for uniquely extending ReadyNAS capabilities. For a full list of what is new compared with existing ReadyNAS systems, see ReadyNAS Specifications on ReadyNAS.com.
What Are the Benefits of X-RAID and X-RAID2?
Shipping in volume since 2004, X-RAID is a proven patent-pending technology that is available only on ReadyNAS. ReadyNAS Pro introduces X-RAID2, the 2nd generation version of X-RAID.
X-RAID Is Expandable RAID
RAID stands for Redundant Array of Independent Disks, which is a way of protecting your data in case of a disk failure. The X in X-RAID stands for “expandable”; X-RAID is expandable RAID.
X-RAID technology simplifies volume management. What most people want to do with their data volumes over time is either add redundancy or expand them without the headaches usually associated with doing so. By using simple rules, X-RAID hides the complexities yet still provides volume management features previously available only in enterprise-level storage solutions.
X-RAID Simplifies Redundancy
To maintain redundancy from disk failure, X-RAID requires a one-disk overhead. In a two-disk X- RAID volume, the usable capacity is one disk, in a three-disk volume the usable capacity is two disks, in a four-disk volume, the usable capacity is three disks, etc.
No Redundancy with a Single Disk but Easy to Add Disks with X-RAID
Even with RAID, there is no data redundancy with one disk; if that disk fails, your data is lost. If you have a one-disk ReadyNAS and want protection from disk failure, you have to add a 2nd disk that is at least as large as the first. It can be ‘hot-added’ while the ReadyNAS is running.
Whenever you add or replace a disk, the ReadyNAS will initialize it, scanning to make sure the disk is good. Once added, your 2nd disk will synch with the 1st disk. Depending on the disk size, the synch may take anywhere from 30 minutes to several hours. The sync occurs in the background so you can still keep on working with the ReadyNAS during this time.
After the sync completes, your data volume is now redundant, meaning if one of the disks fails, the other disk still contains the data, and thus your data is now fully protected from a disk failure.
1-2 |
Getting Acquainted |
v1.3, November 2008

ReadyNAS Pro Business Edition User Guide
The X-RAID Data Volume
X-RAID has one data volume. This volume uses the capacity of the smallest disk from each disk. For instance, if you had one 80 GB disk and two 250 GB disks, only 80 GB from each disk is used in the volume. The leftover space on the 250 GB disks is reclaimed only when the 80 GB disk is replaced with a 250 GB or greater capacity disk. However, as you will see below,
X-RAID2 is more flexible in how it handles volume expansion.
Horizontal Expansion (More Disks) vs. Vertical Expansion (Larger Disks)
The process of expanding the number of disks we call horizontal expansion. X-RAID also supports vertical expansion by adding larger disks. With first generation X-RAID, horizontal expansion, the capacity is limited to a multiple of your original disk. As larger or more affordable disks become available, you take advantave of vertical expansion to grow the size of your volume. You can add additional disks of at least the size of the 1st disk. You can add a larger disk, but with the original X-RAID extra space will not be used until all disks are at least that size.
X-RAID supports replacing disks with larger capacity ones while keeping the volume data intact. Simply replace each of your disks one by one with a larger disk. After the init process, the disk will be synchronized to restore data redundancy. Again, this process can take 30 minutes to several hours. Both processes occur in the background, so you can continue using the ReadyNAS as usual.
Once you have done this for all disks in the system, just reboot the ReadyNAS to start the volume expansion which occurs in the background. When the process completes, your data will remain intact, but your data volume capacity will have expanded to a multiple of the your smallest capacity disk. That multiple is the total number of disks minus 1 for redundancy. For example, if your system now has 3 disks, and the smallest is 500 GB, then the volume capacity is 1TB.
The beauty with vertical expansion is that you can keep expanding your volume repeatedly with larger capacity disks, a definite future-proof advantage that you can count on with the ReadyNAS.
X-RAID2 Is Even More Flexible
Now, X-RAID2 will automatically expand when as little as two of your disks have extra capacity. Your data volume can keep growing every time you add a larger disk after that. X-RAID2 lets you do this without reformatting your disks and shuffling your data back and forth. The process occurs in the background, so access to the ReadyNAS Pro Business Edition is not interrupted.
Others may claim that they have “online” RAID expansion just like X-RAID2, but take a closer look and you’ll see it’s just not that simple. Unlike X-RAID2, not only will there be complex RAID migration steps, but they cannot recover from a power loss during the process. With X- RAID2, you can turn off the power as many times as you want during the expansion, and it’ll continue where it left off.
Getting Acquainted |
1-3 |
v1.3, November 2008

ReadyNAS Pro Business Edition User Guide
Introducing the Status Displays, Ports, and Drive Bay
This section introduces the ReadyNAS Pro display, ports, and drive bay.
Front and Side Panel
1
2
7
3
4
5
6
Figure 1-1
1.OLED display, including the disk activity status light
2.CPU exhaust vent
3.Power button/power status
4.USB backup status light
5.Backup button
6.Front USB port
7.Drive bay door
1-4 |
Getting Acquainted |
v1.3, November 2008

ReadyNAS Pro Business Edition User Guide
Drive Bay
4
1 |
|
|
|
|
|
|
|
|
|
2 |
3 |
|||
Figure 1-2
1.Drive bay door
2.Six disk bays
3.Disk tray pop-out button
4.Disk tray pop-out latch
5.Disk tray
6.Disk tray lock
7.Recessed disk tray latch lock release
5
6 |
7
Note: If you set the tray lock, you will need to use a push-pin or paper clip to open the tray.
Getting Acquainted |
1-5 |
v1.3, November 2008
ReadyNAS Pro Business Edition User Guide
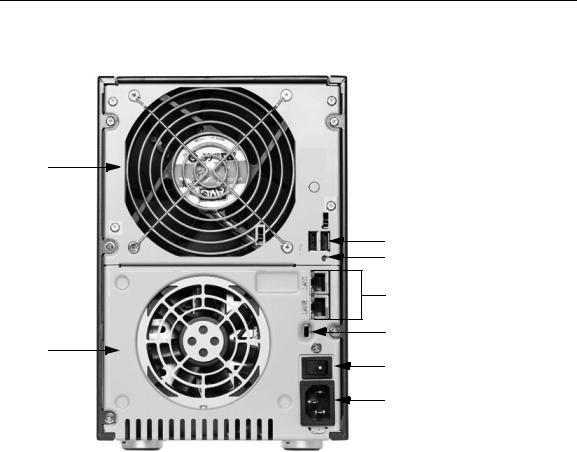
Rear Panel
1
3
4
5
6
2
7
8
Figure 1-3
1.Disk exhaust fan
2.System exhaust fan
3.Two USB ports
4.Recessed button which provides access to the diagnostic startup menu: Normal, Factory Restore (which erases all data), OS Reinstall, Tech Support remote diagnostics, Skip Volume Check, Memory Test.
5.LAN1 and LAN2 gigabit Ethernet ports
6.Kensington lock to prevent unauthorized removal of the unit
7.Power switch
8.Power cable socket
1-6 |
Getting Acquainted |
v1.3, November 2008

ReadyNAS Pro Business Edition User Guide
Choosing a Location for a ReadyNAS Pro
The ReadyNAS Pro is suitable for use in an office environment where it can be free-standing, located in a wiring closet or equipment room.
When deciding where to locate the unite, ensure that:
•It is accessible and cables can be connected easily.
•If it will be protected by an uninterruptable power supply (UPS), its power cable can be securely and safely connected to the UPS.
•Water or moisture cannot enter the case of the unit.
•Airflow around the unit and through the vents in the side of the case is not restricted.
•The air is as free of dust as possible.
•Temperature operating limits are not likely to be exceeded. For information on the recommended operating temperatures, refer to the data sheet on the NETGEAR website.
Initial Setup
Follow the instructions in the NETGEAR Installation Guide that came with your unit to install your NETGEAR® ReadyNAS™ Pro. An electronic copy of the installation guide is on the product CD, on the NETGEAR web site, and on http://readynas.com.
The initial setup estimated completion time is 20 minutes.
Note: A diskless unit requires installing disks and initializing RAID before proceeding.  Go to http://kbserver.netgear.com for a list of supported disks. Refer to
“Configuring RAID” on page 6-7 for instructions on installing disks and configuring RAID.
Refer to Appendix A, “Share Access from MAC and Linux Systems for instructions on accessing shares from Linux and various versions of the MAC OS.
Getting Acquainted |
1-7 |
v1.3, November 2008

ReadyNAS Pro Business Edition User Guide
Default IP Address, Login Name, and Password
The default IP configuration is set to DHCP; if the unit does not get an IP address, it defaults to 192.168.168.168.
The default administrator user name is admin with the default password being netgear1 (case sensitive).
Note: The RAIDar utility includes a discovery mechanism that enables it to find any  ReadyNAS on the network without needing to know its IP address. Also, RAIDar
does not require a user name and password to access a ReadyNAS.
The RAIDar Setup Utility
The RAIDar utility enables easy setup and management of all your ReadyNAS units.
Figure 1-4
It discovers the units in the network, and makes it easy to see the status of the units, and connect to the FrontView management console you use to manage any unit.
1-8 |
Getting Acquainted |
v1.3, November 2008

ReadyNAS Pro Business Edition User Guide
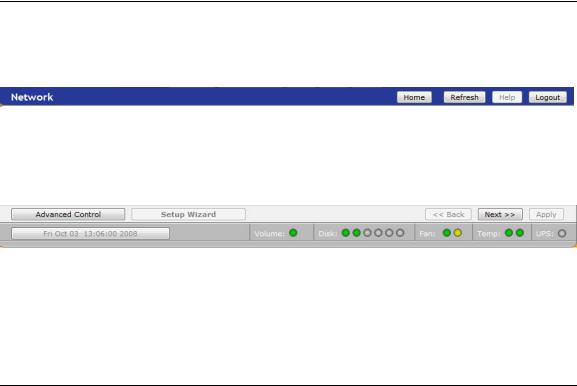
The FrontView Management Console
The FrontView management console operates in two modes: Setup Wizard mode, and Advanced Control mode. When the unit is in its factory default state, FrontView is in Setup Wizard mode.
Figure 1-5
Use the wizard to perform the initial configuration of the unit.
The FrontView Advanced Control mode provides access to all the available settings.
Figure 1-6
Getting Acquainted |
1-9 |
v1.3, November 2008
ReadyNAS Pro Business Edition User Guide
In this mode, you see the menus on the left that allow you to quickly jump to the screen you want.
The bar at the top provides options to return to the Home screen, refresh the browser window, display Help where available, or to log out of this session.
Figure 1-7
At the bottom of the screen is the status bar including the date button on the left which, when clicked takes you to the Clock screen. The status lights to the right give a quick glimpse of the system device status.
Figure 1-8
Move the mouse pointer over the status light to display device information, or click a status light to display the status in more detail. Above the status lights is the Apply button, which you use to save any changes on the current screen.
NETGEAR ReadyNAS Community
NETGEAR ReadyNAS Community web site is http://readynas.com. Find previews and reviews of new features, tutorials, and information you won’t get anywhere else. Well, maybe you will, but not easily and not in one happy place like this. Do give us feedback on the ReadyNAS Community Forum and let us know if you would like to see topics not covered here.
1-10 |
Getting Acquainted |
v1.3, November 2008

ReadyNAS Pro Business Edition User Guide
Chapter 2
Setting Up and Managing Your ReadyNAS Pro
Setting up and managing the ReadyNAS Pro Network Attached Storage System Business Edition in your network is described in this chapter.
This chapter contains the following sections:
•“Customizing Network Settings”
•“Updating the Admin Password”
•“Selecting Services for Share Access”
•“Understanding Volume Management”
•“Setting Up Printers”
•“Adjusting System Settings”
•“Configuration Backup”
Customizing Network Settings
Access network settings by clicking the Advanced Control button, and selecting Network > from the main menu. From the Network menu, you can then navigate to your basic network settings screens such as Interfaces, Gateway, DNS, WINS, DHCP, and Route options.
Figure 2-1
Setting Up and Managing Your ReadyNAS Pro |
2-1 |
v1.3, November 2008
ReadyNAS Pro Business Edition User Guide
Ethernet Interfaces
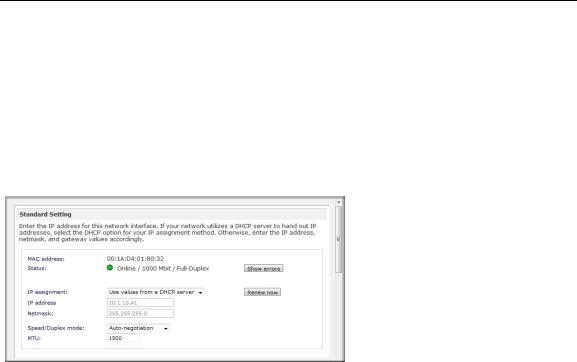
Select Network > Interfaces > Ethernet 1 /Ethernet 2 tab pages to specify network interfacespecific settings for Standard Settings, Teaming/Failover, VLAN Settings and Performance Settings.
Standard Setting. In this section, you can specify the IP address, network mask, speed/duplex mode, and MTU settings. In most networks where a DHCP server is enabled, you can simply specify the Use values from a DHCP server option to automatically set the IP address and network mask.
Figure 2-2
•IP Assignment. Select either Use values from a DHCP server or Use values below.
–If you elect to assign the IP address using Use values from a DHCP server, NETGEAR advises that you set the lease time on the DHCP server/router to a value of at least a day. Otherwise, you might notice that the IP address of the unit changes even when it has been powered down for only a few minutes. Most DHCP servers allow you to assign a static IP address for specified MAC addresses. If you have this option, this would be a good way to ensure your ReadyNAS Pro Business Edition maintains the same IP address even in DHCP mode.
–If you assign a static IP address by selecting Use values below, be aware that the browser will lose connection to the ReadyNAS Pro Business Edition device after the IP address has been changed. To reconnect after assigning a static IP address, open RAIDar and click Rescan to locate the device, and then reconnect.
•Speed/Duplex Mode (Only applies to 10/100 connections). If you have a managed switch that works best if the devices are forced to a particular speed or duplex mode, you can select
2-2 |
Setting Up and Managing Your ReadyNAS Pro |
v1.3, November 2008

ReadyNAS Pro Business Edition User Guide
the setting you want. NETGEAR advises that you keep the setting in an Auto-negotiation mode otherwise.
Figure 2-3
•MTU. In some network environments, changing the default MTU value can fix throughput problems. NETGEAR advises that you leave the default setting otherwise.
Figure 2-4
Teaming/Failover. In this section, you can select the desired bonding mode. First, set the Teaming/Failover on the Ethernet 1 tab page, then configure the other options for Ethernet 1 and Ethernet 2 accordingly.
Network teaming provides a way to aggregate the two network interfaces into a single logical teamed, or bonded, interface. The teamed interface allows for fail-over support and can provide for enhanced aggregate performance over a single interface.
Figure 2-5
The following bonding options are available. Note that the option you select may affect the ReadyNAS network performance.
•Round-Robin: Transmit packets in sequential order from the first available interface to the next. This mode provides load balancing and fault tolerance.
•Active Backup: Only one interface in the bond is active. A different interface becomes active if, and only if, the active interface fails. The bond’s MAC address is externally visible on only one port to avoid confusing the switch.
Setting Up and Managing Your ReadyNAS Pro |
2-3 |
v1.3, November 2008
ReadyNAS Pro Business Edition User Guide
•XOR: Transmit based on the default simple transmit hash policy. This mode provides load balancing and fault tolerance.
•Broadcast: Transmit everything on all slave interfaces. This mode provides fault tolerance.
•IEEE 802.3ad: Creates aggregation groups that share the same speed and duplex settings. Utilizes all interfaces in the active aggregator according to the 802.3ad specification. You will need a switch that supports IEEE 802.3ad Dynamic link aggregation.
•Transmit Load Balancing: Channel bonding that does not require any special switch support. The outgoing traffic is distributed according to the current load (computed relative to the speed) on each interface. Incoming traffic is received by the current interface. If the receiving interface fails, another interface takes over the MAC address of the failed receiving interface.
•Adaptive Load Balancing: Includes Transmit Load Balancing plus Receive Load Balancing for IPV4 traffic, and does not require any special switch support. The receive load balancing is achieved by ARP negotiation.
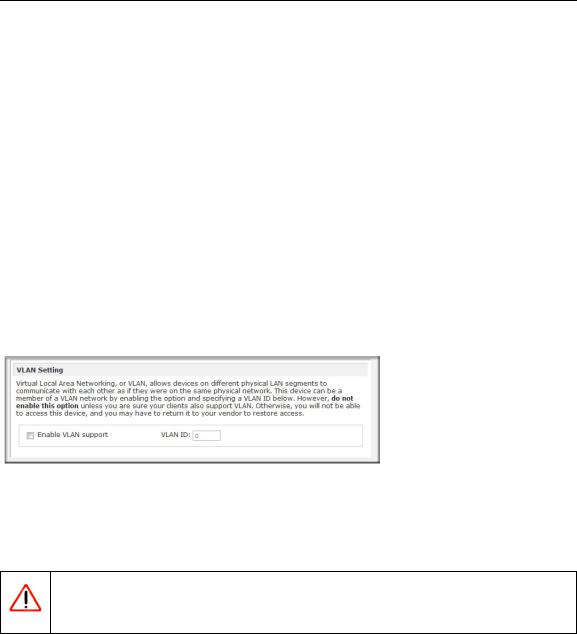
VLAN Settings (Virtual Local Area Network) . In this section, you can specify whether to allow devices residing on different segments of a LAN to appear in the same segment or, conversely, to allow devices on the same switch to behave as through they belong to a different LAN.
Figure 2-6
If you wish to use the ReadyNAS Pro Business Edition in a VLAN environment, select the Enable VLAN support check box, and enter a numeric VLAN ID. You need to reboot the ReadyNAS Pro Business Edition for the VLAN function to take effect.
Warning: Do not enable VLAN support unless you are sure that your clients also support VLAN. Otherwise, you can lose network access to the unit, and you might need to reinstall the firmware to disable the VLAN setting.
2-4 |
Setting Up and Managing Your ReadyNAS Pro |
v1.3, November 2008
ReadyNAS Pro Business Edition User Guide
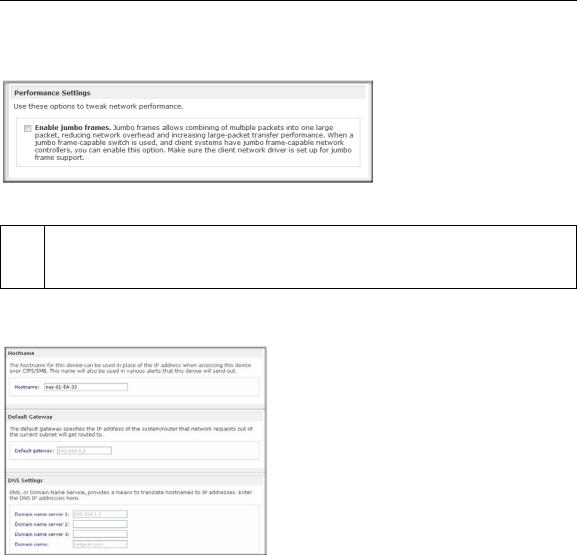
Performance Settings . In this section, you can the Enable jumbo frames option allows you to optimize the ReadyNAS Pro Business Edition for large data transfers such as multiple streams of video playback.
Figure 2-7
Note: Use this option only if your NIC and your gigabit switch support jumbo frames.  The ReadyNAS Pro Business Edition supports a 9000 byte frame size. For optimal
performance, a switch capable of this frame size or larger should be used.
Global Network Settings
Figure 2-8
Hostname
The Hostname you specify is used to advertise the ReadyNAS Pro Business Edition on your network. You can use the hostname to address the ReadyNAS Pro Business Edition in place of the IP address when accessing the ReadyNAS Pro Business Edition from Windows, or over OS X using SMB. This is also the name that appears in the RAIDar scan list.
The default hostname is nas- followed by the last three bytes of your primary MAC address.
Setting Up and Managing Your ReadyNAS Pro |
2-5 |
v1.3, November 2008

ReadyNAS Pro Business Edition User Guide
Default Gateway
The Default Gateway specifies the IP address of the system where your network traffic is routed if the destination is outside your subnet. In most homes and smaller offices, this is the IP address of the router connected to the cable modem or your DSL service.
If you selected the DHCP option in the Ethernet or Wireless tab, the Default Gateway field is automatically populated with the setting from your DHCP server. If you selected the Static option, you can manually specify the IP addresses of the default gateway server here.
DNS Settings
The DNS area allows you to specify up to three Domain Name Service servers for hostname resolution. The DNS service translates host names into IP addresses.
If you selected the DHCP option in the Ethernet or Wireless tab, the Domain Name Server fields are automatically populated with the DNS settings from your DHCP server. If you selected the Static option, you can manually specify the IP addresses of the DNS servers and the domain name here.
WINS
The WINS option allows you to specify the IP address of the WINS (Windows Internet Naming Service) server. A WINS server is typically a Windows server on the network that allows the ReadyNAS Pro Business Edition or other devices on the network to be browsed from other subnets.
Figure 2-9
If you do not have an existing WINS server, you can designate the ReadyNAS Pro Business Edition to be one. Simply select the Become a WINS server check box, and configure your Windows PC to specify the ReadyNAS Pro Business Edition IP address as the WINS server. This can be useful if you wish to browse by hostname across multiple subnets (for example, over VPN).
2-6 |
Setting Up and Managing Your ReadyNAS Pro |
v1.3, November 2008
ReadyNAS Pro Business Edition User Guide
DHCP
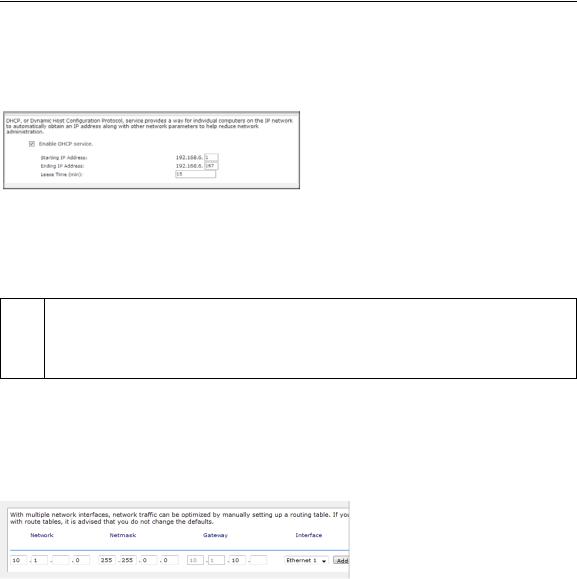
The DHCP tab allows you to specify this device as a DHCP (Dynamic Host Configuration Protocol) server. DHCP service simplifies management of a network by dynamically assigning IP addresses to new clients on the network.
Figure 2-10
Select the Enable DHCP service check box if you want the ReadyNAS Pro Business Edition device to act as a DHCP server. This is convenient in networks where DHCP service is not already available.
Note: These options are available only if this device is not already using a DHCP address.  Enabling DHCP service on a network already utilizing another DHCP server will
result in conflicts. If you wish to use this device as a DHCP server, make sure to specify static addresses in the Ethernet and DNS tabs.
Route: A Manual Routing Table
The Route tab allows you to specify a manual routing table for each Ethernet interface. You can use this option to optimize performance. For example, you could configure a manual routing table to assure that these Ethernet interfaces were directly routed over a fiber backbone to assure that the unit would not experience the traffic congestion that can build up on a gigabit segment.
Figure 2-11
Setting Up and Managing Your ReadyNAS Pro |
2-7 |
v1.3, November 2008

ReadyNAS Pro Business Edition User Guide
Updating the Admin Password
The Security tab allows you to set the administrator password, administer security, and set up the password recovery feature on the ReadyNAS.
Note: The RAIDar utility includes a discovery mechanism that enables it to find any  ReadyNAS on the network without needing to know its IP address. Also, RAIDar
does not require a user name and password to monitor a ReadyNAS.
The Admin Password tab allows you to change the administrator user password. The administrator user is the only user that can access FrontView, and this user has administrative privileges when accessing shares. Be sure to set a password different from the default password, and make sure that this password is kept in a safe place. Anyone who obtains this password can change or erase the data on the ReadyNAS.
Figure 2-12
Note: In User or Domain security mode, you can use the admin account to log in to a  Windows share, and perform maintenance on any file or folder in that share. The
admin user also has permission to access all shares to perform backups.
As a safeguard, you are requested to enter a password recovery question, the expected answer, and an e-mail address. If, in the future, you forget the password, you can go to
https://<ReadyNAS ip_address>/password_recovery. Successfully answering the questions there resets the Admin Password, which is sent to the e-mail address you enter on this screen.
2-8 |
Setting Up and Managing Your ReadyNAS Pro |
v1.3, November 2008
Loading...