


 Loading...
AccuSync LCD73V
AccuSync LCD93V
LCD170V
LCD190V
User’s Manual
WARNING
TO PREVENT FIRE OR SHOCK HAZARDS, DO NOT EXPOSE THIS UNIT TO RAIN OR MOISTURE. ALSO, DO NOT USE THIS UNIT’S POLARIZED PLUG WITH AN EXTENSION CORD RECEPTACLE OR OTHER OUTLETS UNLESS THE PRONGS CAN BE FULLY INSERTED.
REFRAIN FROM OPENING THE CABINET AS THERE ARE HIGH VOLTAGE COMPONENTS INSIDE. REFER SERVICING TO QUALIFIED SERVICE PERSONNEL.
|
|
CAUTION |
|
|
|
|
|
|
|
RISK OF ELECTRIC SHOCK • DO NOT OPEN |
|
|
|
|
|
CAUTION: |
TO REDUCE THE RISK OF ELECTRIC SHOCK, DO NOT REMOVE COVER (OR BACK). NO USER |
||
|
SERVICEABLE PARTS INSIDE. REFER SERVICING TO QUALIFIED SERVICE PERSONNEL. |
||
This symbol warns user that uninsulated voltage within the unit may have sufficient magnitude to cause electric shock. Therefore, it is dangerous to make any kind of contact with any part inside this unit.
This symbol alerts the user that important literature concerning the operation and maintenance of this unit has been included. Therefore, it should be read carefully in order to avoid any problems.
Caution:
When operating the AccuSync LCD73V/AccuSync LCD93V/LCD170V/LCD190V with a 220-240V AC power source in Europe, use the power cord provided with the monitor.
In the UK, a BS approved power cord with a moulded plug has a Black (five Amps) fuse installed for use with this equipment. If a power cord is not supplied with this equipment please contact your supplier.
For all other cases, use a power cord that matches the AC voltage of the power outlet and has been approved by and complies with the safety standard of your particular country.
Declaration
Declaration of the Manufacturer
We hereby certify that the colour monitors AccuSync LCD73V (L175GZ)/AccuSync LCD93V (L195GY)/ LCD170V (L175GZ)/LCD190V (L195GY) are in compliance with
Council Directive 73/23/EEC:
– EN 60950-1
Council Directive 89/336/EEC:
–EN 55022
–EN 61000-3-2
–EN 61000-3-3
–EN 55024
and marked with
NEC Display Solutions, Ltd.
4-13-23, Shibaura,
Minato-Ku
Tokyo 108-0023, Japan
As an ENERGY STAR Partner, NEC Display Solutions of America, Inc. has determined that this product meets the ENERGY STAR guidelines for energy efficiency. ENERGY STAR is a U.S. registered mark. The ENERGY STAR emblem does not represent EPA endorsement of any product or service.
ErgoDesign is a registered trademark of NEC Display Solutions, Ltd. in Austria, Benelux, Denmark, France, Germany, Italy, Norway, Spain, Sweden, U.K..
IBM PC/XT/AT, PS/2, MCGA, VGA, 8514/A and XGA are registered trademarks of International Business Machines Corporation.
Apple and Macintosh are registered trademarks of Apple Computer Inc. Microsoft and Windows are registered trademarks of the Microsoft Corporation. NEC is a registered trademark of NEC Corporation.
All other trademarks or registered trademarks are property of their respective owners.
English
English-1
For the Customer to use in U.S.A. or Canada
Canadian Department of Communications Compliance Statement
DOC: This Class B digital apparatus meets all requirements of the Canadian Interference-Causing Equipment Regulations. Cet appareil numérique de la classe B respecte toutes les exigences du Règlement sur le matériel brouiller du Canada.
C-UL: Bears the C-UL Mark and is in compliance with Canadian Safety Regulations according to CSA C22.2 No. 60950-1. Ce produit porte la marque ‘C-UL’ et se conforme aux règlements de sûrele Canadiens selon CAN/CSA C22.2 No. 60950-1.
FCC Information
1.Use the attached specified cables with the AccuSync LCD73V/AccuSync LCD93V/LCD170V/LCD190V colour monitor so as not to interfere with radio and television reception.
(1)The power supply cord you use must have been approved by and comply with the safety standards of U.S.A., and meet the following condition.
Power supply cord |
Non shield type, 3-conductor |
Length |
1.8 m |
Plug shape |
|
U.S.A
(2)Please use the supplied shielded video signal cable. Use of other cables and adapters may cause interference with radio and television reception.
2.This equipment has been tested and found to comply with the limits for a Class B digital device, pursuant to part 15 of the FCC Rules. These limits are designed to provide reasonable protection against harmful interference in a residential installation. This equipment generates, uses, and can radiate radio frequency energy, and, if not installed and used in accordance with the instructions, may cause harmful interference to radio communications. However, there is no guarantee that interference will not occur in a particular installation. If this equipment does cause harmful interference to radio or television reception, which can be determined by turning the equipment off and on, the user is encouraged to try to correct the interference by one or more of the following measures:
• Reorient or relocate the receiving antenna.
• Increase the separation between the equipment and receiver.
• Connect the equipment into an outlet on a circuit different from that to which the receiver is connected.
• Consult your dealer or an experienced radio/TV technician for help.
If necessary, the user should contact the dealer or an experienced radio/television technician for additional suggestions. The user may find the following booklet, prepared by the Federal Communications Commission, helpful: “How to Identify and Resolve Radio-TV Interference Problems.” This booklet is available from the U.S. Government Printing Office, Washington, D.C., 20402, Stock No. 004-000-00345-4.
Declaration of Conformity
This device complies with Part 15 of FCC Rules. Operation is subject to the following two conditions. (1) This device may not cause harmful interference, and (2) this device must accept any interference received, including interference that may cause undesired operation.
U.S. Responsible Party: NEC Display Solutions of America, Inc.
Address: |
500 Park Blvd, Suite 1100 |
|
Itasca, Illinois 60143 |
Tel. No.: |
(630) 467-3000 |
|
|
Type of Product: |
Display Monitor |
Equipment Classification: |
Class B Peripheral |
Model: |
AccuSync LCD73V/ LCD170V (L175GZ) |
|
AccuSync LCD93V/ LCD190V (L195GY) |
We hereby declare that the equipment specified above conforms to the technical standards as specified in the FCC Rules.
English-2

Contents
Your new NEC LCD monitor box* should contain the following:
•LCD monitor with tilt base
•Power Cord
•User’s Manual
•CD-ROM
•Base Stand
•Cable Holder
English
User’s Manual |
Power Cord |
Base Stand |
Cable Holder |
CD-ROM |
LCD monitor |
|
|
|
|
|
Captive type (Video signal cable is |
|
|
|
|
|
connected) |
*Remember to save your original box and packing material to transport or ship the monitor.
Quick Start
To attach the Base to the LCD Stand:
1.Insert the front of the LCD stand into the holes in the front of the Base (Figure S.1).
2.Attach the Base to the Stand. The locking tab on the Base should fit into the hole on the back of the Stand (Figure S.1).
To attach the Cable Holder:
1.Attach the Cable Holder on to the Base. Insert the hooks on the Cable Holder into the holes at the back of the Stand and slide the Cable Holder downward into place (Figure S.1).
NOTE: Please confirm that the tabs are completely secure.
Stand
Locking Tabs
Cable Holder
Base
|
|
Macintosh Cable |
|
Figure S.1 |
Figure A.1 |
Adapter (not included) |
Figure A.2 |
|
To attach the LCD monitor to your system, follow these instructions:
1.Turn off the power to your computer.
2.For the PC with Analog output: Connect the 15-pin mini D-SUB signal cable connected with the monitor to the connector of the display card in your system (Figure A.1). Tighten all screws.
For the Mac: Connect the MultiSync Macintosh cable adapter (not included) to the computer. Attach the 15-pin mini D-SUB signal cable to the MultiSync Macintosh cable adapter (Figure A.2). Tighten all screws.
NOTE: Some Macintosh systems do not require a Macintosh cable adapter.
English-3
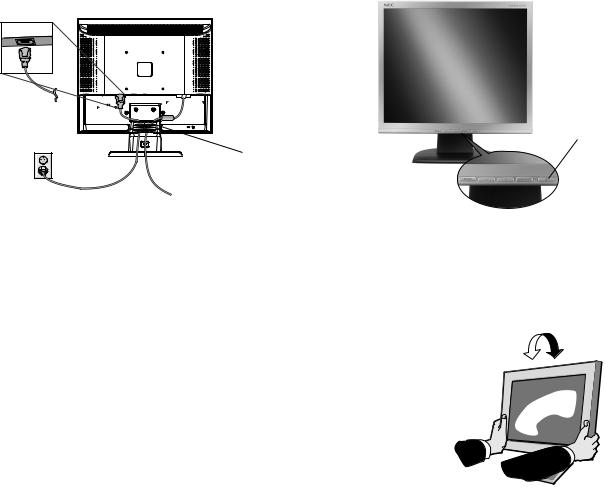
3.Connect the power cord to the power outlet. Place the Video Signal Cable and power cord to the Cable holder (Figure B.1).
NOTE: Adjust position of cable that place under the Cable holder to avoid damage for cable or monitor.
NOTE: Please refer to Caution section of this manual for proper selection of power cord. 4. Turn on the monitor with the front power button and the computer (Figure C.1).
Power Button
Cable holder
Figure B.1 |
Figure C.1 |
5.No-touch Auto Adjust automatically adjusts the monitor to optimal settings upon initial setup for most timings. For further adjustments, use the following OSM controls:
•Auto Adjust Contrast
•Auto Adjust
Refer to the Controls section of this User’s Manual for a full description of these OSM controls.
NOTE: If you have any problem, please refer to the Troubleshooting section of this
User’s Manual.
Tilt
Grasp both sides of the monitor screen with your hands and adjust the tilt as desired (Figure TS.1).
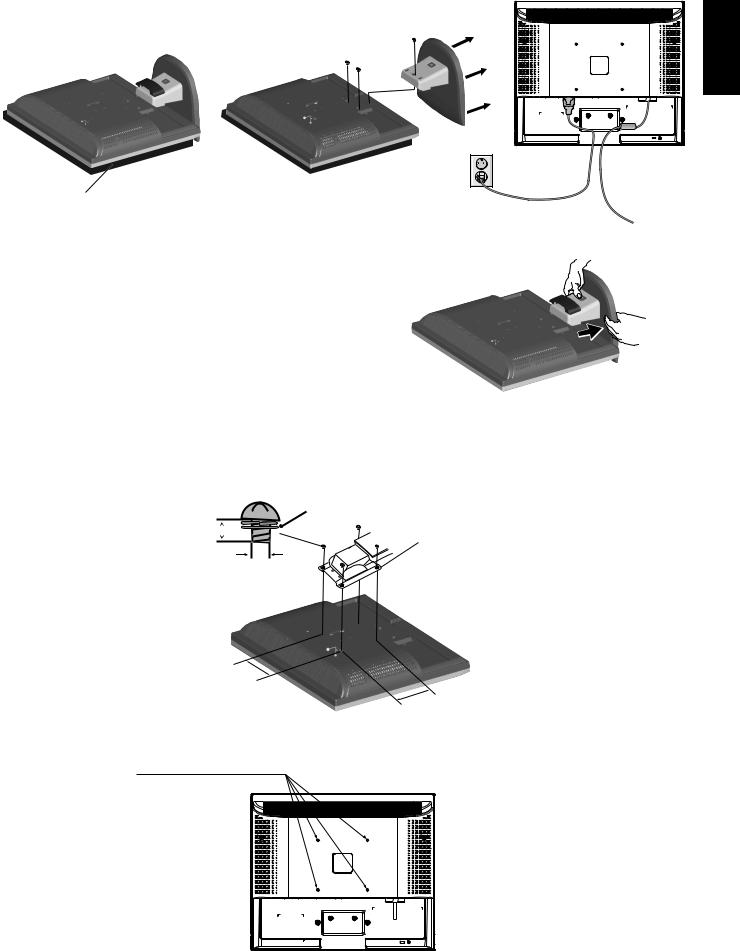
Remove Monitor Stand for Mounting
To prepare the monitor for alternative mounting purposes:
Figure TS.1
1.Disconnect all cables.
2.Place monitor face down on a non-abrasive surface (Figure R.1).
3.Remove the 3 screws connecting the monitor to the stand and remove the stand as indicated (Figure R.2). The monitor is now ready for mounting in an alternative manner.
4.Connect the AC cord to the back of the monitor (Figure R.3).
5.Reverse this process to re-attach stand.
NOTE: Use only VESA-compatible alternative mounting method.
NOTE: Handle with care when removing monitor stand.
English-4
English
Non-abrasive surface
Figure R.1 |
Figure R.2 |
Figure R.3 |
Removing the Base
NOTE: Always remove the Base when shipping the LCD.
1.Place monitor face down on a non-abrasive surface (Figure R.1).
2.While using your thumbs, press the bottom tabs upward to unlock.
3.Pull the unlocked base off the stand.
Connecting a Flexible Arm
This LCD monitor is designed for use with a flexible arm.
Please use the screws (4pcs) as shown in the picture when installing. To meet the safety requirements, the monitor must be mounted to an arm which guaranties the necessary stability under consideration of the weight of the monitor.
The LCD monitor shall only be used with an approved arm (e.g. GS mark).
|
4 x 12 mm with lock washer and flat washer |
12 mm |
|
|
Thickness of Bracket |
M4 |
(Arm) 2.0 ~ 3.2 mm |
Tighten all screws
100 mm
100 mm
Specifications
4-SCREWS (M4)
(MAX depth: 8.5 mm)
Weight of LCD assembly: 3.6 kg - AccuSync LCD73V/LCD170V (MAX) 4.9 kg - AccuSync LCD93V/LCD190V (MAX)
English-5
Loading...