


AccuSync LCD51VM
AccuSync LCD71VM
User’s Manual
UÏivatelská pfiíruãka
Bedienerhandbuch
δηγίες ρήσης
Manual del usuario
Manuel Utilisateur
Manuale utente
Gebruikershandleiding
Podr´cznik u˝ytkownika
Руководство пользователя
Kullan∂c∂ Klavuzu
00Cover_all.p65 |
1 |
20/05/2003, 11:43 |

For the Customer to use in U.S.A. or Canada
Canadian Department of Communications Compliance Statement
DOC: This Class B digital apparatus meets all requirements of the Canadian Interference-Causing Equipment Regulations. Cet appareil numérique de la classe B respecte toutes les exigences du Règlement sur le matériel brouiller du Canada.
C-UL: Bears the C-UL Mark and is in compliance with Canadian Safety Regulations according to CSA C22.2 No. 60950. Ce produit porte la marque ‘C-UL’ et se conforme aux règlements de sûrele Canadiens selon CAN/CSA C22.2 No. 60950.
FCC Information
1.Use the attached specified cables with the AccuSync LCD51VM/AccuSync LCD71VM colour monitor so as not to interfere with radio and television reception.
(1)The power supply cord you use must have been approved by and comply with the safety standards of U.S.A., and meet the following condition.
Power supply cord |
Non shield type, 3-conductor |
Length |
2.0 m |
Plug shape |
|
U.S.A
(2)Shielded video signal cable. Use of other cables and adapters may cause interference with radio and television reception.
2.This equipment has been tested and found to comply with the limits for a Class B digital device, pursuant to part 15 of the FCC Rules. These limits are designed to provide reasonable protection against harmful interference in a residential installation. This equipment generates, uses, and can radiate radio frequency energy, and, if not installed and used in accordance with the instructions, may cause harmful interference to radio communications. However, there is no guarantee that interference will not occur in a particular installation. If this equipment does cause harmful interference to radio or television reception, which can be determined by turning the equipment off and on, the user is encouraged to try to correct the interference by one or more of the following measures:
• Reorient or relocate the receiving antenna.
• Increase the separation between the equipment and receiver.
• Connect the equipment into an outlet on a circuit different from that to which the receiver is connected.
• Consult your dealer or an experienced radio/TV technician for help.
If necessary, the user should contact the dealer or an experienced radio/television technician for additional suggestions. The user may find the following booklet, prepared by the Federal Communications Commission, helpful: “How to Identify and Resolve Radio-TV Interference Problems.” This booklet is available from the U.S. Government Printing Office, Washington, D.C., 20402, Stock No. 004-000-00345-4.
Declaration of Conformity
This device complies with Part 15 of FCC Rules. Operation is subject to the following two conditions. (1) This device may not cause harmful interference, and (2) this device must accept any interference received, including interference that may cause undesired operation.
U.S. Responsible Party: |
NEC-Mitsubishi Electronics Display of America, Inc. |
Address: |
1250 N. Arlington Heights Road |
|
Itasca, Illinois 60143-1248 |
Tel. No.: |
(630) 467-3000 |
|
|
Type of Product: |
Display Monitor |
Equipment Classification: |
Class B Peripheral |
Model: |
AccuSync LCD51VM/AccuSync LCD71VM |
We hereby declare that the equipment specified above conforms to the technical standards as specified in the FCC Rules.
00Cover_all.p65 |
2 |
20/05/2003, 11:43 |
TCO’99
Congratulations! You have just purchased a TCO’99 approved and labelled product! Your choice has provided you with a product developed for professional use. Your purchase has also contributed to reducing the burden on the environment and also to the further development of environmentally adapted electronics products.
Why do we have environmentally labelled computers?
In many countries, environmental labelling has become an established method for encouraging the adaptation of goods and services to the environment. The main problem, as far as computers and other electronics equipment are concerned, is that environmentally harmful substances are used both in the products and during the manufacturing. Since it has not been possible for the majority of electronics equipment to be recycled in a satisfactory way, most of these potentially damaging substances sooner or later enter Nature.
There are also other characteristics of a computer, such as energy consumption levels, that are important from the viewpoints of both the work (Internal) and natural (external) environments. Since all methods of conventional electricity generation have a negative effect on the environment (acidic and climate-influencing emissions, radioactive waste, etc.), it is vital to conserve energy. Electronics equipment in offices consume an enormous amount of energy since they are often left running continuously.
What does labelling involve?
This product meets the requirements for the TCO’99 scheme which provides for international and environmental labelling of personal computers. The labelling scheme was developed as a joint effort by the TCO (The Swedish Confederation of Professional Employees), Svenska Naturskyddsforeningen (The Swedish Society for Nature Conservation) and Statens Energimyndighet
(The Swedish National Energy Administration).
The requirements cover a wide range of issues: environment, ergonomics, usability, emission of electrical and magnetic fields, energy consumption and electrical and fire safety.
The environmental demands concern restrictions on the presence and use of heavy metals, brominated and chlorinated flame retardants, CFCs (freons) and chlorinated solvents, among other things. The product must be prepared for recycling and the manufacturer is obliged to have an environmental plan which must be adhered to in each country where the company implements its operational policy. The energy requirements include a demand that the computer and/or display, after a certain period of inactivity, shall reduce its power consumption to a lower level in one or more stages. The length of time to reactivate the computer shall be reasonable for the user.
Labelled products must meet strict environmental demands, for example, in respect of the reduction of electric and magnetic fields, physical and visual ergonomics and good usability.
Environmental Requirements
Flame retardants
Flame retardants are present in printed circuit boards, cables, wires, casings and housings. In turn, they delay the spread of fire. Up to thirty percent of the plastic in a computer casing can consist of flame retardant substances. Most flame retardants contain bromine or chloride and these are related to another group of environmental toxins, PCBs, which are suspected to give rise to severe health effects, including reproductive damage in fisheating birds and mammals, due to the bioaccumulative* processes. Flame retardants have been found in human blood and researchers fear that disturbances in foetus development may occur.
TCO’99 demand requires that plastic components weighing more than 25 grams must not contain flame retardants with organically bound chlorine and bromine. Flame retardants are allowed in the printed circuit boards since no substitutes are available.
Lead**
Lead can be found in picture tubes, display screens, solders and capacitors. Lead damages the nervous system and in higher doses, causes lead poisoning.
TCO’99 requirement permits the inclusion of lead since no replacement has yet been developed.
Cadmium**
Cadmium is present in rechargeable batteries and in the colourgenerating layers of certain computer displays. Cadmium damages the nervous system and is toxic in high doses. TCO’99 requirement states that batteries, the colourgenerating layers of display screens and the electrical or electronics components must not contain any cadmium.
Mercury**
Mercury is sometimes found in batteries, relays and switches,
Mercury damages the nervous system and is toxic in high doses.
TCO’99 requirement states that batteries may not contain any Mercury. It also demands that no mercury is present in any of the electrical or electronics components associated with the display unit.
CFCs (freons)
CFCs (freons) are sometimes used for washing printed circuit boards. CFCs break down ozone and thereby damage the ozone layer in the stratosphere, causing increased reception on Earth of ultraviolet light with consequent increased risks of skin cancer (malignant melanoma).
The relevant TCO’99 requirement; Neither CFCs nor HCFCs may be used during the manufacturing and assembly of the product or its packaging.
*Bio-accumulative is defined as substances which accumulate within living organisms.
**Lead, Cadmium and Mercury are heavy metals which are Bio-accumulative.
To obtain complete information on the environmental criteria document, order from:
TCO Development Unit
SE-114 94 Stockholm SWEDEN
FAX Number: +46 8 782 92 07
E-mail (Internet): development@tco.se
You may also obtain current information on TCO’99 approved and labelled products by visiting their website at: http://www.tcodevelopment.com
00Cover_all.p65 |
3 |
20/05/2003, 11:43 |

Index
Warning, Caution ............................... |
English-1 |
Declaration ......................................... |
English-1 |
Contents ............................................. |
English-2 |
Quick Start ......................................... |
English-2 |
Controls .............................................. |
English-6 |
Recommended use ............................ |
English-9 |
Varování, Upozornûní........................... |
âesky-1 |
Prohlá‰ení ............................................ |
âesky-1 |
Obsah .................................................. |
âesky-2 |
Rychl˘ start ........................................... |
âesky-2 |
Ovládací prvky ...................................... |
âesky-6 |
Provozní pokyny ................................... |
âesky-9 |
Warnung, Vorsicht ............................. |
Deutsch-1 |
Erklärung ........................................... |
Deutsch-1 |
Inhalt ................................................. |
Deutsch-2 |
Kurzanleitung .................................... |
Deutsch-2 |
Bedienelemente ................................ |
Deutsch-6 |
Einsatzempfehlungen ........................ |
Deutsch-9 |
ΠΡ ΕΙ∆ Π ΙΗΣΗ, ΠΡ Σ Η ..... |
Ελληνικά-1 |
∆ήλωση ......................................... |
Ελληνικά-1 |
Περιε µενα ................................. |
Ελληνικά-2 |
Γρήγ$ρη Εκκίνηση ....................... |
Ελληνικά-2 |
Πλήκτρα Ελέγ $υ ........................ |
Ελληνικά-6 |
Πρ$τειν µενη ρήση .................. |
Ελληνικά-9 |
Advertencia, Peligro .......................... |
Español-1 |
Declaración ....................................... |
Español-1 |
Contenido .......................................... |
Español-2 |
Inicio rápido ....................................... |
Español-2 |
Controles ........................................... |
Español-6 |
Uso recomendado ............................. |
Español-9 |
Avertissement, Attention .................. |
Français-1 |
Déclaration ....................................... |
Français-1 |
Sommaire ......................................... |
Français-2 |
Mise en marche rapide .................... |
Français-2 |
Commandes ..................................... |
Français-6 |
Conseils d’utilisation ........................ |
Français-9 |
Avvertenza, Attenzione |
...................... Italiano-1 |
Dichiarazione ..................................... |
Italiano-1 |
Contenuto .......................................... |
Italiano-2 |
Guida rapida ...................................... |
Italiano-2 |
Controlli .............................................. |
Italiano-6 |
Uso consigliato ................................... |
Italiano-9 |
Waarschuwing, Let op! ................ |
Nederlands-1 |
Kennisgeving ............................... |
Nederlands-1 |
Inhoud ......................................... |
Nederlands-2 |
Snel aan de slag .......................... |
Nederlands-2 |
Besturingselementen ................... |
Nederlands-6 |
Aanbevolen gebruik ..................... |
Nederlands-9 |
Uwagi dotyczàce zasilania monitora |
.... Polski-1 |
Ostrze˝enie, Uwaga ............................. |
Polski-2 |
Deklaracja ............................................ |
Polski-2 |
ZawartoÊç opakowania ........................ |
Polski-3 |
Pod∏àczenie monitora .......................... |
Polski-3 |
Przyciski ............................................... |
Polski-7 |
Zalecenia eksploatacyjne ..................... |
Polski-9 |
Предупреждение, Внимание ......... |
Русский-1 |
Заявление ....................................... |
Русский-1 |
Содержимое ................................... |
Русский-2 |
Краткое руководство по |
|
началу работы ................................ |
Русский-2 |
Органы управления........................ |
Русский-6 |
Рекомендации по эксплуатации .... |
Русский-9 |
D∂kkat, Uyari ....................................... |
Türkçe-1 |
Bildirim ................................................ |
Türkçe-1 |
∑çindekiler ............................................ |
Türkçe-2 |
H∂zl∂ Baµlama ...................................... |
Türkçe-2 |
Kontroller ............................................. |
Türkçe-6 |
Tavsiye Edilen Kullan∂m ...................... |
Türkçe-9 |
00Cover_all.p65 |
4 |
20/05/2003, 11:43 |
 English
 âesky
âesky
 Deutsch
 Ελληνικά
 Español
 Français
 Italiano
 Nederlands
 Polski
 Русский
 Türkçe
01b_XChapterOpener |
1 |
20/05/2003, 11:43 |
01b_XChapterOpener |
2 |
20/05/2003, 11:43 |
WARNING
TO PREVENT FIRE OR SHOCK HAZARDS, DO NOT EXPOSE THIS UNIT TO RAIN OR MOISTURE. ALSO, DO NOT USE THIS UNIT’S POLARIZED PLUG WITH AN EXTENSION CORD RECEPTACLE OR OTHER OUTLETS UNLESS THE PRONGS CAN BE FULLY INSERTED.
REFRAIN FROM OPENING THE CABINET AS THERE ARE HIGH VOLTAGE COMPONENTS INSIDE. REFER SERVICING TO QUALIFIED SERVICE PERSONNEL.
|
|
CAUTION |
|
|
|
|
|
|
|
RISK OF ELECTRIC SHOCK • DO NOT OPEN |
|
|
|
|
|
CAUTION: |
TO REDUCE THE RISK OF ELECTRIC SHOCK, DO NOT REMOVE COVER (OR BACK). NO USER |
||
|
SERVICEABLE PARTS INSIDE. REFER SERVICING TO QUALIFIED SERVICE PERSONNEL. |
||
This symbol warns user that uninsulated voltage within the unit may have sufficient magnitude to cause electric shock. Therefore, it is dangerous to make any kind of contact with any part inside this unit.
This symbol alerts the user that important literature concerning the operation and maintenance of this unit has been included. Therefore, it should be read carefully in order to avoid any problems.
Caution:
When operating the AccuSync LCD51VM/AccuSync LCD71VM with a 220-240V AC power source in Europe, use the power cord provided with the monitor.
In the UK, a BS approved power cord with a moulded plug has a Black (five Amps) fuse installed for use with this equipment. If a power cord is not supplied with this equipment please contact your supplier.
For all other cases, use a power cord that matches the AC voltage of the power outlet and has been approved by and complies with the safety standard of your particular country.
English
Declaration
Declaration of the Manufacturer
We hereby certify that the colour monitor AccuSync LCD51VM/AccuSync LCD71VM are in compliance with
Council Directive 73/23/EEC:
– EN 60950
Council Directive 89/336/EEC:
–EN 55022
–EN 61000-3-2
–EN 61000-3-3
–EN 55024
and marked with
NEC-Mitsubishi Electric Visual
Systems, Corp.
MS Shibaura Bldg., 13-23,
Shibaura 4-chome,
Minato-Ku, Tokyo 108-0023, Japan
As an ENERGY STAR Partner, NEC-Mitsubishi Electric Visual Systems Corp. has determined that this product meets the ENERGY STAR guidelines for energy efficiency. ENERGY STAR is a U.S. registered mark.
ErgoDesign is a registred trademark of NEC-Mitsubishi Electric Visual Systems Corporation in Austria, Benelux, Denmark, France, Germany, Italy, Norway, Spain, Sweden, U.K..
IBM PC/XT/AT, PS/2, MCGA, VGA, 8514/A and XGA are registered trademarks of International Business Machines Corporation.
Apple and Macintosh are registered trademarks of Apple Computer Inc. Microsoft and Windows are registered trademarks of the Microsoft Corporation. NEC is a registered trademark of NEC Corporation.
All other trademarks or registered trademarks are property of their respective owners.
English-1
01_English |
1 |
20/05/2003, 11:44 |

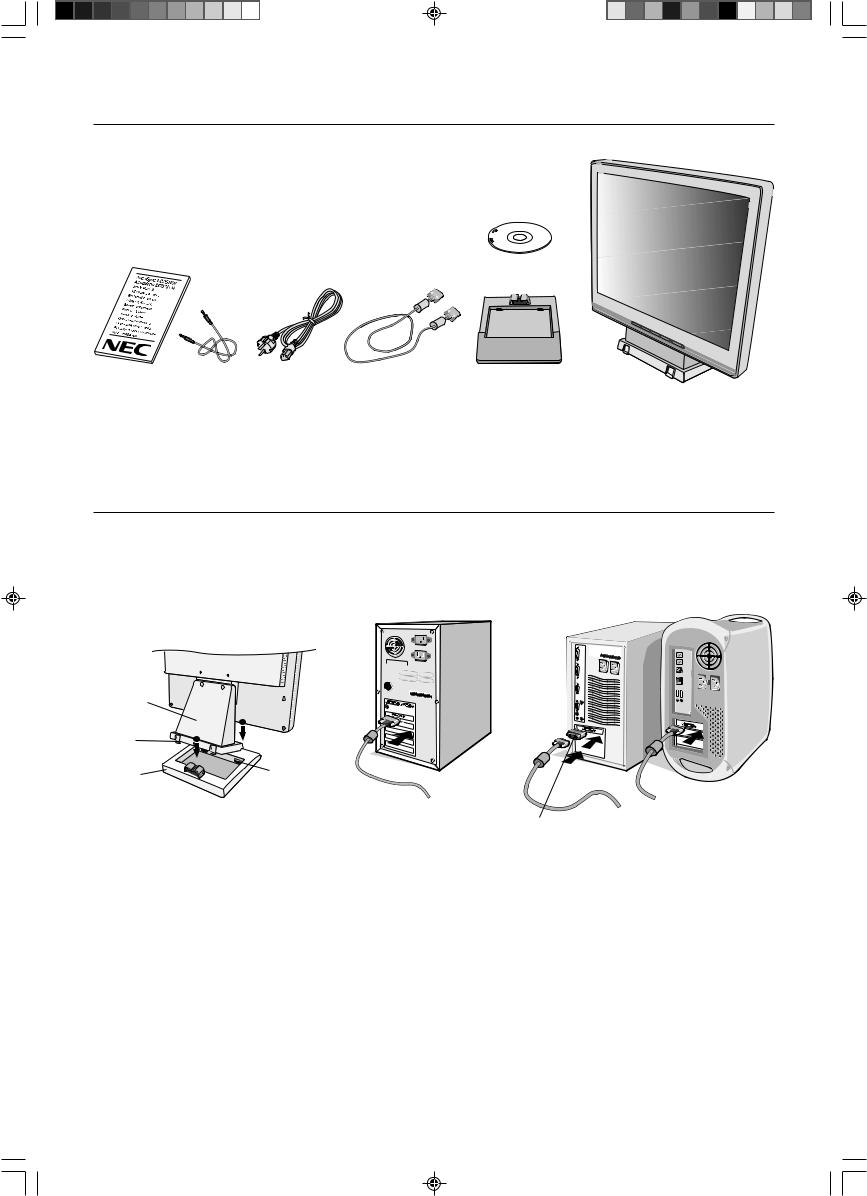
Contents
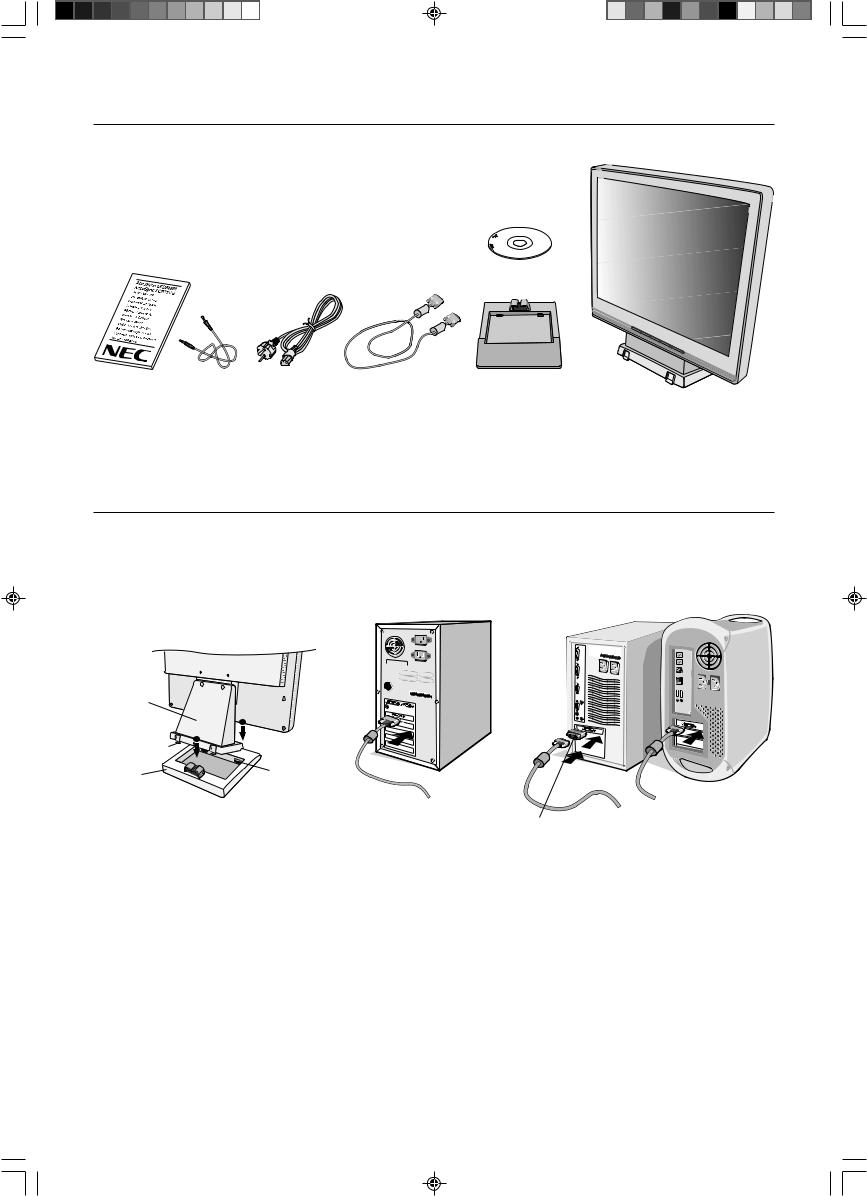
Your new NEC AccuSync LCD monitor box* should contain the following:
•AccuSync LCD monitor with tilt base
•Audio Cable
•Power Cord
•Video Signal Cable
• User’s Manual
•CD-ROM
CD-ROM
User’s Manual Audio Cable |
Power Cord |
Video Signal Cable |
Base Stand |
AccuSync LCD monitor |
|
|
|
|
(base stand not connected) |
*Remember to save your original box and packing material to transport or ship the monitor.
Quick Start
To attach the Base to the LCD Stand:
1.Insert the front of the LCD stand into the holes in the front of the Base (Figure S.1).
2.Next, position the locking tabs on the back side of the LCD stand with the holes on the Base. Lower the Stand in place until locking tabs are secure (Figure S.1).
Stand
|
1 |
|
Locking Tabs |
2 |
|
|
||
Base |
Front Base |
|
Holes |
||
|
Figure S.1 |
Figure A.1 |
Macintosh Cable
Adapter (not included)
Figure A.2
To attach the AccuSync LCD monitor to your system, follow these instructions:
1.Turn off the power to your computer.
2.For the PC with Analog output: Connect the 15-pin mini D-SUB signal cable to the connector of the display card in your system (Figure A.1). Tighten all screws.
For the Mac: Connect the MultiSync Macintosh cable adapter (not included) to the computer. Attach the 15-pin mini D-SUB signal cable to the MultiSync Macintosh cable adapter (Figure A.2). Tighten all screws.
NOTE: Some Macintosh systems do not require a Macintosh cable adapter.
English-2
01_English |
2 |
20/05/2003, 11:44 |
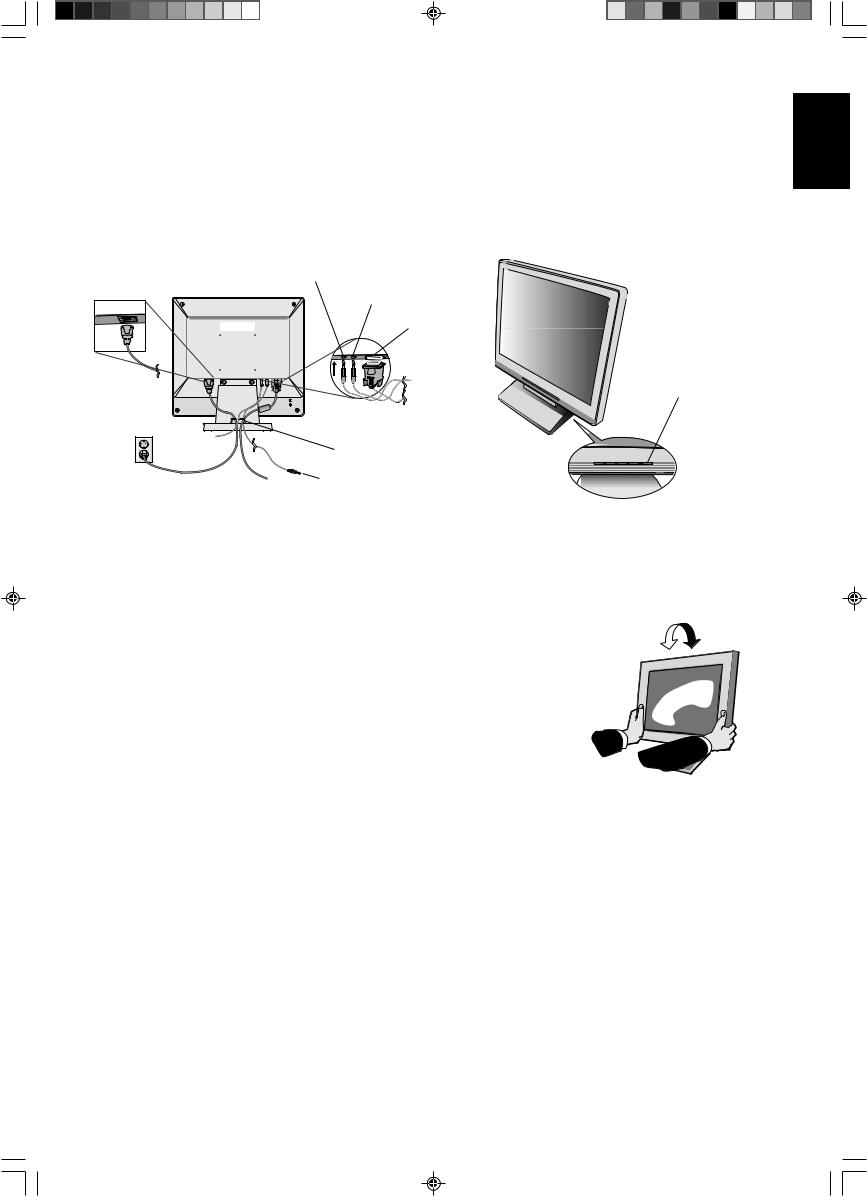
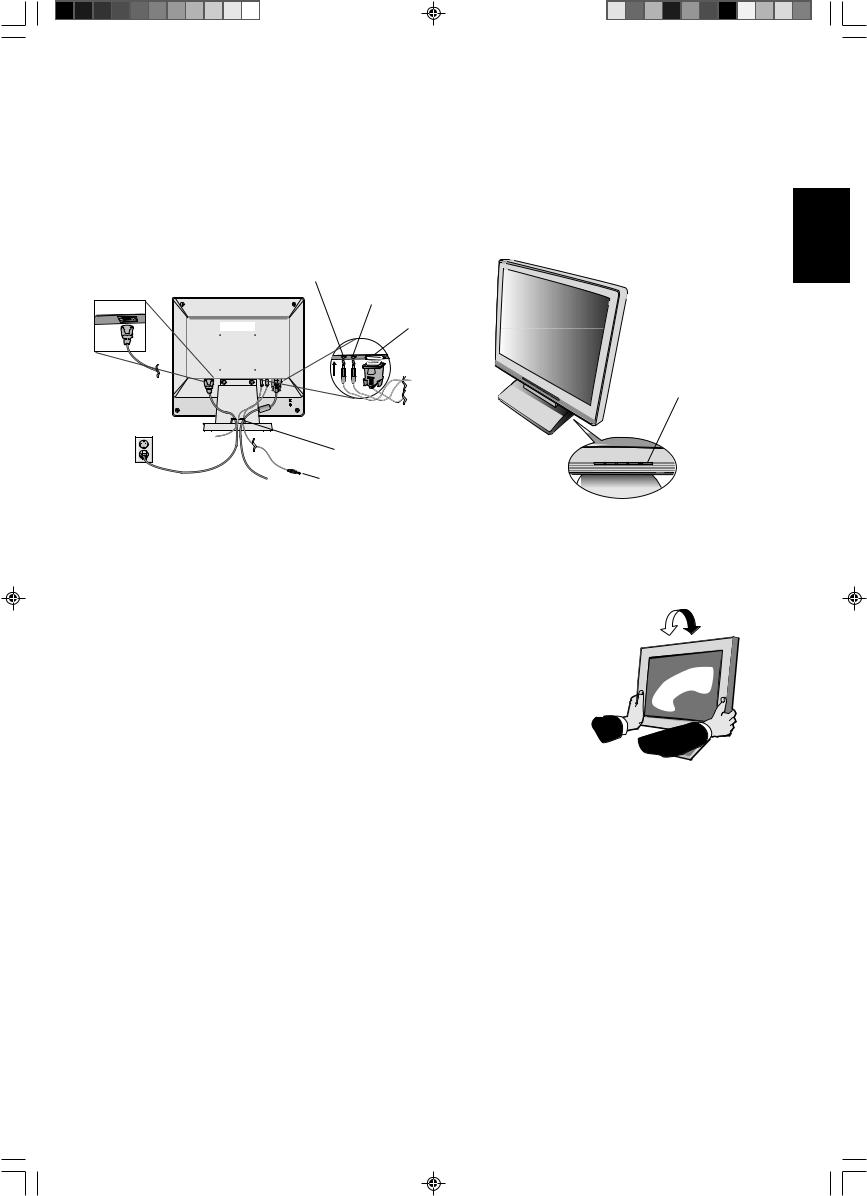
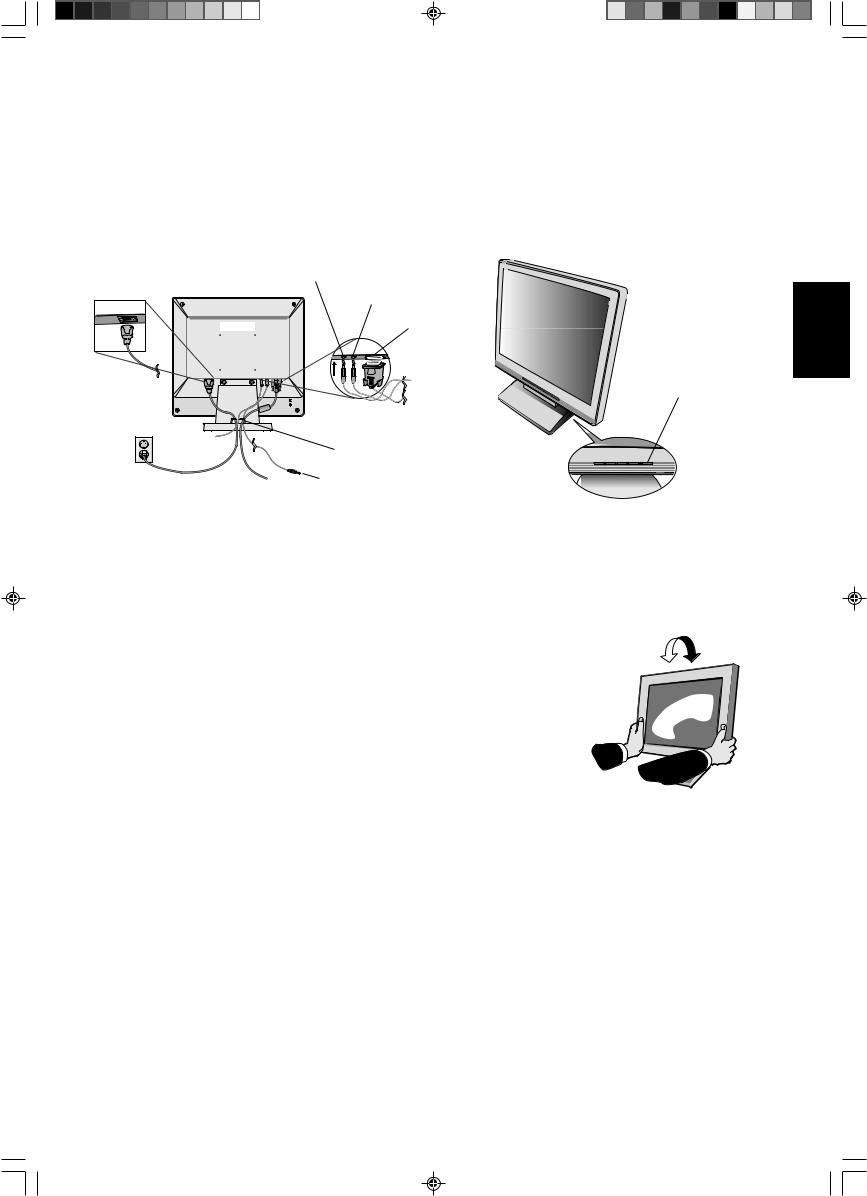
3.Connect the 15-pin mini D-SUB of the video signal cable, Audio Cable and Headphone (not included) to the appropriate connector on the back of the monitor (Figure B.1).
4.Connect one end of the power cord to the monitor and the other end to the power outlet. Place the Video Signal Cable, Headphone (not included) and power cord to the Cable holder (Figure B.1).
NOTE: Adjust position of cable that place under the Cable holder to avoid damage for cable or monitor.
NOTE: If you use this monitor at AC125-240V, please refer to Recommended Use section of this manual for proper selection of power cord.
5. Turn on the monitor with the front power button and the computer (Figure C.1).
HEAD PHONE
AUDIO INPUT
Input (D-Sub)
Power Button
Cable holder
Connect to
Computer audio output
Figure B.1 |
Figure C.1 |
6.No-touch Auto Adjust automatically adjusts the monitor to optimal settings upon initial setup for most timings. For further adjustments, use the following OSM controls:
•Auto Adjust Contrast
•Auto Adjust
Refer to the Controls section of this User’s Manual for a full description of these OSM controls.
NOTE: If you have any problem, please refer to the Troubleshooting section of this
User’s Manual.
Tilt
Grasp both sides of the monitor screen with your hands and adjust the tilt as desired (Figure TS.1).
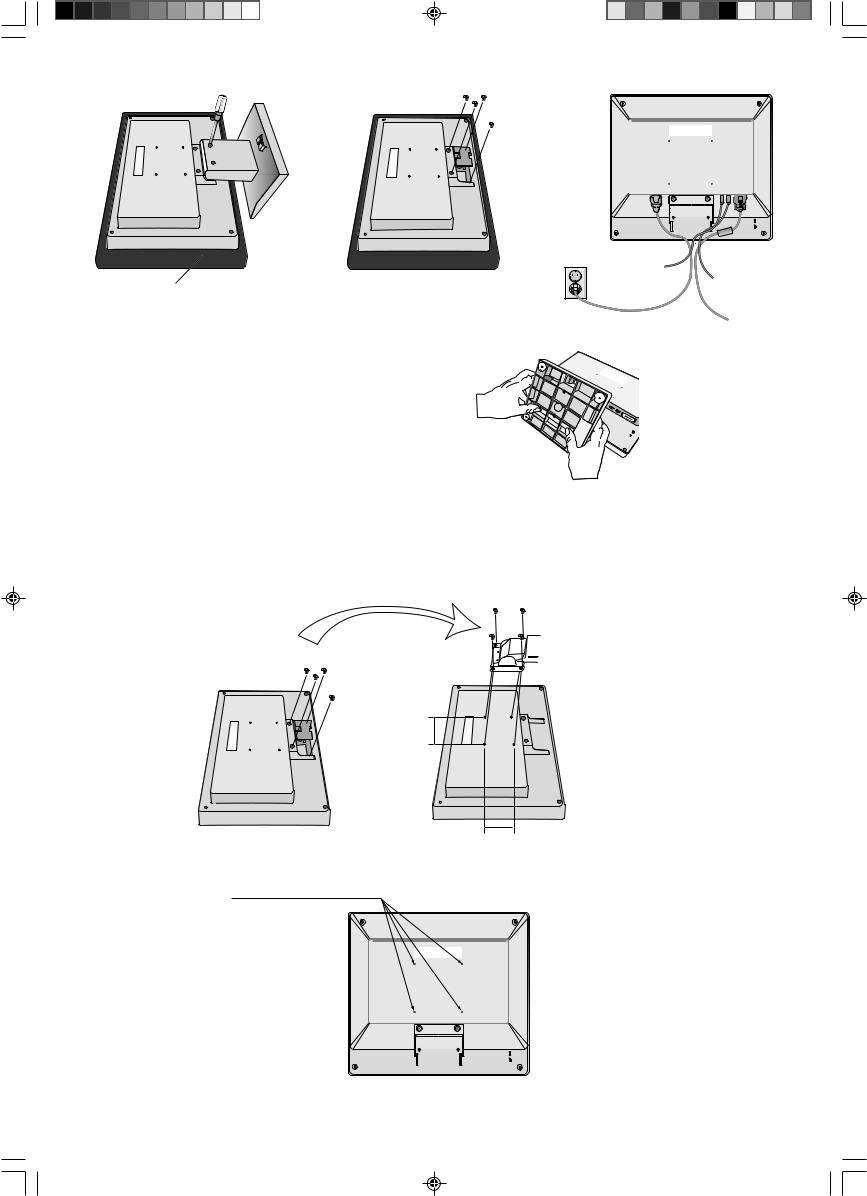
Remove Monitor Stand for Mounting
To prepare the monitor for alternate mounting purposes: |
Figure TS.1 |
1.Disconnect all cables.
2.Place monitor face down on a non-abrasive surface (Figure R.1).
3.Remove the 2 screws connecting the monitor to the stand and lift off the stand (Figure R.1)
4.Remove the 4 screws connecting the monitor to the stand and lift off the stand, assembly (Figure R.2). The monitor is now ready for mounting in an alternate manner.
5.Connect the AC cord and signal cable to the back of the monitor (Figure R.3).
6.Reverse this process to reattach stand.
NOTE: Use only VESA-compatible alternative mounting method.
NOTE: Handle with care when removing monitor stand.
English-3
English
01_English |
3 |
20/05/2003, 11:44 |

Non-abrasive surface
Figure R.1 |
Figure R.2 |
Figure R.3 |
Removing the Base
NOTE: Always remove the Base when shipping the LCD.
1. Place monitor face down on a non-abrasive surface (Figure R.1).
2. While using your thumbs, press the bottom tabs upward to unlock.
3. Press the top tabs down to unlock and pull off the stand.
Connecting a Flexible Arm
This LCD monitor is designed for use with a flexible arm.
Please use the attached screws (4pcs) as show in the picture when installing. To meet the safety requirements, the monitor must be mounted to an arm which guaranties the necessary stability under consideration of the weight of the monitor.
The LCD monitor shall only be used with an approved arm (e.g. GS mark).
Replace screws
Thickness of Bracket
(Arm) 2.0 ~ 3.2 mm
Tighten all screws
75 mm (LCD51VM)
100 mm (LCD71VM)
75 mm (LCD51VM)
100 mm (LCD71VM)
Specifications
4-SCREWS (M4)
(MAX depth: 8.5 mm)
If use other screw, check depth of hole.
Weight of LCD assembly: 2.6 kg - LCD51VM (MAX) 4.0 kg - LCD71VM (MAX)
English-4
01_English |
4 |
20/05/2003, 11:44 |
Controls
OSM (On-Screen Manager) control buttons on the front of the monitor function as follows:
1. Basic function at pressing each key
|
|
|
|
|
|
|
|
|
|
|
|
|
Button |
|
SELECT |
|
|
– |
|
|
+ |
|
|
AUTO / RESET |
|
|
|
|
|
|
|
|
|
|
|
|
|
|
At No OSD |
Showing OSM. |
Shortcut to Bright adjust |
Shortcut to Volume adjust |
“Auto adjust” operate. |
||||||||
showing |
|
|
|
window. |
window. |
|
|
|
||||
|
|
|
|
|
|
|
|
|
|
|
|
|
At OSD showing |
Go to Adjustment stage. |
Cursor goes to left. |
Cursor goes to right. |
|
|
|
||||||
(Icon selection stage) |
|
|
|
|
|
|
|
|
|
|
|
|
At OSD showing |
Go to Icon selection stage. |
Adjust value decrease or |
Adjust value increase or |
Reset operation. |
||||||||
(Adjustment stage) |
|
|
|
Cursor for adjust goes to left. |
Cursor for adjust goes to |
Mute off/on switch on Volume |
||||||
|
|
|
|
|
|
|
right. |
adjustment window. |
||||
|
|
|
|
|
|
|
|
|
|
|
|
|
NOTE: To quit the OSM screen at any time during the operation, press SELECT key for longer than 3 seconds.
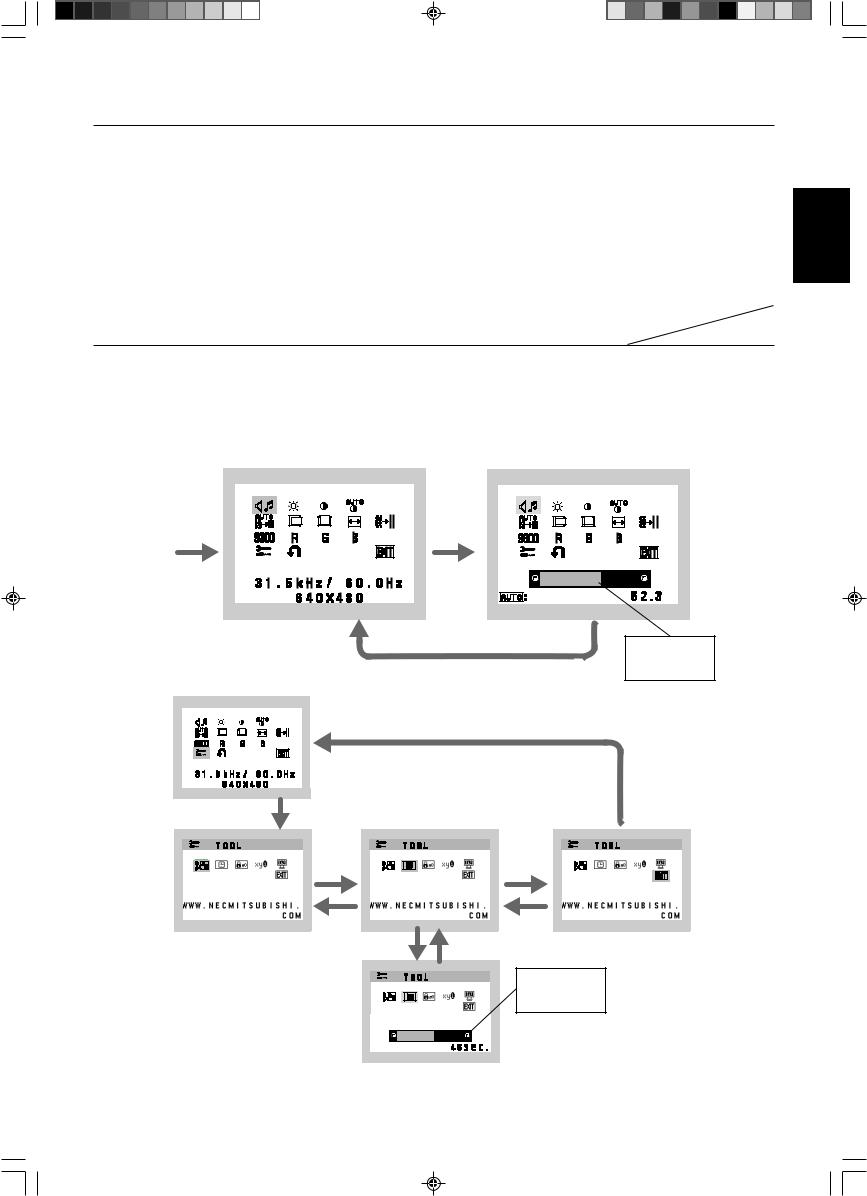
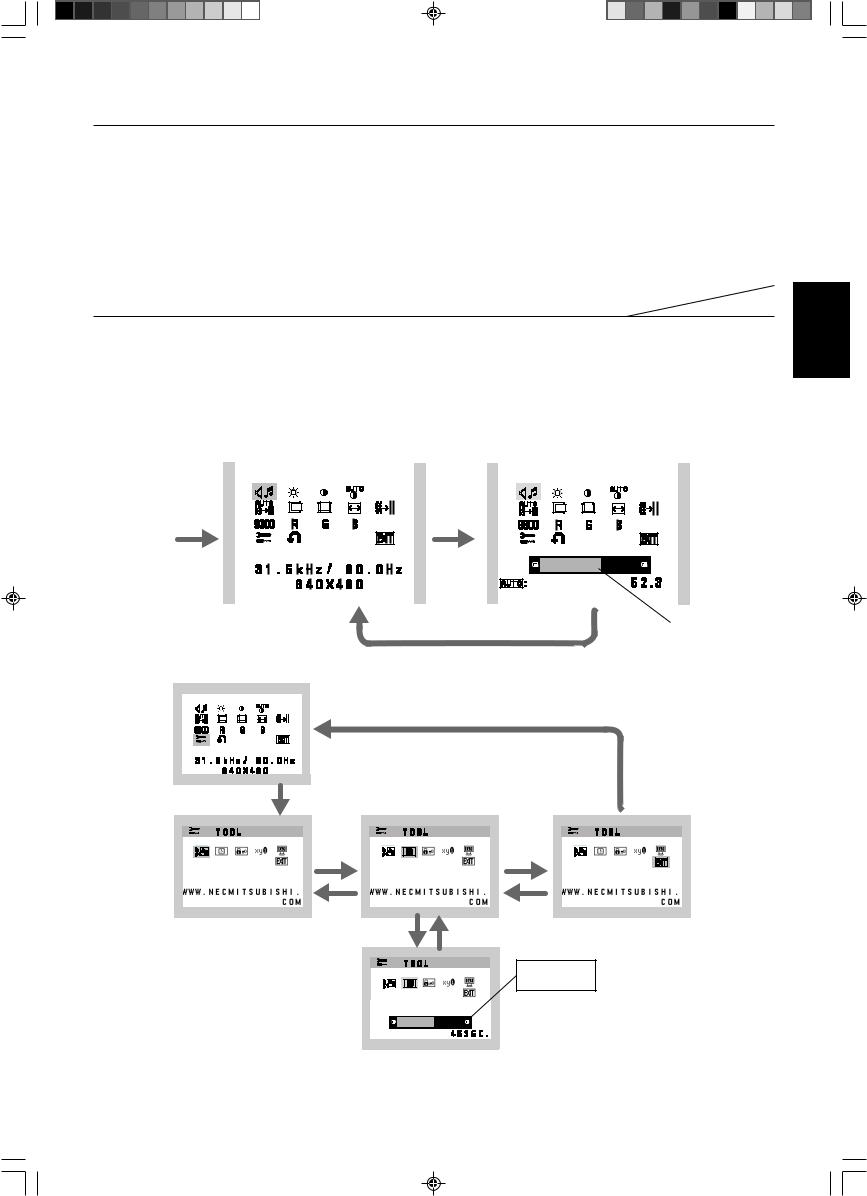
2. OSM structure
Main Menu (Icon Select) |
|
Main Menu (Adjust) |
|
|
|
|
|
|
Press |
Press |
“SELECT” |
“SELECT” |
key |
key |
VOLUME |
M U T E |
% |
|
|
|
|
|
|
Press “SELECT” key |
|
|
|
|
Adjust by using |
|||
|
|
|
“–” or “+” |
|
|
|
|
|
|
Example Tool:
Press “SELECT” key
Press
“SELECT” key
Press |
Press |
“–” or “+” |
“–” or “+” |
Sub Menu (Icon Select) |
Press |
“SELECT” key
O S M T U R N O F F |
Sub Menu (Adjust)
Adjust by using
“–” or “+”
English
English-5
01_English |
5 |
20/05/2003, 11:44 |
AUDIO
Audio volume icon is chosen, depending on the volume condition (AUTO/RESET).
BRIGHTNESS
Adjusts the overall image and background screen brightness.
CONTRAST
Adjusts the image brightness in relation to the background.
AUTO CONTRAST
Adjusts the image displayed for non-standard video inputs.
AUTO ADJUST
Automatically adjusts the Image Position, the H. Size and Fine setting.
LEFT/RIGHT
Controls Horizontal Image Position within the display area of the LCD.
DOWN/UP
Controls Vertical Image Position within the display area of the LCD.
H. SIZE
Adjusts the horizontal size by increasing or decreasing this setting.
FINE
Improves focus, clarity and image stability by increasing or decreasing this setting.
COLOUR CONTROL SYSTEMS
Four colour presets (9300/7500/6500/USER) select the desired color setting.
COLOUR RED
Increase or decreases Red. The change will appear on screen.
COLOUR GREEN
Increase or decreases Green. The change will appear on screen.
COLOUR BLUE
Increase or decreases Blue. The change will appear on screen.
TOOL
Selecting TOOL allows you to get into the sub menu.
FACTORY PRESET
Selecting Factory Preset allows you to reset all OSM control settings back to the factory settings. The RESET button will need to be held down for several seconds to tage effect. Individual settings can be reset by highlighting the control to be reset and pressing the RESET button.
EXIT
Selecting EXIT allows you exit OSM menu/ sub menu.
LANGUAGE
OSM control menus are available in seven languages.
OSM TURN OFF
The OSM control menu will stay on as long as it is in use. In the OSM Turn OFF submenu, you can select how long the monitor waits after the last touch of a button to shut off the OSM control menu. The preset choices are 10 - 120 seconds by 5 seconds step.
English-6
01_English |
6 |
20/05/2003, 11:44 |
OSM LOCK OUT
This control completely locks out access to all OSM control functions without Brightness and Contrast. When attempting to activate OSM controls while in the Lock Out mode, a screen will appear indicating the OSM are locked out. To activate the OSM Lock Out function, press “AUTO/ RESET”, then “+” key and hold down
simultaneously. To de-activate the OSM Lock Out, press “AUTO/ RESET”, then “+” key and hold down simultaneously.
RESOLUTION NOTIFIER
If ON is selected, a message will appear on the screen after 30 seconds, notifying you that the resolution is not at optimal resolution.
MONITOR INFO
Indicates the model and serial numbers of your monitor.
OSM Warning
OSM Warning menus disappear with Exit button.
NO SIGNAL: This function gives a warning when there is no signal present. After power is turned on or when there is a change of input signal or video is inactive, the No Signal window will appear.
RESOLUTION NOTIFIER: This function gives a warning of use with optimized resolution. After power is turned on or when there is a change of input signal or the video signal doesn’t have proper resolution, the Resolution Notifier window will open. This function can be disabled in the TOOL menu.
OUT OF RANGE: This function gives a recommendation of the optimized resolution and refresh rate. After the power is turned on or there is a change of input signal or the video signal doesn’t have proper timing, the Out Of Range menu will appear.
Recommended use
Safety Precautions and Maintenance
FOR OPTIMUM PERFORMANCE, PLEASE NOTE
THE FOLLOWING WHEN SETTING UP AND
USING THE ACCUSYNC LCD COLOUR MONITOR:
•DO NOT OPEN THE MONITOR. There are no user serviceable parts inside and opening or removing covers may expose you to dangerous shock hazards or other risks. Refer all servicing to qualified service personnel.
•Do not spill any liquids into the cabinet or use your monitor near water.
•Do not insert objects of any kind into the cabinet slots, as they may touch dangerous voltage points, which can be harmful or fatal or may cause electric shock, fire or equipment failure.
•Do not place any heavy objects on the power cord. Damage to the cord may cause shock or fire.
•Do not place this product on a sloping or unstable cart, stand or table, as the monitor may fall, causing serious damage to the monitor.
•When operating the LCD monitor with its AC 125-240V power supply, use a power supply aord that matches the power supply voltage of the AC power outlet being used. The power supply cord you use must have been approved by and comply with the safety standards of your country. (Type H05VV-F should be used in Europe).
•In U.K, use a BS-approved power cord with molded plug having a black (5A) fuse installed for use with this monitor. If a power cord is not supplied with this monitor, please contact your supplier.
•Do not place any objects onto the monitor and do not use the monitor outdoors.
•The inside of the fluorescent tube located within the LCD monitor contains mercury. Please follow the bylaws or rules of your municipality to dispose of the tube properly.
Immediately unplug your monitor from the wall outlet and refer servicing to qualified service personnel under the following conditions:
•When the power supply cord or plug is damaged.
•If liquid has been spilled, or objects have fallen into the monitor.
•If the monitor has been exposed to rain or water.
•If the monitor has been dropped or the cabinet damaged.
•If the monitor does not operate normally by following operating instructions.
•Do not bend power cord.
•Do not use monitor in high temperature, humid, dusty, or oily areas.
•Do not cover vent on monitor.
•If monitor is broken, do not come in contact with the liquid crystal and handle with care.
English-7
English
01_English |
7 |
20/05/2003, 11:44 |

• Allow adequate ventilation around the monitor so that heat can properly dissipate. Do not block ventilated openings or place the monitor near a radiator or other heat sources. Do not put anything on top of monitor.
CAUTION |
• The power cable connector is the primary means of detaching the system from the power supply. The |
|
|
|
monitor should be installed close to a power outlet, which is easily accessible. |
•Handle with care when transporting. Save packaging for transporting.
•Image Persistence: Image persistence is when a residual or “ghost” image of a previous image remains visible on the screen. Unlike CRT monitors, LCD monitors’ image persistence is not permanent, but constant images being displayed for a long period of time should be avoided.
To alleviate image persistence, turn off the monitor for as long as the previous image was displayed. For example, if an image was on the monitor for one hour and a residual image remains, the monitor should be turned off for one hour to erase the image.
NOTE: As with all personal display devices, NEC-Mitsubishi Electronics Display-Europe recommends using a moving screen saver at regular intervals whenever the screen is idle or turning off the monitor when not in use.
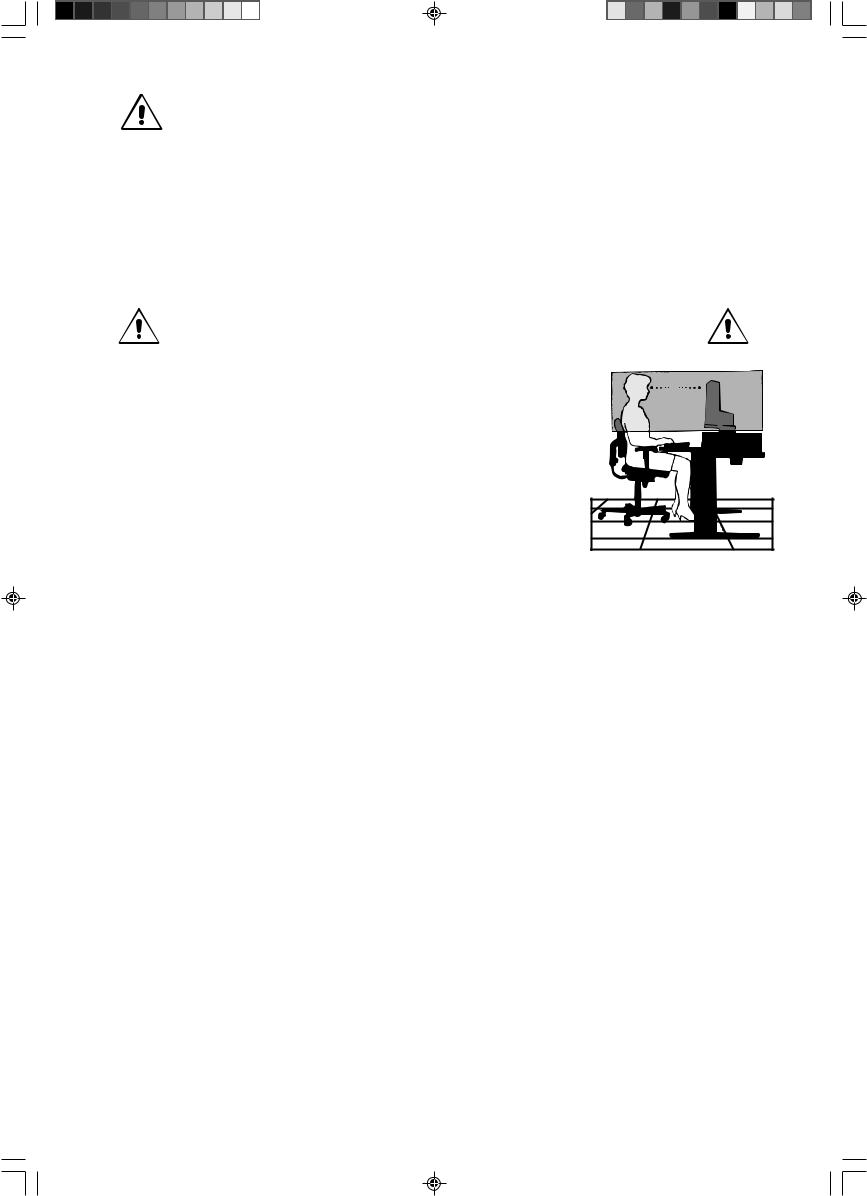
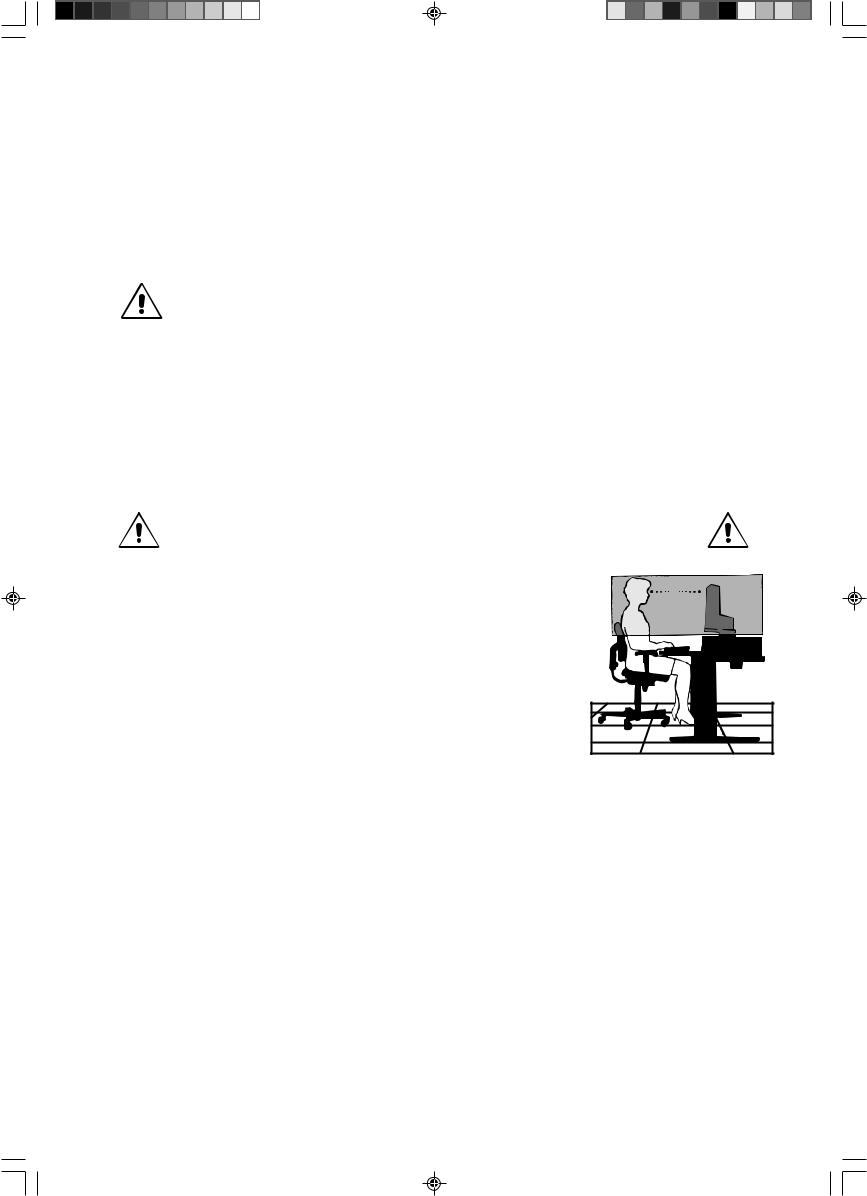
CORRECT PLACEMENT AND ADJUSTMENT OF THE MONITOR CAN
REDUCE EYE, SHOULDER AND NECK FATIGUE. CHECK THE
FOLLOWING WHEN YOU POSITION THE MONITOR:
•For optimum performance, allow 20 minutes for warm-up.
•Adjust the monitor height so that the top of the screen is at or slightly below eye level. Your eyes should look slightly downward when viewing the middle of the screen.
• Position your monitor no closer than 40 cm and no further away than 70 cm from your eyes. The optimal distance is 58 cm.
•Rest your eyes periodically by focusing on an object at least 6 m away. Blink often.
•Position the monitor at a 90° angle to windows and other light sources to minimize glare and reflections. Adjust the monitor tilt so that ceiling lights do not reflect on your screen.
•If reflected light makes it hard for you to see your screen, use an antiglare filter.
•Clean the LCD monitor surface with a lint-free, non-abrasive cloth. Avoid using any cleaning solution or glass cleaner!
•Adjust the monitor’s brightness and contrast controls to enhance readability.
•Use a document holder placed close to the screen.
•Position whatever you are looking at most of the time (the screen or reference material) directly in front of you to minimize turning your head while you are typing.
•Avoid displaying fixed patterns on the monitor for long periods of time to avoid image persistence (after-image effects).
•Get regular eye checkups.
Ergonomics
To realize the maximum ergonomics benefits, we recommend the following:
•Use the preset Size and Position controls with standard signals.
•Use the preset Colour Setting.
•Use non-interlaced signals with a vertical refresh rate between 60-75 Hz.
•Do not use primary colour blue on a dark background, as it is difficult to see and may produce eye fatigue to insufficient contrast.
English-8
01_English |
8 |
20/05/2003, 11:44 |

VAROVÁNÍ |
|
|
CHRA≈TE ZA¤ÍZENÍ P¤ED DE·TùM A VLHKEM. ZABRÁNÍTE TAK NEBEZPEâÍ POÎÁRU NEBO ÚRAZU |
|
|
ELEKTRICK¯M PROUDEM. POLARIZOVANOU ZÁSTRâKU JEDNOTKY NEPOUÎÍVEJTE VE SPOJENÍ SE ZÁSUVKOU |
|
|
PRODLUÎOVACÍ ·≈ÒRY NEBO JIN¯MI ZÁSUVKAMI, POKUD KOLÍKY NELZE ZCELA ZASUNOUT. |
|
|
UVNIT¤ ZA¤ÍZENÍ SE NACHÁZÍ VYSOKONAPùËOVÉ KOMPONENTY, PROTO SK¤Í≈ NEOTEVÍREJTE. SERVIS |
|
|
SVù¤TE KVALIFIKOVANÉ OSOBù. |
|
|
UPOZORNùNÍ |
âesky |
|
RIZIKO ÚRAZU ELEKTRICK¯M PROUDEM • NEOTVÍRAT |
||
|
||
UPOZORNùNÍ: VZHLEDEM K RIZIKU ÚRAZU ELEKTRICK¯M PROUDEM NEODNÍMEJTE KRYT (NEBO ZADNÍ âÁST). |
|
|
UVNIT¤ SE NENACHÁZEJÍ DÍLY, DO KTER¯CH UÎIVATEL MÒÎE ZASAHOVAT. SERVIS SVù¤TE |
|
|
KVALIFIKOVANÉ OSOBù. |
|
|
Tento symbol upozorÀuje uÏivatele na neizolované napûtí v rámci jednotky, jehoÏ intenzita mÛÏe b˘t |
|
|
dostateãnû vysoká, aby zpÛsobila úraz elektrick˘m proudem. Jak˘koli kontakt s libovoln˘m dílem uvnitfi |
|
|
jednotky je proto nebezpeãn˘. |
|
|
Tento symbol upozorÀuje uÏivatele na dÛleÏitou literaturu t˘kající provozu a údrÏby jednotky dodanou spoleãnû |
|
|
s tímto zafiízením. Chcete-li pfiedejít problémÛm, doporuãujeme peãlivé proãtení pfiíslu‰n˘ch materiálÛ. |
|
Upozornûní:
Pfii provozu monitoru AccuSync LCD51VM/AccuSync LCD71VM v síti se stfiídav˘m napûtím 220-240 V v Evropû pouÏívejte napájecí ‰ÀÛru dodávanou s monitorem.
Ve Spojeném království se smí pouÏívat k tomuto monitoru jen schválená ‰ÀÛra BS se zalitou zástrãkou a s ãernou pojistkou
(5A). Není-li napájecí ‰ÀÛra souãástí zafiízení, spojte se s dodavatelem.
Ve v‰ech ostatních pfiípadech pouÏívejte napájecí ‰ÀÛru, která se shoduje se stfiídav˘m napûtím zásuvky a která vyhovuje bezpeãnostním pfiedpisÛm dané zemû.
Prohlá‰ení
Prohlá‰ení v˘robce
Zde tímto prohla‰ujeme, Ïe barevn˘ monitor
AccuSync LCD51VM a AccuSync LCD71VM odpovídají normám
smûrnicemi 73/23/EEC:
– EN 60950
smûrnicemi 89/336/EEC:
–EN 55022
–EN 61000-3-2
–EN 61000-3-3
–EN 55024
a je opatfien oznaãením
NEC-Mitsubishi Electric Visual
Systems, Corp.
MS Shibaura Bldg., 13-23,
Shibaura 4-chome,
Minato-Ku, Tokyo 108-0023, JAPAN
Spoleãnost NEC-Mitsubishi Electric Visual Systems Corp. jako partner ENERGY STAR® urãila, Ïe tento produkt splÀuje poÏadavky smûrnic ENERGY STAR pro efektivní vyuÏití energie. ENERGY STAR je v USA registrovaná známka.
ErgoDesign je registrovaná ochranná známka spoleãnosti NEC Mitsubishi Electric Visual Systems Corporation v Rakousku, Beneluxu, Dánsku, Francii, Nûmecku, Itálii, Norsku, ·panûlsku, ·védsku a Spojeném království.
IBM PC/XT/AT, PS/2, MCGA, VGA, 8514/A a XGA jsou registrované obchodní znaãky spoleãnosti International Business Machines Corporation.
Apple a Macintosh jsou registrované ochranné známky spoleãnosti Apple Computer Inc.
Microsoft a Windows jsou registrované ochranné známky spoleãnosti Microsoft Corporation. NEC je registrovaná ochranná známka spoleãnosti NEC Corporation.
V‰echny ostatní ochranné známky nebo registrované ochranné známky jsou majetkem pfiíslu‰n˘ch vlastníkÛ.
âesky-1
02_Czech |
1 |
20/05/2003, 11:44 |
Obsah
Balení nového monitoru LCD NEC AccuSync* musí pfii dodání obsahovat následující poloÏky:
•monitor LCD AccuSync s otoãnou základnou,
•audio kabel,
•napájecí ‰ÀÛra,
•kabel pro obrazov˘ signál,
• uÏivatelská pfiíruãka,
•CD-ROM.
CD-ROM
UÏivatelská |
Audio kabel |
Napájecí ‰ÀÛra |
Kabel pro |
Podstavec se |
Monitor LCD AccuSync |
pfiíruãka |
|
|
obrazov˘ signál |
základnou |
(základna s podstavcem není |
|
|
|
|
|
pfiipojena) |
*PÛvodní karton a balicí materiál si uschovejte pro pfiípadnou pfiepravu monitoru.
Rychl˘ start
Pfiipevnûní základny k podstavci monitoru:
1.ZasuÀte pfiední ãást podstavce monitoru do otvorÛ na pfiední stranû základny (obrázek S.1).
2.Nasaìte pojistné západky na zadní stranû podstavce monitoru otvory na základnu. SniÏte podstavec tak, aby pojistné západky zapadly (obrázek S.1).
Podstavec
Pojistné
západky
1
2
Základna |
Otvory na |
|
pfiední stranû |
||
|
||
|
základny |
|
|
Adaptér kabelu pro |
|
|
Obrázek S.1 |
Obrázek A.1 |
poãítaãe Macintosh |
Obrázek A.2 |
|
(není souãástí v˘bavy) |
||||
|
|
|
Monitor LCD AccuSync pfiipojíte k poãítaãi následujícím postupem:
1.Vypnûte poãítaã.
2.Osobní poãítaã s analogov˘m v˘stupem: V poãítaãi pfiipojte 15kolíkovou minizástrãku D-SUB signálního kabelu ke konektoru grafické karty (obrázek A.1). Dotáhnûte v‰echny ‰rouby.
Macintosh: Pfiipojte kabelov˘ adaptér (není souãástí dodávky) monitoru MultiSync pro Macintosh do poãítaãe. Pfiipojte
15kolíkovou minizástrãku D-SUB signálního kabelu do adaptéru Macintosh monitoru MultiSync (obrázek A.2). Dotáhnûte v‰echny ‰rouby.
POZNÁMKA: U nûkter˘ch poãítaãÛ Macintosh pouÏití tohoto kabelového adaptéru není nutné.
âesky-2
02_Czech |
2 |
20/05/2003, 11:44 |
3.Pfiipojte 15kolíkovou mini-zástrãku D-SUB kabelu pro obrazov˘ signál, audio kabel a sluchátka (není souãástí dodávky) k pfiíslu‰nému konektoru na zadní stranû monitoru (obrázek B.1).
4.Pfiipojte napájecí ‰ÀÛru k monitoru a druh˘ konec zapojte do elektrické zásuvky. VloÏte kabel pro obrazov˘ signál, sluchátka
(není souãástí dodávky) a napájecí ‰ÀÛru do drÏáku kabelÛ (obrázek B.1).
POZNÁMKA: Upravte pozici kabelu pod drÏák kabelu, aby nedo‰lo k po‰kození kabelu nebo monitoru.
POZNÁMKA: Pokud tento monitor pfiipojíte ke zdroji napájení v rozsahu 125-240 V, v ãásti Provozní pokyny této pfiíruãky najdete informace o volbû poÏadované ‰ÀÛry.
5. Zapnûte pomocí ãelního vypínaãe monitor a poãítaã (obrázek C.1).
Sluchátka
Zvukov˘ vstup
Vstup (D-Sub)
Tlaãítko napájení
DrÏák kabelu
Pfiipojit ke zvukovému v˘stupu poãítaãe
Obrázek B.1 |
Obrázek C.1 |
6.Funkce bezdotykového automatického sefiízení automaticky nastaví monitor pfii poãáteãní instalaci pro vût‰inu ãasování.
K dal‰ímu sefiízení pouÏijte následující ovladaãe OSM:
•Automatické upravení kontrastu
•Auto Adjust (Automatické sefiízení)
Úpln˘ popis tûchto ovladaãÛ OSM je uveden v ãásti Ovladaãe v této uÏivatelské pfiíruãce.
POZNÁMKA: Vyskytnou-li se potíÏe, proãtûte si kapitolu ¤e‰ení potíÏí dále v této pfiíruãce.
Sklon monitoru
Uchopte obû strany obrazovky monitoru a upravte sklon podle poÏadavkÛ (obrázek TS.1).
Odebrání podstavce pfii pfiemístûní monitoru
Pfiíprava monitoru na pfiemístûní pfii zmûnû umístûní:
1. Odpojte v‰echny kabely.
2. Monitor umístûte obrazovkou dolÛ na hladk˘ povrch (obrázek R1).
3. OdstraÀte 2 ‰roubky uchycující monitor k podstavci a zvednutím odeberte podstavec (obrázek R.1).
4. OdstraÀte 4 ‰roubky uchycující monitor k podstavci a zvednutím odeberte sestavu podstavce (obrázek R.2).
Monitor je nyní pfiipraven k pfiemístûní.
5. Pfiipojte napájecí ‰ÀÛru a kabel signálu do zadní ãásti monitoru (obrázek R.3). 6. Pfii upevnûní podstavce postupujte opaãnû.
POZNÁMKA: Pfii jiném upevnûní pouÏívejte pouze prostfiedky kompatibilní s normou VESA.
POZNÁMKA: Pfii sejmutí podstavce monitoru zacházejte se zafiízením opatrnû.
âesky-3
âesky
02_Czech |
3 |
20/05/2003, 11:44 |
Hladk˘ povrch
Obrázek R.1 |
Obrázek R.2 |
Obrázek R.3 |
Odebrání základny
POZNÁMKA: Základnu odeberte vÏdy pfied pfiepravou monitoru.
1. Monitor umístûte obrazovkou dolÛ na hladk˘ povrch (obrázek R1).
2. Palci stisknûte dolní západky smûrem nahoru a odemknûte je.
3. Zatlaãením na horní západky podstavec odemknûte a potom jej sejmûte.
Pfiipojení pruÏného ramene
Tento displej je navrÏen k pouÏití spolu s pruÏn˘m ramenem.
Pfii instalaci pouÏijte uchycené ‰roubky (4 kusy), postupujte podle obrázku. Aby byly splnûny bezpeãnostní poÏadavky, musí b˘t monitor namontován na rameno, které zaruãuje nezbytnou stabilitu s ohledem na hmotnost monitoru.
Ploch˘ monitor je moÏno pouÏívat pouze se schválen˘m ramenem (napfi. znaãky GS).
Vyjmûte a upevnûte ‰rouby
Síla konzoly
 (ramene) 2,0-3,2 mm
Dotáhnûte v‰echny ‰rouby
75 mm (LCD51VM)
100 mm (LCD71VM)
75 mm (LCD51VM)
100 mm (LCD71VM)
Technické údaje
4-·ROUBY (M4)
(MAX. hloubka: 8.5 mm)
Pokud chcete pouÏít jin˘ ‰roub, zkontrolujte hloubku otvoru.
Hmotnost kompletu LCD: 2,6 kg – LCD51VM (MAX.)
4,0 kg – LCD71VM (MAX.)
âesky-4
02_Czech |
4 |
20/05/2003, 11:44 |
Ovladaãe
Ovládací tlaãítka OSM (On-Screen Manager) na pfiední stranû monitoru mají následující funkce:
1. Pfii stisknutí kaÏdého tlaãítka se aktivuje základní funkce
|
|
|
|
|
|
|
|
|
|
|
|
|
Tlaãítko |
|
SELECT |
|
|
– |
|
|
+ |
|
|
AUTO / RESET |
|
|
|
|
|
|
|
|
|
|
|
|
|
|
Pokud se |
Zobrazí nabídku OSM. |
Rychlá úprava jasu. |
Rychlá úprava hlasitosti. |
Aktivace funkce “Auto |
||||||||
nezobrazuje |
|
|
|
|
|
|
|
|
|
adjust” (autom. úprava |
||
Ïádná nabídka |
|
|
|
|
|
|
|
|
|
nastavení). |
||
OSD |
|
|
|
|
|
|
|
|
|
|
|
|
Je zobrazena |
Pfiechod do úrovnû |
Kurzor se posune vlevo. |
Kurzor se posune |
|
|
|
||||||
nabídka OSD |
nastavení. |
|
|
|
vpravo. |
|
|
|
||||
(na úrovni volby ikon) |
|
|
|
|
|
|
|
|
|
|
|
|
Je zobrazena |
Pfiechod do úrovnû volby |
SníÏení hodnoty nebo |
Zv˘‰ení hodnoty nebo |
Reset operace. |
||||||||
nabídka OSD |
pomocí ikon. |
pfiesun kurzoru pro úpravu |
pfiesun kurzoru pro úpravu |
Okno pro úpravu hlasitosti a |
||||||||
(na úrovni operací |
|
|
|
vlevo. |
vpravo. |
vypnutí a zapnutí zvuku. |
||||||
nastavení) |
|
|
|
|
|
|
|
|
|
|
|
|
|
|
|
|
|
|
|
|
|
|
|
|
|
POZNÁMKA: Chcete-li nabídku OSM bûhem jakékoli operace ukonãit, pfiidrÏte tlaãítko SELECT (Vybrat) alespoÀ tfii sekundy.
2. Struktura nabídky OSM
Hlavní nabídka (volba ikon) |
Hlavní nabídka (úpravy) |
|
Stisknûte |
Stisknûte |
|
tlaãítko |
tlaãítko |
|
“SELECT” |
“SELECT” |
|
(Vybrat) |
(Vybrat) |
|
|
|
VOLUME |
|
M U T E |
% |
|
Stisknûte tlaãítko “SELECT” (Vybrat) |
Úpravu proveìte |
|
|
pomocí tlaãítka |
|
|
“–” nebo “+” |
Pfiíklad: |
|
|
Stisknûte tlaãítko “SELECT” (Vybrat) |
|
|
Stisknûte tlaãítko |
|
|
“SELECT” (Vybrat) |
|
|
Stisknûte |
Stisknûte |
|
tlaãítko “–” |
tlaãítko “–” |
|
nebo “+” |
nebo “+” |
|
Dílãí nabídka (volba ikon) |
Stisknûte tlaãítko |
|
|
“SELECT” (Vybrat) |
|
Úpravu proveìte pomocí tlaãítka
“–” nebo “+”
O S M T U R N O F F
Dílãí nabídka (úpravy)
âesky-5
âesky
02_Czech |
5 |
20/05/2003, 11:44 |

AUDIO
V závislosti na nastavení hlasitosti (AUTO/RESET) bude zvolena ikona hlasitosti.
BRIGHTNESS (JAS)
SlouÏí k nastavení celkového jasu obrazu a pozadí obrazovky.
CONTRAST (KONTRAST)
Nastavuje jas obrazu vzhledem k pozadí.
AUTO CONTRAST (AUTOMATICKÉ NASTAVENÍ KONTRASTU)
Nastaví obraz pro nestandardní obrazové vstupy.
AUTO ADJUST (AUTOMATICKÁ ÚPRAVA)
Automaticky nastaví pozici obrazu, vodorovn˘ rozmûr a jemné nastavení.
LEFT/RIGHT (VLEVO NEBO VPRAVO)
Ovládá vodorovnou polohu obrazu na zobrazovací plo‰e monitoru LCD.
DOWN/UP (NAHORU NEBO DOLÒ)
Ovládá svislou polohu obrazu na zobrazovací plo‰e monitoru LCD.
H. SIZE (VODOROVN¯ ROZMùR)
Upraví vodorovn˘ rozmûr zv˘‰ením nebo sníÏením hodnoty tohoto nastavení.
FINE (JEMNÉ DOLADùNÍ)
Zlep‰í zaostfiení, jasnost a stabilitu obrazu zv˘‰ením nebo sníÏením hodnoty tohoto nastavení.
COLOUR CONTROL SYSTEMS (SYSTÉMY PRO ¤ÍZENÍ BAREV)
âtyfii pfiedvolby (9300/7500/6500/USER) slouÏí k poÏadovanému nastavení barev.
COLOUR RED (âERVENÁ)
Zv˘‰í nebo sníÏí úroveÀ ãervené. Zmûna se projeví okamÏitû.
COLOUR GREEN (ZELENÁ)
Zv˘‰í nebo sníÏí úroveÀ zelené. Zmûna se projeví okamÏitû.
COLOUR BLUE (MODRÁ)
Zv˘‰í nebo sníÏí úroveÀ modré. Zmûna se projeví okamÏitû.
TOOL (NÁSTROJ)
Volbou této poloÏky se zobrazí dílãí nabídka.
FACTORY PRESET (NASTAVENÍ V¯ROBCE)
Volba nastavení v˘robce umoÏÀuje vrátit v‰echna nastavení ovladaãÛ OSM na hodnoty nastavené v˘robcem.
Aby se nastavení zavedlo, tlaãítko RESET je tfieba pfiidrÏet po nûkolik vtefiin. K individuálnímu nastavení se lze vrátit oznaãením pfiíslu‰n˘ch ovládacích prvku a stisknutím tlaãítka RESET.
EXIT
Zvolením poloÏky EXIT se nabídka nebo dílãí nabídka OSM zavfie.
LANGUAGE (JAZYK)
Nabídky OSM lze zobrazit v sedmi jazycích.
OSM TURN OFF (VYPNUTÍ OSM)
Nabídka ovládání OSM zÛstane zobrazena, dokud se pouÏívá. V dílãí nabídce Vypnutí OSM lze nastavit prodlevu monitoru pro vypnutí nabídky OSM od posledního stisknutí tlaãítka. âas lze vybrat v rozmezí 10-120 sekund po
5sekundov˘ch krocích.
âesky-6
02_Czech |
6 |
20/05/2003, 11:44 |
OSM LOCK OUT (UZAMâENÍ OSM)
Zcela znemoÏÀuje pfiístup ke v‰em funkcím OSM, kromû jasu a kontrastu. Pfii pokusu o aktivaci ovládání OSM v reÏimu uzamãení se na obrazovce zobrazí sdûlení, Ïe funkce OSM jsou uzamãeny. Chcete-li funkce OSM uzamknout, podrÏte souãasnû stisknutá tlaãítka “AUTO/ RESET” a “+”. Chcete-li nabídku OSM odemknout, pfiidrÏte tlaãítko “AUTO/ RESET” a potom “+”.
RESOLUTION NOTIFIER (UPOZORNùNÍ NA ROZLI·ENÍ)
Pokud vyberete ON (Zapnout), po dobu 30 sekund se zobrazí zpráva o tom, Ïe zvolené rozli‰ení není optimální.
MONITOR INFO (INFORMACE O MONITORU)
Zobrazí model monitoru a jeho sériové ãíslo.
Upozornûní OSM
Nabídky upozornûní OSM zmizí po stisknutí tlaãítka Exit (Konec).
NO SIGNAL (Není signál): Tato funkce v pfiípadû nepfiítomnosti signálu zobrazí upozornûní. Okno No Signal se zobrazí po zapnutí monitoru nebo pokud do‰lo ke zmûnû vstupního signálu ãi není-li obraz aktivní.
RESOLUTION NOTIFIER (Oznámení o rozli‰ení): Tato funkce upozorní na pouÏití optimalizovaného rozli‰ení. Okno Resolution Notifier (Oznámení o rozli‰ení) se otevfie po zapnutí monitoru nebo pokud do‰lo ke zmûnû vstupního signálu nebo pokud obrazov˘ signál není ve správném rozli‰ení. Tuto funkci lze deaktivovat v nabídce TOOL.
OUT OF RANGE (Mimo rozsah): Tato funkce doporuãuje optimalizované rozli‰ení a obnovovací kmitoãet. Po zapnutí monitoru nebo pokud do‰lo ke zmûnû vstupního signálu nebo pokud obrazov˘ signál není ve správném kmitoãtu, otevfie se okno Out Of Range.
Provozní pokyny
Bezpeãnostní opatfiení a údrÏba
CHCETE-LI DOSÁHNOUT OPTIMÁLNÍ V¯KONU,
P¤I INSTALACI A NASTAVOVÁNÍ POSTUPUJTE
PODLE NÁSLEDUJÍCÍCH POKYNÒ:
•MONITOR NEOTVÍREJTE. Uvnitfi monitoru nejsou Ïádné souãásti, které by mohl uÏivatel opravit sám. Pfii otvírání nebo odstraÀování krytÛ se vystavujete nebezpeãí úrazu elektrick˘m proudem a jin˘m rizikÛm. Ve‰keré zásahy tohoto druhu pfienechejte odborníkÛm.
•Dbejte, aby se do monitoru nedostaly tekutiny a nepouÏívejte ho v blízkosti vody.
•Do mezer obalu nezasouvejte Ïádné pfiedmûty. Mohly by se dotknout nebezpeãn˘ch ãástí pod napûtím, coÏ mÛÏe zpÛsobit úraz elektrick˘m proudem, poÏár nebo selhání zafiízení.
•Na napájecí ‰ÀÛru nepokládejte Ïádné tûÏké pfiedmûty. Po‰kození ‰ÀÛry mÛÏe zpÛsobit úraz elektrick˘m proudem nebo poÏár.
•Produkt neumísÈujte na ‰ikmé a nestabilní vozíky, stojany nebo stoly; monitor se mÛÏe pádem váÏnû po‰kodit.
•PouÏíváte-li pro provoz monitoru LCD napájení 125-240V, pouÏijte také odpovídající napájecí ‰ÀÛru, která odpovídá napûtí zásuvky stfiídavého proudu. Napájecí ‰ÀÛra musí b˘t schválena a musí vyhovovat bezpeãnostním pfiedpisÛm platn˘m v pfiíslu‰né zemi. (Typ H05VV-F se musí pouÏívat v Evropû.)
•Ve Velké Británii se smí pouÏívat k tomuto monitoru jen ‰ÀÛra odpovídající normám BS se zalitou zástrãkou a s ãernou pojistkou (5A). Není-li napájecí ‰ÀÛra pfiibalena k monitoru, spojte se prosím s dodavatelem.
•NeumisÈujte na monitor Ïádné pfiedmûty a nepouÏívejte monitor venku.
•Fluorescenãní trubice v monitoru LCD obsahuje rtuÈ. Pfii likvidaci této trubice se fiiìte normami a pfiedpisy místních úfiadÛ.
V níÏe popsan˘ch pfiípadech je nutno monitor okamÏitû odpojit od napájení a pfiivolat odborného technika:
•Dojde k po‰kození napájecí ‰ÀÛry.
•Do monitoru se dostane kapalina nebo monitor upadne na zem.
•Monitor byl vystaven de‰ti nebo vodû.
•Monitor upadne nebo se po‰kodí jeho obal.
•Monitor fiádnû nefunguje, pfiestoÏe jste dodrÏeli v‰echny pokyny.
•Neoh˘bejte síÈovou ‰ÀÛru.
•NepouÏívejte monitor na pfiíli‰ teplém, vlhkém, pra‰ném nebo mastném místû.
•Nezakr˘vejte vûtrací otvory na monitoru.
•JestliÏe monitor praskne, nedot˘kejte se tekut˘ch krystalÛ a manipulujte s monitorem opatrnû.
âesky-7
âesky
02_Czech |
7 |
20/05/2003, 11:44 |
•Zajistûte kolem monitoru odpovídající odvûtrávání, aby se nepfiehfiíval. Nezakr˘vejte vûtrací otvory a
neumísÈujte monitor do blízkosti topidel a jin˘ch tepeln˘ch zdrojÛ. Nepokládejte na monitor Ïádné
pfiedmûty.
UPOZORNùNÍ • Konektor napájecí ‰ÀÛry je hlavním prostfiedkem pro odpojení systému od pfiívodu elektrického napûtí. Monitor je tfieba umístit v blízkosti elektrické zásuvky, která je snadno pfiístupná.
•Pfii dopravû a manipulaci zacházejte se zafiízením opatrnû. Obal uschovejte pro pfiípadnou pfiepravu.
•Dosvit obrazu: Dosvitem obrazu se oznaãuje zbytkov˘ obraz (“duchy”) pfiedchozího obrazu, kter˘ zÛstane viditeln˘ na obrazovce. Narozdíl od bûÏn˘ch monitorÛ není dosvit obrazu na displeji LCD permanentní, ale pfiesto by se mûlo pfiedejít zobrazení jednoho obrazu po dlouhou dobu.
Chcete-li zmírnit dosvit obrazu, vypnûte monitor na stejnû dlouhou dobu, po jakou byl poslední obraz zobrazen. JestliÏe byl napfiíklad obraz na obrazovce hodinu a zÛstal po nûm zbytkov˘ obraz, znovu vypnûte monitor na jednu hodinu, aby obraz zmizel.
POZNÁMKA: Stejnû jako u v‰ech osobních zobrazovacích zafiízení doporuãuje firma NEC-Mitsubishi Electronics Display
pravidelné pouÏívání spofiiãÛ obrazovky pfii neãinnosti a vypnutí monitoru v dobû, kdy se nepouÏívá.
SPRÁVN¯M UMÍSTùNÍM A NASTAVENÍM MONITORU MÒÎETE
P¤EDEJÍT ÚNAVù OâÍ, BOLESTEM RAMEN A ·ÍJE. P¤I NASTAVOVÁNÍ
MONITORU DODRÎUJTE NÁSLEDUJÍCÍ POKYNY:
•Pro dosaÏení optimálního v˘konu nechejte monitor 20 minut zahfiát.
•Umístûte monitor do takové v˘‰ky, abyste horní ãást obrazovky mûli mírnû pod úrovní oãí. Pohled na stfied obrazovky by mûl smûfiovat mírnû dolÛ.
• Doporuãená minimální vzdálenost monitoru od oãí je 40 cm, maximální 70 cm. Optimální vzdálenost je 58 cm.
•Pfii práci zamûfiujte zrak pravidelnû na nûjak˘ pfiedmût vzdálen˘ nejménû 6 m, sníÏí tak namáhání va‰eho zraku. âasto mrkejte.
•Pro minimalizaci odleskÛ a odrazÛ monitor umístûte pod úhlem asi 90° od okna a jiného svûtelného zdroje. Monitor sklopte tak, aby se na obrazovce neodráÏela stropní svûtla.
•Pokud se nelze odrazu svûtla na obrazovce vyhnout, pouÏívejte filtr proti odleskÛm.
•Povrch monitoru LCD ãistûte jemnou látkou, která nepou‰tí vlákna a není agresivní.
NepouÏívejte ãisticí roztoky nebo ãisticí pfiípravky na sklo!
•Jas a kontrast nastavte tak, aby byla zaji‰tûna optimální ãitelnost.
•Stojan na dokumenty pouÏívejte v blízkosti obrazovky.
•Obrazovku nebo referenãní materiál, se kter˘m pracujete, umístûte pfied sebe, abyste pfii psaní museli co nejménû otáãet hlavou.
•Rozhodnû nezobrazujte nehybné vzory na dlouhou dobu, abyste zabránili dosvitu obrazu (magnetické zpoÏdûní obrazu).
•Choìte pravidelnû na prohlídky k oãnímu lékafii.
Ergonomika
Pro maximální ergonomickou pohodu doporuãujeme:
•Pfii pouÏití standardního signálu vyuÏívejte v˘robcem nastavenou velikost a polohu.
•PouÏijte pfiedvolbu nastavení barev.
•PouÏívejte neprokládané signály s vertikální obnovovací frekvencí v rozsahu 60–75 Hz.
•NepouÏívejte primární modrou barvu na tmavém pozadí; je ‰patnû vidût a zpÛsobuje únavu oãí v dÛsledku nedostateãného kontrastu.
âesky-8
02_Czech |
8 |
20/05/2003, 11:44 |
WARNUNG
SETZEN SIE DAS GERÄT WEDER REGEN NOCH FEUCHTIGKEIT AUS, DA ES ANDERNFALLS ZU FEUER ODER STROMSCHLÄGEN KOMMEN KANN. VERWENDEN SIE DEN NETZSTECKER DIESES GERÄTS KEINESFALLS MIT EINEM VERLÄNGERSKABEL ODER EINER STECKDOSENLEISTE, WENN DIE STECKERSTIFTE NICHT VOLLSTÄNDIG EINGEFÜHRT WERDEN KÖNNEN.
ÖFFNEN SIE DAS GEHÄUSE NICHT, DA SICH IM INNEREN KOMPONENTEN BEFINDEN, DIE UNTER HOCHSPANNUNG STEHEN. LASSEN SIE WARTUNGSARBEITEN VON QUALIFIZIERTEN WARTUNGSTECHNIKERN DURCHFÜHREN.
VORSICHT
STROMSCHLAGGEFAHR • NICHT ÖFFNEN
VORSICHT: ENTFERNEN SIE KEINESFALLS ABDECKUNG ODER RÜCKSEITE, DAMIT ES NICHT ZU STROMSCHLÄGEN KOMMT. IM INNEREN BEFINDEN SICH KEINE VOM BENUTZER ZU WARTENDEN KOMPONENTEN. LASSEN SIE WARTUNGSARBEITEN VON QUALIFIZIERTEN WARTUNGSTECHNIKERN DURCHFÜHREN.
Dieses Symbol weist den Benutzer auf nicht isolierte spannungsführende Komponenten im Gerät hin, die Stromschläge verursachen können. Aus diesem Grund dürfen Sie keinesfalls Kontakt mit einer Komponente im Geräteinneren herstellen.
Dieses Symbol weist den Benutzer auf wichtige Informationen zu Betrieb und Pflege dieses Geräts hin. Die Informationen sollten sorgfältig gelesen werden, um Probleme zu vermeiden.
Vorsicht:
Wird der AccuSync LCD51VM/AccuSync LCD71VM in Europa an einem Wechselstromnetz mit 220-240 V betrieben, muss das mit dem Monitor gelieferte Netzkabel verwendet werden.
In Großbritannien ist ein BS-zugelassenes Netzkabel mit diesem Monitor zu verwenden. Das Netzkabel muss mit einem Spritzgussstecker mit schwarzer Sicherung (5 A) ausgestattet sein. Setzen Sie sich mit Ihrem Händler in Verbindung, wenn der Monitor ohne Netzkabel geliefert wurde.
In allen anderen Ländern ist ein für die Spannung des Stromnetzes geeignetes und zugelassenes Netzkabel zu verwenden, dass den Sicherheitsstandards des betreffenden Landes entspricht.
Erklärung
Erklärung des Herstellers
Wir bestätigen hiermit, dass der Farbmonitor AccuSync LCD51VM und AccuSync LCD71VM den folgenden Richtlinien entspricht:
EG-Direktive 73/23/EG:
– EN 60950
EG-Direktive 89/336/EG:
–EN 55022
–EN 61000-3-2
–EN 61000-3-3
–EN 55024
und mit folgendem Siegel gekennzeichnet ist:
NEC-Mitsubishi Electric Visual
Systems, Corp.
MS Shibaura Bldg., 13-23,
Shibaura 4-chome,
Minato-Ku, Tokyo 108-0023, JAPAN
NEC-Mitsubishi Electric Visual Systems Corp. hat als ENERGY STAR®-Partner festgestellt, dass dieses Gerät den ENERGY STAR- Richtlinien für Energieeffizienz entspricht. ENERGY STAR ist eine eingetragene Marke in den USA.
ErgoDesign ist eine eingetragene Marke der NEC-Mitsubishi Electric Visual Systems Corporation in Österreich, Benelux, Dänemark, Frankreich, Deutschland, Italien, Norwegen, Spanien, Schweden und Großbritannien.
IBM PC/XT/AT, PS/2, MCGA, VGA, 8514/A und XGA sind eingetragene Marken der International Business Machines Corporation.
Apple und Macintosh sind eingetragene Marken von Apple Computer Inc. Microsoft und Windows sind eingetragene Marken der Microsoft Corporation. NEC ist eine eingetragene Marke der NEC Corporation.
Alle anderen Marken oder eingetragenen Marken sind Eigentum der jeweiligen Unternehmen.
Deutsch-1
03_German |
1 |
20/05/2003, 11:44 |
Deutsch
Inhalt der Verpackung
Der Karton* mit Ihrem neuen NEC AccuSync LCD-Monitor sollte folgende Komponenten enthalten:
•AccuSync LCD-Monitor mit verstellbarem Fuß
•Audiokabel
•Netzkabel
•Signalkabel
• |
Bedienungsanleitung |
• |
CD-ROM |
CD-ROM
Bedienung- |
Audiokabel |
Netzkabel |
Signalkabel |
Standfuß |
AccuSync LCD-Monitor |
sanleitung |
|
|
|
|
(Standfuß nicht montiert) |
*Bewahren Sie den Originalkarton und das Verpackungsmaterial für spätere Transporte des Monitors auf.
Kurzanleitung
So befestigen Sie den Standfuß am Fuß des LCD-Monitors:
1.Setzen Sie die Vorderseite des LCD-Fußes in die Löcher auf der Vorderseite des Standfußes (Abbildung S.1).
2.Richten Sie nun die Verriegelungen auf der Rückseite des LCD-Fußes auf die Löcher am Standfuß aus. Lassen Sie den Monitorfuß in den Standfuß ein, bis die Verriegelungen einrasten (Abbildung S.1).
Monitorfuß
|
1 |
|
Verriegelungen |
2 |
|
|
||
Standfuß |
Löcher auf der |
|
Vorderseite des |
||
|
||
|
Standfußes |
|
|
Macintosh- |
|
|
Abbildung S.1 |
Abbildung A.1 |
Kabeladapter |
Abbildung A.2 |
|
(nicht mitgeliefert) |
||||
|
|
|
Gehen Sie folgendermaßen vor, um den AccuSync LCD-Monitor an Ihr System anzuschließen:
1.Schalten Sie Ihren Computer aus.
2.PC mit analogem Ausgang: Verbinden Sie den Mini-D-SUB-Stecker (15 Stifte) des entsprechenden Signalkabels mit dem Anschluss der Grafikkarte in Ihrem System (Abbildung A.1). Ziehen Sie die Schrauben fest.
Mac: Schließen Sie den MultiSync-Kabeladapter für Macintosh (nicht mitgeliefert) an den Computer an. Stecken Sie den Mini-D-SUB-Stecker (15 Stifte) des Signalkabels in den Macintosh-Kabeladapter (Abbildung A.2). Ziehen Sie die Schrauben fest.
HINWEIS: Für einige Macintosh-Systeme ist kein Macintosh-Kabeladapter erforderlich.
Deutsch-2
03_German |
2 |
20/05/2003, 11:44 |
3.Stecken Sie den Mini-D-SUB-Stecker (15 Stifte) des Signalkabels, das Audiokabel und den Kopfhörer (nicht mitgeliefert) in die entsprechende Buchse auf der Rückseite des Monitors (Abbildung B.1).
4.Stecken Sie ein Ende des Netzkabels in den Monitor und das andere Ende in die Steckdose. Führen Sie das Signalkabel, Kopfhörerkabel (nicht mitgeliefert) und Netzkabel durch den Kabelhalter (Abbildung B.1).
HINWEIS: Bringen Sie die Kabel so unter der Kabelabdeckung an, dass weder Kabel noch Monitor beschädigt werden können.
HINWEIS: Wenn Sie diesen Monitor an ein Wechselstromnetz mit 125-240 V anschließen, sehen Sie sich die Hinweise zur Auswahl des geeigneten Netzkabels unter „Einsatzempfehlungen“ an.
5. Schalten Sie den Computer und den Monitor mit dem Netzschalter an der Vorderseite (Abbildung C.1) ein.
KOPFHÖRER
AUDIOEINGANG
Eingang (D-Sub)
Netzschalter
Kabelhalter
An Audio-Ausgang des
Computers anschließen
Abbildung B.1 |
Abbildung C.1 |
6.Die berührungslose Einstellungsautomatik nimmt beim ersten Setup für die meisten Timings die optimalen Einstellungen für den Monitor vor. Weitere Anpassungen werden mit den folgenden OSM Steuerungen vorgenommen:
•Automatische Kontrasteinstellung
•Automatische Einstellung
Im Abschnitt Bedienelemente dieser Bedienungsanleitung finden Sie eine ausführliche
Beschreibung der OSM-Steuerungen.
HINWEIS: Treten Probleme auf, beachten Sie das Kapitel Fehlerbehebung in dieser
Bedienungsanleitung.
Neigen
Fassen Sie den Monitor an beiden Seiten und neigen Sie ihn nach Bedarf (Abbildung TS.1).
Entfernen des Monitorfußes für die Montage
So bereiten Sie den Monitor für eine alternative Montage vor: |
|
1. Ziehen Sie alle Kabel ab. |
Abbildung TS.1 |
2.Legen Sie den Monitor mit der Vorderseite nach unten auf eine weiche Oberfläche (Abbildung R.1).
3.Entfernen Sie die 2 Schrauben, mit denen der Fuß am Monitor befestigt ist, und heben Sie den Fuß ab (Abbildung R.1).
4.Entfernen Sie die 4 Schrauben, mit denen der Fuß am Monitor befestigt ist, und heben Sie den Fuß ab (Abbildung R.2). Der Monitor kann jetzt auf andere Art montiert werden.
5.Schließen Sie Netzund Signalkabel an der Rückseite des Monitors an (Abbildung R.3).
6.Führen Sie die Schritte in umgekehrter Reihenfolge aus, um den Fuß wieder anzubringen.
HINWEIS: Verwenden Sie ausschließlich VESA-kompatible Montagemethoden.
HINWEIS: Entfernen Sie den Monitorfuß vorsichtig.
Deutsch-3
Deutsch
03_German |
3 |
20/05/2003, 11:44 |

Weiche Oberfläche
Abbildung R.1 |
Abbildung R.2 |
Abbildung R.3 |
Entfernen des Standfußes
HINWEIS: Entfernen Sie den Standfuß vor dem Versenden des Monitors.
1. Legen Sie den Monitor mit der Vorderseite nach unten auf eine weiche Oberfläche (Abbildung R.1).
2. Drücken Sie mit den Daumen die unteren Verriegelungen nach oben, um sie zu lösen.
3. Drücken Sie die oberen Verriegelungen nach unten, um sie zu lösen, und ziehen Sie den Monitorfuß heraus.
Befestigen eines Tragarms
Dieser LCD-Monitor kann mit einem Tragarm verwendet werden.
Verwenden Sie die beigefügten Schrauben (4 Stück) für die Montage, wie es in der Abbildung dargestellt ist. Die Sicherheitsvorschriften verlangen, dass der Monitor an einem Tragarm montiert wird, der für das Gewicht des Monitors ausreichend stabil ist.
Der LCD-Monitor darf nur auf einem zugelassenen Arm montiert werden, der beispielsweise mit einem GS-Zeichen versehen ist.
Schrauben anbringen
Stärke der Halterung (Arm) 2,0 ~ 3,2 mm
Alle Schrauben festziehen
75 mm (LCD51VM)
100 mm (LCD71VM)
Technische Daten
4 SCHRAUBEN (M4)
(maximale Tiefe: 8,5 mm)
Wenn Sie andere Schrauben verwenden, prüfen Sie die Tiefe der Bohrung.
75 mm (LCD51VM)
100 mm (LCD71VM)
Gewicht des LCD-Monitors komplett: 2,6 kg - LCD51VM (max.) 4,0 kg - LCD71VM (max.)
Deutsch-4
03_German |
4 |
20/05/2003, 11:44 |
Bedienelemente
Die OSM Bedienelemente (On-Screen-Manager) auf der Vorderseite des Monitors haben folgende Funktionen:
1. Basisfunktion beim Betätigen der jeweiligen Taste
|
|
|
|
|
|
|
|
|
|
|
|
|
Taste |
|
SELECT |
|
|
– |
|
|
+ |
|
|
AUTO / RESET |
|
|
|
|
|
|
|
|
|
|
|
|
|
|
Ohne OSD- |
Zeigt den OSM an. |
Öffnet das Fenster für die |
Öffnet das Fenster für die |
Aktiviert die automatische |
||||||||
Anzeige |
|
|
|
Helligkeitseinstellung. |
Lautstärkeeinstellung. |
Einstellung. |
||||||
|
|
|
|
|
|
|
|
|
|
|
|
|
Mit OSD-Anzeige |
Wechselt zur |
Cursor nach links. |
Cursor nach rechts. |
|
|
|
||||||
(Symbolauswahlmodus) |
Einstellungsphase. |
|
|
|
|
|
|
|
|
|
||
Mit OSD-Anzeige |
Wechselt zum |
Verringert den Wert oder |
Erhöht den Wert oder bewegt |
Zurücksetzen der Einstellung. |
||||||||
(Einstellungsmodus) |
Symbolauswahlmodus. |
bewegt Cursor nach links. |
Cursor nach rechts. |
Schaltet im Fenster für die |
||||||||
|
|
|
|
|
|
|
|
|
|
Lautstärkeeinstellung die |
||
|
|
|
|
|
|
|
|
|
|
Stummschaltung ein/aus. |
||
|
|
|
|
|
|
|
|
|
|
|
|
|
HINWEIS: Sie können den OSM Bildschirm jederzeit verlassen, indem Sie die Taste SELECT mindestens 3 Sekunden lang drücken.
2. OSM Struktur
Hauptmenü (Symbolauswahl) |
|
Hauptmenü (Einstellungen) |
|
|
|
|
|
|
Taste |
Taste |
„SELECT“ |
„SELECT“ |
drücken |
drücken |
VOLUME |
M U T E |
% |
|
|
|
|
|
Taste „SELECT“ drücken |
|
|
||
Mit „–“ oder „+“ |
||||
|
|
|
einstellen |
|
|
|
|
|
|
Beispiel WERKZEUG:
Taste „SELECT“ drücken
Taste „SELECT“
drücken
Taste „–“ |
Taste „–“ |
oder „+“ |
oder „+“ |
drücken |
drücken |
Untermenü (Symbolauswahl) |
Taste |
„SELECT“ drücken
O S M T U R N O F F |
Untermenü (Einstellungen)
Mit „–“ oder „+“ einstellen
Deutsch-5
Deutsch
03_German |
5 |
20/05/2003, 11:44 |

AUDIO
Das Symbol für die Einstellung der Lautstärke ist ausgewählt, abhängig von Lautstärkebedingung (AUTO/RESET).
HELLIGKEIT
Passt die Bildund Hintergrundhelligkeit des Bildschirms an.
KONTRAST
Ändert die Bildhelligkeit im Verhältnis zum Hintergrund.
AUTOM. KONTRAST
Passt das angezeigte Bild bei Verwendung nicht dem Standard entsprechender Eingangssignale an.
AUTOM. EINSTELLUNG
Stellt Bildposition, Bildbreite und Optimierung automatisch ein.
LINKS/RECHTS
Steuert die horizontale Bildposition im Anzeigebereich des LCD.
AUF/AB
Steuert die vertikale Bildposition im Anzeigebereich des LCD.
BILDBREITE
Durch Erhöhen oder Verringern dieses Werts wird das Bild breiter bzw. schmaler.
OPTIMIERUNG
Optimiert Schärfe, Deutlichkeit und Bildstabilität durch Erhöhen oder Verringern dieses Werts.
FARBSTEUERUNGSSYSTEM
Vier Voreinstellungen (9300/7500/6500/BENUTZER) wählen die gewünschte Farbeinstellung aus.
FARBE ROT
Erhöht oder verringert den Rotanteil. Die Änderung wird auf dem Bildschirm sichtbar.
FARBE GRÜN
Erhöht oder verringert den Grünanteil. Die Änderung wird auf dem Bildschirm sichtbar.
FARBE BLAU
Erhöht oder verringert den Blauanteil. Die Änderung wird auf dem Bildschirm sichtbar.
WERKZEUG
Durch Auswahl von WERKZEUG gelangen Sie in das Untermenü.
WERKSEINSTELLUNG
Mit der OSM-Steuerung „Werkseinstellung“ werden alle OSM-Einstellungen auf die Werkseinstellungen zurückgesetzt. Sie müssen die Taste RESET mehrere Sekunden halten, um die Rücksetzung durchzuführen. Einzelne Einstellungen können durch Markieren der betreffenden Steuerung und anschließendes Drücken der Taste RESET zurückgesetzt werden.
EXIT
Mit „EXIT“ verlassen Sie das OSM Menü/Untermenü.
SPRACHE
Die OSM Menüs sind in sieben Sprachen verfügbar.
OSM ANZEIGEDAUER
Das OSM Steuerungsmenü wird ausgeblendet, wenn es nicht mehr verwendet wird. Im Untermenü „OSM Anzeigedauer” können Sie festlegen, nach welchem Zeitraum das OSM Steuerungsmenü ausgeblendet wird, wenn der Benutzer keine Taste drückt. Die Voreinstellungen reichen von 10 – 120 Sekunden in 5-Sekunden-Abständen.
Deutsch-6
03_German |
6 |
20/05/2003, 11:44 |
OSM ABSCHALTUNG
Mit „OSM Abschaltung“ werden alle OSM-Funktionen bis auf „Helligkeit“ und „Kontrast“ gesperrt. Wenn Sie im Modus „OSM Abschaltung“ auf die OSM Steuerungen zugreifen, wird ein Bildschirm angezeigt, der auf die Sperre der OSM Steuerungen hinweist. Um die Funktion „OSM Abschaltung“ zu aktivieren, halten Sie die Tasten AUTO/RESET und „+“ gleichzeitig gedrückt. Um die Funktion „OSM Abschaltung“ wieder zu deaktivieren, drücken Sie erneut die Taste AUTO/RESET und gleichzeitig die Taste „+“.
AUFLÖSUNGSANZEIGE
Wenn Sie AN auswählen, wird nach 30 Sekunden eine Meldung auf dem Bildschirm angezeigt, wenn der Monitor nicht auf die optimale Auflösung eingestellt ist.
MONITORINFORMATION
Die Modellund die Seriennummer des Monitors.
OSM Warnung
Die Menüs der OSM Warnungen können mit der Taste „Exit“ ausgeblendet werden.
KEIN SIGNAL: Diese Funktion gibt eine Warnung aus, wenn kein Signal verfügbar ist. Das Fenster Kein Signal wird nach dem Einschalten oder einem Wechsel des Eingangssignals sowie dann angezeigt, wenn kein Videosignal verfügbar ist.
AUFLÖSUNGSANZEIGE: Diese Funktion warnt Sie, wenn nicht die optimale Auflösung verwendet wird. Nach dem Einschalten, nach einer Änderung des Videosignals oder wenn das Videosignal nicht die richtige Auflösung besitzt, wird das Fenster Auflösungsanzeige angezeigt. Diese Funktion kann im Hilfsfunktionenmenü deaktiviert werden.
FREQUENZ ZU HOCH: Diese Funktion empfiehlt die optimale Auflösung und Bildwiederholrate. Nach dem Einschalten, nach einer Änderung des Eingangssignals oder wenn das Videosignal nicht die richtige Auflösung besitzt, wird das Fenster Frequenz zu hoch angezeigt.
Einsatzempfehlungen
Sicherheitsvorkehrungen und Pflege
BEACHTEN SIE ZUR ERZIELUNG OPTIMALER LEISTUNG
DIE FOLGENDEN HINWEISE ZUM EINRICHTEN UND
NUTZEN DES ACCUSYNC LCD-FARBMONITORS:
•ÖFFNEN SIE DEN MONITOR NICHT. Es befinden sich keine vom Benutzer zu wartenden Teile im Inneren. Das Öffnen oder Abnehmen der Abdeckungen kann zu gefährlichen Stromschlägen führen und birgt weitere Risiken. Lassen Sie alle Wartungsarbeiten von qualifizierten Wartungstechnikern durchführen.
•Lassen Sie keine Flüssigkeiten in das Gehäuse gelangen, und stellen Sie den Monitor in trockenen Räumen auf.
•Führen Sie keinesfalls Objekte in die Gehäuseschlitze ein, da spannungsführende Teile berührt werden können, was zu schmerzhaften oder gefährlichen Stromschlägen, zu Feuer oder zu Beschädigungen des Geräts führen kann.
•Legen Sie keine schweren Objekte auf das Netzkabel. Beschädigungen des Kabels können zu Stromschlägen oder Feuer führen.
•Stellen Sie dieses Produkt nicht auf wackelige oder instabile Flächen, Wagen oder Tische, da der Monitor fallen und dabei schwer beschädigt werden könnte.
•Achten Sie bei Verwendung des 125-240-V-Wechselstromnetzteils des LCD-Monitors auf Verwendung eines Netzkabels, das den Anschlusswerten der Netzsteckdose entspricht. Das Netzkabel muss in Ihrem Land zugelassen sein und den gültigen Sicherheitsbestimmungen entsprechen. (Typ H05VV-F, außer in Europa).
•Verwenden Sie in Großbritannien für diesen Monitor ein BS-zugelassenes Netzkabel mit angeformtem Stecker. Der Stecker muss mit einer schwarzen Sicherung (5 A) ausgestattet sein. Setzen Sie sich mit Ihrem Händler in Verbindung, wenn der Monitor ohne Netzkabel geliefert wurde.
•Stellen Sie keine Objekte auf den Monitor und setzen Sie den Monitor nicht außerhalb umbauter Räume ein.
•Im Inneren der Fluoreszenzröhre des LCD-Monitors befindet sich Quecksilber. Beachten Sie zur Entsorgung der Röhre die örtlichen Vorschriften und Richtlinien.
Deutsch
Deutsch-7
03_German |
7 |
20/05/2003, 11:44 |
Unter den folgenden Bedingungen müssen Sie den Monitor sofort vom Stromnetz trennen und sich mit einem qualifizierten Wartungstechniker in Verbindung setzen:
•Das Netzkabel oder der Netzstecker ist beschädigt.
•Flüssigkeit wurde über den Monitor gegossen oder Gegenstände sind in das Gehäuse gefallen.
•Der Monitor wurde Regen oder Wasser ausgesetzt.
•Der Monitor wurde fallen gelassen, oder das Gehäuse wurde beschädigt.
•Der Monitor arbeitet trotz Beachtung der Bedienungsanleitung nicht ordnungsgemäß.
•Knicken Sie das Netzkabel nicht.
•Verwenden Sie den Monitor nicht in heißen, feuchten, staubigen oder öligen Bereichen.
•Decken Sie die Lüftungsschlitze des Monitors nicht ab.
•Berühren Sie die Flüssigkristalle nicht, wenn der Monitor zerbrochen ist.
• Achten Sie auf ausreichende Luftzufuhr, damit die entstehende Wärme abgeführt werden kann. Decken Sie die Lüftungsschlitze nicht ab, und stellen Sie den Monitor nicht neben Heizkörpern oder anderen Wärmequellen auf. Stellen Sie keine Gegenstände auf den Monitor.
VORSICHT |
• Durch Ziehen des Netzkabelsteckers kann das Gerät vom Stromnetz getrennt werden. |
|
|
|
Der Monitor muss in der Nähe einer Steckdose aufgestellt werden, die leicht zugänglich ist. |
•Transportieren Sie den Monitor vorsichtig. Bewahren Sie die Verpackung für spätere Transporte auf.
•Bildschatten: Bildschatten sind verbleibende oder sogenannte „Geister“-Bilder, die vom vorhergehenden Bild sichtbar auf dem Bildschirm bleiben. Im Unterschied zu CRT-Monitoren ist der Bildschatten auf LCD-Monitoren nicht dauerhafter Natur, aber die Anzeige von Standbildern über eine längere Zeit sollte vermieden werden.
Sie können den Bildschatten beseitigen, indem Sie den Monitor so lange ausschalten, wie das vorherige Bild angezeigt wurde. Wurde auf dem Monitor beispielsweise eine Stunde lang ein Standbild angezeigt und bleibt ein „Geister“-Bild sichtbar, sollte der Monitor mindestens eine Stunde ausgeschaltet werden, damit der Bildschatten verschwindet.
HINWEIS: NEC-Mitsubishi Electronic Displays empfiehlt die Aktivierung eines Bildschirmschoners auf allen Anzeigegeräten, wenn sich das Bild längere Zeit nicht verändert. Schalten Sie den Monitor aus, wenn Sie ihn nicht verwenden.
DURCH RICHTIGE AUFSTELLUNG UND EINSTELLUNG DES MONITORS KÖNNEN
ERMÜDUNGSERSCHEINUNGEN VON AUGEN, SCHULTERN UND NACKEN VERMIEDEN
WERDEN. BEACHTEN SIE BEI DER AUFSTELLUNG DES MONITORS FOLGENDES:
•Optimale Leistung wird erst nach ca. 20 Minuten Aufwärmzeit erzielt.
•Stellen Sie den Monitor so auf, dass sich die Oberkante des Bildschirms auf Augenhöhe oder knapp darunter befindet. Ihre Augen sollten leicht nach unten gerichtet sein, wenn
Sie auf die Bildschirmmitte blicken.
• Platzieren Sie den Monitor in einem Abstand von 40-70 cm von Ihren Augen. Der optimale Abstand beträgt 58 cm.
•Entspannen Sie Ihre Augen regelmäßig, indem Sie ein Objekt fokussieren, dass sich in einer Entfernung von mindestens 6 m befindet. Blinzeln Sie häufig.
•Stellen Sie den Monitor in einem 90°-Winkel zu Fenstern und anderen Lichtquellen auf, um Blendung und Reflexionen zu verhindern. Neigen Sie den Monitor in einem Winkel,
der Reflexionen der Deckenleuchten auf dem Bildschirm verhindert.
•Ist das dargestellte Bild aufgrund von Reflexionen nur schwer zu erkennen, sollten Sie einen Blendschutzfilter verwenden.
•Reinigen Sie die Oberfläche des LCD-Monitors mit einem fusselfreien, weichen Tuch. Verwenden Sie weder Reinigungsmittel noch Glasreiniger!
•Stellen Sie Helligkeit und Kontrast des Monitors mit den entsprechenden Steuerungen ein, um die Lesbarkeit zu optimieren.
•Stellen Sie neben dem Monitor einen Dokumentenhalter auf.
•Platzieren Sie das beim Tippen häufiger betrachtete Objekt (Monitor oder Dokumentenhalter) direkt vor Ihnen, damit Sie den Kopf seltener drehen müssen.
•Vermeiden Sie die längerfristige Darstellung gleichbleibender Muster auf dem Bildschirm, um Bildschatten zu vermeiden.
•Lassen Sie Ihre Augen regelmäßig untersuchen.
Ergonomie
Wir empfehlen folgendes Vorgehen, um eine ergonomisch optimale Arbeitsumgebung einzurichten:
•Verwenden Sie bei Standardsignalen die voreingestellten Größenund Positionseinstellungen.
•Verwenden Sie die vordefinierte Farbeinstellung.
•Verwenden Sie Signale ohne Zeilensprung (Non-Interlaced) mit einer vertikalen Wiederholfrequenz von 60-75 Hz.
•Verwenden Sie die Primärfarbe Blau nicht auf schwarzem Hintergrund, da dies die Lesbarkeit beeinträchtigt und aufgrund des geringen Kontrasts zu starker Ermüdung der Augen führen kann.
Deutsch-8
03_German |
8 |
20/05/2003, 11:44 |
 Loading...