


003–3273–012510D

Para obtener este manual en Español Latino Americano vaya a:
http://support.nautilus.com.
Table of Contents
Important Safety Instructions — Assembly |
3 |
Important Safety Instructions — Operation |
14 |
Specifications |
4 |
Features |
17 |
Before Assembly |
5 |
Operations |
25 |
Tools |
6 |
Maintenance |
31 |
Hardware |
6 |
Troubleshooting |
36 |
Parts |
7 |
Contacts |
38 |
Assembly |
8 |
Guide de Montage et du Propriétaire |
39 |
Leveling the Machine |
13 |
|
|
Patent Information This product may be covered by US and Foreign Patents and Patents Pending.
©2010 Nautilus, Inc., All rights reserved
™and ® indicate a trademark or registered trademark. Nautilus, Inc. (www.nautilus.com) trademarks include NAUTILUS®, BOWFLEX®, SCHWINN® and UNIVERSAL® and respective logos.
Other trademarks are the property of their respective owners.
2

Important Safety Instructions
Indicates a potentially hazardous situation which, if not avoided, could result in death or serious injury.
Obey the following warnings:
Read and understand all warnings on this machine.
Carefully read and understand the Assembly Manual.
•Keep bystanders and children away from the product you are assembling at all times.
•Do not connect power supply to the machine until instructed to do so.
•Do not assemble this machine outdoors or in a wet or moist location.
•Make sure assembly is done in an appropriate work space away from foot traffic and exposure to bystanders.
•Some components of the machine can be heavy or awkward. Use a second person when doing the assembly steps involving these parts. Do not do steps that involve heavy lifting or awkward movements on your own.
•Set up this machine on a solid, level, horizontal surface.
•Do not try to change the design or functionality of this machine. This could compromise the safety and can void the warranty.
•If replacement parts are necessary use only genuine Nautilus® replacement parts and hardware. Failure to use genuine replacement parts can cause a risk to users, keep the machine from operating correctly or void the warranty.
•Do not use or put the machine into service until the machine has been fully assembled and inspected for correct performance in accordance with the Owner’s Manual.
•Read and understand the complete Owner’s Manual supplied with this machine before first use. Keep the Owner’s and Assembly Manuals for future reference.
3
Specifications
Nautilus® T514 Treadmill
Dimensions |
|
Length |
74" / 188 cm |
Width |
32" / 81 cm |
Height |
54" / 137 cm |
Assembled Unit Weight |
205 lb / 93 kg |
Folded |
39" X 32" X 60" / 99 X 81 X |
|
152 cm |
Shipping Weight |
233.7 lb / 106 kg |
Regulatory Approvals
Intertek ETL listed. Conforms to ANSI / UL1647. 4th ED. Certified to CAN/CSA-C22.2 No. 68-92.
RoHS
Power Requirements
120VAC 15A 60Hz Non-GFI grounded outlet (dedicated circuit)
Nautilus® T516Treadmill |
|
Dimensions |
|
Length |
78" / 198 cm |
Width |
34" / 86 cm |
Height |
54" / 137 cm |
Assembled Unit Weight |
220.5 lb / 100kg |
Folded |
41" X 34" X 65 1/2" / 104 X |
|
86 X 166 cm |
Shipping Weight |
253.5 lb / 115kg |
Regulatory Approvals
Intertek ETL listed. Conforms to ANSI / UL1647. 4th ED.
Certified to CAN/CSA-C22.2 No. 68-92.
RoHS
Power Requirements
120VAC 15A 60Hz Non-GFI grounded outlet (dedicated circuit)
Capacities |
|
Maximum User Weight |
350 lb / 158 kg |
Workout Programs |
16 |
Speed Range |
0.5–12 mph / 0.8–19.3 |
|
km/h |
Elevation Range |
0–12% |
Component Specifications |
|
Frame, Folding |
Steel |
Motor |
2.75 CHP DC |
Deck Size |
20" x 55" / 51 x 140 cm |
Belt |
2 ply |
Heart Rate Monitor |
Contact, Telemetry |
Heart Rate Chest Strap |
Polar® |
Display |
Backlit LCD |
Built-In Fan |
3–speed |
Capacities |
|
Maximum User Weight |
350 lb / 158 kg |
Workout Programs |
21 |
Speed Range |
0.5–15 mph / 0.8–24.1 |
|
km/h |
Elevation Range |
0–15% |
Component Specifications |
|
Frame, Folding |
Steel |
Motor |
3.2 CHP DC |
Deck Size |
20" x 58" / 51 x 147 cm |
Belt |
2 ply |
Heart Rate Monitor |
Contact, Telemetry |
Heart Rate Chest Strap |
Polar® |
Display |
Backlit LCD |
Built-In Fan |
3–speed |
4
Before Assembly
Select the area where you are going to set up and operate your machine. For safe operation, the location must be on a hard, level surface. Allow a workout area of minimum 201” x 71” (5.1m x 1.8m).
Follow these basic points when you assemble your machine:
1.Read and understand the “Important Safety Instructions” before assembly.
2.Collect all the pieces necessary for each assembly step.
3.Using the recommended wrenches, turn the bolts and nuts to the right (clockwise) to tighten, and the left (counterclockwise) to loosen, unless instructed otherwise.
4.When attaching 2 pieces, lightly lift and look through the bolt holes to help insert the bolt through
the holes.
5. The assembly requires 2 people.
Note: The treadmill is designed to plug into a grounded, non-GFI outlet only. Do not connect the treadmill to a GFI outlet. To determine if your outlet or circuit breaker is GFI, look for a test and reset button on them. If they have the test and reset button, it is a GFI outlet or circuit breaker.
5
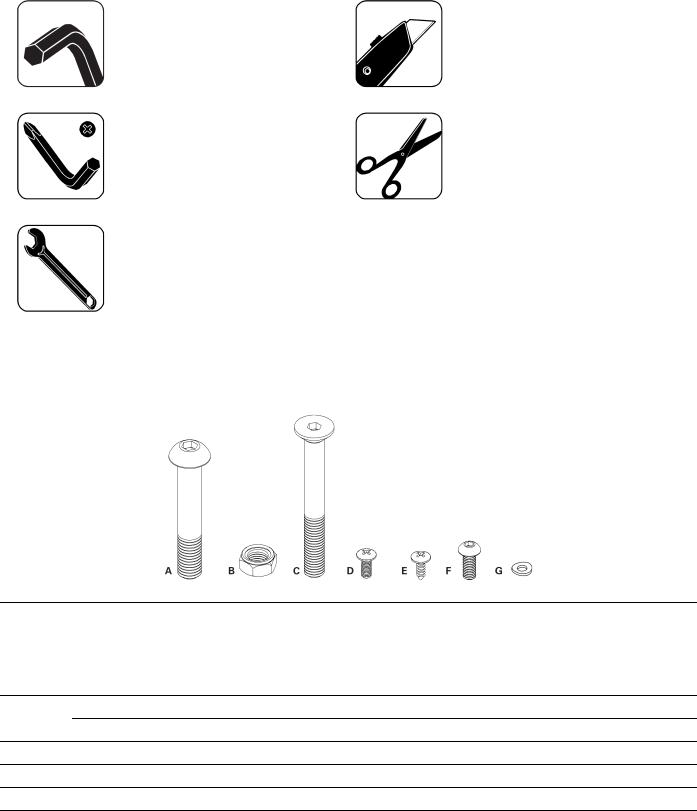
Tools
Included |
Not Included |
6mm
5mm
Hardware
Item |
Qty |
Description |
|
|
|
A |
2 |
M10 x 60L Button Head Hex Screws, pre-installed |
|
|
|
B |
2 |
M10 Nylock Nuts, pre-installed |
|
|
|
C |
2 |
M8 x 70L Flathead Hex Screws |
D4 M4 x 10 Phillips Head Screws, pre-installed (model T514)
6M4 x 10 Phillips Head Screws, pre-installed (model T516)
E2 #8 x 1/2L Phillips Head Bolts, pre-installed
F4 M8 x 15L Button Head Hex Screws, 2 pre-installed
G4 M8 washer, 2 pre-installed
6
Parts
Item |
Qty |
Description |
|
|
|
1 |
1 |
Frame |
22 Console Side Panels
32 Side Covers (model T516 only)
41 Power Cord
51 Rear End Cap (model T516 only)
7
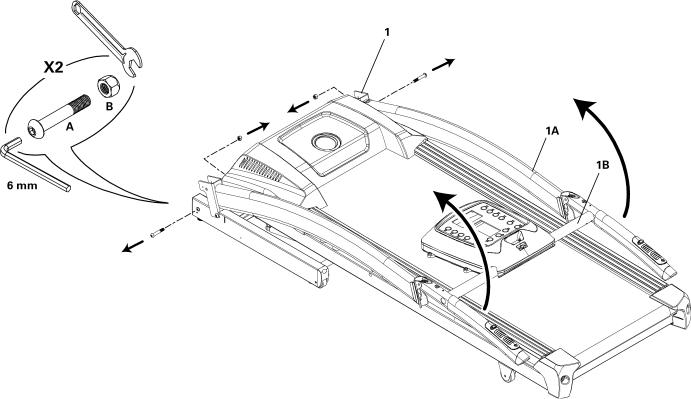
Assembly
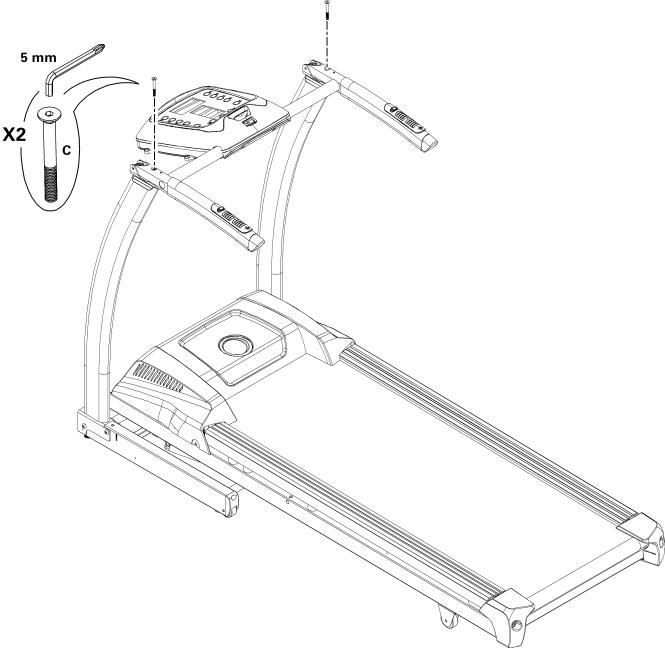
1. Unfold Frame
Note: Hold one Upright (1A) and the Ergo Bar (1B) when you lift the folded uprights into position. Keep your hands clear of the area between the Ergo Bar and the Upright.
8
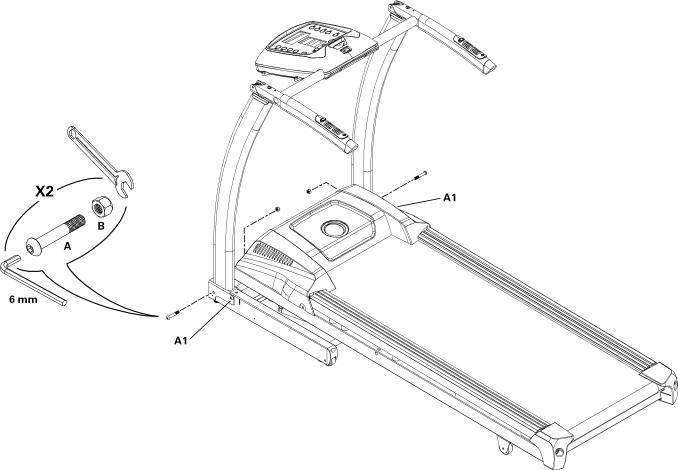
2. Install Screws and Adjust Handlebars
Note: Tighten pivot screws (A1).
9
3. Install Screws in Handlebars
10
4. Adjust Console/Ergo Bar and Install Console Side Panels
11
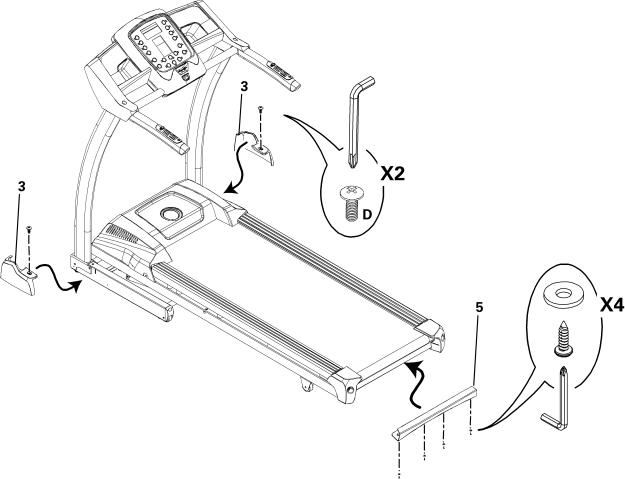
5. Attach Side Covers and Rear End Cap (model T516 only)
12
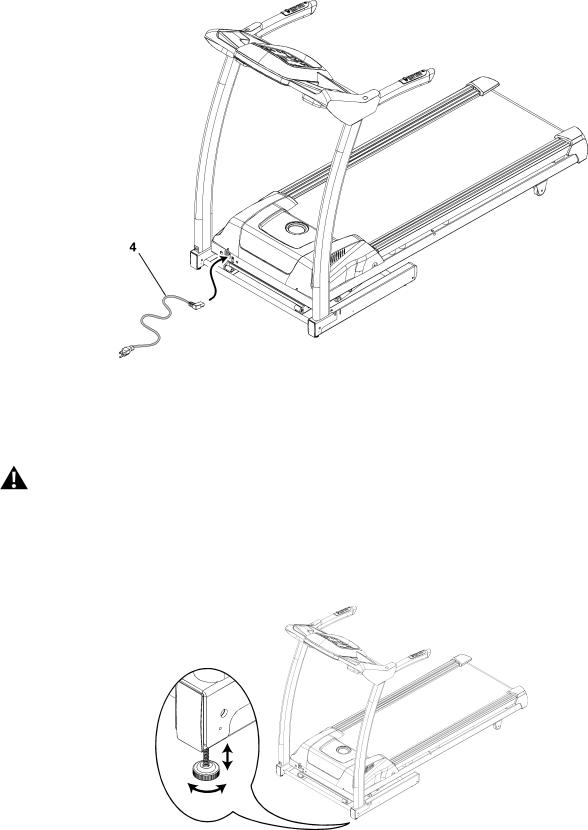
6. Connect Power Cord
Final Inspection
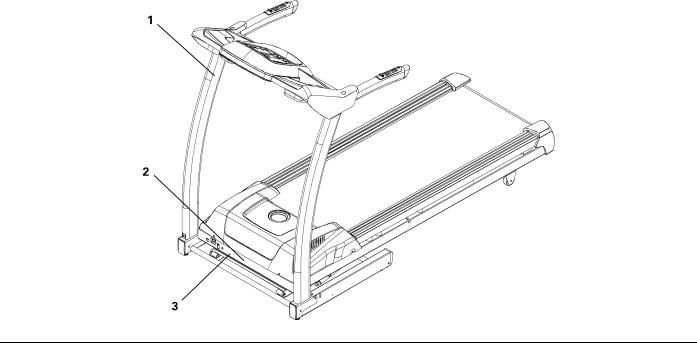
Inspect your machine to ensure that all fasteners are tight and components are properly assembled.
Do not use or put the machine into service until the machine has been fully assembled and inspected for correct performance in accordance with the Owner’s Manual.
Leveling the Machine
To stabilize the treadmill, adjust the 2 feet below the front of the base frame.
•Lift one side of the machine and turn the foot — clockwise to shorten or counterclockwise to lengthen.
•Adjust the foot on the other side if necessary.
13

Important Safety Instructions
Indicates a potentially hazardous situation which, if not avoided, could result in death or serious injury.
Before using this equipment, obey the following warnings:
To decrease the risk of burns, electric shock, or injury to persons, read and understand the complete Owner’s Manual. Failure to follow these guidelines can cause a serious or possibly fatal electrical shock or other serious injury. Keep Owner’s Manual for future reference.
Read and understand all warnings on this machine. If at any time the Warning stickers become loose, unreadable or dislodged, contact Nautilus® Customer Service for replacement stickers.
• To reduce the risk of electrical shock, always unplug the power cord and wait 5 minutes before cleaning,
maintaining or repairing this machine.
•Children must not be let on or near to this machine. Moving parts and other features of the machine can be dangerous to children.
•Consult a physician before you start an exercise program. Stop exercising if you feel pain or tightness in your chest, become short of breath, or feel faint. Contact your doctor before you use the machine again. Use the values calculated or measured by the machine’s computer for reference purposes only.
•Before each use, examine this machine for damage to power cord, power receptacle, loose parts or signs of wear. Do not use if found in this condition. Contact Nautilus® Customer Service for repair information.
•Maximum user weight limit: 350 lbs. (158 kg). Do not use if you are over this weight.
•This machine is for home use only.
•Do not wear loose clothing or jewelry. This machine contains moving parts. Do not put fingers or other objects into moving parts of the exercise equipment.
•Always wear rubber soled athletic shoes when you use this machine. Do not use the machine with bare feet or only wearing socks.
•Set up and operate this machine on a solid, level, horizontal surface.
•Use caution when you step on and off the machine. Use the supplied foot support platforms for stability before walking on the moving belt.
•Do not operate this machine outdoors or in moist or wet locations.
•Keep at least 19.5" (0.5 m) on each side of the machine and 79” (2 m) behind the machine clear. This is the recommended safe distance for access, movement and emergency dismounts from the machine. Keep third parties out of this space when the machine is in operation.
•Do not over exert yourself during exercise. Operate the machine in the manner described in this manual.
•Read, understand, and test the Emergency Stop Procedure before use.
•Keep the walking belt clean and dry.
•Do not stand on machine motor cover or front trim cover
•Keep power cord away from heat source and hot surfaces.
•Do not drop or put objects into any opening of the machine.
•Connect this machine to a correctly grounded outlet; consult a licensed electrician for assistance.
•Do not operate where aerosol products are being used.
14
•Do not let liquids touch the electronic controller. If it does, the controller must be inspected and tested for safety by an approved technician before it can be used again.
•Do not remove the machine motor cover, dangerous voltages are present. The components are serviceable only by approved service personnel.
•The electrical wiring for the residence in which the machine will be used must obey the applicable local and provincial requirements.
Safety Warning Labels and Serial Number
|
Type |
Description |
|
|
|
|
|
1 |
WARNING |
Failure to obey these safeguards can cause serious injury or health problems. |
|
|
|
|
|
|
|
1. |
Keep children and pets away from this machine at all times. |
|
|
|
|
|
|
2. |
When this machine is not in operation, remove the Safety Key and keep out of the reach |
|
|
of children. |
|
|
|
|
|
|
|
3. |
Use Caution when you operate this equipment or serious injury can occur. |
|
|
|
|
|
|
4. |
Prior to use, read and understand the Owner’s Manual, including all Warnings. |
|
|
|
|
|
|
5. |
To prevent injury, stand on the Foot Platforms before you start the machine. |
|
|
|
|
|
|
6. |
This machine is for Residential use only. |
|
|
|
|
|
|
7. |
The Maximum user Weight for this machine is 350 lbs/158 kg |
|
|
|
|
|
|
8. |
Replace any Warning label that becomes damaged, illegible or is removed. |
|
|
|
|
15
|
AVERTISSEMENT |
Le non-respect de ces mesures de protection pourrait entraîner des blessures ou de graves |
|
|
|
problèmes de santé |
|
|
|
|
|
|
|
1. Gardez les enfants et les animaux de compagnie éloignés de cette machine en tout temps. |
|
|
|
|
|
|
|
2. |
Lorsque cette machine n’est pas utilisée, retirez le cordon de sécurité et gardez-le hors de la |
|
|
portée des entants. |
|
|
|
|
|
|
|
3. |
Soyez prudent lorsque vous utilisez cet équipement pour ne pas vous infliger de graves |
|
|
blessures. |
|
|
|
4. |
Lisez et familiarisez-vous avec le Manuel du propriétaire et avec tous les avertissements avant |
|
|
d’utiliser cette machine. |
|
|
|
|
|
|
|
5. |
Pour éviter les blessures, mettez-vous debout sur les repose-pieds avant de mettre la machine |
|
|
en marche. |
|
|
|
|
|
|
|
6. |
Cette machine est à usage domestique uniquement. |
|
|
|
|
|
|
7. |
Cette machine supporte un poids maximal de (158 kg). |
|
|
|
|
|
|
8. |
Remplacez toute étiquette d’avertissement endommagée, illisible ou manquante. |
|
|
|
|
2 |
WARNING |
Do not lift or move from this end — rotating parts can pinch or crush |
|
|
|
|
|
|
AVERTISSEMENT |
Ne pas soulever ou déplacer depuis cette extrémité — les éléments pivotants peuvent pincer |
|
|
|
ou écraser |
|
3 |
Serial Number |
Record serial number on Contacts page at end of this manual. |
|
|
|
|
|
Grounding Instructions
This product must be grounded. If it should malfunction or break down, grounding gives a path of least resistance for electrical current, to decrease the risk of electric shock. The power cord is equipped with an Equipment-grounding Conductor and a grounding plug. The plug must be connected to an outlet that is correctly installed and grounded. The electrical wiring must obey the applicable local and provincial requirements.
Incorrect connection of the equipment-grounding conductor can result in a risk of electric shock. Consult a licensed electrician if you are not sure if the machine is correctly grounded. Do not change the plug on the machine – if it does not fit the outlet, have a correct outlet installed by a licensed electrician.
It is recommended to use a dedicated circuit for this machine. This means that no other equipment is connected to the same outlet. Do not use a GFI outlet, surge protector or extension cord for this machine.
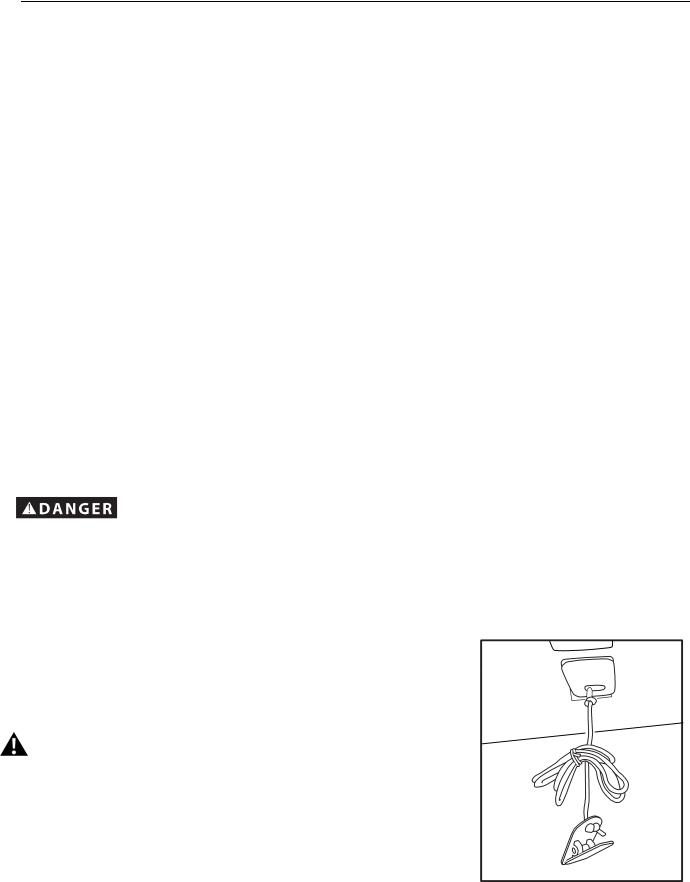
Emergency Stop Procedures
The treadmill is equipped with a Safety Key that can prevent serious injury, as well as prevent children from playing with and/or being injured on the machine. If the Safety Key is not fully put into the Safety Key Port, the belt will not operate.
To prevent unsupervised operation of the machine always remove the Safety Key and disconnect the power cord from the wall outlet or machine AC input.
Always attach the Safety Key Clip to your clothing during your workout.
When you use the machine, only remove the Safety Key in an emergency. When the key is removed while the machine is in operation, it will stop quickly, which could cause the loss of balance and possible injury.
Be sure to remove the Safety Key for safe storage when not in operation.
16
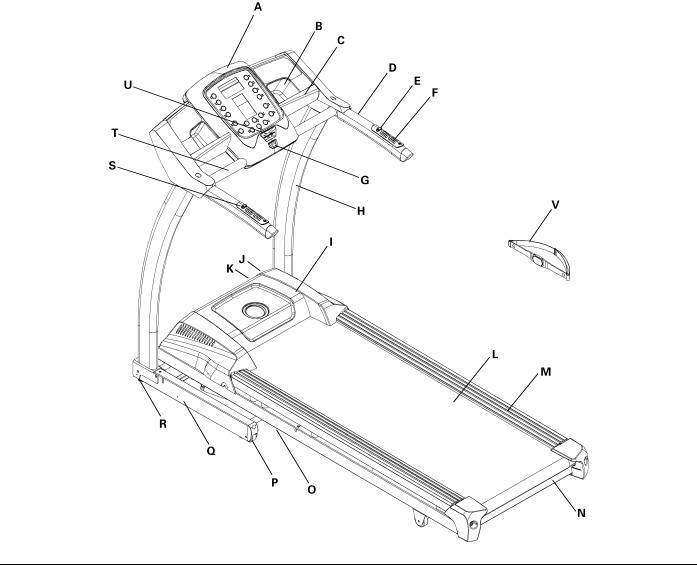
Features
A |
Console |
L |
Walking Belt |
|
|
|
|
B |
Water Bottle Holder |
M |
Side Foot Support Rails |
|
|
|
|
C |
Magazine Rack |
N |
Support Bar |
|
|
|
|
D |
Handlebars |
O |
Hydraulic Lift |
|
|
|
|
E |
Remote Speed Control |
P |
Transport Wheels |
|
|
|
|
F |
Contact Heart Rate (CHR) Sensors |
Q |
Base |
|
|
|
|
G |
Safety Key Port |
R |
Adjustable Feet |
|
|
|
|
H |
Uprights |
S |
Remote Incline Control |
|
|
|
|
I |
Motor Cover |
T |
Ergo Bar |
|
|
|
|
J |
Power Switch |
U |
Fan |
|
|
|
|
K |
Power Cord |
V |
Heart Rate (HR) Chest Strap |
|
|
|
|
17
Console Features
AA |
Dual LCD — Backlit Display |
FF |
Fan Button |
|
|
|
|
BB |
Preset Speed Keys |
GG |
Stop |
|
|
|
|
CC |
Speed Up/Down |
HH |
Profiles/Courses |
|
|
|
|
DD |
Enter/Reset |
II |
Incline Up/Down |
|
|
|
|
EE |
Quick Start (Start) |
JJ |
Preset Incline Keys |
|
|
|
|
LCD Display Data
The multi-function, backlit LCD shows your workout measurements (during the workout), results, user setup data and console diagnostics.
18
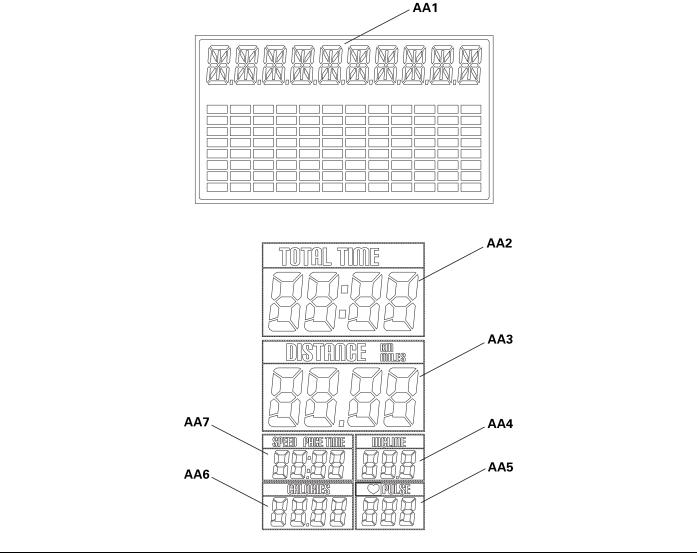
AA1 |
Program Display |
AA5 |
PULSE |
|
|
|
|
AA2 |
TOTAL TIME |
AA6 |
CALORIES |
|
|
|
|
AA3 |
DISTANCE (km/miles) |
AA7 |
SPEED / PACE TIME |
|
|
|
|
AA4 |
INCLINE |
|
|
|
|
|
|
Note: To change the measurement units to English Imperial or metric, refer to the “Changing Unit Measures (English/Metric)” section in this manual.
Program Display
The Program Display shows the name of the program selection and the dot-matrix area shows the course profile for the program. Each column in the profile shows one interval (1/12 of the total program time). The higher the column, the higher the incline and/or speed for that interval. The flashing column shows your current interval.
Total Time
The TOTAL TIME display field shows the time count in the workout. If a preset time is not set up for the current workout program, the display value starts at zero and counts forward until the end of the workout. The maximum time is 99:59.
If the workout has a preset time, the display starts at the preset value and counts down to zero. The display shows the total time count for the workout, then the time count for the current interval.
19

Distance
The DISTANCE display field shows the distance count (miles or km) in the workout. If no distance goal is set up for the current workout program, the display value starts at zero and counts forward until the end of the workout. If the workout has a distance goal, the display starts at the preset value and counts down to zero.
Incline
The INCLINE display field shows the treadmill incline in percentage of elevation.
Pulse
The Pulse display field shows the heart rate in beats per minute (BPM) from the heart rate monitor (HRM).
Consult a physician before you start an exercise program. Stop exercising if you feel pain or tightness in your chest, become short of breath, or feel faint. Contact your doctor before you use the machine again. Use the values calculated or measured by the machine’s computer for reference purposes only.
Calories
The CALORIES display field shows the estimated calories that you have burned during the exercise. If no calorie goal is set up for the current workout program, the display value starts at zero and counts forward until the end of the workout. If the workout has a calorie goal, the display starts at the preset value and counts down to zero.
Speed/Pace Time
The SPEED/PACE TIME display field shows the machine speed in kilometers per hour (km/h) or miles per hour (mph) for 10 seconds, then the pace in minutes per mile (or minutes per km) for 10 seconds.
Key Functions
The multi-function console keys let you adjust the machine settings, make exercise program selections, and enter user setup data for the console to calculate your workout data. The Operations section of this manual gives the procedures for using the keys
in each Operations mode.
INCLINE ▲ / ▼ |
Push the ▲ (Up) or ▼ (Down) keys to: |
|
|
• |
Adjust the Incline in increments of 1%. |
|
• |
Adjust the data values for user setup. |
|
|
|
COURSES/PROFILES |
Push the COURSES/PROFILES key to go to the Program Selection menu. |
|
STOP
•Push the STOP key to pause your workout.
•Push and hold the STOP key for 3 seconds to stop the workout and go back to Ready Mode (workout data not saved).
[Fan] |
Push the Fan button 1 time for Low speed. Push again for High speed. Push 1 more time to turn the |
|
fan off. |
|
|
20
ENTER / RESET
•Make a selection from the Program Selection menu.
•Set your selection of data values for user setup or exercise program setup.
•When the workout is paused, push and hold the ENTER/RESET key for 3 seconds to save workout data .
QUICK START [Start]
•When the console is in Ready Mode, push the QUICK START key to start the Manual Program.
•After you make a selection from the Program Selection menu, push the QUICK START key to start the program.
SPEED ▲ / ▼ |
Push the ▲ (Up) or ▼ (Down) keys to: |
|
|
• Adjust the Speed in increments of 0.1 mph or 0.1 km/h. |
|
|
• Adjust the data values for user setup. |
|
|
• Move through the Program Selection or Service Menu options. |
|
|
|
|
2%, 4%, 6%, 8% |
To change the Incline to one of the preset levels, push the applicable key during Workout Mode. Then |
|
[Preset Incline Keys] |
you must push the ENTER/RESET key in less than 5 seconds to set the selection. |
|
|
||
|
|
|
2, 4, 6, 8 |
To change the Speed to one of the preset levels, push the applicable key during Workout Mode. For |
|
[Preset Speed Keys] |
example, if you press 2, the treadmill speed adjusts to 2 mph (or 2 km/h). Then you must push the |
|
ENTER/RESET key in less than 5 seconds to set the selection. |
||
|
||
|
|
Changing Unit Measures (English Imperial/Metric)
To change the measurement units (for speed, distance and weight) to English Imperial or metric:
1.Push the STOP key and SPEED▲(Up) key and hold for 5 seconds to go to Engineering Mode.
2.Push the ENTER/RESET key 2 times. The console display shows KM for metric or MILES for English Imperial.
3.Tap the ▲(Up) or ▼ (Down) keys to look at the measurement options.
4.Push the ENTER/RESET key to set your selection.
5.Push the ENTER/RESET key 2 times to go back to the main display and start your workout.
The Preset Speed keys also change when you set the measurement units option to English Imperial or metric.
Note: The start speed is 0.5 mph or 0.8 km/h.
Remote Speed and Incline Controls
There are toggle switches on the handlebars to adjust Speed and Incline. The left handlebar switch adjusts Incline up and down in increments of 1%. The right handlebar adjusts Speed up or down in increments of 0.1 mph or 0.1 km/h.
21
Remote Heart Rate Monitor
Monitoring your Heart Rate is one of the best procedures to control the intensity of your exercise.
Contact Heart Rate (CHR) sensors are installed to send your heart rate signals to the Console. A Heart Rate Chest Strap Transmitter is also included. The Console shows your Heart Rate in Beats Per Minute (BPM).
If you have a pacemaker or other implanted electronic device, consult your doctor before using a wireless chest strap or other telemetric heart rate monitor.
Chest Strap
Using the heart rate transmitter chest strap lets you monitor your heart rate at any time during your workout.
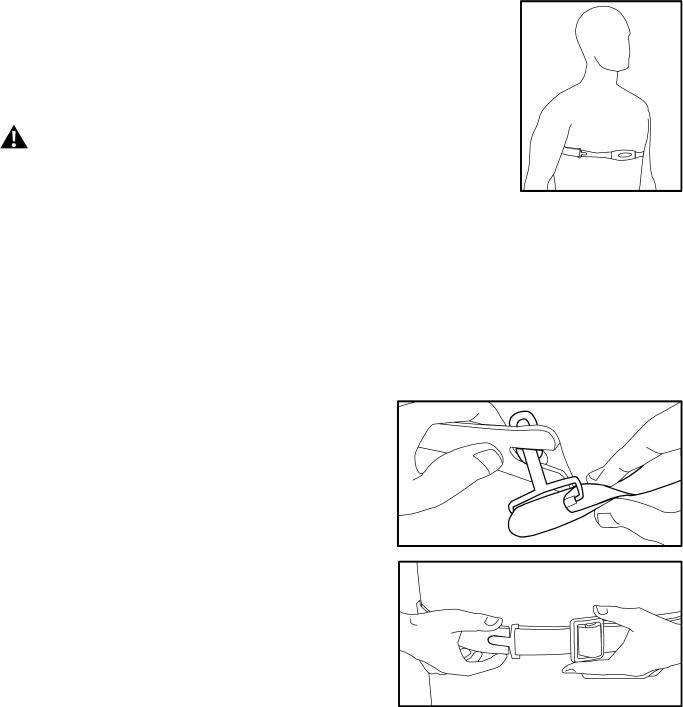
The heart rate transmitter is attached to a chest strap to keep your hands free during your workout. Attach the transmitter to the elastic chest strap.
Adjust the strap length to fit snugly and comfortably against your skin. Secure the strap around your chest, just below the chest muscles, and buckle it.
22
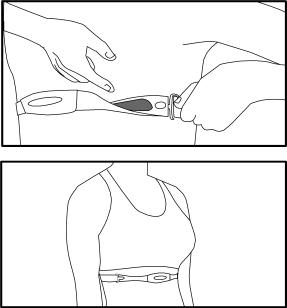
Lift the transmitter off your chest and moisten the two Grooved
Electrode Areas on the back.
Check that the wet electrode areas are firmly against your skin.
The transmitter will send your heart rate to the machine’s receiver and display your Beats Per Minute (BPM).
Always remove the transmitter before you clean the chest strap. Clean the chest strap regularly with mild soap and water, and thoroughly dry it. Residual sweat and moisture keep the transmitter active and drain the battery in the transmitter.
Note: Do not use abrasives or chemicals such as steel wool or alcohol when you clean the chest strap, as they can damage the electrodes permanently.
If the Console displays a heart rate value of “0”, then the transmitter is not sending a signal. Check that the textured contact areas on the chest strap are contacting with your skin. You may need to lightly wet the contact areas. If no signal appears or you
need further assistance, call your Nautilus® Representative.
Heart Rate Calculations
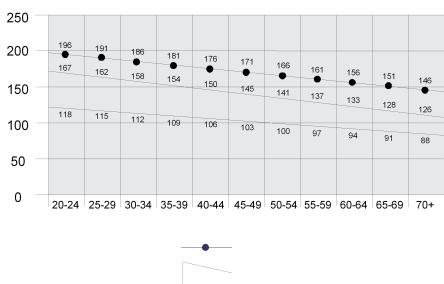
Your maximum heart rate usually decreases from 220 Beats Per Minute (BPM) in childhood to approximately 160 BPM by age 60. This fall in heart rate is usually linear, decreasing by approximately one BPM for each year. There is no indication that training influences the decrease in maximum heart rate. Individuals of the same age could have different maximum heart rates. It is more accurate to find this value by getting a stress test than by using an age related formula.
Your at rest heart rate is influenced by endurance training. The typical adult has an at rest heart rate of approximately 72 BPM, where as highly trained runners may have readings of 40 BPM or lower.
The Heart Rate table is an estimate of what Heart Rate Zone (HRZ) is effective to burn fat and better your cardiovascular system. Physical conditions vary, therefore your individual HRZ could be several beats higher or lower than what is shown.
The most efficient procedure to burn fat during exercise is to start at a slow pace and gradually increase your intensity until your heart rate reaches between 60 – 85% of your maximum heart rate. Continue at that pace, keeping your heart rate in that target zone for over 20 minutes. The longer you maintain your target heart rate, the more fat your body will burn.
The graph is a brief guideline, describing the generally suggested target heart rates based on age. As noted above, your optimal target rate may be higher or lower. Consult your physician for your individual target heart rate zone.
23
Note: As with all exercises and fitness regimens, always use your best judgment when you increase your exercise time or intensity.
Fat Burning Target Heart Rate
Heart Rate
BPM (beats
per minute)
Age
Maximum Heart Rate
Target Heart Rate Zone (keep within this range for optimum fat burning)
Exercise Programs
Nautilus® T514 Treadmill |
Nautilus® T516 Treadmill |
||
Quick Start (Manual Program) |
Quick Start (Manual Program) |
||
Profile Programs: |
Profile Programs: |
||
• |
2 Challenge |
• |
3 Challenge |
• |
2 Intervals |
• |
3 Intervals |
• |
2 Hills |
• |
3 Hills |
Calorie Goal |
Calorie Goal |
||
5K Course |
5K Course |
||
10K Course |
10K Course |
||
2 Custom User Programs |
3 Custom User Programs |
||
Heart Rate Controlled: |
Heart Rate Controlled: |
||
• |
Target HR |
• |
Target HR |
• |
65% Max |
• |
65% Max |
• |
75% Max |
• |
75% Max |
• |
85% Max |
• |
85% Max |
Body Mass Index (BMI)
24
 Loading...