


E514 Elliptical
003–3260–101509C

Para obtener este manual en Español Latino Americano vaya a:
http://support.nautilus.com.
Table of Contents
Before Assembly |
2 |
Features |
23 |
Important Safety Instructions — Assembly |
3 |
Operations |
24 |
Specifications |
4 |
Remote Heart Rate Monitor |
31 |
Tools |
4 |
Maintenance |
34 |
Parts |
5 |
Level the Machine |
35 |
Hardware |
6 |
Moving the Machine |
35 |
Assembly |
7 |
Troubleshooting |
36 |
Important Safety Instructions — Operation |
20 |
Contacts |
39 |
Safety Warning Labels and Serial Number |
21 |
Guide de Montage et du Propriétaire |
41 |
Before Assembly
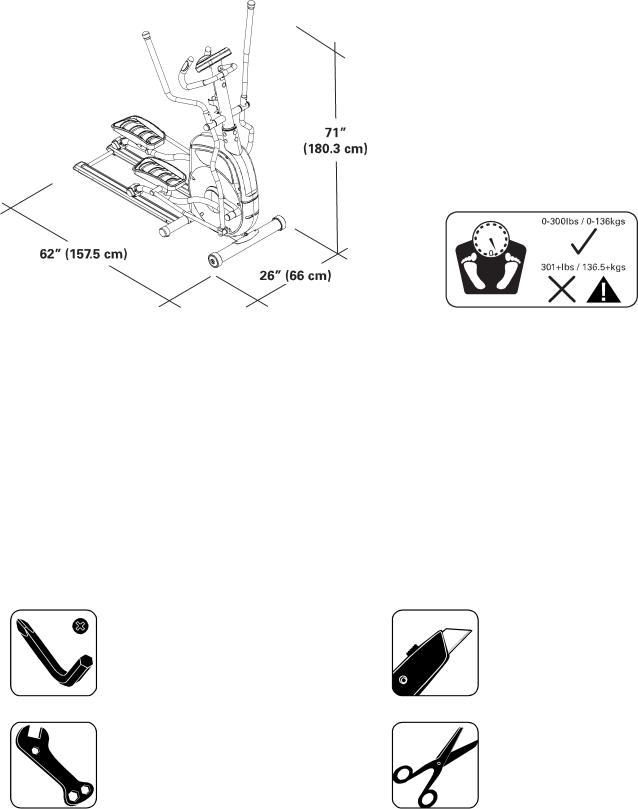
Select the area where you are going to set up and operate your machine. For safe operation, the location must be on a hard, level surface. Allow a workout area of minimum 74” x 130” (190 cm x 330 cm).
Follow these basic points when you assemble your machine:
1.Read and understand the “Important Safety Instructions” before assembly.
2.Collect all the pieces necessary for each assembly step.
3.Using the recommended wrenches, turn the bolts and nuts to the right (clockwise) to tighten, and the left (counterclockwise) to loosen, unless instructed otherwise.
4.When attaching 2 pieces, lightly lift and look through the bolt holes to help insert the bolt through
the holes.
5. The assembly requires 2 people.
Note: Some axles contain oil. Use caution to avoid staining clothes or carpet.
Patent Information This product may be covered by US and Foreign Patents and Patents Pending.
©2009 Nautilus, Inc., All rights reserved
™and ® indicate a trademark or registered trademark. Nautilus, Inc. (www.nautilus.com) trademarks include NAUTILUS®, BOWFLEX®, STAIRMASTER®, SCHWINN® and UNIVERSAL® and respective logos.
Other trademarks are the property of their respective owners.
2

Important Safety Instructions
This icon means a potentially hazardous situation which, if not avoided, could result in death or serious injury.
Obey the following warnings:
Read and understand all warnings on this machine.
Carefully read and understand the Assembly Manual.
•Keep bystanders and children away from the product you are assembling at all times.
•Do not connect power supply to the machine until instructed to do so.
•Do not assemble this machine outdoors or in a wet or moist location.
•Make sure assembly is done in an appropriate work space away from foot traffic and exposure to bystanders.
•Some components of the machine can be heavy or awkward. Use a second person when doing the assembly steps involving these parts. Do not do steps that involve heavy lifting or awkward movements on your own.
•Set up this machine on a solid, level, horizontal surface.
•Do not try to change the design or functionality of this machine. This could compromise the safety and can void the warranty.
•If replacement parts are necessary use only genuine Nautilus® replacement parts and hardware. Failure to use genuine replacement parts can cause a risk to users, keep the machine from operating correctly or void the warranty.
•Do not use or put the machine into service until the machine has been fully assembled and inspected for correct performance in accordance with the Owner’s Manual.
•Read and understand the complete Owner’s Manual supplied with this machine before first use. Keep the Owner’s and Assembly Manuals for future reference.
•Do all assembly steps in the sequence given. Incorrect assembly can lead to injury.
3
Specifications
Power
Requirements
Operational Voltage |
9VDC |
Operating Current |
1500mA |
Regulatory Approvals |
AC Power Adapter: UL listed, CSA certified (or equivalent), Rated 120V60Hz Input, 9VDC, 1500mA |
|
Output. Class 2 or LPS. |
Tools
6 mm (included) |
(recommended) |
(included) |
(recommended) |
4
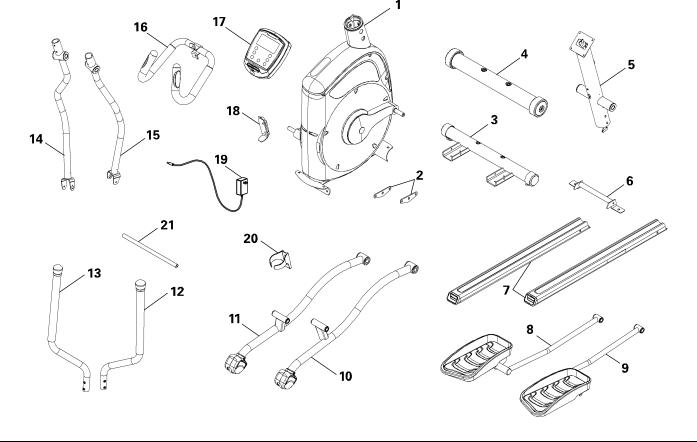
Parts
Item |
Qty |
Description |
Item |
Qty |
Description |
|
|
|
|
|
|
1 |
1 |
Frame |
13 |
1 |
Upper Left Handlebar Arm |
|
|
|
|
|
|
2 |
2 |
Pedal Mount Plate |
14 |
1 |
Lower Left Handlebar Arm |
|
|
|
|
|
|
3 |
1 |
Rear Stabilizer |
15 |
1 |
Lower Right Handlebar Arm |
|
|
|
|
|
|
4 |
1 |
Front Stabilizer |
16 |
1 |
Static Handlebar |
|
|
|
|
|
|
5 |
1 |
Console Mast |
17 |
1 |
Console |
|
|
|
|
|
|
6 |
1 |
Transport Handle |
18 |
1 |
Water Bottle Brace |
|
|
|
|
|
|
7 |
2 |
Rail |
19 |
1 |
Power Cord |
|
|
|
|
|
|
8 |
1 |
Right Pedal |
20 |
1 |
Water Bottle Holder |
|
|
|
|
|
|
9 |
1 |
Left Pedal |
21 |
1 |
Arm Pivot Rod |
|
|
|
|
|
|
10 |
1 |
Right Leg |
22 |
1 |
Manual Pack |
|
|
|
|
|
|
11 |
1 |
Left Leg |
23 |
1 |
Hardware Card |
|
|
|
|
|
|
12 |
1 |
Upper Right Handlebar Arm |
|
|
|
|
|
|
|
|
|
5
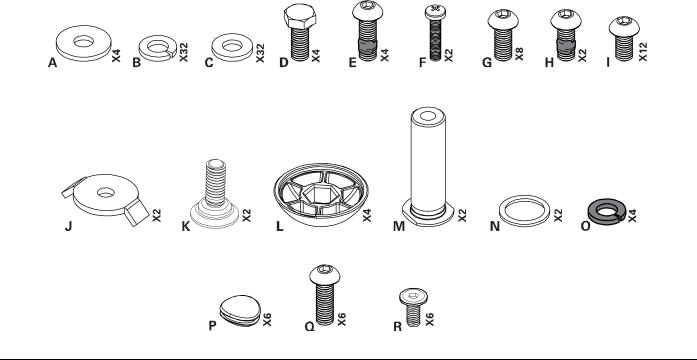
Hardware
Item |
Qty |
Description |
Item |
Qty |
Description |
|
|
|
|
|
|
A |
4 |
Wide Washer, M8 |
K |
2 |
Leveler Screw |
|
|
|
|
|
|
B |
32 |
Lock Washer, M8 |
L |
4 |
Round Cover |
|
|
|
|
|
|
C |
32 |
Washer, M8 |
M |
2 |
Cotter Pin |
|
|
|
|
|
|
D |
4 |
Hex Head Bolt, M8 x20L Thread Lock |
N |
2 |
Wave Washer |
|
|
|
|
|
|
E |
4 |
Button Head Hex Screw, M8 x25L Thread |
O |
4 |
Lock Washer, M8 Black |
|
|
Lock |
|
|
|
|
|
|
|
|
|
F |
2 |
Phillips Head Screw, M5 x20L |
P |
6 |
Cover |
|
|
|
|
|
|
G |
8 |
Button Head Hex Screw, M8 x20L |
Q |
6 |
Button Head Hex Screw, M8 x25L |
|
|
|
|
|
|
H |
2 |
Button Head Hex Screw, M8 x20L Thread |
R |
6 |
Flat Head Hex Screw, M8 x25L Thread |
|
|
Lock |
|
|
Lock |
|
|
|
|
|
|
I |
12 |
Button Head Hex Screw, M8 x15L |
|
|
|
|
|
|
|
|
|
J |
2 |
Leveler Washer |
|
|
|
|
|
|
|
|
|
6
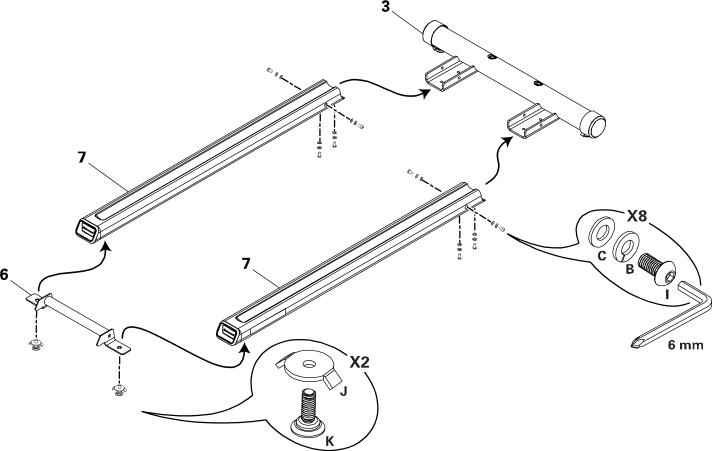
Assembly
1. Attach Rear Stabilizer and Transport Handle to Rails
7
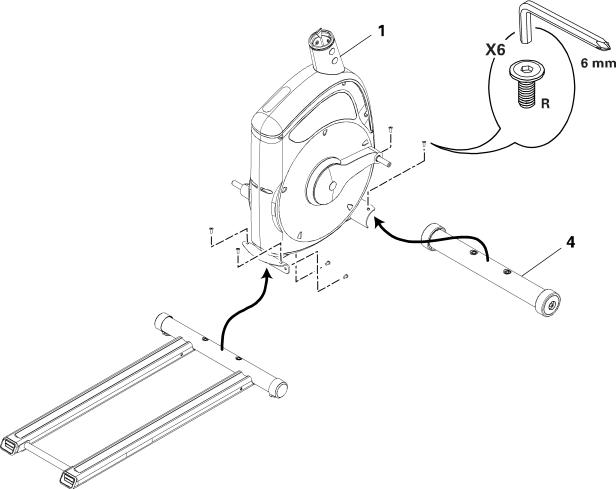
2. Attach Rail Assembly and Front Stabilizer to Frame
NOTE: Level the parts before you tighten.
8
3. Connect Lower Console Cable
NOTE: Do not crimp the Console Cable.
9
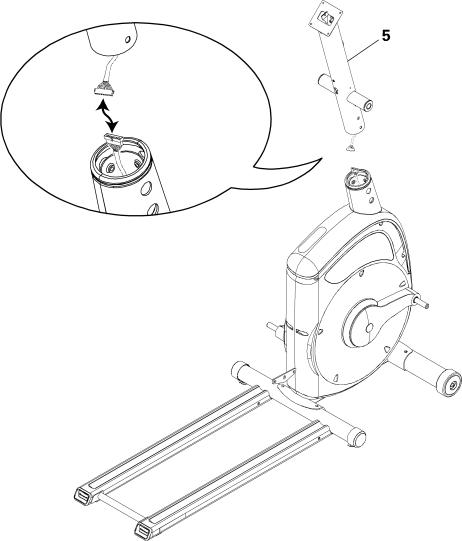
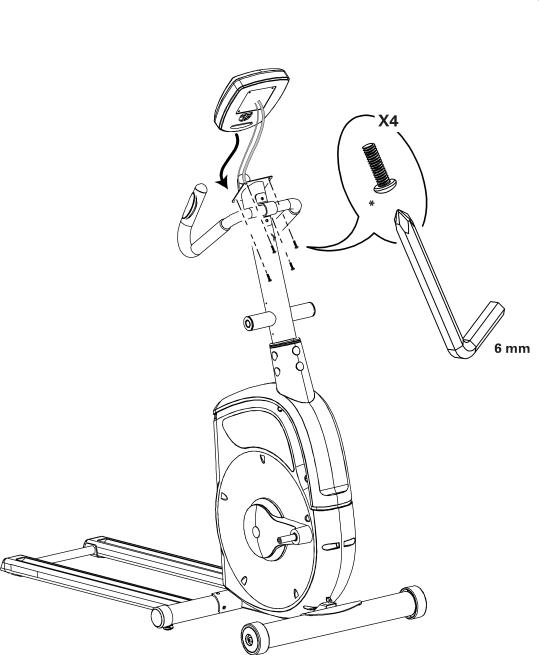
4. Attach Console Mast to Frame Assembly
NOTE: Do not crimp the Console Cable.
10
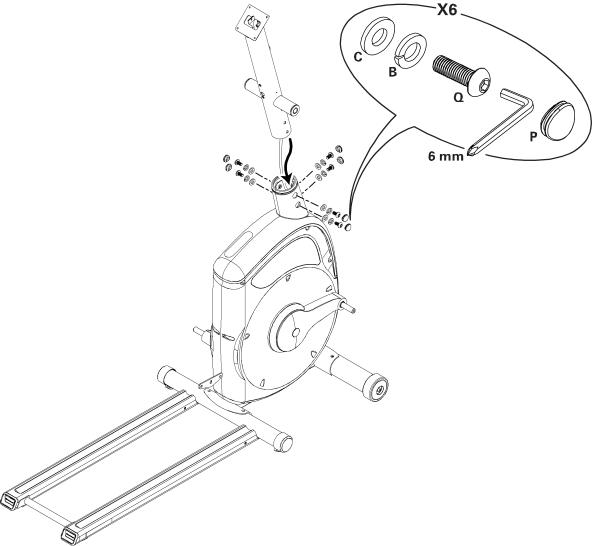
5. Attach the Static Handlebar
NOTE: Do not crimp the Console Cable.
11
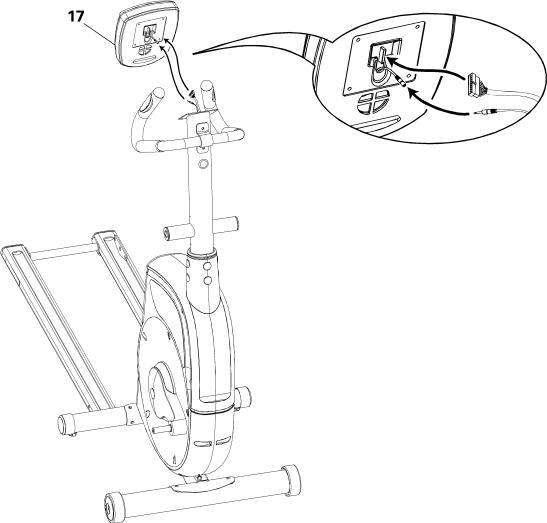
6. Connect the Console
NOTE: Do not crimp the Console Cable.
12
7. Attach Console to Frame Assembly
* Hardware is pre-installed on Console and not on Hardware Card.
13
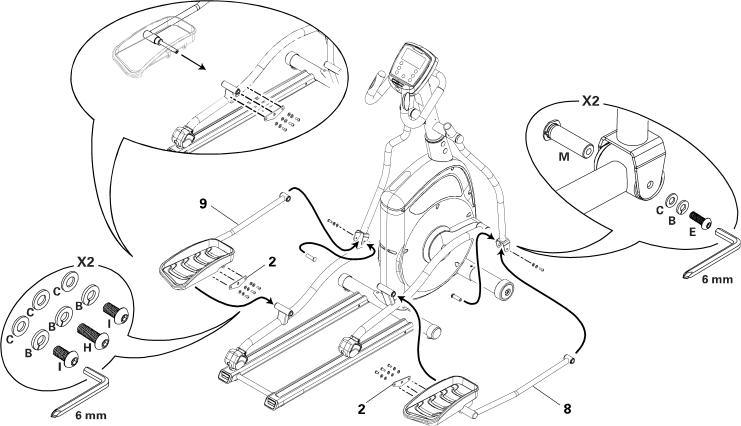
8. Attach Legs to Frame Assembly
14
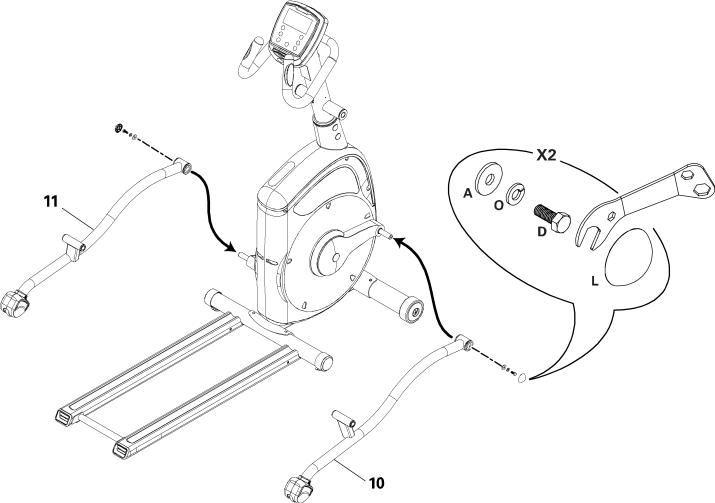
9. Attach Lower Handlebar Arms
15
10. Attach Pedals to Rails and Lower Handlebar Arms
NOTE: Be sure the key on the Cotter Pin engages the Lower Handlebar Arm.
16
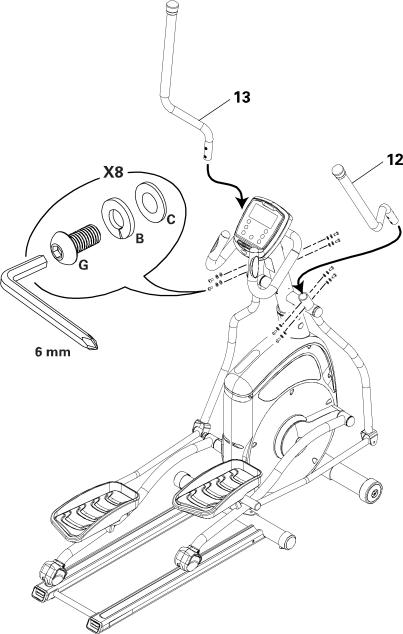
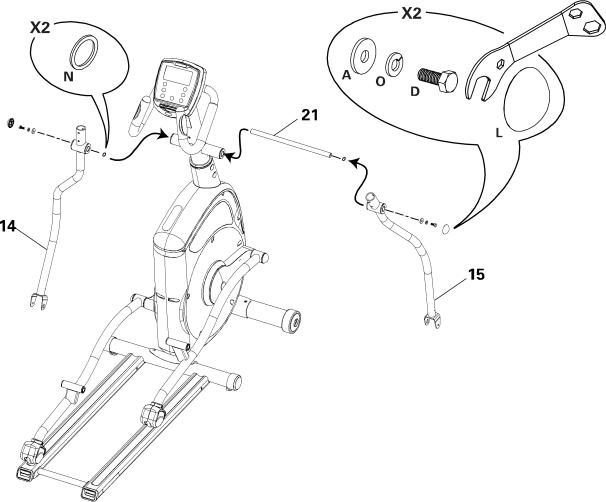
11. Attach Upper Handlebar Arms
17
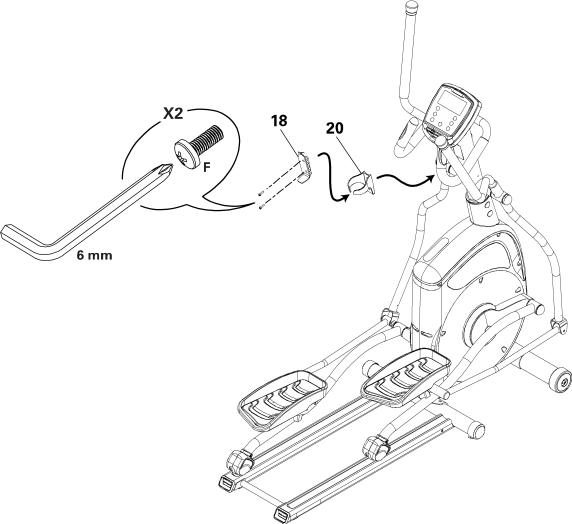
12. Attach Water Bottle Holder to Frame Assembly
18
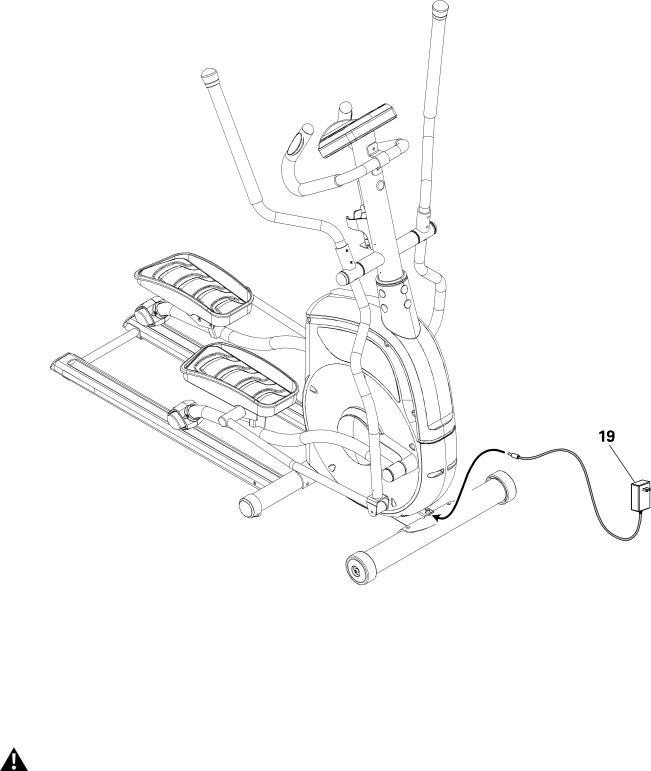
13. Connect Power Cord to Frame Assembly
Final Inspection
Inspect your machine to ensure that all fasteners are tight and components are properly assembled.
Do not use or put the machine into service until the machine has been fully assembled and inspected for correct performance in accordance with the Owner’s Manual.
19

Important Safety Instructions
This icon means a potentially hazardous situation which, if not avoided, could result in death or serious injury.
Before using this equipment, obey the following warnings:
Read and understand the complete Owner’s Manual. Keep Owner’s Manual for future reference.
Read and understand all warnings on this machine. If at any time the Warning stickers become loose, unreadable or dislodged, contact Nautilus® Customer Service for replacement stickers.
•Children must not be let on or near to this machine. Moving parts and other features of the machine can be dangerous to children.
•Consult a physician before you start an exercise program. Stop exercising if you feel pain or tightness in your chest, become short of breath, or feel faint. Contact your doctor before you use the machine again. Use the values calculated or measured by the machine’s computer for reference purposes only.
•Before each use, examine this machine for loose parts or signs of wear. Contact Nautilus® Customer Service for repair information.
•Maximum user weight limit: 300 lbs. (136 kg). Do not use if you are over this weight.
•This machine is for home use only.
•Do not wear loose clothing or jewelry. This machine contains moving parts.
•Set up and operate this machine on a solid, level, horizontal surface.
•Make the Pedals stable before you step on them. Use caution when you step off the machine.
•Disconnect all power before servicing this machine.
•Do not operate this machine outdoors or in moist or wet locations.
•Keep at least 24" (0.6 m) on each side of the machine clear. This is the recommended safe distance for access and passage around and emergency dismounts from the machine. Keep third parties out of this space when machine is in use.
•Do not over exert yourself during exercise. Operate the machine in the manner described in this manual.
•Correctly adjust and safely engage all Positional Adjustment Devices. Make sure that the Adjustment Devices do not hit the user.
•Keep the Foot Pedals clean and dry.
20
Safety Warning Labels and Serial Number
Type Description
AWARNING
•Keep children away.
•Prior to use, read and understand the Owners Manual.
•Injury or death is possible if Caution is not used while using this machine.
•The maximum user weight for this machine is 300 lbs (136 kg).
•Replace any “Caution”, “Warning” or “Danger” label that is illegible, damaged, or removed.
•This machine is for home use only.
AVERTISSEMENT
•Gardez les enfants et les animaux de compagnie éloignés de cette machine en tout temps.
•Lisez et familiarisez-vous avec le Manuel du propriétaire et avec tous les avertissements avant d’utiliser cette machine.
•Soyez prudent lorsque vous utilisez cet équipement pour ne pas vous infliger de graves blessures.
•Cette machine supporte un poids maximal de 300 lbs (136 kg).
•Remplacez toute étiquette d’avertissement endommagée, illisible ou manquante.
21

•Cette machine est à usage domestique uniquement.
B Serial Number |
Record serial number on Contacts page at end of this manual. |
|
|
22
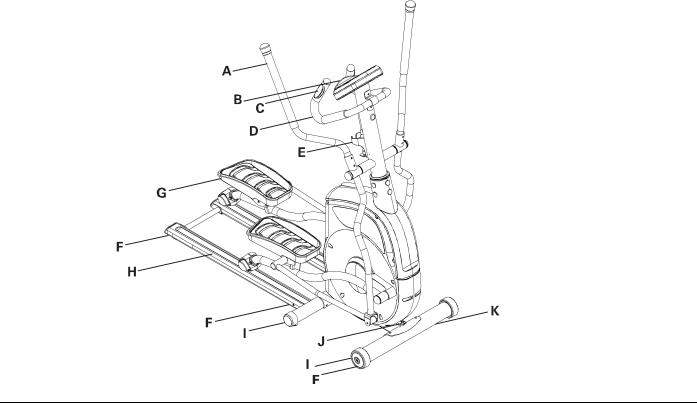
Features
A |
Swingarm Handlebars |
G |
Foot Pedals |
|
|
|
|
B |
Console |
H |
Rails |
|
|
|
|
C |
Contact Heart Rate (CHR) sensors |
I |
Stabilizer Bars |
|
|
|
|
D |
Static Handlebars |
J |
AC Adaptor Plug |
|
|
|
|
E |
Water Bottle Holder |
K |
Transport Wheels |
|
|
|
|
F |
Levelers |
|
|
|
|
|
|
23

Operations
Before You Start
Consult a physician before you start an exercise program. Stop exercising if you feel pain or tightness in your chest, become short of breath, or feel faint. Contact your doctor before you use the machine again. Use the values calculated or measured by the machine’s computer for reference purposes only.
How Often Should You Exercise
Consult a physician before you start an exercise program. Stop exercising if you feel pain or tightness in your chest, become short of breath, or feel faint. Contact your doctor before you use the machine again. Use the values calculated or measured by the machine’s computer for reference purposes only.
•3 times a week for 30 minutes each day.
•Schedule workouts in advance. Try to work out even when you do not want to.
Step Onto Your Machine
1.Steady yourself with the Handlebars or the hand grips under the Console.
2.The Pedals may not be at the same resting level. Step onto the lower Pedal with your first step.
3.Place your other foot on the opposite Pedal. Be sure to get comfortable with the Pedals before beginning a workout.
Workout Stride
The Elliptical lets you do a forward or backward workout stride. You can even change the direction during a workout. To change your stride, slow the Pedals until they stop and change direction.
What to Wear
Wear rubber-soled athletic shoes. You will need the appropriate clothes for exercise that allow you to move freely.
Console
The Console provides important information about your workout and lets you control the resistance levels while you exercise. The Console has a grid display with touch control buttons to navigate you through the exercise programs.
Power-Up Mode
The Console will enter POWER-UP mode if it is plugged into a power source, any button is pushed, or if it receives an indication from the RPM sensor as a result of pedaling the machine.
24
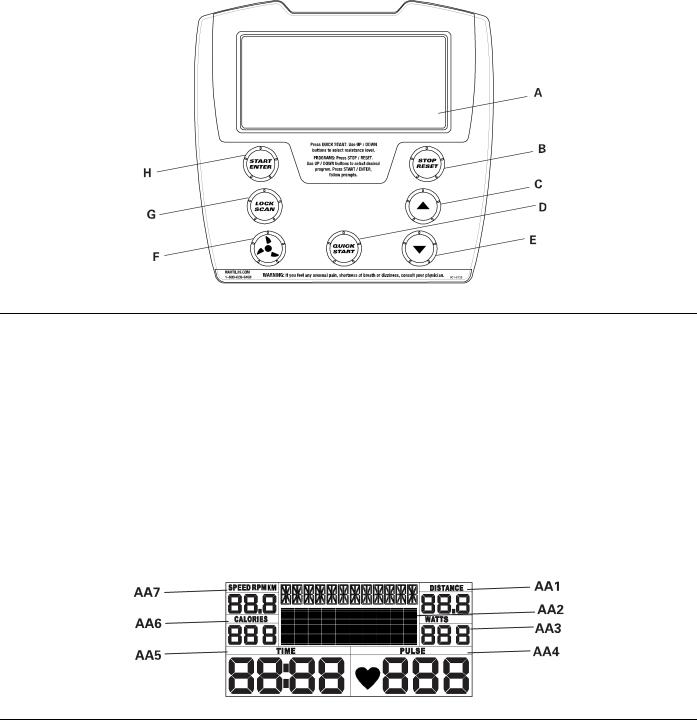
Features
A |
LCD Display |
— Backlit Console screen |
|
|
|
B |
STOP/RESET button |
— Pauses an active workout, , and if pushed again, will end the workout |
|
|
|
C |
Increase button (▲) |
— Increases a value (age, time, distance, calories, or workout resistance level) |
D |
QUICK START button |
— Begins a Quick Start workout |
|
|
|
E |
Decrease button (▼) |
— Decreases a value (age, time, distance, calories, or workout resistance level) |
|
|
|
F |
Fan button |
— fan control button, push to start and push again to turn off |
|
|
|
G |
LOCK/SCAN button |
— Cycles through your workout variables for 6 seconds each. Push STOP/RESET for |
|
|
manual control of the scan function. Push STOP/RESET again to exit the scan mode. |
H |
START/ENTER button |
— Starts a Program workout, confirms information , or will resume a paused workout |
|
|
|
LCD Display
AA1 |
Distance |
AA5 |
Time / Interval |
|
|
|
|
AA2 |
Program Display |
AA6 |
Calories |
|
|
|
|
AA3 |
Watt / Level |
AA7 |
Speed |
|
|
|
|
AA4 |
Pulse |
|
|
|
|
|
|
Distance
The DISTANCE display field shows the distance count (miles or km) in the workout. If no distance goal is set up for the current
25

workout program, the display value starts at zero and counts forward until the end of the workout. If the workout has a distance goal, the display starts at the preset value and counts down to zero.
Program Display
The Program Display shows the name of the program selection and the dot-matrix area shows the course profile for the program. Each column in the profile shows one interval (1/40 of the total program time). The higher the column, the higher the resistance level and/or speed for that interval. The flashing column shows your current interval.
Watts
The WATTS display field shows the power that you are producing at the current resistance level (1 horsepower = 746 watts).
Pulse
The Pulse display field shows the heart rate in beats per minute (BPM) from the heart rate monitor (HRM).
Consult a physician before you start an exercise program. Stop exercising if you feel pain or tightness in your chest, become short of breath, or feel faint. Contact your doctor before you use the machine again. Use the values calculated or measured by the machine’s computer for reference purposes only.
Time
The Time display field shows the time count in the workout. If no preset time is set up for the current workout program, the display value starts at zero and counts forward until the end of the workout. Maximum time is 99:59.
If the workout has a preset time, the display starts at the preset value and counts down to zero. The display shows the total time count for the workout, then the time count for the current interval.
Interval
The Interval display field shows the time remaining in the current program interval. When the time reaches zero, the program moves to the next column.
Calories
The CALORIES display field shows the estimated calories that you have burned during the exercise. If no calorie goal is set up for the current workout program, the display value starts at zero and counts forward until the end of the workout. If the workout has a calorie goal, the display starts at the preset value and counts down to zero.
Speed
The Speed display field shows the estimated speed in kilometers per hour (KM) or miles per hour (MPH).
Quick Start / Manual Program
The Quick Start / Manual program lets you start a workout without entering any information.
1.Step on the machine.
2.Push the QUICK START button to start the QUICK START / MANUAL program.
3.Push the Increase or Decrease buttons to change the resistance level. The default Quick Start resistance level is 3. The time will count up from 00:00.
4.Push STOP when done with your workout.
Workout Program Selection
To go to the Program Menu, you must first make a User selection in the User menu. Use the Increase/Decrease buttons to look at the User menu options. You can use the Guest User option to go to the Program Menu without user setup data. If you want to save your workout data, refer to the User Setup procedure in this manual.
User Setup
The Nautilus® 14 Series console lets you store and use 2 User profiles (U1 and U2) in addition to a Guest User with no setup data stored. This feature automatically records your workout results in your User profile and lets you track your fitness progress.
The User profile stores the following information:
26
 Loading...