


OPERATING INSTRUCTIONS FOR
FOO
MODEL 
FOR SERVICE OR QUESTIONS CALL l-800-672-6333
FOR HOUSEHOLD USE ONLY

IMPORTANT SAFEGUARDS
When using all electrical appliance, basic safety |
precautions should always be |
followed to reduce the risk of fire, electric shock, |
injury to persons, includ- |
ing the following: |
|
1. Read all instructions before using the |
machine. |
2.Do not touch hot surfaces. Use handles or knobs.
3.To protect against electrical shock, do not immerse cord, plugs, or
base in water or other liquid.
4.Close supervision is necessary when any appliance is used by or near children.
5.Unplug from outlet when not in use and before cleaning. Allow to
cool before putting on or taking off parts.
6.Do not operate any appliance with a damaged cord or plug or after the appliance malfunctions, or has been damaged in any manner, Return appliance only to the nearest authorized service facility for examination, repair, or adjustment.
7. |
The |
use of accessories or attachments not recommended or sold by |
|
|
Mr. |
Coffee, |
may cause hazards or injuries. |
8. |
Do |
not use |
outdoors. |
9. Do not let cord hang over edge of table or counter or touch hot surfaces.
10. Do not place on or near a hot gas or electric burner or in a heated oven.
11.Do not use appliance for other than intended use.
12.Do not disassemble product. There are no user-serviceable parts inside.
SAVE THESE INSTRUCTIONS
FOR HOUSEHOLD USE ONLY

SPECIAL CORD SET
INSTRUCTIONS
1.A short power supply cord is provided to reduce the hazards resulting from becoming entangled in, or tripping over a longer cord.
2.An extension cord may be purchased and used if care  exercised in its use.
3.If an extension cord is used, the marked electrical rating of the extension cord must be at least 10 amps and 120 volts. The
resulting extended cord must be arranged so that  will not drape over the counter top or table top where it can be pulled on by children or tripped over accidentally.
! This appliance has a polarized plug (one blade is larger than the other). As a safety feature, this plug will fit in a polarized outlet only one way. If the plug does not fully fit, reverse the
plug. it still |
does not fit, contact a qualified electrician. Do |
not attempt to |
defeat this safety feature. |
2

Warnings:
The following safety practices must be followed to prevent food-borne illnesses. This is the case with any food-handling product and does not  to all foods, fresh and dried.
!Thoroughly wash hands before starting to work with food, and wash again each time they touch anything other than food, before resuming work.
!Scrub and sanitize trays and lid of dehydrator between uses.
!Clean all kitchen equipment thoroughly after each use. Use hot water
and detergent.
Further suggested
! Use clean tongs, forks, and other utensils instead of hands whenever possible; avoid touching food as much as possible.
!Thaw frozen foods in the refrigerator or cook from frozen state.
!Avoid handling food when sick, or with cuts or sores on hands.
!Keep hands away from mouth, nose and hair when handfing food.
!Avoid coughing or sneezing on or near food and food contact surfaces.
Failure to follow these practices could  in bacteria growth in the food product or container which could result in serious illness.
3
Introduction
Congratulations, your are the owner of The Food  by Mr. Coffee This instruction book will introduce you to simple and easy ways to preserve
vegetables, fruits, and meats. You |
can make nutritious snacks while |
saving |
||||||
money |
on |
groceries. |
|
|
|
|
|
|
Herbs, |
flowers and potpourri |
be |
made |
by the |
at |
a fraction of |
the cost |
|
of store-bought goods. |
|
|
|
|
|
|
||
Please |
read |
of the instructions |
in this |
booklet |
carefully |
before you be in to |
||
use this appliance. Proper care and maintenance will ensure long life o this
appliance and its trouble-free |
operation. Save these instructions and refer to |
them often for cleaning and |
care tips. |
Table of Contents
Important Safeguards.................. |
................................................................ |
1 |
|
Cord Set |
Instructions .................................................................................... |
|
2 |
Warnings |
........................................................................................................ |
|
3 |
Introduction ..................................................................................................... |
|
4 |
|
Diagram |
of Parts ............................................................................................. |
|
5 |
Cleaning |
Instructions ...................................................................................... |
|
5 |
General Information/Before You |
Begin |
|
|
Why Dry Foods’. . . . . . . . . . . . . . . . . . . . . . . . . . . |
. . . . . . . . . . . . . . . . . . . . . . . . . . . . . . . . . . . . . . . . . . . . . . . . ..* |
...............6 |
|
How do Foods Dry’. ....................... |
..... |
6 |
|
Selecting Foods to Dry................... |
.. |
6 |
|
AN0 |
|
|
|
Fruit |
.................................................................................................... |
|
8 |
‘reparation .................................................................................................... |
|
|
8 |
.................................................................................................. |
|
|
8 |
Test.................................................................................................. |
|
9 |
|
........................................................................................ |
|
|
10 |
................................................................................................... |
|
|
IO |
................................................................................................. |
|
|
1 0 |
Test................................................................................................ |
|
1 0 |
|
of Drying ...................................................................................Times |
|
11 |
|
MEATS |
|
|
1 5 |
Jerky-Meats ............................ . . . . . . . . . . . . . . . . . . . . . . . . . . . . . . . . . . . . . . . . . . . . . . . . . . . . . .and Fish |
|
||
Dried Meats ........... |
and Fish |
|
16 |
BABY ............................................................................................... |
|
|
16 |
................................................................. |
|
|
17 |
STORAGE ...................................................................... |
AN0 LABELING |
|
18 |
......................................................... |
|
|
1 9 |
RECIPES |
|
|
20 |
Fruit............................................................................................................. |
|
|
|
Fruit Lea&r/Rolls....................................................................................... |
|
21 |
|
Vegetables .................................................................................................. |
|
|
22 |
Meats .......................................................................................................... |
|
|
24 |
TO ORDER .....................................................................ACCESSORIES |
|
24 |
|
RECORD-KEEPING ...................................................................CHARTS |
|
25 |
|
IF SERVICE ........................................................................IS REQUIRED |
|
26 |
|
Operating Instructions
! |
Before using The Food Dehydrator by Mr. Coffee |
for the |
first time, wash |
|
the trays and cover in warm, soapy water and rinse well. Trays can be |
||
|
washed on the top rack of a dishwasher only. |
|
|
! |
Simply plug in The Food Dehydrator. Push the |
ON/OFF |
switch ON. |
The light on the switch will illuminate to indicate that the unit is operating.
! Once drying is complete, turn the switch to OFF, and unplug unit.
! When using the Fruit Roll tray, always place on the top tray.
! Make sure lid is in place when drying.
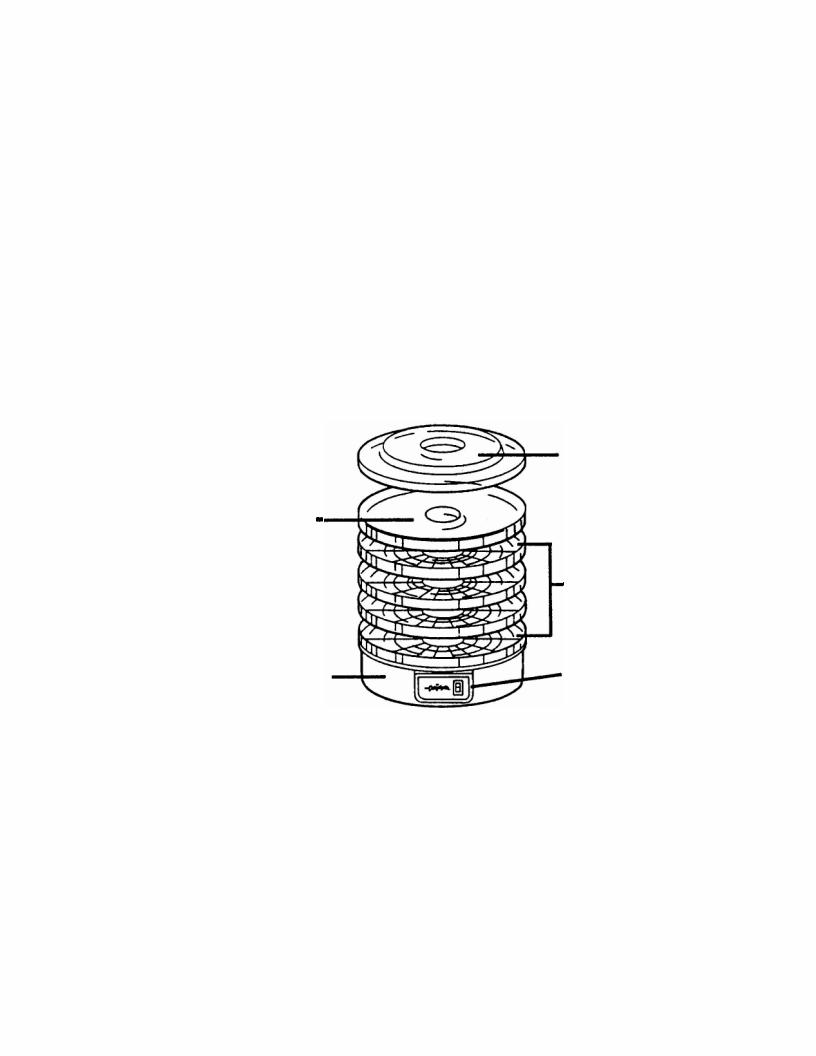
Diagram of Parts
Lid
Fruit Roll
Tray
Trays
Base Plate |
Lighted On/Off |
|
Switch |
||
|
Cleaning Instructions
Unplug from outlet prior to cleaning.
Wash trays prior to use in warm, soapy water. Rinse well, then dry.
DO NOT IMMERSE the base plate in water. Only use a damp cloth to clean.
The trays are top rack dishwasher safe.
DO NOT place the fruit roll tray in the dishwasher.

Genera/  About Drying Foods
Why use a Food Dehydrator?
COST
Saving money is a major benefit of drying foods. Home-dried foods can be made at a fraction of the cost that you will pay at the supermarket. Buying produce and meats on special, or growing your own in the summer is a great way to make your food dollar stretch further.
GREAT TASTE
Once water is removed from fruits and vegetables, the natural flavor is concentrated into chewy, healthy snacks.
STORAGE
Once the water is removed from foods they are only a portion of their original size. Foods can be sealed in airtight bags or mason jars. Open these in winter and enjoy the fresh taste of summer.
HOW  DRY?
DRY?
Dehydrating foods is a simple way to expose foods to heat and air, thus evaporating the moisture and removing any water vapors emitted from the foods.
 the moisture out of the foods quickly and evenly. This method is
  of the
  forms of food preservation.
SELECTING FOODS TO DRY
Select foods to dry that are in excellent condition. Remove any bruises or  before drying. Fruits should be ripe. Those fruits that are naturally rippened have the highest natural sugar content and dry best.
Vegetables should be ripe also. Cut away any spoiled or bruised areas. Any fruit, vegetable and most meats can be dried. Experimentation with your food dehydrator is the best way to find which foods you enjoy most.
6

Highlights
Be sure to choose fresh, ripe fruits and vegetables. Quality meats; herbs and flowers will help insure good results.
Clean produce thoroughly before using.
Cut foods |
Slices that |
are about |
thick |
work |
the best. |
Foods can |
be sliced, shredded |
or diced. |
Cut foods, |
then |
quickly place |
to dry. |
|
|
|
|
|
Don’t overlap pieces on the trays, however, they may touch.
Drying |
times |
are affected by |
the humidity, |
thickness |
of |
slices and |
moisture |
|||||||
content |
of |
the |
foods. |
Keeping |
good |
records |
will |
help |
adapt |
drying |
habits |
|||
to |
these |
variables. |
|
|
|
|
|
|
|
|
|
|||
Dried |
foods |
will |
have |
a pliable texture similar to |
licorice. |
|
|
|
||||||
A small percentage of moisture is retained in the |
dried |
foods. |
|
|||||||||||
Rotate |
trays |
if |
you notice uneven drying. Simply |
move |
the |
bottom |
trays |
|||||||
to |
the |
top |
and |
the top trays |
down |
towards |
the bottom. |
|
|
|
||||
Blanching or steaming of vegetables is recommended to help retain color. Blanching also helps break down waxy skins on fruits like grapes to help with even drying.
For best results, keep all |
five |
trays |
in |
place |
while drying, |
whether |
they |
are |
|||||||
used or |
not. |
|
|
|
|
|
|
|
|
|
|
|
|
||
Always |
use |
the Fruit |
Roll |
Insert |
on |
the top |
tray. |
This |
will |
help ensure |
even |
||||
air |
flow |
to |
all trays. |
|
|
|
|
|
|
|
|
|
|
|
|
If |
using |
cheesecloth, |
use |
on |
top |
two |
trays |
only. |
This |
will |
ensure |
proper air |
|||
flow.
SEE SPECIFIC INSTRUCTIONS ABOUT DRYING MEATS AND POULTRY.

Drying |
Fruits |
|
|
Use fruits |
that are fresh and ripe. Grow your own |
or select from a farmer’s |
|
market to |
help ensure quality produce. High quality produce will generate high |
||
quality |
results. |
|
|
Once |
you |
start processing fruits, work quickly to |
prevent spoilage. |
PREPARATION
Wash fruits thoroughly. Remove any blemishes or spoiled spots. Slice into  slices or circles or in halves. A slicer or food processor will help speed up this step.
PRETREATMENT (OPTIONAL)
Pretreating fruits is optional. You do not have to pretreat fruits to get good results. Listed below are several options for pretreating. You may experiment
and find the |
option that is best for you. The key to long life is proper storage. |
Review the “Storage and Labeling” section on page18 for more details. |
|
Pretreating is |
a step that helps to slow down enzyme growth. Enzyme growth |
leads to unwanted color and flavor changes in fruits. |
|
NATURAL |
PRETREATMENTS |
Lemon and pineapple juices are the most common natural pretreaters. Soak the
cut |
fruit |
in |
either |
|
juice for about 2 minutes. Then place fruit directly |
onto |
the |
|||||||
trays. |
Try other |
types |
of natural juices such as orange |
or |
lime. |
|
|
|
||||||
For |
a |
|
tasty |
treat, dip soaked fruit slices into coconut, |
honey, spices, |
cinnamon or |
||||||||
even a gelatin powder, then place on trays to dry. |
|
|
|
|
|
|||||||||
Syrup |
|
|
|
|
|
|
|
|
|
|
|
|
||
Syrup |
|
|
|
|
|
is a process that helps retain the color of |
apples, |
apricots, |
||||||
nectarines, |
|
|
peaches, plums, and pears. This process |
results |
in a |
sweeter |
||||||||
tasting |
|
|
candied |
fruit. |
|
|
|
|
|
|
||||
Mix 1 cup sugar, 1 cup white corn syrup and 2 cups water |
in a large heavy sauce |
|||||||||||||
pan. Add 1 and |
|
|
pounds of cut fruit. Bring to a boil. Then remove from heat |
|||||||||||
and |
let |
stand about |
35 minutes. Do not stir while the |
fruit |
is sitting, |
this |
causes |
|||||||
the |
fruit |
to |
break |
|
up |
and lose juice. Drain and lightly |
rinse |
with |
water, then place |
|||||
on |
trays |
to |
dry. |
|
|
|
|
|
|
|
|
|
||
8
 Loading...