


User Manual /
Manual del Usuario
Single Serve Brewer / Cafetera individual
BVMC-KG5
©2011 Sunbeam Products, Inc. doing business as Jarden Consumer Solutions. All rights reserved. Distributed by Sunbeam Products, Inc. doing business as Jarden Consumer Solutions, Boca Raton, Florida 33431. Sunbeam Products, Inc.is a subsidiary of Jarden Corporation (NYSE:JAH).
©2011 Sunbeam Products, Inc. operando bajo el nombre de Jarden Consumer Solutions. Todos los derechos reservados. Distribuido por Sunbeam Products, Inc. operando bajo el nombre de Jarden Consumer Solutions, Boca Raton, Florida 33431. Sunbeam Products, Inc. es una subsidiaria de Jarden Corporation (NYSE:JAH).
U.S. 1-800-MR COFFEE (1-800-672-6333) Canada 1-800-667-8623 Visit us at www.mrcoffee.com / Visítenos en www.mrcoffee.com
Printed in China/Impreso en China |
P.N. 155574 |
www.mrcoffee.com |
GCDS-MRC23392-PH |
BVMC-KG5_11ESM1 |
BVMC-KG5_11ESM1.indd 1-2 |
|
|
11/11/11 4:00 PM |
|
|

IMPORTANT SAFEGUARDS
When using electrical appliances, basic safety precautions should be followed, including the following:
1.Read all instructions before using.
2.Do not touch hot surfaces. Use handles and knobs when available. Scalding may occur if the coffee brewer is moved or opened or K-Cup® Portion Pack is disturbed during brewing cycles.
3.This appliance must be properly installed and located in accordance with these instructions before it is used.
4.The use of accessory attachments not recommended by the appliance manufacturer may result in fire, electrical shock or injury to persons.
5.Do not place on or near a hot gas or electric burner, or in a heated oven.
6.Do not use outdoors.
7.To protect against fire, electric shock and injury, do not immerse cords, plugs or the appliance in water or any other liquid.
8.Use only water in this appliance! Do not put any other liquids or foods in the Water Reservoir.
9.To disconnect, unplug power cord when not in use and before cleaning.
10.Do not operate any appliance with a damaged cord or plug or after the appliance malfunctions or is damaged in any manner. Contact your Mr. Coffee® Customer Service to arrange for replacement or repair.
11.Do not let the cord hang over the edge of the table or counter, or touch hot surfaces.
12.Close supervision is necessary when any appliance is used by or near children.
13.Do not open the brewer while brewing is in progress.
14.Do not use appliance for other than intended use.
2
CAUTION: There are two sharp needles that puncture the K-Cup® portion pack, one above the K-Cup® portion pack Holder and the other in the bottom of the K-Cup® portion pack Holder. To avoid risk of injury, do not put your fingers in the K-Cup® portion pack Assembly Housing.
CAUTION: There is extremely hot water in the K-Cup® portion pack Holder during the brew process. To avoid risk of injury, do not lift the Handle or open the K-Cup® portion pack Assembly Housing during the brewing process.
WARNING: To reduce the risk of fire or electric shock, do not remove any service covers. There are no user serviceable parts inside the coffeemaker.
Only authorized personnel should repair the
 coffeemaker.
Please read ALL of the instructions in this manual carefully before you begin to use this appliance. Proper care and maintenance will ensure a long life and a trouble-free operation for this appliance. Please save these instructions and refer to them for cleaning and care tips.
SAVE THESE INSTRUCTIONS
3
BVMC-KG5_11ESM1.indd 3-4 |
|
|
11/11/11 4:00 PM |
|
|
SPECIAL CORD SET INSTRUCTIONS
1.A short power supply cord is provided to reduce the hazards resulting from a person or pet becoming entangled in, or tripping over, a longer cord.
2.An extension cord may be purchased and used if care is exercised in its use.
3.If an extension cord is used, the marked electrical rating of the extension cord must be at least 10 amps and 120 volts. The resulting extended cord must be arranged
so that it will not drape over a countertop or tabletop where it can be pulled on by children or tripped over accidentally.
4.This appliance has a polarized plug (one blade is wider than the other). To reduce the risk of electric shock, this plug will fit in a polarized outlet only one way. If the plug does not fit fully in the outlet, reverse the plug. If it still does not fit, contact a qualified electrician. Do not modify the plug in any way.
THIS PRODUCT IS FOR
HOUSEHOLD USE ONLY
4
Table of Contents
Important Safeguards . . . . . . . . . . . . . . . . . . . . . . . . . . . . . . 2
Special Cord Set Instructions. . . . . . . . . . . . . . . . . . . . . . . . . 4
Parts Diagram . . . . . . . . . . . . . . . . . . . . . . . . . . . . . . . . . . . . 6
Set-Up & How to Brew . . . . . . . . . . . . . . . . . . . . . . . . . . . . . 7
Helpful Hints . . . . . . . . . . . . . . . . . . . . . . . . . . . . . . . . . . . . . 10
Cleaning and Maintaining . . . . . . . . . . . . . . . . . . . . . . . . . . 11
Troubleshooting . . . . . . . . . . . . . . . . . . . . . . . . . . . . . . . . . 15
Service and Maintenance . . . . . . . . . . . . . . . . . . . . . . . . . . 16
Warranty Information . . . . . . . . . . . . . . . . . . . . . . . . . . . . . 17
Welcome and congratulations on the purchase of your new Mr. Coffee® Single Serve Brewer. Your new brewer will wake up with you in the morning and provide you breaks and treats during your hectic daily activities.
How you enjoy your Mr. Coffee® Single Serve Brewer is up to you!
5
BVMC-KG5_11ESM1.indd 5-6 |
|
|
11/11/11 4:00 PM |
|
|

PARTS DIAGRAM
14 |
1 |
|
13
|
2 |
12 |
3 |
|
|
11 |
4 |
|
|
|
5 |
|
6 |
|
7 |
|
10 |
|
|
|
9 |
8 |
|
1 |
Reservoir Lid |
9 |
Drip Tray Base (Not |
2 |
Reservoir |
|
shown) |
3 |
Brew Now / Off |
10 |
Drip Tray Plate |
4 |
Heating Indicator (Red) |
11 |
K-cup® Portion Pack |
5 |
Brewing Indicator (Green) |
|
Assembly Housing |
6 |
Serving Size Indicators |
12 |
K-cup® Portion Pack |
7 |
Serving Size Button |
13 |
Brew Head Handle |
8 |
Drip Tray |
14 |
Brew Head |
|
|
6 |
|
SET-UP & HOW TO BREW
1.Place Brewer upright on a flat surface, remove all
product packaging and plug into outlet.
2.Remove reservoir and reservoir lid, then fill with water to the MAX FILL line.
3.Replace reservoir lid and place reservoir on top of Brewer.
4.DO NOT remove or puncture the foil lid of the K-Cup® portion pack.
Lift the handle of the brewer to insert a K-Cup® portion pack.
7
BVMC-KG5_11ESM1.indd 7-8 |
|
|
11/11/11 4:00 PM |
|
|
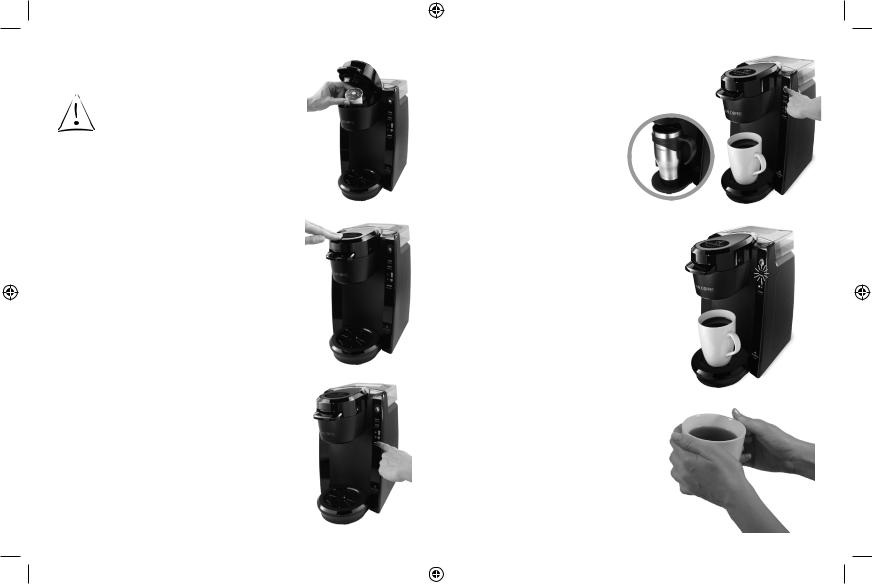
5.Place chosen K-Cup® Portion Pack into the K-Cup® Portion Pack assembly housing.
CAUTION: Avoid the sharp needle inside the brew head.
6.Close by pressing down on top of the brew head.
NOTE: Closing the brew head will puncture the K-Cup® Portion Pack.
7.Select Brew Size by pressing the serving size button.
8
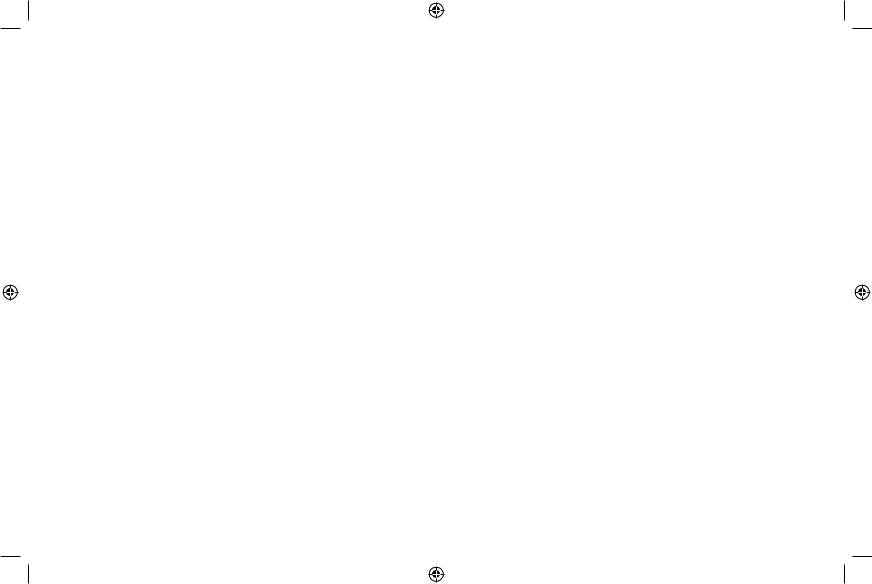
8.Place a coffee cup in the dispense area on the drip tray. Press the BREW NOW button.
NOTE: Drip Tray and Drip Tray Plate can be removed to accomodate larger mugs.
9.When the water reaches temperature, the Heating indicator light will go off and the Brewing indicator light will turn on.
NOTE: Pump will remain on for up to 90 seconds after brew is completed to dry the K-Cup® Portion Pack.
10.Enjoy!
9
BVMC-KG5_11ESM1.indd 9-10 |
|
|
11/11/11 4:00 PM |
|
|
Helpful Hints
•Initial Cleansing Brew – Before you use your Brewer for the first time, perform an initial cleansing brew by running clean water through the brew cycle without using a K-Cup® portion pack.
•One Cup at a Time – Your new Brewer makes one fresh beverage at a time.
•Water Reservoir for Convenience - Your new Brewer holds up to 24oz. or water. This will make 4 small cups of coffee (6 oz. each) or 2 large cups of coffee (10 oz. each).
•The Right Water Makes a Difference – For the best tasting gourmet coffee, tea or hot cocoa, we recommend using bottled or filtered water. We do not recommend using distilled or reverse osmosis water. Water quality varies from place to place. If you notice an undesirable taste in your cup of coffee such as chlorine or other mineral taste, we recommend you consider using bottled water or water from a filtration system.
•Customize Your Flavor & Brew – With the choice of over 200 varieties of K-Cup® portion pack, your Brewer gives you endless options to customize the flavor and strength that’s perfect for you. For a strong, intense cup, select an Extra Bold K-Cup® portion pack (with up to 30% more ground coffee than regular varieties). Fill the reservoir with filtered or bottled water up to the FILL LEVEL indicator and brew normally.
•Brewing Into a Tall Mug – To brew into a tall mug, simply remove the Drip Tray Assembly and place the tall mug on the Drip Tray Base.
•The Drip Tray – Any liquid overflow (from your cup or the Cold Water Reservoir) will be caught in the Drip Tray. Be sure to empty the Drip Tray. The Drip Tray has a snug fit to ensure it stays put in transit.
•Clean Your Brewer Regularly – To keep your Brewer looking and performing its best, be sure to clean the external and
10
BVMC-KG5_11ESM1.indd 11-12
internal components on a regular basis. See page 11 for more information.
•De-Scaling – Mineral content in water varies from place to place. Depending on the mineral content of the water in your area, calcium deposits or scale may build up in your Brewer. Scale is non-toxic, but left unattended, it can hinder Brewer performance. De-scaling your Brewer helps
maintain the heating element and other internal parts of the Brewer that come in contact with water. See page 13 for more information.
•Storing – When storing your Brewer, carefully empty the Drip tray and water reservoir. Store your Brewer upright in a safe, dry, frost-free environment.
CLEANING AND MAINTAINING
YOUR SINGLE SERVE BREWER
Cleaning External Parts
IMPORTANT: Make sure the Brewer is unplugged before cleaning Regular cleaning of the Brewer’s external components is recommended. Allow to Cool.
1. Never immerse the Brewer in water or other liquids. The Housing and other external components may be cleaned with a soapy, damp, non-abrasive cloth.
2. The Drip Tray can accumulate liquids. The Drip Tray and Drip Tray Plate should be periodically inspected and cleaned with a damp soapy nonabrasive lint free cloth. The Drip Tray and Drip Tray Plate should not be put into the dishwasher. To remove the Drip Tray Assembly, simply slide
it toward you, keeping it level at all times to avoid spilling.
Cleaning the K-Cup® Portion Pack Holder Assembly
1.Cleaning the Parts – The K-Cup® portion pack Holder Assembly can be placed onto the top shelf of a dishwasher. NOTE: Use low temperature cycles in the dishwasher. To remove from the Brewer, lift the front face of the Brewer. Grasp the top of the K-Cup® portion pack
11
11/11/11 4:00 PM
 Loading...