


DTR Series®
DTR410/DTR510/DTR610
User Guide
 610
610
Motorola, Inc. |
|
8000 West Sunrise Boulevard |
|
Fort Lauderdale, Florida 33322 |
6881097C81-O |

Foreword
The information contained in this manual relates to all DTR Series portable radios, unless otherwise specified.
Product Safety and RF Exposure Compliance
! |
Before using this product, read the operating instructions |
for safe usage contained in the Product Safety and RF |
|
C a u t i o n |
Exposure booklet enclosed with your radio. |
|
|
|
ATTENTION! |
This radio is restricted to occupational use only to satisfy FCC RF energy exposure requirements. Before using this product, read the RF energy awareness information and operating instructions in the Product Safety and RF Exposure booklet enclosed with your radio (Motorola Publication part number 6881095C98) to ensure compliance with RF energy exposure limits.
For a list of Motorola-approved antennas, batteries, and other accessories, visit the following web site which lists approved accessories: <http://www.motorola.com/cgiss/index.shtml>
Computer Software Copyrights
The Motorola products described in this manual may include copyrighted Motorola computer programs stored in semiconductor memories or other media. Laws in the United States and other countries preserve for Motorola certain exclusive rights for copyrighted computer programs, including, but not limited to, the exclusive right to copy or reproduce in any form the copyrighted computer program. Accordingly, any copyrighted Motorola computer programs contained in the Motorola products described in this manual may not be copied, reproduced, modified, reverse-engineered, or distributed in any manner without the express written permission of Motorola. Furthermore, the purchase of Motorola products shall not be deemed to grant either directly or by implication, estoppel, or otherwise, any license under the copyrights, patents or patent applications of Motorola, except for the normal non-exclusive license to use that arises by operation of law in the sale of a product.
Document Copyrights
No duplication or distribution of this document or any portion thereof shall take place without the express written permission of Motorola. No part of this manual may be reproduced, distributed, or transmitted in any form or by any means, electronic or mechanical, for any purpose without the express written permission of Motorola.
Disclaimer
The information in this document is carefully examined, and is believed to be entirely reliable. However, no responsibility is assumed for inaccuracies. Furthermore, Motorola reserves the right to make changes to any products herein to improve readability, function, or design. Motorola does not assume any liability arising out of the applications or use of any product or circuit described herein; nor does it cover any license under its patent rights nor the rights of others.
Trademarks
MOTOROLA and The Stylized M Logo are registered in the US Patent & Trademark Office. All other product or service names are the property of their respective owners.
© Motorola, Inc. 2005.

Table of Contents
Foreword......................................................................................................... |
|
ii |
FCC Licensing Information ........................................................................... |
v |
|
Chapter 1 |
Introduction ......................................................................... |
1-1 |
Notations Used in This Manual................................................................................................................ |
1-1 |
|
Your DTR Series Radio........................................................................................................................... |
1-3 |
|
Getting Started ........................................................................................................................................ |
|
1-4 |
Menu Icons .................................................................................................................................... |
1-4 |
|
Status Icons ................................................................................................................................... |
1-4 |
|
Text Area |
....................................................................................................................................... |
1-5 |
Display Options.............................................................................................................................. |
1-5 |
|
Menu Key |
....................................................................................................................................... |
1-5 |
Menus and Lists............................................................................................................................. |
1-5 |
|
Battery ..................................................................................................................................................... |
|
1-5 |
Battery Life..................................................................................................................................... |
1-5 |
|
Charging the Radio.................................................................................................................................. |
1-6 |
|
Charging using the Drop-in Charging Tray .................................................................................... |
1-6 |
|
Charging using the Plug-in Charger .............................................................................................. |
1-6 |
|
Charging a Radio and Battery using a Multi-Unit Charger............................................................. |
1-7 |
|
Battery Meter ................................................................................................................................. |
1-7 |
|
Attaching the Battery ............................................................................................................................... |
1-7 |
|
Swivel Belt Holster................................................................................................................................... |
1-8 |
|
Mini Keyboard.......................................................................................................................................... |
|
1-8 |
Attaching the Mini Keyboard to the Radio ..................................................................................... |
1-8 |
|
Disconnecting the Mini Keyboard from Your Radio ....................................................................... |
1-8 |
|
Entering Text with the Mini Keyboard ............................................................................................ |
1-9 |
|
Yellow/Lock Key Functionality ....................................................................................................... |
1-9 |
|
Green/Lock Key Functionality........................................................................................................ |
1-9 |
|
CAPS Key Functionality................................................................................................................. |
1-9 |
|
Standard Yellow Function Green Function .................................................................................. |
1-10 |
|
Using Mini Keyboard Key Shortcuts ............................................................................................ |
1-11 |
|
Extended Character Set .............................................................................................................. |
1-11 |
|
Accent Marks ............................................................................................................................... |
1-11 |
|
Other Special Characters ............................................................................................................ |
1-12 |
|
Accessories ........................................................................................................................................... |
|
1-12 |
Chapter 2 |
General Radio Operations.................................................. |
2-1 |
Turning Your Radio On or Off.................................................................................................................. |
2-1 |
|
Adjusting the Speaker Volume ................................................................................................................ |
2-1 |
|
Selecting a Scroll List Contact................................................................................................................. |
2-2 |
|
Viewing a Contact.......................................................................................................................... |
2-2 |
|
Receiving and Making Calls .................................................................................................................... |
2-3 |
|
Types of Calls ................................................................................................................................ |
2-3 |
|
Receiving a Call............................................................................................................................. |
2-3 |
|
Making a Call ................................................................................................................................. |
2-3 |
|
|
|
|

ii |
Table of Contents |
|
|
Call Alerts (DTR510 / DTR610 only)........................................................................................................ |
2-4 |
Sending Call Alerts ........................................................................................................................ |
2-4 |
Receiving a Call Alert..................................................................................................................... |
2-4 |
Text Messaging (DTR510 / DTR610 only)............................................................................................... |
2-5 |
Receiving a Message..................................................................................................................... |
2-5 |
Reading from the Inbox.................................................................................................................. |
2-5 |
Replying to a Received Message .................................................................................................. |
2-6 |
Sending a Text Message ............................................................................................................... |
2-7 |
Composing a Message Using the Mini Keyboard .......................................................................... |
2-8 |
Deleting a Message ....................................................................................................................... |
2-9 |
Accessing the Main Menu...................................................................................................................... |
2-10 |
Main Menu Navigation Chart ................................................................................................................. |
2-10 |
Recent Calls .......................................................................................................................................... |
2-11 |
Viewing a Recent Call.................................................................................................................. |
2-11 |
Alerting a Recent Caller ............................................................................................................... |
2-11 |
Deleting Recent Calls .................................................................................................................. |
2-12 |
Settings.................................................................................................................................................. |
2-12 |
Setting the Display ....................................................................................................................... |
2-13 |
Setting VibraCall (DTR510 / DTR610 only) ................................................................................. |
2-14 |
Clock and Alarm........................................................................................................................... |
2-14 |
Setting the Volume....................................................................................................................... |
2-17 |
My Info................................................................................................................................................... |
2-18 |
Chapter 3 |
Advanced Radio Operations .............................................. |
3-1 |
Accessing the Advanced Menu ............................................................................................................... |
3-1 |
|
Managing Your Scroll List .............................................................................................................. |
3-1 |
|
Scan |
............................................................................................................................................... |
3-2 |
Enabling Call Forwarding (DTR510 / DTR610 only) ...................................................................... |
3-2 |
|
Remote ...............................................................Disabling (initiated from DTR610 Models Only) |
3-3 |
|
Remote .................................................................Monitoring (initiated by DTR610 Models Only) |
3-4 |
|
Remote .........................................................................Time (initiated by DTR610 Models Only) |
3-4 |
|
Chapter 4 |
Radio Programming............................................................ |
4-1 |
Program Menu Navigation Chart ............................................................................................................. |
4-1 |
|
Entering Programming Mode................................................................................................................... |
4-2 |
|
My Info..................................................................................................................................................... |
|
4-2 |
Adding Contacts (DTR510 / DTR610 only).............................................................................................. |
4-3 |
|
Call Type........................................................................................................................................ |
|
4-3 |
Channel.......................................................................................................................................... |
|
4-4 |
Unit Name ...................................................................................................................................... |
4-4 |
|
Programming a Unit ID (Private Calls Only) .................................................................................. |
4-5 |
|
Selecting a Group ID...................................................................................................................... |
4-5 |
|
Entering a Home Group Number (Contacts Only) ......................................................................... |
4-5 |
|
Selecting Group Only..................................................................................................................... |
4-6 |
|
Entering a Ringer Type (Private Calls Only - not supported on DTR410) ..................................... |
4-6 |
|
Text Messaging (DTR510 / DTR610 only)............................................................................................... |
4-7 |
|
Settings.................................................................................................................................................... |
|
4-8 |
Radio History ................................................................................................................................. |
4-8 |
|
Scan Lists ...................................................................................................................................... |
4-8 |
|
Manager Mode............................................................................................................................... |
4-8 |
|
April 27, 2005 |
6881097C81-O |

Table of Contents |
iii |
|
|
|
|
|
Language....................................................................................................................................... |
4-9 |
Chapter 5 |
Cloning Mode ...................................................................... |
5-1 |
Entering Cloning Mode............................................................................................................................ |
5-1 |
|
Cloning Using the Cloning Cable............................................................................................................. |
5-1 |
|
Cloning by Sending a Contact (not supported by DTR410) .................................................................... |
5-3 |
|
Chapter 6 |
Troubleshooting .................................................................. |
6-1 |
Chapter 7 |
Motorola Limited Warranty for the United States |
|
|
and Canada .......................................................................... |
7-3 |
What Does this Warranty Cover?......................................................................................................... |
7-3 |
|
Products and Accessories ............................................................................................................. |
7-3 |
|
Exclusions...................................................................................................................................... |
7-3 |
|
Software |
......................................................................................................................................... |
7-4 |
Who is Covered?..................................................................................................................................... |
7-4 |
|
How to Obtain Warranty ..........................................................................Service or Other Information? |
7-4 |
|
Software Copyright .......................................................................................................................Notice |
7-4 |
|
Patent Notice ........................................................................................................................................... |
|
7-5 |
Export Law Assurances........................................................................................................................... |
7-5 |
|
INDEX
6881097C81-O |
April 27, 2005 |

iv |
Table of Contents |
Notes
April 27, 2005 |
6881097C81-O |

FCC Licensing Information
DTR Series® business two-way radios operate in the license-free 900 MHz ISM band and are subject to the Rules and Regulations of the Federal Communications Commission (FCC)
This device complies with part 15 of the FCC rules. Operation is subject to the following two conditions: (1) This device may not cause harmful interference, and (2) this device must accept any interference received, including interference that may cause undesired operation.
Read this manual carefully and make sure you know how to properly operate radio before use.
Changes or modifications not expressly approved by Motorola may void the user’s authority granted by the FCC to operate this radio and should not be made. To comply with FCC requirements, transmitter adjustments should be made only by or under the supervision of a person certified as technically qualified to perform transmitter maintenance and repairs. Replacement of any transmitter component (crystal, semiconductor, etc.) not authorized by the FCC equipment authorization for this radio could violate FCC rules.
NOTE: Use of this radio outside the country where it was intended to be distributed is subject to government regulations and may be prohibited.

vi |
: |
|
|
Notes
April 27, 2005 |
6881097C81-O |

Chapter 1 Introduction
Thank you for purchasing a Motorola‚ DTR Series® radio. Your radio is a product of Motorola’s 75 plus years of experience as a world leader in the designing and manufacturing of communications equipment. The DTR Series radios provide cost-effective communications for businesses such as retail stores, restaurants, schools, construction sites, manufacturing, property and hotel management, and more. Motorola business two-way radios are the perfect communications solution for all of today’s fast-paced industries.
Please read this manual carefully to ensure you know how to properly operate the radio before use. This User’s Guide covers operation and maintenance of your DTR Series radio.
Notations Used in This Manual
Throughout the text in this publication, you will notice the use of WARNINGS, Cautions, and Notes. These notations are used to emphasize that safety hazards exist, and the care that must be taken or observed.
WARNING: An operational procedure, practice, or condition, etc., which may result in injury or death if not carefully observed.
CAUTION: An operational procedure, practice, or condition, etc., which may result in damage to the equipment if not carefully observed.
NOTE: An operational procedure, practice, or condition, etc., which is essential to emphasize.
The following special notations identify certain items:
Example |
Description |
|
|
Volume Control |
Button names are shown in bold print. |
|
|
|
Radio keys and buttons are shown as they appear on |
|
the radio. |
|
|
Contcs |
Text appearing on the display is shown in bold print. |
|
|

1-2 |
Introduction: Notations Used in This Manual |
|
|
Your model number is shown on the radio lens above the display, and tells you the following information:
DTR Features
|
DTR 410 |
DTR 510 |
DTR 610 |
|
|
|
|
PublicGroups |
Up to 5 |
Up to 10 |
Up to 25 |
Available |
(2 default) |
(5 default) |
(5 default) |
|
|
|
|
PublicGroup Scan |
Up to 5/Channel |
Up to 5/Channel |
Up to 5/Channel |
|
|
|
|
PrivateCall |
No |
Yes |
Yes |
|
|
|
|
SMS Messaging |
No |
5 Quick Notes |
10 Quick Notes |
|
|
(10 available) |
(20 available) |
|
|
|
|
Vibracall® |
No |
Yes |
Yes |
|
|
|
|
Clock/Alarm |
Yes |
Yes |
Yes |
|
|
|
|
Scroll List |
Yes |
Yes |
Yes |
|
|
|
|
Call Forwarding |
No |
Yes |
Yes |
|
|
|
|
Remote Disable |
No |
Receive Only |
Yes |
|
|
|
|
Remote Monitor |
No |
Receive Only |
Yes |
|
|
|
|
Remote Time |
No |
Receive Only |
Yes |
|
|
|
|
Battery Life |
14.5 Hours |
14.5 Hours |
19 Hours |
|
(5/5/90) |
(5/5/90) |
(5/5/90) |
|
|
|
|
Charging Time |
Up to 3 Hours |
Up to 3 Hours |
Up to 1 Hour |
|
|
|
|
Drop in Charging Tray |
Yes |
Yes |
Yes |
|
|
|
|
April 27, 2005 |
6881097C81-O |
Introduction: Your DTR Series Radio |
1-3 |
|
|
Your DTR Series Radio
Volume Controls 
Push-to-Talk (PTT)
Button
Menu Key 
Speaker
Plug-in Charging
and Connectivity
Accessories
Antenna
Audio Jack
Connect audio accessories

 510
510
 Option Keys
Use to select display options

 Home Key
Use to exit the current menu
and return to the idle screen
 Power Button
 Navigation Keys
Use to scroll menu settings
Microphone
6881097C81-O |
April 27, 2005 |
1-4 |
Introduction: Getting Started |
|
|
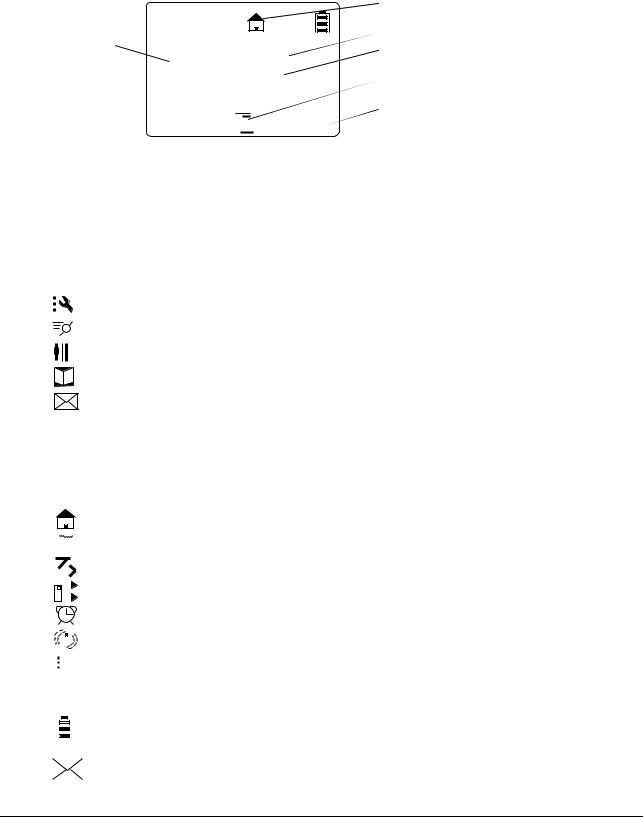
Getting Started
Any time your radio is powered on, the display provides you with information and options.
Text Area
JOE SMITH Security
5:49pm 11/14 Contcs 


 Mesgs
Mesgs
Menu/Status Icons
User Name
Scroll Setting
Menu Icon
Display Options
The display shown is in idle. The idle screen appears when your radio is on, but not engaged in any activity.
Menu Icons
Menu icons appear when you are accessing a particular menu. The icon for that menu appears in the upper left corner of the display.
Settings |
Customize your radio. |
Recent Calls |
Lists recent calls. |
My Info |
View personal radio information. |
Contacts |
Create, view, store, edit contacts. |
Messages |
View, reply, create, send messages. |
Status Icons
Status icons usually appear in first row at the top of the display. Some appear at all times. Others appear only when your radio is engaged in certain activities or when you have activated certain features.
|
|
|
|
|
|
|
Home |
The private or group contact shown is on your home channel. |
|
|
|
|
|
|
|
PublicGroup |
The contact selected is a PublicGroup. |
|
|
|
|
|
||||
|
|
|
|
|
||||
|
|
|
|
|
|
|
Scan |
The radio is scanning PublicGroups on your current channel. |
|
|
|
|
|
|
|
||
|
|
|
|
|
|
|||
|
|
|
|
|
|
|
|
|
|
|
|
1 |
|
|
Call Forward |
Your radio is set to forward calls. |
|
|
|
|
|
|
||||
|
|
|
|
|||||
|
|
2 |
|
|
Alarm |
The alarm has been set. |
||
|
|
|
|
|
|
|
||
|
|
|
|
|
|
|
VibraCall |
Your radio is set to vibrate when receiving an alert or text message. |
|
|
|
|
|
|
|||
|
|
|
|
|
|
|
Menu |
Main Menu. |
|
A B |
|
|
Text Input |
Indicates you are entering text. The mini keyboard must be attached |
|||
|
C |
|
|
|
to the radio |
|||
|
|
|
|
|
|
|
|
|
|
|
|
|
|
|
|
Battery Status |
More bars on the battery indicate a greater charge. When the |
|
|
|
|
|
|
|
||
|
|
|
|
|
|
|
|
battery is flashing, it is time to charge the radio. |
|
|
|
|
|
|
|
|
|
|
|
|
|
|
|
|
New Message |
You have a new unopened text message. |
|
|
|
|
|
|
|
||
|
|
|
|
|
|
|
|
|
April 27, 2005 |
6881097C81-O |

Introduction: Battery |
1-5 |
|
|
Text Area
This area displays menus, messages, unit names or IDs, and other information.
Display Options
Two display options appear at the bottom of most screens. You select a display option by pressing the  below it.
Menu Key
Many features provide context-sensitive menus that let you access related features and actions. the


 icon appears any time a context-sensitive menu is available. Press
  to access the menu.
Menus and Lists
Your radio’s features are arranged in menus, submenus, and lists. To access the items in a menu or list, scroll using either the  or
or  keys.
keys.
Battery
WARNING: To avoid a possible explosion: DO NOT replace the battery in any area labeled “hazardous atmosphere.” DO NOT discard batteries in a fire.
Battery Life
Your radio uses a rechargeable Lithium Ion (Li-Ion) battery.
Based on 5% transmit, 5% receive, 90% standby (standard duty cycle):
•NNTN4655 Li-Ion; Up to 19 Hours
•SNN5706 Li-Ion; Up to 14.5 Hours
Battery life is determined by several factors. Among the more critical are the regular overcharge of batteries and the average depth of discharge with each cycle. Typically, the greater the overcharge and the deeper the average discharge, the fewer cycles a battery will last.
For example, a battery which is overcharged and discharged 100% several times a day, lasts fewer cycles than a battery that receives less of an overcharge and is discharged to 50% per day. Further, a battery which receives minimal overcharging and averages only 25% discharge, lasts even longer.
WARNING: Care should be taken to avoid external short circuiting of the battery. A sustained high-rate discharge (for example, a paper clip placed accidentally across the battery contacts) may permanently damage the battery, void the battery warranty, and create a burn or fire hazard.
Motorola batteries are designed specifically to be used with a Motorola charger and vice versa. Charging in non-Motorola equipment may lead to battery damage and void the battery warranty. The battery should be at about 77°F (25°C) (room temperature), whenever possible. Charging a cold battery (below 50° F [10°C]) may result in leakage of electrolyte and ultimately in failure of the battery.
Charging a hot battery (above 95°F [35°C]) results in reduced discharge capacity, affecting the performance of the radio. Motorola rapid-rate battery chargers contain a temperature-sensing circuit to ensure that batteries are charged within the temperature limits stated above.
WARNING: Do not attempt to change or charge the battery in a hazardous atmosphere.
To charge the battery, place the battery (with or without the radio) in a Motorola-approved charger.
6881097C81-O |
April 27, 2005 |
1-6 |
Introduction: Charging the Radio |
|
|
Charging the Radio
While the radio is charging, the display lights and the battery status icon flashes to show the status. The battery will charge in approximately 1-3 hours, and battery gauge will show all segments and stop flashing when fully charged.
Charging using the Drop-in Charging Tray
NOTE: Use of the Drop-in Charging Tray is recommended for daily use.
1.Place the charging tray on a flat surface.
2.Connect the plug-in charger and drop-in charging tray by inserting the plug into the rear of the drop-in charging tray.
3.Plug the charger into an AC outlet.
4.Insert the radio (with battery installed) into the charging tray.
NOTE: The charging tray has been designed to charge the radio with or without the holster.
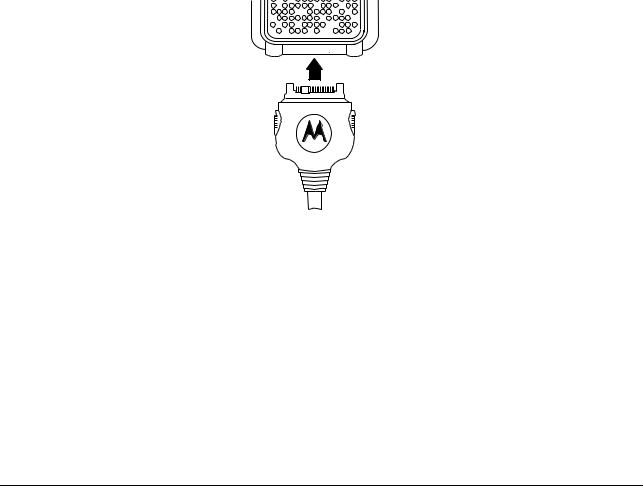
Charging using the Plug-in Charger
1.Plug the charger into an AC outlet.
2.Open the accessory connector cover.
3.Plug the other end of the charger into the accessory connector.
4.Disconnect the charger from the radio by pressing the two side buttons on the charger and remove from the radio.
 Accessory Connector
April 27, 2005 |
6881097C81-O |
Introduction: Attaching the Battery |
1-7 |
|
|
Charging a Radio and Battery using a Multi-Unit Charger
A Multi-Unit Charger (MUC) is available separately (53960) which will charge up to 6 radios, batteries, or a combination of the two at the same time.
When charging a radio in the MUC, the battery icon on the radio display shows the charging status.
When charging a battery, the LED in front of the pocket indicates charging status. The LED is solid red when the battery is charging, and solid green when charging is complete.
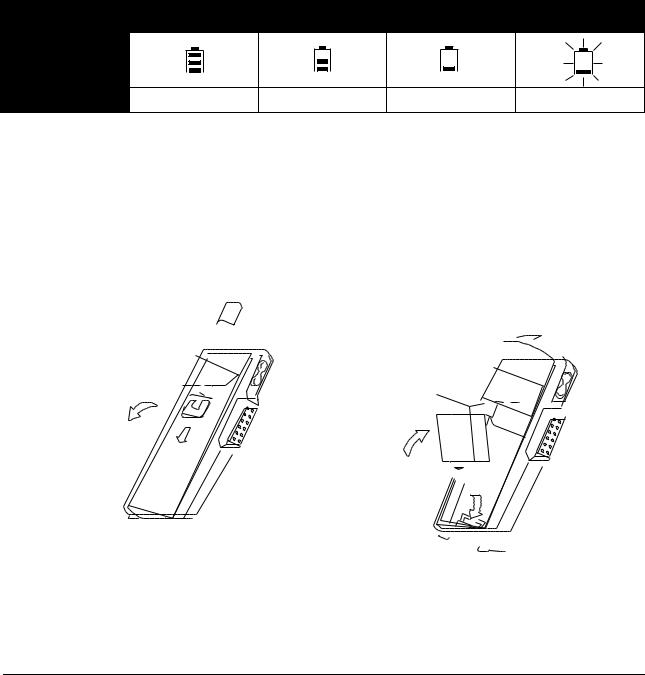
Battery Meter
The battery meter in the upper right corner of the radio display shows how much battery power is remaining:
Battery Type |
3 Bars |
2 Bars |
1 Bar |
Flashing |
Li-Ion |
|
|
|
|
|
100%–85% |
85%–25% |
25%–10% |
Final 10% |
Attaching the Battery
1.If the battery door is already in place, push down on the latch at the top and lift the door off the radio.
2.Insert the battery, printed arrows first, into the battery compartment and press down to secure firmly in place.
3.Replace the battery door onto the radio and slide the latch into place.
6881097C81-O |
April 27, 2005 |
1-8 |
Introduction: Swivel Belt Holster |
|
|
Swivel Belt Holster
1.Slide the bottom of radio into the holster and push the top of the radio against it until it snaps into place.
2.To remove, push the tab located on top of the holster and pull the radio from it.
NOTE: In case of loss, please contact your point-of-sale to request replacement part number 53961.
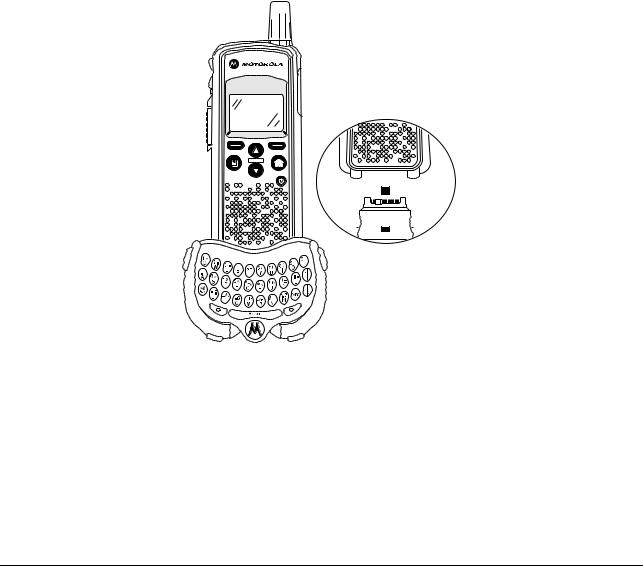
Mini Keyboard
A mini keyboard accessory (53967) is available separately that can be attached to your radio. The mini keyboard allows you to customize Private and Group names, write text messages, and create/ modify stored text messages.
Attaching the Mini Keyboard to the Radio
When the mini keyboard is attached to your radio, the “Device Attached” message is displayed.
1.Insert the mini keyboard's connector, with the arrow facing up, into your radio’s accessory connector.
2.Fold the mini keyboard over the front of your radio.
 550
550

 Accessory Connector

 Keyboard Connector
Disconnecting the Mini Keyboard from Your Radio
1.Press and hold the buttons on the side of the mini keyboard connector.
2.Pull the mini keyboard connector straight out from your radio’s accessory connector. Do not twist the connector.
April 27, 2005 |
6881097C81-O |

Introduction: Mini Keyboard |
1-9 |
|
|
Entering Text with the Mini Keyboard
If you have attached the mini keyboard correctly and the keyboard bezel is installed on the keyboard base you can begin.
Here are some important points to remember when using the mini keyboard.
•Your radio accepts a maximum of 80 characters in its largest input fields.
•Some of your radio's functions cannot be used simultaneously, just as when you are using your radios without the mini keyboard.
•Letters and functions shown in white are the default keys.
•All letters are lower case by default. For example, pressing the "Q" key displays "q."
•The Bspc key works as a Back Space key when entering a message.
•The Space key works as a Space Bar.
Yellow/Lock Key Functionality
1.Press the Yellow key once. The next key pressed displays the yellow character on that key. The keyboard will then return to the default keys (as if the yellow key had not been pressed).
•For example, press the Yellow key followed by the "Q" key, and a "1" displays. If "Q" is pressed again, a "q" displays.
2.Press the Yellow key twice to lock the keyboard in the yellow mode. All subsequent key presses display the yellow character associated with the key pressed. The keys that do not have yellow functions (Left Option, Right Option, Bspc, Space) will still operate in the default (white) mode.
3.Press the Yellow key again to unlock the yellow mode and revert back to the default (white) mode.
4.Press the Green key to cancel the yellow mode and enter the green mode.
5.Press the CAPS key to cancel the yellow mode and enter the CAPS mode.
Green/Lock Key Functionality
1.Press the Green key once. The next key pressed displays the Green character on that key. The keyboard will then return to the default keys (as if the green key had not been pressed).
•For example, press the Green key followed by the "U" key, and a "{" displays. If "U" is pressed again, a "u" displays.
2.Press the Green key twice to lock the keyboard in the green mode. All subsequent key presses display the Green character or function associated with the key pressed. The keys that do not have green functions still operate in the default (white) mode.
3.Press the Green key again to unlock the green mode and revert back to the default (white) mode.
4.Press the Yellow key to cancel the green mode and enter the yellow mode.
5.Press the CAPS key to cancel the green mode and enter the CAPS mode.
CAPS Key Functionality
1.Press the CAPS key once. The next key pressed displays the capitalized character on that key. Subsequent keys pressed will be displayed lower case.
2.Press the CAPS key twice to lock the keyboard in the caps mode. All subsequent key presses display the capitalized character associated with the key pressed.
3.Press the CAPS key again to unlock the caps mode and revert back to the lower case mode.
4.Press the Yellow or Green key to unlock the caps mode and enter the yellow or green mode, respectively.
6881097C81-O |
April 27, 2005 |

1-10 |
|
|
Introduction: Mini Keyboard |
||
|
|
|
|
|
|
Standard Yellow Function Green Function |
|
|
|||
|
|
|
|
|
|
|
|
Standard |
Yellow Function |
Green Function |
|
|
|
|
|
|
|
|
|
Q |
1 |
APOSTROPHE |
|
|
|
|
|
|
|
|
|
W |
2 |
" |
|
|
|
|
|
|
|
|
|
E |
3 |
~ |
|
|
|
|
|
|
|
|
|
R |
4 |
ACCENT |
|
|
|
|
|
|
|
|
|
T |
5 |
+ |
|
|
|
|
|
|
|
|
|
Y |
6 |
^ |
|
|
|
|
|
|
|
|
|
U |
7 |
{ |
|
|
|
|
|
|
|
|
|
I |
8 |
} |
|
|
|
|
|
|
|
|
|
O |
9 |
[ |
|
|
|
|
|
|
|
|
|
P |
0 |
] |
|
|
|
|
|
|
|
|
|
A |
! |
# |
|
|
|
|
|
|
|
|
|
S |
@ |
< |
|
|
|
|
|
|
|
|
|
D |
* |
> |
|
|
|
|
|
|
|
|
|
F |
$ |
UP ARROW |
|
|
|
|
|
|
|
|
|
G |
% |
DOWN ARROW |
|
|
|
|
|
|
|
|
|
H |
& |
LEFT ARROW |
|
|
|
|
|
|
|
|
|
J |
( |
RIGHT ARROW |
|
|
|
|
|
|
|
|
|
K |
) |
= |
|
|
|
|
|
|
|
|
|
L |
: |
; |
|
|
|
|
|
|
|
|
|
Z |
- |
¡ |
|
|
|
|
|
|
|
|
|
X |
_ |
Å |
|
|
|
|
|
|
|
|
|
C |
. |
ß |
|
|
|
|
|
|
|
|
|
V |
\ |
Þ |
|
|
|
|
|
|
|
|
|
B |
, |
Æ |
|
|
|
|
|
|
|
|
|
N |
/ |
I |
|
|
|
|
|
|
|
|
|
M |
? |
¿ |
|
|
|
|
|
|
|
April 27, 2005 |
6881097C81-O |
Introduction: Mini Keyboard |
1-11 |
|
|
Using Mini Keyboard Key Shortcuts
You can perform most of your radio’s functions using the keys on the Motorola mini keyboard.
Radio Key |
Action |
Keyboard Equivalent |
|
Chooses current left |
|
Left Option |
display option |
Left Option Key |
|
||
|
|
|
|
Chooses current right |
|
Right Option |
display option |
Right Option Key |
|
||
|
|
Extended Character Set
The mini keyboard lets you enter special characters using a combination of keystrokes.
NOTE: The extended character set is only available if your radio is configured for a language other than English.
Accent Example |
Description |
|
Keystrokes |
|
|
|
|
å |
acute accent (for letters a, e, i, o, u, y) |
single quote, then letter |
|
|
|
|
|
â |
circumflex (for a, e, i, o, u |
L |
+ Y+ letter |
k |
|||
|
|
o |
|
|
|
c |
|
|
|
Green |
|
|
|
|
|
ä |
umlaut (for letters a, e, i, o, u) |
shift and quote, then letter |
|
|
|
|
|
à |
grave accent (for letters a, e, i, o, u) |
grave accent, then letter |
|
|
|
|
|
ã |
tilde (for letters a, n, o) |
L |
+ ~ + letter |
k |
|||
|
|
o |
|
|
|
c |
|
|
|
Green |
|
|
|
|
|
Å |
nordic A-ring (for letter a only) |
L |
+ X |
k |
|||
|
|
o |
|
|
|
c |
|
|
|
Green |
|
|
|
|
|
Accent Marks
To create a letter with an accent mark over it, enter the keystrokes listed in the table above.
If your radio displays a language other than English, you must press the right arrow after a single quote, ~, ', /, -, or ^ for the character to appear.
6881097C81-O |
April 27, 2005 |

1-12 |
Introduction: Accessories |
|
|
Other Special Characters
To create other special characters, enter the keystrokes listed in the table below.
Accent Example |
Description |
|
Keystrokes |
|
|
|
|
ß |
sharp s, German sz ligature |
L |
+ C |
o |
|||
c |
|||
k |
|||
|
|
Green |
|
|
|
|
|
Æ |
diphthong AE ligature |
L |
+ B |
o |
|||
c |
|||
k |
|||
|
|
Green |
|
|
|
|
|
ç or Ç |
cedilla |
single quote, then c or C |
|
|
|
|
|
Þ |
icelandic thom |
L |
+ V |
o |
|||
c |
|||
k |
|||
|
|
Green |
|
|
|
|
|
ðor Ð |
icelandic eth |
dash and d or D |
|
|
|
|
|
ø or Ø |
nordic O-Slash |
/, then o or O |
|
|
|
|
|
¿ |
upside down? |
L |
+ M |
o |
|||
c |
|||
k |
|||
|
|
Green |
|
|
|
|
|
¡ |
upside down! |
L |
+ Z |
o |
|||
c |
|||
k |
|||
|
|
Green |
|
|
|
|
|
Accessories
The DTR Series radios comes with a Lithium-Ion battery, Charger, and a Drop-in Charging Tray.
Various accessories are available for use with your DTR Series radio, including holsters, hands-free accessories, headset accessories, a mini keyboard, and more.
To order additional accessories, contact your dealer or call (800) 448-6686.
April 27, 2005 |
6881097C81-O |
Chapter 2 General Radio Operations
Your radio is ready for use after a fully-charged battery has been installed. However, your radio should be programmed in order to be fully compatible with any existing DTR Series radios and to fully utilize all radio features.
Refer to Chapter 3 - Advanced Radio Operations.
Turning Your Radio On or Off
Press  to turn your radio on.
The radio chirps and the display briefly shows Motorola.
The display shows the radio Unit ID or Name, current Scroll list setting, time, date, and the available Option key selections. If the radio has been assigned a unique Unit Name, the name will display rather than the Unit ID for both the radio and any Contacts.
17179860200
Public1 5:49pm 11/14 Contcs 


 Mesgs
Mesgs
Press and hold  to turn the radio off.
Adjusting the Speaker Volume
The Volume Control buttons are located on the upper left side of the radio. To adjust the speaker volume, press the upper button to increase the volume level and press the lower button to decrease the volume level. When either button is pressed, the display shows a bar chart indicating the present level for the volume.
 Loading...