


Operating and Installation
Instructions
Fridge/freezer combination with ice cube maker NoFrost system
and DynaCool
KFN 14943 SDE ed
To prevent accidents and machine damage read these instructions before
en - CA
installation or use. |
M.-Nr. 07 792 920 |

Contents
Description of the appliance . . . . . . . . . . . . . . . . . . . . . . . . . . . . . . . . . . . . . . . . . 5
Caring for the environment . . . . . . . . . . . . . . . . . . . . . . . . . . . . . . . . . . . . . . . . . . 7
Warning and Safety Instructions . . . . . . . . . . . . . . . . . . . . . . . . . . . . . . . . . . . . . 8
How to save energy . . . . . . . . . . . . . . . . . . . . . . . . . . . . . . . . . . . . . . . . . . . . . . . 13
Switching the appliance ON and OFF . . . . . . . . . . . . . . . . . . . . . . . . . . . . . . . . 14 Operating the appliance . . . . . . . . . . . . . . . . . . . . . . . . . . . . . . . . . . . . . . . . . . . . 14 Switching the appliance ON . . . . . . . . . . . . . . . . . . . . . . . . . . . . . . . . . . . . . . . . . 14 Switching the appliance OFF. . . . . . . . . . . . . . . . . . . . . . . . . . . . . . . . . . . . . . . . . 15 To switch the refrigerator or freezer section on and off separately . . . . . . . . . 15 Switching off for extended periods of time . . . . . . . . . . . . . . . . . . . . . . . . . . . . . . 16 The settings mode . . . . . . . . . . . . . . . . . . . . . . . . . . . . . . . . . . . . . . . . . . . . . . . . . 16 Turning the button sound on and off . . . . . . . . . . . . . . . . . . . . . . . . . . . . . . . . 17 Activating and deactivating the safety lock . . . . . . . . . . . . . . . . . . . . . . . . . . . 17
The correct temperature . . . . . . . . . . . . . . . . . . . . . . . . . . . . . . . . . . . . . . . . . . . 19
. . . in the refrigerator . . . . . . . . . . . . . . . . . . . . . . . . . . . . . . . . . . . . . . . . . . . . . . . 19
. . . in the freezer . . . . . . . . . . . . . . . . . . . . . . . . . . . . . . . . . . . . . . . . . . . . . . . . . . 19 Temperature display . . . . . . . . . . . . . . . . . . . . . . . . . . . . . . . . . . . . . . . . . . . . . . . 19 Setting the temperature . . . . . . . . . . . . . . . . . . . . . . . . . . . . . . . . . . . . . . . . . . . . . 20 Temperature ranges . . . . . . . . . . . . . . . . . . . . . . . . . . . . . . . . . . . . . . . . . . . . . 20 Changing the brightness of the temperature display . . . . . . . . . . . . . . . . . . . . 21
Alarm. . . . . . . . . . . . . . . . . . . . . . . . . . . . . . . . . . . . . . . . . . . . . . . . . . . . . . . . . . . 22 Temperature alarm . . . . . . . . . . . . . . . . . . . . . . . . . . . . . . . . . . . . . . . . . . . . . . . . 22 Door alarm . . . . . . . . . . . . . . . . . . . . . . . . . . . . . . . . . . . . . . . . . . . . . . . . . . . . . . . 23
Super Cool, Super Freeze and DynaCool . . . . . . . . . . . . . . . . . . . . . . . . . . . . . 24
Super Cool . . . . . . . . . . . . . . . . . . . . . . . . . . . . . . . . . . . . . . . . . . . . . . . . . . . . . . . 24
Super Freeze . . . . . . . . . . . . . . . . . . . . . . . . . . . . . . . . . . . . . . . . . . . . . . . . . . . . . 25
DynaCool . . . . . . . . . . . . . . . . . . . . . . . . . . . . . . . . . . . . . . . . . . . . . . . . . . . . . . . . 26
Using the refrigerator efficiently . . . . . . . . . . . . . . . . . . . . . . . . . . . . . . . . . . . . 27 Different storage zones . . . . . . . . . . . . . . . . . . . . . . . . . . . . . . . . . . . . . . . . . . . . . 27
Adjusting the interior fittings . . . . . . . . . . . . . . . . . . . . . . . . . . . . . . . . . . . . . . . 28 Moving the shelves . . . . . . . . . . . . . . . . . . . . . . . . . . . . . . . . . . . . . . . . . . . . . . . . 28 Split shelf . . . . . . . . . . . . . . . . . . . . . . . . . . . . . . . . . . . . . . . . . . . . . . . . . . . . . . . . 28 Moving the serving shelf / bottle shelf . . . . . . . . . . . . . . . . . . . . . . . . . . . . . . . . . . 29 Universal box . . . . . . . . . . . . . . . . . . . . . . . . . . . . . . . . . . . . . . . . . . . . . . . . . . . . . 29 Adjusting the bottle divider . . . . . . . . . . . . . . . . . . . . . . . . . . . . . . . . . . . . . . . . . . 30

Contents
Freezing and storing food . . . . . . . . . . . . . . . . . . . . . . . . . . . . . . . . . . . . . . . . . . 31 Maximum freezing capacity. . . . . . . . . . . . . . . . . . . . . . . . . . . . . . . . . . . . . . . . . . 31 Freezing fresh food . . . . . . . . . . . . . . . . . . . . . . . . . . . . . . . . . . . . . . . . . . . . . . . . 31 Storing frozen food . . . . . . . . . . . . . . . . . . . . . . . . . . . . . . . . . . . . . . . . . . . . . . . . 31 Home freezing . . . . . . . . . . . . . . . . . . . . . . . . . . . . . . . . . . . . . . . . . . . . . . . . . . . . 32
Hints for home freezing. . . . . . . . . . . . . . . . . . . . . . . . . . . . . . . . . . . . . . . . . . . 32 Packing . . . . . . . . . . . . . . . . . . . . . . . . . . . . . . . . . . . . . . . . . . . . . . . . . . . . . . . 32 Before placing food in the freezer . . . . . . . . . . . . . . . . . . . . . . . . . . . . . . . . . . 33 Placing food in the freezer . . . . . . . . . . . . . . . . . . . . . . . . . . . . . . . . . . . . . . . . 33 Freezing large items . . . . . . . . . . . . . . . . . . . . . . . . . . . . . . . . . . . . . . . . . . . . . . . 33 Freezer calendar . . . . . . . . . . . . . . . . . . . . . . . . . . . . . . . . . . . . . . . . . . . . . . . . . . 33 Defrosting frozen foods . . . . . . . . . . . . . . . . . . . . . . . . . . . . . . . . . . . . . . . . . . . . . 34 Cooling drinks quickly . . . . . . . . . . . . . . . . . . . . . . . . . . . . . . . . . . . . . . . . . . . . . . 34 Using the cool pack . . . . . . . . . . . . . . . . . . . . . . . . . . . . . . . . . . . . . . . . . . . . . . . . 34
Making ice cubes . . . . . . . . . . . . . . . . . . . . . . . . . . . . . . . . . . . . . . . . . . . . . . . . . 35 Setting the water inlet time. . . . . . . . . . . . . . . . . . . . . . . . . . . . . . . . . . . . . . . . . . . 36
Automatic defrosting . . . . . . . . . . . . . . . . . . . . . . . . . . . . . . . . . . . . . . . . . . . . . . 38
Cleaning and care . . . . . . . . . . . . . . . . . . . . . . . . . . . . . . . . . . . . . . . . . . . . . . . . 39 Cleaning the outside walls, the interior and accessories . . . . . . . . . . . . . . . . . . . 39 Cleaning the ice cube tray. . . . . . . . . . . . . . . . . . . . . . . . . . . . . . . . . . . . . . . . . . . 40 Cleaning the ventilation slits . . . . . . . . . . . . . . . . . . . . . . . . . . . . . . . . . . . . . . . . . 40 Door seal . . . . . . . . . . . . . . . . . . . . . . . . . . . . . . . . . . . . . . . . . . . . . . . . . . . . . . . . 41 Cleaning the exterior coils . . . . . . . . . . . . . . . . . . . . . . . . . . . . . . . . . . . . . . . . . . . 41
Active charcoal filter . . . . . . . . . . . . . . . . . . . . . . . . . . . . . . . . . . . . . . . . . . . . . . 42 Replacing the active charcoal filters . . . . . . . . . . . . . . . . . . . . . . . . . . . . . . . . . . . 42
Troubleshooting. . . . . . . . . . . . . . . . . . . . . . . . . . . . . . . . . . . . . . . . . . . . . . . . . . 44
Noises . . . . . . . . . . . . . . . . . . . . . . . . . . . . . . . . . . . . . . . . . . . . . . . . . . . . . . . . . . 48
After sales service . . . . . . . . . . . . . . . . . . . . . . . . . . . . . . . . . . . . . . . . . . . . . . . . 49
Water supply . . . . . . . . . . . . . . . . . . . . . . . . . . . . . . . . . . . . . . . . . . . . . . . . . . . . 50 Notes on connecting to the water supply . . . . . . . . . . . . . . . . . . . . . . . . . . . . . . . 50 Connecting to the water supply . . . . . . . . . . . . . . . . . . . . . . . . . . . . . . . . . . . . . . . 50
Electrical information . . . . . . . . . . . . . . . . . . . . . . . . . . . . . . . . . . . . . . . . . . . . . 52
Installation information . . . . . . . . . . . . . . . . . . . . . . . . . . . . . . . . . . . . . . . . . . . . 53 Location . . . . . . . . . . . . . . . . . . . . . . . . . . . . . . . . . . . . . . . . . . . . . . . . . . . . . . . . . 53 Climate range . . . . . . . . . . . . . . . . . . . . . . . . . . . . . . . . . . . . . . . . . . . . . . . . . . 53 Proper ventilation . . . . . . . . . . . . . . . . . . . . . . . . . . . . . . . . . . . . . . . . . . . . . . . . . . 53 Installation . . . . . . . . . . . . . . . . . . . . . . . . . . . . . . . . . . . . . . . . . . . . . . . . . . . . . . . 53

Contents
Adjustments . . . . . . . . . . . . . . . . . . . . . . . . . . . . . . . . . . . . . . . . . . . . . . . . . . . . . . 54 Appliance dimensions . . . . . . . . . . . . . . . . . . . . . . . . . . . . . . . . . . . . . . . . . . . . . . 55
Changing the door hinging . . . . . . . . . . . . . . . . . . . . . . . . . . . . . . . . . . . . . . . . . 56
Aligning the appliance doors . . . . . . . . . . . . . . . . . . . . . . . . . . . . . . . . . . . . . . . 66
Installing the appliance . . . . . . . . . . . . . . . . . . . . . . . . . . . . . . . . . . . . . . . . . . . . 67

Description of the appliance
ON button for the whole appliance and ON/OFF button for switching the refrigerator and freezer sections on and off individually.
DynaCool button
Super Cool / Super Freeze button
Button to set the temperature ( for colder)
Safety lock indicator light (only visible when the lock is on)
Temperature display for the refrigerator / freezer sections
Button for switching between the refrigerator and freezer sections (top: Refrigerator symbol; bottom: Freezer symbol)
Button to set the temperature ( for warmer)
Alarm off button
(only visible during door / temperature alarm)
Active charcoal filter change display (only visible with prompt to change
the active charcoal filter)
5

Description of the appliance
Fan
Interior lighting
Butter and cheese compartment
Bottle shelf
Egg tray / serving shelf
Retainer for the Active AirClean filter
Shelves
Condensate channel and drain hole
Fruit and vegetable drawers
Bottle divider*
Bottle shelf
Ice cube drawer with automatic ice cube maker
Freezer drawers with freezer calendar
* Depending on model
6

Caring for the environment
Disposal of packing materials
The cardboard box and packing materials are biodegradable and recyclable. Please recycle.
Ensure that any plastic wrappings, bags, etc., are disposed of safely and kept out of the reach of babies and young children. Danger of suffocation!
Disposal of an old appliance
Old appliances contain materials that can be recycled. Please contact your local recycling center about the possibility of recycling these materials.
Before discarding an old appliance, disconnect it from the gas and electrical supply and cut off the power cord to prevent it from becoming a hazard.
7

Warning and Safety Instructions
This appliance complies with all applicable safety laws and regulations. However, improper use can result in personal injury and material damage.
Read the operating instructions carefully before operating the appliance for the first time. They contain important information on the installation, safety, operation and care of your appliance. This will avoid the risk of personal injury and damage to the appliance.
Keep the operating instructions in a safe place and pass them on to any future owner!
Correct use
This appliance is intended for domestic use only, specifically for the cool storage of food and drinks, for storing frozen food, for freezing fresh food and for making ice.
Any other use is not permitted and could be dangerous. The manufacturer will not be held liable for damage caused by incorrect use or operation.
Persons incapable of using the appliance safely owing to their physical, sensory or mental capabilities or their inexperience or lack of knowledge must not use this appliance without supervision or instruction by a responsible person.
Safety with children
Children may use the appliance without supervision only if its operation has been clearly explained to them and they are able to use it safely. They must be able to recognize the potential hazards of improper operation.
Supervise any children in the vicinity of the appliance. Do not allow children to play with the appliance, for example to climb inside the drawers or to swing on the door.
8

Warning and Safety Instructions
Technical safety
Before setting up the appliance, check it for any external damage. Do not install and use a damaged appliance.
A damaged appliance may endanger your safety!
If the connection cable is damaged it must be replaced by a Miele approved service technician to protect the user from danger.
This appliance contains the coolant Isobutane (R600a), a natural gas that is environmentally friendly but flammable. It does not damage the ozone layer and does not increase the greenhouse effect. The use of this environmentally friendly coolant has, however, led to a slight increase in the noise level of the appliance. In addition to the noise of the compressor, you might be able to hear the coolant flowing through the system. This is unavoidable, but does not have any adverse effect on the performance of the appliance.
Ensure that no parts of the cooling system are damaged during transportation and setting up of the appliance. Leaking coolant can damage the eyes!
In the event of damage:
- avoid open fires and any ignition sources,
- pull out the plug,
- air the room in which the appliance is located for several minutes and
- contact the Service Department.
The more coolant there is in an appliance, the larger the room it should be installed in. If a leak occurs, combustible gases may build up if the appliance is in a too small room.
For every 8 g of coolant in the
appliance, the room must be at least 1m3 in size. The amount of coolant in the appliance is stated on the data plate inside the appliance.
Safe operation of the appliance is only assured if it has been installed and connected in accordance with these installation and operating instructions.
Before plugging in the appliance, make sure that the connection data (voltage and frequency) indicated on the data plate corresponds with the electrical supply.
These data must match in order to avoid damaging the appliance. If in doubt, please contact a qualified electrician.
Do not connect the appliance to the power supply by an extension cord or power bar, as they do not guarantee the required safety (risk of overheating, for example).
9

Warning and Safety Instructions
The electrical safety of this appliance can only be guaranteed if it is properly grounded in compliance with all applicable local and national safety regulations. It is very important to ensure that this essential safety requirement is met. If there is any doubt about the grounding of your household wiring, have it inspected by a qualified electrician.
The manufacturer will not be held liable for damages resulting from an inadequate grounding system (e.g. electric shock).
Only professionals who are duly authorized by the manufacturer may install or perform maintenance and repair work on this appliance.
Work performed by unqualified persons harbors the risk of serious harm to the user for which the manufacturer will not be held liable.
Repair of the appliance during the warranty period should only be performed by a service technician authorized by the manufacturer, otherwise any damage will not be covered by the warranty.
Disconnect the appliance from the electrical power supply prior to installation, maintenance or repair. The appliance is disconnected when one of the following conditions is met:
–the appliance has been unplugged. To unplug, pull carefully on the plug, NOT on the cord.
–the respective breaker of the house wiring system is off.
Defective components should only be replaced with genuine Miele original spare parts. Only with these parts does the manufacturer guarantee that they comply with the safety requirements.
Installation of this appliance in
non-stationary locations (e.g. on ships) must only be performed by a qualified specialist who must ensure that the conditions for safe operation are in place.
10
Warning and Safety Instructions
The manufacturer will not be held liable for damage resulting from a faulty connection to the water supply.
Only qualified specialists should connect the appliance to the household water line or perform any repairs on the ice cube maker.
The ice cube maker is not intended to be used with a hot water supply line.
The fridge/freezer must be disconnected from the electrical power supply before the appliance is connected to the household water line.
Never store explosive materials or products with flammable propellants (spray cans, for example) in the appliance. Sparking can occur when the thermostat switches on. This can cause flammable gasses to explode.
Do not operate any electrical devices in the appliance (soft ice cream maker, for example). This could cause sparking. Danger of explosion!
High proof alcohol should be stored upright in tightly closed bottles in the refrigerator section.
Danger of explosion!
Correct use
Do not handle frozen items when your hands are wet. Your hands could freeze to the item(s). Risk of injury!
Never put ice or popsicles in your mouth immediately after taking them out of the freezer - your lips or tongue could freeze to the item(s). Risk of injury!
Never re-freeze food that has been partially or completed thawed. Defrosted food should be used promptly, before it loses nutritional value or spoils. However, once it has been cooked, thawed food can be refrozen.
Do not store cans or bottles in the freezer section that contain carbonated beverages or liquids that could freeze. The cans or bottles could burst.
Risk of personal injury or damage to the appliance!
Bottles that are put in the freezer for quick cooling must be removed within one hour. Otherwise, they could burst. Risk of personal injury or damage to the appliance!
Eating food stored for too long can cause food poisoning.
The storage life depends on many factors, including the quality of the food, how fresh it is, and the storage temperature. Always observe the manufacturer's recommended storage instructions and expiry dates.
11

Warning and Safety Instructions
Never use a pointed or sharp-edged object to
–remove frost or ice,
–or to free frozen items or ice trays from the freezer.
This will damage the evaporators, causing irreversible damage to the appliance.
Never place candles or electric heaters in the appliance to defrost it. This can damage the plastic.
Do not use defrosting sprays or de-icers.
They may contain substances that can damage the plastic, or that could cause a build-up of potentially explosive gasses or pose a danger to health.
Do not use any oils or grease on the door seals.
They can cause the seals to deteriorate over time.
If you store fatty or oily foods in the appliance or the appliance door, make sure that no oil or grease leaks onto the plastic parts of the appliance.
This can cause the plastic to crack and break.
Do not block the ventilation slits, because this interferes with proper air supply to the appliance. This in turn causes increased electricity consumption and may also result in damage to appliance parts.
The appliance is designed for use within a certain climate range (room temperature range) and should not be used outside this range. The climate range for your appliance is printed on the data plate inside the appliance.
If the room temperature is cold, this will cause the appliance to switch off for longer periods of time, with the result that it cannot maintain the required internal temperature.
Never use a steam cleaner to defrost or clean the appliance.
The steam could reach the electrical components and cause a short circuit.
Disposing of your old refrigerator / freezer
Before disposing of your old fridge/freezer, first make the door latch or lock unusable.
This will prevent children from accidentally locking themselves in and endangering their lives.
Be careful not to damage any part of the cooling system, for example by
–puncturing the coolant channels in the evaporator.
–kinking any pipework.
–scratching the surface coating.
Caution: Splashes of coolant can damage the eyes.
The manufacturer will not be held liable for damage caused by failure to comply with these "Warning and Safety Instructions".
12
|
|
How to save energy |
|
|
|
|
|
|
Normal energy consumption |
|
Increased energy consumption |
|
|
||
|
|
|
|
|
|
|
|
Installation site |
In a well ventilated room. |
|
In an enclosed, poorly ventilated |
|
|
|
room. |
|
|
|
|
|
Protected from direct sunlight. |
|
In direct sunlight. |
|
|
|
|
|
Away from heat sources (radiator, |
|
Near heat sources (radiator, |
|
stove/oven). |
|
stove/oven). |
|
|
|
|
|
When the room temperature is |
|
When the room temperature is |
|
ideal (approx. 20 °C (68 F)). |
|
high. |
|
|
|
|
|
|
|
|
Temperature setting (dial) |
At a medium setting of 2 to 3. |
|
At a high setting: The lower the |
|
|
|
temperature in the appliance, the |
|
|
|
more energy it consumes. |
|
|
|
|
|
|
|
|
Temperature setting |
Cellar compartment 8 to 12 °C (46 |
|
On appliances with a winter |
(digital) |
to 54 F) |
|
setting, make sure that the winter |
|
|
|
setting is switched off when the |
|
Refrigerator section 4 to 5 °C (39 |
|
|
|
|
room temperature is warmer than |
|
|
to 41 F) |
|
|
|
|
16 °C. |
|
|
|
|
|
|
Freezer section -18 °C (-2 F) |
|
|
|
|
|
|
|
|
|
|
Use |
Open the door only when |
|
Frequent opening of the door for |
|
necessary, and for as short a time |
|
long periods will cause a loss of |
|
as possible. |
|
coldness. |
|
|
|
|
|
Store food in an organized way. |
|
Disorganized contents will take |
|
|
|
time to sort through, leaving the |
|
|
|
door open too long. |
|
|
|
|
|
Allow hot food and drinks to cool |
|
Placing hot food in the appliance |
|
down before placing them in the |
|
will cause the compressor to run |
|
appliance. |
|
for a long time, with the appliance |
|
|
|
working harder to lower the |
|
|
|
temperature. |
|
|
|
|
|
Store food covered or packaged. |
|
The evaporation or condensation |
|
|
|
of liquids will cause a loss of |
|
|
|
coldness in the refrigerator. |
|
|
|
|
|
Place frozen food in the |
|
|
|
refrigerator to defrost. |
|
|
|
|
|
|
|
Do not overfill the appliance. |
|
|
|
Leave some room so that air can |
|
|
|
circulate properly. |
|
|
|
|
|
|
|
|
|
|
Defrosting |
Defrost the freezer when a layer of |
|
A layer of thick ice hinders cold air |
|
ice 1 cm thick has built up. |
|
from reaching the frozen food, and |
|
|
|
causes an increase in energy |
|
|
|
consumption. |
|
|
|
|
13

Switching the appliance ON and OFF
Before first use
The stainless steel surfaces are covered with protective sheeting for protection during transport.
Do not remove the protective sheeting until the appliance has been installed in its final location.
Wipe the exterior surfaces of the appliance with the enclosed stainless steel cleaning agent directly after removing the protective sheeting.
Important! The stainless steel cleaning agent provides a durable protective film that prevents rapid soiling of the surface!
Clean the inside of the appliance and the accessories with warm water and dry with a soft cloth.
It is very important to let the appliance stand for 30 to 60 minutes after transport before plugging it in. Failure to do so can prevent the appliance from functioning properly!
Active charcoal filter (AirClean Filter)
Place the enclosed active charcoal filters into the retainer and place the retainer on any shelf in the refrigerator section
(see "Active charcoal filter").
Operating the appliance
To operate this unit, simply touch the sensor buttons as needed.
Switching the appliance ON
The refrigerator and freezer sections are switched on together by touching the ON/OFF button.
Touch the ON/OFF button until the temperature display lights up.
The temperature display for the refrigerator section will show the actual temperature in the refrigerator section.
If the temperature in the freezer section is above 0°C, the temperature display will show only dashes. As soon as the temperature drops below 0°C, the temperature display will show the actual temperature in the freezer section.
The Freezer symbol and the alarm off button will flash until the temperature in the freezer section is cold enough.
The appliance will now start cooling, and the interior light of the refrigerator will come on when you open the door.
Allow the appliance to run for a few hours before placing food in it.
Do not place food in the freezer section until the temperature is cold enough (at least -18°C).
14
Switching the appliance ON and OFF
Switching the appliance OFF
Use this button to switch back and forth between the refrigerator section and the freezer section.
If you want to select the freezer section (e. g. to check the temperature),
tap the button to switch from the refrigerator section to the freezer section; the Freezer symbol will light up yellow.
Depending on the selected temperature zone, you can
–either select the DynaCool function,
–the Super Cool / Super Freeze functions or
–adjust the temperature.
For additional information, please see the corresponding sections in the manual.
Cool pack
Place the cool pack in the top drawer of the freezer section or, to save space, on the freezer tray. The cool pack will be at its most effective after it has been in the freezer for approximately
24 hours.
Touch the ON/OFF button until all displays are out. (If this does not happen, then the safety lock is still activated!!)
The refrigerator and freezer sections switch off one after the other.
The interior lighting goes out and the cooling is switched off.
To switch the refrigerator or freezer section on and off separately
The refrigerator and freezer sections can be switched on and off separately so that you can use one section only if you wish.
This is useful, e.g. whilst on holiday, when you only need the freezer section switched on.
Select the appliance section you wish to switch off.
The Refrigerator or Freezer symbol lights up yellow.
Touch the ON/OFF button until the Refrigerator or Freezer symbol goes out.
15
Switching the appliance ON and OFF
That section is now switched off, while the other section remains on.
To switch a section back on again,
If during a long absence, you fail to clean the appliance and leave the doors ajar before switching it off, mould may build up in the appliance.
select the section you wish to switch on; the corresponding symbol lights up yellow.
Touch the ON/OFF button until the temperature display lights up, or
switch the appliance off and then back on again.
Switching off for extended periods of time
If the appliance is not needed for a longer period of time:
switch the appliance off,
unplug it from the socket,
empty the ice cube tray and clean it,
close the water shut-off valve,
clean the appliance and
leave the doors ajar to prevent any odour build-up in the appliance.
The settings mode
Certain appliance settings can only be selected in settings mode.
How to enter the settings mode and how to change the settings is described in the respective chapters.
Overview of available functions in the settings mode:
|
|
To enter or exit the settings |
|
mode |
c |
|
|
|
|
To turn the button sound on or |
|
off |
|
(see "Switching the appliance |
b |
|
|
ON and OFF") |
|
|
|
To confirm active charcoal |
|
filter change (see "Active |
^ |
charcoal filter") |
|
|
|
To turn the safety lock on or off |
|
(see "Switching the appliance |
u |
ON and OFF") |
|
|
|
To change the brightness of |
|
the temperature display |
|
(see "The correct |
d |
|
|
temperature") |
|
|
|
To set the water inlet time for |
|
the ice cube maker |
e |
(see "Making ice cubes") |
|
|
|
|
|
16

Switching the appliance ON and OFF
The door alarm is automatically disabled while you are in the settings mode. Once the door is closed, the door alarm is re-activated.
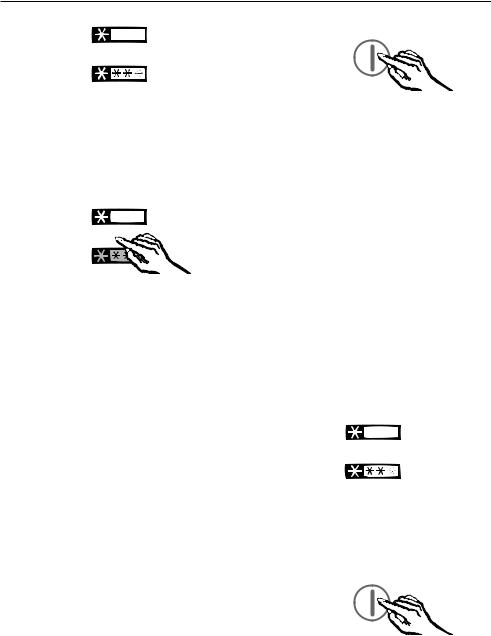
Turning the button sound on and off
If you prefer the buttons to be silent when touched, you can turn the button sound off.
Touch the button and keep your finger on the button.
Now tap once on the ON/OFF button (WITHOUT releasing the button!).
Keep your finger on the button for another 5 seconds until c is displayed.
Again tap the button repeatedly until b is displayed.
Tap the ON/OFF button to confirm.
By tapping the button, you can now select whether you would like the button sound to be on or off. b 0: Button sound is off
b 1: button sound is on b –: return to menu.
The old setting is displayed steady, the setting to be selected flashes.
Whenever you finish changing a setting, tap the ON/OFF button to confirm.
Keep tapping the button until c is displayed.
Tap the ON/OFF button.
You have left the settings mode.
Activating and deactivating the safety lock
The safety lock can be activated to prevent the appliance from being switched off inadvertently.
Touch the button and keep your finger on the button.
Now tap once on the ON/OFF button (WITHOUT releasing the button!).
Keep your finger on the button for another 5 seconds until c is displayed.
Keep tapping the button until u is displayed.
Tap the ON/OFF button to confirm.
17

Switching the appliance ON and OFF
By tapping the button you can now select whether the safety lock should be activated or not.
u 0: Safety lock is deactivated u 1: Safety lock is activated
u –: return to menu.
The old setting is displayed steady, the setting to be selected flashes.
Whenever you finish changing a setting, tap the ON/OFF button to confirm.
Keep tapping the button until c is displayed.
Tap the ON/OFF button.
You have left the settings mode.
When the safety lock is activated, the safety lock indicator will light up in the temperature display.
18

The correct temperature
The correct temperature is very important for storing food. If food is not stored at the correct temperature, bacteria can multiply rapidly, causing the food to spoil. This can be prevented or slowed down by selecting the correct temperature. Temperature affects the rate at which bacteria can multiply. Reducing the temperature slows down this process.
The temperature in the appliance will rise for the following reasons:
–if you open the door frequently, or keep it open too long,
–if you put too much food in it,
–if you put food in it that is too warm,
–if the ambient temperature is too high.
The appliance is designed for use within a certain climate range (room temperature range), and should not be used outside this range.
. . . in the refrigerator
We recommend a temperature of 39°F (4°C) in the middle of the appliance.
. . . in the freezer
For freezing fresh food and storing frozen food for longer periods of time, the temperature needs to be at least 0°F (-18°C). At this temperature, most bacteria stop growing. However, when the temperature rises above 14°F (-10°C) the bacteria become active, causing the food to start deteriorating and reducing the storage life. This is why any partially or completely thawed food must never be refrozen until it has been cooked. High cooking temperatures will kill most bacteria.
Temperature display
During normal operation, the temperature display shows on the control panel the temperature in the middle of the refrigerator section and the temperature in the warmest part of the freezer section.
19

The correct temperature
Setting the temperature
The temperatures for the refrigerator section and the freezer section are set separately.
Select the refrigerator or the freezer section.
The Refrigerator or Freezer symbol lights up yellow.
Set the temperature with the buttons beside the display.
Tap the
button: to decrease the temperature
button: to increase the temperature.
The temperature being set will flash in the display.
When you tap the buttons, you will see the following changes in the temperature display:
–When first tapped: The last temperature selected flashes.
–Each subsequent tapping: adjusts the temperature in increments of 1°F / 1°C.
–Holding down the button will adjust the temperature continuously. When the highest / lowest temperature is reached the / button disappears.
Approximately 5 seconds after you release the button, the actual average temperature in the refrigerator or freezer section will automatically be displayed.
If you have adjusted the temperature, wait approx. 6 hours if the appliance is not very full or approx. 24 hours if it is full before checking the temperature display again. It will take that long to reach the selected temperature. If, after this amount of time, the temperature is too high or too low, you will need to adjust it again.
Temperature ranges
The temperature can be selected within the following ranges:
–In the refrigerator section, from 36 to 44°F (2°C to 7°C).
–In the freezer section, 6 to -15°F (-14° to -26°C).
The ambient temperature in the room and the installation location can affect the time it takes for the appliance to reach the coldest temperature. If the ambient temperature is too high, it may not be possible for the appliance to reach the lowest temperature.
20
|
The correct temperature |
|
|
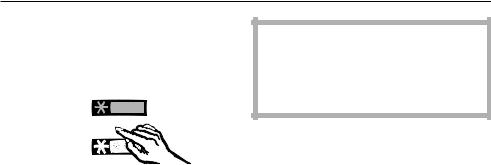
Changing the brightness of the |
You have left the settings mode. |
temperature display |
|
You can adjust the brightness of the |
|
temperature display to suit the lighting |
|
conditions of the room. |
|
Touch the button and keep your finger on the button.
Now tap once on the ON/OFF button (WITHOUT releasing the button!).
Keep the finger on the button for another 5 seconds until c is displayed.
Again tap the button until d is displayed.
Tap the ON/OFF button to confirm.
By tapping the button you can now change the brightness of the temperature display:
d 0: maximum brightness d 1: reduced brightness d –: return to menu.
The old setting is displayed steady, the setting to be selected flashes.
Whenever you finish changing a setting, tap the ON/OFF button to confirm.
Keep tapping the button until c is displayed.
Tap the ON/OFF button.
21
 Loading...