Midland Radio BT2 User Manual

INDEX |
|
Technical specifications of Midland BT2.................................................................................................... |
3 |
Structure of the operator’s manual............................................................................................................. |
4 |
Charging batteries...................................................................................................................................... |
4 |
Description of the unit and installation brackets......................................................................................... |
4 |
Typical configurations of BT2..................................................................................................................... |
6 |
General considerations on priority ............................................................................................................. |
6 |
Switching your Midland BT2 on and off ..................................................................................................... |
7 |
Pairing with Bluetooth devices................................................................................................................... |
7 |
Adjusting the volume.................................................................................................................................. |
9 |
Using the features of the Bluetooth devices .............................................................................................. |
9 |
Using the wired audio input...................................................................................................................... |
13 |
Using a Two Way Radio transceiver........................................................................................................ |
13 |
Special configurations.............................................................................................................................. |
13 |
Recommendations for specific uses........................................................................................................ |
14 |
Light and sound signals/Unit functions .................................................................................................... |
16 |
Unit Functions .................................................................................................................................... |
16-18 |
FCC Compliance Info............................................................................................................................... |
18 |
Accessories for the BT2........................................................................................................................... |
19 |
Accessories Order Form.......................................................................................................................... |
20 |
Waiver and General Release................................................................................................................... |
22 |
English
1
2

Midland BT2 Intercom
Thank you for purchasing the Midland BT2 Intercom, the first truly wireless multimedia system for bikers. The Midland BT2 is designed to be fitted directly on to your helmet and to be used for communications with Bluetooth devices like mobile phones, GPS Sat-Navs and MP3 players. If desired, it can also be paired with another Midland BT2 unit and used as wireless Rider/Passenger Intercom system or Rider to Rider in bike-to-bike mode, within a maximum range of 220 yards. The Midland BT2 is also supplied with a wired connection that can be used to connect an iPod/MP3 player or GMRS transceiver,which will then enable bike-to-bike communications up to a maximum range of 3 Miles.
Midland BT2 is available in two versions:
›Single BT2-S Intercom kit with one unit only
›Dual BT2-D Intercom with two units
Depending on the model purchased, the package contains the following parts:
BT2-S Intercom
›1 BT2 communication unit
›1 audio kit with two stereo speakers, microphone with boom and wire microphone
›1 plate with bi-adhesive strip to fix the unit onto the helmet
›1 clamp to fix the unit onto the helmet
›1 stereo audio cable to connect an iPod/ or other models of MP3 players
›1 mini USB wall-mounting power supply
1 mini USB DC adapter
›Wind Suppressing Foam Microphone Cover, Allen key and Velcro strip for assembly
BT2-D Intercom DUAL
›2 BT2 communication units
›2 audio kits with two stereo speakers, microphone with boom and wire microphone
›2 plates with bi-adhesive strip to fix the unit onto the helmet
›2 clamps to fix the unit onto the helmet
›2 stereo audio cables to connect an iPod/ or other models of MP3 players
›1 mini USB wall-mounting power supply with double plug 1 mini USB DC adapter with double plug
›Wind Suppressing Foam Microphone Cover, Allen key and Velcro strip for assembly
The units included in the DUAL kit are already paired and can therefore be immediately used in the Intercom mode.
Technical specifications of Midland BT2
General:
›Bluetooth ver. 2.0 stereo (Headset/Handsfree/A2DP protocol)
›AGC system automatically controls the volume in relation to background noise
›Voice (VOX) or manual communications option
›Private or shared (3-way communications) call mode
›Manual controls to enable: phone, intercom and wire connection
›Fully waterproof
›Lithium battery with 8 hours talk time (up to 2 days in standby mode)
›Recharge time: app. 4 hours
›Dimensions. Length: 87 mm – Width: 47 mm - Thickness: 16 mm
Bluetooth connections:
›Identical device for Rider to Passenger or Bike-to-Bike Intercom mode, up to a maximum range of 220 yards
›Bluetooth devices
-Cell phone, GPS (Garmin Zumo and TomTom Rider 1 and 2), MP3 player Stereo (with A2DP protocol)
-GMRS transceivers (with built-in or external Bluetooth connection) for group bike-to-bike communications
Wire connections:
›For stereo audio input (iPod/MP3 player)
›For GMRS transceivers (with optional cable)
Attention: before using BT2 for the first time, remember to recharge it for at least 4 hours.
Attention: Midland BT2 is designed to withstand rain and water. However, if it is raining, always verify that the rubber caps protecting the sockets are fully fitted.
English
3

Structure of the operator’s manual
This manual is divided into 5 main sections:
›Description of the unit and installation brackets
›Pairing with Bluetooth devices
›Using the features of Bluetooth devices
›Using the wire audio input
›Special configurations
To easily configure your BT2 unit, please follow the sequence of steps described below:
›Step 1: fix the unit onto your helmet following the instructions provided in the “Fixing the unit onto the helmet” section.
›Step 2: pair the Bluetooth devices (for example a cell phone or GPS) with the BT2 unit. Follow the procedure described in the chapter: “Pairing with Bluetooth devices”, choosing the Bluetooth devices you are using.
›Step 3: after completing the pairing operation, go to the “Using the features of the Bluetooth devices” section, choosing Bluetooth devices you are using.
›Step 4: if you have a wired audio input, read chapter “Using the wire audio input”.
›Step 5: for information on how to use the advanced features, read the “Special configurations” chapter.
Charging batteries
Make sure that the unit is fully charged before use. Allow at least 5-6 hours for a full charge before using the unit for the first time. Normally, after the first time, it takes 4 hours for a full charge.
Charge the unit by inserting the wall-charger into the charging socket (lift the rubber cover to insert the plug).
›The red LED on the unit will start flashing when charging begins.
›Allow the headset to charge until the red LED turns off.
›When the charge is complete, release the headset from the charger.
Description of the unit and installation brackets
Description of the BT2 unit
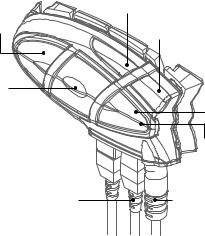
The BT2 has 5 multifunction buttons on the front and 3 wired connections in the lower section.
|
Volume + |
Phone |
Volume - |
|
|
Intercom |
|
AUX
Red and blue light
Charger 
Audio kit |
iPod/MP3 |
|
GMRS |
Description of the button features:
›Phone: can be used to enable/disable and manage cellphone features
›Intercom: can be used to enable/disable the Intercom feature and manage 3-way communications
›AUX: can be used to enable/disable the wired audio input
›Volume+: enables you to increase the volume
›Volume -: enables you to decrease the volume
Description of the wired connections
›Charger jack: enables to recharge the unit using a standard mini USB power supply
›Audio kit jack: enable to connect an audio kit (stereo headset and microphone)
›Auxiliary audio jack (AUX): can be used to connect an audio source, like a stereo iPod/MP3 player or GMRS transceiver
4

Description of the audio kit
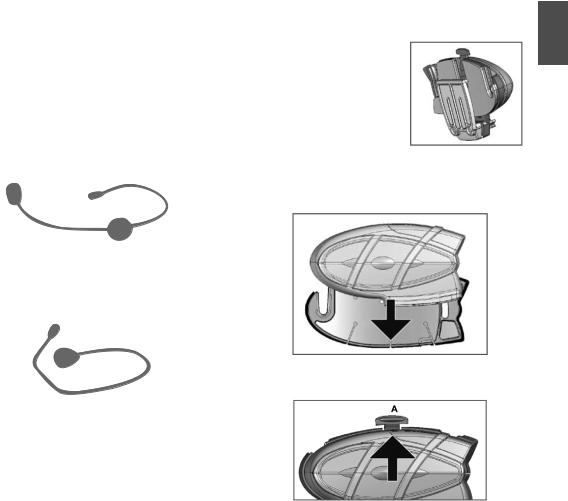
The audio system includes two ultra-flat stereo speakers and two interchangeable microphones, which are both supplied with a bracket and wire connection.
Fixing the stereo speakers. The two stereo speakers have a Velcro/adhesive strip that aids their fixing to your helmet. Beware to not completely cover your ear with the speakers, you must always be able to listen to the traffic sound and indication.
The microphone can be fixed onto the helmet in two ways: Boom Microphone. Place the section with the Velcro/adhesive strip between the padding and the rigid cover of the helmet, so that the microphone is correctly positioned in front of your mouth and that the white symbol is facing your mouth. This type of microphone is suited for Open Faced and Flip Front helmets.
Wire microphone. Using the Velcro/adhesive strip, place the microphone inside the helmet in front of your mouth. This type of microphone is more suited for Full Faced helmets. The mini connector on the microphone allows you choose the microphone that best suits the helmet you are using.
The audio kit must then be connected to the central jack of the Midland BT2 Intercom unit using the “L” shaped connector. This connector is very flexible and can be easily adapted to most commercial helmets.
Description of the installation brackets
The Midland BT2 can be fixed onto the helmet in two different ways: By either using the plate with bi-adhesive strip, or the clamp. These methods allow you to safely “fix” the BT2 unit onto your helmet and to remove it at any time in order to recharge or store it.
Plate with bi-adhesive strip
The fixing plate has a bi-adhesive strip on one of its sides. To fix the plate in place, clean the application area on the helmet surface, remove the bi-adhesive film and place the fixing plate on the helmet by keeping it contact with the surface for a few seconds.
Clamp
Using the Allen Key, loosen the two screws on the clamp and place the rear plate between the helmet padding and the external rigid protection. Then, tighten the two screws in order to firmly fix the clamp in place.
Fitting and removing your Midland BT2
The BT2 can be easily fitted onto the helmet by sliding it downwards so that it fits into the slot of the selected fixing device (plate with bi-adhesive strip or clamp).
BT2 is maintained in position thanks to the fixing clip located on the upper section (A).
To detach the BT2, simply press the fixing clip and push the unit upwards.
English
5

Typical confi gurations of BT2
1. Single Midland BT2, “Rider only”
›Bluetooth connection for cell phone, GPS and MP3 player or a cell phone with MP3 feature (to listen to music)
›Wired connection for stereo music player (iPod/MP3 player)
›Bike to bike communication system that allows two riders to communicate up to maximum distances of 220 yards
2.Midland BT2 paired, “Rider & Passenger”
›Rider to Passenger intercom feature
›Rider can connect the GPS system and both Rider and Passenger can connect/attach their own MP3 Players/cell phones etc to their own headsets and still be able to communicate with each other via the Intercom.
›Wired connection for stereo music player (iPod/MP3 player)
3.Midland BT2 Bike-to-bike; “Riders & Passengers equipped with
Midland BT2 and GMRS transceivers”
›Rider to Passenger intercom system
›Bluetooth connections for Rider and Passenger depending on needs: each connection is fi t for cell phone, Rider’s GPS system and MP3 stereo player or cell phone with MP3 feature (to listen to music)
›Wired connection for stereo music player (iPod/MP3 player)
›Group communication (“bike to bike”): it is possible to connect GMRS transceiver to all motorbikes in order to communicate as group. The GMRS transceiver can be connected in Bluetooth or wired mode to both the rider’s or passenger’s unit. There is no limit to the number of people who can communicate while using GMRS to communicate while in a group.
General considerations on priority
The Midland BT2 is a Bluetooth unit that can be paired with other Bluetooth devices with different features: cell phone, GPS, MP3 player, etc...
Depending on the type of device, Midland BT2 assigns operating priorities; for example calls have a higher priority compared to music. This means that if a call arrives while you are listening to music, your music will automatically be interrupted so that you can answer the call. There are three priorities available to meet the most common requirements.
Devices with (high) priority 1
Because of their use, cell phones and GPS Sat-Navs always have a higher priority compared to other connected devices. Therefore, an incoming call or instruction from a GPS always interrupts all other active communications. Devices with priority 1 must be paired with the BT2 unit using the “Phone” button.
Devices with (Medium) priority 2
This priority can be assigned only to another BT2 with Intercom feature. Enabling the Intercom feature disables all other communications except those with (High) priority 1. This is
6

true if you haven’t changed the default setting, following the procedure described in the final chapter “Special Configuration”. The two Midland BT2 units can be paired by means of “Volume +” and “Volume –“ buttons.
Devices with (Low) priority 3
MP3 players, Bluetooth adapters or GMRS transceivers have the lower priority, which means that all communications with these devices will be disabled if a call or GPS communication (priority 1) arrives or if the Intercom feature is enabled (priority 2).
Devices with priority 3 must be paired with the BT2 unit using the “AUX” button.
Midland BT2 can also be paired with audio devices by means of a wired connection. This connection has the lowest priority and is disabled every time a Bluetooth connection is enabled.
Switching your Midland BT2 on and off
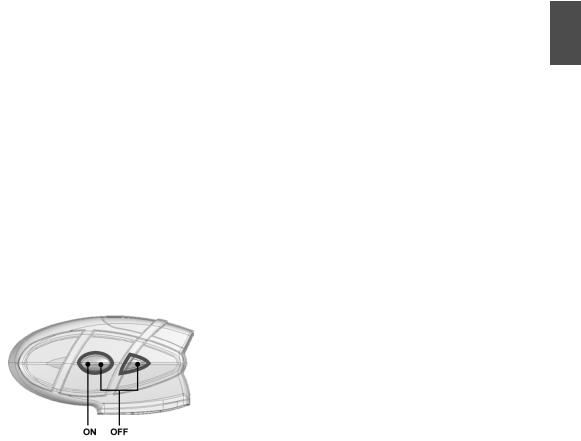
BT2 can be switched on by means of the central button labeled “Intercom”.
To switch off the unit you must use a combination of two buttons (intercom+AUX), thus lessening the chances that you might turn off the unit accidentally (especially while wearing heavy gloves).
Switching the unit on:
›Press and hold Intercom button down for approximately 3 seconds until the BLUE indicator lights.
Switching the unit off:
›Press and hold both “Intercom” and “AUX” buttons together for approximately 3 seconds until the RED indicator flashes 3 times.
Pairing with Bluetooth devices
Your Midland BT2 is a Bluetooth unit that can be paired with other Bluetooth devices.
Before performing this procedure, it is necessary to set BT2 into “Pairing mode” (Setup).
The only operations permitted in this mode are the pairing ones. To use the BT2 unit after pairing it with the desired devices, it is necessary to quit the “Setup” mode and switch to the “Operating” mode.
Setup mode
Switch off the BT2 device. Press and hold down the central button (Intercom/on) for about 7 sec. until the red indicator switches on permanently. BT2 is now in “Setup” mode and can therefore be paired with other devices.
Pairing the unit with another BT2 unit
The two units supplied in the Midland BT2-D Intercom DUAL kit, are already paired and ready for use, which means that it is not necessary to perform this procedure.
If the devices are not part of the same kit, or one of the BT2 units has been purchased separately, you need to pair them in order to be able to use the Intercom function.
Place both BT2 units in Setup mode (red indicator permanently on) Press the “Volume +” button on the first unit until the RED and BLUE lights begin to flash rapidly and alternately.
Then press the “Volume –“button on the second unit until the RED and BLUE lights begin to flash rapidly and alternately.
Now both BT2 units are trying to pair to each other.
When successfully paired, each device will light the BLUE light for 1 sec and go back to setting mode (red light always on) waiting for additional pairing or setting procedures.
Pairing the unit with your cell phone
1.Enable the Bluetooth device search feature on your cell phone.As this procedure varies according to the brand and model of the mobile phone, refer to the manual supplied to your particular phone for further information.
2.Set the BT2 unit in “Setup” mode, then press the “Phone” button on the unit until the red and blue indicators start flashing.
English
7
 Loading...