


 www.meade.com
MEADE INSTRUCTION MANUAL
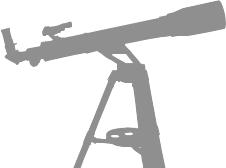
70mm | 2.8" Altazimuth Refracting Telescope
NG-70SM
 WARNING!
Never use a Meade® Telescope to look at the Sun!
Looking at or near the Sun will cause instant and irreversible damage to your eye. Eye damage is often painless, so there is no warning to the observer that damage has occurred until it is too late. Do not point the telescope at or near the Sun. Do not look through the telescope or viewfinder as it is moving. Children should always have adult supervision while observing.
INTRODUCTION
Your telescope is an excellent beginner’s instrument, and is designed to observe objects in the sky and also on land. It can be your personal window on the universe or allows you to intimately study the behavior of nesting birds on a distant hillside.
The telescope is shipped with the following parts:
•Optical tube
•Steel tube tripod with an accessory tray
•Two 1.25" eyepieces: MH25mm (28X), MH9mm (78X)
•Diagonal mirror
•Red dot viewfinder with bracket
•Telescope mount with slow motion controls
The tube has a focal length of 700mm, and its objective lens has a diameter of 70mm. The lens diameter is one of the most important pieces of information about the telescope. The size of the objective lens determines how much detail you will be able to see in your telescope. The focal length will help later on to calculate magnification.
Setting up your telescope involves these |
1 |
||
simple steps: |
|||
|
|||
• |
Assemble your tripod |
|
|
• |
Adjusting the tripod |
|
|
• Attach the optical tube to the mount
• Attach the red dot viewfinder
• Attach the diagonal mirror and eyepiece
• Balancing the optical tube
• Align the red dot viewfinder
Study the the picture on the next page and become acquainted with the parts of your telescope. Then proceed to “Assemble your Tripod.”

FIGURE 1
2
Figure 1: Meade NG-70SM Altazimuth Refracting Telescope
Inset A: Red Dot Viewfinder Assembly Inset B: Altazimuth or Azimuth Mount Inset C: Tripod Legs and Accessory Tray
1.Eyepiece
2.Red dot viewfinder (see Inset A)
3.Red dot viewfinder alignment screws (see Inset A)
4.Optical tube assembly
5.Vertical slow motion control
6.Base/tripod head
7.Tripod legs
8.Leg brace supports (See Inset C)
9.Leg brace (See Inset C)
10.Tripod leg nuts and bolts
11.Optical tube lock knobs
12.Horizontal slow motion control (See Inset B)
13.Diagonal mirror
14.Objective lens cell
15.Focuser drawtube
16.Telescope mount
17. |
Accessory tray (Inset C) |
|
18. |
Red dot viewfinder bracket (see Inset A) |
|
19. |
Adjustable sliding leg extension (see Inset C) |
|
20. |
Tripod leg lock (see Inset C) |
(Not visible) |
21. |
Dew shield/lens shade |
22.Front lens cap (removed)
23.Focusing knob
Inset A
Inset B
Inset C
ASSEMBLE YOUR TRIPOD
The tripod is the basic support for your telescope and is shipped with the tripod head and legs unattached.
Note: Number in brackets, eg., [3], refer to Fig. 1.
1.Attach the 3 steel tripod legs [7] to the tripod head [6] with the 3 leg locks [20] facing inward. Three 1-11/16” long bolts are provided for this purpose. Once the tripod head and legs are connected, spread the tripod legs evenly apart.
(SEE FIG. 2).
2.Attach the leg braces [9] to the leg brace supports [8] using the three provided 1-1/4” long bolts and the wing nuts.
3.Place the round accessory tray into the hole in the center of the leg braces [9] and spin the tray clockwise to thread the tray into the hole. Tighten until firm.
ADJUSTING THE TRIPOD
Now that the tripod has been assembled, the tripod height can be adjusted so that you can view comfortably.
1.Spread the legs out evenly apart.
2.To set the height of the tripod, unlock the tripod leg lock knob [20].
3.Slide the leg [19] in or out to the desired length.
4.Tighten the leg lock knob [20] until firm.
3.Repeat for the other two legs.
ATTACH THE OPTICAL TUBE TO THE MOUNT
The optical tube gathers distant light which is focused in the eyepiece.
1.Remove the two lock knobs (11) from the optical tube.
2.Slide the optical tube [4] onto the mounting bracket from the front end of the mounting bracket.
3.Thread the lock knob [11] into the mounting bracket and tighten until firm.
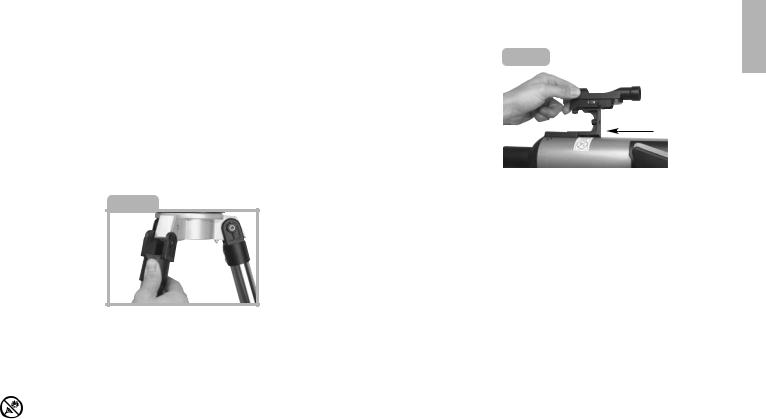
ATTACH THE RED DOT VIEWFINDER
Fig. 3 |
An eyepiece (1) has a narrow field |
3 |
|
|
of view. A |
||
|
|
|
|
|
|
viewfinder |
|
|
|
(2) has a wider |
|
|
|
field of view, |
|
|
|
which makes it |
|
|
|
easier to locate |
|
|
|
objects. The red |
|
|
|
dot viewfinder |
|
|
|
has a red dot to |
|
|
|
||
make it easier to line up more precisely with a target.
1.Slide the red dot viewfinder (2) into the mounting bracket as shown in Fig. 3.
Note: To detach the red dot viewfinder, slide the bracket out.
ATTACH THE DIAGONAL MIRROR AND EYEPIECE
The diagonal mirror reflects the light from the optical tube to a more comfortable viewing position.
1.Slide the diagonal mirror (13) into the focuser drawtube(15).
2.Tighten the drawtube thumbscrew to hold the diagonal mirror securely.
Looking at or near the Sun will cause irreversible damage to your eye. Do not point this telescope at or near the Sun. Do not look through the telescope as it is moving.
3. Slide the MH 25mm eyepiece (1) into diagonal mirror (13).
4 4. Tighten the diagonal mirror thumbscrew to hold the eyepiece
securely.
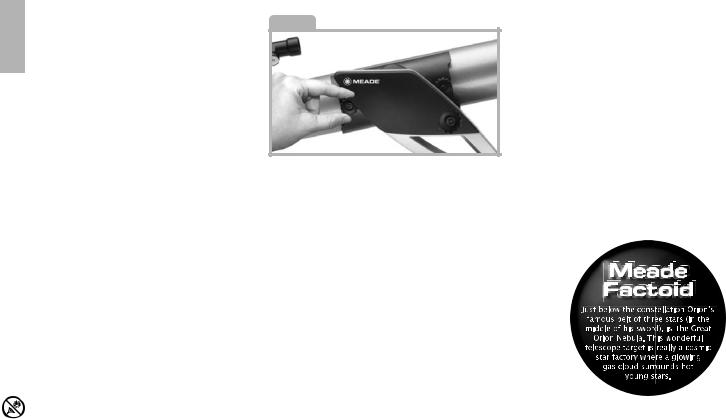
BALANCING THE OPTICAL TUBE
The telescope is designed with a bracket that will allow the user to balance the optical tube. This may be needed when heavier eyepieces or accessories are used.
1.Loosen the optical tube locks [11] so the tube will slide in the mounting bracket.
2.Balance the tube by sliding it back and forth in the bracket until you find a position where the tube remains horizontal (i.e., without tipping up or down).
3.Retighten the optical tube lock knobs to a firm feel (SEE FIG. 4).
Note: If the horizontal and/or vertical movement of the optical tube seems to be too loose or too tight, you can adjust the amount of tension in the movement of the tube to suit your own preferences. See ADJUSTING THE
HORIZONTAL AND VERTICAL TENSION OF THE OPTICAL TUBE, page 13.
Fig. 4
ALIGN THE RED DOT VIEWFINDER
Perform the first part of this procedure during the daytime and the last step at night.
1.Point the telescope at an easy-to-find land object such as the top of a telephone pole or a distant mountain or tower. Look through the eyepiece in the diagonal mirror and turn the focuser knob (23) until the image is sharply focused. Center the object precisely in the eyepiece’s field of view.
2.Turn on the red dot viewfinder using the switch on the side of the finder.
3.Without moving the telescope, look through the red dot viewfinder. Turn one or more of the viewfinder’s alignment screws
(3) until the red dot is precisely over the same object as you centered in the eyepiece.
4.Check this alignment at night on a celestial object, such as the Moon or a bright star, and use the viewfinder’s alignment screws to make any necessary refinements.
TO MOVE THE TELESCOPE
Your telescope is altazimuth mounted. Altazimuth is just a complicated way of saying that your telescope moves up and down and from side to side. Other telescopes may be mounted in
Looking at or near the Sun will cause irreversible damage to your eye. Do not point this telescope at or near the Sun. Do not look through the telescope as it is moving.
different ways.
1.To move the telescope to an object, simply move the telescope tube in the horizontal and/or vertical plane until it is centered in the red dot viewfinder. The object will now be in the eyepiece of the telescope.
2.Once an object is found, you can then use the slow motion controls [5,12] to make smooth and precise movements as you follow (or “track”) an object as it moves in the eyepiece.
You will enjoy your telescope even more as you learn more about it. But don’t be scared off by difficult terms or complicated procedures. Don’t panic! Just relax and enjoy your scope.
THE MOST IMPORTANT RULE
We have one very important rule that you should always follow when using your telescope:
Have Fun!
Have a good time when you’re observing. You may not know everything that there is to know about a telescope or what all the sights
SUN WARNING
NEVER USE YOUR TELESCOPE TO LOOK AT THE SUN!
LOOKING AT OR NEAR THE SUN WILL CAUSE INSTANT AND IRREVERSIBLE DAMAGE TO YOUR EYE. EYE DAMAGE IS OFTEN PAINLESS, SO THERE IS NO WARNING TO THE OBSERVER THAT DAMAGE HAS OCCURRED UNTIL IT IS TOO LATE. DO NOT POINT THE TELESCOPE OR ITS VIEWFINDER AT OR
NEAR THE SUN. DO NOT LOOK THROUGH THE TELESCOPE OR ITS VIEWFINDER AS IT IS MOVING. CHILDREN SHOULD ALWAYS HAVE ADULT SUPERVISION WHILE OBSERVING.
in the universe are, but that’s OK. Just point and observe at first.
You will begin to grow and learn more about astronomy the more you observe. Go to the library and read some books about the stars and planets. Read about astronomers of old. Many of them had telescope no bigger than the one you are using right now. Galileo, who is one of the first astronomers to use a telescope, discovered four of the moons of Jupiter with a telescope about the same size as yours (and his didn’t even focus very well!).
OBSERVING
Observe during the daytime: Try out |
5 |
|
|
your telescope during the daytime at |
|
first. It is easier to learn how it operates and how to observe when it is light.
Pick out an easy object to observe: A distant mountain, a large tree, a lighthouse or skyscraper make excellent targets. Point the optical tube so it lines up with your object.
Use the red dot viewfinder: If you have not done so, align the viewfinder (2) with the telescope’s eyepiece (1) as described earlier. Look through the viewfinder until you can see the object. It will be easier to locate an
THE MEADE 4M COMMUNITY
You haven’t just bought a telescope, you have embarked on an astronomy adventure that never ends. Share the journey with others by accepting your free membership in the 4M community of astronomers.
Go to www.Meade4M.org to activate your membership today.
Looking at or near the Sun will cause irreversible damage to your eye. Do not point this telescope at or near the Sun. Do not look through the telescope as it is moving.
object using the viewfinder rather than locating with the eyepiece. Line up the
6 object with the viewfinder's red dot.
Look through the eyepiece: Once you have the object lined up in the viewfinder, look through the optical tube’s eyepiece. If you have aligned your viewfinder, you will you see the object in your eyepiece.
Focus: Look through the eyepiece and practice focusing on the object you have chosen.
Try out the slow motion adjustment controls:
TOO MUCH POWER?
Can you ever have too much power? If the type of power you’re referring to is eyepiece magnification, yes you can! The most common mistake of the beginning observer is to “overpower” a telescope by using high magnifications which the telescope’s aperture and atmospheric conditions cannot reasonably support. Keep in mind that a smaller, but bright and well-resolved image is far superior to one that is larger, but dim and poorly resolved. Powers above 400x should be employed only under the steadiest atmospheric conditions.
Practice using the slow motion controls (5,12) to move the telescope. These can come in very handy, especially when you wish to move the telescope in very small (fine control) steps.
Observe the Moon: When you feel comfortable with the viewfinder, the eyepieces, and the adjustment controls, you will be ready to try out the telescope at night. The Moon is the best object to observe the first time you go out at night. Pick a night when the Moon is a crescent. No shadows are seen during a full Moon, making it appear flat and uninteresting.
Look for different features on the Moon. The most obvious features are craters. In fact you can see craters within craters. Some craters have bright lines about them. These are called rays and are the result of material thrown out of the crater when it was struck by a colliding object. The dark areas on the Moon are called maria and are composed of lava from the period when the Moon still had volcanic activity. You can also see mountain ranges and fault lines on the Moon.
Use a neutral density filter (often called a “moon filter”) when observing the Moon. Neutral density filters are available from Meade as an optional accessory and enhance contrast to improve your observation of lunar features.
Spend several nights observing the Moon. Some nights, the Moon is so bright that it makes other objects in the sky difficult to see. These are nights that are excellent for lunar observation.
Observe the Solar System: After observing the Moon, you are ready to step up to the next level of observation, the planets. There are four planets that you can easily observe in your telescope: Venus, Mars, Jupiter and Saturn.
Eight planets (maybe more!) travel in a fairly circular pattern around our Sun. Any system of planets orbiting one or more stars is called a solar system. Our Sun, by the way, is a single, yellow dwarf star. It is average as far as stars go and is a middle aged star. Beyond the planets are clouds of comets, icy
Looking at or near the Sun will cause irreversible damage to your eye. Do not point this telescope at or near the Sun. Do not look through the telescope as it is moving.
 Loading...