


1 |
Après un certain temps, la vitesse de roulement peut diminuer. Veuillez l’ajuster de cette façon:
• Tournez le vis moletée (1) dans le sens contraire des aiguilles d'une montre pour tendre le câble d'entraînement. La vitesse de roulement devrait augmenter.
Si la vitesse de roulement demeure inchangée, la courroie du système d’entraînement est usée et doit être remplacée. REMARQUE: Si le tondeuse commence “à ramper” vers l'avant, le câble d'entraînement est trip tendu. Tournez dans le sens des aiguilles d'une montre pour se desserrer le câble d'entraînement.
Con el tiempo, la velocidad con relación al suelo puede reducirse. Ajustar del siguiente modo:
• Rote tornillo de apriete manual (1) a la izquierda para tensar el cable impulsor. La velocidad con relación al suelo tendría que aumentar.
Si la velocidad con relación al suelo permanece invariada, la correa de transmisión está desgastada y se tiene que sustituir.
AVISO: Si el segadora comienza “a arrastrarse” delantero, el cable impulsor es demasiado tensado. Rote tornillo de apriete manual a la derecha para aflojar el cable impulsor.
Soms kan de basissnelheid afnemen. Corrigeer als volgt:
• Draai de duimschroef(1) naar links om de kabel te spannen. De basissnelheid moet toenemen. Als de snelheid dezelfde blijft, is de drijfriem versleten en dient deze te worden vervangen.
N.B.: Als de maaier naar voor begint te “kruipen”, is de aandrijfkabel te strak gespannen. Draai de duimschroef naar rechts om de kabel losser te maken.
Con il trascorrere del tempo, la velocità rispetto al suolo potrebbe ridursi. Effettuare le seguenti regolazioni:
• Ruotare la vite a testa zigrinata (1) in senso antiorario in modo tale da serrare il cavo. La velocità rispetto al suolo dovrebbe aumentare.
Qualora la velocità rispetto al suolo non cambi, signifi ca che la cinghia di trasmissione è usurata e dovrà essere quindi sostituita.
NOTA: Qualora il tosaerba inizi a “slittare” in avanti, signifi ca che il cavo di azionamento è troppo serrato. Ruotare la vite a testa zigrinata in senso orario per allentare il cavo d’azionamento.
GENERAL INFORMATION Transport
Remove spark plug lead. Empty the petrol tank. Before public transporting, engine oil and petrol must be removed.
ALGEMEINE ERLÄUTERUNGEN Transport
Zienhen Sie das Zündkerzenkabel ab. Entleeren Sie den Benzintank. Bei Transport mit öffentlichen Verkehrsmittein ist der Benzin und Öltank zu entleeren.
RENSEIGNEMENTS GENERAUX Transport
Débrancher la bougie. Vider le réservoir d'essence. En cas de transport par un service public, il faut vider et l'essence et l'huile.
INFORMACIONES GENERALES Transporte
Desconexióndelcabledebujía. Vacíese el depósito de gasolina y, si se trata de transporte público, también el de aceite.
ALGEMENE NFORMATIE Vervoer
De bougiekabel losmaken. Ledig de benzinetank. Bij openbaar vervoer dienen zowel olie-als benzinetank geledigd te worden.
INFORMAZIONI GENERALI Transporto
Staccare il cavo d'accensione dalla candela. Svuotare il serbatoio della benzina. In caso di transporto su mezzi pubblici, si deve svuotare sia la benzina che l'olio.
532 40 21-52 Rev. 2 |
www.mcculloch.biz |
Printed |
06.27.06 BY |
in U.S.A. |
PRE6556
Instruction manual |
Manuel d’instructions |
Instructieboekje |
Please read these instructions carefully |
Lisez très attentivement et soyez |
Lees deze instructies aandachtig |
and make sure you understand them |
certain de comprende ces instruc- |
en zorg dat u ze begrijpt voordat |
before using this machine. |
tions avant d’utiliser cette machine. |
u deze machine gebruikt. |
Anleitungshandbuch |
Manual de las |
Manuale di istruzioni |
Bitte lesen Sie diese Anleitungen sorg- |
instrucciones |
Prima di utilizzare la macchina |
fältig durch und vergewissern Sie sich, |
Por favor lea cuidadosamente y |
leggete queste istruzioni con at- |
daß Sie diese verstehen, bevor Sie die |
comprenda estas intrucciones antes |
tenzione ed accertatevi di averle |
Maschine in Betrieb nehmen. |
de usar esta maquina. |
comprese bene. |
CONTENTS |
|
INDICE |
|
|
SAFETY RULES ........................ |
PAGE 3-8 |
REGLAS DE SEGURIDAD.......... |
SIVU 3-8 |
|
TECHNICAL DATA .................................. |
9 |
ESPECIFICACIONES TÉCNICAS |
........... 9 |
|
OVERVIEW ............................................ |
10 |
SUMARIO .............................................. |
|
10 |
ASSEMBLY....................................... |
10-12 |
MONTAJE ......................................... |
|
10-12 |
ADJUSTMENTS .................................... |
13 |
REGULACIÓN ....................................... |
|
13 |
START AND STOP ........................... |
14-16 |
ARRANQUE Y PARADA .................. |
|
14-16 |
USE ................................................... |
16-17 |
APLICACIÓN DEL CORTACÉSPED . 16-17 |
||
MAINTENANCE................................ |
17-20 |
MANTENIMIENTO ............................ |
|
17-20 |
GENERAL INFORMATION.................... |
20 |
INFORMACIONES GENERALES |
......... |
20 |
INHALTSVERZEICHNIS |
INHOUD |
|
||
SICHERHEITSREGELN ............ |
SEITE 3-8 |
VEILIGHEIDSMAATREGELEN .... |
PAG.3-8 |
|
TECHNISCHE DATEN............................. |
|
9 |
TECHNISCHE GEGEVENS..................... |
9 |
ÜBERSICHT .......................................... |
|
10 |
OVERZICHT........................................... |
10 |
MONTIEREN..................................... |
|
10-12 |
MONTEREN...................................... |
10-12 |
EINSTELLUNG ...................................... |
|
13 |
INSTELLEN ........................................... |
13 |
START UND ABSTELLEN ............... |
|
14-16 |
STARTEN EN STOPPEN.................. |
14-16 |
GEBRAUCH DES RASENMÄHERS.. |
16-17 |
GEBRUIK VAN DE MAAIER ............ |
16-17 |
|
WARTUNG........................................ |
|
17-20 |
ONDERHOUD................................... |
17-20 |
ALLGEMEINE ERLÄUTERUNGEN ...... |
20 |
ALGEMENE INLICHTINGEN ................ |
20 |
|
TABLE DES MATIERES |
|
INDICE DEL CONTENUTO |
|||
|
|||||
MESURES DE SÉCURITÉ ........ |
PAGE 3-8 |
|
NORME DE SICUREZZA........PAGINA 3-8 |
||
DONNÉES TECHNIQUES ....................... |
|
9 |
|
CARATTERISTICHE TECNICHE |
............ 9 |
APERÇU ................................................ |
|
10 |
|
SOMMARIO ........................................... |
10 |
MONTAGE ........................................ |
|
10-12 |
|
MONTAGGIO .................................... |
10-12 |
RÉGLAGE.............................................. |
|
13 |
|
REGOLAZIONE ..................................... |
13 |
MARCHE ET ARRÊT........................ |
|
14-16 |
|
AVVIAMENTO ED ARRESTO .......... |
14-16 |
UTILISATION DE LA TONDEUSE ... |
16-17 |
|
USO DELLA FALCIATRICE ............. |
16-17 |
|
ENTRETIEN ...................................... |
|
17-20 |
|
MANUTENZIONE ............................. |
17-20 |
RENSEIGNEMENTS GÉNÉRAUX ........ |
20 |
|
INFORMAZIONI GENERICHE............... |
20 |
|
1 |
Change oil after each season or after 25 hours running time. Run the engine warm, remove the spark plug lead. Remove the drain plug from bottom of engine and drain oil. Fill with new oil. SAE 30 can be used.
Ölwechsel einmal pro Jahr oder nach 25 Betriebsstunden. Den Motor warm laufen lassen, abstellen und das Zündkerzenkabel abziehen. Die Ölablaßschraube an der Unterseite des Motors entfernen und das Öl ablassen. Danach neues Öl auffüllen SAE 30.
Changezl'huile àchaquesaisonouaprès25heuresdemarche.Allumez le moteur, arrêtez-le et enlevez le câble d'allumage. Enlevez le bouchon de vidange sous le moteur et vider l'huile. Puis remplissez avec de l'huile neuve (les huiles SAE 30 sont utilisables).
(1) OIL DRAIN PLUG
(1) ÖLABLAßSCHRAUBE
(1)BOUCHON DE VIDANGE D'HUILE
(1)TAPON DE DRENAJE PARA ACEITE
(1) AFTAPPLUG OLIE
(1)TAPPO DI SCARICO DELL'OLIO
Cambiar el aceite cada temporada, o después de 25 horas de funcionamiento. Dejar funcionar el motor hasta que se caliente, pararlo y quitar el cable de encendido. Quitar el tapón de drenaje del lado inferior del motor y dejar salir el aceite. Poner después aceite nuevo. Pueden utilizarse los aceites SAE 30.
Ververs de olie elk seizoen, of na 25 u rijden. Laat de motor warmlopen, schakel de motor uit en demonteer de ontstekingskabel. Verwijder de aftapplug op de onderkant van de motor en tap de olie af. Vul daarna met verse olie: SAE 30.
Sostituire l'olio al termine di ogni stagione, oppure dopo 25 ore di esercizio. Scaldare il motore, spengerlo e staccare il cavo della candela. Togliere il tappo di scarico sotto il motore e far uscire tutto l'olio. Rifornire con olio nuovo SAE 30.
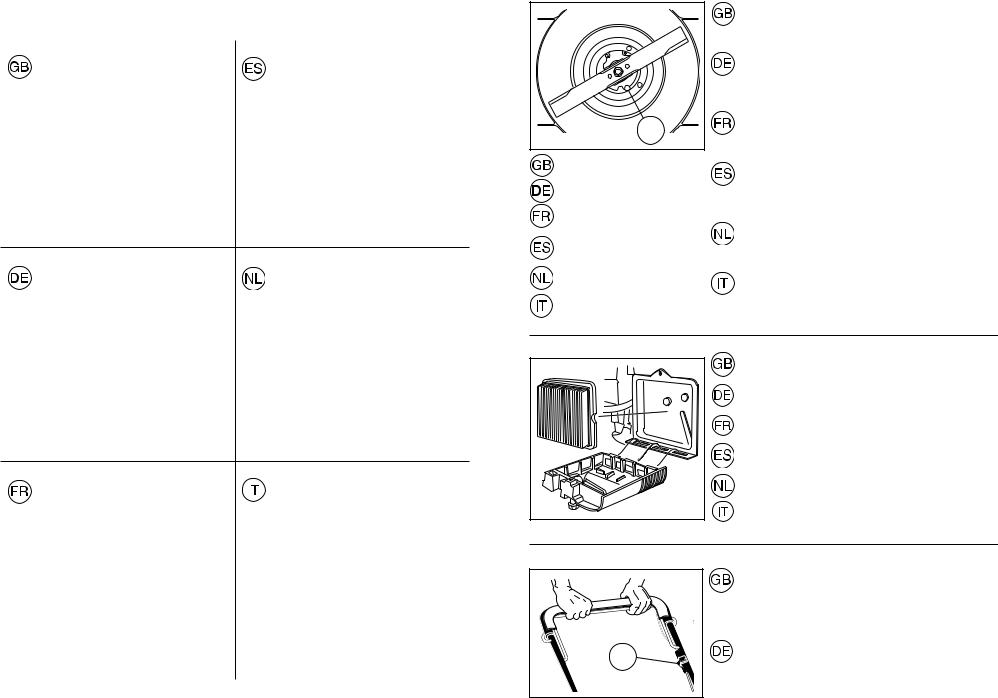
Cleaning of air fi lter. Remove the lid and remove the filter cartridge.
Reinigung des Luftfi lters. Deckel abnehmen und Filtereinsatz herausnehmen.
Nettoyage du fi ltre à air. Enlevez le capot et retirez la cartouche filtrante.
Limpieza del fi ltro de aire. Quitar la tapa y extraer el elemento filtrante.
Het schoonmaken van het luchfi lter. Verwijder de deksel en haal het filter eruit.
Pulizia del filtro. Togliere il coperchio ed estrarre il fi ltro.
1 |
Over time, ground speed may decrease. Adjust as follows:
•Rotate thumbscrew (1) counter-clockwise to tighten cable. Ground speed should increase.
If ground speed remains the same, drive belt is worn and should be replaced.
NOTE: If mower begins to “creep” forward, the drive cable is too tight. Rotate thumbscrew clockwise to loosen drive cable.
Mit der Zeit kann die Grundgeschwindigkeit abnehmen, regulieren Sie diese wie folgt:
•Drehen Sie die Daumenschraube (1) gegen den Uhrzeigersinn um den Riemen zu straffen. Die Grundgeschwindigkeit sollte so zunehmen.
Verändert dieses Verfahren die Geschwindigkeit nicht, ist der Transmissionsriemen defekt und muss ersetzt werden. HINWEIS: Wenn der Mäher beginnt, nach vorn zu “ziehen”, ist der Antriebsriemen zu straff. Drehen Sie die Schraube im Uhrzeigersinn um ihn zu lockern.
2 |
19 |
Periódicamente |
Regularly
Stop the engine and unscrew the dipstick. The level should be between FULL and ADD. NOTE: The dipstick must be screwed all the way down in order to indicate correct oil level. Avoid fi lling with too much oil.
Regelmässig
StellenSiedenMotorabundschraubenSiedenÖlpeilstabheraus. De Ölstand soll swischen FULL and ADD liegen. ACHTUNG: Der Ölpeilstab muss vollständig hineingeschraubt sein, damit der richtige Ölstand angezeigt werden kann. Vermeiden Sie zu viel Öl einzufüllen.
Régulièrement
Arrêter le moteur et vérifi er la jauge à julie. Le niveau doit être situé entre FULL (plein) et ADD (ajoutez). ATTENTION: Il faut que la jauge soit vissé à fond pour obtenir un résultat correct.
Evitez de mettre trop d'huile.
Parar el motor para controlar el nivel de aceite del motor. Debe estar entre FULL y ADD. ATENCIÓN: La tapa tiene que estar bien puesta para que la indicación del nivel de aceite de la varilla sea correcta. Evitar relleno excesivo de aceite.
Regelmatig
Kontroleer het oliepeil bij voorkeur bij een koude motor. Het niveau moet tussen FULL en ADD staan. Nooit beneden de ADD mar ook nooit boven FULL. N.B.: De peilstok moet geheel ingedraaid worden voor dejuiste meting. Niet teveel olie bijvullen.
Periodicamente
Arrestare il motore e controllare l'asta dell'olio. Ll livello deve trovarsi fra FULL e ADD. ATTENZIONE: L'asta dell'olio deve essere avvitata fi no in fondo per vedere il livello correctto dell'olio. Evitare di versare troppo olio.
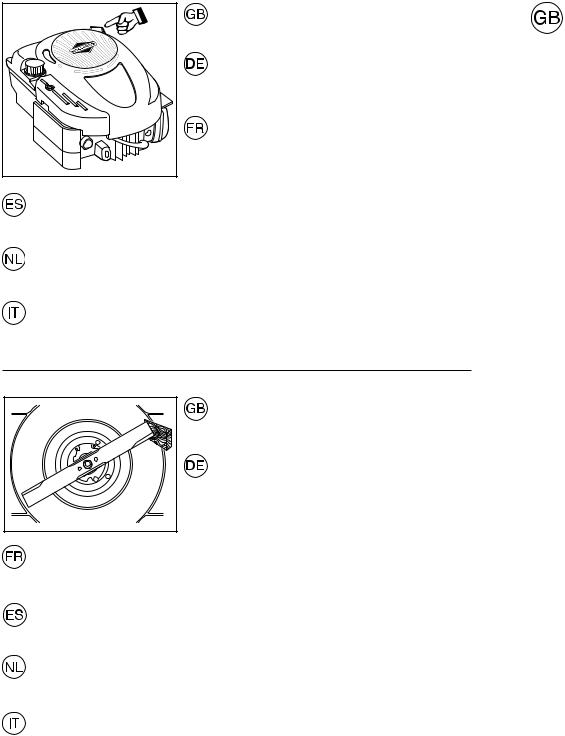
Annually (After end of season)
Grinding and balancing the cutter blade. Remove the spark plug lead. Fitting and removing the blade require the use of protective gloves. Unscrew the cutter blade and deliver it to a service workshop for grinding and balancing. Tighten the screw properly when reassembling.
Jährlich (nach Beendigung der Saison)
Schleifen und Auswuchten des Messers. (Achtung: Vor
Demontage des Messers Zündkabel von der Zündkerze entfernen). Die Klinge nur mit Schutzhandschuhen einsetzen und entfernen. Schrauben Sie das Messer ab und bringen dieses in eine Service-Werkstatt. Bei der Montage die Schrauben richtig anziehen.
Annuellement (à fin de la saison)
Aiguisage et équilibrage de la lame. Débrancher la bougie. Mettre des gants de protection avant de mettre en place ou d’enlever la lame. Démontez-la et donnez-la à aiguiser à un professionnel. Bien resserer la vis après remontage.
Revisión anual (Al terminar la estación)
Afilado y equilibrado de la cuchilla. Se desconecta el cable del encendido de la bujía. El ajuste y la sustitución de la hoja requiere el uso de guantes protectores. Se desmonta leugo la cuchilla que es entrega a un taller mecánico para su afilado y equilibrado. Apriétese bien la tuerca al volver a montar.
Jarlijks (na einde van het seizoen)
Slijpen en balanceren van het maaimes. De bougiekabel losmaken. Bij het afstellen en verwijderen van het mes moeten altijd beschermende handschoenen worden gedragen. Schroef het mes er af en breng het naar de werkplaats voor slijpen en balanceren. Bij het weer aanbrengen de schroef goed vastdraaien.
Controllo annuale (All fine della stagione)
Rettifica e bilanciamento della lama. Rimuovere il cavo di accensione. Inserire e rimuovere la lama solamente indossando guanti di protezione. Smontare la lama e consegnarla ad una offi cina di servizio per la rettifica ed il bilanciamento. Stringere bene le viti nel rimontaggio.
18
Safe Operation Practices for Pedestrian-Controlled Rotary Lawnmowers
IMPORTANT: This cutting machine is capable of amputating hands and feet and throwing objects. Failure to observe the following safety instructions could result in serious injury or death.
I.Training
•Read the instructions carefully. Be familiar with the controls and the proper use of the equipment.
•Never allow children or people unfamiliar with the instructions to use the lawnmower. Local regulations may restrict the age of the operator.
•Never mow while people, especially children, or pets are nearby.
•Keep in mind that the operator or user is responsible for accidents or hazards occurring to other people or their property.
II. Preparation
•While mowing, always wear substantial footwear and long trousers. Do not operate the equipment when barefoot or wearing open sandals.
•Thoroughly inspect the area where the equipment is to be used and remove all objects which may be thrown by the machine.
•WARNING - Petrol is highly flammable.
-Store fuel in containers specifi cally designed for this purpose.
-Refuel outdoors only and do not smoke while refueling.
-Add fuel before starting the engine. Never remove the cap of the fuel tank or add petrol while the engine is running or when the engine is hot.
-If petrol is spilled, do not attempt to start the engine but move the machine away from the area of spillage and avoid creating any source of ignition until petrol vapors have dissipated.
-Replace all fuel tanks and container caps securely.
•Replace faulty silencers.
•Before using, always visually inspect to see that the blades, blade bolts and cutter assembly are not worn or damaged. Replace worn or damaged blades and bolts in sets to preserve balance.
•On multi-bladed machines, take care as rotating one blade can cause other blades to rotate.
III. Operation
•Do not operate the engine in a confi ned space where dangerous carbon monoxide fumes can collect.
•Mow only in daylight or in good artificial light.
•Avoid operating the equipment in wet grass, where feasible.
•Always be sure of your footing on slopes.
•Walk, never run.
•For wheeled rotary machines, mow across the face of slopes, never up and down.
•Exercise extreme caution when changing direction on slopes.
•Do not mow excessively steep slopes.
•Use extreme caution when reversing or pulling the lawnmower towards you.
•Stop the blade if the lawnmower has to be tilted for transportation when crossing surfaces other than grass, and when transporting the lawnmower to and from the area to be mowed.
•Never operate the lawnmower with defective guards, or without safety devices, for example defl ectors and/or grass catchers, in place.
•Do not change the engine governor settings or overspeed the engine. Operating the engine at excessive speed may increase the hazard of personal injury.
•Disengage all blade and drive clutches before starting the engine.
•Start the engine or switch on the motor carefully according to instructions and with feet well away from the blade.
•Do not tilt the lawnmower when starting the engine or switching on the motor, except if the lawnmower has to be tilted for starting. In this case, do not tilt more than absolutely necessary and lift only the part which is away from the operator.
•Do not start the engine when standing in front of the discharge chute.
•Do not put hands or feet near or under rotating parts. Keep clear of the discharge opening at all times.
•Never pick up or carry lawnmower while the engine is running.
•Stop the engine and disconnect the spark plug wire:
-before cleaning blockages or unclogging chute;
-before checking, cleaning or working on the lawnmower;
-after striking a foreign object. Inspect the lawnmower for damage and make repairs before restarting and operating the lawnmower;
-if the lawnmower starts to vibrate abnormally (check immediately).
•Stop the engine:
-whenever you leave the lawnmower;
-before refuelling.
•Reduce the throttle setting during engine shut down and, if the engine is provided with a shut-off valve, turn the fuel off at the conclusion of mowing.
•Go slow when using a trailing seat.
IV. Maintenance and Storage
•Keep all nuts, bolts and screws tight to be sure the equipment is in safe working condition.
•Never store the equipment with petrol in the tank inside a building where fumes may reach an open fl ame or spark.
•Allow the engine to cool before storing in any enclosure.
•To reduce the fi re hazard, keep the engine, silencer, battery compartment and petrol storage area free of grass, leaves, or excessive grease.
•Check the grass catcher frequently for wear or deterioration.
•Replace worn or damaged parts for safety.
•If the fuel tank has to be drained, this should be done outdoors.
3
 Loading...