


RC5200
Table of contents
 Loading...
User Guide
To The
RC9200/RC5200
Touch Screen Remote Controls
Automating Your
Home Theater
With Marantz

Automating Your Home Theater With The Marantz RC9200/5200
RC9200/5200 Remote Control User Guide
The information in this manual is copyright-protected. No part of this manual may be
copied or reproduced in any form without prior written consent from Marantz America,
Inc.
MARANTZ AMERICA, INC. CORPORATION SHALL NOT BE LIABLE FOR
OMISSIONS OR FOR TECHNICAL OR EDITORIAL ERRORS CONTAINED IN THIS
MANUAL. MARANTZ AMERICA, INC. SHALL NOT BE HELD LIABLE FOR
INCIDENTAL OR CONSEQUENTIAL DAMAGES RESULTING FROM THE
SUPPLYING OR USE OF THIS INFORMATION. MARANTZ AMERICA, INC. SHALL
NOT BE HELD LIABLE FOR INCIDENTAL OR CONSEQUENTIAL DAMAGES
RESULTING FROM THE PERFORMANCE OR USE OF THE MATERIALS
DESCRIBED IN THIS MANUAL.
The information in this manual may be subject to change without prior notice.
All other brand or product names are trademarks or registered trademarks of their
respective companies or organizations.
FCC NOTICE: This equipment has been tested and found to comply with the limits for
a Class B digital device, pursuant to part 15 of the FCC rule. These limits are
designed to provide reasonable protection against harmful interference in residential
installation. This equipment generates, uses, and can radiate radio frequency energy
and , if not installed and used in accordance with the instructions, may cause harmful
interference to radio communications. However, there is not guarantee that
interference will not occur in a particular installation. If this equipment does cause
harmful interference to radio or television reception, which can be determined by
turning the equipment off and on, the user is encouraged to try to correct the
interference by one or more of the following measures:
n Reorient or relocate the receiving antenna.
n Increase the separation between the equipment and receiver.
n Connect the equipment into an outlet on a different circuit from the receiver.
n Consult the dealer or an experienced radio/TV technician for help.
Note If serial or parallel ports are configured, a filtered/shielded serial or
User Guide
1
Introduction 2
1. The Marantz RC9200/5200 2
2. The Battery 3
Getting Started 6
1. Activating the RC9200/5200 6
2. Navigating Control Panels 7
3. Operating a Device 12
4. Check Battery Life - The INFO Panels 13
5 The Setup Panels 13
6. The Mode Menus 15
Customizing Your RC9200/5200 17
7. Managing Memory 17
1. Introduction 18
2. Cloning All Your Existing Remotes 18
3 Complex Operation? Macros or Help... 20
4. Programming Help Lists 22
5. Macro/Panel Jump Capabilities 23
6. Programming Macros & Panel Jumps 24
7. Macros From Your Home Buttons 26
Reference 28
1. Programming Buttons 28
2. Labeling Buttons, Frames and Menu Items 32
3. Working with Device and Macro Groups 35
4. Deleting and Restoring 40
5. Recording Macros 43
6. Using the Remote Control with Radio Frequency 47
7. RCEdit 50
Troubleshooting 52
Frequently Asked Questions 55
Overview of Symbols 57
Specifications 59
The Revert Configuration 60
Index 61
Table of Contents
User Guide
2
The RC9200/5200 is designed to control most devices that understand
infrared remote control signals. Its easy-to-use touchscreen and its
intuitive interface make it a perfect remote control for every user. The
RC9200/5200 is completely customizable and programmable. You can
add devices and functions, relabel buttons, record macros and animate
your macros. Although the RC9200/5200 is pre-programmed for Marantz
components, a vast collection of built-in tab guided panels with prearranged button art enables you to easily choose the perfect interface for
any non-Marantz component. The RC9200/5200 easily “learns”
commands from the vast majority of manufacturers’ remote controls.
Introduction
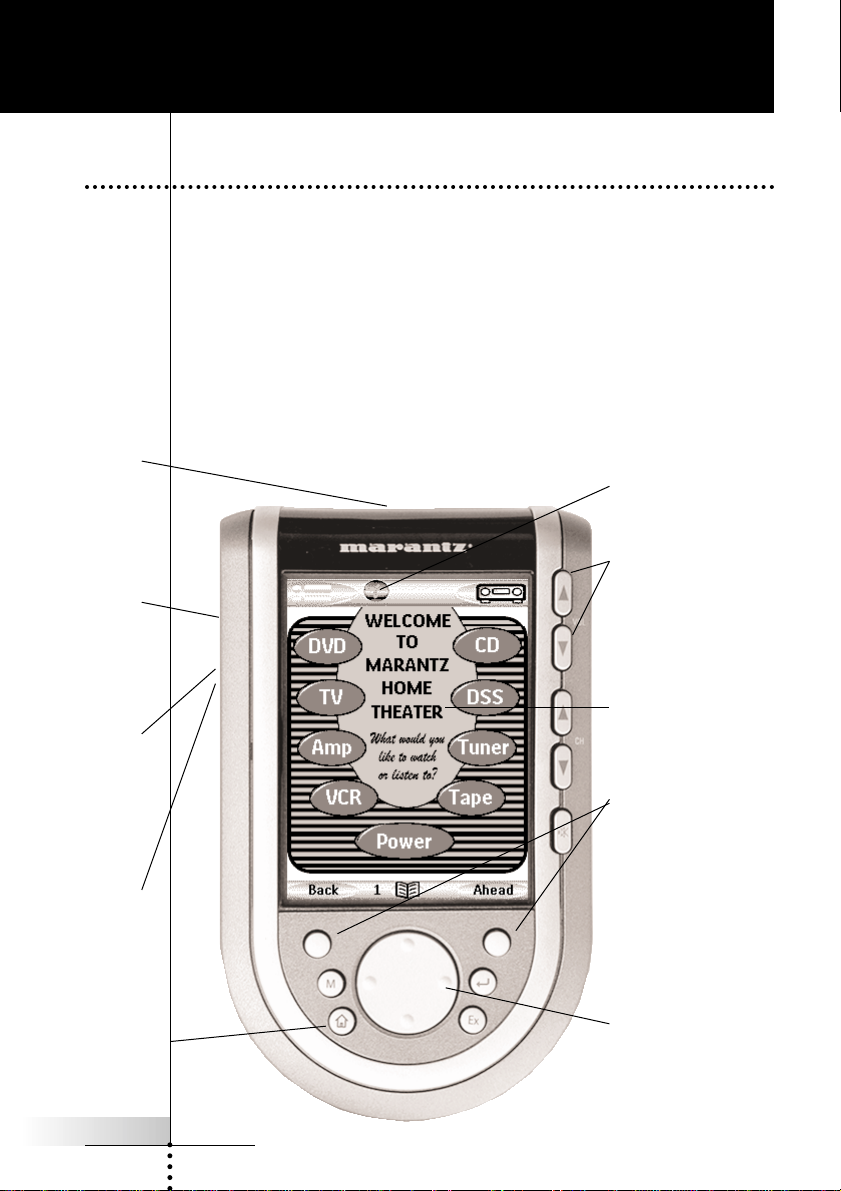
1. The Marantz RC9200/5200
The Volume, Channel
and Mute buttons are
typically programmed to
always work the same
way regardless of what
panel is displayed.
The Infrared Eye
transmits to your
devices and learns
from your existing
remotes.
The Touchscreen
The INFO button
enables you to check
battery life.
Back and Ahead buttons
enable you to quickly
navigate the last six
screens you’ve viewed.
\Menu, Enter, Exit and 4
way navigator buttons will
change their function
depending on what device
you are controlling.
The Contrast Dial
adjusts the
appearance of the
screen.
The Backlight
button lights up the
screen (you can
adjust the length of
time it stays on,
see page 13).
The Serial Port
enables you to
program the
RC9200/5200 on a
Windows PC.
The Home B utton
always takes you
back to the Main
Home Panel Control
Screen (think of it
as the Start button).
User Guide
3
Introduction
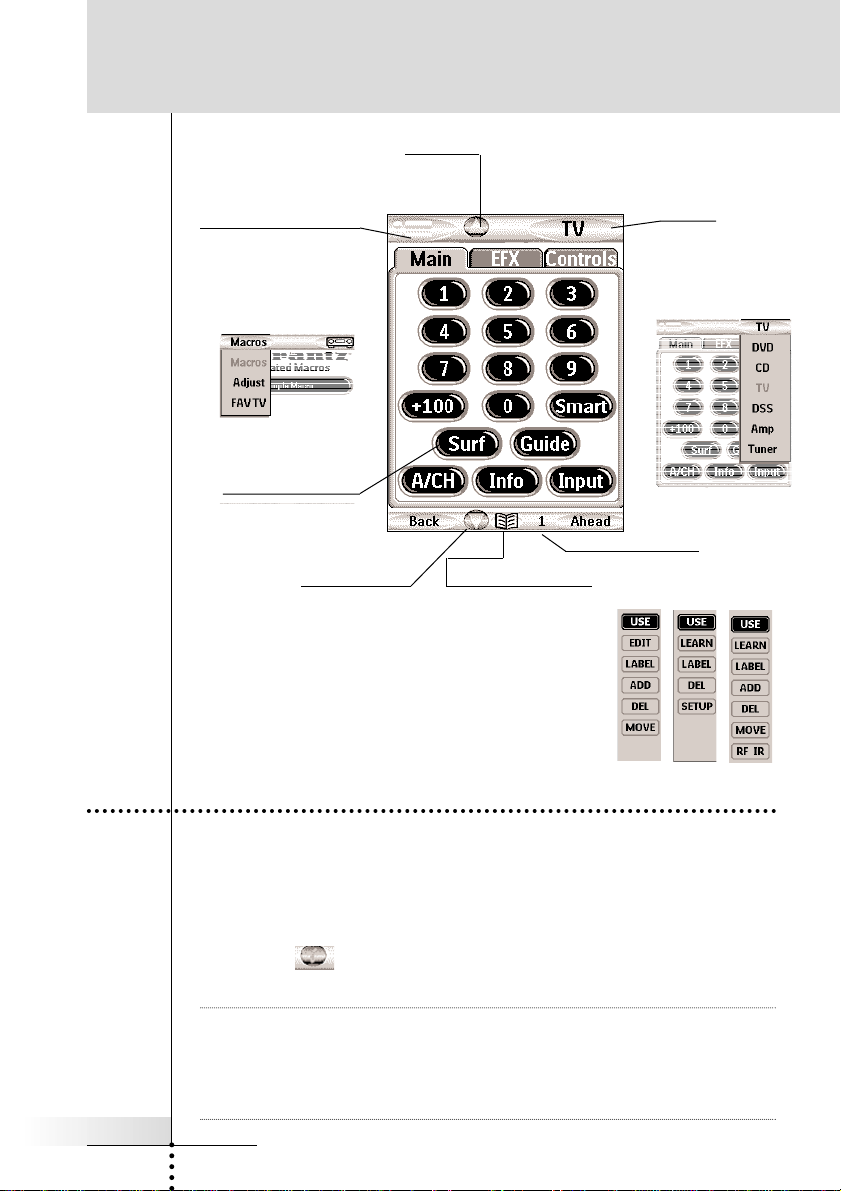
Tap the Mode Button:
to access the Mode
Menus. They are
different based on the
type of panel you last
displayed. Use the
Mode Menus to
customize your remote.
Devices
Macros
Home
Tap the Scroll Arrows:
to scroll to other panels within the
active group.
Tap the Macro menu Bar:
to use your one touch
Macro buttons. Tap again
and a menu of all of your
Macro groups appears.
Tap again to select:
Tap the Device
menu bar:
to operate devices.
Tap again and a
menu of all your
devices appears.
Tap again to select:
Panel number:
shows active
control panel
Tap the Scroll Arrows:
to scroll to other
panels within the
active group.
2. The Battery
When you use the Remote Control for the first time, you will have
to:
• install the battery pack;
• place the Remote Control in the docking station and charge the
Remote Control.
• tap the INFO button on the Home Panel to check battery
life.
Warning Use the docking station only with the Philips NiMH rechargeable
battery pack.
We strongly advise you not to plug other appliances (like mobile
phones, PDA’s, …) into the docking station. This will damage both
the connector and the appliance.
Use the Control Panel
Buttons:
to operate your
components
User Guide
4
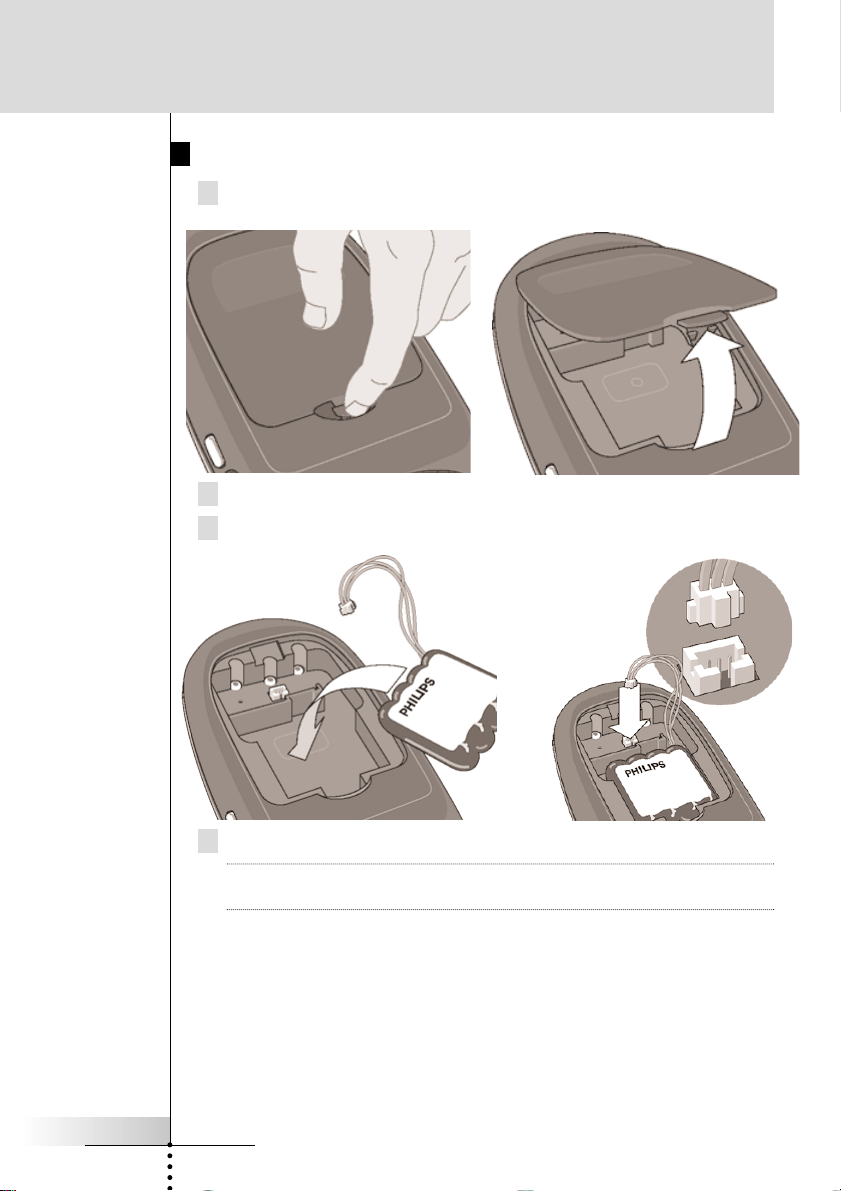
Installing the Battery Pack
1 Press the latch on the battery cover and remove the battery
cover from the Remote Control.
2 Place the battery pack in the battery compartment.
3 Plug the cable of the battery pack in the connector as illustrated.
4 Place the battery cover back on.
Note Make sure the cable of the battery pack does not get stuck
between the molded interior and the battery cover.
After a few seconds, the Remote Control starts up automatically
and an Introduction screen appears. The Remote Control beeps
twice to indicate that it has finished starting up.
Because the battery pack of the Remote Control is not fully precharged, you will have to charge it as described below.
Introduction
User Guide
5
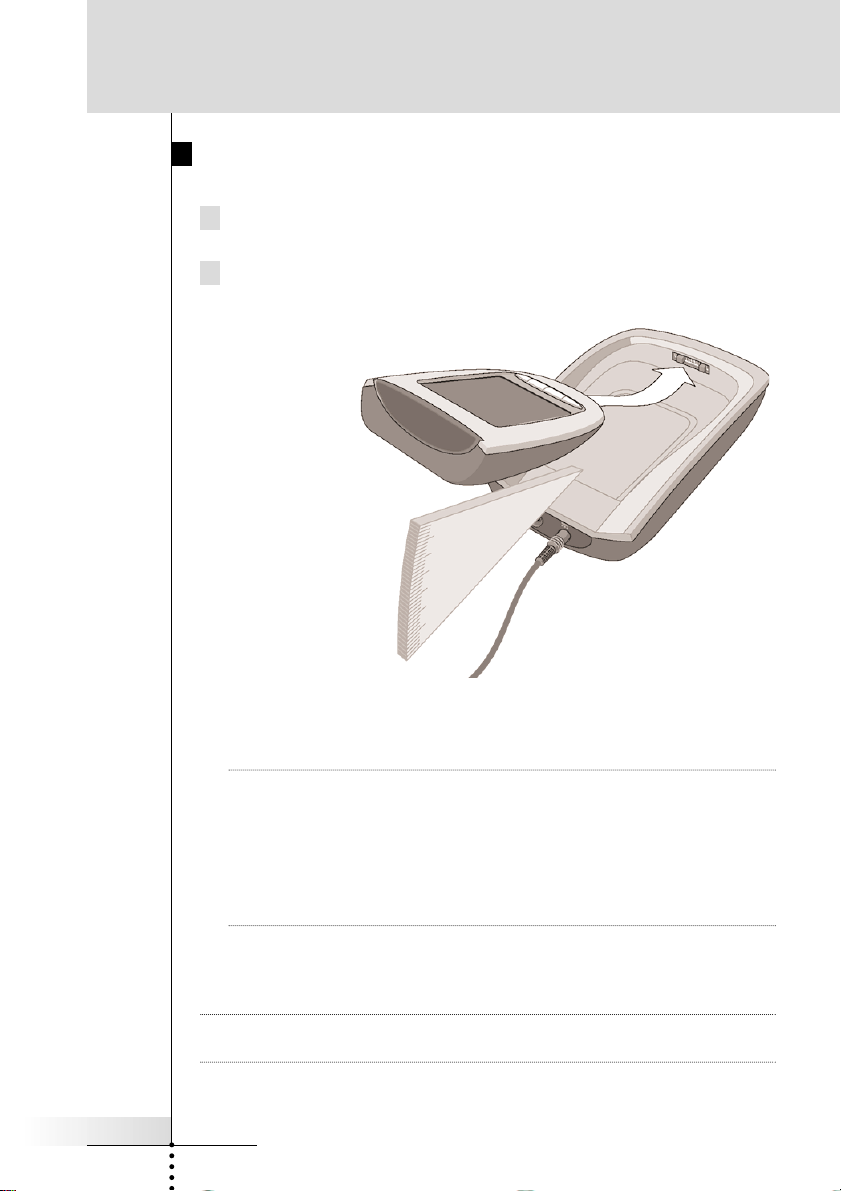
Charging the Remote Control
For charging the Remote Control you use the docking station.
1 Plug the power adapter into a wall outlet and connect it to the
docking station.
2 Place the Remote Control in the docking station.
Make sure you hold the Remote
Control at an angle of 30° to 45°
when you place the it in the
docking station.
Charging starts immediately. The green charging LED on the
front of the docking station indicates charging takes place.
When the Remote Control is fully charged, the LED goes off.
Note Normal charging time is 2 to 3 hours, depending on the
condition of the battery pack.
You can operate the Remote Control while it is being charged.
The battery pack does not have to be entirely empty before
recharging.
You can place the Remote Control in the docking station at any
time.
When the battery pack is running low, the Low Battery icon flashes
at the top of the screen. Recharge the Remote Control as soon as
possible to ensure perfect performance.
Note The RC9200/5200 retains all settings when the battery is
completely dead. You will only have to reset the clock.
Introduction
User Guide
6
Turning on the Display
Tap the screen gently with your finger or a blunt, soft object like
a pencil eraser.
The display is activated and you see the Home panel.
Notes · If the display stays blank or becomes black, adjust
the contrast dial on the left side.
· If another panel is displayed, tap the Home button .
· The RC9200/5200 shuts down automatically after being left
alone for a few seconds (you can adjust the time out period in
the Setup panels).
Using the Backlight
Press the backlight button on the left side.
The backlight shuts off after a few seconds to save power.
Note In the settings (see page 13) you can choose to activate the
backlight automatically when you turn the RC9200/5200 on.
Modes
The RC9200/5200 has different “modes.” When you activate the
RC9200/5200 for the first time, it starts up in Use mode allowing
you to immediately operate your devices.In Use mode the menu
bar at the bottom of the screen displays the symbol for the
Mode Menu. Tap the symbol. A menu will pop up with USE as
an option. If the menu bar shows another symbol, like , tap it
to reveal the Mode menu and tap USE to return to normal
operating mode.
Note If you do not see the mode menu symbol; it has been
deactivated via the Setup panel. Press and hold the center of
the bottom menu bar to overide the Mode menu deactivation.
Getting Started
1. Activating the RC9200/5200
User Guide
7
Three Divisions of Control Panel Types
Your RC9200/5200 is capable of displaying hundreds of different
control screens. By grouping them into sensible divisions, it is easy
to navigate to the control panel you want. The three main divisions
are:
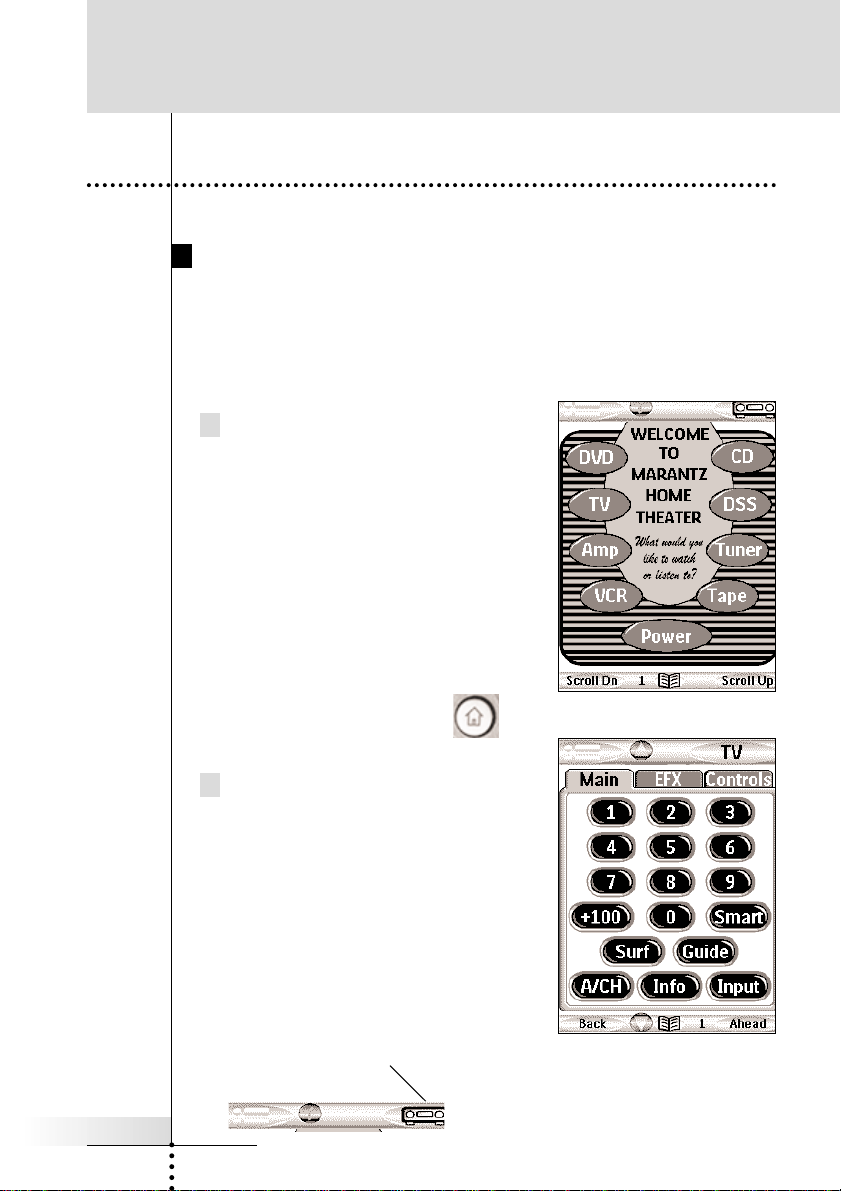
Home — The Home group displays convenient instant jump buttons
to the main control panels of your
system devices (your VCR, TV, CD
player etc.). These buttons
also select the Input of your Home
Theater Receiver or Preamp (Home
buttons are linked to the Device
pull down menu, which also selects
inputs on your receiver).
Access Home by tapping
the Home button at the
bottom left of the remote.
Devices — The Device side
displays the control panels of your
components, one device group at a
time. A button on a Device panel
will act just like the buttons on the
original remote control. You can
always select the Device
side of the RC9200/5200 by tapping
the menu bar to the right of the
remote icon.
Getting Started
2. Navigating Control Panels
Tap to select the Device side
of your RC9200/5200 .
User Guide
8
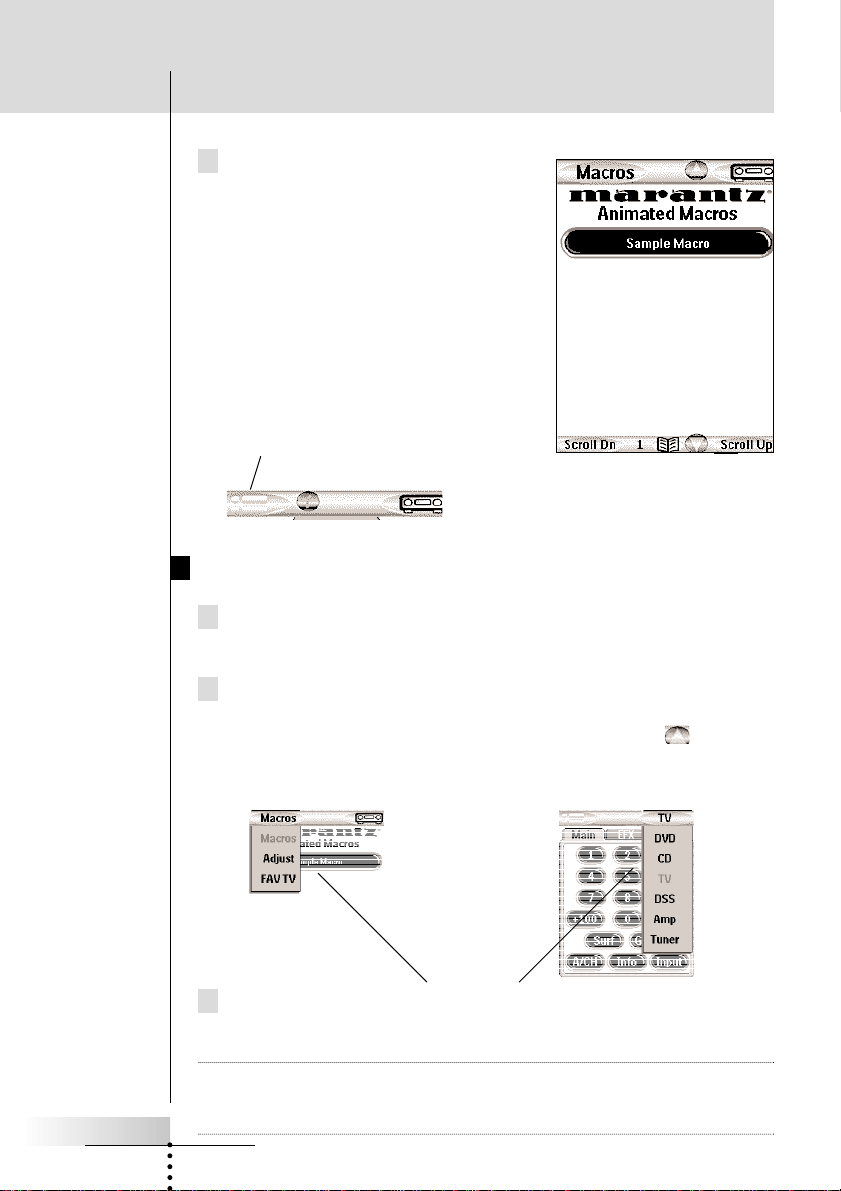
Macros — The Macro side of your
RC9200/5200 displays Macro buttons.
Macro buttons play back a sequence
of up to 255 different commands (and
panel jumps, which can be programmed to do crude animations or
to give messages during the Macro).
You can always select the Macro side
of the RC9200/5200 by tapping the
menu bar to the left.
Using Menus to Jump to a Panel Group
1 Navigate to either the Macro (left) or the Device (right) side of
the remote by tapping the left or right menu bar.
2 Tap the Menu bar again. A menu will pop into view, enabling you
to choose which group of panels you want. If you have a large
system with more than seven groups, scroll arrows enable
you to select those that are out of sight.
3 After using the scroll arrows to view all of the choices, simply
tap the label of the group you would like.
Note When you jump to a Device, the RC9200/5200 will change the
input of your home theater receiver/preamp (using the pull down
menus is exactly the same thing as pressing a Home button).
Getting Started
Tap to select the Macro side of your
RC9200/5200.
Device Groups
Macro Groups
User Guide
9
Home Buttons Jump to Device Panel Groups
and Change Your Receiver’s Inputs
Each of the Device Panel Groups has a matching Device button on
the home panel. These Device buttons perform two actions when
pressed:
1 Jumps to the main panel of the Device Group.
2 Changes your home theater receiver/preamp to the appropriate
input. See page 30 to program for a non-Marantz
receiver/preamp.
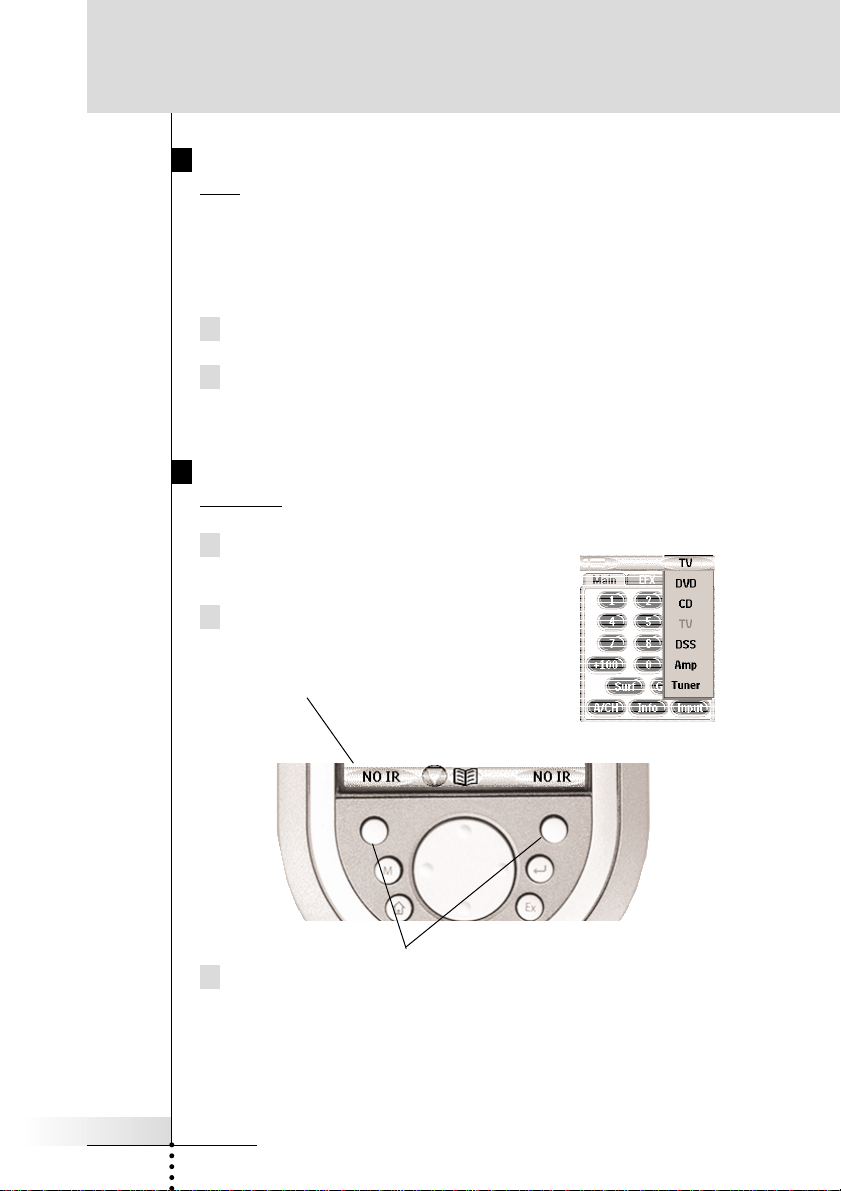
Jump to a Device Panel Group
Without Changing Inputs
1 Pop up the Device menu, by tapping
the Device Menu bar.
2 Look at the labels for the Left and Right
hard buttons. Now, they are labeled
NO IR.
3 Press and hold either of the two Left and Right hard buttons,
then select the device you would like to jump to. No input
commands will be sent to your receiver/preamp.
Getting Started

User Guide
10
Using the Scroll Arrows To Scroll to Panels
Tap the Scroll arrows to navigate to other panels within the
active group (home, macros or devices).
Getting Started
Opposite the scroll arrow on the bottom of the
screen, the Panel display shows you which
panel you are viewing.
Using the Back & Ahead Hard Buttons
Tap the Back hard button to navigate to last six panels you’ve
viewed. Use the Ahead hard button to navigate in the other
direction.
User Guide
11
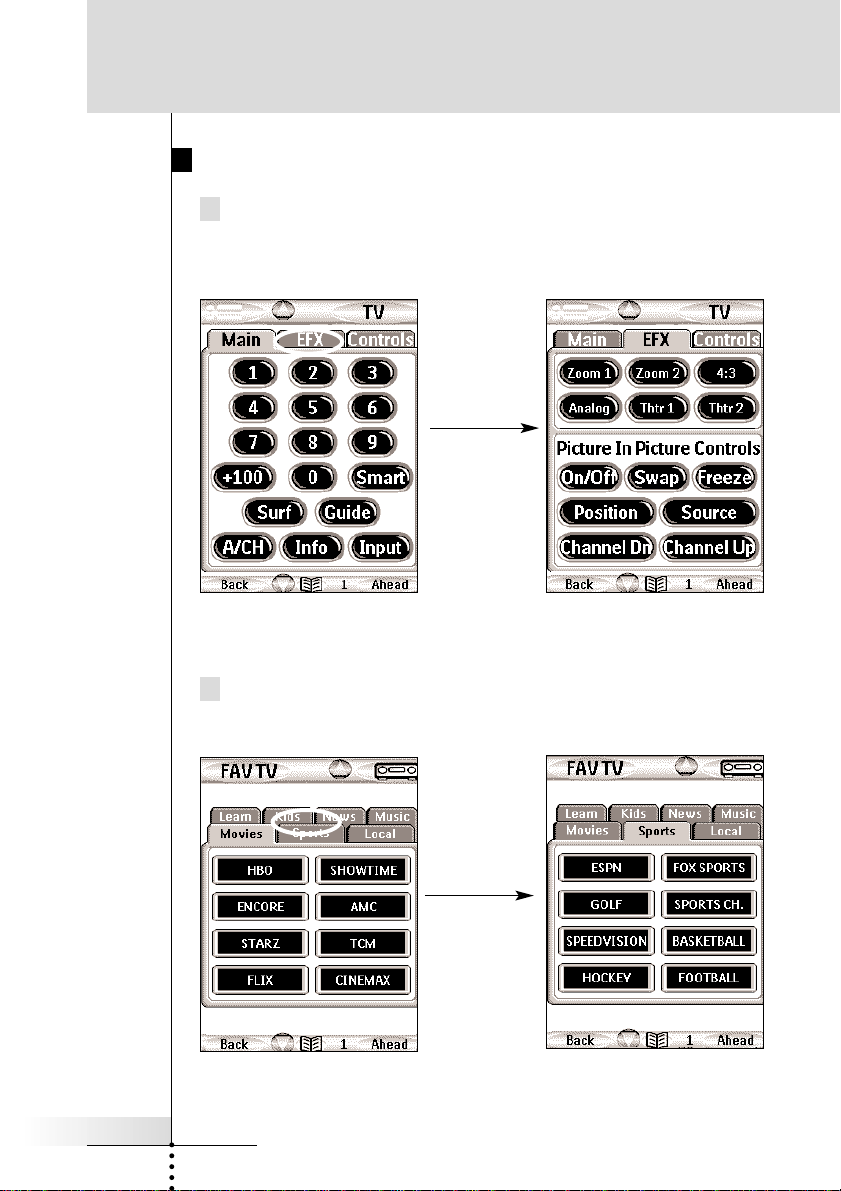
Using Tab Buttons to Jump to Panels
All of your device groups have been programmed with “onetouch” jump buttons to all of the panels for that device. Simply
touch the tab label and the RC9200/5200 will jump to the
appropriate panel.
Your Macro Groups have also been programmed with “onetouch” jump buttons and tab style navigation to make it easy to
sort your macros out.
Getting Started
1. To view the TV’s Effects
panel, press the EFX tab.
2. The RC9200/5200 will jump
to the TV Effects panel.
1. To view the channel macros
for sports channels, press
the sports tab.
2. The RC9200/5200 will jump
to the panel displaying
Sports Channel macros.
You operate devices using two kinds of buttons:
Touchscreen buttons
Hard buttons - nine buttons below the screen (Home is not
programmable and doesn’t count) and five to the right of the
screen (Vol, Channel and Mute).
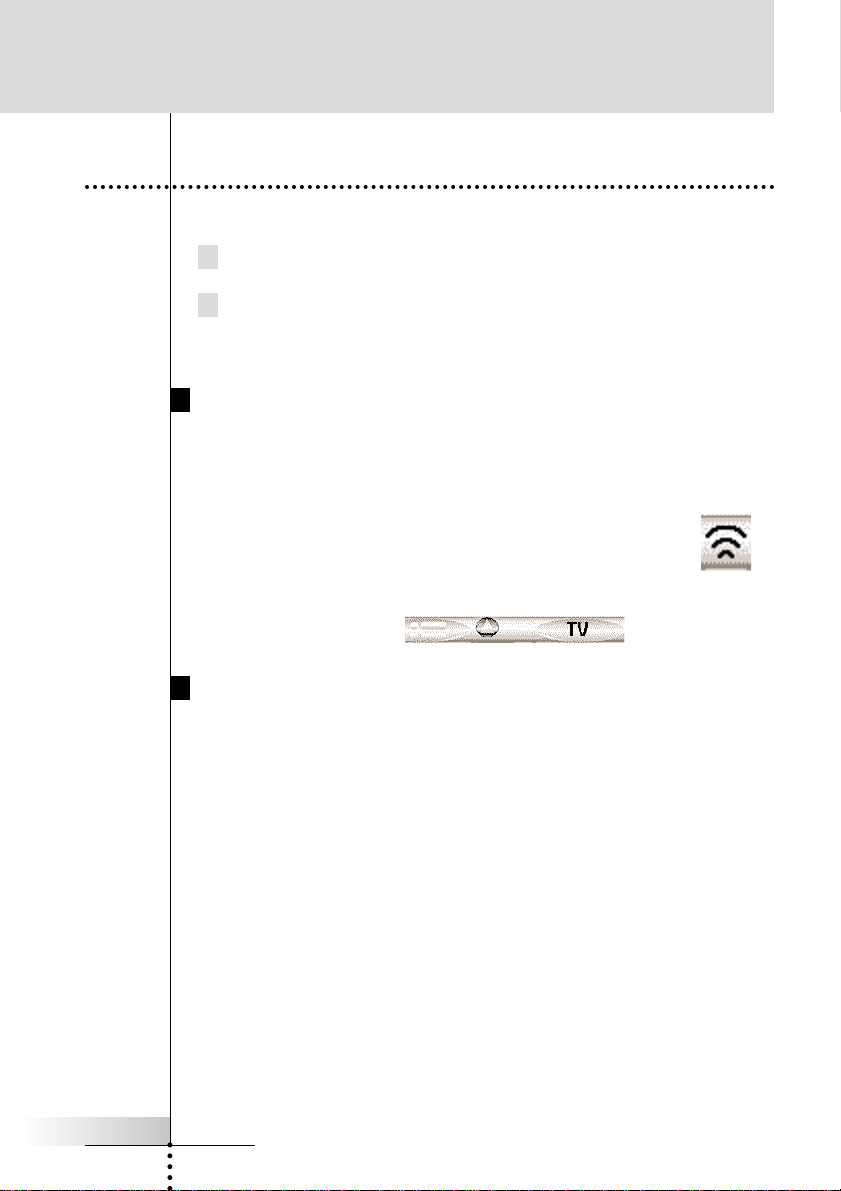
Using Touchscreen Buttons
Sending commands
Infrared commands are invisible. However, when you send a
command, an animated icon appears at the top of the panel to
show that a command is being sent.
The name of the device you are controlling is always displayed on
the device menu tab.
Using the Hard Buttons
Hard buttons can be operated at any time, even without turning on
the touchscreen. These buttons can be programmed to always do
the same thing regardless of the panel displayed (teach commands
on Home Panel) or they can change their function depending on
which device is active (teach commands only to the specific
device). For example:
Since Volume Up, Volume Down and Mute are typically
receiver/preamp commands in most home theaters, these direct
access buttons have been pre-programmed to always operate a
Marantz receiver/preamp. Should you own another brand, see the
programming instructions on page 31-32. Menu, 4 Way Arrows,
Channel Up and Channel Down are typically programmed to
change with the device selected. So when you are operating your
DVD player, you use them to navigate DVD menus and change
chapters, while when you are watching TV, the Menu buttons
operate the TV menus and the Channel buttons change channels.
User Guide
12
Getting Started
3. Operating a Device
While RC9200/5200
Transmits

User Guide
13
4. Check Battery Life - The Info Panels
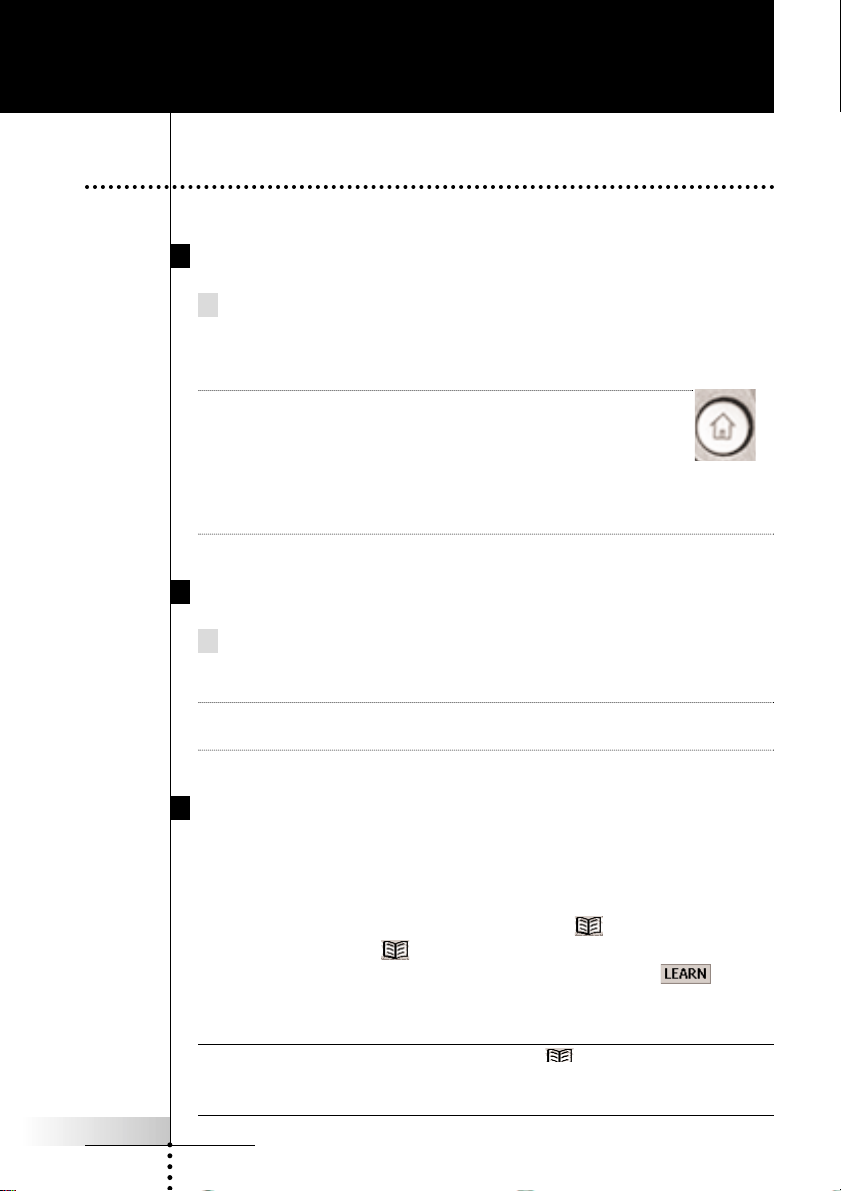
Access INFO panel display by navigating to the Home panel
(tap the Home button), then tapping the INFO button at the top
of the screen.
The Percentage of battery life.
The Percentage of free memory available for new programming.
There are two configurations built in to your RC9200/5200. If
your info screen says:
MZE EV2.0 You are using the factory default file.
MZE REV You are using the memory saving, stripped-
down file. See pages 17 and 57.
To exit INFO panel display, Tap the INFO button again.
Most of the RC9200/5200’s features can be set to your own wishes.
1 Make sure you are on the HOME panel. Once you are on the
HOME panel, tap the Mode button at the bottom of the
screen.
2 Choose SETUP.
The first setup panel appears. You can display the second and
third setup panel by using the scroll buttons.
3 Tap the button of the setting you want to adjust.
The button becomes black.
4 Use the Left and Right buttons to adjust the setting.
Getting Started
5 The Setup Panels
User Guide
14
First setup panel
Setting Function Adjusting
LCD Sleep Sets how long the touchscreen Tap the LCD button and use
stays on. the Left and Right buttons.
LCD Light Sets how long the backlight of Tap the LCD Light button and
the touchscreen stays on. use the Left and Right buttons.
Button Light Sets how long the backlight of Tap the Button Light button and
the direct-access and Left/Right use the Left and Right buttons.
buttons stays on.
Touch Selects the beep volume (Off, 1,2,3) Tap the LCD button.
for Touch Screen buttons
Button Selects the beep volume (Off, 1,2,3) Tap the LCD button.
for Hard buttons.
Note: Use the down scroll arrow to move to the second
setup panel.
Second setup panel
Setting Function Adjusting
Mode Menu Active Deactive - Turns off the Mode Menu Icon so the user cannot access
SETUP, LEARN, LABEL etc. Good when children are tech-savvy.
Active - Normal. Anyone can program or adjust the Remote by tapping on
the Mode Menu icon.
SPECIAL NOTE To access the MODEmenu after deactivating it, press and hold the spot
where the Mode Menu icon used to be for five or six seconds.
Macro Menu Active DeActive - Turns off Macro Navigation.Tap the LCD button
Active- Turns on Macro Navigation. repeatedly.
Device Menu Active DeActive - Turns off Device Navigation.Tap the LCD button
Active- Turns on Device Navigation. repeatedly.
Calibrate Calibrates the touchscreen. Tap the Calibrate button and
follow the on-screen
instructions.
Revert* Reverts the RC9200/5200 to Tap the Revert button and
the Revert 2.01 configuration follow the on-screen
(see pages 15, 17 and 57). instructions.
*The Revert button will only appear if one change has been made to the RC9200/520o
Getting Started
6 The Mode Menu
User Guide
15
Getting Started
To help you plan how your RC9200/5200 will operate your home
theater system, you should practice using the three mode menus.
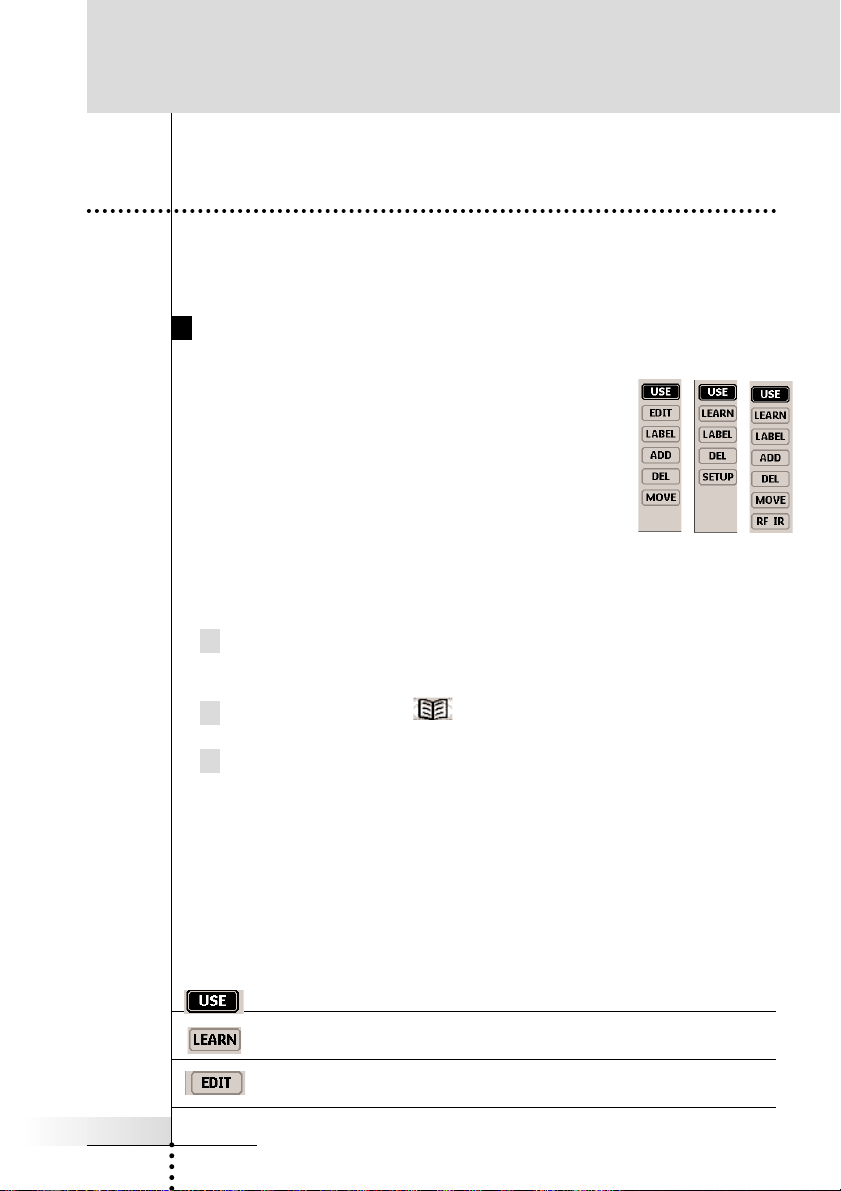
Working with Modes
All customization is done via the three Mode
menus. They differ in their capabilities:
Macro Side - No IR learning is possible, so
there is no LEARN ability.
Home Panels - Since there is only one Home
group, there is no ability to add or move groups.
Device Side - No Macros can be programmed,
so there is no EDIT button.
The mode menus are utilized like this:
1 Select either the Home, Device or Macro divisions of panels by
touching the appropriate tabs or the Home Icon.
2 Touch the Mode icon at the bottom of the screen.
3 Select the mode you wish to use to customize your
RC9200/5200 by touching the appropriate button on the Mode
Menu.
When you operate your devices, the RC9200/5200 is in Use mode.
For actions other than operating (like programming buttons,
recording macros, adding devices, and so on) you have to switch to
the appropriate mode:
For operating devices.
For learning commands from other devices.
For recording macros and jumping to other panels.
Devices
Macros
Home
User Guide
16
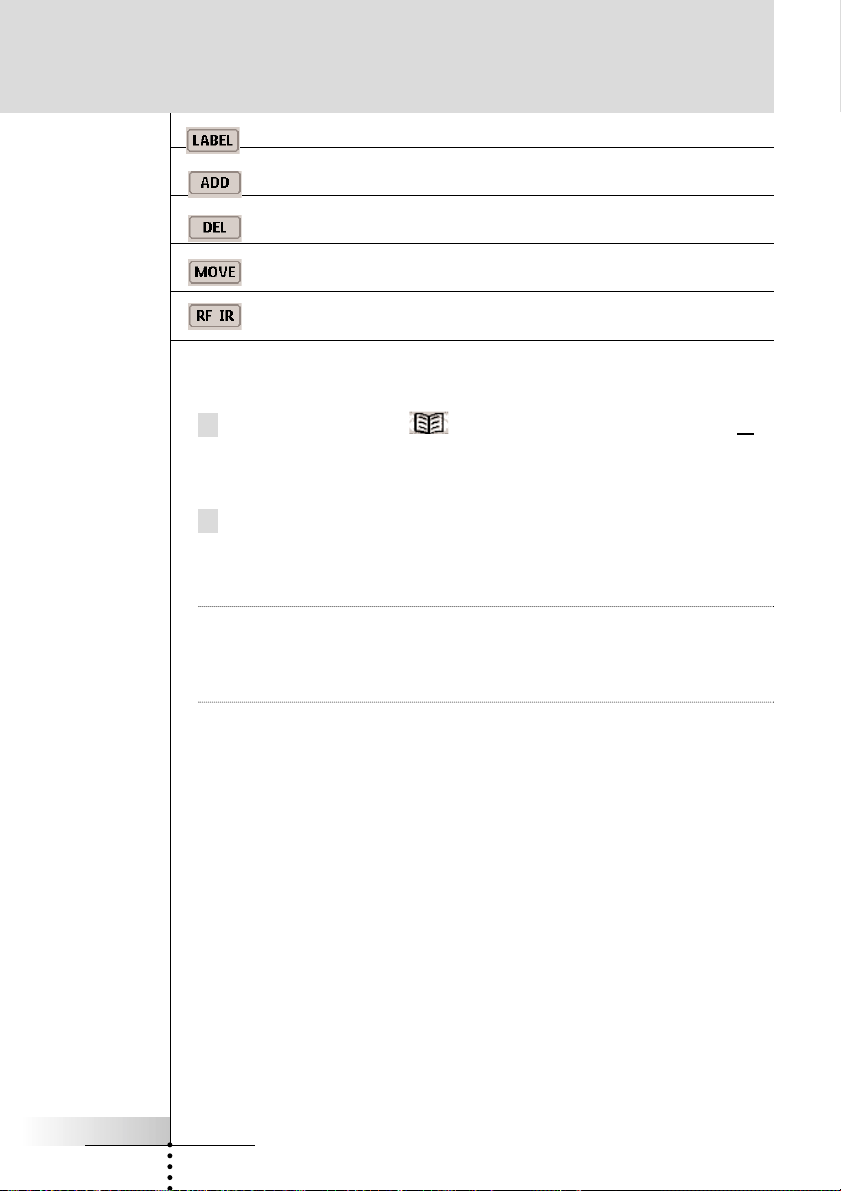
For labeling buttons and commands.
For adding new devices.
For deleting buttons, devices and macros.
For changing the order in a menu.
For selecting the correct ID for the RF Extender
To switch to another mode
1 Tap the Mode button at the bottom of the touchscreen or
the label of the mode you are using.
The Mode menu pops up.
2 Tap the mode you want to use.
The label of the active mode appears on the RC9200/5200 icon.
You can now work in the selected mode.
Note USE mode is the normal operating mode for the
RC9200/5200. The RC9200/5200 will not “time out” and
automatically return to USE mode. You must redisplay the Mode
Menu and select USE.
Getting Started
User Guide
17
Getting Started
As you customize your remote, the RC9200/5200 will manage
memory automatically. It will keep deleted groups of panels
restorable as long as possible. When you need additional memory,
it will notify you that it needs to do “Memory Cleanup,” which will
permanently erase everything you have deleted so far. See page
50.
You can choose to manually manage your memory by choosing a
smaller template file to program with. There are two configurations
built-in. The default Marantz file and the memory saving strippeddown Revert file. The default Marantz file offers these unique
features:
75 pre-programmed templates for home theater components.
All have the option of adding pre-programmed Marantz
remote codes for your convenience. See creating new
devices on page 36.
FAV TV - Macro groups for surfing channels with one touch
via customizable labels. See recording macros on page 43.
ADJUST - a macro group with one touch jumps to all of the
power user features of a Marantz system.
POWER - a group of control panels that will help your family
power up a home theater system. See Deciding on Macros
or Help Lists on page 20-21.
Should you feel that you do not need all of these features or you
know your configuration requires lots of memory (i.e. you are
planning hundreds of animated macros), we provide the Revert
configuration. It provides 13 styles of component templates and one
macro example. Permanently deleting the factory configuration and
using the Revert configuration will add 400kb to your free memory
space. See The Revert Configuration on page 60.
Customizing Your RC9200/5200
7. Managing Memory
User Guide
18
Customizing Your RC9200/5200
1. Introduction
It is best to proceed with customizing in several stages. The first
stage is to teach all of your existing remote codes to the
RC9200/5200. The second stage is to practice using your home
theater system with the RC9200/5200. As you gain familiarity
with your system, you’ll notice that many operations in a home
theater require several steps. In the third stage of
customization, you will record multiple step operations as either
a “Macro” that you can play back with one button push or as a
list of numbered steps recorded in a “Help List” device group.
In the next few pages you’ll find step by step guidelines on each
of the three stages. When a more detailed explanation can be
found in the Reference section, we’ve noted the page.
1 Gather all of your remote controls in front of you.
2 Play with all of the example device groups. Compare the device
groups with your existing remote controls. Can you use any as
templates for non-Marantz components?
3 Use DEL mode to delete all of the device groups that you don’t
like (see page 40).
4 Use ADD mode to add the device groups for each Marantz
component (see page 35-40).
When you are prompted to add with or without RC codes,
choose WITH RC CODES.
5 Use ADD mode to add a device group for each non-Marantz
component (see page 38).
Choose WITHOUT RC CODES.
6 Switch to LEARN Mode to evaluate the panel layouts of the new
2. Cloning All Your Existing Remotes
Loading...