


The Compact Make-Music-Now Keyboard Studio
English
User Guide

Session KeyStudio 25 User Guide
Introduction. . . . . . . . . . . . . . . . . . . . . . . . . . . . . . |
. . . . . . . . . . . . . . . . . . . . . . . . . . |
. |
. . |
. |
. |
. 3 |
|
Session KeyStudio Features. . . . . . . . . . . . . . . |
. . . . . . . . . . . . . . . . . . . . . . . . . . |
. |
. |
. |
. |
. |
. 3 |
What’s in the Box?. . . . . . . . . . . . . . . . . . . . . . . . |
. . . . . . . . . . . . . . . . . . . . . . . . . . |
. |
. |
. |
. |
. |
. 3 |
Minimum System Requirements. . . . . . . . . . . |
. . . . . . . . . . . . . . . . . . . . . . . . . . |
. |
. |
. |
. |
. |
. 4 |
Installation and Setup . . . . . . . . . . . . . . . . . . . . . . . . . . . . . . . . . . . . . . . . . . . . . . . . . . . . 5 |
|||||||
Getting Started Making Music with Session. |
. . . . . . . . . . . . . . . . . . . . . . . . . . |
. |
. |
. |
. |
. |
. 7 |
More Information on Configuring Session. . |
. . . . . . . . . . . . . . . . . . . . . . . . . . |
. . |
. |
. |
. 10 |
||
ASIO/WDM Switch. . . . . . . . . . . . . . . . . . . . . . . . . . . . . |
. . . . . . . . . . . . . . . . . . . . . . . . . . |
. |
. |
. |
. |
. |
10 |
Output and Input Device Selectors. . . . . . . . . . . . . . . . . . . . . |
. . . . . . . . . . . . . . . . . . . . . . . . . . |
. |
. |
. |
. |
. |
10 |
Buffer Size Selector. . . . . . . . . . . . . . . . . . . . . . . . . . . . . |
. . . . . . . . . . . . . . . . . . . . . . . . . . |
. |
. |
. |
. |
. |
10 |
Use Low Latency Streaming Checkbox . . . . . . . . . . . . . . . . . . |
. . . . . . . . . . . . . . . . . . . . . . . . . . |
. . |
. |
. |
. |
11 |
|
OK Button. . . . . . . . . . . . . . . . . . . . . . . . . . . . . . . . . . |
. . . . . . . . . . . . . . . . . . . . . . . . . . |
. |
. |
. |
. |
. |
11 |
Cancel Button. . . . . . . . . . . . . . . . . . . . . . . . . . . . . . . . |
. . . . . . . . . . . . . . . . . . . . . . . . . . |
. |
. |
. |
. |
. |
11 |
About Latency. . . . . . . . . . . . . . . . . . . . . . . . . . . . . . . . |
. . . . . . . . . . . . . . . . . . . . . . . . . . |
. |
. |
. |
. |
. |
11 |
Upgrading your Sound Card. . . . . . . . . . . . . . . . . . . . . . . . |
. . . . . . . . . . . . . . . . . . . . . . . . . . |
. |
. |
. |
. |
. |
11 |
Using KeyStudio with GarageBand. . . . . . . . . . . . . . . . . . . . . . . . . . . . . . . . . . . . . . . . 11 About MIDI and Software Synthesis. . . . . . . . . . . . . . . . . . . . . . . . . . . . . . . . . . . . . . . 12 The KeyStudio 25 Keyboard. . . . . . . . . . . . . . . . . . . . . . . . . . . . . . . . . . . . . . . . . . . . . . 12 Controls and Connectors . . . . . . . . . . . . . . . . . . . . . . . . . . . . . . . . . . . . . . . . . . . . . . . . . . . . . . . . . 12 Using the KeyStudio 25 Keyboard . . . . . . . . . . . . . . . . . . . . . . . . . . . . . . . . . . . . . . . . 15 Configuring Your Software: . . . . . . . . . . . . . . . . . . . . . . . . . . . . . . . . . . . . . . . . . . . . . . . . . . . . . . . . 15 Assigning KeyStudio 25’s Buttons, Knobs, or the Slider to Control Your Software: . . . . . . . . . . . . . . . . . . . . . . . . . . 15 Sending Bank Changes . . . . . . . . . . . . . . . . . . . . . . . . . . . . . . . . . . . . . . . . . . . . . . . . . . . . . . . . . 16 Setting the Global MIDI Channel . . . . . . . . . . . . . . . . . . . . . . . . . . . . . . . . . . . . . . . . . . . . . . . . . . . . . 17 KeyStudio 25 Advanced Features . . . . . . . . . . . . . . . . . . . . . . . . . . . . . . . . . . . . . . . . 18 Recalling Presets . . . . . . . . . . . . . . . . . . . . . . . . . . . . . . . . . . . . . . . . . . . . . . . . . . . . . . . . . . . . . 18 Storing Presets . . . . . . . . . . . . . . . . . . . . . . . . . . . . . . . . . . . . . . . . . . . . . . . . . . . . . . . . . . . . . . 18 Duplicating and Organizing Presets . . . . . . . . . . . . . . . . . . . . . . . . . . . . . . . . . . . . . . . . . . . . . . . . . . . 18 Enigma Software . . . . . . . . . . . . . . . . . . . . . . . . . . . . . . . . . . . . . . . . . . . . . . . . . . . . . . . . . . . . . 19 Sending a Snap Shot . . . . . . . . . . . . . . . . . . . . . . . . . . . . . . . . . . . . . . . . . . . . . . . . . . . . . . . . . . . 19 Muting All Controllers . . . . . . . . . . . . . . . . . . . . . . . . . . . . . . . . . . . . . . . . . . . . . . . . . . . . . . . . . . . 19 Program Mode Overview . . . . . . . . . . . . . . . . . . . . . . . . . . . . . . . . . . . . . . . . . . . . . . . . . . . . . . . . . 19 Assigning MIDI CCs . . . . . . . . . . . . . . . . . . . . . . . . . . . . . . . . . . . . . . . . . . . . . . . . . . . . . . . . . . . 20 Assigning MIDI Channels . . . . . . . . . . . . . . . . . . . . . . . . . . . . . . . . . . . . . . . . . . . . . . . . . . . . . . . . . 20 Reassigning MIDI CC for the Modulation Control. . . . . . . . . . . . . . . . . . . . . . . . . . . . . . . . . . . . . . . . . . . . 20 Reassigning MIDI CC for the Pitch Control. . . . . . . . . . . . . . . . . . . . . . . . . . . . . . . . . . . . . . . . . . . . . . . 21 Reassigning MIDI CC for the Sustain Pedal input . . . . . . . . . . . . . . . . . . . . . . . . . . . . . . . . . . . . . . . . . . . 21 Limiting the Range of the Controls . . . . . . . . . . . . . . . . . . . . . . . . . . . . . . . . . . . . . . . . . . . . . . . . . . . . 21 Setting Toggle Values for the Buttons . . . . . . . . . . . . . . . . . . . . . . . . . . . . . . . . . . . . . . . . . . . . . . . . . . 22

Session KeyStudio 25 User Guide
Assigning MIDI Machine Control (MMC) Commands to a Button . |
23 |
Assigning a Note to a Button . |
24 |
Assigning RPN/NRPN to a Fader or Knob . |
24 |
About SysEx Messages and Device ID . |
25 |
Assigning the Device ID . |
25 |
Memory Dump . |
25 |
MIDI Messages In-Depth. |
26 |
Program & Bank Changes . |
26 |
Troubleshooting. |
28 |
Appendices - Useful MIDI Data. |
31 |
Appendix A: MIDI Implementation Chart. |
31 |
Appendix B: Assignable MIDI CC’s on KeyStudio 25. |
32 |
Appendix C: Hexadecimal Conversion Chart. |
34 |
Appendix D: General MIDI Preset Specification. |
35 |
Appendix E: MIDI Note Numbers. . . . . . . . . . . . . . . . . . . . . . . . . . . . . . . . . . . . . . . . . . . . . . . . . . . . 35 |
|
Appendix F: Standard MIDI Controller Numbers (MIDI CC’s). |
36 |
Appendix G: Roland GS and Yamaha XG NRPN Support . |
37 |
Appendix H: General MIDI Reverb and Chorus Types . |
37 |
Technical Info. |
38 |
Warranty. |
38 |
Session KeyStudio 25 User Guide |
| 3 |
Introduction
Congratulations on your purchase of Session KeyStudio 25. This complete music production package contains the KeyStudio 25-note velocity sensitive USB keyboard and powerful Session music creation software. This provides you with everything you need to compose great music on your computer.
This User Guide covers setup and features of the KeyStudio 25 USB keyboard and installation of the Session music creation software. Even if you are experienced with computer-based music production, we still recommend reading this User Guide to help you get the most out of this package.
Finally, keep in mind that the hardware contained in the bundle can also be used with third-party music software. If you are using third-party software with the KeyStudio 25 keyboard, you may want to refer to your application’s User Guide to learn how the keyboard can best be used with your software.
Mac OS X Users: Session KeyStudio 25 is a software and hardware combination designed for Windows XP and Windows Vista. However, the KeyStudio 25 USB keyboard also works well on Apple computers running Mac OS X and popular applications such as GarageBand. To assist Apple users, this guide includes KeyStudio 25 installation instructions for OS X.
Session KeyStudio Features
KeyStudio 25 USB Keyboard:
<25 full-sized, half-action, velocity sensitive keys
<MIDI-reassignable Pitch Bend control
<MIDI-reassignable Modulation control
<Octave up/down button
<8 assignable knobs
<8 assignable buttons
<1 assignable slider
<1 assignable pedal input
<USB bus-powered operation
<Compatible with M-Audio’s Enigma librarian software
<Thin, compact design
<Class-compliant operation—no driver installation required
What’s in the Box?
Session Software:
<CD-quality multi-track audio and MIDI recording software
<Built-in studio-quality effects
<Built-in virtual synthesizer with hundreds of instrument sounds
<Includes over 3.5 GB of sound content for professional music creation
Your M-Audio Session KeyStudio 25 bundle should contain the following items:
<M-Audio KeyStudio 25 USB keyboard
<M-Audio Session DVD-ROM
<USB cable
<Printed Session KeyStudio 25 Quick Start Guide
If any of the above listed items are missing, please contact the retailer where you purchased the product.

Session KeyStudio 25 User Guide |
| 4 |
Minimum System Requirements
Windows XP (SP2) or higher*
<Pentium 4 1.6 GHz processor (CPU may be higher for laptops)
<512MB RAM
<4GB free hard disk space for complete Session software installation 32MB video RAM **
<1024 x 768 video resolution (1280 x 1024 recommended)
<Built-in or third-party audio interface
<DVD drive for Session software installation
<One native USB port
Windows Vista 32-bit
<Pentium 4 1.6 GHz processor (CPU may be higher for laptops)
<1 GB RAM
<4GB free hard disk space for complete Session software installation
<128 MB video RAM**
<1024 x 768 video resolution (1280 x 1024 recommended)
<Built-in or third-party audio interface
<DVD drive for Session software installation
<One native USB port
Mac OS X (KeyStudio 25 hardware only)
<Macintosh G4 1GHz
<OS X 10.3.9 with 512 MB RAM
<OS X 10.4.9 with 512 MB RAM
<One native USB port
*Home and Professional Edition only. Windows Media Center Edition is not currently supported.
**Session does not support video cards based on any of the following chipsets: S3/VIA UniChrome, SiS EL315, Matrox. If the video card being used shares system RAM, then overall system RAM requirements may increase by the amount of system RAM shared with the video card.
Session software will operate with any audio interface; for best performance, M-Audio recommends using an ASIO-compatible audio interface.
G3/G4 accelerator cards are not supported.

Session KeyStudio 25 User Guide |
| 5 |
Installation and Setup
1. Connect the KeyStudio 25 keyboard.
The KeyStudio 25 USB keyboard is class-compliant. This means that you may simply connect the KeyStudio 25 keyboard to your Windows XP, Windows Vista or Mac OS X computer using the provided USB cable and switch the keyboard on. No additional installation or drivers are required.
NOTE: Windows users who would like to take advantage of the more advanced features of KeyStudio 25, such as using the keyboard with more than one application at the same time (multi-client), should install the optional M-Audio KeyStudio 25 drivers. These drivers can be found by going to the Support > Drivers page at www.m-audio.com.
Advanced installation instructions for Windows users (optional):
1.If you have already connected the KeyStudio 25 keyboard to your computer, disconnect it before beginning the installation.
2.Download the most recent KeyStudio 25 drivers by going to the Support > Drivers page at www.m-audio.com. This ensures that you have the newest drivers available. Double-click the file once it has finished downloading.
3.Follow the driver installer’s on-screen direction prompts.
4.At various points in this installation process, you may be notified that the driver being installed has not passed Windows Logo Testing, or asked whether the program you wish to run is a trusted application. Click “Continue Anyway” or “Install” to proceed with installation.
5.Once the installer has completed, click “Finish.”
6.Attach KeyStudio 25 to an available USB port using the cable provided. Make sure the power switch on the back of the keyboard is in the “on” position. If you are using Windows Vista, your KeyStudio 25 installation is now complete. If you are using Windows XP, proceed to steps 7-9.
7.Windows XP will identify the controller and will ask if you want to search the Internet for a driver. Select “No, not this time,” and press “Next.”
8.Windows XP will display a Found New Hardware Wizard. Choose “Install the software automatically,” and click “Next.”
9.Click “Finish” once the Wizard has completed the installation.
Session KeyStudio 25 User Guide |
| 6 |
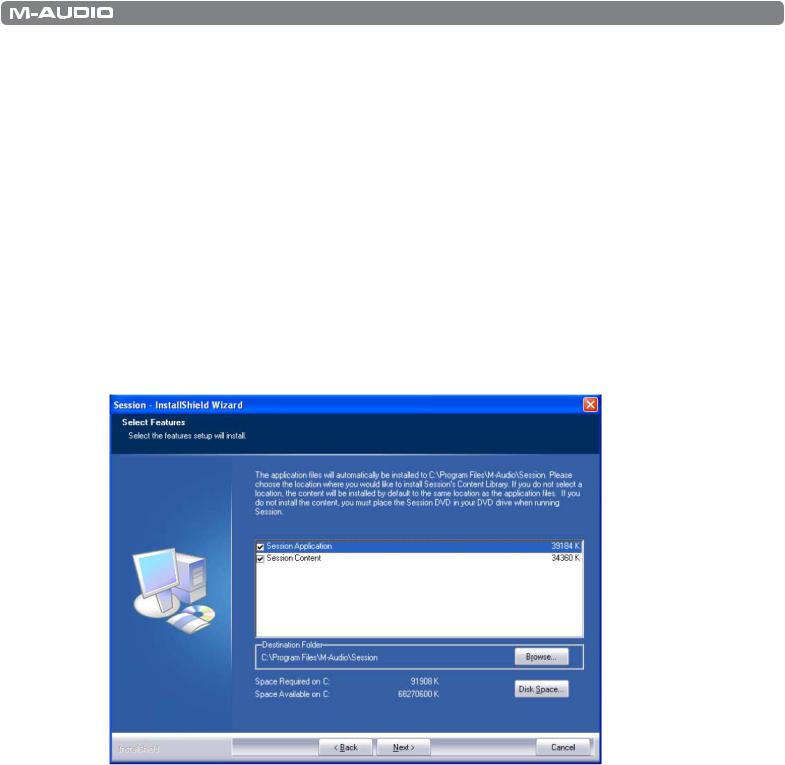
2.Install the Session Music Creation Software.
1.Insert the M-Audio Session DVD-ROM into your computer’s DVD-ROM drive.
2.The computer will automatically display the install screen. If your computer fails to launch the installer, manually start it by clicking on Start > My Computer* and then double-clicking Session.
3.Follow the software installer’s on-screen instructions.
NOTE: Session comes with a large library of loops and instrument samples for music creation, known as Session Content. During the installation process, you will be asked if you would like to install the Session Content on your hard drive. If you do not have 4 GB of disk space available, you may choose not to install the Session Content, but you will then have to place the Session DVD in your DVD-ROM drive whenever you run Session. Accessing Session’s content via DVD-ROM results in slightly slower computer performance. If the required hard drive space is available, installing the Session Content on your computer’s hard drive is recommended.
Please be aware that your Session software’s Factory Content Library may take as long as 30 minutes to install. This behavior is normal. During the installation process, the installer displays helpful Session tutorial information.
4. Click “Finish” once the installer has completed the installation.
*If you are using Windows Vista, “My Computer” will be labeled “Computer” in this step.
Session KeyStudio 25 User Guide |
| 7 |
Getting Started Making Music with Session
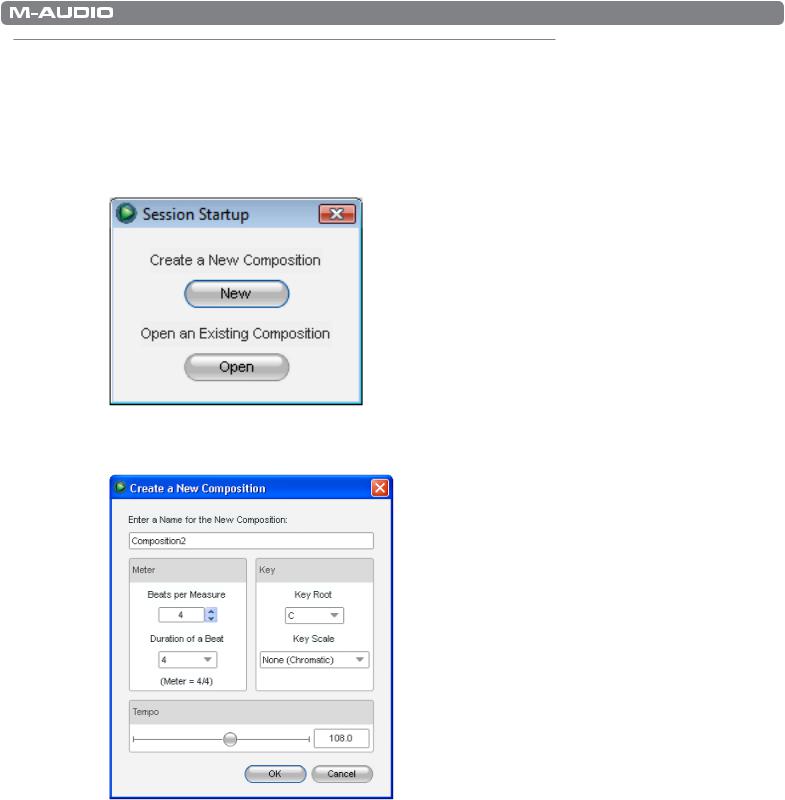
1.Connect the KeyStudio 25 keyboard to your computer using the supplied USB cable and make sure the keyboard is switched on.
2.Launch Session by clicking Start > All Programs > M-Audio > Session > Session. Alternatively, if you chose to create a desktop shortcut icon during installation, you can double-click the shortcut.
3.Click the button labeled “New” in the Session Startup window.
4.A New Composition dialog box will appear allowing you to choose a Name, Time Signature, Key Root, Key Scale, and Tempo for your composition. After these choices have been made, click OK.
Session KeyStudio 25 User Guide |
| 8 |
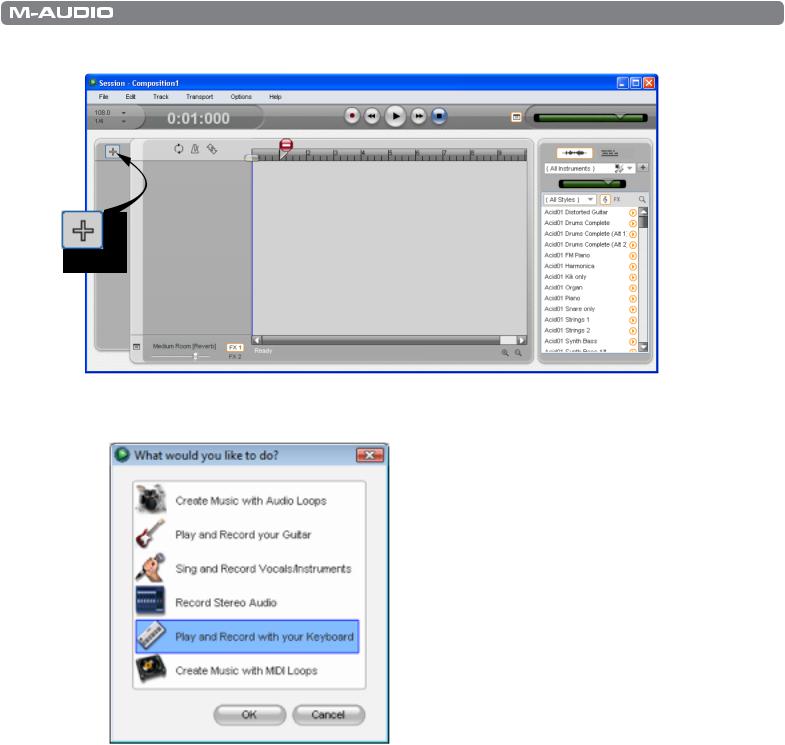
5.Click the Add a Track button in the upper left corner of the Session Main Screen.
6. The “What would you like to do?” dialog box will now appear. For this example, select Play and Record with your Keyboard, and click OK.

Session KeyStudio 25 User Guide |
| 9 |
7.In the “Select Keyboard Sound” dialog box, select the bank of sounds you would like to associate with the first track of your new song, and click OK.
8.A new track will now appear in the main Session window. You may click the specific instrument you would like to play from the instrument list appearing on the left side of the screen.
Session KeyStudio 25 User Guide |
| 10 |
9.Try playing notes on your KeyStudio 25 keyboard. If you can hear instrument sounds,you may skip steps 10-12. If your computer does not yet generate sounds when KeyStudio 25 is played, proceed to step 10 for additional configuration instructions.
10.Go to Options > Audio Hardware and make sure the sound card you wish you use (i.e., your computer’s built-in sound card or an installed ASIO compatible audio interface) is selected in the Output Device and Input Device pull-down menus. Click OK. See the following chapter, ”More Information on Configuring Session,” for further explanation of this.
11.Go to Options > MIDI Hardware and make sure “USB Audio Device,”“USB O2,” or “USB O2 In” is selected in the Input Port box. KeyStudio will appear as “USB Audio Device” in Windows XP and “USB O2” in Windows Vista if additional drivers have not been installed. If the optional drivers are installed, KeyStudio will appear as “USB O2 In.” Click OK.
Figure A: Session MIDI Hardware dialog window without optional drivers installed in Windows XP.
Figure B: Session MIDI Hardware dialog window without optional drivers installed in Windows Vista.
12. You should now be able to use your KeyStudio keyboard to play instruments from the Session instrument library.
More Information on Configuring Session
To play back and record audio in Session, Session must communicate with your sound card. On first launch, Session attempts to choose the first sound card containing both an audio input and audio output, effectively making this connection automatically. If Session is not able to select audio inputs and outputs automatically, it will open the Audio Hardware dialog. If the process is successful (Session does not open the Audio Hardware dialog automatically), but you cannot play back or record audio with Session, you’ll need to open the Audio Hardware dialog by choosing Options>Audio Hardware.
The Audio Hardware dialog contains the following options:
ASIO/WDM Switch
This control switches the Audio Hardware dialog of Session between ASIO and WDM mode. For best performance in Session, use ASIO mode. Consult the documentation for your sound card to determine if it supports ASIO.
Output and Input Device Selectors
These controls set the Output Device (sound card) through which Session plays audio, and the Input Device (sound card) from which Session records audio. It is recommended that you select the same sound card for audio input and output.
Buffer Size Selector
This control sets the latency of Session. See the “About Latency” section found later in this guide for additional information.
Session KeyStudio 25 User Guide |
| 11 |
Use Low Latency Streaming Checkbox
When checked, Session attempts to open the selected audio interface in low latency mode (WDM Kernel Streaming). While most sound cards should “open” in this mode, results vary widely based on the sound card in use. See the “About Latency” section of this User Guide for further information on this.
OK Button
After making the desired settings, press the OK button to commit your changes and close the Audio Hardware dialog.
Cancel Button
Press the Cancel button to discard your changes and close the Audio Hardware dialog.
About Latency
Latency is loosely defined as the amount of time it takes for a sound made in Session to reach your speakers. For example, with a high latency (Buffer Size) setting, there will be a noticeable delay between the press of a key on KeyStudio 25, and the resultant
sound. Smaller Buffer Size settings result in lower latency, but may not function well with slower systems. If you hear clicks and pops, the Buffer Size setting is too low. To adjust this setting of Session, open the Audio Hardware dialog (Options > Audio Hardware), select the desired buffer size from the Buffer Size selector, and then click the OK button.
NOTE: Deselecting the “Low-Latency Streaming” checkbox may also reduce any clicks and pops in Session audio. This setting is only available if WDM is selected as the driver type.
Upgrading your Sound Card
If you find that your sound card is incapable of producing acceptable latency times, we recommend that you upgrade your sound card. Visit www.m-audio.com for a selection of low latency ASIO audio interfaces for every purpose.
Using KeyStudio with GarageBand
The M-Audio Session software was created for use with Windows. However, the KeyStudio 25 hardware can be used with Macintosh
OS X computers as well. KeyStudio 25 integrates seamlessly with the GarageBand music production software which comes pre-installed on many late-model Apple computers.
To use KeyStudio 25 with GarageBand:
1.Be sure KeyStudio is connected to your Mac OS X computer via the provided USB cable (See “Connect the KeyStudio 25 Keyboard.”)
2.Launch GarageBand.
3.Create a Software Instrument track by clicking Track > New Track > Software Instrument > Create, or select a pre-existing Software Instrument track. The default instrument GarageBand selects is a Grand Piano.
When a Software Instrument is selected, clicking the  button in the lower right corner of the GarageBand window will open the Track Info screen. From this area, you can select which instrument you would like to play.
Provided your computer’s speakers are not muted or turned down, you will now hear sounds corresponding to notes you play on KeyStudio.
 Loading...