Lift-Master 65 5208 User Manual

DUAL TROLLEY MODIFICATION
(For Use With Models: T and GT )
65-5208 and 65-52081
APPLICATION REQUIREMENTS:
This modification is available to model T and GT operators. For 1/2 H.P. and lower drawbar operators use #48 drive chain. For 3/4 H.P. and higher drawbar operators use #41 drive chain.
FUNCTIONS:
Provides stabilization of drive system on very wide (over 22 ft.) standard lift sectional doors utilizing drawbar operators.
Greatly minimizes the risk of damage to the top section of the door which might otherwise occur on very wide door driven by a single, centered drawbar system.
PARTS LIST:
Unpack kit to verify the parts listed below are included. Refer to installation on following pages.
PART NUMBER |
DESCRIPTION |
QUANTITY |
01-12198 |
INSTRUCTION SHEET, DUAL TROLLEY MODIFICATION |
1 |
|
|
|
10-10203 |
DOOR CURVED ARM |
2 |
|
|
|
10-10204 |
DOOR BRACKET |
2 |
|
|
|
12-11438 |
BEARING ASSEMBLY |
2 |
15-48B14XX |
SPROCKET, 48B14 1” BORE |
2 |
75-10170 |
SLIDER ASSEMBLY |
2 |
|
|
|
75-10214 |
STRAIGHT ARM ASSEMBLY |
2 |
75-11502 |
FRONT IDLER ASSEMBLY, #48 DRIVE CHAIN |
SEE NOTE 1 |
|
|
|
75-11503 |
FRONT IDLER ASSEMBLY, #41 DRIVE CHAIN |
SEE NOTE 2 |
|
|
|
77-10200 |
HARDWARE BAG, ST |
1 |
77-11982 |
HARDWARE BAG FOR MANUAL HOIST |
1 |
|
|
|
86-RPO8-108 |
ROLL PIN |
2 |
|
|
|
NOTES:
1.(2) Shipped With 1/2 and Lower H.P. Operators.
2.(2) Shipped With 3/4 and Higher H.P. Operators

INSTALLATION INSTRUCTIONS
NOTE: Use the Model “T” or “GT” owners manual for trolley installation, where appropriate, with the following exceptions:
1.For help with any of the following steps refer to the assembly drawing on page 3.
2.The operator powerhead can be mount to either track assembly so the location of the must be decided before starting.
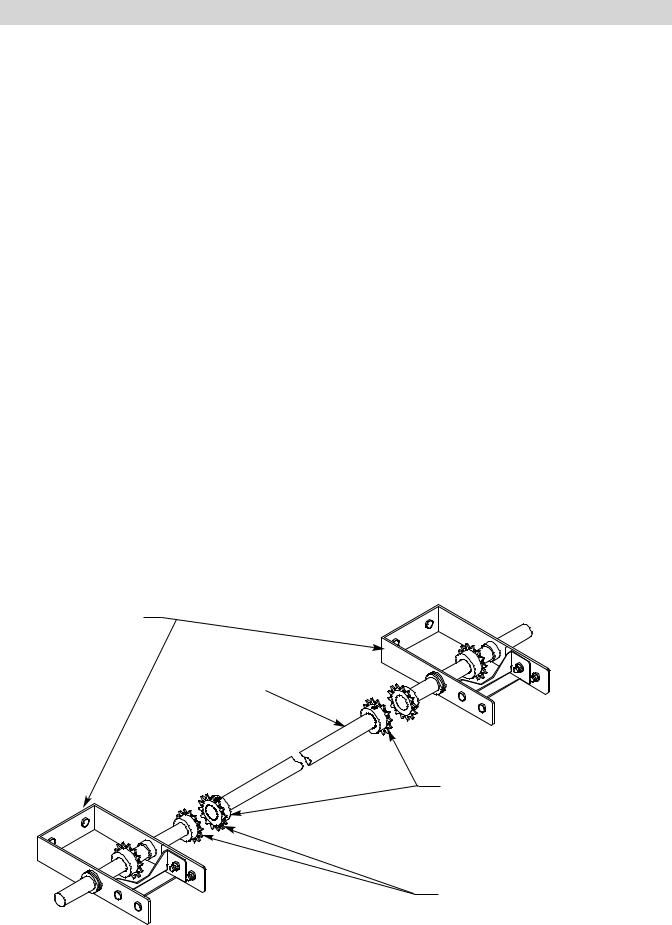
3.Determine the rough spacing of the two tracks, generally they are separated by 1/3 to 1/2 the door width. We have supplied a cross header shaft that is one half the door width.
4.Assemble the operator per the installation manual but with the special idler and coupler assembly at the header end of the track in place of the standard front idler. Be sure the coupler assembly is towards the center of the door.
5.Assemble the second track the same way as the operator but at the operator end of the track install a standard front idler. Be sure the coupler assembly is towards the center of the door.
6.Install the operator in the location that was determined in step 1 and 2.
7.Install the second track assembly, taking care that the two tracks are parallel to each other.
8.Install a 48B14 sprocket on one end of the cross header shaft by drilling through the hub and shaft and securing with a 1/4” x 1-1/2” roll pin. Be sure that the shaft is flush with the sprocket (Refer to Figure 2).
9.Determine the distance between the two coupler sprockets on the track assemblys and cut the cross header shaft to that length. If the shaft is to long and is sagging in the middle you may have to install one or two bearings for extra support. Install the second 48B14 sprocket to the end of the shaft, securing in place the same way as the sprocket in step 8 (Refer to figure 2).
10.Check to see that the two trolleys are spaced the same distance from the header so that the two door arms will be parallel.
11.Install the cross header shaft by butting the sprockets on the shaft against the sprockets on the idler assemblys and wrapping them with the #40 chain and master link (Refer to figure 1).
12. Complete the installation per the trolley instructions.
FIGURE 1
TROLLEY HOIST
IDLER ASSEMBLY
CROSS HEADER
SHAFT
COUPLER SPROCKETS
COUPLE SPROCKETS TOGETHER
WITH #40 CHAIN AND MASTER
LINK
2
 Loading...