


 Loading...
Lenovo 59365302, N586, P585, P580, N580 User Manual
...Lenovo IdeaPad P580/P585/N580/ N581/N585/N586
User Guide V2.0
Read the safety notices and important tips in the included manuals before using your computer.

Note
•Before using the product, be sure to read Lenovo Safety and General Information Guide first.
•Some instructions in this guide may assume that you are using Windows® 8. If you are using other Windows operating system, some operations may be slightly different. If you are using other operating systems, some operations may not apply to you.
•The features described in this guide are common to most models. Some features may not be available on your computer and/or your computer may include features that are not described in this user guide.
•The illustrations used in this manual are for Lenovo IdeaPad N580 unless otherwise stated.
•The illustrations in this manual may differ from the actual product. Please refer to the actual product.
•To learn more about Lenovo Applications, go to: http://www.lenovo.com.
Second Edition (June 2012)
© Copyright Lenovo 2012.
LIMITED AND RESTRICTED RIGHTS NOTICE: If data or software is delivered pursuant a General Services Administration “GSA” contract, use, reproduction, or disclosure is subject to restrictions set forth in Contract No. GS-35F-05925.
Contents
Chapter 1. Getting to know your computer .......................................... |
1 |
Top view....................................................................................................................... |
1 |
Left-side view .............................................................................................................. |
5 |
Right-side view............................................................................................................ |
6 |
Front view .................................................................................................................... |
7 |
Bottom view ................................................................................................................. |
8 |
Chapter 2. Learning the basics............................................................ |
10 |
Configuring the operating system for the first time ............................................ |
10 |
Operating system interfaces .................................................................................... |
10 |
The Charms ................................................................................................................ |
11 |
Putting the computer to sleep or shutting it down .............................................. |
13 |
Using the touchpad................................................................................................... |
15 |
Function key combinations...................................................................................... |
16 |
Connecting external devices.................................................................................... |
18 |
Special keys and buttons.......................................................................................... |
20 |
System status indicators........................................................................................... |
22 |
Securing your computer........................................................................................... |
23 |
Using Switchable Graphics (specific models only) .............................................. |
23 |
Chapter 3. Connecting to the Internet................................................. |
24 |
Wired connection ...................................................................................................... |
24 |
Wireless connection .................................................................................................. |
25 |
Chapter 4. Lenovo OneKey Recovery system ................................... |
27 |
Chapter 5. Troubleshooting ................................................................. |
28 |
Frequently asked questions ..................................................................................... |
28 |
Troubleshooting ........................................................................................................ |
30 |
Appendix A. CRU instructions............................................................. |
34 |
Replacing the battery................................................................................................ |
34 |
Replacing the hard disk drive ................................................................................. |
35 |
Replacing memory .................................................................................................... |
40 |
Replacing the wireless LAN card ........................................................................... |
43 |
Removing the optical drive ..................................................................................... |
45 |
Trademarks............................................................................................ |
47 |
i

Chapter 1. Getting to know your computer
 Top view ---------------------------------------------------------------------------------------------------
P580/P585
1
2 |
a |
|
3 |
|
|
|
|
9 |
5 |
P580 |
|
|
|
|
4 |
8 |
8 |
6
7
1
Chapter 1. Getting to know your computer
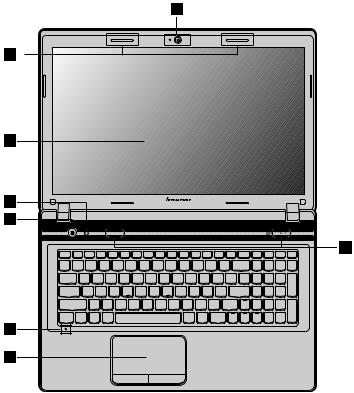
N580/N585
1
2 b
3
5 |
N580 |
|
|
4 |
|
8
6
7
2
Chapter 1. Getting to know your computer
N581/N586
1
2 b
3
5 |
N581 |
|
|
4 |
|
8
6
7
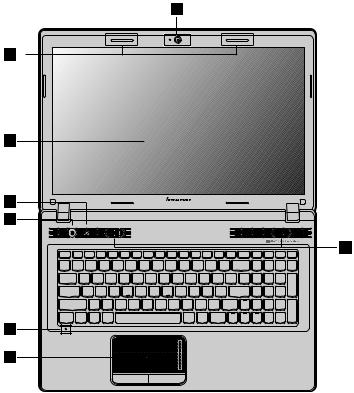
Attention:
•The dashed part is invisible.
•Do NOT open the display panel beyond 130 degrees. When closing the display panel, be careful NOT to leave pens or any other objects in between the display panel and the keyboard. Otherwise, the display panel may be damaged.
3

Chapter 1. Getting to know your computer
aIntegrated camera
bWireless module antennas (on select models)
Use the camera for video communication.
The built-in antennas ensure optimal reception of wireless radio.
Note: Wireless module antennas may be placed in different positions (2a/2b) depending on different configurations.
cComputer display
dPower button
eNovo button
The LCD display with LED backlight provides brilliant visual output.
Press this button to turn on the computer.
When the computer is off, press this button to start the Lenovo Recovery system or the BIOS setup utility, or to enter the boot menu.
Note: For details, see “Lenovo OneKey Recovery system” on page 27.
fBuilt-in microphone
gTouchpad
The built-in microphone (with noise reduction) can be used for video conferencing, voice narration, or simple audio recordings.
The touchpad functions as a conventional mouse.
Note: For details, see “Using the touchpad” on page 15.
hSpeakers (on The stereo speakers provide rich and powerful sound. select models)
Note: For sound effects and speaker locations specific to your model, refer to the actual product.
i Volume buttons For details, see “Volume buttons” on page 21.
4
Chapter 1. Getting to know your computer
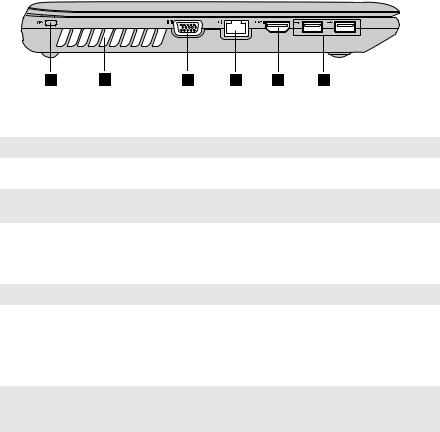
 Left-side view --------------------------------------------------------------------------------------
1 |
2 |
3 |
4 |
5 |
6 |
a Kensington slot |
Attach a security lock (not supplied) here. |
Note: For details, see “Attaching a security lock (not supplied)” on page 23.
b Fan louvers |
Dissipate internal heat. |
Note: Make sure that none of the fan louvers are blocked or else overheating of the computer may occur.
c |
VGA port |
Connects to external display devices. |
d |
RJ-45 port |
This port connects the computer to an Ethernet network. |
Note: For details, see “Wired connection” on page 24.
eHDMI port (on select models)
fUSB port (on select models)
Connects to devices with HDMI input such as a TV or a display.
Connect to USB devices.
Note:
•The blue ports are USB 3.0 ports. The black ports are USB 2.0 ports.
•For details, see “Connecting a universal serial bus (USB) device” on page 19.
5
Chapter 1. Getting to know your computer
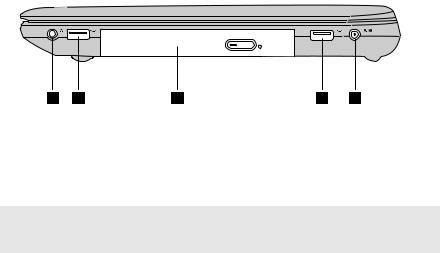
 Right-side view ----------------------------------------------------------------------------------
4 2 3 2 1
a |
AC power |
Connect the AC adapter here. |
|
adapter jack |
|
b |
USB port (on |
Connects to USB devices. |
|
select models) |
|
|
|
Note:
•The blue ports are USB 3.0 ports. The black ports are USB 2.0 ports.
•For details, see “Connecting a universal serial bus (USB) device” on page 19.
c Optical drive |
Reads/Burns optical discs. |
d jackCombo audio |
Connects to headsets or headphones. |
|
Attention:
•Listening to music at high volume over extended periods of time may damage your hearing.
6
Chapter 1. Getting to know your computer
 Front view -----------------------------------------------------------------------------------------------
2 1
a Memory card slot Insert memory cards (not supplied) here.
Note: For details, see “Using memory cards (not supplied)” on page 18.
bSystem status For details, see “System status indicators” on page 22. indicators
7
Chapter 1. Getting to know your computer
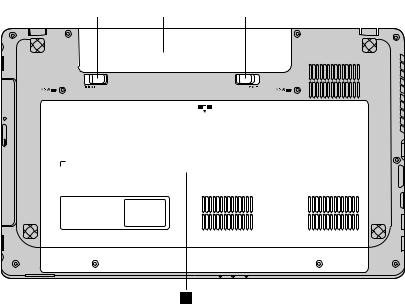
 Bottom view ------------------------------------------------------------------------------------------
1 |
|
2 |
|
3 |
4
8
Chapter 1. Getting to know your computer
a Battery latch - |
The manual battery latch is used to keep the battery pack |
manual |
secured in place. |
bBattery pack
cBattery latch - The spring-loaded battery latch keeps the battery pack
spring loaded |
secured in place. |
dOptical drive/ Hard disk drive (HDD)/Memory/ CPU (Central processing unit)/ Mini PCI Express Card slot compartment
9
Chapter 2. Learning the basics
 Configuring the operating system for the first time-----------
You may need to configure the operating system when it is first used. The configuration process may include the procedures below:
•Accepting the end user license agreement
•Configuring the Internet connection
•Creating a user account
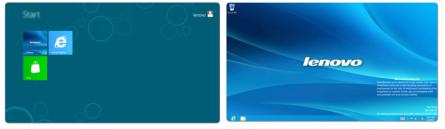
 Operating system interfaces -------------------------------------------------
Windows 8 comes with two main user interfaces: the Start screen and the Windows desktop.
To switch from the Start screen to the Windows desktop, do one of the following:
•Select the Windows desktop tile on the Start screen.
•Press the Windows key + D.
To switch from desktop to Start screen, do one of the following:
•Select Start  from the Charms.
•Move the pointer to the lower-left corner and then select the Start screen thumbnail when it is displayed.
Start screen |
Desktop |
|
|
|
|
10
Chapter 2. Learning the basics
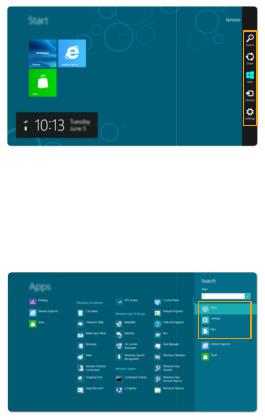
 The Charms -----------------------------------------------------------------------------
The five Charms provide new and faster ways to perform many basic tasks, and are always available regardless of which app you are currently in.
To display the Charms, do one of the following:
•Move the pointer to the upper-right or lower-right corner until the Charms bar is displayed.
•Press Windows key + C.
 Search charm
The Search charm is a powerful new way to find whatever you are looking for, including apps, settings and files.
11
Chapter 2. Learning the basics
 Share charm
The Share charm lets you send links, photos, and more to your friends and social networks without leaving the app you are in.
 Start charm
The Start charm is a fast way to go to the Start screen.
 Devices charm
The Devices charm allows you to connect or send files to any external devices, such as digital cameras, TVs, or printers.
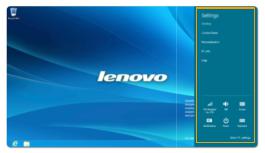
 Settings charm
The Settings charm lets you perform basic tasks, such as setting the volume or shutting down the computer. Also, you can get to the Control Panel through the Settings charm when using the desktop screen.
12
Loading...