


 Loading...
Lenovo 2594, 2577, 2579, 2593, 2595 User Manual
...ThinkServer
User Guide
Machine Types: 2577, 2579, 2592, 2593, 2594, and 2595
Note:
Before using the information and the product it supports, be sure to read and understand the following:
•The Read Me First that comes with your product
•“Safety information” on page iii
•Appendix A “Notices” on page 167
Fourth Edition (March 2013)
© Copyright Lenovo 2012, 2013.
LIMITED AND RESTRICTED RIGHTS NOTICE: If data or software is delivered pursuant a General Services Administration “GSA” contract, use, reproduction, or disclosure is subject to restrictions set forth in Contract No. GS-35F-05925.

Contents
Safety information . . . . . . . . . . |
|
iii |
Chapter 1. General information . . . . |
. |
1 |
Introduction . . . . . . . . . . . . . . . . |
. |
1 |
Server documentation. . . . . . . . . . . . |
. |
2 |
Chapter 2. Server setup road map . . |
. |
5 |
Chapter 3. Product overview . . . . . |
. |
7 |
Server package . . . . . . . . . . . . . . |
. |
7 |
Features . . . . . . . . . . . . . . . . . |
. |
8 |
Specifications . . . . . . . . . . . . . . . |
|
12 |
Software . . . . . . . . . . . . . . . . . |
|
12 |
ThinkServer EasyStartup . . . . . . . . . |
|
12 |
ThinkServer EasyUpdate Firmware Updater . |
|
13 |
Lenovo ThinkServer EasyManage . . . . . |
|
13 |
BIOS and TMM update utilities . . . . . . |
|
13 |
RAID configuration utilities . . . . . . . . |
|
13 |
Remote management software . . . . . . |
|
13 |
Lenovo Rack Planner . . . . . . . . . . |
|
13 |
ThinkServer Smart Grid Technology . . . . |
|
14 |
Diagnostic programs . . . . . . . . . . |
|
14 |
Locations. . . . . . . . . . . . . . . . . |
|
14 |
Machine type, model, and serial number |
|
|
label . . . . . . . . . . . . . . . . . |
|
14 |
Front view of the server . . . . . . . . . |
|
16 |
Front panel . . . . . . . . . . . . . . |
|
19 |
Diagnostic module . . . . . . . . . . . |
|
21 |
Rear view of the server . . . . . . . . . |
|
25 |
Server components . . . . . . . . . . . |
|
29 |
Hot-swap hard disk drive status LEDs . . . |
|
32 |
RAID card. . . . . . . . . . . . . . . |
|
33 |
Expander card . . . . . . . . . . . . . |
|
34 |
Hot-swap hard disk drive backplane . . . . |
|
35 |
Mini-SAS to mini-SAS signal cable |
|
|
connections . . . . . . . . . . . . . . |
|
38 |
System board components . . . . . . . . |
|
41 |
System board jumpers and switches . . . . |
|
44 |
System board LEDs . . . . . . . . . . . |
|
49 |
Chapter 4. Turning on and turning off |
|
|
the server . . . . . . . . . . . . . . . |
|
51 |
Turning on the server . . . . . . . . . . . . |
|
51 |
Turning off the server . . . . . . . . . . . . |
|
51 |
Chapter 5. Configuring the server . . |
|
53 |
Using the Setup Utility program . . . . . . . . |
|
53 |
Starting the Setup Utility program . . . . . |
|
53 |
Viewing information in the Setup Utility |
|
program . . . . . . . . . . . . . . . |
53 |
Setup Utility program interface . . . . . . |
54 |
Setting the system date and time . . . . . |
56 |
Using passwords . . . . . . . . . . . . |
57 |
Selecting a startup device . . . . . . . . |
58 |
Configuring the TPM function . . . . . . . |
58 |
Setting the mode of the Ethernet connector |
|
0 . . . . . . . . . . . . . . . . . . |
59 |
Exiting the Setup Utility program . . . . . . |
59 |
Updating or recovering the BIOS. . . . . . |
59 |
Using the ThinkServer EasyStartup program . . . |
61 |
Features of the ThinkServer EasyStartup |
|
program . . . . . . . . . . . . . . . |
61 |
Starting the ThinkServer EasyStartup |
|
program . . . . . . . . . . . . . . . |
62 |
Using the ThinkServer EasyStartup program |
|
on a Windows operating system . . . . . . |
63 |
Configuring RAID. . . . . . . . . . . . . . |
64 |
About RAID . . . . . . . . . . . . . . |
64 |
Configuring RAID using the ThinkServer |
|
EasyStartup program . . . . . . . . . . |
65 |
Configuring the advanced SATA or SAS |
|
hardware RAID . . . . . . . . . . . . . |
66 |
Configuring the Ethernet controllers . . . . . . |
66 |
Updating the firmware. . . . . . . . . . . . |
67 |
Using the Firmware Updater program . . . . |
67 |
Using the Lenovo ThinkServer EasyManage |
|
program . . . . . . . . . . . . . . . . . |
67 |
Chapter 6. Installing, removing, or |
|
replacing hardware . . . . . . . . . . |
69 |
Guidelines . . . . . . . . . . . . . . . . |
69 |
Precautions . . . . . . . . . . . . . . |
69 |
Handling static-sensitive devices . . . . . |
70 |
System reliability guidelines . . . . . . . . |
70 |
Working inside the server with the power on . |
71 |
Removing the server cover . . . . . . . . . . |
71 |
Removing and reinstalling the front bezel . . . . |
73 |
Installing, removing, or replacing hardware . . . |
74 |
Removing and reinstalling the rack handles . |
74 |
Removing and reinstalling the cooling |
|
shroud . . . . . . . . . . . . . . . . |
76 |
Removing and reinstalling the left cage . . . |
78 |
Installing or removing a memory module. . . |
80 |
Installing or removing an Ethernet card . . . |
87 |
Installing or removing the ThinkServer RAID |
|
500 Upgrade Key for Advanced RAID . . . . |
92 |
© Copyright Lenovo 2012, 2013 |
i |
Installing or removing the ThinkServer RAID |
|
700 Battery . . . . . . . . . . . . . . |
94 |
Installing or removing the expander card. . . |
97 |
Installing or removing the ThinkServer |
|
Management Module Premium . . . . . . |
101 |
Installing or removing the ThinkServer Trusted |
|
Platform Module . . . . . . . . . . . . |
105 |
Installing or replacing a hot-swap redundant |
|
power supply . . . . . . . . . . . . . |
108 |
Installing or replacing a heat sink. . . . . . |
112 |
Installing or replacing the microprocessor . . |
114 |
Installing or replacing the optical drive . . . |
122 |
Installing or replacing a hot-swap hard disk |
|
drive . . . . . . . . . . . . . . . . . |
127 |
Replacing the hot-swap hard disk drive |
|
backplane. . . . . . . . . . . . . . . |
131 |
Replacing the riser card assembly 1 . . . . |
136 |
Replacing the riser card assembly 2 . . . . |
138 |
Replacing the RAID card . . . . . . . . . |
140 |
Replacing the front panel board . . . . . . |
142 |
Replacing the diagnostic module . . . . . |
146 |
Replacing a system fan . . . . . . . . . |
149 |
Replacing the system board battery . . . . |
151 |
Completing the parts replacement . . . . . . . |
153 |
Reinstalling the server cover and reconnecting |
|
cables . . . . . . . . . . . . . . . . |
153 |
Updating the server configuration . . . . . |
156 |
Chapter 7. Troubleshooting and diagnostics . . . . . . . . . . . . . 157
Troubleshooting procedure . . . . . . . . . . 157 Viewing the status and diagnostic LEDs. . . . . 157 Using a diagnostic program . . . . . . . . . 158 Viewing the system event log . . . . . . . . . 158 Basic troubleshooting tables . . . . . . . . . 158
ThinkServer EasyStartup program
problems . . . . . . . . . . . . . . . 158
Optical drive problems. . . . . . . . . . |
159 |
Hard disk drive problems . . . . . . . . . |
160 |
Memory module problems . . . . . . . . |
161 |
Keyboard, mouse, and USB device |
|
problems . . . . . . . . . . . . . . . |
162 |
Chapter 8. Getting information, help, |
|
and service . . . . . . . . . . . . . |
163 |
Information resources . . . . . . . . . . . . |
163 |
Using the documentation. . . . . . . . . |
163 |
ThinkServer Web site . . . . . . . . . . |
163 |
Lenovo Support Web site. . . . . . . . . |
163 |
Help and service . . . . . . . . . . . . . . |
164 |
Before you call . . . . . . . . . . . . . |
164 |
Calling for service. . . . . . . . . . . . |
164 |
Using other services . . . . . . . . . . |
165 |
Purchasing additional services . . . . . . |
165 |
Appendix A. Notices. . . . . . . . . |
167 |
Trademarks . . . . . . . . . . . . . . . . |
168 |
Important notes . . . . . . . . . . . . . . |
168 |
Polyvinyl Chloride (PVC) cable and cord notice . . 168
Recycling information . . . . . . . . . . |
. . |
168 |
Battery return program. . . . . . . . |
. . |
169 |
Requirement for batteries containing |
|
|
perchlorate . . . . . . . . . . . . |
. . |
169 |
Particulate contamination . . . . . . . . |
. . |
170 |
Important WEEE information . . . . . . . |
. . |
170 |
German Ordinance for Work gloss statement. |
. . |
171 |
Export classification notice . . . . . . . . |
. . |
171 |
Electronic emission notices. . . . . . . . |
. . |
171 |
Federal Communications Commission (FCC) |
|
|
Statement. . . . . . . . . . . . . |
. . |
171 |
ENERGY STAR model information . . . . . |
. . |
173 |
Index. . . . . . . . . . . . . . . . |
. |
175 |
ii ThinkServer User Guide

Safety information
Note: Before using the product, be sure to read and understand the multilingual safety instructions on the documentation DVD that comes with the product.
Antes de usar o produto, leia e entenda as instruções de segurança multilíngues no DVD de documentação que o acompanha.
Преди да използвате този продукт, задължително прочетете и вникнете в многоезичните инструкции за безопасност в DVD диска с документация, който се предоставя с продукта.
Prije upotrebe ovog proizvoda obavezno pročitajte višejezične sigurnosne upute koje se nalaze na DVD-u s dokumentacijom koji dobivate uz proizvod.
Před použitím produktu je třeba si přečíst a porozumět bezpečnostním pokynům uvedeným na disku DVD s dokumentací, který je dodáván s produktem.
Før du bruger produktet, skal du sørge for at læse og forstå de sikkerhedsforskrifter, der findes på flere sprog, på den dokumentations-dvd, der følger med produktet.
Lue tuotteen mukana toimitetulla DVD-tietolevyllä olevat monikieliset turvaohjeet ennen tämän tuotteen käyttöä.
Avant d'utiliser le produit, veillez à bien lire et comprendre les instructions de sécurité multilingues figurant sur le DVD de documentation fourni avec le produit.
Πριν χρησιμοποιήσετε το προϊόν, βεβαιωθείτε ότι έχετε διαβάσει και κατανοήσει τις οδηγίες ασφάλειας, οι οποίες είναι διαθέσιμες σε διάφορες γλώσσες στο DVD τεκμηρίωσης που συνοδεύει το προϊόν.
Vor Verwendung des Produkts sollten Sie unbedingt die mehrsprachigen Sicherheitsanweisungen auf der Dokumentations-DVD lesen, die im Lieferumfang des Produkts enthalten ist.
A termék használata előtt mindenképpen olvassa el és értelmezze a termékhez kapott dokumentációs DVD lemezen található, több nyelven elolvasható biztonsági előírásokat.
Prima di utilizzare il prodotto, accertarsi di leggere e comprendere le informazioni sulla sicurezza multilingue disponibili sul DVD di documentazione fornito con il prodotto.
Documentation DVD
DVD .
Voordat u het product gebruikt, moet u ervoor zorgen dat u de meertalige veiligheidsinstructies op de documentatie-dvd van het product hebt gelezen en begrijpt.
© Copyright Lenovo 2012, 2013 |
iii |
Przed skorzystaniem z produktu należy zapoznać się z wielojęzycznymi instrukcjami bezpieczeństwa znajdującymi się na płycie DVD z dokumentacją dostarczoną wraz z produktem.
Antes de utilizar o produto, leia atentamente as instruções de segurança multilingues que constam no DVD de documentação fornecido com o produto.
Înainte de a utiliza produsul, asiguraţi-vă că aţi citit şi înţeles instrucţiunile de siguranţă în mai multe limbi de pe DVD-ul cu documentaţie care însoţeşte produsul.
Før du bruker produktet, må du lese og forstå den flerspråklige sikkerhetsinformasjonen på DVDen med dokumentasjon som følger med produktet.
Прежде чем использовать этот продукт, внимательно ознакомьтесь с инструкциями по технике безопасности на разных языках, которые можно найти на DVD-диске с документацией в комплекте с продуктом.
DVD
Pre nego to upotrebite proizvod obavezno paljivo proitajte i prouite viejeziko uputstvo za bezbednost na dokumentacionom DVD-u koji ste dobili uz proizvod.
Pred pouvanm produktu si pretajte viacjazyn bezpenostn pokyny na disku DVD s dokumentciou dodanom s produktom.
Preden začnete uporabljati izdelek, je pomembno, da preberete in razumete večjezična varnostna navodila na DVD-ju z dokumentacijo, ki ste ga prejeli skupaj z izdelkom.
Antes de utilizar el producto, asegúrese de leer y comprender las instrucciones de seguridad multilingües del DVD de documentación que se proporciona con el producto.
Var noga med att läsa säkerhetsinstruktionerna på dokumentations-DVD-skivan som följer med produkten innan du börjar använda produkten.
DVD
Bu ürünü kullanmadan önce, ürünle birlikte gönderilen belge DVD'si üzerindeki çok dil içeren güvenlik yönergelerini okuyup anladýðýnýzdan emin olun.
Перед використанням цього продукту уважно ознайомтеся з інструкціями з техніки безпеки на різних мовах, що можна знайти на DVD-диску з документацією в комплекті з продуктом.
Important: The caution and danger statements in this document are labeled with numbers. Each number identifies an English-language caution or danger statement that refers to translated versions of the caution or danger statement in the Safety Information document. For example, if a danger statement is labeled “Statement 1,” translations for this danger statement are in the Safety Information document under “Statement 1.”
Ensure that you read and understand all caution and danger statements in this document before you perform the procedures. Read and understand any additional safety information that is included with the server or optional device before you install, remove, or replace the device.
iv ThinkServer User Guide

Statement 1
DANGER
Electrical current from power, telephone, and communication cables is hazardous.
To avoid a shock hazard:
•Do not connect or disconnect any cables or perform installation, maintenance, or reconfiguration of this product during an electrical storm.
•Connect all power cords to a properly wired and grounded electrical outlet.
•Ensure that all power cord connectors are securely and completely plugged into receptacles.
•Connect to properly wired outlets any equipment that will be attached to this product.
•When possible, use one hand only to connect or disconnect signal cables.
•Never turn on any equipment when there is evidence of fire, water, or structural damage.
•Disconnect the attached power cords, telecommunications systems, networks, and modems before you open the device covers, unless instructed otherwise in the installation and configuration procedures.
•Connect and disconnect cables as described in the following table when installing, moving, or opening covers on this product or attached devices.
To connect: |
To disconnect: |
||
1. |
Turn everything OFF. |
1. |
Turn everything OFF. |
2. |
First, attach all cables to devices. |
2. |
First, remove power cords from outlets. |
3. |
Attach signal cables to connectors. |
3. |
Remove signal cables from connectors. |
4. |
Attach power cords to outlets. |
4. |
Remove all cables from devices. |
5. |
Turn devices ON. |
|
|
|
|
|
|
Statement 2
 DANGER
Danger of explosion if battery is incorrectly replaced.
When replacing the lithium coin cell battery, use only the same or an equivalent type that is recommended by the manufacturer. The battery contains lithium and can explode if not properly used, handled, or disposed of.
Do not:
•Throw or immerse into water
•Heat to more than 100°C (212°F)
•Repair or disassemble
Dispose of the battery as required by local ordinances or regulations.
© Copyright Lenovo 2012, 2013 |
v |
Statement 3
CAUTION:
When laser products (such as CD-ROMs, DVD drives, fiber optic devices, or transmitters) are installed, note the following:
•Do not remove the covers. Removing the covers of the laser product could result in exposure to hazardous laser radiation. There are no serviceable parts inside the device.
•Use of controls or adjustments or performance of procedures other than those specified herein might result in hazardous radiation exposure.
 DANGER
Some laser products contain an embedded Class 3A or Class 3B laser diode. Note the following:
Laser radiation when open. Do not stare into the beam, do not view directly with optical instruments, and avoid direct exposure to the beam.
Statement 4
≥ 18 kg (39.7 lb) |
≥ 32 kg (70.5 lb) |
≥ 55 kg (121.2 lb) |
< 32 kg (70.5 lb) |
< 55 kg (121.2 lb) |
< 100 kg (220.5 lb) |
CAUTION:
Use safe practices when lifting.
Statement 5
CAUTION:
The power control button on the device and the power switch on the power supply do not turn off the electrical current supplied to the device. The device also might have more than one power cord. To remove all electrical current from the device, ensure that all power cords are disconnected from the power source.
vi ThinkServer User Guide
Statement 6
CAUTION:
If you install a strain-relief bracket option over the end of the power cord that is connected to the device, you must connect the other end of the power cord to a power source that is easily accessible in case it needs to be disconnected.
Statement 7
CAUTION:
If the device has doors, ensure that you remove or secure the doors before moving or lifting the device to protect against personal injury. The doors will not support the weight of the device.
Statement 8
CAUTION:
Never remove the cover on a power supply or any part that has the following label attached.
Hazardous voltage, current, and energy levels are present inside any component that has this label attached. There are no serviceable parts inside these components. If you suspect a problem with one of these parts, contact a service technician.
Statement 9
CAUTION:
Disconnect the hot-swap fan cables before removing the fan from the device to protect against personal injury.
Statement 10
CAUTION:
The following label indicates a sharp-edge hazard.
© Copyright Lenovo 2012, 2013 |
vii |
Statement 11
CAUTION:
The following label indicates a potential heat hazard.
Statement 12
DANGER
Overloading a branch circuit is a potential fire hazard and a shock hazard under certain conditions. To avoid these hazards, ensure that your system electrical requirements do not exceed branch current ratings at the installation site.
Statement 13
CAUTION:
Ensure that the rack is secured properly to avoid tipping when the server unit is extended on the rails.
Statement 14
CAUTION:
Some accessory or option board outputs exceed Class 2 or limited power source limits. You must install the appropriate interconnecting cabling in accordance with your local electrical code requirements.
Statement 15
CAUTION:
The power-control button on the device may put the device in standby mode instead of turning off the device. In addition, the device might have multiple connections to dc power. To remove all electrical current from the device, ensure that all connections to dc power are disconnected at the dc power input terminals.
viii ThinkServer User Guide
Statement 16
CAUTION:
To reduce the risk of electric shock or energy hazards:
•This equipment must be installed by trained service personnel in a restricted-access location, as defined by your local electrical code and the latest edition of IEC 60950.
•Connect the equipment to a reliably earthed safety extra low voltage (SELV) source. An SELV source is a secondary circuit that is designed so that normal and single fault conditions do not cause the voltages to exceed a safe level (60 V direct current).
•The branch circuit overcurrent protection must be rated in accordance with local electrical code requirements.
•Use 1.3 mm2 or 16 American Wire Gauge (AWG) copper conductor only, not exceeding 3 meters in length.
•Torque the wiring-terminal screws to 1.4 newton-meters or 12 inch-pounds.
•Provide a readily available, approved and rated disconnect device in the field wiring.
Statement 17
CAUTION:
This product contains a Class 1M laser. Do not view directly with optical instruments.
Statement 18
CAUTION:
Do not place any object on top of rack-mounted products.
Statement 19
CAUTION:
Hazardous moving parts. Keep fingers and other body parts away.
© Copyright Lenovo 2012, 2013 |
ix |

Statement 20
CAUTION:
A lithium ion battery is provided. To avoid possible explosion, do not burn the battery. Replace the battery only with the Lenovo-approved part. Recycle or discard the battery as instructed by local regulations.
x ThinkServer User Guide

Chapter 1. General information
This chapter provides some general information about your product.
This chapter contains the following items:
•“Introduction” on page 1
•“Server documentation” on page 2
Introduction
This user guide for your Lenovo® ThinkServer® product contains information about the server features, specifications, component locations, configuration instructions, hardware replacement procedures, and basic troubleshooting and diagnostics.
Your server comes with a documentation DVD that contains various server documents to help you use and maintain the server. Meanwhile, your server comes with a ThinkServer EasyStartup DVD that provides a convenient solution for configuring the server and installing an operating system.
The Lenovo Limited Warranty (LLW) contains the warranty terms that apply to the product you purchased from Lenovo. Read the LLW on the documentation DVD that comes with your server. A printable generic version of the latest LLW also is available in more than 30 languages at http://www.lenovo.com/warranty/llw_02. If you cannot obtain the LLW through the documentation DVD or Lenovo Web site, contact your local Lenovo office or reseller to obtain a printed version of the LLW, free of charge.
For warranty service, consult the worldwide Lenovo Support telephone list. Telephone numbers are subject to change without notice. The most up-to-date telephone list for Lenovo Support is always available on the Web site at http://www.lenovo.com/support/phone. If the telephone number for your country or region is not listed, contact your Lenovo reseller or Lenovo marketing representative.
To obtain the most up-to-date information about the server, go to:
http://www.lenovo.com/thinkserver
Lenovo maintains pages on the World Wide Web, where you can get the latest technical information and download documentation or device drivers and updates. To access the Lenovo Support Web site, go to: http://www.lenovo.com/support
© Copyright Lenovo 2012, 2013 |
1 |

Record information about your server in the following table. You will need the information if you ever need to have your server serviced.
For where to find the product information label on the chassis, see “Machine type, model, and serial number label” on page 14.
Product name |
______________________________________________ |
Machine type and model (MT-M) |
______________________________________________ |
Serial number (S/N) |
______________________________________________ |
Date of purchase |
______________________________________________ |
You can register your server with Lenovo by following the instructions at:
http://www.lenovo.com/register
When you register your server, information is entered into a database, which enables Lenovo to contact you in case of a recall or other severe problem. After you register your server with Lenovo, you will receive quicker service when you call Lenovo for help. In addition, some locations offer extended privileges and services to registered users.
Server documentation
This topic provides a general description of each document for your server and instructions on how to obtain all the documents.
Printed documents
The following documents are printed out and included in your server package.
•Read Me First
This is a multilingual document you should read first. This document guides you to read the complete warranty, support, and safety information on the documentation DVD that comes with your server before using the product. This document also provides information about how to find the most up-to-date information on the Lenovo Support Web site.
•Important Notices
This document includes safety and legal notices that you should read and understand before using the server.
•Rack Installation Instructions
This document provides instructions on how to install your server into a standard rack cabinet by using the rail kit shipped with the server.
Note: This document is available in five languages. A printed English version is included in your server package. A PDF version of French, German, Italian, and Spanish are provided on the documentation DVD that comes with the server.
2 ThinkServer User Guide
Documentation DVD
The documentation DVD, which comes with your server, contains various documents for your server in Portable Document Format (PDF) and HyperText Markup Language (HTML). The documentation DVD is not bootable. To view the documents on the DVD, you will need a computer with a Web browser and the Adobe Reader program, which is available for download at:
http://www.adobe.com
To start the documentation DVD, insert the DVD into the optical drive. The DVD is AutoPlay enabled and starts automatically in most Microsoft® Windows® environments. If the DVD fails to start or if you are using a Linux® operating system, open the launch.htm file located in the root directory of the DVD.
Note: Lenovo maintains pages on the World Wide Web, where you can get the latest technical information and download documentation or device drivers and updates. Some information in the documents on the documentation DVD might change without notice after the first release of the DVD. You can always obtain all the most up-to-date documentation for your server from the Lenovo Web site at: http://www.lenovo.com/ThinkServerUserGuides
The following documents are on the documentation DVD that comes with your server:
•Safety Information
This is a multilingual document that includes all the safety statements for your product in more than 30 languages. Be sure to read and understand all the safety statements before using the product.
•Warranty and Support Information
This document includes the Lenovo warranty statement, Customer Replaceable Units (CRUs) information, and information about how to contact the Lenovo Customer Support Center.
•Lenovo License Agreement
This document includes the terms and conditions of the Lenovo License Agreement.
•User Guide
This document provides detailed information to help you get familiar with your server and help you use, configure, and maintain your server.
•Rack Installation Instructions
This document provides instructions on how to install your server into a standard rack cabinet by using the rail kit shipped with the server.
•ThinkServer Management Module User Guide
This document provides information about server remote management. This document is in English only. You might find this document on the documentation DVD that comes with your server. If not, download it from the Lenovo Web site at:
http://www.lenovo.com/ThinkServerUserGuides
Note: To obtain advanced remote management functions, install a ThinkServer Management Module Premium (TMM Premium) on the TMM Premium connector on the system board. See “Installing or removing the ThinkServer Management Module Premium” on page 101.
•MegaRAID SAS Software User Guide
This document provides information about Redundant Array of Independent Disks (RAID) and how to use the utility programs to configure, monitor, and maintain your server RAID and related devices. This document is in English only.
Chapter 1. General information 3
Document only for trained service personnel
The following document is intended only for trained service personnel of Lenovo.
Hardware Maintenance Manual
This document provides information about troubleshooting and diagnostics, component locations, and replacement procedures for major Field Replaceable Units (FRUs). This document is updated frequently, and the most up-to-date version is always available in English on the Lenovo Web site at: http://www.lenovo.com/ThinkServerUserGuides
4 ThinkServer User Guide

Chapter 2. Server setup road map
This chapter provides a general road map to guide you through setting up your server.
The server setup procedure varies depending on the configuration of the server when it was delivered. In some cases, the server is fully configured and you just need to connect the server to the network and an ac power source, and then you can turn on the server. In other cases, the server needs to have hardware devices installed, requires hardware and firmware configuration, and requires an operating system to be installed.
The general procedure for setting up your server is:
1.Unpack the server package. See “Server package” on page 7.
2.Install any required hardware or server options. See the related topics in Chapter 6 “Installing, removing, or replacing hardware” on page 69.
3.Install the server into a standard rack cabinet by using the rail kit shipped with the server. See the Rack Installation Instructions that comes with the server.
4.Connect the Ethernet cable(s) and power cord(s) to the server. See “Rear view of the server” on page 25 to locate the connectors.
5.Turn on the server to verify operation. See “Turning on the server” on page 51.
6.Review the Unified Extensible Firmware Interface (UEFI) Basic Input Output System (BIOS) settings and customize as needed. See “Using the Setup Utility program” on page 53.
7.Configure RAID and install the operating system and device drivers. See “Using the ThinkServer EasyStartup program” on page 61 and “Configuring RAID” on page 64.
8.Install any additional drivers required for added features. Refer to the instructions that come with the hardware option.
9.Configure Ethernet settings in the operating system by referring to the operating system help. This step is not required if the operating system was installed using the ThinkServer EasyStartup program.
10.Check for firmware updates. See “Updating the firmware” on page 67.
11.Install management applications and any other applications. Refer to the documentation that comes with the applications that you want to install.
© Copyright Lenovo 2012, 2013 |
5 |
6 ThinkServer User Guide
Chapter 3. Product overview
This chapter provides information about the server package, features, specifications, software programs, and component locations.
This chapter contains the following items:
•“Server package” on page 7
•“Features” on page 8
•“Specifications” on page 12
•“Software” on page 12
•“Locations” on page 14
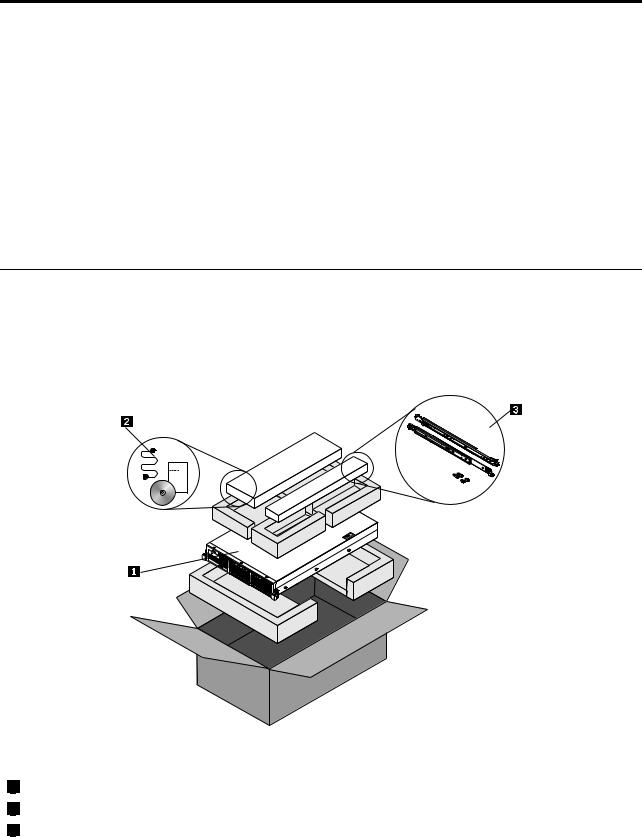
Server package
The server package includes the server, power cord(s), a rail kit, printed documentation, a documentation DVD, and software media.
Note: Depending on the model, your server might look slightly different from the following illustration.
Figure 1. Server package
1Server
2Material box, including power cord(s), printed documentation, a documentation DVD, and software media
3Rail kit
© Copyright Lenovo 2012, 2013 |
7 |

Features
This topic provides general information about the server features for a variety of models. Depending on your specific model, some features might vary or unavailable. For information about your specific model, use the Setup Utility program. See “Viewing information in the Setup Utility program” on page 53.
Microprocessor
One or two Intel® Xeon® quad-core, hexa-core, or octa-core microprocessors (internal cache size varies by model)
For a list of the ThinkServer microprocessor options, go to:
http://www.lenovo.com/thinkserver
Memory
Your server has 20 memory slots. For more information, see “Memory module installation rules” on page 80.
Power supply
One or two 800-watt hot-swap redundant power supplies (Universal input and compliant with 80 PLUS Gold)
System fans
Your server supports six hot-swap system fans with redundancy, which means that five system fans can provide adequate cooling while the extra one serves as a redundant system fan. This design helps you to avoid significant cooling problems when a system fan fails and you can replace a hot-swap system fan without turning off the server.
Internal drives
Internal drives are devices that your server uses to read and store data. The internal drives supported by your server vary by model.
•Hard disk drive
–Up to eight 3.5-inch hot-swap Serial Advanced Technology Attachment (SATA) or Serial Attached SCSI (SAS) hard disk drives (SCSI is the acronym for Small Computer System Interface)
–Up to eight 2.5-inch hot-swap SAS hard disk drives or SATA solid-state drives
–Up to 16 2.5-inch hot-swap SAS hard disk drives or SATA solid-state drives
Note: The term “2.5-inch hot-swap hard disk drives” or “2.5-inch hard disk drives” hereinafter refers to all the supported types of 2.5-inch hard disk drives, including the solid-state drives.
•Optical drive
– One slim SATA optical drive in some models
Expansion slots
•Two riser card assembly slots on the system board
•Two PCI Express card slots on the riser card assembly 1
•Three PCI Express card slots on the riser card assembly 2
For detailed information, see “Rear view of the server” on page 25.
8 ThinkServer User Guide
Input/Output (I/O) features
•One serial connector on the rear panel
•Six USB 2.0 connectors (two on the front panel and four on the rear panel)
•Three RJ-45 Ethernet connectors on the rear panel (Ethernet connector 0 is for system management)
•Two Video Graphics Array (VGA) connectors (one on the front panel and the other on the rear panel)
For the location information about the connectors, refer to the related topics in “Locations” on page 14.
Video subsystem
An integrated graphics controller in the ThinkServer Management Module (TMM), which also is known as the Baseboard Management Controller (BMC) chip, on the system board to support VGA connectors for connecting video devices
Ethernet connectivity
Three RJ-45 Ethernet connectors on the rear panel with 10 megabits per second (Mbps), 100 Mbps, or 1000 Mbps network connectivity.
•Onboard Intel 82574 Gigabit Ethernet controller for dedicated or shared local area network (LAN) management interface (Ethernet connector 0 is for system management)
•Onboard Intel Gigabit Dual Port Ethernet controller for Ethernet connector 1 and Ethernet connector 2
For more information, see “Rear view of the server” on page 25.
Reliability, availability, and serviceability
Reliability, availability, and serviceability (hereinafter referred to as RAS) are three important server design features. The RAS features help you to ensure the integrity of the data stored on the server, the availability of the server when you need it, and the ease with which you can diagnose and correct problems.
Your server has the following RAS features:
•Security features
–Administrator password and user password to help protect unauthorized access to the server (see “Using passwords” on page 57)
–ThinkServer Trusted Platform Module (TPM), which is a security chip, to help enhance server security
Note: The TPM is only available in some models.
–Remote monitoring or control by an administrator to provide protection or help
–Hot-swap redundant power supplies to help avoid significant interruption to the operation of the system when a power supply fails
–Six hot-swap system fans with redundancy, which means that five system fans can provide adequate cooling while the extra one serves as a redundant system fan, to help you to avoid significant cooling problems when a system fan fails
•Basic system management features
–Ability to store the power-on self-test (POST) hardware test results
–BIOS Setup Utility program
The BIOS Setup Utility program helps you view the server information and configure the server in the pre-operating system environment. See “Using the Setup Utility program” on page 53.
Chapter 3. Product overview 9
–TMM (also known as BMC) and Intelligent Platform Management Interface (IPMI) 2.0
The system board platform management subsystem is based on the integrated TMM features. The TMM is a management chip that is integrated on the system board of your server. With the TMM, no matter what condition the server operating system is in and no matter if the server is on or off, as long as the server is connected to network and an ac power source, the interaction with the TMM-controlled servers can be achieved through system network. The user can obtain the server hardware health information and system event log (SEL), and is able to conduct the operations including turning on or off the server, restarting the server, locking the power switch on the front panel, and so on. This part of server management is independent of the operating system and is called out-of-band management.
The system board platform management subsystem consists of the integrated TMM, communication buses, sensors, the BIOS, and server management firmware. It is responsible for error reporting, system power control, thermal monitoring, system fan control, and other management features. The TMM provides system management and monitoring features based on the IPMI 2.0 specification. IPMI helps lower the overall costs of server management. You can find more information about IPMI 2.0 from the Web site of Intel. The TMM also supports some non-IPMI features, such as the Dynamic Host Configuration Protocol (DHCP) and the Platform Environment Control Interface (PECI), to provide more system management functions.
For more information, refer to the ThinkServer Management Module User Guide, which is available for download at:
http://www.lenovo.com/ThinkServerUserGuides
–Hot-swap feature
Your server supports hot-swap hard disk drives, hot-swap system fans, and hot-swap redundant power supplies. With the hot-swap feature, you can install, remove, or replace a hot-swap device without turning off the server.
–Preboot Execution Environment (PXE)
The Intel PXE technology enables you to boot your computers, load an operating system, or deploy executable images from a remote server by using a network interface. The operation can be done independently of local data storage devices (such as hard disk drives) or operating systems.
–Redundant Array of Independent Disks (RAID)
Your server supports advanced SATA/SAS hardware RAID if your server has a required RAID card installed. For detailed information, see “Configuring RAID” on page 64.
–Status light-emitting diodes (LEDs) and diagnostic LEDs
For more information about the LEDs for your server, refer to the related topics in “Locations” on page 14.
–Software programs
For more information about the software programs, see “Software” on page 12.
–Wake on LAN
When the Wake on LAN feature is enabled on a computer that is connected to a LAN, a network administrator can remotely turn on or wake up the computer from a management console using remote network management software. Besides, many other functions, such as data transfer and software updates, can be performed remotely without remote attendance and can be done after normal working hours and on weekends to save time and increase productivity.
•Advanced system management features
The TMM firmware supports the following advanced system management features.
Note: The advanced system management features are only available when the TMM detects the presence of a ThinkServer Management Module Premium (TMM Premium), which also is known as integrated keyboard, video, and mouse (iKVM) key. The TMM Premium is a remote management module. You
can purchase a TMM Premium from Lenovo and install it on the TMM Premium connector (also known
10 ThinkServer User Guide
as iKVM connector) on the system board of your server to enable the iKVM function and activate the advanced system management features.
–iKVM redirection
The TMM firmware supports iKVM redirection over LAN. This feature is available remotely from the embedded Web server. The remote management module can digitize and compress the collected keyboard, video, and mouse signals from the host system and then send them to the remote console. Meanwhile, it is easily accessible by remote KVM and controllable through LAN or Internet. For more information, refer to the ThinkServer Management Module User Guide, which is available for download at:
http://www.lenovo.com/ThinkServerUserGuides
–Media redirection
The embedded Web server provides a Java JNLP to enable the remote media redirection. This is used in conjunction with the remote KVM feature or as a standalone applet.
–Web Services for Management (WS-MAN)
The TMM firmware supports the WS-MAN specification.
–Local Directory Authentication Protocol (LDAP)
The TMM firmware supports the LDAP for user authentication.
Note: The IPMI users, passwords, and sessions are not supported over LDAP.
–Embedded Web server
The TMM provides an embedded Web server for out-of-band management. The user authentication is handled by IPMI user names and passwords. For more information, refer to the ThinkServer Management Module User Guide, which is available for download at: http://www.lenovo.com/ThinkServerUserGuides
Chapter 3. Product overview 11

Specifications
This topic lists the physical specifications for your server.
Dimensions
Width without rack handles: 442 mm (17.4 inches)
Width with rack handles: 482.4 mm (19 inches)
Depth without rack handles: 720.6 mm (28.37 inches)
Depth with rack handles: 734 mm (28.9 inches)
Height: 87.6 mm (3.45 inches)
Weight
The product weight varies depending on different system configurations.
Range of product weight without package: 16 kg (35.27 lb) to 26.5 kg (58.42 lb)
Range of product weight with package: 19 kg (41.89 lb) to 32.5 kg (71.65 lb)
Environment
• Air temperature:
Operating: 10°C to 35°C (50°F to 95°F)
Storage: -40°C to 70°C (-40°F to 158°F) in original shipping package
•Altitude: 0 to 3048 m (0 to 10 000 ft) in an unpressurized environment
•Humidity:
Operating: 8% to 80% (non-condensing)
Storage without package: 8% to 80% (non-condensing)
Storage with package: 8% to 90% (non-condensing)
Electrical input
•Universal input:
– Low range:
Minimum: 100 V ac
Maximum: 127 V ac
Input frequency range: 50 to 60 Hz
– High range:
Minimum: 200 V ac
Maximum: 240 V ac
Input frequency range: 50 to 60 Hz
Software
This topic provides information about the software programs that you can use to help you set up, use, and maintain the server.
ThinkServer EasyStartup
The ThinkServer EasyStartup program simplifies the process of configuring RAID and installing supported Microsoft Windows and Linux operating systems and device drivers on your server. This program is provided with your server on a self-starting (bootable) ThinkServer EasyStartup DVD. The user guide for the program
12 ThinkServer User Guide
also is on the DVD and can be accessed directly from the program interface. For detailed information, see “Using the ThinkServer EasyStartup program” on page 61.
ThinkServer EasyUpdate Firmware Updater
The ThinkServer EasyUpdate Firmware Updater program (hereinafter referred to as the Firmware Updater program) enables you to maintain your server firmware up-to-date and helps you avoid unnecessary server outages. The Firmware Updater program is provided on the Lenovo Support Web site. For more information about downloading and using the Firmware Updater program, see “Updating the firmware” on page 67.
Lenovo ThinkServer EasyManage
The Lenovo ThinkServer EasyManage program enables enterprise users to remotely control and monitor multiple Lenovo servers within a LAN.
For detailed information, see “Using the Lenovo ThinkServer EasyManage program” on page 67.
BIOS and TMM update utilities
The BIOS and TMM (also known as BMC) firmware keeps updating after the shipment of the server. Lenovo maintains pages on the Support Web site and provides the BIOS and TMM update utilities with instructions for download to help you update the BIOS and TMM firmware if needed. For more information, see “Updating or recovering the BIOS” on page 59 and “Updating the firmware” on page 67.
RAID configuration utilities
Your server has a RAID card installed, which works with some configuration utilities to support hardware RAID. For detailed information, see “Configuring RAID” on page 64.
Remote management software
The integrated TMM provides basic remote management features for the server. The add-on TMM Premium option provides advanced remote management features for the server.
For detailed information about the remote management software and server remote management, refer to the ThinkServer Management Module User Guide, which is available for download at: http://www.lenovo.com/ThinkServerUserGuides
Lenovo Rack Planner
Racks and servers are usually deployed on a large scale. When deploying the equipment, equipment managers need a lot of reference parameters to calculate power consumption and electric current values under different configurations. The Lenovo Rack Planner program provides data maintenance, power consumption and electric current calculations, and reports to help equipment managers significantly increase efficiency in deploying the equipment and conveniently manage the equipment.
To download the Lenovo Rack Planner program, go to http://www.lenovo.com/drivers and follow the instructions on the Web page.
For detailed information about using the Lenovo Rack Planner program, refer to the help system for the program.
Chapter 3. Product overview 13

ThinkServer Smart Grid Technology
The ThinkServer Smart Grid Technology program helps administrators to monitor and manage server performance, especially the power consumption for groups of servers equipped with the Intel Intelligent Power Node Manager technology.
Lenovo provides a trial version of the ThinkServer Smart Grid Technology program with a free 90-day subscription. After 90 days, you must renew the license to continue using the program. You can purchase the license from Lenovo to activate the ThinkServer Smart Grid Technology program and expand the management capability of the program when the free trial ends.
To download the ThinkServer Smart Grid Technology program, go to http://www.lenovo.com/drivers and follow the instructions on the Web page.
For detailed information about using the ThinkServer Smart Grid Technology program, refer to the help system for the program.
Diagnostic programs
The following diagnostic programs are available for you to diagnose server problems:
•ThinkServer Diagnostic Tool
•ThinkServer System Profile Collection Tool
For more information, see “Using a diagnostic program” on page 158.
Locations
This topic provides information to help you locate your server components.
Machine type, model, and serial number label
This topic helps you to locate the label that contains the machine type, model, and serial number information for your server.
When you contact Lenovo for help, the machine type, model, and serial number information helps support technicians to identify your server and provide faster service.
14 ThinkServer User Guide
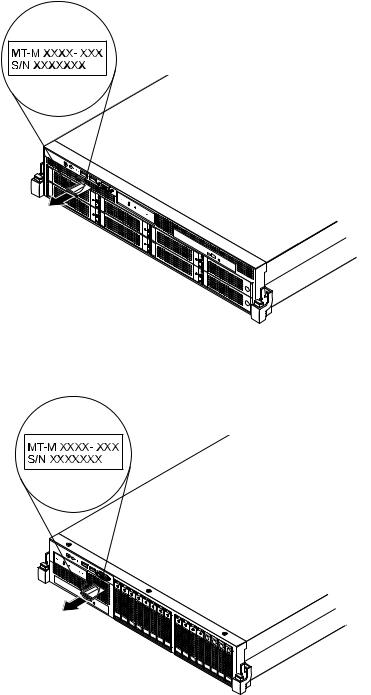
The machine type, model, and serial number label is attached on the pull-out information card, which is a small plastic tab and can be slid out of the front of the chassis. The following illustrations are samples of the machine type, model, and serial number labels on server models with different hard disk drive configurations.
Note: Depending on the model, your server might look slightly different from the illustrations in this topic.
Figure 2. Label on server models with 3.5-inch hard disk drives
Figure 3. Label on server models with 2.5-inch hard disk drives
Chapter 3. Product overview 15
Front view of the server
This topic provides information to help you locate the parts on the front of the server.
The front view of the server varies by model. The illustrations in this topic show the server front views based on the supported hard disk drives:
•Front view of server models with 3.5-inch hard disk drives
•Front view of server models with 2.5-inch hard disk drives
Note: Depending on the model, your server might look slightly different from the illustrations in this topic.
Front view of server models with 3.5-inch hard disk drives
The following illustration shows the front view of server models with 3.5-inch hard disk drives.
Figure 4. Front view of server models with 3.5-inch hard disk drives
|
|
3.5-inch hard disk drive area |
|
|
Diagnostic panel (varies by model) |
|
1 |
|
5 |
||
|
|
|
|
|
|
|
|
Rack handle (left) |
|
|
Slim optical drive (available in some models) |
|
2 |
|
6 |
||
|
|
|
|
|
|
|
|
Pull-out information card |
|
|
Rack handle (right) |
|
3 |
|
7 |
||
|
|
|
|
|
|
|
|
Front panel |
|
|
|
|
4 |
|
|
|
|
|
|
|
|
|
|
16 ThinkServer User Guide
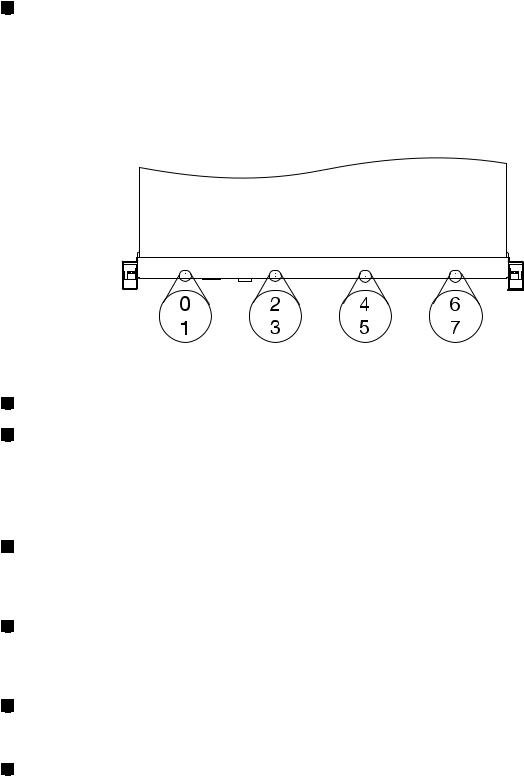
1 |
3.5-inch hard disk drive area |
The EMI integrity and cooling of the server are protected by having all drive bays covered or occupied. The number of the installed hard disk drives in your server varies by model. The vacant hard disk drive bays are occupied by dummy hard disk drive trays.
For server models with up to eight 3.5-inch hard disk drives, the hard disk drive bay numbers are marked on the top edge of the front bezel.
Figure 5. 3.5-inch hard disk drive bay numbers (top view of the server)
2 |
Rack handle (left) |
7 |
Rack handle (right) |
If your server is installed in a rack cabinet, you can use the rack handles to help you slide the server out of the rack cabinet; or use the rack handles and screws to secure the server in the rack cabinet so that the server cannot slide out, especially in vibration-prone areas. For more information, refer to the Rack Installation Instructions that comes with your server.
3 |
Pull-out information card |
The machine type, model, and serial number label of the server is attached on the pull-out information card. See “Machine type, model, and serial number label” on page 14.
4 |
Front panel |
For detailed information about the controls, connectors, and status LEDs on the front panel, see “Front panel” on page 19.
5 |
Diagnostic panel |
The diagnostic panel varies by model. For detailed information, see “Diagnostic module” on page 21.
6 |
Slim optical drive |
Some server models come with a slim SATA optical drive (DVD-RW or DVD-ROM).
Chapter 3. Product overview 17

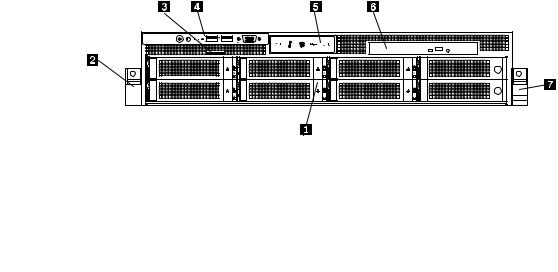
Front view of server models with 2.5-inch hard disk drives
The following illustration shows the front view of server models with 2.5-inch hard disk drives.
Figure 6. Front view of server models with 2.5-inch hard disk drives
|
|
2.5-inch hard disk drive area (right cage) |
|
|
Rack handle (left) |
|
1 |
|
5 |
||
|
|
|
|
|
|
|
|
2.5-inch hard disk drive area (middle cage) |
|
|
Diagnostic panel (varies by model) |
|
2 |
|
6 |
||
|
|
|
|
|
|
|
|
Pull-out information card |
|
|
Front panel |
|
3 |
|
7 |
||
|
|
|
|
|
|
|
|
Slim optical drive (available in some models) |
|
|
Rack handle (right) |
|
4 |
|
8 |
||
|
|
|
|
|
|
1 |
2.5-inch hard disk drive area (right cage) |
2 |
2.5-inch hard disk drive area (middle cage) |
The front of server models with 2.5-inch hard disk drives consists of three cages:
•The left cage consists of the front panel board, the front VGA DB-15 connector, the diagnostic module, the pull-out information card, and the slim optical drive bay.
•The middle cage consists of the number 0 to number 7 hard disk drive bays. There is either a 2.5-inch hot-swap hard disk drive or a 2.5-inch dummy hard disk drive tray installed in each bay.
•The right cage consists of the number 8 to number 15 hard disk drive bays. There is either a 2.5-inch hot-swap hard disk drive or a 2.5-inch dummy hard disk drive tray installed in each bay. If the server supports up to eight hard disk drives, there will be an EMI-protective panel that covers the right cage as a whole.
Figure 7. Right cage with an EMI-protective panel
Note: The hard disk drive bay number (0-15) is marked above each 2.5-inch hard disk drive bay on the front bezel.
3 |
Pull-out information card |
The machine type, model, and serial number label of the server is attached on the pull-out information card. See “Machine type, model, and serial number label” on page 14.
18 ThinkServer User Guide
Loading...