


WARNING
This equipment has been tested and found to comply with the limits for a Class A digital device, pursuant to Part 15 of FCC Rules. These limits are designed to provide reasonable protection against harmful interference when the equipment is operated in a commercial environment. This equipment generates, uses, and can radiate radio frequency energy and, if not installed and used in accordance with the instruction manual, may cause harmful interference to radio communications. Operation of this equipment in a residential area is likely to cause harmful interference in which case the user will be required to correct the interference at his or her own expense.
Caution: Changes or modifications not expressly approved by the party responsible for compliance could void the user's authority to operate the equipment.
This User's Manual and its contents are copyrighted by LATHEM TIME CORP. with all rights reserved.
Lathem Time Corporation
www.lathem. com
(800)241-4990
(404)691-1065

TABLE OF CONTENTS
1. INTRODUCTION ________________________________ |
1 |
Accessories _______________________________________ |
1 |
Features _________________________________________ |
1 |
2. QUICK SETUP___________________________________ |
3 |
Installing Ribbon Cassette _____________________________ |
3 |
Display Hours _____________________________________ |
5 |
Time Zone ________________________________________ |
6 |
Default Settings ____________________________________ |
7 |
Advanced Settings Contents ____________________________ |
8 |
Installing the Unit ___________________________________ |
9 |
Environmental Conditions _____________________________ |
9 |
3. ADVANCED SETTINGS ___________________________ |
11 |
Time ___________________________________________ 11
Date ____________________________________________ 12 Payroll Mode, Weekly _______________________________ 14 Payroll Mode, Monthly _______________________________ 15 Payroll Mode, Bi-Weekly _____________________________ 16 Payroll Mode, Semi-Monthly ___________________________ 17
Job-Cost _________________________________________ 18 Print Format ______________________________________ 19
Rounding ________________________________________ 21 Auto Break Deduction ________________________________ 23
Max In __________________________________________ 25
Button Function ____________________________________ 26 Daylight Savings Time _______________________________ 28
Disable Daylight Savings Time __________________________ 31
Print Language _____________________________________ 32
4. OPERATIONS & FUNCTIONS_____________________ 33
Radio Signal Reception _______________________________ 34
Reset Settings _____________________________________ 35 Reset Cards in Job Cost Mode___________________________ 36
Card Reassign _____________________________________ 37 All Cards Reset ____________________________________ 38
5.PRINT EXAMPLE ________________________________ 40
6.INSTALLING Ni-Cd BATTERY (Optional) ___________ 41
7.TROUBLESHOOTING____________________________ 42
8.WARNINGS & CAUTIONS ________________________ 44
9.SPECIFICATIONS ________________________________ 45
1. INTRODUCTION
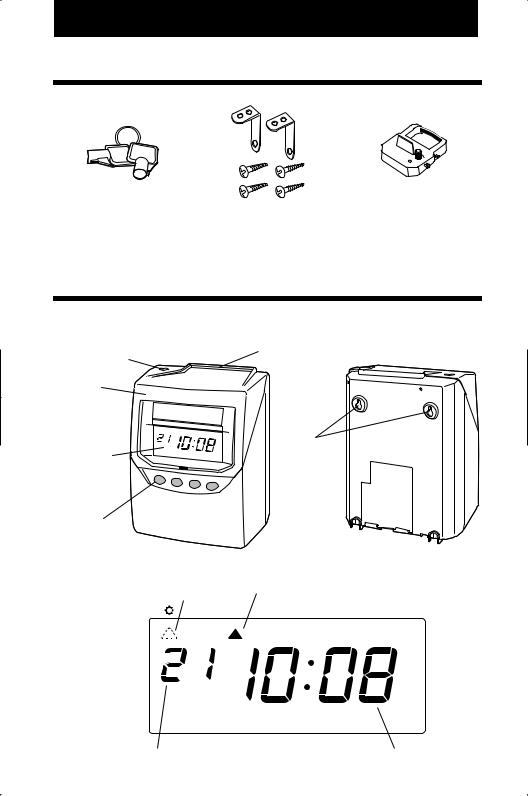
Accessories
Keys |
Ribbon cassette |

 Part No. VIS6008 Wall mount hardware
MUST USE THE E7 SERIES CARD FROM LATHEM TO INSURE PROPER OPERATION.
An optional battery is sold separately (Part No. VIS 6020) to provide 100% operation of card print mechanism during power failures.
Features
<Front view> |
<Back view> |
Card slot
Key hole
Cover
|
Wall-mounting |
Display |
hole |
|
Control button
< Display >
Daylight saving time indication |
Day of the week indication |
|
|
SU MO TU WE TH FR SA |
|
1 |
Current dateIN |
OUT |
Current time |
|
|
|

INTRODUCTION
About Your Atomic Clock
In addition to a regular quartz time clock, the Model 7500E contains an antenna and a microchip. The antenna receives the official time signal from the U.S. Government's National Institute of Standards and Technology and the microchip translates the time signal and adjusts the time display to the correct time. The Model 7500E receives a 60-kilohertz, low frequency AM radio signal from the WWVB radio station maintained by the National Institute of Standards and Technology (NIST). The NIST, using its atomic clock, is the official timekeeper for the U.S. and is located in Boulder, Colorado. The Model 7500E will work anywhere it can receive the WWVB signal from the NIST. This signal is broadcast to reach across the continental U.S. and into parts of Canada and Mexico. To learn more about the NIST time correction technology used in the Model 7500E, you can visit: http://tf.nist.gov/stations/wwvb.htm
2
2. QUICK SETUP
This setup should take approximately ten to fifteen minutes to completeif you use the default settings. For this setup, take the clock to a comfortable position that has access to power.
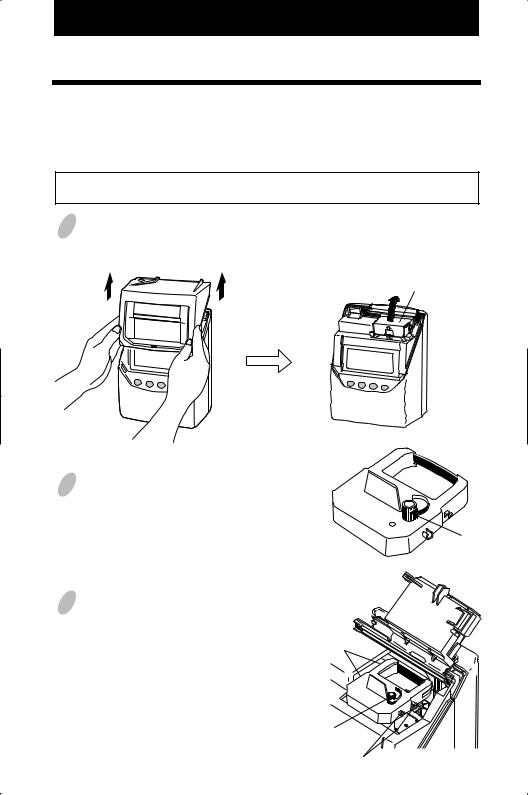
Installing Ribbon Cassette
MAKE SURE THE POWER IS ON BEFORE INSTALLING.
1 Hold the left and right sides of the cover and lift up. Then, lift up the antenna case.
Antenna Case
2 Turn the knob of the new ribbon cassette in the same direction as the arrow to tighten the ribbon.
3 Place the ribbon cassette inside the time recorder as shown in the figure. Push the ribbon cassette until it snaps into the clasps on both sides. If it is difficult to insert the ribbon cassette, try it while turning the knob.
3
Knob
Clasp
Knob
Clasp
(located on both sides)

4 Install the ribbon cassette so that the ribbon is between the print head and the ribbon mask (see the figure on the left). Printing will not come out properly if the ribbon is placed behind the ribbon mask (see the figure on the right).
Print head |
Print head |
Ribbon mask |
Ribbon mask |
Ribbon |
Ribbon |
CORRECT |
WRONG |
5 Turn the knob of the ribbon cassette in the direction of the arrow to tighten the ribbon.
6 Set the antenna case down. Leave the cover off while changing any settings in the next step. When the settings are complete, replace the cover.
Knob 

4
Setting the Display Hours
"Display Hours" is the format that the hours appear on the clock face. The default is "AM/PM".
|
|
Type of Hour |
|
|
|
|
|
|
|
|
1 |
AM/PM (12 hour) |
For example, PM 2:55 |
|
|
|
|
|
|
|
2 |
24 hour |
For example, 14:55 |
|
|
|
|
|
|
|
|
|
|
|
|
|
|
|
|
Display
CLOCK Hours
OPTION
SELECT |
CHANGE SET |
Set the "Display Hours".
1 Push the DATE/TIME button for 5
seconds and position the " " under the "CLOCK OPTION" mark.
A flashing number can be changed.
|
|
|
|
|
|
2 Push the |
|
|
|
button to select |
|
|
|
|
|
|
|
CHANGE |
|||||
|
|
|
|
|
|
either "1" for AM/PM or "2" for 24 |
|||||
|
|
|
|
|
|
hour with the left-side number. |
|||||
CLOCK |
|
|
|
|
3 Push the |
|
|
|
|
|
|
OPTION |
|
|
|
|
SET |
button to confirm the |
|||||
|
|
|
|
|
|
|
|
||||
|
|
|
|
|
|
setting. At that moment, the flashing |
|||||
|
|
|
|
|
|
of display will change to the right-side |
|||||
|
|
|
|
|
|
number. The unit is set to "1" for the |
|||||
|
|
|
|
|
|
Eastern Time Zone. If you need to |
|||||
|
|
|
|
|
|
change the time zone for atomic clock |
|||||
|
SELECT |
CHANGE |
SET |
||||||||
|
|
|
|
|
|
function, go to Setting the Time Zone |
|||||
|
|
|
|
|
|
for Atomic Clock Function. |
|||||
|
|
|
|
|
|
If you don't need to change the time |
|||||
|
|
|
|
|
|
zone setting |
shown on the display, |
||||
|
|
|
|
|
|
push the SET button two more times |
|||||
|
|
|
|
|
|
to finish the setting. Then, the unit |
|||||
|
|
|
|
|
|
starts reception of the WWVB radio |
|||||
|
|
|
|
|
|
signal. |
|||||
5

Setting the Time Zone for Atomic Clock Function
The Model 7500E can be set to one of the four United States time zones. Additionally, two more options including no reception of WWVB signal are available with this model. By default, the unit is shipped preset to Eastern Time.
|
Order Option |
Notes |
|
|
|
|
|
1 |
Eastern |
Default |
|
|
|
|
|
2 |
Central |
|
|
|
|
|
|
3 |
Mountain |
|
|
|
|
|
|
4 |
Pacific |
|
|
|
|
|
|
5 |
Other |
Adjusts just "minute" and "second" by the WWVB radio signal. |
|
|
|
You must set "date" and "time" to your local time first before |
|
|
|
starting reception of the WWVB signal. |
|
|
|
|
|
6 |
No Reception |
Disables atomic clock function and does not adjust time by the |
|
|
|
WWVB radio signal. |
|
|
|
|
|
|
|
|
|
|
|
|
|
Important Note: To set the Time Zone for Atomic Clock Function, you must start at Step 1 of "Setting the Display Hours". Continue from Step 3 of "Setting the Display Hours" to Step 4 of "Setting the Time Zone".
Example: Change the time zone to "Central".
Time
CLOCK Zone
OPTION
SELECT |
CHANGE SET |
Reception
Indication
Signal Condition Indication ON  Good
Good
FLASHING or OFF  Not good enough
4 In case of the example, push the CHANGE button to set at "2", and then push the SET button to finish the setting. At that moment, the display will change from flashing to steady and the setting is now completed.
5 Push the SET button once again.
Then the unit starts reception of the WWVB radio signal.
Please see "Radio Signal Reception" on page 34 for more information on the WWVB signal.
5 |
6 |

DEFAULT SETTINGS
All of the settings have defaults that are already set. If these settings in the following list are acceptable, you do not have to do anything. If you would like to change any of these settings, please review the alternative options available in the Advanced Settings contents list on page 8.
Setting |
Explanation |
Default Setting |
Display Hours |
How the hours are displayed |
AM/PM |
|
on clock face |
For example, PM 2:55 |
_____________________________________________________________________________ |
||
Time Zone |
When using WWVB, clock’s |
Eastern time zone |
|
time will be set to this time zone. |
|
_____________________________________________________________________________ |
||
Time |
Current time |
Eastern Standard Time |
_____________________________________________________________________________ |
||
Date |
Current date |
Current date |
_____________________________________________________________________________ |
||
Mode |
Schedule that the clock will |
Payroll (Weekly), Monday |
|
operate with start day |
for the starting day |
_____________________________________________________________________________ |
||
Print Format |
Format that prints on time card |
Day of the week, AM/PM, |
|
when punched |
and regular minutes |
|
|
For example, FR 4:30P |
_____________________________________________________________________________ |
||
Rounding |
Clock can calculate total |
No rounding, prints |
|
hours and minutes with |
totals calculated to exact |
|
rounding rules |
minute |
_____________________________________________________________________________ |
||
Auto Break |
Clock will discount break |
None, employees should |
Deduction |
when a given amount of |
punch in/out for breaks |
|
hours are calculated |
if they are not paid |
_____________________________________________________________________________ |
||
Max In |
Clock will assume that an |
The next punch made by |
|
"OUT" punch is missed after |
anyone 'in' more than 13 |
|
a given number of hours. |
hrs. will be recorded as |
|
|
the next 'in' |
_____________________________________________________________________________ |
||
Button Function |
How the user operates the |
Clock will automatically |
(IN/OUT) |
"IN" and "OUT" buttons |
position; User can override |
_____________________________________________________________________________ |
||
Daylight |
Clock will change automatically |
Yes, will change 2nd |
Savings Time |
for Daylight Savings Time |
Sunday of March and 1st |
|
|
Sunday of November |
_____________________________________________________________________________ |
||
Print Language |
Language that month and |
English |
|
days of the week are printed |
|
Please go to "Installing the Unit" on page 9 when you are finished with the settings.
7
ADVANCED SETTINGS CONTENTS
If you choose to change any of the optional settings below, remove the top and go to the page as noted next to the optional setting.
Setting |
Explanation of Optional Settings |
Page |
Display Hours |
24 hour, for example, 14:55 |
5 |
_____________________________________________________________________________ |
||
Time Zone |
Central, Mountain, or Pacific |
6 |
|
Adjust only minute and seconds by WWVB |
|
|
No adjustment by WWVB |
|
_____________________________________________________________________________ |
||
Time |
|
11 |
_____________________________________________________________________________ |
||
Date |
|
12 |
_____________________________________________________________________________ |
||
Mode |
Payroll, Monthly |
15 |
|
Payroll, Bi-Weekly |
16 |
|
Payroll, Semi-Monthly |
17 |
|
Job-Cost |
18 |
_____________________________________________________________________________ |
||
Print Format |
Date, 24 hour, and hundredths |
19 |
|
(these can be chosen individually) |
|
_____________________________________________________________________________ |
||
Rounding |
6 minute with 3 minute breakpoint |
21 |
|
15 minute with 3 minute breakpoint |
|
|
15 minute with 7 minute breakpoint |
|
_____________________________________________________________________________ |
||
Auto Break |
Enter elapsed time and break duration |
23 |
Deduction
_____________________________________________________________________________
Max In |
Deactivate or change number of hours |
25 |
_____________________________________________________________________________ |
||
Button Function |
IN/OUT Button punch required before |
26 |
(IN/OUT) |
printing or IN/OUT Buttons disabled |
|
_____________________________________________________________________________ |
||
Daylight |
Can change DST to new dates |
28 |
Savings Time |
for Daylight Savings Time |
|
|
or Disable Daylight Savings Time |
31 |
_____________________________________________________________________________ |
||
Print Language |
French, Spanish |
32 |
Please go to "Installing the Unit" on page 9 when you are finished with the settings.
7 |
8 |
INSTALLING THE UNIT
Note: The unit has an internal battery that will save the settings when unplugged.
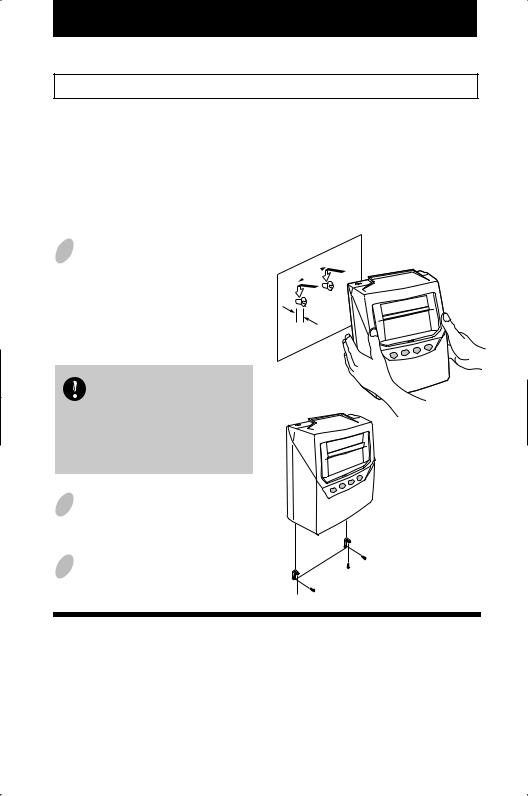
The unit can be used on a table-top or mounted on a wall. When choosing a location, please note locations to avoid in "Environmental Conditions" at the bottom of the page. If you are using the unit as a table-top, find an appropriate place and skip to Step 3. If using as a wall-mount, take the following steps.
Mounting Unit on Wall
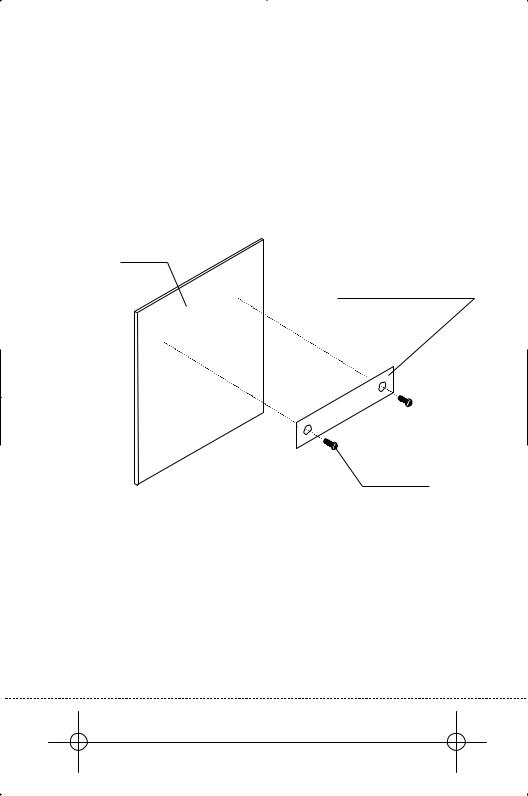
The unit can be mounted on a wall using the supplied mounting fittings.
1 Install wall mount screws (supplied) into a wall 3 15/16" (10 cm) apart.
Be sure to keep about 1/8" ( 3mm) of the screw head out of the wall.
(10cm) 315/16"
Use template on bottom of page 10 if you prefer.
The supplied screws are intended for use on a thick wooden wall or wooden column. Do not use them on any other materials. There is a danger that the unit may come off if used on other materials.
2 Mount the wall mount fittings as shown on the right.
3 Plug the unit into power, and the unit is ready to use.
(3mm)1/8"
Environmental Conditions
Avoid placing the unit in environments that are:
•humid or dusty
•exposed to direct sunshine
•subject to frequent or continuous vibrations
•outside the temperature range between 23˚F (-5˚C) and 113˚F (45˚C)
•affected by chemicals or ozone
9
Template for wall mounting
Please copy and use this page when needed.
Wall
Wall Mount Template
Screws
Leave about 1/8" gap between wall and screw head.
Level Line
9 |
Wall Mount Template |
10 |
3. Advanced Settings
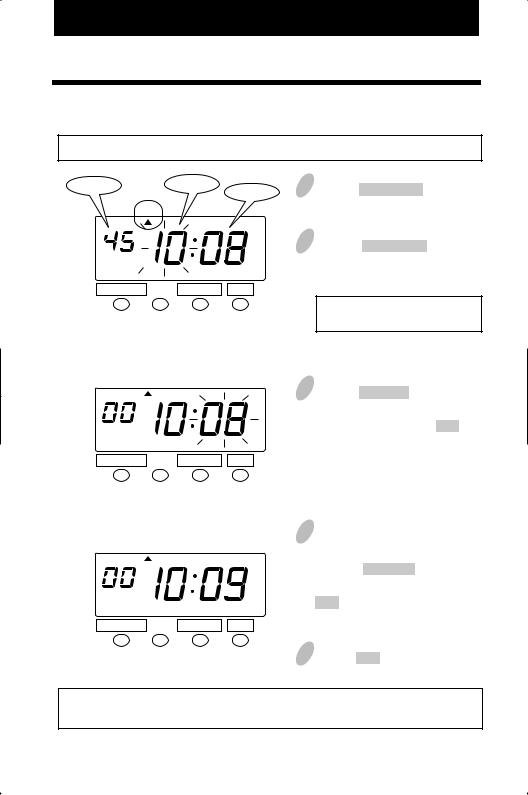
Setting the Time
Example: Change the time from 10:08 a.m. to 10:09 a.m.
Second |
Hour |
Minute |
|
|
|
TIME |
|
|
AM |
|
|
DATE/TIME |
CHANGE SET |
|
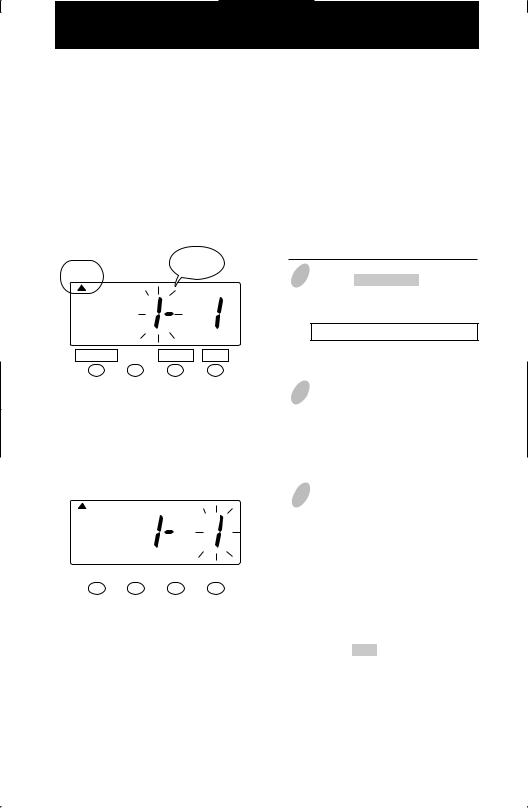
1 Push the DATE/TIME button for 5 seconds.
2 Push the DATE/TIME button and position the " " under the "TIME" mark.
TIME
AM
DATE/TIME |
CHANGE SET |
TIME
AM
DATE/TIME |
CHANGE SET |
The flashing number can be changed.
3 Press the CHANGE button to change the hour. In the example, the hour is not to be changed. Push the SET button to accept, the flashing of the display changes from "Hour" to "Minute".
4 Changing the "Minute" (for example, from 8 minutes to 9 minutes).
Push the CHANGE button to set "Minute" at "09" and then push the SET button. Now the minutes of 9
have been set.
5 Push the SET button once again.
You have completed this setting. Go to the next setting listing in "Default Settings" on page 7 to continue with the setup.
11
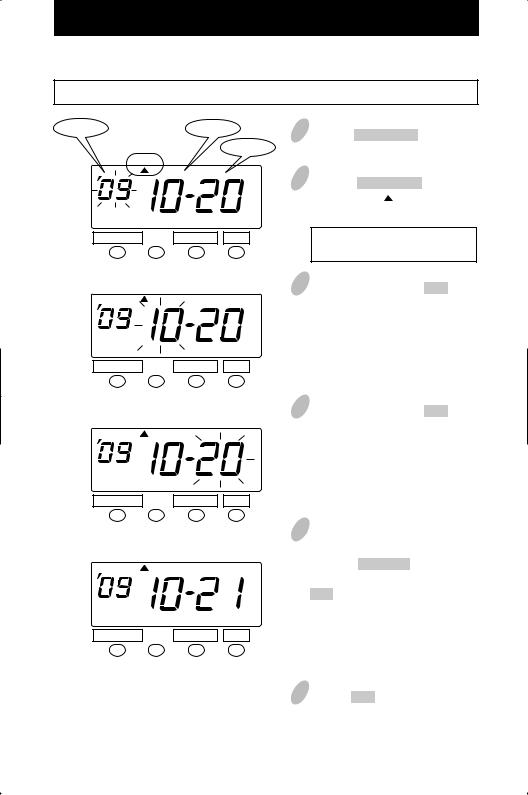
Setting the Date
Example: Change the date from October 20, 2009 to October 21, 2009.
Year |
Month |
Date
DATE
DATE/TIME |
CHANGE SET |
DATE
DATE/TIME |
CHANGE SET |
DATE
DATE/TIME |
CHANGE SET |
DATE
DATE/TIME |
CHANGE SET |
1 Push the DATE/TIME button for 5 seconds.
2 Push the DATE/TIME button twice to position the " " under the "DATE" mark.
A flashing number means that it can be changed.
3 In the example, push the SET button because the year 2009 is not to be changed. Now the year of 2009 has been set.
At that moment, the flashing of the display will change from "Year" to "Month".
4 In the example, push the SET button because the month of October is not to be changed. Now October has been set.
At that moment, the flashing of the display will change from "Month" to "Date".
5 Change "Date" (for example, from
20 to 21)
Push the CHANGE button to set "Date" at "21" and then push the SET button, and now the date of 21 has been set.
At that moment, "Date" on the display will change from flashing to steady, and the date change setting is now completed.
6 Push the SET button once again.
|
|
You have completed this setting. Go to the next setting listing in |
|
|
|
|
"Default Settings" on page 7 to continue with the setup. |
|
|
11 |
12 |
|||
|
|
|||
|
|
|||
|
|
|
|
 Loading...