


CloudBox
DESIGN BY NEIL POULTON
Quick Install Guide
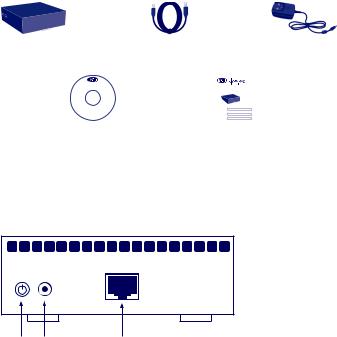
Box Content
LaCie CloudBox |
Ethernet cable |
External power supply |
||||
|
cloudbox |
|
|
|
|
|
|
|
|
|
|
|
|
|
|
|
|
1-Year Online Backup Contract |
|
|
|
|
|
|
CONTRACT NUMBER |
1111-2222-3333-4444 |
|
|
|
|
|
|
||
|
|
|
|
CONTRACT NUMBER |
1111-2222-3333-4444 |
|
|
Ver |
|
|
|
|
|
|
|
|
|
DEVICE ID NUMBER |
00-0C-F1-56-98-AD |
|
LaCie Utilities CD-ROM: |
|
|
|
|||
Leafl et with your |
||||||
•LaCie Network Assistant |
1-Year Online |
|||||
•LaCie Backup Assistant |
Backup Contract |
|||||
•User Manual |
|
|
|
|
|
|
Rear View
Power |
Power supply |
Ethernet port to |
button |
connector |
connect to router |
Protect your investment – register for free technical support at www.lacie.com/register

Installation
 Before starting the installation, please:
•Locate the included Leafl et with your 1-Year Online Backup Contract number. You will be asked for the number during the Setup.
•Read the User Manual
1. Connect the included Ethernet cable |
Router or Hub |
|
|
to the CloudBox and to your local |
|
network (router or hub). |
|
1-Year Online Backup Contract
CONTRACT NUMBER |
1111-2222-3333-4444 |
CONTRACT NUMBER |
1111-2222-3333-4444 |
DEVICE ID NUMBER |
00-0C-F1-56-98-AD |
Fig. 1 - Leafl et
Fig. 2
2. Connect the power supply.
Router or Hub
Fig. 3

3. Turn on the CloudBox by pushing and holding the power button
for 2 seconds. When the front light
stops blinking, the CloudBox is ready for use.
Fig. 4
Note: If you want to turn off the drive, press and hold the power button for 5 seconds until the LED blinks. When the LED turns off, the drive has shut down.

Setup
VERY IMPORTANT:
•Your network must have access to the Internet to complete the CloudBox Setup Wizard.
•The CloudBox Setup Wizard will guide you through the installation in a few easy steps.
•The CloudBox will be available for use once the Setup Wizard is complete and your online account has been verified.
1.Install and run LaCie Network Assistant, located on the LaCie
Utilities CD-ROM. LaCie Network Assistant can help you launch the CloudBox Setup Wizard.
2.There are two options for launching the CloudBox Setup Wizard: a. LaCie Network Assistant; and b. From your Internet browser.
cloudbox
DESIGN BY NEIL POULTON
Version1.0 |
© 2010 |
|
|
La |
Fig. 5
a. LaCie Network Assistant (preferred)
Windows®:
Click the LaCie Network Assistant icon located in the system tray (bottom right of the screen) and select CloudBox > Web Access...
Mac®:
Click the LaCie Network Assistant icon located in the menu bar (top right of the screen) and select CloudBox > Web Access...
Fig. 6 - LaCie Network Assistant (Windows)
Fig. 7 - LaCie Network Assistant (Mac)
Setup
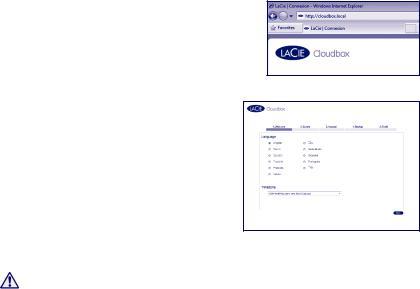
b. To launch the Setup Wizard in your web browser, type the name of your CloudBox in the address bar (the default address is http://cloudbox or http://cloudbox.local, depending upon your browser).
Fig. 8
3.The Setup Wizard will load in your browser. Complete the Wizard and make note
of your username and password for subsequent logins. You will be asked for your contract number during the setup. Please find the contract number on the leaflet shipped with your product.
Fig. 9 - CloudBox Setup Wizard
THE ADMINISTRATOR LOGIN AND PASSWORD CANNOT BE RECOVERED.
LaCie highly recommends that you write your administrator username and password for your records since they cannot be recovered.
Note: Please create an administration password that is not easy to guess.
Transfer Files and Backup
Now you can keep your important files secure by storing them on the CloudBox. Your data will be automatically backed up online.
To begin storing files on your CloudBox:
•Copy files manually from your computer to the CloudBox.
•Copy files automatically from your computer to the CloudBox using backup software. You can run the LaCie Backup Assistant on the included LaCie Utilities CD-ROM to configure your backup.
Note: Please see the User Manual for more information on how to copy files to your LaCie CloudBox.

LaCie Dashboard
Use the Dashboard administration tool to manage your LaCie CloudBox. You can create user folders, set storage quotas for each user, change the device network settings, restore data from online backups, and much more. See the User Manual for further information on how to launch the Dashboard and manage your LaCie CloudBox.
Fig. 10 - LaCie CloudBox Dashboard

FR Installation
 Avant de commencer l'installation, procédez aux étapes suivantes :
•Repérez dans le livret fourni le numéro de votre contrat annuel de sauvegarde en ligne (1-Year Backup Online). Il vous sera demandé pendant l'installation (Fig. 1).
•Lisez le manuel d'utilisation.
1.Connectez le câble Ethernet fourni à la CloudBox et à votre réseau local (routeur ou concentrateur) (Fig. 2).
2.Connectez l'alimentation (Fig. 3).
3.Mettez la CloudBox sous tension ; appuyez pour cela sur le bouton de mise en marche et maintenez-le enfoncé pendant 2 secondes. Lorsque le clignotement du voyant avant s'arrête, la CloudBox est prête à fonctionner (Fig. 4).
Remarque : si vous souhaitez éteindre le disque, appuyez sur le bouton d'alimentation et maintenez-le enfoncé pendant 5 secondes jusqu'à ce que le voyant clignote. Lorsque le voyant s'éteint, le disque est éteint.
Configuration
 TRÈS IMPORTANT :
•Votre réseau doit disposer d'un accès à Internet pour que l'Assistant CloudBox Setup Wizard puisse s'exécuter correctement.
•L'assistant CloudBox Setup Wizard vous guidera à travers les étapes d'installation.
•CloudBox sera disponible après l'exécution de l'assistant et la vérification de votre compte en ligne.
1.Installez et lancez le LaCie Network Assistant qui se trouve sur le CD-ROM des utilitaires LaCie (Fig. 5). L'assistant LaCie Network Assistant peut vous aider à lancer l'assistant CloudBox Setup Wizard.
2.Vous pouvez lancer l'assistant CloudBox Setup Wizard à l'aide de l'assistant LaCie Network Assistant (option a) ou de votre navigateur Internet (option b).
a.LaCie Network Assistant (préféré)
Windows®:
Cliquez sur l'icône LaCie Network Assistant  dans la barre d'état système (dans l'angle inférieur droit de l'écran) et sélectionnez CloudBox > Accès Web... (Fig. 6)
Mac®:
Cliquez sur l'icône LaCie Network Assistant  dans la barre de menu (dans l'angle supérieur droit de l'écran) et sélectionnez CloudBox > Accès Web... (Fig. 7)
b.Pour lancer l'assistant d'installation, saisissez le nom de votre CloudBox dans la barre d'adresse de votre navigateur Web (l'adresse par défaut est http://cloudbox ou http://cloudbox.local, en fonction de votre navigateur) (Fig. 8).
FR 3. L'assistant d'installation se charge dans votre navigateur. Terminez l'assistant et notez votre nom d'utilisateur et votre mot de passe pour les connexions suivantes. Au cours de l'installation, votre numéro de contrat vous est demandé. Vous pouvez trouver ce numéro de contrat sur le livret fourni avec votre produit (Fig. 9).
 LE NOM D'UTILISATEUR ET LE MOT DE PASSE DE L'ADMINISTRATEUR NE PEUVENT PAS ÊTRE RÉCUPÉRÉS.
LaCie recommande vivement noter et de conserver votre mot de passe administrateur pour référence ; il est en effet impossible de les récupérer.
Transfert de fichiers et sauvegarde
Vous pouvez désormais stocker vos fichiers importants en toute sécurité dans votre CloudBox. Vos données sont automatiquement sauvegardées en ligne. Pour commencer à stocker vos fichiers sur votre CloudBox :
•Copiez manuellement les fichiers de votre ordinateur sur la CloudBox.
•Copiez automatiquement les fichiers de votre ordinateur sur la CloudBox à l'aide du logiciel de sauvegarde. Vous pouvez exécuter le LaCie Backup Assistant situé sur le CD-ROM LaCie Utilities fourni pour configurer votre sauvegarde.
Remarque : reportez-vous au manuel d'utilisation pour plus d'informations concernant la copie des fichiers sur votre LaCie CloudBox.
Tableau de bord LaCie
Utilisez l'outil d'administration du Tableau de bord pour gérer votre LaCie CloudBox. Vous pouvez créer des dossiers utilisateurs, définir les quotas de stockage pour chaque utilisateur, modifier les paramètres réseau du périphérique, restaurer les données grâce aux sauvegardes en ligne, etc. Reportez-vous au manuel d'utilisation pour plus d'informations sur le lancement du Tableau de bord et la gestion de votre CloudBox (Fig. 10).

IT Installazione
 Prima di avviare l'installazione, eseguire le seguenti operazioni:
•Individuare il volantino incluso con il numero di contratto per 1 anno di backup in linea. Durante la configurazione sarà richiesto il numero. (Fig. 1)
•Leggere il manuale per l'utente
1.Collegare il cavo Ethernet incluso alla CloudBox e alla rete locale (router o hub) (Fig. 2).
2.Collegare l'alimentatore (Fig. 3).
3.Accendere la CloudBox tenendo premuto il pulsante di alimentazione per 2 secondi. Quando la luce anteriore smette di lampeggiare, la CloudBox è pronta per l'utilizzo (Fig. 4).
Nota: Se si vuole spegnere l'unità, tenere premuto l'interruttore di accensione per 5 secondi finché il LED non lampeggia. Lo spegnimento dell'unità è segnalato dallo spegnimento del LED.
Impostazione
 MOLTO IMPORTANTE:
•La rete deve avere accesso a Internet per completare la configurazione guidata di CloudBox.
•La Configurazione guidata di CloudBox conduce attraverso l'installazione in pochi semplici passaggi.
•CloudBox sarà disponibile per l'uso una volta completata la Configurazione guidata e verificato l'account in linea.
1.Installare ed eseguire LaCie Network Assistant, situato nel CD-ROM delle utility LaCie (Fig. 5). LaCie Network Assistant può essere d'aiuto per avviare la Configurazione guidata di CloudBox.
2.Vi sono due opzioni per aggiornare la Configurazione guidata di CloudBox: a. LaCie Network Assistant e b. Dal browser Internet.
a. LaCie Network Assistant (preferenziale)
Windows®:
Fare clic sull'icona di LaCie Network Assistant  situata nell'area di notifica (in basso a sinistra nello schermo) e selezionare o sulla barra dei menu (in Mac) e selezionare CloudBox > Accesso Web... (Fig. 6)
Mac®:
Fare clic sull'icona di LaCie Network Assistant  situata nella barra dei menu (in alto a destra nello schermo) e selezionare CloudBox > Accesso Web... (Fig. 7)
b. Per avviare la Configurazione guidata dal browser web, digitare il nome della propria CloudBox nella barra dell'indirizzo (l'indirizzo predefinito è http://cloudbox or http://cloudbox.local, a seconda del browser) (Fig. 8).
 Loading...