


RE-210
Digital Piano
Owner’s Manual
Table of Contents
Important Safety & Installation |
|
Instructions |
4 |
Important Safety Instructions |
5 |
The Front Panel of the RE-210 |
6 |
Introduction |
8 |
The Features of the RE-210 |
8 |
Setting up the Instrument |
9 |
Listen to the Demo Songs |
12 |
The Keyboard and Pedals |
14 |
The Keyboard |
14 |
The Pedals |
14 |
Sound Select |
15 |
Variation |
15 |
List of Preset Sounds and Their Variation |
16 |
Drum and Percussion Key Assignments |
16 |
Drum Kit Maps |
17 |
Sound Expression by Pedals |
18 |
Layering Sounds |
19 |
Left Split |
20 |
Activate Left Split |
20 |
Split Point |
20 |
Custom |
21 |
Digital Reverb & Effects |
22 |
Volume |
20 |
Bass and Treble |
22 |
Reverb and Effect |
23 |
Reverb/Effect Wet/Dry Mix |
24 |
|
|
Recorder |
|
26 |
||
Song |
|
26 |
||
Track |
|
26 |
||
Record |
|
26 |
||
Play/Stop |
|
27 |
||
Start Control |
|
27 |
||
Display while playing and recording |
|
28 |
||
Metronome |
|
29 |
||
Adjusting Tempo |
|
29 |
||
Adjusting the time signature |
|
29 |
||
Tap Tempo |
|
29 |
||
Options |
|
30 |
||
Demo |
|
30 |
||
MIDI/Preference |
|
30 |
||
Transpose |
|
38 |
||
MIDI |
|
39 |
||
MIDI Connection |
|
39 |
||
MIDI Channels |
|
40 |
||
MIDI Messages |
|
41 |
||
Miscellaneous |
|
44 |
||
Bottom Panel |
|
44 |
||
Rear Panel |
|
44 |
||
Appendix |
|
45 |
||
Specifications |
|
45 |
||
List of Sounds and Pedal Assignments |
|
46 |
||
Piano Demo Song List |
|
47 |
||
MIDI Implementation Chart |
|
48 |
||
|
|
|
|
|
|
|
|
|
|
|
|
|
|
|
|
|
|
|
|
|
|
|
|
|
|
|
|
|
|
|
|
|
|
|
|
|
|
|
|
www.ycpiano.co.kr
www.kurzweilmusicsystems.com
The lightning flash with the arrowhead symbol, within an equilateral triangle, is intended to
alert the user to the presence of uninsulated “dangerous voltage” within the product’s
enclosure that may be of sufficient magnitude to constitute a risk of electric shock to persons.
The exclamation point within an equilateral triangle is intended to alert the user to the presence of important operating and maintenance (servicing) instructions in the literature accompanying the product.
IMPORTANT SAFETY & INSTALLATION INSTRUCTIONS
INSTRUCTIONS PERTAINING TO THE RISK OF FIRE, ELECTRIC SHOCK, OR INJURY TO PERSONS
W A R N I N G : When using electric products, basic precautions should always be followed, including the following:
1.Read all of the Safety and Installation Instructions and Explanation of Graphic Symbols before using the product.
2.This product must be grounded. If it should malfunction or break down, grounding provides a path of least resistance for electric current to reduce the risk of electric shock. This product is equipped with a power supply cord having an equipment-grounding conductor and a grounding plug. The plug must be plugged into an appropriate outlet which is properly installed and grounded in accordance with all local codes and ordinances.
D A N G E R : Improper connection of the equipment-grounding conductor can result in a risk of electric shock. Do not modify the plug provided with the product-if it will not fit the outlet, have a proper outlet installed by a qualified electrician. Do not use an adaptor which defeats the function of the equipment-grounding conductor. If you are in doubt as to whether the product is properly grounded, check with a qualified serviceman or electrician.
3.Do not use this product near water-for example, near a bathtub, washbowl, kitchen sink, in a wet basement, or near a swimming pool, or the like.
4.This product should only be used with a stand or cart that is recommended by the manufacturer.
5.This product, either alone or in combination with an amplifier and speakers or headphones, may be capable of producing sound levels that could cause permanent hearing loss. Do not operate for a long priod of time at a high volume level or at a level that is uncomfortable. If you experience any hearing loss or ringing in the ears, you should consult an audiologist.
6.The product should be located so that its location or position does not interfere with its proper ventilation.
7.This product should be located away from heat sources such as radiators, heat registers, or other products that produce heat.
8.This product should be connected to a power supply only of the type described in the operating instructions or as marked on the product.
9.This product may be equipped with a polarized line plug (one blade wider than be other). This is a safety feature. If you are unable to insert the plug into the outlet, contact an electrician to replace your obsolete outlet. Do not defeat the safety purpose of the plug.
10.The power supply cord of the product should be unplugged from the outlet when left unused for a long period of time. When unplugging the power supply cord, do not pull on the cord, but grasp it by the plug.
11.Care should be taken so that objects do not fall and liquids are not spilled into the enclosure through openings.
12.The product should be serviced by qualified service personnel when:
A.The power supply cord or the plug has been damaged;
B.Objects have fallen, or liquid has been spilled into the product;
C.The product has been exposed to rain;
D.The product does not appear to be operating normally or exhibits a marked change in performance;
E.The product has been dropped, or the enclosure damaged.
13.Do not attempt to service the product beyond that described in the user maintenance instructions. All other servicing should be referred to qualified service personnel.
14.W A R N I N G : Do not place objects on the product’s power supply cord, or place the product in a position where anyone could trip over, walk on, or roll anything over cords of any type. Do not allow the product to rest on or be installed over cords of any type. Improper installations of this type create the possibility of a fire hazard and/or personal injury.
RADIO AND TELEVISION INTERFERENCE
W A R N I N G : Changes or modifications to this instrument not expressly approoved by KURZWEIL could void your authority to operate the instrument.
I M P O R T A N T : When connecting this product to accessories and/or other equipment use only high quality shielded cables.
N O T E : This instrument has been tested and found to comply with the limits for a Classic B digital device, pursuant to Part 15 fo the FCC Rules. These limits are designed to provide reasonable protection against harmful interference in a residential installation. This instrument generates, uses, and can radiate radio frequency energy and, if not installed and used in accordance with the instructions, may cause harmful interference to radio communications. However, there is no guarantee that interference will not occur in a particular installation. If this instrument does cause harmful interference to radio or television reception, which can be determined by truning the instrument off and on, the user is encouraged to try to correct the interference by one or more of the following measures:
 Reorient or relocate the receiving antenna.
Increase the separation between the instrument and the receiver.
Connect the instrument into an outlet on a circuit other than the one to which the receiver is connected.
 If necessary consult your dealer or an experienced radio/television technician for additional suggestions.
N O T I C E
This apparatus does not exceed the Class B limits for radio noise emissions from digital apparatus set out in the Radio Interference Regulations of the Canadian Department of Communications.
AVIS
Le present appareil numerique n’emet pas de bruits radioelectriques depassant les limites applicables aux appareils numeriques de la class B prescrites dans le Reglement sur le brouillage radioelectrique edicte par le ministere des Communications du Canada.
IMPORTANT SAFETY INSTRUCTIONS
1.Read these instrucions.
2.Keep these instructions.
3.Heed all warnings.
4.Follow all instrunctions.
5.Do not use this apparatus near water.
6.Clean only with dry cloth.
7.Do not block any of the ventilation openings. Install in accordance with the manufacturer’s instructions.
8.Do not install near any heat sources such as radiators, heat registers, stoves, or other apparatus (including amplifiers) that produce heat.
9.Do not defeat the safety purpose of the polarized or grounding-type plug. A polarized plug has two blades with one wider than the other. A grounding type plug has two blades and a third grounding prong. The wide blade or the third prong are provided for your safety. If the provided plug does not fit into your outlet, consult an electrician for replacement of the obsolete outlet.
10.Protect the power cord from being walked on or pinched, particularly at plugs, convenience receptacles, and the point where they exit from the apparatus.
11.Only use attachments / accessories specified by the manufacturer.
12.Use only with a cart, stand, tripod, bracket, or table specified by the manufacturer, or sold with the
apparatus. When a cart is used, use caution when moving the cart / apparatus combination to avoid injury from tip-over.
13. Unplug this apparatus during lightning storms or when unused for long periods of time.
14.Refer all servicing to qualified service personnel. Servicing is required when the apparatus has been damaged in any way, such as power-supply cord or plug is damaged, liquid has been spilled or objects have fallen into the apparatus, the apparatus has been exposed to rain or moisture, does not operate normally, or has been dropped.
W A R N I N G : To reduce the risk of fire or electric shock, do not expose this apparatus to rain or moisutre. Do not expose this equipment to dripping or splashing and ensure that no objects filled with liquids, such as vases, are placed on the equipment.
To completely disconnect this equipment from the AC Mains, disconnect the power supply cord plug from the AC receptacle.
To reduce tyhe danger of explosion if the liithium battery is inncorrectly replaced, replace only with the same or equivalent type.
SAVE THESE INSTRUCTIONS
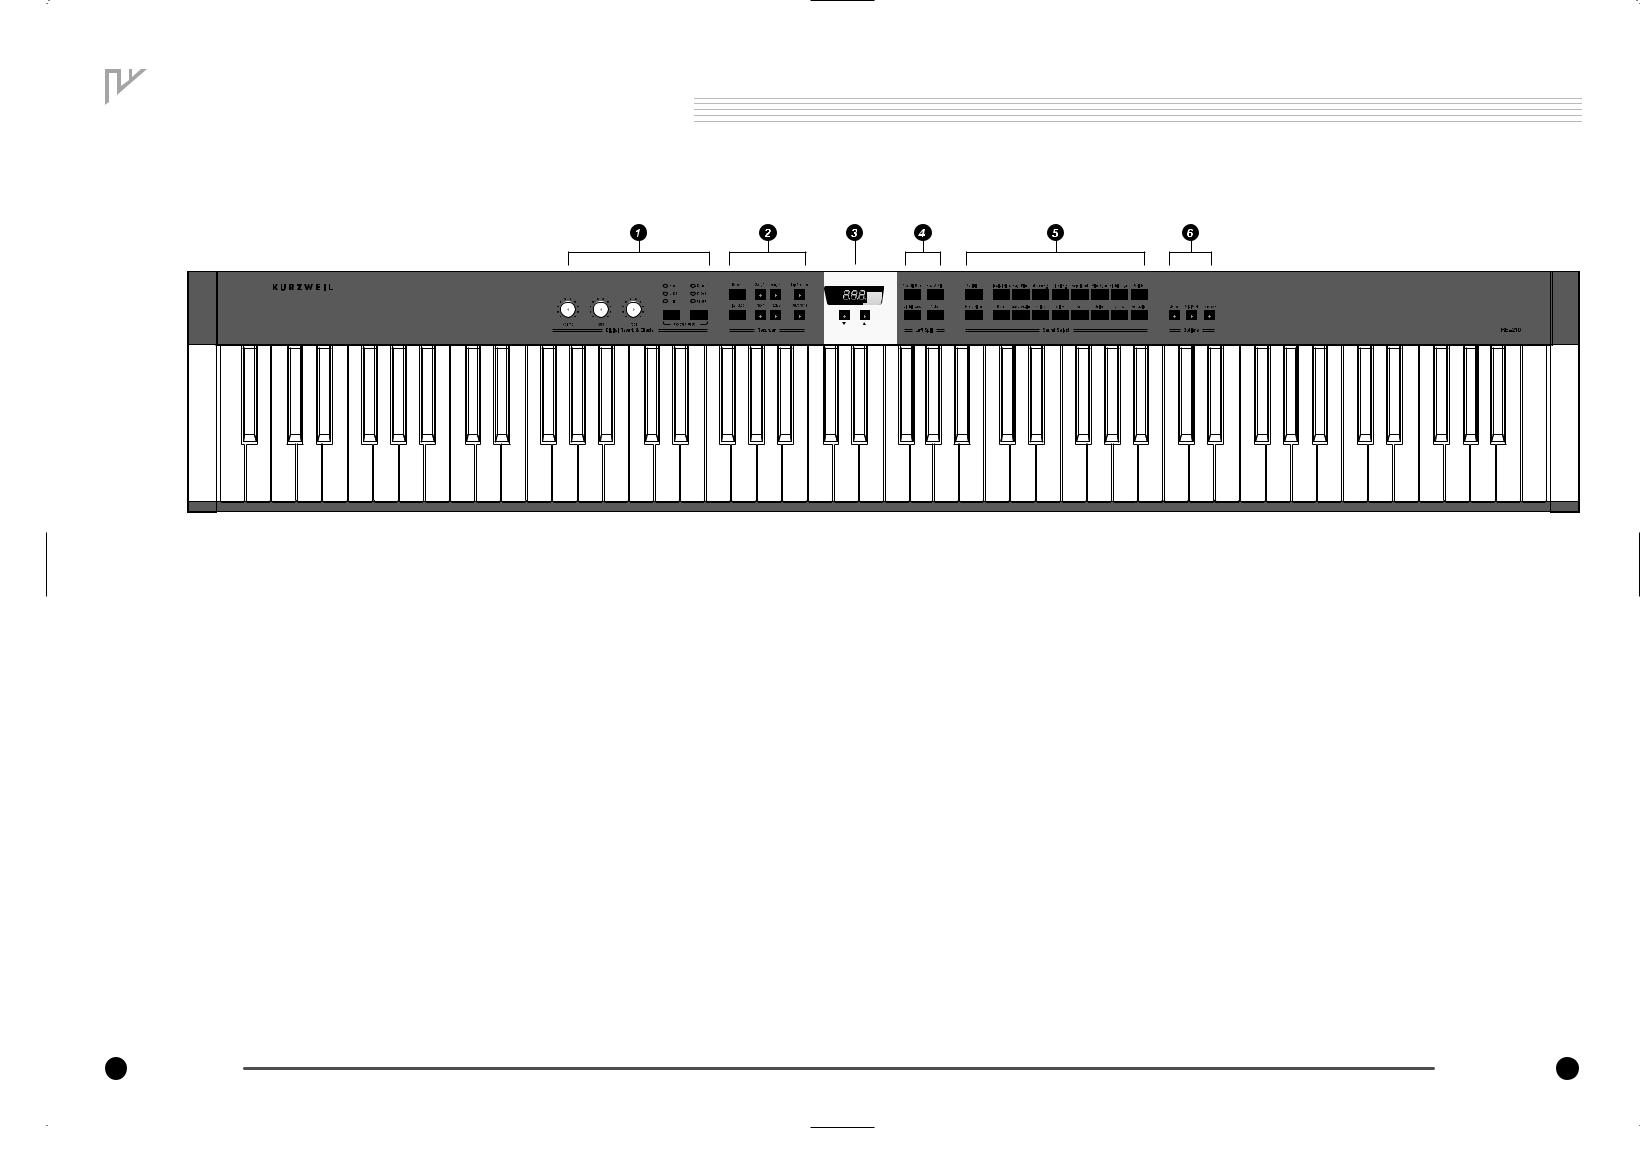

 The Front Panel of the RE-210
Digital Reverb & Effects
Tailor the overall sound of the RE-210 See pages 22~25
R ecorder
Record and play back multi-track songs See pages 26~28
Display
View current tempo and settings See page 29
Left Split
Divide the keyboard into two different sounds
See pages 20~21
Sound Select
Enliven your music with stunningly realistic sounds
See pages 15~17
Options
Tailor the response of the instrument, store your favorite panel settings and play Demo songs
See pages 30~38
6 The Front Panel |
The Front Panel |
7 |

 Introduction
Welcome to the world of the KURZWEIL RE-210 Digital Piano.
The RE-210 gives you easy access to KURZWEIL's high-quality sound technology. Authentic digital representations of musical instrument sounds are the starting points. The RE-210 reproduces the finest details of the original sounds; you'll even hear differences in tone as you play from bass to treble, and from soft and loud, just as in the original instruments.
The Features of the RE-210
■88 notes, Hammer type keys
■Three Pedals
■7 different types of keyboard touch sensitivity
■37 Preset Sounds (including Triple-Strike Stereo Piano Sample and Take 6 voices)
■Real-time Sound Expression
■Sound Layering with Volume Balance.
■Left Key Split
■Transpose, Detune
■3 Reverbs and 3 Effects (Chorus 1, 2 and Flanger )
■60Watt Sound System with Bass and Treble control
■3 x 7-Segments Display
■2 songs, 2 tracks Recorder
■Metronome
■Tap tempo
■50 Piano Demo Songs
■20 Preset Demo Songs
■Line In / Out
■MIDI In / Out
■2 Headphone Jacks
Setting up the Instrument
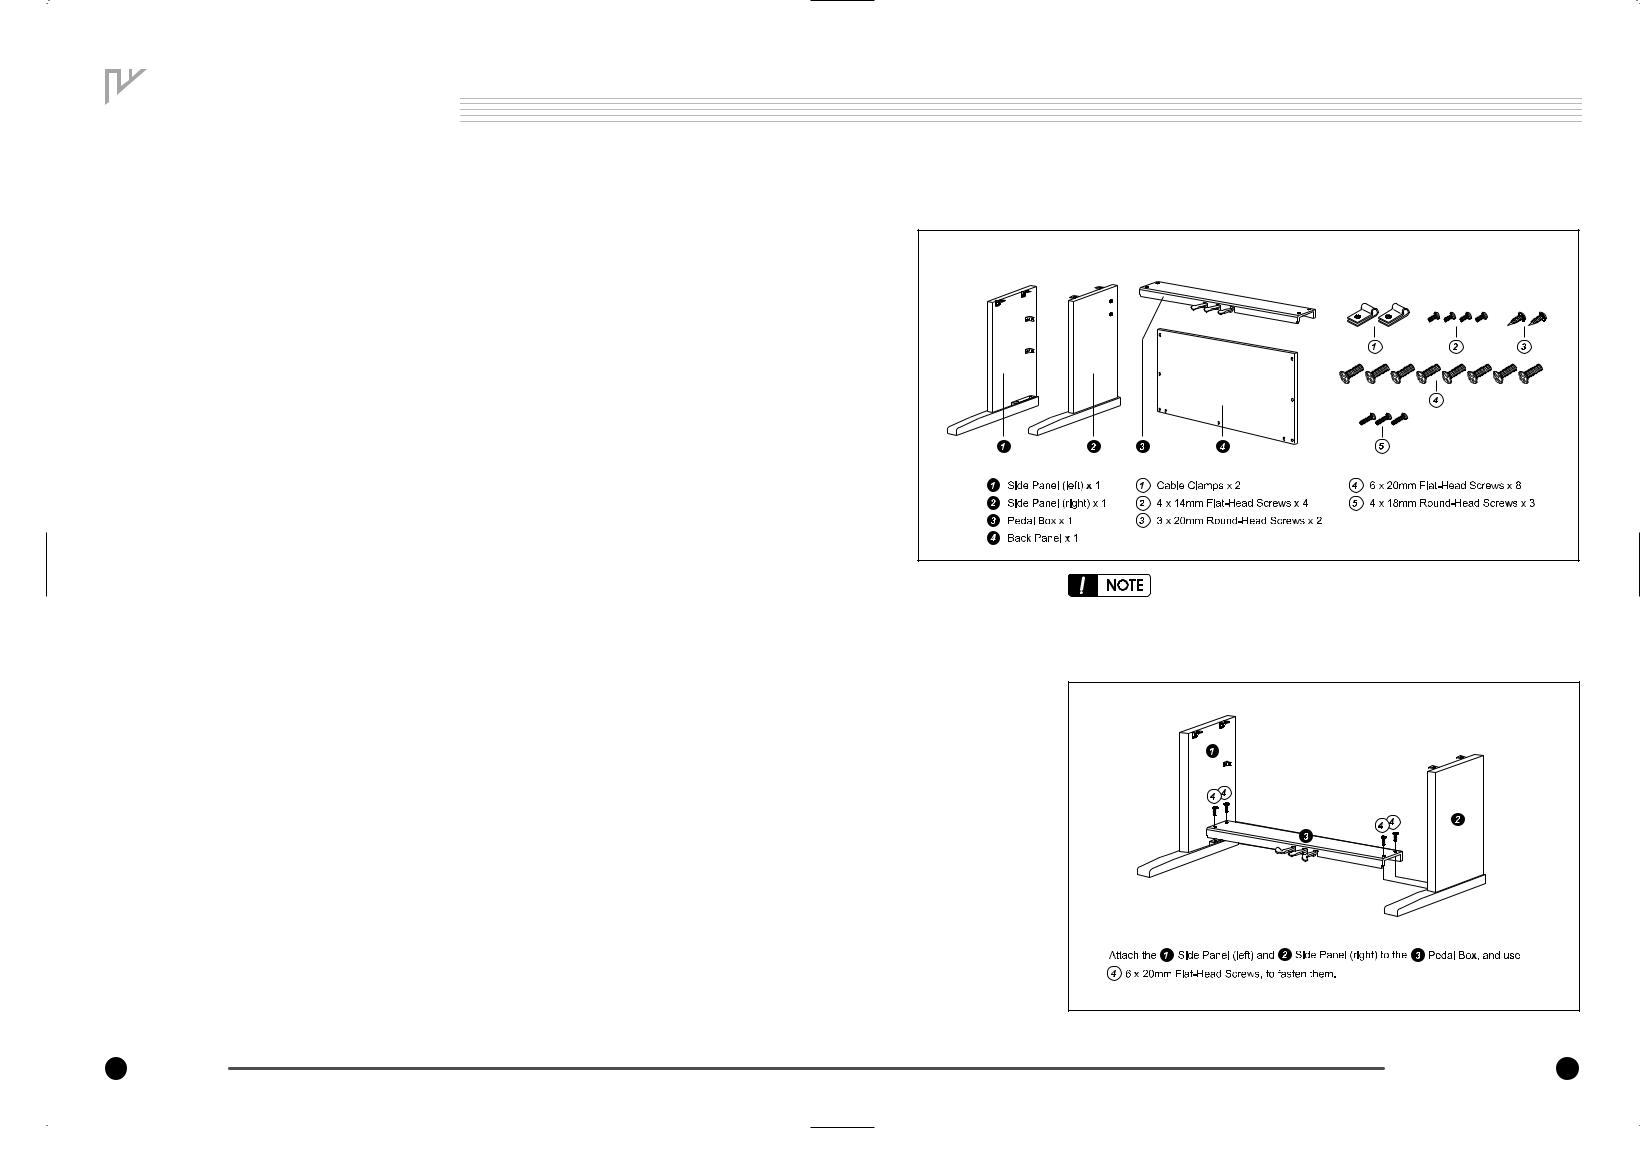
Check that all of the following items are present.
We do not recommend attempting to assemble the RE-210 alone. The job can be easily accomplished, however, with only two people.
Use only the screws provided or replacements of exacitly the specified size. Using screws of the wrong size can result in damage to the instrumen and personal injury.
Keyboard stand assembly
8 Introduction |
Setting up the Instrument |
9 |

Attach the back |
Connect the pedal |
panel |
cable, and fasten it. |
Attach the piano
Cautions
CHECK AFTER ASSEMBLY
■ Are any parts left over? : If any parts are left over, check the diagrams to see where they should be used.
■ Are any of the assembly screws loose? : Make sure that all screws are tight.
Caution when moving
Take the piano off the stand, and transport the stand and piano separately. After moving them refer to this manual, and re-assemble the stand and piano.
Loosened screws
After the stand and piano are assembled, the screws of the stand may become loose after extended use, causing the stand to wobble. If this occurs, re-tighten each of the screws in the stand.
Disassembly
To remove the piano and disassemble the stand, reverse the order of assembly. After desassembly, store all parts such as the screws so that they will not be lost.
10 Setting up the Instrument |
Setting up the Instrument 11 |

 Listen to the Demo Songs
Turning on the Instrument (Power)
The RE-210 operates on AC power. A power cord is included with the instrument to connect it to an AC Outlet. Before connecting the power cord, be sure that the power switch, located under the left-hand end of the keyboard, is off. Then plug the power cord into an AC outlet. Once the power cord is connected, you can turn the power switch on.
After the power switch is turned on, it will take about 2 seconds before the front panel lights up. An additional 3 seconds is needed before it is ready to play.
The RE-210 contains a number of built-in demonstrations to acquaint you with the sound and capabilities it possesses. To access these demonstrations, press the
D e m o button, which is located near the right end of the front panel controls, in the Options section. The button lights up to show that the RE-210 is in the demonstration mode.
To listen to the demo songs for the preset sounds
Press any button where the light rotates in the Sound Select or Left Split section to hear a demonstration of the sound. The Variation button plays all demo songs for preset sounds in a loop.To stop playing a song, press the currently seleced button. The button lights resume their blinking pattern.
Setting the Volume
To be sure that you can hear the instrument, move the Volume knob (on the left end of the front panel) to the middle of its range. This should provide a reasonably comfortable level of volume, which you can adjust if you wish the sound to be louder or softer.
To listen to the Piano Demo Songs
There are 50 piano demo songs available. The number on the display indicates the current song number that ranges from 1 to 50. Select a song by pressing the
U p / D o w n button. Press the Play/Stop button to hear the song. The Recorder button plays all Piano demo songs in a loop. To stop playing a song, press the
Play/Stop button. The button lights resume their blinking pattern.
|
To exit demonstration mode, press the D e m o button again. |
|
12 Setting up the Instrument |
Listen to the Demo Songs 13 |


 The Keyboard and Pedals

 Sound Select
The Keyboard
The keyboard of the RE-210 consists of 88 weighted keys with an action designed to simulate the feel of an acoustic piano. Just as with an acoustic piano, the harder you press the keys of the RE-210 (more precisely, the faster you strike them), the louder and brighter the resulting sound is. In technical terms, this is called "velocity sensitivity". It makes the RE-210 a truly expressive instrument. See page 35 for information on adjusting the velocity sensitivity to suit your preference (NOTE: The organ and harpsichord sounds purposely aren't velocity-sensitive, in order to be more realistic; real organ and harpsichords aren't velocity-sensitive.)
The Pedals
SOFT SOSTENUTO SUSTAIN
In addition to the expressiveness offered by the keyboard, there are three pedals that provide you with further control over the sounds of the RE-210. These pedals have the same function as those on a grand piano, which are, from left to right:
S O F T |
Notes played while this pedal is down sound softer than those |
|
|
played when the pedal is up. |
|
SOSTENUTO |
Keys that are already held down at the time this pedal is |
|
|
pressed will sustain while any keys played after the pedal is |
|
|
down will not. |
|
SUSTAIN |
Pressing this pedal causes all notes to sustain, or gradually fade |
|
|
out, even when you lift your fingers from the keys. |
|
|
|
|
|
|
|
The Sound Select portion of the front panel contains buttons used for selecting the individual sounds available on the RE-210 Digital Piano. You select a sound by pressing the corresponding button; the light in the button illuminates to show you which sound is selected. There are 17 Sound Select buttons. On power-up, the Grand Piano is selected.
Variation
Each Sound Button actually can select two different sounds. To access the second sound, press the Variation button; the light in the Variation button will illuminate, indicating that now the second sound for the active sound button is selected. Pressing the Variation button again will select the original sound.
Each of the Sound Select buttons "remembers" whether or not Variation was On the last time that sound was selected; so if you select the variation for a particular sound, then select a different sound button, then return to the first sound, the variation will automatically be selected again (This variation memory is reset when you execute Hard Reset in the RE-210.)
1. Press the Pipe Organ button. Play a few notes on the keyboard.
2.Press the Variation button. Notice that the button illuminates. Play a few notes again to hear the difference in the sound.
3.Press the Electric Organ button. Notice that the Variation button is no longer illuminated. Play a few notes.
4.Press the Pipe Organ again. Notice that the Variation button re-illuminates. Play a few notes to hear the sound.
14 The Keyboard and Pedals |
Sound Select 15 |
 Loading...