


OWNER’S MANUAL MANUEL D’UTILISATION BEDIENUNGSANLEITUNG

Precautions
Location
Using the unit in the following locations can result in a malfunction.
•In direct sunlight
•Locations of extreme temperature or humidity
•Excessively dusty or dirty locations
•Locations of excessive vibration
•Close to magnetic fields
Power supply
Please connect the designated AC adapter to an AC outlet of the correct voltage. Do not connect it to an AC outlet of voltage other than that for which your unit is intended.
Interference with other electrical devices
Radios and televisions placed nearby may experience reception interference. Operate this unit at a suitable distance from radios and televisions.
Handling
To avoid breakage, do not apply excessive force to the switches or controls.
Care
If the exterior becomes dirty, wipe it with a clean, dry cloth. Do not use liquid cleaners such as benzene or thinner, or cleaning compounds or flammable polishes.
Keep this manual
After reading this manual, please keep it for later reference.
Keeping foreign matter out of your equipment
Never set any container with liquid in it near this equipment. If liquid gets into the equipment, it could cause a breakdown, fire, or electrical shock.
Be careful not to let metal objects get into the equipment. If something does slip into the equipment, unplug the AC adapter from the wall outlet. Then contact your nearest Korg dealer or the store where the equipment was purchased.
THE FCC REGULATION WARNING (for U.S.A.)
This equipment has been tested and found to comply with the limits for a Class B digital device, pursuant to Part 15 of the FCC Rules. These limits are designed to provide reasonable protection against harmful interference in a residential installation. This equipment generates, uses, and can radiate radio frequency energy and, if not installed and used in accordance with the instructions, may cause harmful interference to radio communications. However, there is no guarantee that interference will not occur in a particular installation. If this equipment does cause harmful interference to radio or television reception, which can be determined by turning the equipment off and on, the user is encouraged to try to correct the interference by one or more of the following measures:
•Reorient or relocate the receiving antenna.
•Increase the separation between the equipment and receiver.
•Connect the equipment into an outlet on a circuit different from that to which the receiver is connected.
•Consult the dealer or an experienced radio/TV technician for help.
Unauthorized changes or modification to this system can void the user’s authority to operate this equipment.
CE mark for European Harmonized Standards
CE mark which is attached to our company’s products of AC mains operated apparatus until December 31, 1996 means it conforms to EMC Directive (89/336/EEC) and CE mark Directive (93/68/EEC).
And, CE mark which is attached after January 1, 1997 means it conforms to EMC Directive (89/336/EEC), CE mark Directive (93/68/EEC) and Low Voltage Directive (73/23/EEC).
Also, CE mark which is attached to our company’s products of Battery operated apparatus means it conforms to EMC Directive (89/336/EEC) and CE mark Directive (93/68/EEC).

Introduction
Thank you for purchasing the KAOSS PAD Entrancer audio/video processor.
To ensure trouble-free enjoyment, please read this manual carefully and use the product as directed.
Main features
Use the X-Y touch-pad to freely control audio and video effects in a single performance.
By rubbing your finger across the touch-pad or tapping it, you can simultaneously control different effect parameters in the horizontal and vertical directions, allowing you to manipulate images and/or audio processing in realtime.
One hundred video effect programs and combinations dramatically transform the images
The KAOSS PAD Entrancer provides one hundred ready-to-use video effect programs, letting you apply dramatic effects to any type of image. These effects cover a wide range, from basic effects such as fade, wipe, color modification, freeze, flip left/right, invert top/down, rotate, and expand/shrink, through sophisticated effects such as split-screen, inverted image components, sandstorm, monochrome compositing, delay, strobe, emboss, and even shrinking while spinning! You can use the knobs to easily select effect programs, and register eight of your favorites to the program memory buttons.
One hundred audio effect programs for DJ mixes and sound design
The KAOSS PAD Entrancer provides one hundred audio effects that include filters, spatial-effects such as delay and reverb, and modulation effects such as flanger, phaser, and pan. Numerous analog synth sounds and ambient sounds are also built-in, making the KAOSS PAD Entrancer an ideal tool not only for the VJ but also for DJ/remix/music production work.
BPM effect functionality with a variety of BPM detection
Twenty BPM effects can be synchronized to the BPM to control delay time or the LFO speed of pan, phaser, or flanger effects. You can set the BPM manually, use the Auto BPM to automatically detect the beat of an audio input source, use the Tap Tempo function to set by BPM by tapping the Tap key, or detect BPM from incoming MIDI Clock messages.
Ten types of Sample/Play effect let you sample motion video, still images, and audio
You can directly sample and play back the output image or an input phrase (a six-second motion video sample, plus a still image and six-second phrase for each of the two sample keys)
Pad Motion function and Mute/Freeze function for realtime operation
The Pad Motion function lets you capture a favorite or complex movement on the touch-pad, which can then be played back instantly to control images and sound. The Mute/Freeze function lets you freeze the image that is being output.
Easy connection to video equipment or other VJ devices
The KAOSS PAD Entrancer provides a full range of inputs and outputs for connection to your VJ setup or any other situation. MIDI connectors allow the KAOSS PAD Entrancer to be used with external keyboards, samplers, sequencers or effect devices as a controller for sounds or effects. By using the KAOSS PAD Entrancer with external equipment you can enjoy a nearly infinite range of possibilities for controlling images and sounds.
“Light” adds an exciting dimension to your live performances
The pad color changes dramatically depending on the position of your finger on the pad and on the type of effect selected. These colorful lighting effects will add a dramatic element to your performance.
Compact size that fits into any setup
With a compact size, and a highly functional design, the KAOSS PAD Entrancer occupies minimal space and will easily fit into any setup.
How to read this manual
|
|
|
|
Indicates a caution or warning. |
|
|
|
|
Indicates a useful hint. |
|
|
|
|
|
p.?? |
Indicates a reference page. |
|||
|
|
|
|
Indicates material relating to video effects. |
|
|
|
|
|
|
|
|
|
Indicates material relating to audio effects. |
A note about using this video device
Some people subjected to stimulation by intense light or rapidly flashing images may experience symptoms of temporary muscle spasms or loss of consciousness. If you experience any such symptoms, stop using this device immediately and seek medical attention.
In particular when using this device in a public place or other location where there are large numbers of people, you must take into account people other than the operator, and avoid creating and displaying continuous successions of images that might produce this type of intense stimulation.
Korg Corporation accepts no responsibility for any health problem or personal or property damage that may occur to the operator or observers from use of this device in violation of this warning.
1
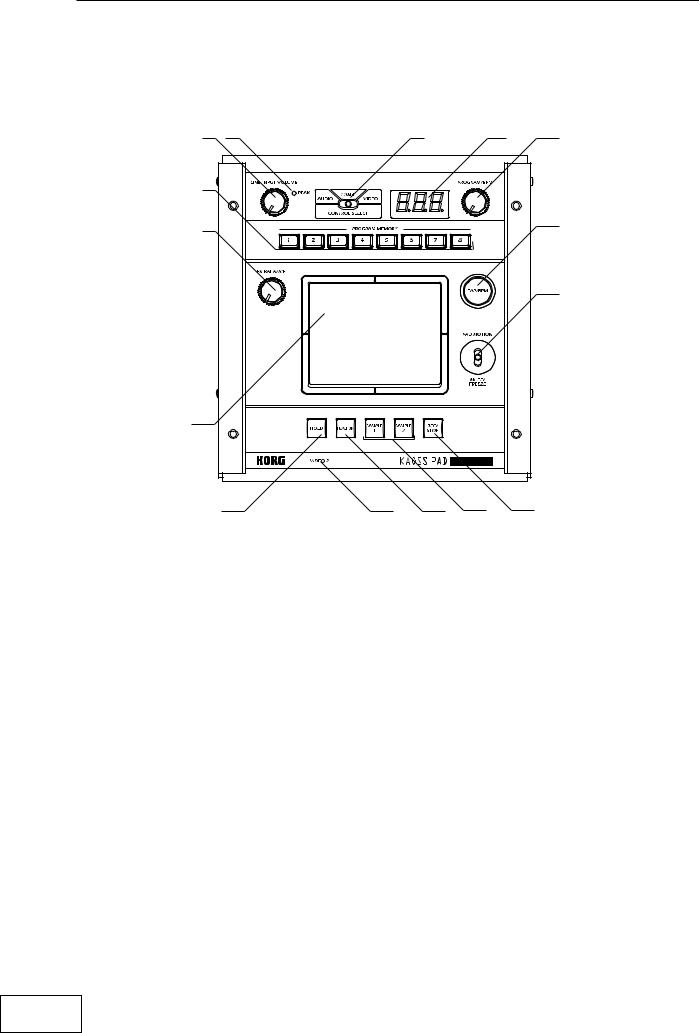
Parts and their function
Top panel
3 |
2 |
1 |
5 |
6 |
7 |
|
|
|
|
4 |
|
|
|
8 |
|
|
|
|
|
|
|
|
|
10 |
9
11 |
15 |
12 |
13 |
14 |
1. |
[CONTROL SELECT] switch |
10. |
[PAD MOTION / MUTE/FREEZE] lever |
2. |
[PEAK] indicator |
11. |
[HOLD] key |
3. |
[LINE INPUT VOLUME] knob |
12. |
[FUNCTION] key |
4. |
[FX BALANCE] knob |
13. |
[SAMPLE 1], [SAMPLE 2] keys |
5. |
[PROGRAM/BPM] display |
14. |
[REC/STOP] key |
6. |
[PROGRAM/BPM] knob |
15. |
[VIDEO 2] indicator |
7.[PROGRAM MEMORY 1–8] keys
8.[TAP/BPM] key
9.Touch-pad
Care of the touch-pad
Never apply excessive force to the touch-pad or place heavy objects on it. Rough handling may crack or break the touch-pad. Rubbing or scraping the surface of the touch-pad with a sharp object will scratch it; you must operate it only with your fingers. To clean the touch-pad, wipe it gently with a soft dry cloth. Do not use organic solvents such as thinner, since this may cause deformation.
2
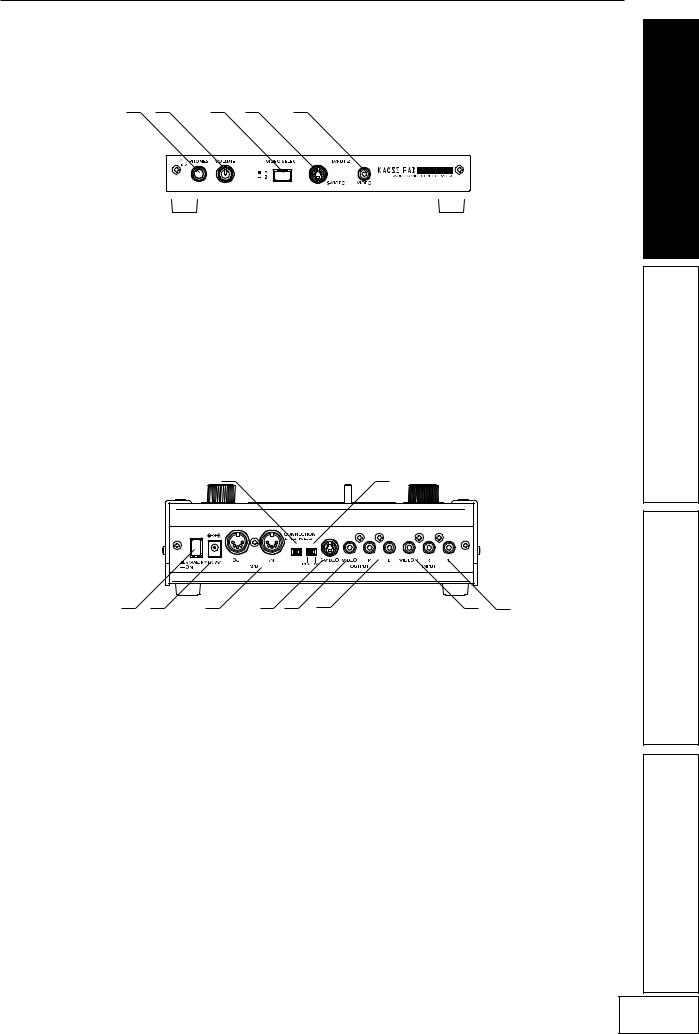
Front panel
1 |
2 |
3 |
4 |
5 |
|
|
||
|
|
|
|
|
|
|
|
|
|
|
|
|
|
|
|
|
|
|
|
|
|
|
|
|
|
|
|
|
|
|
|
|
|
|
|
|
|
|
|
|
|
|
|
|
|
|
|
|
|
|
|
|
|
1. |
[PHONES] output jack |
4. |
[INPUT 2] S-video jack |
2. |
[PHONES VOLUME] knob |
5. |
[INPUT 2] video jack |
3. |
[VIDEO SELECT] switch |
|
|
Rear panel
|
|
|
4 |
|
|
5 |
|
1 |
2 |
3 |
6 |
7 |
8 |
9 |
10 |
1. Power switch |
6. |
[OUTPUT] S-video jack |
|
2. Power connector |
7. |
[OUTPUT] video jack |
|
3. |
[MIDI IN], [MIDI OUT] connectors |
8. |
[OUTPUT] audio jacks |
4. |
[CONNECTION] switch |
9. |
[INPUT] video jack |
5. |
[NTSC/PAL] switch |
10. |
[INPUT] audio jacks |
3
Connections
Video 
DVD Player
VIDEO MONITOR |
|
INPUT VIDEO OUTPUT VIDEO |
DC7V |
AC
AC ADAPTER
INPUT 2 VIDEO
About video signals
The KAOSS PAD Entrancer can be used with either NTSC or PAL video formats. Set the [NTSC/PAL] switch to the appropriate format setting for the video materials you will be using. The KAOSS PAD Entrancer will not operate correctly if the incorrect video signal format is selected. The KAOSS PAD Entrancer will not operate correctly with non-interlaced signals.
“NTSC” is the standard format used within the USA, Canada and Japan.
You must turn off the power before you change the setting of the [NTSC/PAL] switch.
Video camera
The KAOSS PAD Entrancer will not operate if a copy-protected video signal is input.
Striped noise may appear in the image depending on the performance and characteristics of the device connected to the S-video input jack.
4

Audio 
Here’s an example of connections for applying effects to the audio input from devices connected to the KAOSS PAD Entrancer’s input jacks, and sending the processed sound from the output jacks.
TURNTABLE |
LINE OUT
DJ MIXER
CD PLAYER
INPUT L/R |
OUTPUT L/R |
DC7V |
|
|
|
|
|
|
|
|
|
TURNTABLE |
MIXER, DJ MIXER
AC
AC ADAPTER
DJ mixer connections
Connect the effect send jack of your DJ mixer etc. to the KAOSS PAD Entrancer’s [INPUT] audio jack, and connect the KAOSS PAD Entrancer’s [OUTPUT] audio jacks to the effect return jacks of your mixer. This lets you use the KAOSS PAD Entrancer as an external effect processor.
When connecting the KAOSS PAD Entrancer to the effect send/return jacks of your mixer 
If you set the KAOSS PAD Entrancer’s [CONNECTION] switch to FX LOOP, the output of the KAOSS PAD Entrancer’s [OUTPUT] audio jacks will not include the sound that is input to the KAOSS PAD Entrancer; only the effect sound will be output. To adjust the effect depth and volume, use the KAOSS PAD Entrancer’s [FX BALANCE] knob and the controls of your mixer.
DIRECT
FX LOOP
CONNECTION |
LINE OUT |
RETURN |
OUTPUT L/R |
SEND |
INPUT L/R |
TURNTABLE |
DJ MIXER |
TURNTABLE |
5
Operation
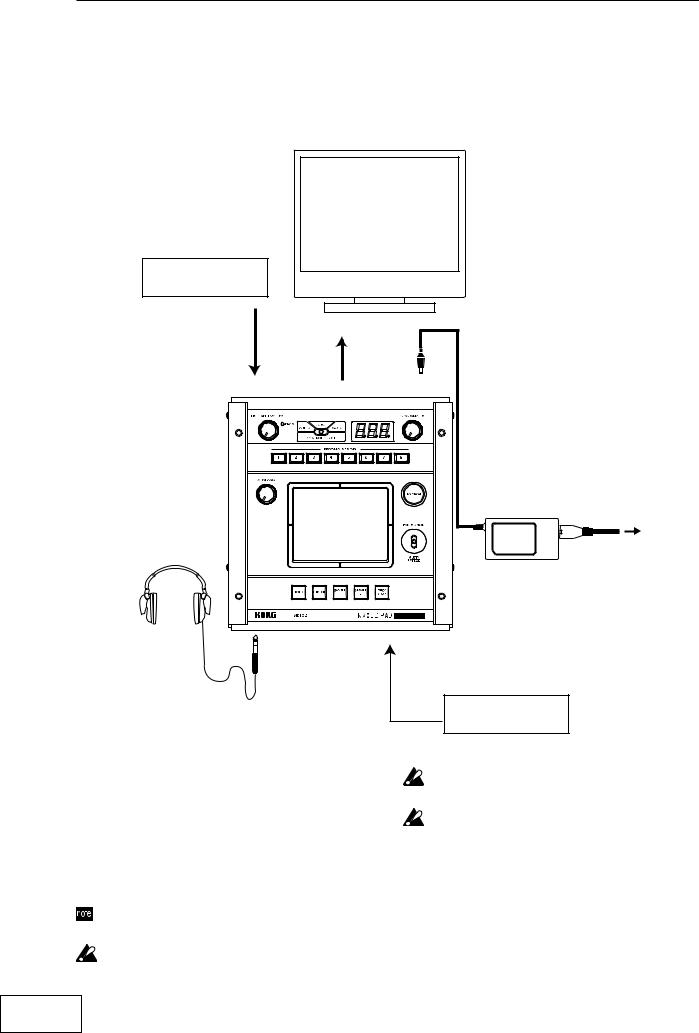
1.Turning on the power
1.Connect your equipment as described in the connection examples, and plug the AC adaptor into an AC outlet.
2.Press the [STANDBY] switch to turn on the power. The [PROGRAM/BPM] display will light.
 An image will appear on the connected TV monitor.
To turn off the power
Press the [STANDBY] switch once again.
2.Checking the video input 
1.Output a video signal from a connected device.
2.Use the [VIDEO SELECT] switch to select the input jack that is receiving the video signal you want to process.
1:The effect will apply to video input 1.
2:The effect will apply to video input 2 (or
S-video input 2). The [VIDEO 2] indicator will light.
If no signal is being input to video input 2, the [VIDEO 2] indicator will blink.

 S-video input 2 takes priority for video input 2.
3.Adjusting the volume 
1.Output audio from a connected device.
2.Adjust the audio input level.
Use the [LINE INPUT VOLUME] knob to adjust the input level so that the peak indicator does not light red.
If you are using headphones
Use the [PHONES VOLUME] knob to adjust the volume.
4.Selecting a program
1.Use the [CONTROL SELECT] switch to select the signal (video, audio) that you want to process with the effect.
Use the left position to apply effects to the audio, or the right position to apply effects to the video. If you select COMBI (center
position), effects will be applied to both audio and video.

 Refer to “Creating a COMBI program”
2.The [PROGRAM/BPM] display shows the number of the currently selected program. Use the [PROGRAM/BPM] knob to select a program (00–99).
3.Use the [FX BALANCE] knob to adjust the effect depth.
Turning this knob to the far left will lessen the effect; turning it to the far right will produce the maximum effect.
 The result will depend on the effect you select.
 If this knob is set to the far left, no effect will be applied to the sound (“dry”); if the knob is set to the far right, the maximum effect will be applied (“wet”).
 If you want to use the [FX BALANCE] knob to adjust the effect depth, set the [CONNECTION] switch to DIRECT.
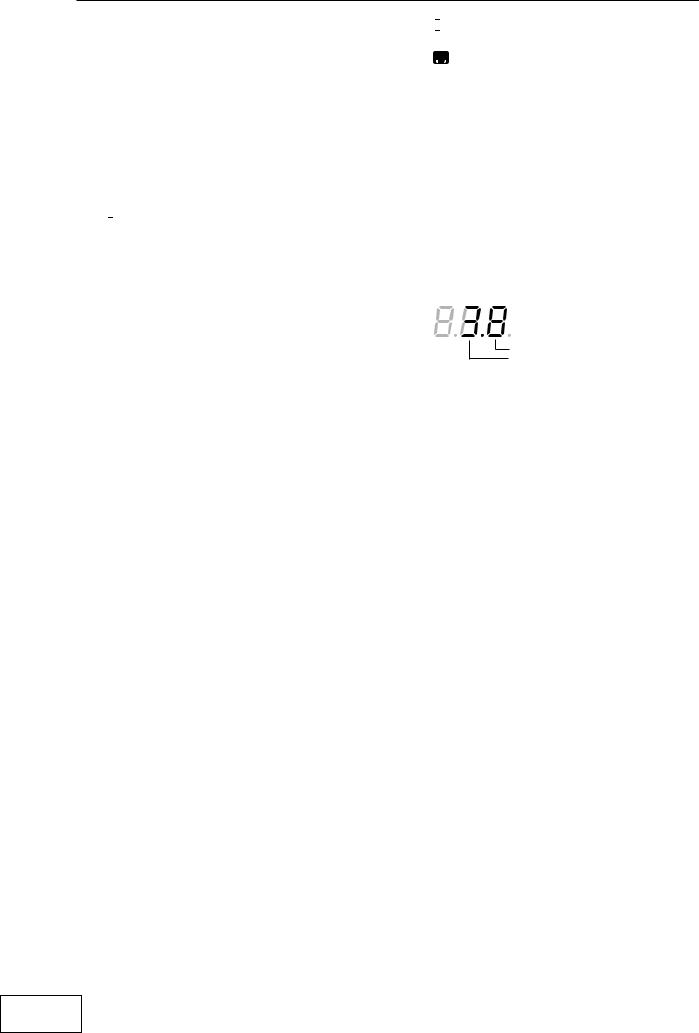
About the [PROGRAM/BPM] display
This shows the number of the currently selected program, the specified BPM, and the position of the point at which you touch the touch-pad.
When you touch the touch-pad: The position you touched (1.1–9.9; 5.5 is center) is displayed.
Vertical position (1–9)
Horizontal position (1–9)
When you switch programs: The display shows the program number (00–99). In Combination mode, this may indicate (--) for some settings when you use the program memory keys to recall a program.
When you set the BPM: When you use the [TAP/BPM] key to set the BPM, the display shows the BPM value. In Auto BPM mode, three dots will light.
In Pattern Select mode: The display shows the number of the currently selected pattern.
In MIDI Edit mode: The display shows information such as the MIDI channel or control number.
5. Using the touch-pad
1.Rub your finger over the touch-pad or tap (lightly strike) it to control the effect (sound).

 Affix the included protective sheet to the pad to help protect it.
2.If you turn on the [HOLD] key, the effect (sound) for the position immediately before you removed your finger from the touch pad will be maintained.
6
6. Mute/Freeze function
By moving the [PAD MOTION / MUTE/ FREEZE] lever to the MUTE/FREEZE position (toward yourself) you can perform the following operations.
 The current video image will freeze.
 The currently-input signal, sampling sound, or synth/drum sound will be cut. This lets you output only the effect sound (e.g., delay or reverb).
Transformer 
By using the [PAD MOTION / MUTE/ FREEZE] lever to rapidly switch MUTE on/ off, you can create a rhythm from a sustained input sound; this is the “transformer” technique often used by DJs.
7. Pad motion
You can capture a series of finger movements performed on the touch-pad, and replay that motion by moving the [PAD MOTION / MUTE/FREEZE] lever to PAD MOTION.
[HOLD] key on/off operations are not recorded in a Pad Motion. If you turn the [HOLD] key on and replay a Pad Motion, the effect will be held at the point where pad motion playback stopped.
Recording
When you move the [PAD MOTION / MUTE/FREEZE] lever to PAD MOTION and touch the pad, recording will begin.
Since taking your finger off the touch-pad is also recorded as an operation, you can record operations such as tapping (lightly striking the pad several times). Recording will end when you return the [PAD MOTION / MUTE/FREEZE] lever, or when the maximum recording time (approximately six seconds) has been reached.
Playback
After recording, move the [PAD MOTION / MUTE/FREEZE] lever to PAD MOTION to play back the recorded motion.
While the [PAD MOTION / MUTE/FREEZE] lever is in the PAD MOTION position, the recorded movement will be played back repeatedly as a loop.
However if you touch the touch-pad during playback, recording will begin.
If you change programs, the pad motion that was recorded in the selected program will be recalled.
Erase
To erase the recorded motion, hold down the [FUNCTION] key and move the [PAD MOTION / MUTE/FREEZE] lever to PAD MOTION.
8. Setting the BPM
If you have set the BPM, you can select an effect program from the “BPM FX” or “BPM PTN” group and apply an effect that is synchronized to the BPM. For details on the relevant effect parameters, refer to the Effect Program List ( separate sheet).
What is BPM?
BPM (Beats Per Minute) indicates the tempo of a song in terms of the number of beats (quarter notes) per minute. A higher BPM means a faster tempo.
To set the BPM
If you already know the BPM value, press the [TAP/BPM] key and use the [PROGRAM/ BPM] knob to specify the value. If you do not set the BPM value within five seconds, normal operation will resume. You can also press the [FUNCTION] key to return to normal operation.

 The range for BPM is 40–300.
Tap Tempo function
If you don’t know the BPM, set the tempo by pressing the [TAP/BPM] key two or more times at the beat of the song; the BPM will appear in the [PROGRAM/BPM] display.
Auto BPM function
If you press and hold the [TAP/BPM] key for several seconds, three dots will appear in the [PROGRAM/BPM] display, and the BPM of the input audio will be detected automatically.
If the BPM cannot be detected, the [PROGRAM/BPM] display will blink. Press the [TAP/BPM] key once again to exit automatic detection.

 The detectable BPM range is 80–160.
MIDI Sync function
You can set the BPM to MIDI clock messages from an external MIDI device. Connect the [MIDI OUT] connector of the external MIDI device (e.g., a sequencer) that is sending MIDI clock messages to the [MIDI IN] connector of the KAOSS PAD Entrancer.
In order to make the KAOSS PAD Entrancer synchronize to sequence data, you will either need to insert a “Touch Pad On” message at the beginning of each measure in your sequence data, or touch the KAOSS PAD Entrancer’s touch-pad at the beginning of the phrase to start the phrase pattern.

 If you want the KAOSS PAD Entrancer to receive MIDI Clock and Touch Pad On messages, go to MIDI Edit mode ( p.11) and make settings in “MIDI message transmission/reception settings” ( p.12) so that these messages will be received.
This function does not synchronize the KAOSS PAD Entrancer’s rhythm pattern programs to the sequence data.
If the KAOSS PAD Entrancer is synchronized to timing clock messages being received from an external MIDI device, the Touch Tempo and Auto BPM functions will not be available.
7
9. Storing settings to the [PROGRAM MEMORY] keys
You can store your favorite settings to the [PROGRAM MEMORY 1–8] keys, and instantly recall those settings when desired.
Settings that can be stored
•Effect program
•[HOLD] key on/off status and position (coordinates)
•[FX BALANCE] knob setting
•For the “BPM FX” group, the specified BPM value
•For the “SAMPLE/PLAY” group, the [SAMPLE 1] and [SAMPLE 2] keys used
•Pad motion
Audio effect programs 60 and 90–99 do not store the state of the [HOLD] key.
Storing
1.Use the [PROGRAM/BPM] knob to select the effect program you want to assign.
If you want to store the state of the [HOLD] key, select the program, then turn the [HOLD] key on and touch the touch-pad to specify the position. Also make any other settings that you want to store.
2.While holding down the [FUNCTION] key, hold down the [PROGRAM MEMORY 1–8] key that you want to assign for approximately two seconds; the settings will be stored.
When the settings have been stored, the [PROGRAM/BPM] display will stop blinking.
If you hold the [PAD MOTION / MUTE/ FREEZE] lever at PAD MOTION while storing the settings, the pad motion will not be stored.
Recalling
1.Press one of the [PROGRAM MEMORY 1–8] keys to recall the program and settings that were stored in that key. If you hold the [PAD MOTION / MUTE/FREEZE] lever at PAD MOTION while recalling the settings, the pad motion will not be recalled.
10. Creating a COMBI program
About COMBI
By setting the [CONTROL SELECT] switch to [COMBI] and operating the touch-pad, you can simultaneously control video effects and audio effects.
To store a COMBI
1.Set the [CONTROL SELECT] switch to [AUDIO], and select a program.
2.Set the [CONTROL SELECT] switch to [VIDEO], and select a program.
3.Set the [CONTROL SELECT] switch to [COMBI], and while you hold down the [FUNCTION] key, hold down the desired [PROGRAM MEMORY] key for approximately two seconds to store the settings.
11.Sampling and playing a still
image 
By moving the [PAD MOTION / MUTE/FREEZE] lever to MUTE/FREEZE you can freeze the video that is being output, store the still image in the [SAMPLE 1] or [SAMPLE 2] key, and then use the touch-pad to control the still image (for example by expanding or inverting it). You can store one still image in each of the two keys.
The sampled images will be lost when you turn off the power. It is not possible to save the sampled images.
Sampling
1.Set the [PAD MOTION / MUTE/FREEZE] lever to MUTE/FREEZE.
The monitor image will freeze.
2.Press either the [SAMPLE 1] or [SAMPLE 2] key.
The still image shown in the monitor will be stored to the key you press.
Playback
1.When you press the [SAMPLE 1] or [SAMPLE 2] key, the sampled still image will be selected as the input source.
While playing back the still image, you can operate the touch-pad to apply an effect to the still image.
Press the [SAMPLE 1] or [SAMPLE 2] key once again to cancel the still image playback.
Some effects may not produce any result.
If you have selected a program from other than the “SAMPLE/PLAY” group, you cannot play back the still image except while recording.
8
12. Sampling and playing motion video 
You can sample a motion video clip and play it back while using an effect program and the touch-pad to control the video clip (for example by expanding or inverting it).
If you have selected a program from the SAMPLE/ PLAY group, you can use the touch-pad to control the playback speed of the video, or even reverse the playback.
The sampled video will be lost when you turn off the power. It is not possible to save the sampled video.
Sampling
1.Select program 94–99 from the “SAMPLE/ PLAY” group.
2.When you press the [REC/STOP] key, the [REC/STOP] key will light and recording will begin. Recording will end when you
press the key again or when the memory capacity has been reached.

 If you select an effect clip pattern (40–59) in pattern display mode, you will be able to record a pattern. Turn on the [SAMPLE 1] or [SAMPLE 2] key to record the still image that you sampled.
Playback
The playback method will depend on the effect program you have selected.
For a program in the “SAMPLE/PLAY” group
1.Select a program in the “SAMPLE/PLAY” group.
2.When you touch the touch-pad, the video clip will play back according to the position of your finger on the touch-pad.
For a program not in the “SAMPLE/PLAY” group
1.Select a program not in the “SAMPLE/ PLAY” group.
2.With the [SAMPLE 1] and [SAMPLE 2] keys turned off, hold down the [REC/STOP] key and touch the touch-pad; the sampled video clip will playback at normal speed. If you hold down the [REC/STOP] key and press the [HOLD] key, the [REC/STOP] key will be held, allowing you to play back the video clip simply by touching the touch-pad. Hold will be cancelled when you press the [REC/ STOP] key once again.
When you hold down the [REC/STOP] key and press the [HOLD] key, playback will be held. When you press the [REC/STOP] key
once again, the hold will be cancelled. 
 Pattern display will be cancelled if you play back a motion video sample while a pattern is displayed.
You cannot display a pattern during sample playback.
13. Sampling and playing a phrase 
If you have recorded a phrase from the input into the [SAMPLE 1] and [SAMPLE 2] keys, you can select a program from the “SAMPLE/PLAY” group (90–99) and use the touch-pad to control the playback speed or reverse playback.
If you have selected a program from other than the “SAMPLE/PLAY” group, pressing the [SAMPLE 1] or [SAMPLE 2] key will play back the phrase that was recorded on each key. You can record approximately six seconds of monaural sound in each key.
The recorded phrase will be lost when you turn off the power. It is not possible to save the recorded phrase.
Recording
1.Press the [REC/STOP] key. The [REC/STOP] key LED will blink, and you will be in record-ready mode.
2.Press either the [SAMPLE 1] or [SAMPLE 2] key that you want to use for recording. The playback audio will not be heard at this time.
3.Press the [REC/STOP] key; the [REC/STOP] key LED will light and recording will begin. Recording will end when you press the [REC/STOP] key once again.
Recording will end automatically if you record up to the maximum recording time.
If you select a program not in the “SAMPLE/ PLAY” group, you can operate the touch-pad while you record; the sound processed by the effect will be recorded.
Auto-rec (AUTO REC)
You can make recording start automatically when audio is input to the [INPUT] audio jacks.
1.In step 2 of recording, hold down the [SAMPLE 1] or [SAMPLE 2] key you want to use, and press the [REC/STOP] key; the [REC/STOP] key and [SAMPLE 1] [SAMPLE 2] key LEDs will blink simultaneously, and you will be in record-ready mode.
2.When you input an audio signal, recording will begin automatically. Recording will end when you press the [REC/STOP] key once again.

 If the lever is set to “COMBI,” and you have selected a program from the “SAMPLE/PLAY” group as the video effect, you can record the video simultaneously with the audio.
9

Playback
The playback method will depend on the effect program you have selected.
For a program in the “SAMPLE/PLAY” group
1.Select a program of the “SAMPLE/PLAY” group (90–99).
2.Press the [SAMPLE 1] or [SAMPLE 2] key that you want to play back. You will not hear the playback at this time.
3.When you touch the touch-pad, playback will occur according to the position you touch. The way in which the phrase plays back will depend on the program. ( separate sheet “Effect Program List)
4.Use the [FX BALANCE] knob to adjust the volume of the playback.
If the [FX BALANCE] knob is in the center position, the playback sound and the input sound will be output in a 1:1 proportion.
Setting the knob to the maximum position will output only the sample sound when playing; the input sound will not be heard.
For a program not in the “SAMPLE/PLAY” group
1.Select a program not in the “SAMPLE/ PLAY” group.
2.When you press the [SAMPLE 1] or [SAMPLE 2] key, recorded phrase will play back at normal speed. If you continue holding down the key, the playback will loop.
To adjust the volume, hold down the [SAMPLE 1] or [SAMPLE 2] key and turn the [FX BALANCE] knob.
By operating the touch-pad during playback, you can apply effects to the playback sound. If you hold down the [SAMPLE 1] or [SAMPLE 2] key and press the [HOLD] key, the playback will be held. Hold will be cancelled when you press the [SAMPLE 1] or [SAMPLE 2] key once again.
14.Displaying the audio waveform or a composite
pattern
You can display the waveform of the audio input signal or audio output signal. In addition, patterns built into the KAOSS PAD Entrancer can be used instead of the video input as material for modification.
Pattern Display mode
Hold down the [FUNCTION] key and press the [SAMPLE 1] key to enter Pattern Display mode; the [PROGRAM/BPM] display will blink indicate either Pattern Display mode or the pattern select number.

 If you display a pattern while playing back a motion video sample, playback will stop. When you play back the sample once again, pattern display mode will be cancelled and the sample will play back.
Exiting Pattern Display mode
To return to normal operation, either touch the touch-pad, press the [FUNCTION] key, or simply do not operate the KAOSS PAD Entrancer for ten seconds.
Displaying a pattern
From Pattern Display mode, press one of the [PROGRAM MEMORY 1–8] keys to recall the pattern that is pre-selected for that key.
You can press the [SAMPLE 1] key to turn the last-selected pattern on/off.
To cancel the display
To cancel the display, press the selected [PROGRAM MEMORY 1–8] key once again. The display will also be cancelled if you switch programs during normal operation.

 The display will be not cancelled if you hold down the [FUNCTION] key and turn the program knob to change programs.

 Effect clip patterns (40–59) will appear when you operate the touch pad.
Switching patterns
In Pattern Display mode, you can hold down one of the [PROGRAM MEMORY 1–8] keys and turn the [PROGRAM/BPM] knob to switch the pattern that is assigned to that key. If that key is selected, you can simply turn the [PROGRAM/BPM] knob to switch patterns.
Storing the modified settings
In Pattern Display mode, press and hold the [REC/STOP] key for one second or longer to store the modified settings. The settings of MIDI Edit mode will also be stored at this time. If you turn off the power without storing, the settings will revert to their previous state.
To stop the pattern display from being turned off when you change programs
Hold down the HOLD key while you turn on the power. (The HOLD key will light for a short time.)
To cancel
Turn off the power, and then turn it on in the normal way.
Pattern types
00–39: Impose patterns
These layer a superimposed pattern (such as the waveform of the input signal, or touch pad position information) onto the image. You cannot apply an effect to the imposed pattern or sample it.
40–59: Effect clip patterns
These patterns display color patterns or image data. You can use these as effect materials.
If you have selected a program from other than the “SAMPLE/PLAY” group, you cannot display these except while recording.
10

MIDI functions
What is MIDI?
MIDI (Musical Instrument Digital Interface) is a world-wide standard for exchanging a wide variety of performance-related data between electronic musical instruments, effect processors, sequencers, etc. and computers.
MIDI connections
Use commercially available MIDI cables to send or receive MIDI messages. Connect the KAOSS PAD Entrancer’s MIDI connectors to the MIDI connectors of the external MIDI device to/from which you want to send/receive data.
MIDI IN connector: Receives MIDI messages from another MIDI device. Connect this to the MIDI OUT connector of the external device.
MIDI OUT connector: Transmits messages from the KAOSS PAD Entrancer. Connect this to the MIDI IN connector of the external device.
Connection example
Here is an example of connecting the KAOSS PAD Entrancer with another MIDI device so that it will play back along with sequence data.
|
|
|
|
|
|
|
|
|
|
|
|
|
|
|
|
|
|
|
|
|
|
|
|
|
|
|
|
|
|
|
|
|
|
|
|
|
|
|
|
|
|
|
|
|
|
|
|
|
|
|
|
|
|
|
|
|
|
|
|
|
|
|
|
|
|
|
|
|
|
|
|
|
|
|
|
|
|
|
|
|
|
|
|
|
|
|
|
|
|
|
|
|
|
|
|
|
|
|
|
|
|
|
|
|
|
|
|
|
|
|
|
|
OUTPUT |
|
MIDI OUT |
|
|
LINE IN |
MIDI IN |
||||||||||||||||||||
|
|
|
|
|
|
|
|
|
|
|
|
|
|
|
|
|
|
|
|
|
|
|
|
|
|
|
|
|
|
|
|
|
|
|
|
|
|
|
|
|
|
|
|
|
|
|
|
|
|
|
|
|
|
|
|
|
|
|
|
|
|
|
|
|
|
|
|
|
|
|
|
|
|
|
|
|
|
|
|
|
|
|
|
|
|
|
|
|
|
|
|
|
|
|
|
|
|
|
|
|
|
|
|
|
|
|
|
|
|
|
|
|
|
|
|
|
|
|
|
|
|
|
|
|
|
|
|
|
|
|
|
|
|
|
|
|
|
|
|
|
|
|
|
|
|
|
|
|
|
|
|
|
|
|
|
|
|
|
|
|
|
|
|
|
|
|
|
|
|
|
|
|
|
|
|
|
|
|
|
|
|
|
|
|
|
|
|
|
|
|
|
|
|
|
|
|
|
|
|
|
|
|
|
|
|
|
|
|
|
|
|
|
|
|
|
|
|
|
|
|
|
|
|
|
|
|
|
|
|
|
|
|
|
|
|
|
|
|
|
|
|
|
|
|
|
|
|
|
|
|
|
|
|
|
|
|
|
|
|
|
|
|
|
|
|
|
|
|
|
|
|
|
|
|
|
|
|
|
|
|
|
|
|
|
|
|
|
|
|
|
|
|
|
|
|
|
|
|
|
|
|
|
|
|
|
|
|
|
|
|
|
|
|
|
|
|
|
|
|
|
|
|
|
|
|
|
|
|
|
|
|
|
|
|
|
|
|
|
|
|
|
|
|
|
|
|
|
|
|
|
|
|
|
|
|
|
|
|
|
|
|
|
|
KORG EM-1
Using MIDI
In addition to using the KAOSS PAD Entrancer as an effect processor, you can use it as a realtime controller that can transmit MIDI messages to control a synthesizer or other external MIDI device.
If the KAOSS PAD Entrancer is connected to a MIDI sequencer, the MIDI messages transmitted when you operate the touch-pad can be recorded on the MIDI sequencer and then played back to reproduce all of your touch-pad operations.
About the MIDI implementation chart
The owner’s manual of each MIDI device contains a “MIDI implementation chart.” This chart is designed to show what type of MIDI messages this particular device is able to transmit and receive. When using two MIDI devices together, compare the implementation charts of the two devices to verify that they can communicate with each other.
* Detailed MIDI specifications are listed in the MIDI Implementation.
MIDI Edit mode
On the KAOSS PAD Entrancer, use the MIDI Edit mode to access the MIDI-related settings.
Hold down the [FUNCTION] key and press the [SAMPLE 2] key to enter MIDI Edit mode. The MIDI channel will blink in the [PROGRAM/BPM] display.
Setting the MIDI channel
In MIDI Edit mode, the [PROGRAM/BPM] display shows the MIDI channel. In this state you can use the [PROGRAM/BPM] knob to change the MIDI channel.
About MIDI channels
MIDI uses sixteen “channels” (1–16) to independently send data along a single cable to more than one MIDI device.
If the transmitting device is set to MIDI channel “1,” the MIDI messages will not be received unless the receiving device is also set to MIDI channel “1“.
11

MIDI message transmission/ reception settings
The transmission and reception of each type of MIDI message can be switched on/off by pressing the key assigned to that type of MIDI message. Transmission/ reception is enabled if the corresponding key is lit, and disabled if the key is dark. (see the “Transmitted and received messages” table below)
Some parameters are only transmitted, and others are only received.
Changing the MIDI control numbers
In MIDI Edit mode, you can hold down one of the [PROGRAM MEMORY 3–8] keys and turn the [PROGRAM/BPM] knob to change the control number setting assigned to that key.
Although you are free to assign (duplicate) an alreadyassigned control number, you cannot simultaneously enable transmission/reception of the same control number.
The MIDI messages transmitted and received by the KAOSS PAD Entrancer can be selected from a range of CC#1–CC#31, CC#64–CC#95, and Pitch Bend.
Storing the edited settings
In MIDI Edit mode, press and hold the [REC/STOP] key for one second or more; the edited MIDI settings will be stored. The pattern select mode setting will also be stored at this time. If you turn off the power without storing the settings, the KAOSS PAD Entrancer will revert to the previous settings.
To exit MIDI Edit mode
To return to normal operation, you can either touch the touch-pad, press the [FUNCTION] key, or wait for ten seconds without performing any operation.
About the stored settings
The contents of “PROGRAM MEMORY” and the control number settings you make in MIDI Edit mode can be transmitted as exclusive messages and saved on an external MIDI device.
For details on the exclusive messages that can be transmitted, refer to the separate MIDI Implementation.
Transmitted and received messages
With the factory settings, the KAOSS PAD Entrancer will transmit and receive the following MIDI messages.
Operation transmitted |
MIDI message transmitted |
Key that switches transmission on/off |
|
Touch-pad X axis |
Effect control 1 (CC#12) *1, *2 |
PROGRAM MEMORY 4 |
|
|
|
|
|
Touch-pad Y axis |
Modulation depth 1 (CC#1) Y=5–9 |
PROGRAM MEMORY 1 |
|
|
|
|
|
|
Modulation depth 2 (CC#2) Y=5–1 |
PROGRAM MEMORY 2 |
|
|
|
|
|
|
Effect control 2 (CC#13) *1, *2 |
PROGRAM MEMORY 5 |
|
|
|
|
|
Touch-pad X+Y axis |
Effect depth 3 |
(CC#93) *1 |
PROGRAM MEMORY 3 |
|
|
|
|
Touch-pad on/off |
Effect depth 2 |
(CC#92) *1, *2 |
PROGRAM MEMORY 6 |
|
|
|
|
FX BALANCE |
Effect depth 4 |
(CC#94) *1, *2 |
PROGRAM MEMORY 7 |
|
|
|
|
MUTE |
Effect depth 5 |
(CC#95) *1, *2 |
PROGRAM MEMORY 8 |
|
|
|
|
Program change |
Program change (0–99) *2 |
HOLD |
|
|
|
|
|
Pad motion output |
Each touch-pad message |
SAMPLE 2 |
|
Operation received |
MIDI message received |
Key that switches reception on/off |
|
|
|
Touch-pad X axis |
Effect control 1 (CC#12) *1, *2 |
PROGRAM MEMORY 4 |
|
|
|
Touch-pad Y axis |
Effect control 2 (CC#13) *1, *2 |
PROGRAM MEMORY 5 |
|
|
|
Touch-pad on/off |
Effect depth 2 (CC#92) *1, *2 |
PROGRAM MEMORY 6 |
|
|
|
FX BALANCE |
Effect depth 4 (CC#94) *1, *2 |
PROGRAM MEMORY 7 |
|
|
|
MUTE |
Effect depth 5 (CC#95) *1, *2 |
PROGRAM MEMORY 8 |
|
|
|
Program change |
Program change (0–99) *2 |
HOLD |
|
|
|
BPM |
Timing Clock |
SAMPLE 1 |
*1: You can select the MIDI message that will be transmitted/received from a range of CC#1–CC#31, CC#64– CC#95, and Pitch Bend. ( ) indicates the factory setting.
*2: On/off and CC# settings will be the same for transmission and reception.
Control changes for touch-pad Y-axis (Y=5–9, Y=5–1) and touch-pad X+Y axis can be transmitted but not received. This means that when recording control changes onto a sequencer, you must use MIDI Edit mode to turn [PROGRAM MEMORY 1–3] off so that unnecessary MIDI messages are not transmitted. You cannot duplicate the settings of control numbers that have already been assigned.
12

FAQ
Q1: A video effect is not applied when I touch the pad
A: Check the following points.
1)Is the control lever in the correct position? >> The video effect is applied only when the
control lever is in the COMBI or VIDEO mode.
2)Try adjusting the FX BALANCE knob.
>> The FX BALANCE knob adjusts the video only if the control lever is set to VIDEO.
3)Is the PAL/NTSC switch in the correct
position?
>>You must turn off the power before changing the position of this switch.
Q2: I can't sample a still image successfully.
A: In order to sample a still image, the control lever must be in VIDEO mode.
>>Set the control lever to VIDEO mode. Then use the MUTE/FREEZE lever to freeze the image and press the SAMPLE (1 or 2) button to sample the image.
Q3: In COMBI mode, the VIDEO effect applies only to still images.
A: If a still image is being played back, the video effect will apply to the still image.
>>To stop playback of the still image, temporarily set the control lever to VIDEO, and then press the SAMPLE button to stop the still image playback.
Q4: In COMBI mode, turning the FX BALANCE knob does not change the video effect.
A:In COMBI mode, the FX BALANCE knob applies only to the audio effect.
Q5: I want to store video effect and graphic pattern playback together in memory.
A:You can't store an effect program and graphic pattern playback together in the PROGRAM MEMORY 1–8 keys.
Q6: The graphic pattern disappears when I change the video effect.
A:Graphic pattern playback will stop when you re-select the effect program.
>>If you want to display the pattern again, you must re-enter graphic pattern mode.
If you want to apply a video effect to the pattern, first select the desired video effect, and then enter graphic pattern mode and select the pattern.
Q7: Can I mix the two video inputs VIDEO 1 and VIDEO 2?
A:The KAOSS Pad KAOSS PAD Entrancer does not have input mixing capability.
>>The video effect program applies to the input you select; either VIDEO 1 or VIDEO 2. However, you can operate the input select switch to obtain a result similar to mixing a sampled video clip or still image.
About demo mode
Entering demo mode
Set the control lever to COMBI and hold down the FUNCTION key while you turn on the power. (The FUNCTION key will light momentarily.)
Using demo mode
When the control lever is set to COMBI and you do not perform any operation for five seconds, the demo will start. (Pad motions will be automatically executed as the demo mode advances through the COMBI programs.) Only the COMBIs will be demoed. Sampling programs (94–99) will be skipped.
Pausing demo mode
The KAOSS PAD Entrancer will pause the demo mode when you perform any operation, and will re-enter the demo mode if no further operation has been performed for five seconds.
Exiting demo mode
Turn off the power, and then turn it on again in the usual way.
13

Specifications
Number of effect programs: 100 (video), 100 (audio), 100 (combination) Inputs: Video input jack 1 / RCA (phono style) jack
Video input jack 2 / RCA jack or S-video jack (S-video jack takes priority) (The video input switch selects either video input jack 1 or 2)
Line input jacks / stereo RCA jacks
Outputs: Video output jack / RCA jack
S-video output jack / S-jack
Line output jacks /stereo RCA jacks
Headphone jack / stereo 1/4" phone jack
Audio sampling frequency: 44.1 kHz
Audio AD/DA: 20-bit linear
MIDI: IN/OUT
Power supply: DC7V (dedicated AC adaptor)
Included items: AC adaptor, touch pad protector sheet
Dimensions: 240 (W) × 247 (D) × 83 (H) mm
Weight: 2.0 kg
* Appearance and specifications are subject to change without notice.
14

15
 Loading...