


Owner’s Manual Manuel d’utilisation Bedienungsanleitung

Table of Contents |
|
Precautions ............................................................................ |
3 |
Introduction ........................................................................... |
4 |
Main Features ........................................................................................... |
4 |
Controllers and their Functions ................................................................ |
4 |
Setup ...................................................................................... |
7 |
Installing the MIDI driver and softwares ................................................... |
7 |
Making connections and turning on the power ......................................... |
8 |
About the K-Series and the driver ports ................................................. |
10 |
About K-Series’ MIDI OUT connector ..................................................... |
10 |
Restoring the factory preset programs ................................................... |
11 |
Operation ............................................................................. |
12 |
Keyboard ................................................................................................ |
12 |
ClickPoint ................................................................................................ |
12 |
KNOB1 and KNOB2 ............................................................................... |
12 |
SW1 and SW2 ........................................................................................ |
13 |
OCTAVE SHIFT UP / OCTAVE SHIFT DOWN ....................................... |
13 |
PITCH wheel .......................................................................................... |
13 |
MOD wheel ............................................................................................. |
14 |
SLIDER .................................................................................................. |
14 |
PEDAL .................................................................................................... |
14 |
Using the K61P’s Internal Sounds ..................................... |
15 |
Selecting a sound ................................................................................... |
15 |
Effects ..................................................................................................... |
15 |
Setting mode .......................................................................................... |
16 |
Program change enable/disable ............................................................. |
20 |
Troubleshooting .................................................................. |
22 |
Specifications ...................................................................... |
23 |

Precautions
Location
Using the unit in the following locations can result in a malfunction.
•In direct sunlight
•Locations of extreme temperature or humidity
•Excessively dusty or dirty locations
•Locations of excessive vibration
•Close to magnetic fields
Power supply
Please connect the designated AC adapter to an AC outlet of the correct voltage. Do not connect it to an AC outlet of voltage other than that for which your unit is intended.
Interference with other electrical devices
Radios and televisions placed nearby may experience reception interference. Operate this unit at a suitable distance from radios and televisions.
Handling
To avoid breakage, do not apply excessive force to the switches or controls.
Care
If the exterior becomes dirty, wipe it with a clean, dry cloth. Do not use liquid cleaners such as benzene or thinner, or cleaning compounds or flammable polishes.
Keep this manual
After reading this manual, please keep it for later reference.
Keeping foreign matter out of your equipment
Never set any container with liquid in it near this equipment. If liquid gets into the equipment, it could cause a breakdown, fire, or electrical shock.
Be careful not to let metal objects get into the equipment. If something does slip into the equipment, unplug the AC adapter from the wall outlet. Then contact your nearest Korg dealer or the store where the equipment was purchased.
THE FCC REGULATION WARNING (for U.S.A.)
This equipment has been tested and found to comply with the limits for a Class B digital device, pursuant to Part 15 of the FCC Rules. These limits are designed to provide reasonable protection against harmful interference in a residential installation. This equipment generates, uses, and can radiate radio frequency energy and, if not installed and used in accordance with the instructions, may cause harmful interference to radio communications. However, there is no guarantee that interference will not occur in a particular installation. If this equipment does cause harmful interference to radio or television reception, which can be determined by turning the equipment off and on, the user is encouraged to try to correct the interference by one or more of the following measures:
Owner’s Manual
•Reorient or relocate the receiving antenna.
•Increase the separation between the equipment and receiver.
•Connect the equipment into an outlet on a circuit different from that to which the receiver is connected.
•Consult the dealer or an experienced radio/ TV technician for help.
Unauthorized changes or modification to this system can void the user’s authority to operate this equipment.
CE mark for European Harmonized Standards
CE mark which is attached to our company’s products of AC mains operated apparatus until December 31, 1996 means it conforms to EMC Directive (89/336/EEC) and CE mark Directive (93/ 68/EEC).
And, CE mark which is attached after January 1, 1997 means it conforms to EMC Directive (89/336/ EEC), CE mark Directive (93/68/EEC) and Low Voltage Directive (73/23/EEC).
Also, CE mark which is attached to our company’s products of Battery operated apparatus means it conforms to EMC Directive (89/336/EEC) and CE mark Directive (93/68/EEC).
IMPORTANT NOTICE TO CONSUMERS
This product has been manufactured according to strict specifications and voltage requirements that are applicable in the country in which it is intended that this product should be used. If you have purchased this product via the internet, through mail order, and/or via a telephone sale, you must verify that this product is intended to be used in the country in which you reside.
WARNING: Use of this product in any country other than that for which it is intended could be dangerous and could invalidate the manufacturer’s or distributor’s warranty.
Please also retain your receipt as proof of purchase otherwise your product may be disqualified from the manufacturer’s or distributor’s warranty. Company names, product names, and names of formats etc.are the trademarks or registered trademarks of their respective owners.
*Company names, product names, and names of formats etc. are the trademarks or registered trademarks of their respective owners.
3
Introduction
Thank you for purchasing this K-Series USB/MIDI Studio Controller. For trouble-free enjoyment of this controller, please read this manual carefully and use the product only as directed. Keep this manual in a safe place where you can easily refer to it in the future. This manual applies to the K25, K49, and K61. There is a special section that covers the additional features of the K61P.
Main Features
Equipped with a variety of expressive and powerful controllers.
ClickPoint provides two simultaneous controllers (X and Y), and also serves as a mouse for your software applications.
Korg’s M1 Le software synthesizer is included with your K-Series controller, so you can enjoy playing and creating high quality sounds immediately.
The K61P contains an internal sound engine (borrowed form Korg’s digital piano series) capable of producing 24 high fidelity sounds - including piano, electric piano, organs and more.
Controllers and their Functions
2 |
|
|
|
3 |
|
|
|
4 |
|
|
|
5 |
|
|
|
6 |
7 |
8 |
1 |
|
|
K61P Controller |
|
4

Owner’s Manual
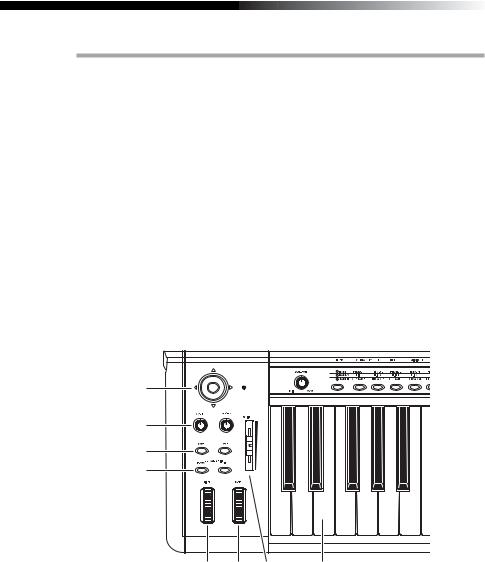
1. Keyboard
The keyboard features full-size, velocity-sensing keys.
2. ClickPoint
Two modes allow the ClickPoint controller to behave as an X - Y realtime controller, or as a clickable cursor/mouse when working with Softsynths or DAW software running on a computer.
3. KNOB1 / KNOB2
With MIDI control assignment, KNOB1/KNOB2 can be used to operate connected external MIDI equipment and software synthesizer such as DAW running on PC.
4. SW1 / SW2
These two assignable switches can be assigned independently to any MIDI control change number, allowing you to control other MIDI devices or music software programs. They can also be used as Up 1 and Down 1 buttons when selecting programs (Program Change).
5. OCTAVE SHIFT UP / OCTAVE SHIFT DOWN
The octave buttons shift the pitch up and down in units of one octave.
6. PITCH wheel
The Pitch Bend Wheel provides a smooth, continuous up or down change in pitch, that can be controlled in realtime.
7. MOD wheel
The Modulation Wheel can be assigned to any MIDI control change number, allowing you to control other MIDI devices or music software programs.
8. SLIDER
The Slider can be assigned to any MIDI control change number, allowing you to control other MIDI devices or music software programs, and is especially handy for functions such as volume and expression.
Sound Generator(K61P)
|
1 |
2 |
3 |
4 5 |
|
|
||||||||
|
|
|
|
|
|
|
|
|
|
|
|
|
|
|
|
|
|
|
|
|
|
|
|
|
|
|
|
|
|
|
|
|
|
|
|
|
|
|
|
|
|
|
|
|
|
|
|
|
|
|
|
|
|
|
|
|
|
|
|
|
|
|
|
|
|
|
|
|
|
|
|
|
|
|
|
|
|
|
|
|
|
|
|
|
|
|
|
|
|
|
|
|
|
|
|
|
|
|
|
|
|
|
|
|
|
|
|
|
|
|
|
|
|
|
|
|
|
|
|
|
|
|
|
|
|
|
|
|
|
|
|
|
|
|
|
|
|
|
|
|
|
|
|
|
|
|
|
|
|
1. VOLUME knob
This knob controls the volume of the internal sound engine. This sound is sent from the OUTPUT jacks (L/MONO,R) and the HEADPHONE jack.
2. BANK button
The 24 internal sounds are arranged in three banks, each containing eight sounds. This button selects the current bank.
5
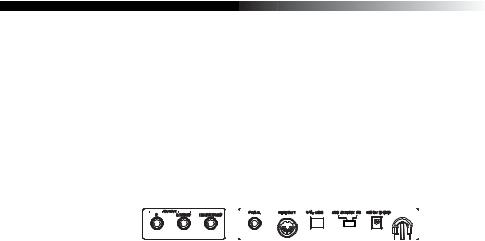
3. PROGRAM buttons
Use one of these buttons to select a sound from within the current bank.
4. REVERB button
This button is used to select the depth of the reverb effect, and to turn it on and off.
5. CHORUS button
This button is used to select the depth of the chorus effect, and to turn it on and off.
Rear panel
|
1 |
2 |
3 |
4 |
5 |
6 |
7 |
|||||||||
|
|
|
|
|
|
|
|
|
|
|
|
|
|
|
|
|
|
|
|
|
|
|
|
|
|
|
|
|
|
|
|
|
|
|
|
|
|
|
|
|
|
|
|
|
|
|
|
|
|
|
|
|
|
|
|
|
|
|
|
|
|
|
|
|
|
|
|
|
|
|
|
|
|
|
|
|
|
|
|
|
|
|
|
|
|
|
|
|
|
|
|
|
|
|
|
|
|
|
|
|
|
|
|
|
|
|
|
|
|
|
|
|
|
|
|
|
|
|
Illustration shows the rear panel of K61P.
1. OUTPUT jacks (K61P only)
These are the output jacks of internal sound engine. These can be connected to an amplifier, audio monitoring system, or to an audio recording device.
2. HEADPHONES jack (K61P only)
This jack is provided so that you can listen to the internal sound engine through a set of stereo headphone (standard plug).
3. PEDAL jack
An optional momentary pedal (such as the Korg PS-2 pedal switch) can be connected to the pedal jack. The K-Series will automatically detect the polarity of the pedal when the power is turned on.
4. MIDI OUT connector
The MIDI out jack provides direct control of other MIDI equipped sound modules or audio devices. (P.10 “About the K-Series’ MIDI OUT connector”)
5. USB connector
The USB connector allows your K-Series controller to communicate directly with your computer.
6. Power switch
This switch turns the K-Series on by selecting either DC(Adapter) or USB power.When not in use, this switch places the K-Series in the standby mode. (p.8
“Making connections and turning on the power”)
7. Power supply connector
Connect the optional AC adapter here. For ultimate convenience, the K-Series controllers can be powered directly from the USB bus - in most cases. In situations using an unpowered USB hub, or when controlling a MIDI module, you may wish to use an AC adapter.
6

Owner’s Manual
Setup
Installing the MIDI driver and softwares
Contents of the CD-ROM
The included CD-ROM contains the follwing.
K-Series editor
KORG M1 Le software synthesizer
KORG USB-MIDI driver for Windows XP
Installation guide
K-Series editor owner’s manual
M1 Le software synthesizer owner’s manual
Software license
Operating requirements
■ Mac OS X users
Computer
Apple Macintosh computer with a USB port that satisfies the operating requirements of Mac OS X
Supported operating systems
Mac OS X ver.10.3 or later
■ Windows XP users
Computer
A computer with a USB port, that satisfies the operating requirements of Microsoft Windows XP (USB chipset made by Intel Corporation is recommended)
Supported operating systems
Microsoft Windows XP Home Edition/Professional Service pack 1 or later
Install
On the CD-ROM included with your K-Series controller, please refer to the installation instructions regarding the installation of the KORG USB-MIDI Driver for Windows XP, the K-Series Editor, and the M1 Le software synthesizer.
Please read before use
Copyright to all software pertaining to this product is the property of Korg Corporation.
A license agreement for the software pertaining to this product is included separately. You must read this license agreement before you install the software.Your installation of the software will be taken to indicate your acceptance of the agreement.
Apple, Macintosh and Mac OS are registered trademarks of Apple Computer, Inc.
Windows XP is a registered trademark of Microsoft Corporation in the U.S. and other countries.
All other product and company names are trademarks or registered trademarks of their respective holders.
7
Making connections and turning on the power
 Be sure all your equipment is turned off BEFORE you begin hooking everything up.You must excercise caution, otherwise you may damage your speaker system or cause other malfunctions.
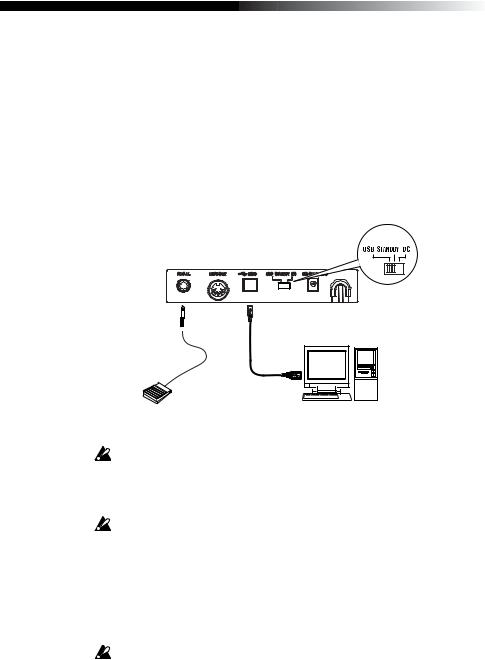
Connections using USB
1 Use a USB cable to connect the K-Series to the USB connector of your computer.
2 If you want to use a pedal, connect it to the PEDAL jack.
 The K-Series will detect the polarity of the pedal when the power is turned on. Therefore, if a pedal is connected, do not hold it down while you turn the power on.
3 To turn on the power, set the K-Series’ power switch to the USB position.
Power switch position
PEDAL jack |
USB connector |
USB cable
Pedal switch
Computer
4 When you are ready to turn off the power, set the power switch to STANDBY.
If you’re using a USB connection, you generally don’t need to use an AC adapter. However if your computer is low-powered, or if you are using a hub that is only buspowered (rather than self-powered), sufficient power may not be supplied to the K- Series. In this case, use the optional AC adapter and set the power switch to the DC position.
When USB is connected, MIDI OUT jack does not send out MIDI messages from the K-Series’ keyboard and controller.
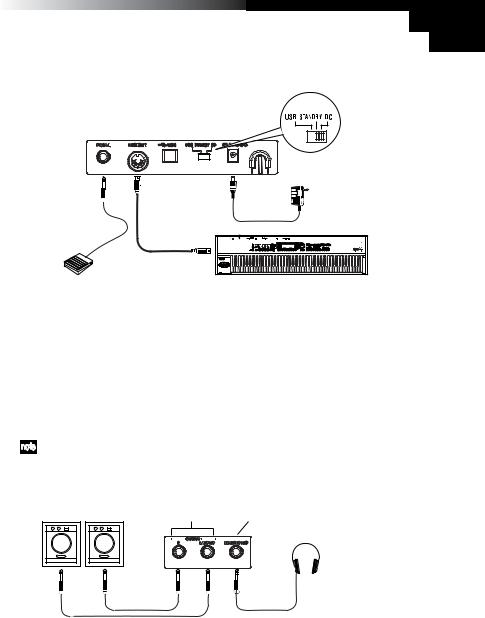
Connections using MIDI
1 Connect the plug of the optional AC adapter to the K-Series’ power connector, and plug the adapter into an AC outlet.
2 Use a MIDI cable to connect the K-Series to your external MIDI sound module.
3 If you want to use an optional pedal, connect it to the pedal jack.
The K-Series will detect the polarity of the pedal when the power is turned on. Therefore, if a pedal is connected, do not hold it down while you turn the power on.
8
Owner’s Manual
4 Set the power switch to the DC position. The power LED will light. When the power is turned on, the most recently saved settings will be recalled automatically.
5 Turn on any external MIDI sound modules connected to your K-Series controller.
|
|
Power switch position |
PEDAL jack |
MIDI OUT |
Power supply connector |
Plug the AC
adaptor into
an AC outlet
MIDI cable
Pedal switch
MIDI IN
External MIDI sound module
6 When you are ready to turn off the power, turn off any external MIDI sound modules first, and then set the K-Series power switch to STANDBY.
Using the internal sound engine [K61P only]
1 Connect the plug of the optional AC adapter to the K-Series power connector, and plug the adapter into an AC outlet.
2 Using standard instrument cables with 1/4” plugs, connect the output jacks on the K61P to the inputs of your audio monitor system or audio recorder. When connecting only one output, use the L/MONO jack only.
3
4
Use the volume knob to adjust the level of the OUTPUT jacks.
Set the power switch to the DC position. The power LED will light.
Turn on your connected audio monitoring system.
Amplified speakers |
OUTPUT jack HEADPHONES jack |
|||||||
|
|
|
|
|
|
|
|
|
|
|
|
|
|
|
|
|
|
|
|
|
|
|
|
|
|
|
Headphone
INPUT |
9

About the K-Series and the driver ports
From the computer’s point-of-view, the K-Series provides 1 USB-MIDI port and 2 USB-
MIDI out ports.
The driver of the application |
|
on a computer |
K-series |
MIDI IN device |
Keyboard/Slider/ |
|
KBD/KNOB |
Pitch,Mod wheel/ |
|
SW1/SW2/Pedal/ |
||
|
||
|
ClickPoint/ |
|
|
Dump data |
|
MIDI OUT device |
MIDI OUT juck |
|
|
||
MIDI OUT |
|
|
SOUND/CTRL *1 |
Dump data |
|
Sound generator *2 |
||
|
||
*1 K25/49/61 is CTRL |
|
|
*2 K61P only |
|
MIDI IN device
KBD / KNOB
This is used to receive MIDI messages from the keyboard and the various controllers on the K-Series. When operating a computer application from the K-Series, select this port as the application’s MIDI input. KBD/KNOB is also used to receive scene data.
Select this port as the K-Series Editor’s MIDI input.
MIDI OUT device
MIDI OUT
MIDI OUT transmits software MIDI OUT messages to K-Series' MIDI OUT jack, i.e transmits MIDI messages from a computer application to external MIDI equipment. When the K-Series is used as a USB-MIDI controller, select this port for computer application’s MIDI output.
SOUND / CTRL (CTRL if K25/K49/K61)
SOUND/CTRL is used to receive scene data from the computer. Select this port as the K-Series Editor’s MIDI input. In addition, this port is used to play notes on internal sound engine of the K61P.
About K-Series’ MIDI OUT connector
When USB is not connected
Sends MIDI messages from K-Series’ keyboard and controller.
When USB is connected
Sends MIDI messages from computer’s MIDI OUT port. It will not send MIDI messages from K-Series’ keyboard and controller.
10
Owner’s Manual
Restoring the factory preset programs
To restore the K-Series to the original factory settings, hold down SW1 and SW2 while turning on the power.
The controllers setting when factory is shipped
Controller |
Function |
SW1 / SW2 |
Program change (-1/+1) |
KNOB1 |
CC#074 (Cutoff) |
KNOB2 |
CC#079 (EG Intensity) |
SLIDER |
CC#007 (Volume) |
PITCH wheel |
Fixed (Pitch Bend) |
MOD wheel |
CC#001 (Modulation) |
PEDAL |
CC#064 (Damper) |
ClickPoint |
Mouse mode |
* The parameters shown inside the brackets relate to the M1 Le.
11
Operation
The K-Series editor software (included on the CD-ROM) is used to assign the controller settings and certain parameter values.
MIDI messages are sent using MIDI channel.
Keyboard
Note messages are sent from the keyboard.
Three velocity curves (and a constant 127 velocity) allow the keyboard response to be tailored to the performer’s playing style.
The keyboard may be transposed by semitones into any musical key.
ClickPoint
MIDI control changes can be assigned individually to the “X” direction (left/right) and the “Y” direction (up/down) to simultaneously control two parameters. In addition, the ClickPoint can be used as a computer mouse.
The assignable values are “No Assign/Control Change/Mouse”.
No Assign
No MIDI information is sent from this controller.
Control Change [0...127]
Moving the ClickPoint controller will change the value of the parameters assigned to the X and Y axis
The ClickPoint controller will return to the center position when it’s released.To lock the
X and Y parameters at their current values, press down (Z axis) on the center switch of the ClickPoint. Press it again to unlock the X and Y values.
Mouse Mode
When set to “Mouse” mode, the ClickPoint can be operates as a mouse and will control the cursor on computer screen. The ClickPoint switch functions as the mouse.
The Mouse Mode is only operative when the connected to a computer via USB.
KNOB1 and KNOB2
By assigning MIDI control changes, these knobs can be used to operate external MIDI equipment and control musical software applications. Each knob can be assigned individually.
The assignable values are “No Assign/Control Change”.
No Assign
No MIDI information is sent from this controller.
Control Change [0...127]
Turning the knob will change the value of the assigned parameter.
12

Owner’s Manual
SW1 and SW2
These two switches can be assigned individually to send a specific value to a specific
MIDI control change parameter. In fact, both an “on” and “off” value can be set. The switch type can be set to Momentary or Toggle.
The assignable values on SW1 and SW2 are “No Assign/Program Change/Control
Change”.
No Assign
No MIDI information is sent from this controller.
Program Change
Every time [SW1] is pressed, the program change number is decreased by 1.
Every time [SW2] is pressed, the program change number is increased by 1.
In addition, a program change message of “0” is sent if [SW1] are [SW2] are pressed simultaneously.
Control Change [0...127]
SW1 and SW2 can be assigned MIDI control change parameters; Toggle or Momentary mode; plus an On Value and a Release Value.
In “Toggle” mode, each time a switch is pressed, a MIDI control message is sent; each press will alternate between the On Value and the Release Value.
In “Momentary” mode, the On Value MIDI control message is sent when the switch is pressed down, and a Off Value MIDI control message is sent when the switch is released.
OCTAVE SHIFT UP / OCTAVE SHIFT DOWN
These buttons can shift pitch of the keyboard in one octave units. The octave shift range is different depending on the keyboard length.
K-Series’ type |
Octave ranges |
K25 |
-4...+4 |
K49 |
-4...+4 |
K61/K61P |
-3...+3 |
Key lights(status) |
Octave setting |
|
Dark |
±0 octave |
|
Green |
+1 |
/ -1octave |
Orange |
+2 |
/ -2octave |
Red |
+3 |
/ -3octave |
Red Flashing |
+4 |
/ -4octave(K25/K49 only) |
PITCH wheel
Use the Pitch Bend Wheel to send MIDI pitch bend messages.
13

MOD wheel
By assigning a MIDI control change number, the Modulation Wheel can be used to operate external MIDI equipment and control musical software applications.
The assignable values are “No Assign/Control Change/After touch”.
No Assign
No MIDI information is sent from this controller.
Control Change [0...127]
Use the Mod Wheel to smoothly change the value of the assigned MIDI control change parameter.
After Touch
Use the Mod Wheel to send channel AFTERTOUCH messages.
SLIDER
By assigning a MIDI control change number, the Modulation Wheel can be used to operate external MIDI equipment and control musical software applications.
The assignable values are “No Assign/Control Change”.
No Assign
No MIDI information is sent from this controller.
Control Change [0...127]
Use the slider to smoothly change the value of the assigned MIDI control change parameter.
PEDAL
An optional pedal switch can be assigned to send a specific value to a specific MIDI control change parameter. In fact, both an “on” and “off” value can be set. The switch type can be set to Momentary or Toggle.
The assignable values are “No Assign/Control Change”.
No Assign
No MIDI information is sent from this controller.
Control Change [0...127]
The pedal is assigned to MIDI controls with Toggle/Momentary mode selection, On
Value and Off Value.
In “Toggle” mode every time press the pedal, MIDI control message with parameter On Value and Off Value will be sent in turn.
In “Momentary” mode every time press the pedal, MIDI control message with parameter On Value will be sent when press down and MIDI control message with parameter
Off Value will be sent when releas up.
14

Owner’s Manual
Using the K61P’s Internal Sounds
Selecting a sound
The 24 Internal sounds of the K61P are organized into three banks each containing eight sounds. To select a particular sound, you need to select a program button and a bank. For example, to select the Clavi sound, press the sixth program button from the left (the key will light). Then press the bank button to select BANK2.
1
2
Press the program key corresponding to the sound you want to select.
Press the bank button to select one of the three banks.
Every time the bank key is pressed, the selected bank will switch from BANK1, BANK2 or BANK3. The selected bank will be shown by the bank lights.
For example, to select the Clavi sound, press the sixth program key from the left to turn on the key light. Then press the bank key to select BANK2.
Sound List
[PROGRAM] key |
Bank1 |
Osc# |
Bank2 |
Osc# |
Bank3 |
Osc# |
[PIANO 1] |
Grand Piano 1 |
2 |
E. Piano 1 |
1 |
Jazz Organ 1 |
2 |
[PIANO 2] |
Grand Piano 2 |
2 |
E. Piano 2 |
1 |
Jazz Organ 2 |
2 |
[PIANO 3] |
Standard Piano |
1 |
Soft E.P. |
1 |
Jazz Organ 3 |
2 |
[PIANO 4] |
Bright Piano |
1 |
Vintage E.P. |
1 |
Church Organ 1 |
3 |
[PIANO 5] |
HonkyTonk Piano |
2 |
E.P.Pad |
2 |
Church Organ 2 |
1 |
|
|
|
|
|
|
|
[PIANO 6] |
Mellow Piano |
1 |
Clavi |
1 |
Church Organ 3 |
1 |
|
|
|
|
|
|
|
[HARPSI 1] |
Harpsichord 1 |
1 |
Vibraphone |
1 |
Strings |
1 |
|
|
|
|
|
|
|
[HARPSI 2] |
Harpsichord 2 |
2 |
Choir |
1 |
Slow Strings |
2 |
|
|
|
|
|
|
|
*[PROGRAM] key is BANK1’s label.
*Indicates the number of oscillators used to produce the voice.
Effects
Reverb
Reverb adds a concert hall ambience by simulating the echoes and sound reflection of such an environment.
1 Press the [REVERB] button to select one of the three reverb depths. The selected setting will be shown by the color of the [REVERB] button.
[REVERB] button lights |
Reverb depth |
Dark |
Off |
Green |
Light |
Orange |
Standerd |
Red |
Deep |
15

Chorus
Chorus adds a sense of depth and motion to the sound
1 Press the [CHORUS] button to select the depth of the chorus effect. The selected setting will be shown by the color of the [CHORUS] button.
[CHORUS] key |
Chorus depth |
Dark |
Off |
Green |
Light |
Orange |
Standerd |
Red |
Deep |
Setting mode
The Setting mode is used to access and change the settings of other features on the
K61P. To enter the Setting mode, hold down the Bank button. The BANK lights and the 8 program button lights will turn off. Now you can use the 8 program buttons to select the function you want to change. The selected program button light will flash. Then press the note on the keyboard to set the value.
When you are done, press the [BANK] button to exit the Setting mode.
The eight items available in the Setting mode are shown below:
[PROGRAM] keys |
Function |
Contents |
[PIANO 1] |
Velocity curve |
Velocity Curve Setting |
[PIANO 2] |
Transpose |
Transposing the Keyboard |
[PIANO 3] |
Pitch |
Adjusting the Pitch |
|
|
|
[PIANO 4] |
Temperament |
Selecting a Temperament |
|
|
|
[PIANO 5] |
Global MIDI channel |
Changing the Global MIDI Channel Setting |
|
|
|
[PIANO 6] |
Local control |
The Local Control On/Off Setting |
|
|
|
[HARPSI 1] |
Program Change Setting |
Enabling or Disabling Program Changes |
|
|
|
[HARPSI 2] |
Volume message filter |
Enabling or Disabling Volume Message Filter |
|
|
|
* [PROGRAM] key is BANK 1’s lablel.
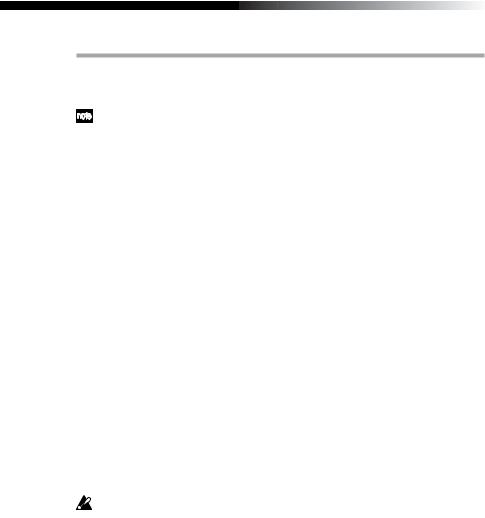
Velocity curve
There are 3 velocity curves and a constant (127) velocity setting. You can select any one of them to match your performance or playing style.
1
2
3
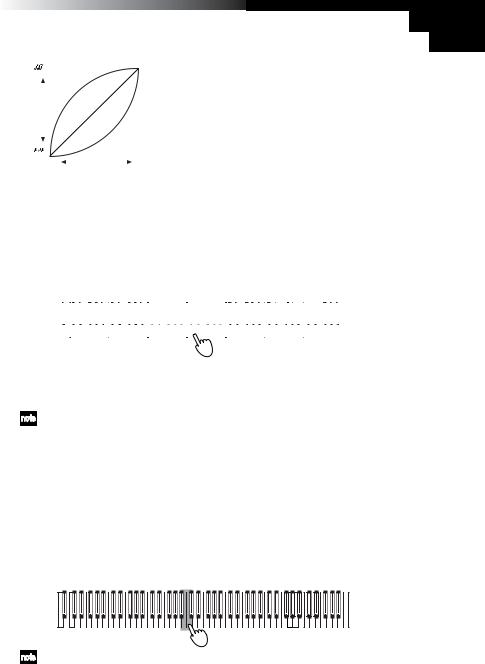
Hold down [BANK] button until the K-Series enters the Setting mode.
Press the Program 1 [PIANO 1/E.P. 1/ORGAN 1] button (the button will flash).
To select the curve, press C4 for (soft), C#4 (standard), D4 (hard),or D#4 (const).
C1 |
C2 |
C3 |
C4 |
C5 |
C6 |
C7 |
C8 |
16
Owner’s Manual
4 Press the [BANK] button to exit the Setting mode.
Loud ( |
) |
|
Light |
|
|
|
Note |
Touch, control change setting |
||||
|
|
|
|
|
|
|||||||
|
|
|
|
|
|
C4 |
Light (less force is required to play loudly) |
|||||
|
|
|
|
|
|
|
|
|
|
|||
|
|
|
|
|
|
|
|
|
|
C#4 |
Standard(general piano intensity) |
|
Output |
|
|
|
|
|
|
|
|
||||
|
|
|
Normal |
|
|
|
|
|
|
|
||
|
|
|
|
|
|
|
D4 |
Heavy (gently struck notes are played softer) |
||||
Level |
|
|
|
|
|
|
|
|
||||
|
|
|
|
|
|
|
|
|
||||
|
|
|
|
Heavy |
D#4 |
CONST(all notes play with a velocity of 127) |
||||||
|
|
|
|
|
||||||||
|
|
|
|
|
||||||||
Soft ( |
) |
|
|
|
|
Velocity Curve setting is used by controller and |
||||||
|
|
|
|
|
|
|
|
|
||||
Gentle |
|
Key Force |
|
Strong |
|
sound generator. |
||||||
|
|
|||||||||||
Transpose
By transposing the keyboard, you can play a song in a different musical key without changing your fingering.
Transpose is set in semitone, ranges within ±1 octave(-12...12).
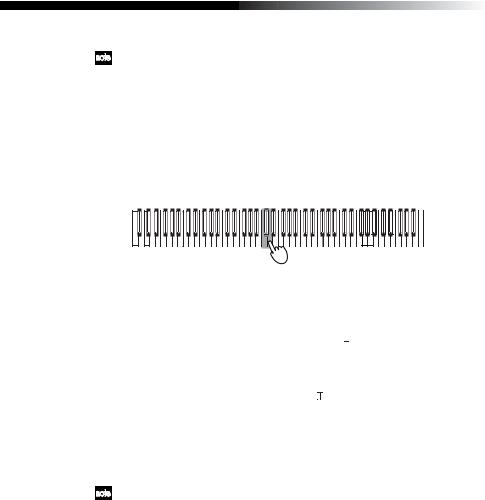
1
2
Hold down [BANK] button until the K-Series enters the Setting mode.
Press the Program 2 [PIANO 2/E.P. 2/ORGAN 2] button (the button will flash). Press one of the notes between C3...C5 to select the transpose setting.
|
|
|
|
|
|
|
|
|
|
|
-12 |
0 |
+12 |
|
|
|
|
|
|
|
|
|
|
|
|
|
|
|
|
|
|
|
|
|||||
|
|
|
|
|
|
|
|
|
|
|
|
|
|
|
|
|
|
|
|
|
|
|
|
|
|
|
|
|
|
|
|
|
|
|
|
|
|
|
|
|
|
|
|
|
|
|
|
|
|
|
|
|
|
|
|
|
|
|
|
|
|
|
|
|
|
|
|
|
|
|
|
|
|
|
|
|
|
|
C1 |
|
|
|
|
C2 |
|
|
|
|
C3 |
C4 |
C5 |
|
|
|
|
C6 |
|
|
C7 |
|
|
|
|
C8 |
||||||||||||
3
4
Press note C4 to cancel the transpose function.
Press the [BANK] button to exit the Setting mode.
Transpose setting is used by controller and sound generator.
Pitch
The overall pitch, or tuning, of the K61P’s internal sound engine can be adjusted to match other instruments or recordings.
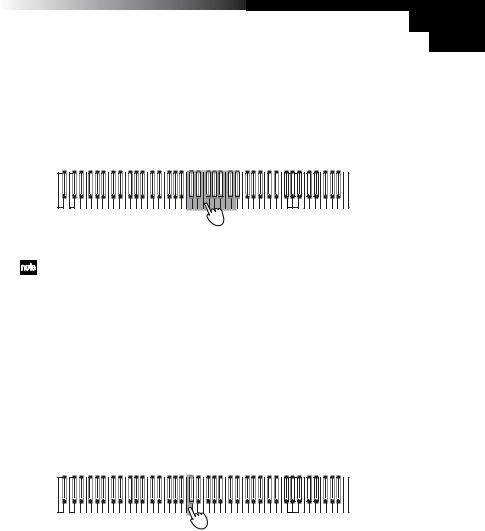
1
2
Hold down [BANK] button until the K-Series enters the Setting mode.
Press the Program 3 [PIANO 3/E.P. 3 ORGAN 3] button (the button will flash).
3 Press note C4 to increase the pitch; every time C4 is pressed, the pitch increases about 0.5Hz
Press note B3 to decrease the pitch; every time B3 is pressed, the pitch decreases about 0.5Hz
C1 |
C2 |
C3 |
C5 |
C6 |
C7 |
C8 |
Press note B3 and C4 together to restore standard pitch A4=440Hz.
17
4 Press the [BANK] button to exit the Setting mode.
The pitch setting reverts to standard A4=440Hz if the power is cut off
Temperament
Temperaments are different tuning systems, mainly used in the baroque and classical periods. In addition to the standard equal tuning, the K61P provides historical Kirnberger and Werckmeister temperaments.
1 Hold down [BANK] button until the K-Series enters the Setting mode.
2 Press the Program 4 [PIANO 4/E.P. 4/ORGAN 4] button (the button will flash).
3
C1 |
C2 |
C3 |
C4 |
C5 |
C6 |
C7 |
C8 |
4 Press the [BANK] button to exit the Setting mode.
Note |
Temperament |
|
|
C4 |
Werckmeister: Uses the Werckmeister scale proposed in |
|
the late Baroque period by organist and musicologist Andreas |
|
Werckmeister, with the intention of enabling relatively |
|
unrestricted play in multiple keys. |
|
|
C#4 |
Kirnberger: Uses the Kirnberger scale proposed in the |
|
Johann Philip Kirnberger in the early 18th century. This |
|
temperament is mainly used for tuning harpsichords. |
|
|
D4 |
Equal temperament: The temperament used on almost all |
|
modern keyboard instruments. This temperament uses equal |
|
semitone increments, so that scales sound identical in all keys. |
|
|
The termperament setting is set to equal temperament if power cut off.
A Note About “Stretch Tuning”
Stretch tuning is used to obtain a more natural sound. Low diapason notes use a lower pitch setting, and high diapason notes use a higher pitch setting. This is the most often used method when tuning an acoustic piano. There are 6 instrument sounds in the K61P that use stretch tuning:
[PROGRAM] keys |
BANK 1 |
|
|
[PIANO1] |
Grand Piano 1 |
[PIANO2] |
Grand Piano 2 |
[PIANO3] |
Standard Piano |
[PIANO4] |
Bright Piano |
[PIANO5] |
Honky Tonk Piano |
[PIANO6] |
Mellow Piano |
18
Owner’s Manual
MIDI channel setting
You can set the K61P to the same MIDI channel as the connected MIDI equipment. MIDI channel is 1-16.
1
2
3
Hold down [BANK] button until the K-Series enters the Setting mode.
Press the Program 5 [PIANO 5/E.P. 5/ORGAN 5] button (the button will flash).
Press one of the notes between C4~D#5.
The MIDI channel assignments are as the followings.
C4 = 1ch, C#4=2ch, D4=3ch…D#5= 16ch
C1 |
C2 |
C3 |
C4 |
C6 |
C7 |
C8 |
4 Press the [BANK] button to exit the Setting mode.
MIDI channel setting is used by controller and sound generator.
The Local control on/off setting
The Local setting separates the K61P’s keyboard from the internal sound engine. When local is on, the keyboard will play the internal sound engine, as well as any other connected devices. When using the K61P with a sequencer, you would normally set the local control to off, to prevent messages being sent to the computer from triggering notes a second time. This setting will depend on the “echo back” setting of the sequencer.
Generally, set local on, and the K61P will play sounds from the internal engine when notes are played on the keyboard.
1
2
3
Hold down [BANK] button until the K-Series enters the Setting mode.
Press the Program 6 [PIANO 6/CLAVE/ORGAN 6] button (the button will flash).
Press note C4(On) or C#4(Off) to select the setting.
C1 |
C2 |
C3 |
C5 |
C6 |
C7 |
C8 |
4 Press the [BANK] button to exit the Setting mode.
19
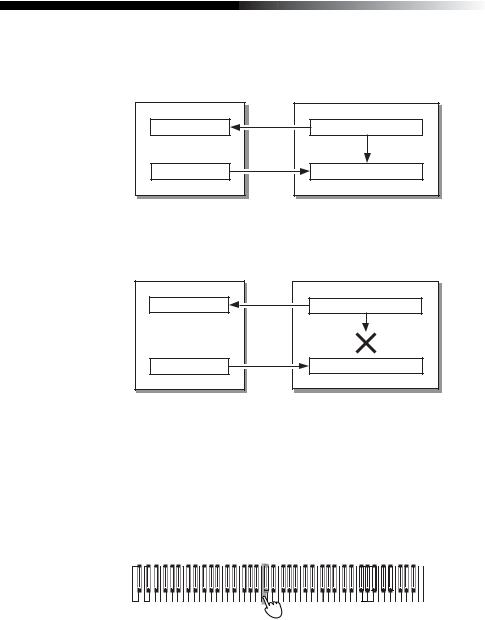
The local control setting
Local control on
Computer |
K61P |
KBD/KNOB |
Keyboard/Each controllers |
SOUND/CTRL |
Tone generator |
Local control off
Computer |
K61P |
KBD/KNOB |
Keyboard/Each controllers |
SOUND/CTRL |
Tone generator |
 The local on/off setting is set to local on if power cut off.
Program change enable/disable
Every time you select one of the K61P’s internal sounds, a MIDI program change message is also sent to any connected MIDI equipment. This feature allows you to prevent program change messages from being sent to your other MIDI devices.
1
2
Hold down [BANK] button until the K-Series enters the Setting mode.
Press the Program 7 [HARPSI 1/VIBE/STRINGS 1] button (the button will flash).
C1 |
C2 |
C3 |
C5 |
C6 |
C7 |
C8 |
3
4
Press note C4(enable) or C#4(disable) to select the setting.
Press the [BANK] button to exit the Setting mode.
20
Owner’s Manual
Volume message filter
You can prevent the internal sound engine from receiving volume change messages. If the Volume message filter is set to “On”, the K61P’s internal sound generator will accept volume(07) message from Knob1, Knob2 and the Slider if they are assigned control change cc#07.
If it’s set to “Off”, the K61P’s internal sound generator will reject volume(07) message from Knob1, Knob2 and the Slider even if they are assigned control change cc#07.
1 Hold down [BANK] button until the K-Series enters the Setting mode.
2 Press the Program 8 [HARPSI 2/CHOIR/STRINGS 2] button (the button will flash).
C1 |
C2 |
C3 |
C5 |
C6 |
C7 |
C8 |
3 Press note C4(On) or C#4(Off) to select the setting.
CC#07 flow chart
ON |
|
OFF |
|
|
|
|
|
|
|
|
|
||||||||||||||
|
|
|
|
|
|
|
|
|
|
|
|
|
|
|
|
|
|
|
|
|
|
|
|
|
|
|
|
|
|
|
|
|
|
|
|
|
|
|
|
|
|
|
|
|
|
|
|
|
|
|
|
|
|
|
|
|
|
|
|
|
|
|
|
|
|
|
|
|
|
|
|
|
|
|
|
|
|
|
|
|
|
|
|
|
|
|
|
|
|
|
|
|
|
|
|
|
|
|
|
|
|
|
|
|
|
|
|
|
|
|
|
|
|
|
|
|
|
|
|
|
|
|
|
|
|
|
|
|
|
|
|
|
|
|
|
|
|
|
|
|
|
|
|
|
|
|
|
|
|
|
|
|
|
|
|
Computer |
Computer |
SG |
Controller |
K61P |
SG |
Controller |
K61P |
* SG: Sound Generator SG's volume knob controls SG's volume level.
4 Press [BANK] key to quit setting mode.
21

Troubleshooting
Power does not turn on
•Is the power switch set to the correct position? (p.8 “Making connections and turning on the power”)
•Is the K-Series be connected to your computer via a hub? If so, try using the AC adapter.
Driver setup failure
•There is a defalut driver installed for Windows. Use the new driver installer to setup driver.
•Make sure the CD-ROM is inserted correctly into the CD drive.
•Make sure the lens of CD drive is not dirty.
Software does not respond
•Is the USB cable connected correctly?
•Has the K-Series been recognized by the connected computer?
Depending on the hardware setup of your computer, it may not be possible for the K-Series to be recognized via a USB connection.
•It may be that the connected device or software does not support the function you’re attempting to use. Refer to the owner’s manual of the connected device or software, and make sure that the function is supported.
No sound(K61P)
•Make sure the K-Series’ volume is not set to “0”.
Please turn the volume to an appropriate position.
Notes are dropping out or being cut off before playing to completion
•You may be exceeding the K61P’s polyphony limit.
About Maximum Polyphony
Maximum polyphony is the maximum number of notes that the internal sound engine is capable of producing at a single time. If you try to play more than this limit, the K61P automatically switches off older notes so that it can sound the newer notes. If you exceed the limit, therefore, you may notice that notes are dropping out or that they are ending prematurely.
The maximum available polyphony varies according to the number of oscillators and effects used to produce the sound. The internal sound generator creates a note using either one or two oscillators. Maximum available polyphony for 1-oscil- lator sounds (such as the HARPSI/VIBES sounds) is 60 notes, while maximum polyphony for 2-oscillator sounds (such as Grand Piano 1 [PIANO 1, Bank A] and
Grand Piano 2 [PIANO 2, Bank A]) is 30 notes. The reverb effect, when used, counts as ten 1-oscillator notes, while the chorus counts as three.
22
 Loading...