


Kodak KE30
35 mm Camera
ENGLISH/ESPAÑOL/FRANÇAIS
Camera Identification |
4 |
5 |
|
3 |
|||
|
|||
|
|
||
2 |
|
|
|
1 |
|
|
6
7
8
9
10
11
12

13 |
14 |
15 |
16
24
23 |
|
|
|
17 |
22 |
21 |
20 |
19 |
18 |
|
|
|
|

Kodak KE30 35 mm Camera
NEED HELP WITH YOUR CAMERA?
Visit our Web sites at http://www.kodak.com (for US) or http://www.kodak.ca (for Canada) or call:
Kodak (USA only) from 9:00 a.m. to 7:00 p.m. (Eastern time) Monday through Friday at 1-800-242-2424.
Kodak (Canada only) from 8:00 a.m. to 5:00 p.m. (Eastern time) Monday through Friday at 1-800-465-6325, ext. 36100; for the Toronto area,
call 416-766-8233, ext. 36100.
When you call, please have your camera available.
For warranty purposes, please keep your sales receipt as proof of the date of purchase.
ENGLISH
1

CONTENTS |
|
CAMERA IDENTIFICATION .............. |
3 |
ATTACHING THE STRAP ................. |
4 |
LOADING THE BATTERIES ............. |
4 |
Low-batteries warning .................. |
5 |
Auto power off ............................. |
5 |
Battery tips .................................. |
6 |
LOADING THE FILM ......................... |
7 |
TAKING PICTURES .......................... |
10 |
Tips for better pictures ................. |
11 |
TAKING FLASH PICTURES ............. |
12 |
Flash-to-subject distance ............. |
12 |
Using fill flash and flash off .......... |
14 |
Using red-eye reduction ............... |
15 |
SELF-TIMER ..................................... |
15 |
UNLOADING THE FILM .................... |
17 |
Using mid-roll rewind ................... |
17 |
CARING FOR YOUR CAMERA ........ |
18 |
TROUBLESHOOTING ...................... |
19 |
SPECIFICATIONS ............................ |
21 |
2
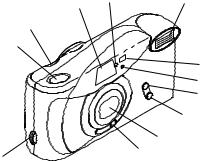
CAMERA IDENTIFICATION |
11 |
LENS-COVER SWITCH |
||
Unfold cover flaps of manual |
12 |
STRAP POST |
||
to view camera diagrams. |
13 |
FILM-DOOR LATCH |
||
1 |
SHUTTER BUTTON |
14 |
VIEWFINDER EYEPIECE |
|
15 |
FLASH-READY LIGHT |
|||
2 |
PICTURE COUNTER |
|||
16 |
SELF-TIMER SWITCH |
|||
3 |
VIEWFINDER |
|||
17 |
FILM-DOOR-LOCK INDICATOR |
|||
4 |
VIEWFINDER LIGHT DIFFUSER |
|||
18 |
TRIPOD SOCKET |
|||
5 |
FLASH |
|||
19 |
FILM-REWIND SWITCH |
|||
6 |
SELF-TIMER BULB / |
|||
20 |
BATTERY DOOR |
|||
|
RED-EYE-REDUCTION BULB |
|||
7 |
LIGHT SENSOR |
21 |
FILM-GUIDE RAILS |
|
8 |
FLASH-OFF BUTTON |
22 |
FILM CHAMBER |
|
9 |
FILL-FLASH BUTTON |
23 |
FILM DOOR |
|
10 |
LENS |
24 |
FILM WINDOW |
|
|
|
|
|
|
3
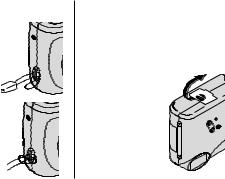
ATTACHING THE STRAP
1.Insert one end of the strap under the STRAP
POST (12) and pull it through.
2. Thread the longer end of the strap through the shorter loop. 
3. Pull the strap tight.
LOADING THE BATTERIES
This camera uses 2 AAA-size alkaline 1.5 V KODAK K3A (or equivalent) Batteries.
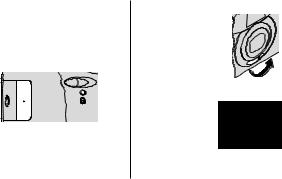
1. Open the BATTERY DOOR (20).
•Before you remove the old batteries, turn off
the camera
by sliding the
LENS-COVER SWITCH (11) to the off position.
4
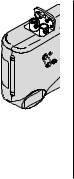
2.Insert the batteries into the chamber as shown.
3.Snap the battery door closed.
Low-batteries warning
It is time to replace the batteries when —
•the FLASH-READY LIGHT (15) takes longer than 30 seconds to turn on.
•the camera motor slows down or will not run.
•the film will not advance.
5

Auto power off
This camera automatically turns off after approximately 4 minutes to conserve the life of the batteries. To awaken the camera, close and open the LENS COVER (11) .
•Close the lens cover when the camera is not used for an extended time.
Battery tips
•Dispose of batteries according to local and national regulations.
•Keep spare batteries with you at all times.
•Read and follow all warnings and instructions supplied by
the battery manufacturer.
•Keep batteries away from children.
•Do not try to take apart, recharge or short circuit the batteries, or subject them to high temperature or fire.
6
•Store batteries in their original packaging prior to use.
•Remove batteries from the camera when the camera is not going to be used for an extended length of time.
•In the unlikely event that battery fluid leaks onto your skin, contact Kodak Health, Safety and Environment Information at 1-716-722-5151 in the U.S.
•In the unlikely event that battery fluid leaks inside the camera, U.S. customers can contact the Kodak Information Center (KIC) at 1-800- 242-2424. Customers outside the U.S. can contact their local Kodak Customer Service representative.
LOADING THE FILM
If in sunlight, turn your back to the sun and load the film in the shade of your body. The unique easy load feature of this camera makes
film loading simple.
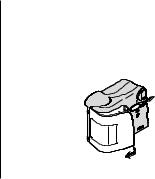
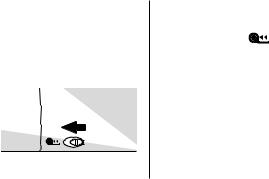
1. Slide the FILM-DOOR LATCH (13)
in the direction |
|
of the arrow |
|
to open the |
OPEN |
FILM DOOR (23). |
|
•You can load film into the camera with the lens cover
opened or closed.
7
2.Insert the film leader into the slot in the back of the camera between the FILM-GUIDE RAILS (21).
FILM-GUIDE
RAILS
NOTE: Do not pull additional film out of the cartridge. You can use the film just as it comes out of the film carton.
3.Push the film cartridge down into the FILM CHAMBER (22) until it fits securely into place.
•Do not force it into the film chamber.
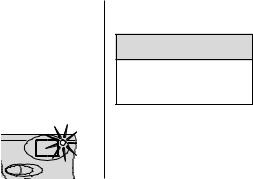
4.Close the film door and check the
FILM WINDOW (24).
8
•The film window displays the film information and the FILM-DOOR-
LOCK INDICATOR (17) changes
from black to amber to indicate the film door is locked and that the film is correctly loaded in the camera.
EASYLOAD |
GA24 100/21° |
•After you close the safety interlocked film door and start to advance the film, you cannot open the film door until the film is completely rewound into the
film cartridge.
5. Slide the LENS-COVER SWITCH (11)
completely open to |
|
|
|
start the automatic |
|
|
|
film advance. |
|
|
|
• |
If the lens cover is |
|
|
|
already open, the |
|
|
|
film advance |
|
|
|
starts |
|
|
|
automatically. |
|
|
• |
The PICTURE |
|
|
|
COUNTER (2) |
|
|
|
automatically |
0 |
4 |
|
advances to |
1 |
|
frame “1.” Beginning at frame 4, every
fourth exposure is numbered.
9

TAKING PICTURES
1. Slide the LENS-COVER SWITCH (11) completely open to  uncover the
LENS (10) and to turn on
the camera.
2. For a sharp picture, stand at least 4 ft
(1.2 m) from your subject.
4 ft
(1.2 m)
3. Look through the
VIEWFINDER
EYEPIECE (14) to see your subject.
4. Hold the camera steady and gently press the
SHUTTER
BUTTON (1) to take
the picture.
•After you take the picture, the film automatically
advances to the next picture.
5.Close the lens cover when you are done taking pictures.
10

Tips for better pictures
•To avoid blurry pictures, hold your camera steady by keeping your elbows close to your body when you press the shutter button.
•Stand close enough to your subject so that it fills the viewfinder but not closer than 4 ft (1.2 m).
•Take pictures at the subject’s level. Kneel down to take pictures of children and pets.
•Hold your camera vertically to capture tall, narrow subjects, such as a waterfall, skyscraper, or a single person.
•Add interest to your picture by framing it with a tree branch, a window, or even the rails of
a fence.
•Keep the sun behind you. This provides the best subject illumination.
•Keep your hand, fingers, or objects away from the flash and picturetaking lens.
•Stand at an angle to shiny surfaces like windows or mirrors to avoid flash reflection and bright spots in your pictures.
11
TAKING FLASH PICTURES
In dim light, such as indoors or outdoors in heavy shade, or on dark overcast days, you need flash. This camera features an automatic flash that fires when you need it.
1.Slide the LENS-COVER SWITCH (11) completely open to uncover the LENS (10) and to turn on the camera.
2.Wait for the FLASH-READY LIGHT (15) to glow.
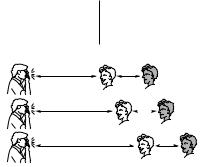
3.Keep the subject within the distance range for the speed of film in your camera.
ISO film Flash-to-subject speed distance
100 4 to 12 ft (1.2 to 3.7 m)
200 4 to 17 ft (1.2 to 5.2 m)
400 4 to 23 ft (1.2 to 7.0 m)
•Do not take pictures beyond the maximum distance or your pictures will be dark.
12
4.Hold the camera steady and gently press the SHUTTER BUTTON (1) to take the picture.
•To prevent battery drain, turn off the flash by closing the lens cover when you are done taking pictures.
4 – 12 ft (1.2 – 3.7 m) |
Beyond |
|
Safe Range |
12 ft |
|
100-speed film |
Picture |
|
|
will be dark |
|
4 – 17 ft (1.2 – 5.2 m) |
Beyond |
|
Safe Range |
17 ft |
|
200-speed film |
Picture |
|
|
will be dark |
|
4 – 23 ft (1.2 – 7.0 m) |
Beyond |
|
Safe Range |
23 ft |
|
400-speed film |
Picture |
|
will be dark |
||
|
13

Using fill flash  and flash off
Fill flash — When bright light indoors or outdoors comes from behind the subject (backlighting), dark shadows (especially on faces) may occur. Use fill flash to lighten these shadows.
Flash off — When you do not want to use the flash, especially indoors where flash is prohibited, or when you want to take twilight scenes or distant subjects that are beyond the flash range, or to capture the ambiance of existing light, use flash off.
1.Slide the LENS-COVER SWITCH (11) completely open to uncover the LENS (10) and to turn on the camera.
2.Press either the FILL-FLASH BUTTON (9) or FLASH-OFF
BUTTON (8) and hold in position without lifting your finger.
14

3.While still pressing the desired flash mode, press the SHUTTER BUTTON (1) to take the picture.
Using red-eye reduction
Some people’s eyes (and some pets’) can reflect flash with a red glow.
To minimize red eye in flash or fillflash pictures, use the red-eye- reduction feature.
1.Slide the LENS-COVER SWITCH (11) completely open to uncover the LENS (10) and to turn on the camera.
2.Partially depress the SHUTTER BUTTON (1) to turn on the
RED-EYE-REDUCTION BULB (6).
3.Have your subject look directly at the red-eye-reduction bulb.
4.Press the shutter button completely down to take the picture.
SELF-TIMER
Use this feature when you want to include yourself in the pictures.
1.Attach a tripod to the camera
TRIPOD SOCKET (18) or place it on another firm support.
2.Slide the LENS-COVER SWITCH (11) completely open to uncover the LENS (10) and to turn on the camera.
15
3.Look through the VIEWFINDER EYEPIECE (14) to compose the picture and to allow room for yourself in it.
4.Slide the SELF-TIMER SWITCH (16) into the locked position.
5.Hold the camera steady and gently press the SHUTTER BUTTON (1) to start the timer.
6.Position yourself in the composed picture making sure that you see the SELF-TIMER BULB (6) completely. NOTE: If you do not see the
entire bulb, you may not be in the picture.
•The self-timer bulb on the front of the camera glows and then blinks during the 10 seconds self-timer countdown.
•The self-timer automatically cancels after the shutter releases.
16
UNLOADING THE FILM
The film will not automatically advance when you reach the end of the roll. You must rewind the film before you open the film door.
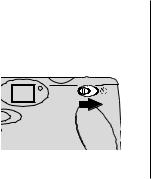
1.Slide the FILM-REWIND SWITCH (19) until it latches to start the motorized film rewind.
•Wait until the motor stops before you open the film door.
2. Open the FILM DOOR (23) to remove film and reload with fresh
KODAK Film.
Using mid-roll rewind
If you do not want to take pictures on the entire roll of film, you can rewind in mid-roll by following steps 1 and 2 of UNLOADING THE FILM.
NOTE: You cannot reload partially exposed film into this camera
for continuous picture-taking.
17
CARING FOR YOUR CAMERA |
• Remove the batteries when |
|
• Protect the camera from dust, |
you store the camera for an |
|
moisture, sudden impact, and |
extended time. |
|
excessive heat. |
CAUTION: To prevent possible |
|
CAUTION: Do not use solvents or |
damage and electrical shock, do |
|
harsh or abrasive cleaners on the |
not attempt to disassemble |
|
or repair the camera or flash unit |
||
camera body. |
||
by yourself. |
||
• If the lens appears dirty, breathe |
||
|
||
on it to form a mist and wipe the |
|
|
surface gently with a soft, lintless |
|
|
cloth or camera lens-cleaning |
|
|
tissue. Never wipe a dry lens. |
|
|
CAUTION: Do not use solvents or |
|
|
solutions not designed for cleaning |
|
|
camera lenses. Do not use |
|
|
chemically treated tissues |
|
|
intended for cleaning eyeglasses. |
|
18
TROUBLESHOOTING
What happened |
Probable cause |
Solution |
Camera will |
Lens cover closed |
Open lens cover |
not operate |
|
completely |
|
Batteries weak, |
Replace or |
|
dead, missing, or |
reload batteries |
|
improperly loaded |
|
|
Flash not ready |
Wait for flash-ready |
|
|
light to glow |
|
Film not properly |
Reload the film; |
|
loaded in camera |
see LOADING THE |
|
|
FILM on page 7 |
|
|
|
|
Film needs to be |
See UNLOADING |
|
rewound/removed |
THE FILM on |
|
|
page 17 |
19
What happened |
Probable cause |
Solution |
|
Flash-ready light |
Lens cover not |
Open lens cover |
|
fails to glow within |
fully opened |
|
|
30 seconds |
|
|
|
Batteries weak, |
Replace or |
||
|
|||
|
dead, missing, or |
reload the batteries |
|
|
improperly loaded |
|
|
|
|
|
|
|
No film in camera |
Load film into camera |
|
|
|
|
|
Film-door latch |
Film is not |
Complete taking |
|
does not open |
completely rewound |
pictures or |
|
|
into the cartridge |
slide the film- |
|
|
|
rewind switch |
|
|
|
|
|
Shutter button |
No film in camera |
Load film into camera |
|
cannot be released |
|
|
20
 Loading...