


Midline Blender
Service Manual
MODELS
Australian Series
5KSB555AAC (Almond Creme)
5KSB555AER (Empire Red)
5KSB555AGR (Imperial Grey)
5KSB555AOB (Onyx Black)
5KSB555AWH (White)
Britain Series
5KSB555BAC (Almond Creme)
5KSB555BER (Empire Red)
5KSB555BMY (Majestic Yellow)
5KSB555BOB (Onyx Black)
5KSB555BWH (White)
5KSB555BBU (Cobalt Blue)
5KSB555BPK (Pink)
5KSB555BNK (Brushed Nickel)
5KSB555BPM (Pearl Metallic)
European Series
5KSB555EAC (Almond Creme)
5KSB555EER (Empire Red)
5KSB555EGR (Imperial Grey)
5KSB555EOB (Onyx Black)
5KSB555EWH (White)
5KSB555EBU (Cobalt Blue)
5KSB555ECR (Chrome)
5KSB555EMY (Majestic Yellow)
5KSB555ENK (Brushed Nickel)
5KSB555EPM (Pearl Metallic)
5KSB555ETG (Tangerine)
5KSB555EPK (Pink)
Swiss Series
5KSB555SWH (White)
5KSB555SER (Empire Red)
5KSB555SGR (Imperial Grey)
5KSB555SOB (Onyx Black)
|
|
|
© 04/2010 KitchenAid |
W10327947 |
|
|

BLENDER SERVICE MANUAL
SAFETY GUIDELINES
Your safety and the safety of others are very important.
We have provided many important safety messages in this manual and on your appliance. Always read and obey all safety messages.
This is the safety alert symbol.
This symbol alerts you to potential hazards that can kill or hurt you and others.
All safety messages will follow the safety alert symbol and either the word “DANGER” or “WARNING.” These words mean:
You can be killed or seriously injured if you don't immediately follow instructions.
You can be killed or seriously injured if you don't follow instructions.
All safety messages will tell you what the potential hazard is, tell you how to reduce the chance of injury, and tell you what can happen if the instructions are not followed.
 WARNING
Electrical Shock Hazard
Disconnect power before servicing.
Replace all parts and panels before operating.
Failure to do so can result in death or electrical shock.
This service manual is written for the professional service technician who is familiar with the KitchenAid blender. The following guidelines should be adhered to when servicing this product.
Service Environment
•The workplace will be dry and sanitary at all times and all units should be inspected for cleanliness before any work is started.
•Visually inspect the unit requiring service in a well-illuminated area.
•A mild, non-abrasive dishwashing soap solution and clean towel can be used to wash any unit requiring attention.
•The hands of the Service Technician should be clean at all times during the service procedure.
Electrical Considerations
•The work place for the blender must have properly grounded AC outlets that adhere to all local electrical codes that are applicable at the time of the repair.
•The blender power cord should always be inspected first before testing the blender operation. Do not run the blender if the power cord is damaged. Replace a damaged power cord.
•All disassembly and assembly procedures discussed in this manual should be conducted with the unit disconnected from power.
•Do not leave the blender unattended while running for extended periods. Always unplug the blender immediately after conducting your tests.
Technician
•The service technician should wear protective eyeware at all times when conducting a repair on the KitchenAid blender.
•Loose fitting sweaters, shirt sleeves or bracelets should not be worn while servicing the KitchenAid blender.
2

|
BLENDER SERVICE MANUAL |
BLENDER REPAIR MANUAL |
|
SUBJECT |
PAGE |
SAFETY GUIDELINES............................................................................................................................. |
2 |
PRODUCT FEATURES............................................................................................................................ |
4 |
PREPARING THE BLENDER FOR USE ................................................................................................. |
4 |
PRELIMINARY INSPECTION OF BLENDER .......................................................................................... |
6 |
OPERATING THE KITCHENAID BLENDER............................................................................................ |
6 |
BLENDER SERVICE PROCEDURES ..................................................................................................... |
7 |
MODEL AND SERIAL NUMBERS............................................................................................................ |
9 |
PARTS LIST ........................................................................................................................................... |
10 |
FOREWORD:
The KitchenAid blender is a high-quality appliance. All KitchenAid blenders are well designed and built. Normally they will give continual use year-after-year without service attention. Records have been maintained over a period of years to determine and correct, through improved design, any troubles that might possibly develop. An effort has been made in preparation of this manual to cover all service issues.
3
BLENDER SERVICE MANUAL
Product Features
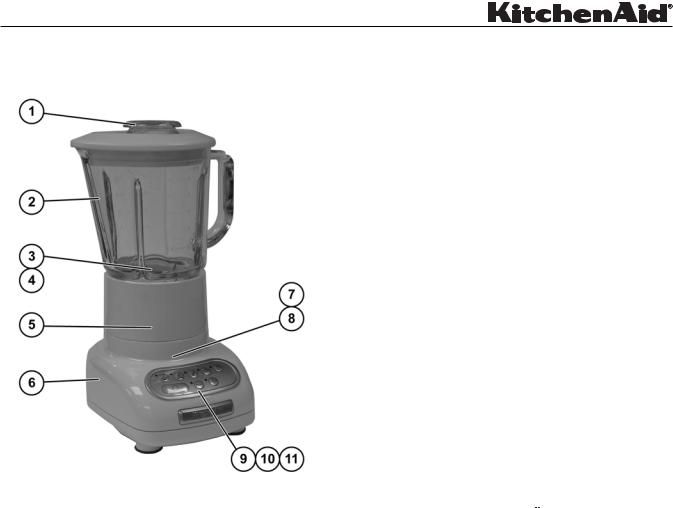
The following are some of the KitchenAid Blender’s unique product features (Fig. 1):
Figure 1
1.Stay-Put Lid with Clear, 60 ml Ingredient Cup:
Provides a strong seal. The flexible lid will maintain its tight seal throughout the life of the blender.
The lid incorporates a removable 60 ml cup for convenience in measuring and adding ingredients.
2.Easy Pour 1.5 L Glass Pitcher: Glass pitcher resists scratches, stains, and odors. Pitcher is removable from locking collar for easy cleaning, and withstands a range of extreme temperatures. Easy pour spout provides smooth, drip-free pouring.
3.Locking Collar and Blade Assembly: Durable, one-piece blade design is built into the locking collar for easy handling and cleaning. Dishwasher-safe assembly keeps the blades from rotating until the pitcher is properly attached to the collar and put on the blender base.
4.Patented Stainless Steel Blade: Sharp oversized blade tines are positioned on four different planes for fast, thorough, and consistent blending.
5.Durable Steel-Reinforced Couplers: Commercialquality couplers with 12 interlocking teeth provide direct transfer of motor power to the blade. Pitcher coupler is coated for quiet operation.
6.Die-Cast Metal Base: Heavy, die-cast metal base ensures stable, quiet operation when blending a full pitcher of ingredients. Four rubber feet on wide, solid base provide a no-slip, non-marring grip. Smooth and rounded, the base is easy to clean and features cord storage underneath.
7.Robust Motor: Rugged 0.9-horsepower motor supplies the power for superb performance with all blending tasks – from pureeing sauces to making chunky salsas, or uniformly crushing a pitcher of ice or frozen fruit within seconds for silky smoothies.
8.Intelli-Speed TM Motor Control: Exclusive IntelliSpeed TM control automatically works to keep speed constant – even through density changes when ingredients are added. This advanced KitchenAid design maintains an optimal blending speed for each culinary task and control setting.
9.Clean Touch Control Panel: Wipes clean in an instant. Smooth control pad has no crevices or cracks to trap ingredients.
10.Soft Start Blending Feature: The blender starts at a slower speed to pull food into the blade then quickly increases to selected speed setting. This design feature reduces start-up kick and allows hands-free operation.
11.Speed Selection Buttons: Create frozen drinks and puree sauces or soups in seconds. Blend with
confidence, control, and consistency at all speed settings: STIR ( ), CHOP (
 ), MIX (
 ), PUREE (
 ), and LIQUEFY (
 ). The PULSE (
 ) mode works with all five speeds. The CRUSH
ICE ( ) feature is designed specifically for crushing ice and will automatically pulse at staggered intervals for optimal results.
Preparing the Blender for Use
Before First Use
Before using your blender for the first time, wipe blender base with a warm sudsy cloth, then wipe clean with a damp cloth. Dry with a soft cloth. Wash pitcher, lid, locking collar and blade assembly, sealing ring and ingredient cup in warm, sudsy water. Rinse parts and wipe dry.
4

BLENDER SERVICE MANUAL
Blender Assembly
1.Put locking collar with blades pointing up on a sturdy surface (Fig. 2).
Figure 2
2.Put sealing ring (1), flat side down, around the blades and into the groove within the locking collar (2) (Fig. 3).
 1
1
 2
2
Figure 3
3.Align the pitcher tabs with the slots of the locking collar (Fig. 4).
Figure 4
4.Press down and rotate pitcher clockwise, approximately ¼ turn until two clicks are heard (Fig. 5).
Figure 5
5. Adjust the length of the blender power cord (Fig.6).
Figure 6
6. Put pitcher assembly onto the blender base (Fig. 7).
Figure 7
NOTE: When properly positioned, pitcher assembly will rest completely on blender base. If not, repeat steps 3 and 4.
7. Put lid on pitcher.
 WARNING
Electrical Shock Hazard
Plug into grounded outlet. Do not use an adapter.
Do not use an extension cord.
Failure to follow these instructions can result in death, fire or electrical shock.
8.Plug power cord into a grounded outlet. Blender is now ready for operation.
9.Before removing the pitcher assembly from the base, always press “O” and unplug the power cord.
5

BLENDER SERVICE MANUAL
Preliminary Inspection of Blender
Before servicing the blender, the following inspection should be performed. All service should be performed on a clean, dry surface with good illumination.
•Lid and Ingredient Cap: Place the lid on top of the jar and push securely on the jar with the ingredient cap in place.
•Power Base: Inspect the blender power base. Make sure the coupling at the end of the motor shaft moves freely. Make sure the four rubber feet are level. Make sure that all of the base assembly screws under the rubber feet are intact and secure.
•Clean Touch Pad: Make sure the blender’s clean touch pad is clean and not distorted.
•Power Cord (Stored in Base) (Fig. 8): Before any operation of the blender is performed, check the power cord for cuts or tears. If any damage to the power cord is found, replace the entire power cord before attempting operation.
Figure 8
 WARNING
Electrical Shock Hazard
Plug into grounded outlet. Do not use an adapter.
Do not use an extension cord.
Failure to follow these instructions can result in death, fire or electrical shock.
Operating the KitchenAid Blender
The KitchenAid blender will operate in two different operating modes: Continuous mode and pulse mode.
Continuous Operation
Continuous operation of the blender is accomplished by pushing a “MODE” pad on the blender’s control panel.
Place one of your hands on top of the jar lid and press one of the speed pads with your other hand.
NOTE: A short delay reaching the selected speed is normal due to the soft start feature. The blender should run and an indicator light for the selected speed will come on.
You can check all the speeds by pressing either a higher or lower speed, without stopping the Motor.
To turn the blender off, press the “O” pad. The “O” pad will stop any speed and deactivate the blender at the same time.
Always deactivate the blender by pressing the “O” pad and unplugging the power cord before removing the blender jar.
Pulse Operation
Activate the “Pulse At Any Speed” feature by pressing the “PULSE” pad. You will hear a click, and the indicator light above the pad will blink, indicating that the blender is activated.
Place one of your hands on top of the jar lid and press one of the desired speed pads with your other hand for the desired pulse time.
NOTE: A short delay reaching the selected speed is normal due to the soft start feature.
To turn the pulse feature off, just press the “O” pad. The blender is now ready for continuous operation.
You are now ready to check the operation of the blender. Plug the power cord into a grounded AC outlet.
6
 Loading...