


INSTRUCTION BOOKLET
Single Serve Brewing System |
SS-700 |
|
|
For your safety and continued enjoyment of this product, always read the instruction book carefully before using.

IMPORTANT
SAFEGUARDS
When using electrical appliances, basic safety precautions should always be followed to reduce the risk of fire, electric shock and/or injury to persons, including the following:
1.READ ALL INSTRUCTIONS.
2.Do not touch hot surfaces. Use handles and knobs.
3.To protect against electric shock, do not place cord, plug, or base unit in water or other liquids.
4.Close supervision is necessary when any appliance is used by or near children.
5.Always unplug from outlet when not in use and before cleaning. Allow to cool before putting on or taking off parts and before cleaning the appliance.
6.Do not operate any appliance with a damaged cord or plug or after the appliance malfunctions or has been dropped or damaged in any manner. Return appliance to the nearest Cuisinart Repair Center for examination, repair, or electrical or mechanical adjustment.
7.The use of accessory attachments not recommended by Cuisinart may cause injuries, fire, electric shock or injury to persons.
8.Do not use outdoors.
9.Do not let cord hang over edge of table or counter, or touch hot surfaces.
10.Do not place on or near a hot gas or electric burner, or in a heated oven.
11.Always fill water reservoir first, then plug cord into the wall outlet. To disconnect, turn controls to Off, then remove plug from wall outlet.
12.Do not use appliance for other than intended use.
13.Do not lift handle to open the lid of the brewer while brewing is in progress.
14.Do not overfill the water reservoir with water. Use ONLY WATER in this appliance! Do not put any other liquids or foods in the water reservoir except as instructed in the cleaning instructions in this guide.
15.Do not clean drip tray with cleansers, steel wool pads, or other abrasive materials.
16.WARNING: TO REDUCE THE RISK OF FIRE OR ELECTRIC SHOCK, DO NOT REMOVE THE BASE PANEL. NO USER-SERVICEABLE PARTS ARE INSIDE. REPAIR SHOULD BE DONE ONLY BY AUTHORIZED PERSONNEL.
SAVE THESE
INSTRUCTIONS.
FOR HOUSEHOLD USE ONLY
WARNING: RISK OF FIRE OR ELECTRIC SHOCK
The lightning flash with arrowhead symbol within an equilateral triangle is intended to alert the user to the presence of uninsulated dangerous voltage within the product’s enclosure that may be of sufficient magnitude to constitute a risk of fire or electric shock to persons.
The exclamation point within an equilateral triangle is intended to alert the user to the presence of important operating and maintenance (servicing) instructions in the literature accompanying the appliance.
2
SPECIAL CORD SET INSTRUCTIONS
A short power-supply cord is provided to reduce the risks resulting from becoming entangled in or tripping over a longer cord.
Longer extension cords are available and may be used if care is exercised in their use.
If a long extension cord is used, the marked electrical rating of the extension cord must be at least as great as the electrical rating of the appliance. The extension cord should be a grounding-type 3-wire cord, and the longer cord should be arranged so that it will not drape over the countertop or tabletop where it can be pulled on by children or tripped over.
NOTICE
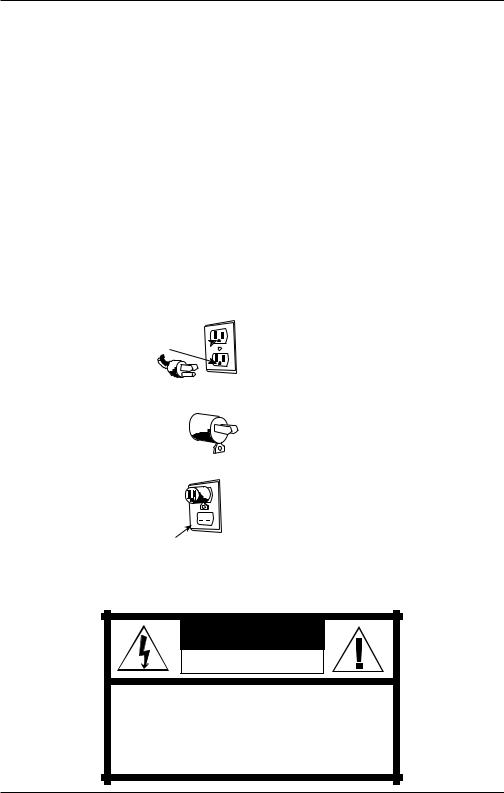
If you have a diecast metal unit, for your protection, it is equipped with a 3-conductor cord set that has
a molded 3-prong grounding-type plug, and should be used in combination with a properly connected grounding-type outlet as shown
in Figure A.
A.
Circuit Grounding
Conductor
Connected
Properly 
Grounding 
Prong
B.
Adapter
Grounding Lug 
C.
Cover
Mounting
Screw 


Cover of
Grounded
Outlet Box
If a grounding-type outlet is not available, an adapter, shown in Figure B, may be obtained so that a 2-slot wall outlet can be used with a 3-prong plug. As shown in Figure C, the adapter must be grounded by attaching its grounding lug under the screw of the outlet cover plate.
NOTE: Do not remove the grounding prong.
CAUTION: Before using an adapter, it must be determined that the outlet cover plate screw is properly grounded. If in doubt, consult a licensed electrician. Never use an adapter unless you are sure it is properly grounded.
Note: Use of an adapter is not permitted in Canada.
IMPORTANT UNPACKING INSTRUCTIONS
1.Place the box on a large, sturdy, flat surface.
2.Remove the instruction book and any other literature.
3.Turn the box so that the backside of the Brewer is down and slide the coffeemaker from the box.
4.After the Brewer has been removed, place the box out of the way and take the pcaking materials away.
5.Remove the polybag covering the Brewer.
We suggest you save all packing materials in the event that future shipping of the machine is needed. Keep all plastic bags away from children.
WARNING |
RISK OF FIRE OR ELECTRIC SHOCK |
DO NOT OPEN |
WARNING: TO REDUCE THE RISK OF FIRE OR ELECTRIC SHOCK,
DO NOT REMOVE COVER (OR BACK)
NO USER-SERVICEABLE PARTS INSIDE
REPAIR SHOULD BE DONE BY AUTHORIZED SERVICE PERSONNEL ONLY
3
Contents
Important Safeguards . . . . . . . . . . . . . . . . . . . . . 2
Important Unpacking Instructions . . . . . . . . . . . . 3
The Quest for the Perfect Cup . . . . . . . . . . . . . . 5
Features and Benefits. . . . . . . . . . . . . . . . . . . . . 6
Set-Up & First Brew . . . . . . . . . . . . . . . . . . . . . . 8
Setting Up Your Brewer . . . . . . . . . . . . . . . . . . . 8
Charcoal Water Filter . . . . . . . . . . . . . . . . . . . . . 9
Brewing. . . . . . . . . . . . . . . . . . . . . . . . . . . . . . . 10
Hot Water/Rinse . . . . . . . . . . . . . . . . . . . . . . . . 12
Brewing with the My K-Cup® Accessory. . . . . . 13
Stopping the Brew Process . . . . . . . . . . . . . . . 14
Adding Water . . . . . . . . . . . . . . . . . . . . . . . . . . 14
Purging the Brewer. . . . . . . . . . . . . . . . . . . . . . 14
Programming . . . . . . . . . . . . . . . . . . . . . . . . . . 15
Setting the Clock . . . . . . . . . . . . . . . . . . . . . 15
Programming On/Off Features . . . . . . . . . . 15
Programming Brew Temperature . . . . . . . . 17
Programming Your Brew Size . . . . . . . . . . . 18
Cleaning & Maintenance. . . . . . . . . . . . . . . . . . 18
Cleaning External Parts . . . . . . . . . . . . . . . . 18
Cleaning the My K-Cup® Filter . . . . . . . . . . . 18
Cleaning the K-Cup® Holder . . . . . . . . . . . . 19
Cleaning the Water Reservoir and Lid. . . . . 19
De-Scaling Your Brewer . . . . . . . . . . . . . . . 20
Troubleshooting . . . . . . . . . . . . . . . . . . . . . . . . 21
Warranty . . . . . . . . . . . . . . . . . . . . . . . . . . . . . . 22
4

The Quest for the Perfect Cup of Coffee
Element 1:
WATER
Any hot beverage is made up primarily of water. Often overlooked, the quality of the water is as important as the quality of the coffee, tea or cocoa. A good rule of thumb is that if your water doesn’t taste good from the tap, it won’t taste any better in your beverage. That’s why the Cuisinart® Single Serve Brewing System has added a charcoal water filter that removes chlorine, bad tastes and odors, for the purest cup every time.
Element 2:
COFFEE
While the bulk of the liquid is water, all of the flavor should be from the coffee, tea or cocoa. To achieve the same great quality you receive at coffee bars, you need to use the same quality ingredients. By using the K-Cup®, brought to you by some of the most premium brands on the market, you can be assured that you’re getting the finest, freshest gourmet product with every cup you brew. If you choose to use your own coffee in the included
My K-Cup®, make sure all your ingredients are at their freshest.
Element 3:
GRIND
The grind of coffee and cocoa, or the refinement of your tea leaves, is critical for proper flavor extraction. With the pre-measured, pre-ground ingredients found in every K-Cup®, you can rest easy knowing that it’ll brew perfectly each and every time, locking in maximum flavor and freshness.
Element 4:
PROPORTION
No matter which cup size you choose, the Cuisinart® Single Serve Brewing System, working in conjunction with K-Cup®, always produces the perfect cup every time. When grinding your own coffee and using it
in the included My K-Cup®, remember to add the amount of ground coffee that corresponds to the number of ounces being brewed.
5
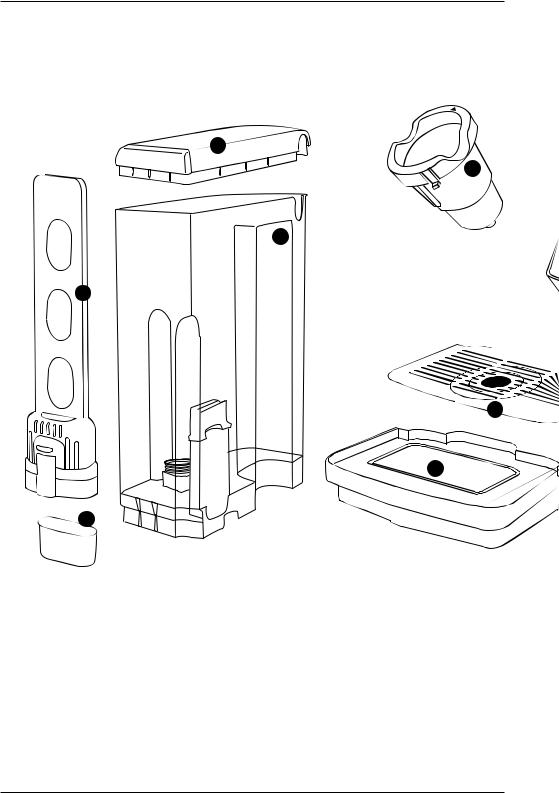
Features and Benefits
2
7
3
1
4 
5
1a
1.Charcoal Filter Holder 1a. Charcoal Water Filter
2.Water Reservoir Lid
Removes for easy filling.
3.Removable 80-oz. Water Reservoir
Offers extra-large capacity, eliminating the need for frequent refills.
4.Removable Drip Tray Plate
Allows extra space for travel mugs.
5.Drip Tray
6.Drip Tray Base
7.Removable K-Cup® Holder
8.Handle
Easy grip prevents slips.
9.Brewing Head
10. Brewing Chamber
Holds My K-Cup® or the K-Cup® Holder.
11. Housing
6

8 
9
12
10
 13
13
19
14
15
16


 17
17
18
11
20
22
6
23
12. Control Panel
13. Menu Button
14. Up Button (  )
)
15. Down Button (  )
)
16. Brew Button
17. Rinse Button
18. Hot Water Button
19. My K-Cup® Compartment
Conveniently stores My K-Cup®.
20. My K-Cup® Reusable
Coffee Filter
21. Power Cord
(not shown)
22. Power Switch
(located rear side of Brewer)
23. Coffee Scoop
7
Set-Up & First Brew
IMPORTANT: Do not attempt to use your Cuisinart® Single Serve Brewing System until it has been set up for its first use as outlined below.
NOTE: If Brewer has been exposed to temperatures below freezing, wait at least two hours for Brewer to reach room temperature before brewing. An extremely cold Brewer will not operate.
Setting Up Your Brewer
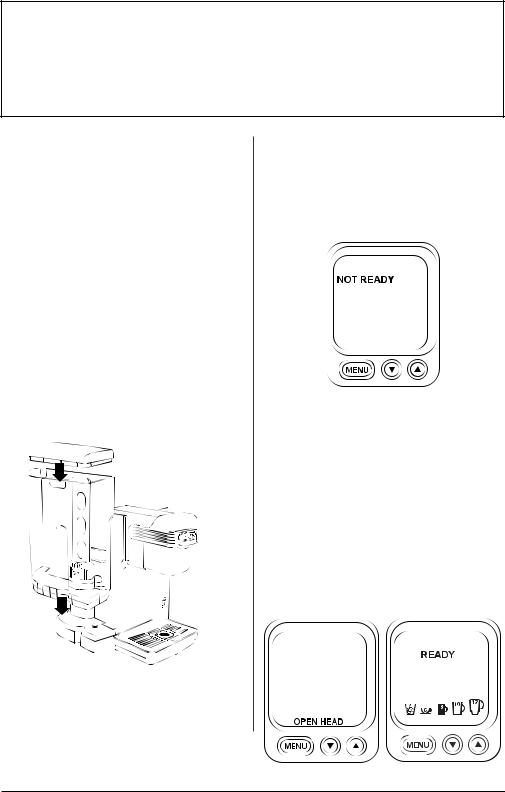
1.Unwrap cord and plug the Brewer into a grounded outlet. Make sure to remove packing tape, clear plastic sticker from control panel, and sticker from water reservoir. Also be sure to remove the polybag from the My K-Cup® located in the compartment on the right side of the brewer.
2.Place a large cup or mug (10 oz. minimum) on the drip tray.
3.Remove lid from reservoir, then lift reservoir straight up and away from the Brewer. Wash the reservoir with warm soapy water.
4.Fill reservoir with water to the max fill line and return with lid to unit (see figure 1).
Water Reservoir Lid
Water Reservoir
figure 1
5.Press the power switch located on the rear right side of the Brewer. The switch is spring-loaded and will return to original position automatically.
6.The Brewer will automatically fill the internal tank with water and heating will begin. This will take approximately 4 minutes. During the heating period, NOT READY will be displayed on the control panel (see figure 2).
Heating Mode
figure 2
Note: It is normal to see small amounts of water dripping into the water reservoir during this and subsequent heatings.
Once the water is heated, OPEN HEAD will be displayed.
7.When the control panel displays OPEN HEAD (see figure 3), open and
close the brewing chamber. READY and brew size icons will be displayed with the default size shown as a solid mug (see figure 4).
Idle Mode |
Ready Mode |
figure 3 |
figure 4 |
8
 Loading...