


KDC-BT742U KDC-X493 KDC-MP442U
CD-RECEIVER
INSTRUCTION MANUAL
AMPLI-TUNER LECTEUR DE CD
MODE D’EMPLOI
REPRODUCTOR DE DISCOS COMPACTOS RECEPTOR DE FM/AM
MANUAL DE INSTRUCCIONES
Take the time to read through this instruction manual.
Familiarity with installation and operation procedures will help you obtain the best performance from your new CD-receiver.
For your records
Record the serial number, found on the back of the unit, in the spaces designated on the warranty card, and in the space provided below. Refer to the model and serial numbers whenever you call upon your Kenwood dealer for information or service on the product. Model KDC-BT742U/ KDC-X493/ KDC-MP442U Serial number
US Residence Only
Register Online
Register your Kenwood product at www.Kenwoodusa.com
© B64-4314-00/00 (KW/K0)

Contents
Before use |
3 |
Basic Operation |
4 |
Function Control |
6 |
ڥ Read through this page first for the setting of each function.
Display Settings |
10 |
Text Display Selection |
|
Auxiliary Input Display Setting |
|
Music disc/Audio file Operation |
11 |
Music Search |
|
Music Search for iPod |
|
All Random |
|
iPod Control by Hand Mode |
|
Direct Music Search |
|
Direct Disc Search |
|
Basic Operation of Disc Changer (Optional) |
|
Tuner Operation |
14 |
Auto Memory Entry |
|
Station Preset Memory |
|
Preset Tuning |
|
Direct Access Tuning |
|
Operation of hands-free phoning |
15 |
Before Use |
|
Receiving a call |
|
During a call |
|
Call waiting |
|
Other functions |
|
Making a call |
|
Dial a number |
|
Speed dialing (Preset dial) |
|
Calling a number in the Phone Book |
|
Calling a number in the call log |
|
Make a voice dialing call |
|
Registering to the Preset Dial Number List |
|
Display of phone number type (category) |
|
Other Functions |
18 |
Activating Security Code |
|
Deactivating Security Code |
|
Manual Clock Adjustment |
|
AMP Control |
|
Demonstration mode setting |
|
Audio Adjustments |
20 |
Audio Control
Adjusting the detail of Audio Control
Audio Setup
Speaker Setting
Audio Preset Memory
Audio Preset Recall
2 | KDC-BT742U/ KDC-X493/ KDC-MP442U
Audio Adjustments (DSP) |
23 |
Cabin selection |
|
Speaker Setting |
|
DTA (Digital Time Alignment) setting |
|
X’Over setting |
|
Equalizer Control |
|
Preset position setting |
|
Audio Preset Memory |
|
Audio Preset Recall |
|
Favorite Control |
26 |
Preset Memory |
|
Preset Recall |
|
Preset Memory Delete |
|
Name Setting |
|
Bluetooth Setup |
28 |
Registering Bluetooth device |
|
Registering Special Bluetooth device |
|
Registering PIN Code |
|
Downloading the Phone Book |
|
Selecting the Bluetooth device You Wish to |
|
Connect |
|
Deleting a Registered Bluetooth device |
|
Displaying the Firmware Version |
|
Adding a voice dialing command |
|
Setting a Voice Command for Category |
|
SMS (Short Message Service) |
|
Downloading the SMS |
|
Satellite Radio tuner control |
|
(Optional) |
32 |
Basic Operation |
|
Category and Channel Search |
|
Preset Memory |
|
Preset Tuning |
|
Channel Scan |
|
Direct Access Tuning |
|
HD Radio tuner control |
|
(Optional : KTC-HR300 connected) |
34 |
HD Radio Tagging (iTunes Tagging) |
|
Basic Operations of remote control |
34 |
Appendix |
36 |
Accessories/ Installation Procedure |
41 |
Connecting Wires to Terminals |
42 |
Installation/Removing the Unit |
43 |
Troubleshooting Guide |
44 |
Specifications |
46 |
Before use
2WARNING
To prevent injury or fire, take the following precautions:
•To prevent a short circuit, never put or leave any metallic objects (such as coins or metal tools) inside the unit.
Before using this unit for the first time
This unit is initially set on the Demonstration mode. When using this unit for the first time, cancel the <Demonstration mode Setting> (page 19).
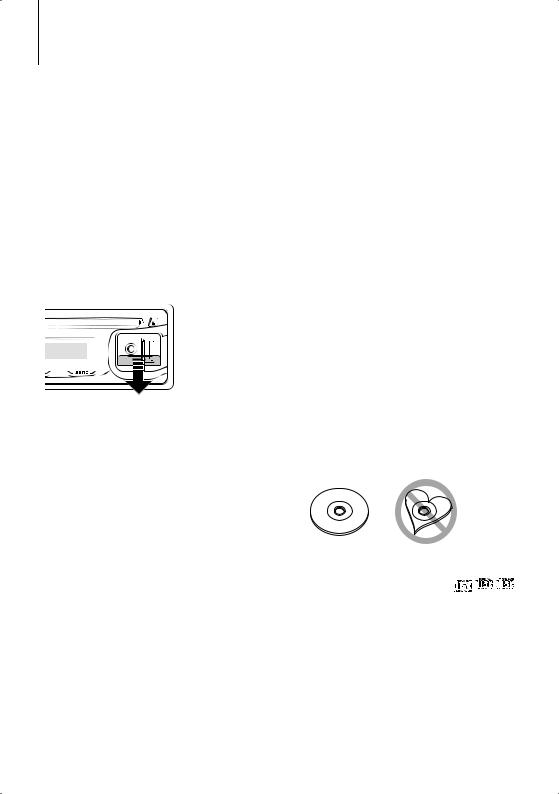
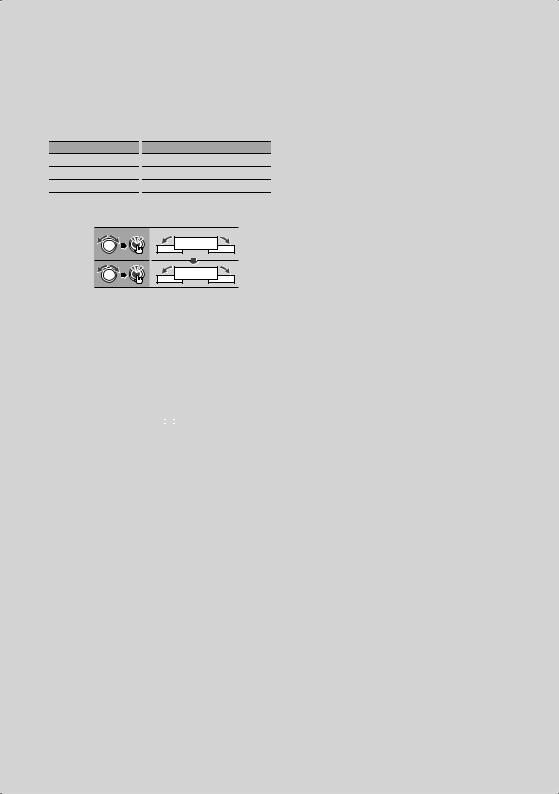
How to reset your unit
•If this unit or the connected unit (disc auto changer, etc.) fails to operate properly, press the Reset button. The unit returns to factory settings when the Reset button is pressed.

 Reset button
Cleaning the Unit
If the faceplate of this unit is stained, wipe it with a dry soft cloth such as a silicon cloth.
If the faceplate is stained badly, wipe the stain off with a cloth moistened with neutral cleaner, then wipe it again with a clean soft dry cloth.
¤
•Applying spray cleaner directly to the unit may affect its mechanical parts. Wiping the faceplate with a hard cloth or using a volatile liquid such as thinner or alcohol may scratch the surface or erases characters.
Cleaning the Faceplate Terminals
If the terminals on the unit or faceplate get dirty, wipe them with a clean soft dry cloth.
Lens Fogging
When you turn on the car heater in cold weather, dew or condensation may form on the lens in the CD player of the unit. Called lens fogging, this condensation on the lens may not allow CDs to play. In such a situation, remove the disc and wait for the condensation to evaporate. If the unit still does not operate normally after a while, consult your Kenwood dealer.
•If you experience problems during installation, consult your Kenwood dealer.
•When you purchase optional accessories, check with your Kenwood dealer to make sure that they work with your model and in your area.
•The characters which can be displayed by this unit are A-Z 0-9 @ “ ‘ ` % & * + – = , . / \ < > [ ] ( ) : ; ^ - { } | ~ .
•The illustrations of the display and the panel appearing in this manual are examples used to explain more clearly how the controls are used. Therefore, what appears on the display in the illustrations may differ from what appears on the display on the actual equipment, and some of the illustrations on the display may be inapplicable.
Handling CDs
•Do not touch the recording surface of the CD.
•Do not stick tape etc. on the CD, or use a CD with tape stuck on it.
•Do not use disc type accessories.
•Clean from the center of the disc and move outward.
•When removing CDs from this unit, pull them out horizontally.
•If the CD center hole or outside rim has burrs, use the CD only after removing the burrs with a ballpoint pen etc.
CDs that cannot be used
• CDs that are not round cannot be used.
• CDs with coloring on the recording surface or CDs that are dirty cannot be used.
• This unit can only play the CDs with

 . This unit may not correctly play discs which do not
have the mark.
•You cannot play a CD-R or CD-RW that has not been finalized. (For the finalization process refer to your CD-R/CD-RW writing software, and your CD-R/CD- RW recorder instruction manual.)
English | 3
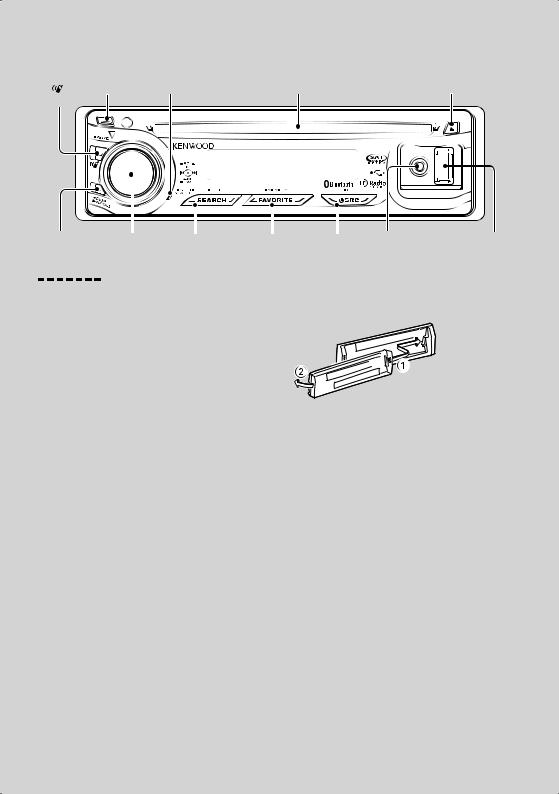
Basic Operation
[ ] Release Microphone Disc slot [ ]
[AUTO]
|
|
|
|
|
|
|
|
|
|
|
|
|
|
|
|
|
|
|
|
|
|
|
|
|
|
|
|
|
|
|
|
|
|
|
|
|
|
|
|
|
|
|
|
|
|
|
|
|
|
|
|
|
|
|
|
|
|
|
|
|
|
|
|
|
|
|
|
|
|
|
|
|
|
|
|
|
|
|
|
|
|
|
|
|
|
|
|
|
|
|
|
|
|
|
|
|
|
|
|
|
|
|
|
|
|
|
|
|
|
|
|
[ ] |
[AUD] |
[SEARCH] |
[FAVORITE] |
[SRC] |
|
|
|
||||||||
Auxiliary input |
|
USB Terminal |
|||||||||||||
General functions
Power/Source Select button: [SRC]
Turns on the power.
When the power is on, the source switches between Tuner (“TUNER”) , USB or iPod (“USB” or “iPod”),
CD (“CD”) , Auxiliary input (“AUX”), and Standby (“STANDBY”) each time this button is pressed.
Press at least 1 second to turn off the power.
⁄
•When an optional accessory is connected, the source name for each device appears.
•When connection of the iPod is recognized, the source display changes from “USB” to “iPod”.
Volume control: [AUD] knob
Turn the knob to adjust the volume.
Subwoofer output: [AUD] knob
Switches between ON (“SUBWOOFER ON”) and OFF (“SUBWOOFER OFF”) each time pushing toward down for at least 2 seconds.
Auxiliary input
Connect a portable audio device with mini-plug cable (3.5 ø).
Faceplate release: Release
Releases the faceplate lock so that it can be removed. Refer to the following diagram when reattaching the faceplate.
¤
•The faceplate is a precision piece of equipment and can be damaged by shocks or jolts.
•Keep the faceplate in its faceplate case while detached.
•Do not place the faceplate (and the faceplate case) in areas exposed to direct sunlight, excessive heat or humidity. Also avoid places with too much dust or the possibility of water splashing.
•To prevent deterioration, do not touch the terminals of the unit or faceplate with your fingers.
Text/Title scroll: [AUD] knob
Scrolls the CD and audio file text display when pushing toward up for at least 2 seconds.
⁄
•Use the mini-plug cable which is stereo type and does not have any resistance.
•The auxiliary input requires the setting made in “MENU” > “AUX” of <Function Control> (page 6).
Muting volume upon reception of phone call (Function of KDC-X493/ MP442U)
When there is a call, “CALL” is displayed and the audio system is paused.
When the call ends, “CALL” disappears and the audio system comes back on.
The audio system comes back on when [SRC] is pressed during a call.
⁄
•To use the TEL Mute feature, you need to hook up the MUTE wire to your telephone using a commercial telephone accessory. Refer to <Connecting Wires to Terminals> (page 42).
4 | KDC-BT742U/ KDC-X493/ KDC-MP442U

Function Control: [SEARCH]
Press this button for 1 second allows you to set various functions using the [AUD] knob. Refer to <Function Control> (page 6).
Category |
Function of setup item |
AUTO MEMORY |
Putting stations with good reception in the memory |
|
automatically. |
iPodCTRL |
Allows you to set up iPod Control by Hand Mode. |
PLAY MODE |
Allows you to set up the play mode. |
DSP* |
Allows you to set up the sound environment. |
MENU |
Allows you to set up the environment. |
RETURN |
Exit Function Control mode. |
* Function of KDC-BT742U.
Favorite Control: [FAVORITE]
Registers to or retrieves from the memory the operation procedure to select your favorite broadcast station or iPod Playlists/ Artists, etc regardless of the selected source. Refer to <Favorite Control>(page 26).
Tuner functions
FM band: [AUD] knob
Switches between FM1, FM2, and FM3 each time pushing toward up.
AM band: [AUD] knob
Switches to AM when pushing toward down.
Tuning: [AUD] knob
Changes the frequency when pushing toward left or
right.
⁄
• During reception of stereo stations the “ST” indicator is ON.
Tuning mode select: [AUTO]
•For KDC-X493/MP442U: Switches as follows each time this button is pressed.
•For KDC-BT742U: Switches as follows each time this button is pressed for at least 1 second.
Tuning mode |
Display |
Operation |
Auto seek |
“SEEK : AUTO1” |
Automatic search for a station. |
Preset station seek |
“SEEK : AUTO2” |
Search in order of the stations in |
|
|
the Preset memory. |
Manual |
“SEEK : MANUAL” |
Normal manual tuning control. |
Disc & Audio file play functions
Disc play: Disc slot
Starts playing when a disc is inserted.
When a CD is inserted, the “IN” indicator is ON.
⁄
•3 inch CD cannot be used. Attempt to insert using an adapter can cause malfunction.
Disc ejection: [0]
⁄
•You can eject the disc for 10 minutes after switching off the engine.
USB device/iPod play: USB Terminal
Connecting a USB device starts playback.
⁄
•For the playable audio file, media, and devices, refer to <About Audio file> (page 36).
Pause and play: [38]
Switches between pause and play each time this button is pressed.
USB device removing: [0]
Press this button for 2 seconds or longer to select the remove mode, and the remove the USB device. During the remove mode, “USB REMOVE” is displayed.
Music search: [AUD] knob
Changes the music when pushing toward left or right. Fast reverses or forwards the music while keeping pushing toward left or right. (No sound is output while playing audio file.)
Folder search: [AUD] knob
Changes the folder containing the audio file when pushing toward up or down.
•For the operation on iPod, enter <Music Search for iPod> (page 12) is first to enter the search mode.
Search mode: [SEARCH]
After pressing [SEARCH] button, you can quickly search songs with the [AUD] knob. See <Music Search> (page 11, 12) for details.
Hands-free phoning
Microphone:
(Function of KDC-BT742U)
The microphone for the hands free phone is built in. When your voice cannot be recognized due to the low microphone volume or noises in the vehicle, adjust the microphone settings by selecting “MENU” >“MIC GAIN” of <Function Control> and “MENU” >“NR LEVEL” of <Function Control> (page6).
English | 5
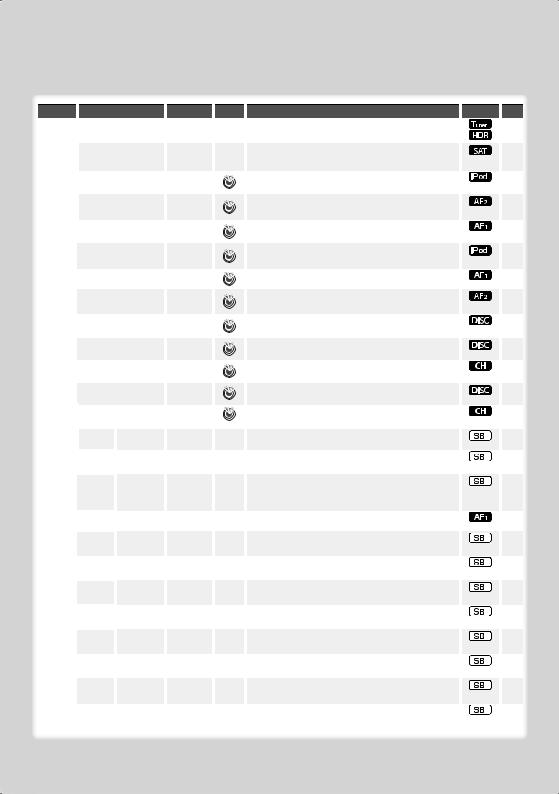
Function Control
Functions in the table below can be set up by using Function Control.
Category |
|
Item |
|
|
Setting |
|
Entry |
|
Setting overview |
|
Condition Page |
|||||
AUTO |
|
“AUTO MEMORY” |
|
|
|
|
|
Memorizes 6 stations with good reception automatically. |
|
|
|
14 |
||||
MEMORY |
|
|
|
|
|
|
|
|
|
|
|
|
|
|
||
|
|
|
|
|
|
|
|
|
|
|
|
|
|
|
|
|
CH-SCAN |
“CH-SCAN” |
|
|
|
|
|
|
Every receivable Channel is checked for 10 seconds. |
33 |
|||||||
|
|
|
|
|
|
|
|
|
|
|
|
|
|
|
|
|
iPodCTRL |
“iPodCTRL” |
|
|
“ON”/ “OFF”* |
|
|
|
When set to “ON”, allows you to operate iPod with the |
13 |
|||||||
|
|
|
|
|
|
|
|
|
|
|
|
control on the iPod. |
|
|
|
|
|
|
|
|
|
|
|
|
|
|
|
|
|
|
|
|
|
PLAY |
“FILE SCN” |
|
|
“ON”/ “OFF”* |
|
|
|
When set to “ON”, plays the intro of the music in the |
|
|
|
— |
||||
MODE* |
|
|
|
|
|
|
|
|
|
folder successively. |
|
|
|
|
||
|
|
|
“FOLD RDM” |
“ON”/ “OFF”* |
|
|
|
When set to “ON”, plays the music in the folder |
|
|
|
— |
||||
|
|
|
|
|
|
|
|
|
|
|
|
randomly. |
|
|
|
|
|
|
|
|
|
|
|
|
|
|
|
|
|
|
|
|
|
|
|
|
“ALL RDM” |
|
|
“ON”/ “OFF”* |
|
|
|
When set to “ON”, all songs in iPod are played at random. |
12 |
|||||
|
|
|
|
|
|
|
|
|
|
|
|
|
|
|
|
|
|
|
|
“FILE REP” |
|
|
“ON”/ “OFF”* |
|
|
|
When set to “ON”, plays the music repeatedly. |
|
|
|
— |
||
|
|
|
|
|
|
|
|
|
|
|
|
|
|
|
|
|
|
|
|
“FOLD REP” |
|
|
“ON”/ “OFF”* |
|
|
|
When set to “ON”, plays the music in the folder |
|
|
|
— |
||
|
|
|
|
|
|
|
|
|
|
|
|
repeatedly. |
|
|
|
|
|
|
|
|
|
|
|
|
|
|
|
|
|
|
|
|
|
|
|
|
“TRAC SCN” |
|
|
“ON”/ “OFF”* |
|
|
|
When set to “ON”, plays the intro of the music on the |
|
|
|
— |
||
|
|
|
|
|
|
|
|
|
|
|
|
disc successively. |
|
|
|
|
|
|
|
“DISC RDM” |
|
|
“ON”/ “OFF”* |
|
|
|
When set to “ON”, plays the music on the disc randomly. |
|
|
|
— |
||
|
|
|
|
|
|
|
|
|
|
|
|
|
|
|
|
|
|
|
|
“MGZN RDM” |
“ON”/ “OFF”* |
|
|
|
When set to “ON”, plays the music in the disc changer |
|
|
|
— |
||||
|
|
|
|
|
|
|
|
|
|
|
|
randomly. |
|
|
|
|
|
|
|
|
|
|
|
|
|
|
|
|
|
|
|
|
|
|
|
|
“TRAC REP” |
|
|
“ON”/ “OFF”* |
|
|
|
When set to “ON”, plays the music repeatedly. |
|
|
|
— |
||
|
|
|
|
|
|
|
|
|
|
|
|
|
|
|
|
|
|
|
|
“DISC REP” |
|
|
“ON”/ “OFF”* |
|
|
|
When set to “ON”, plays the music on the disc |
|
|
|
— |
||
|
|
|
|
|
|
|
|
|
|
|
|
repeatedly. |
|
|
|
|
|
|
|
|
|
|
|
|
|
|
|
|
|
|
|
|
|
DSP* |
“CONTROL” |
“EQ” |
|
|
|
|
Sets the sound quality. |
24 |
||||||||
|
|
|
|
|
|
|
|
|
|
|
|
|
|
|
|
|
|
|
|
|
|
|
“BAS BOOST” |
“OFF”/ |
|
|
|
Sets the Bass Boost level in two steps. |
|
|
|
— |
|
|
|
|
|
|
|
|
|
“STEP1”*/ “2” |
|
|
|
|
|
|
|
|
|
|
|
|
|
|
“HIGHWAY- |
“OFF”/ |
|
|
|
Compensates the low volume or bass sound being lost |
|
|
|
* |
|
|
|
|
|
|
|
SND” |
“STEP1”/, “2”/ |
|
|
|
by road noises to make vocal sound clearer. |
|
|
|
|
|
|
|
|
|
|
|
|
|
“3”* |
|
|
|
|
|
|
|
|
|
|
|
|
|
|
“SUPREME” |
“ON”*/ “OFF” |
|
|
|
Turns ON/OFF the Supreme plus function. |
|
|
|
* |
|
|
|
|
|
|
|
|
|
|
|
|
|
|
|
|
|
|
|
|
|
|
|
|
“POSITION” |
|
|
|
|
Compensates the sound environment in accordance |
24 |
||||
|
|
|
|
|
|
|
|
|
|
|
|
with the listening position. |
|
|
|
|
|
|
|
“SETUP” |
“CABIN” |
“COMPACT” |
|
|
|
Selects the car type to compensate the distance |
23 |
||||||
|
|
|
|
|
|
|
|
etc. |
|
|
|
difference between each speaker. |
|
|
|
|
|
|
|
|
|
|
“SPEAKER” |
|
|
|
|
Sets the connected speaker, speaker size, and |
23 |
||||
|
|
|
|
|
|
|
|
|
|
|
|
installation position. |
|
|
|
|
|
|
|
|
|
|
|
|
|
|
|
|
|
|
|
|
|
|
|
|
|
|
|
“DTA” |
|
|
|
|
Makes fine adjustment of the compensation value |
23 |
||||
|
|
|
|
|
|
|
|
|
|
|
|
specified at Cabin. |
|
|
|
|
|
|
|
|
|
|
“X’OVER” |
|
|
|
|
Makes fine adjustment of the X’Over value specified at |
24 |
||||
|
|
|
|
|
|
|
|
|
|
|
|
Speaker. |
|
|
|
|
|
|
|
|
|
|
|
|
|
|
|
|
|
|
|
|
|
|
|
|
“PRESET” |
“RECALL” |
|
|
|
|
Registering the value setup by Sound Control.Recalling |
25 |
||||||
|
|
|
|
|
|
|
|
|
|
|
|
the sound setup registered by <Audio Preset Memory>. |
|
|
|
|
|
|
|
|
|
|
“MEMORY” |
|
|
|
|
Registering the value setup by Sound Control. |
25 |
||||
|
|
|
|
|
|
|
|
|
|
|
|
|
|
|||
|
|
|
“DSP BYPASS”/ |
|
|
|
|
Setting “BYPASS” passes the DSP function. |
|
|
|
— |
||||
|
|
|
“DSP THROUGH”* |
|
|
|
|
Setting “THROUGH” activates the DSP function. |
|
|
|
|
||||
6 | KDC-BT742U/ KDC-X493/ KDC-MP442U

*Factory setting
* Function of KDC-BT742U. * Function of KDC-X493.
* Function of KDC-MP442U.
* iPod play mode cannot be set when <iPodCTRL> is set to “OFF”.
* Refer to <Menu Glossary> (page 38).
Category  Item
Item
MENU “SECURITY SET”/ “SECURITY CLR”
“SKIP SRCH”
“DVC REGIST”*
“S-DVC SELECT”*
“PHONE SEL”*
“SMS DOWNLOAD”*
“SMS INBOX”*
“VOICE TAG”*
“VOICE RECOG”*
“DEVICE DEL”*
“DVC STATUS”*
“PIN EDIT”*
“AUTO ANS”*
“MIC GAIN”*
“NR LEVEL”*
“SP SEL”*
“CALL BEEP”*
“BT F/W UPDATE”*
“BEEP”*
“CLOCK ADJUST”
“DISPLAY”
“DIMMER”
“IL EFFECT”
“DOT LINE”
“AMP”
Setting
“0.5%”*/ “1%”/ “5%”/ “10%”
“OFF”/ “0S” – “8S”* – “99S”
“–2” – “0”* – “+2”
“–2” – “0”* – “+2”
“FRONT”*/ “F-R”/ “F-L”
“ON”*/ “OFF”
“OFF”/ “ON”*
“OFF”/ “ON”*
“OFF”/
“AUTO”*
“OFF”/ “ON”*
“OFF”/ “ON”*
“OFF”/ “ON”*
Entry
1 sec.
1 sec.
1 sec.
1 sec.
1 sec.
1 sec.
1 sec.
1 sec.
1 sec.
1 sec.
1 sec.
1 sec.
1 sec.
Setting overview |
|
Condition |
|
Page |
Sets/Resets security code. |
|
|
18 |
|
|
|
|
|
|
Sets the ratio of skip performed with <Music Search for |
|
|
12 |
|
iPod>. |
|
|
|
|
|
|
|
|
|
Register a Bluetooth device (pairing). |
|
|
28 |
|
|
|
|
|
|
Allow registration of a special device that cannot be |
|
|
28 |
|
registered normally. |
|
|
|
|
|
|
|
|
|
Select a cell-phone subject to hands-free connection. |
|
|
29 |
|
|
|
|
|
|
Download a short message. |
|
|
32 |
|
|
|
|
|
|
Display the received short message. |
|
|
31 |
|
|
|
|
|
|
Registers voice for voice recognition and voice to select |
|
|
30, |
|
the Phone number category in Phonebook. |
|
|
|
31 |
Calls by recognizing the registered voice. |
|
|
17 |
|
|
|
|
|
|
Cancel registration of the Bluetooth device. |
|
|
30 |
|
|
|
|
|
|
Display the status of the Bluetooth device. |
|
— |
|
* |
|
|
|
|
|
Specify the PIN code required when registering this unit |
|
|
28 |
|
using the Bluetooth device. |
|
|
|
|
|
|
|
|
|
Answer a call automatically after lapse of the preset time |
|
|
|
* |
interval for automatic answer. |
|
|
|
|
Adjusts the sensitivity of the built-in microphone for a |
|
— |
|
* |
telephone call. |
|
|
|
|
|
|
|
|
|
Reduces the noises generated by the surrounding |
|
— |
|
* |
environment without changing the microphone |
|
|
|
|
volume. |
|
|
|
|
|
|
|
|
|
Specify the voice output speaker. |
|
|
|
* |
|
|
|
|
|
Output a beep from the speaker when a call comes in. |
|
|
|
* |
|
|
|
|
|
Display the firmware version and update the firmware. |
|
|
30 |
|
|
|
|
|
|
Setting the operation check sound (beep sound) ON/ |
|
|
|
— |
OFF. |
|
|
|
|
Sets the clock. |
|
— |
19 |
|
|
|
|
|
|
Turns off the display when no operation is performed. |
|
— |
|
* |
|
|
|
|
|
Dims the display part in conjunction with the light |
|
|
|
— |
switch of the vehicle. |
|
|
|
|
Sets whether the key illumination brightness is changed |
|
|
|
— |
in conjunction with the key operation. |
|
|
|
|
|
|
|
|
|
Specifies whether to display the red dotted line on the |
|
|
|
— |
display. |
|
|
|
|
Turns on/off the built-in amplifier. |
|
|
|
* |
Next page 3
English | 7
Function Control
Category |
Item |
Setting |
Entry |
MENU |
“ZONE2” |
“REAR”*/ |
|
|
|
“FRONT” |
|
|
“SUPREME”* * |
“OFF”/ “ON”* |
|
|
“AMS CONTROL”* |
|
|
|
“CRSC” |
“OFF”/ “ON”* |
|
|
“RECEIVE MODE” |
“AUTO”*/ |
1 sec. |
|
|
“DIGITAL”/ |
|
|
|
“ANALOG” |
|
|
“TAG MEM” |
“00”- “50” |
|
|
“TAGGING” |
“0FF”/ “ON”* |
|
|
“ESN=” |
|
|
|
“NAME SET” |
|
1 sec. |
|
|
|
|
|
“SCROLL” |
“AUTO”*/ |
|
|
|
“MANUAL” |
|
|
“FAV DELETE” |
|
1 sec. |
|
|
|
|
|
“AUX” |
“OFF”/ |
|
|
|
“ON1”*/ |
|
|
|
“ON2” |
|
|
“CD READ” |
“1”*/ “2” |
|
|
“AUDIO PRESET”* |
|
1 sec. |
|
|
|
|
|
“DEMO MODE” |
“OFF”/ “ON”* |
2 sec. |
|
|
|
Setting overview |
|
Condition |
|
Page |
Specifies the destination of AUX input sound when the |
|
|
|
* |
Dual Zone function is turned on. |
|
|
|
|
|
|
|
|
|
Turns ON/OFF the Supreme function. |
|
|
|
* |
|
|
|
|
|
Controls the connected LX amplifier. |
|
— |
19 |
|
|
|
|
|
|
Switches to Monaural to decrease noise when reception |
|
|
8 |
|
is poor. |
|
|
|
|
Sets the receive mode of HD Radio. |
|
|
|
* |
|
|
|
|
|
Displays the tag memory usage of HD Radio. Up to 50 |
|
|
34 |
|
tags can be registered to this unit. |
|
|
|
|
|
|
|
|
|
Turns ON / OFF the tag memory function of HD Radio. |
|
|
34 |
|
|
|
|
|
|
Displays the Electronic Serial Number of satellite radio. |
|
|
|
— |
|
|
|
|
|
Sets the display when switched to AUX source. |
|
|
11 |
|
|
|
|
|
|
Specifies whether the text is scrolled automatically. |
|
— |
4 |
|
|
|
|
|
|
Deletes Favorite Preset Memory. |
|
|
26 |
|
|
|
|
|
|
Sets whether to display AUX during source selection. |
|
|
|
* |
|
|
|
|
|
Sets the CD read mode. |
|
|
|
* |
|
|
|
|
|
Presets the setting value of the audio control. The preset |
|
|
22 |
|
value is retained after resetting. |
|
|
|
|
|
|
|
|
|
Specifies whether to enable demonstration. |
|
— |
19 |
|
*Factory setting
* Function of KDC-BT742U. * Function of KDC-X493.
* Function of KDC-MP442U.
* iPod play mode cannot be set when <iPodCTRL> is set to “OFF”.
* Refer to <Menu Glossary> (page 38).
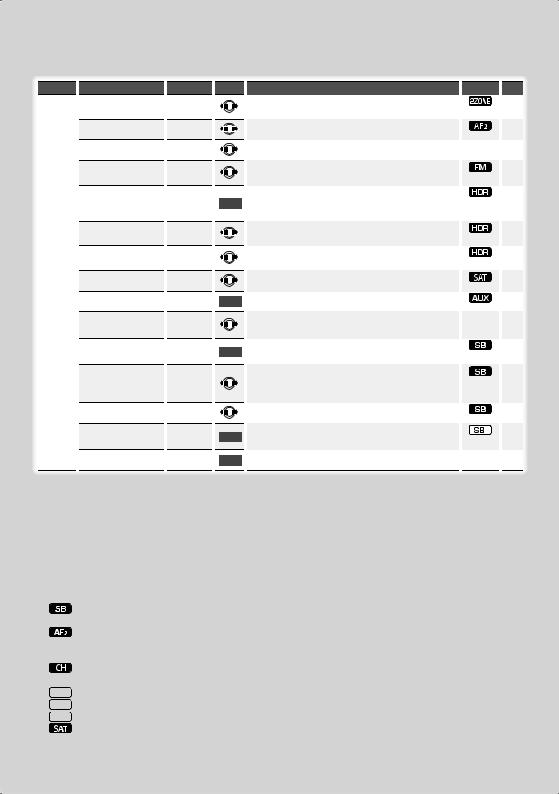
Displayed item is depending on currently selected source or mode. The mark in Condition column shows the condition to which the item is displayed.
 : Can be set in other than standby state.
: Can be set in standby state.
 : Can be set while Audio file source of CD/USB/iPod.
: Can be set while Audio file source of CD/USB (excluding iPod).
 : Can be set while CD/ Disc changer source.
: Can be set while Disc changer source.
 : Can be set during Tuner source.
 : Can be set during FM reception.
 : Can be set while accessing AUX source.
 : Can be set while HD Radio source.
: Can be set during Satellite radio source.
 : Can be set only during playback of the iPod source. (USB source used when the iPod is connected)
 : Can be set for sources other than the standby source by setting “2 ZONE” of <Audio Setup> (page 21) to “ON”.
 : Can be set while a cell-phone is connected.
 : Refer to the reference page.
— : Can be set during all sources.
⁄
•Refer to the respective page for information on how to set the items with reference page number.
•Only the items available to the current source are displayed.
•Strong electrical fields (such as from power lines) may cause unstable sound quality when CRSC is turned ON. In such a situation, turn it OFF.
8 | KDC-BT742U/ KDC-X493/ KDC-MP442U
1Enter Function Control mode
Press the [SEARCH] button for at least 1 second.
”FUNCTION” is displayed.
2Select your desired setup item
Operation type
Movement between items
Selection of item
Return to previous item
Operation
Turn the [AUD] knob.
Press the [AUD] knob.
Press the [SEARCH] button.
Repeat selection and determination until your desired setup item is selected.
Example:
MENU
DOT LINE
In this manual, the above selection is indicated as
Select “MENU” > “DOT LINE”.
3Make a setting
Press the [AUD] knob or turn the [AUD] knob to select a setting value, and then press the [AUD] knob.
•The value of items with  mark can be set by press the [AUD] knob.
•The value of items with 
 mark can be set by pushing the [AUD] knob towards right or left.
•Some items require you to keep pressing the [AUD] knob for 1 or 2 seconds so that you can make a setting. For these items, the time during which you need to keep pressing the [AUD] knob is displayed in the Entry column in seconds.
•For the functions accompanied by the description of the setting procedure and so forth, the reference page numbers are displayed.
4Exit Function Control mode
Press the [SEARCH] button for at least 1 second.
English | 9
Display Settings
Text Display Selection
Changes displayed information on each source following;
In Tuner source
|
Information |
|
Display |
|
Frequency |
|
“FREQUENCY” |
|
Clock |
|
“CLOCK” |
In CD & External disc source |
|
|
|
|
Information |
|
Display |
|
Disc title |
|
“DISC TITLE” |
|
Track title |
|
“TRACK TITLE” |
|
Play time & Track number |
|
“P-TIME” |
|
Clock |
|
“CLOCK” |
In Audio file/ iPod source |
|
|
|
|
Information |
|
Display |
|
Music title & Artist name |
|
“TITLE/ARTIST” |
|
Album name & Artist name |
|
“ALBUM/ARTIST” |
|
Folder name |
|
“FOLDER NAME” |
|
File name |
|
“FILE NAME” |
|
Play time & Music number |
|
“P-TIME” |
|
Clock |
|
“CLOCK” |
In Standby/ Auxiliary input source |
|||
|
Information |
|
Display |
|
Source name |
|
“SOURCE NAME” |
|
Clock |
|
“CLOCK” |
In HD Radio source (Optional) |
|
|
|
|
Information |
|
Display |
|
Station name |
|
“STATION NAME” |
|
Title |
|
“TITLE” |
|
Frequency |
|
“FREQUENCY” |
|
Clock |
|
“CLOCK” |
In SIRIUS/ SAT source (Optional)
Information
Channel Name
Music Title
Artist Name
Composer name
Category Name
Label Name
Comment
Band & Channel Number
Clock
Display
“CHANNEL NAME”
“SONG TITLE”
“ARTIST NAME”
“COMPOSER NAME”
“CATEGORY NAME”
“LABEL NAME”
“COMMENT”
“CH NUMBER”
“CLOCK”
In XM source (Optional)
Information
Channel Name
Title
Name
Category Name
Band & Channel Number
Clock
Display
“CHANNEL NAME”
“TITLE”
“NAME”
“CATEGORY”
“CH NUMBER”
“CLOCK”
1Enter Switching Display mode
Press the [38] button for at least 1 second.
“DISPLAY SEL” is displayed.
2Select the Display item
Turn the [AUD] knob.
3Exit Switching Display mode
Press the [38] button.
⁄
•When you select the clock display, the display setting of each source will be changed to the clock display.
•If the selected display item does not have any information, alternative information is displayed.
•When LX-AMP is connected, the item setup by the Display mode of LX-AMP is displayed. (KDC-X493 only)
•When selecting “FOLDER NAME” while playing with iPod, names will be displayed depending on currently selected browsing items.
•If the iPod Control by Hand Mode is set to on while playing the iPod, “iPod BY HAND” is displayed.
•If all characters cannot be displayed while playing with iPod, the file number in the list is displayed.
Information |
|
Display |
Music title |
|
“TITLE***” |
Folder name |
|
“FLD***” |
File name |
|
“FILE***” |
10 | KDC-BT742U/ KDC-X493/ KDC-MP442U
Auxiliary Input Display Setting
Selects the display when changing to Auxiliary input source.
1Select Auxiliary input display setting item during Menu mode (In AUX mode)
Select the “NAME SET” display.
For how to select Function Control items, refer to <Function Control> (page 6).
2Enter Auxiliary input display setting mode
Press the [AUD] knob for at least 1 second.
The presently selected Auxiliary input display is displayed.
3Select the Auxiliary input display
Turn the [AUD] knob.
“AUX”/ “DVD”/ “PORTABLE”/ “GAME”/ “VIDEO”/ “TV”
4Exit Auxiliary input display setting mode
Press the [SEARCH] button.
⁄
•When operation stops for 10 seconds, the name at that time is registered, and the Auxiliary input display setting mode closes.
•The Auxiliary input display can be set only when the built-in auxiliary input or the auxiliary input of optional KCA-S220A is used. On the KCA-S220A, “AUX EXT” is displayed by default.
Music disc/Audio file Operation
Function of Audio file/ Internal CD source
Music Search
Selecting the music you want to listen to from the device or media being played now.
1Enter Music Search mode
Press the [SEARCH] button.
“SEARCH” is displayed.
Displays the current Audio file name.
2Search for music
Audio file
Operation type |
|
Operation |
Movement between |
|
Turn the [AUD] knob or push it towards |
folders/files |
|
up or down. |
Selection of folder/flie |
|
Press the [AUD] knob or push it towards |
|
|
right. |
Return to previous folder |
|
Push the [AUD] knob towards left. |
Return to root folder |
|
Push the [AUD] knob towards left for at |
|
|
least 1 second. |
“<” or “>” beside the displayed folder name indicates that this folder is preceded or followed by another folder.
When file name is displayed, “ ” is added at the end.
Internal CD source
Operation type |
|
Operation |
Movement between track |
|
Turn the [AUD] knob or push it towards |
|
|
up or down. |
Selection of track |
|
Press the [AUD] knob. |
Return to first track |
|
Push the [AUD] knob towards left for at |
|
|
least 1 second. |
Cancelling the Music Search mode
Press the [SEARCH] button.
⁄
•Music Search cannot be performed during Random play or scan play.
English | 11
Music disc/Audio file Operation
Function of iPod
Music Search for iPod
Search for the song (in iPod) you want to play.
1Enter Music Search mode
Press the [SEARCH] button.
“SEARCH” is displayed.
2Search for music
Operation type |
|
Operation |
Movement between items |
|
Turn the [AUD] knob. |
Skip Search *1 |
|
Push the [AUD] knob towards right or left. |
Selection of item |
|
Press the [AUD] knob. |
Return to previous item |
|
Push the [AUD] knob towards up. |
Return to Top menu |
|
Push the [AUD] knob towards up for at |
|
|
least 1 second. |
Search by initial |
|
Press the [SEARCH] button for at least 1 |
|
|
second. |
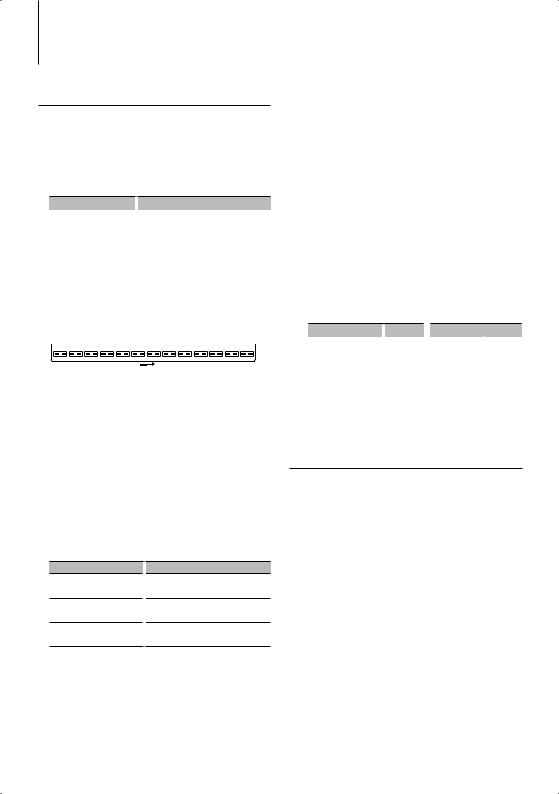
The position of the currently displayed item is indicated by the icon bar in 13 steps.
Cancelling the Music Search mode
Press the [SEARCH] button.
Searching for Music by Initial
You can select an alphabetic character from the list in the browse item (artist, album, etc.) selected now.
1Enter alphabet search mode
Press the [SEARCH] button for at least 1 second.
“A B C …” is displayed.
•If you can not search for a song by an alphabetic character in the browse item selected now, the data on the screen does not change.
2Select the initial to be searched for
Operation type
Move to the next character.
Move to the next row.
Cancelling the alphabet search mode
Operation
Turn the [AUD] knob or push it towards right or left.
Push the [AUD] knob towards up or down.
Press the [SEARCH] button.
3Determine the selected initial.
Press the [AUD] knob.
Start search. When search is completed, the music search mode is selected again at the selected character position.
Cancelling the Searching for Music by Initial
Press the [SEARCH] button for at least 1 second.
12 | KDC-BT742U/ KDC-X493/ KDC-MP442U
⁄
•*1 Skip Search: The number of songs to be skipped is determined by the ratio of the total number of songs in the list which is selected now. Set the ratio with “SKIP SRCH” in <Function Control> (page 6). Keep pushing [AUD] knob for 3 seconds or longer skips songs at 10% irrespective of the setting.
•The time of search by alphabet may become long depending on the number of songs in iPod or the folder structure.
•When selecting an initial in the alphabet search mode, entering “*” searches symbols and entering “1” searches digits.
•If the first character string begins with an article “a”, “an”, or “the” in the alphabet search mode, it is searched for in defiance of the article.
•Characters that are included in a song name but cannot be displayed are left blank. If no character included in a song name cannot be displayed, the browse item name and digits are displayed.
Items |
|
Display |
|
Items |
|
Display |
Playlists |
|
“PLIST***” |
|
Podcasts |
|
“PDCT***” |
Artists |
|
“ART***” |
|
Genres |
|
“GEN***” |
Albums |
|
“ALB***” |
|
Composers |
|
“COM***” |
Songs |
|
“PRGM***” |
|
|
|
|
|
|
|
|
|
|
|
Function of iPod
All Random
All songs in iPod are played at random.
Enter All random mode
Select “PLAY MODE” > “ALL RDM”.
For how to select Function Control items, refer to <Function Control> (page 6).
⁄
•The time required to turn on the all random function may become longer depending on the number of songs in iPod or the folder structure.
•Turning on the all random function changes the iPod browse item to “SONGS”. This browse item will not change even if the all random function is turned off.
•If the browse item is changed to search for music while the all random function is on, the all random function is turned off and the songs in the browse item are played at random.

Function of iPod
iPod Control by Hand Mode
Allows you to operate iPod with the control on the iPod.
Enter iPod Control by Hand Mode
Select “iPodCTRL”.
For how to select Function Control items, refer to <Function Control> (page 6).
⁄
•In the iPod Control by hand mode, iPod cannot be operated using this unit.
•This mode is not compatible with music information display. The display will show “iPod BY HAND”.
•iPod can be operated when it conforms to the iPod control function.
Function of remote control
Direct Music Search
Searchs the music by entering the track number.
1Enter the music number
Press the number buttons on the remote control.
2Search the music
Press the [4] or [¢] button.
Cancelling Direct Music Search
Press the [38] button.
⁄
•Direct Music Search cannot be performed during playing of iPod, Random play, or scan play.
Function of disc changers with remote control
Direct Disc Search
Searchs the disc by entering the disc number.
1Enter the disc number
Press the number buttons on the remote control.
2Search the disc
Press the [FM+] or [AM–] button.
Cancelling Direct Disc Search
Press the [38] button.
⁄
•Direct Disc Search cannot be performed during playing of Random play or scan play.
•Input “0” to select disc 10.
Basic Operation of Disc Changer (Optional)
Selecting CD changer source
Press the [SRC] button.
Select the “CD CH” display.
Music search
Push the [AUD] knob towards right or left.
Disc Search
Push the [AUD] knob towards up or down.
English | 13

Tuner Operation
Auto Memory Entry
Putting stations with good reception in the memory automatically.
1Enter Auto Memory Entry mode
Select “AUTO MEMORY”.
For how to select Function Control items, refer to <Function Control> (page 6).
2Open Auto Memory Entry
Turn the [AUD] knob to select “YES”, and then press the [AUD] knob.
When 6 stations that can be received are put in the memory, auto memory entry closes.
Station Preset Memory
Putting a station in the memory.
1Select the frequency to put in the memory
Push the [AUD] knob towards right or left.
2Enter Preset Memory mode
Press the [SEARCH] button.
3Select the number to put in the memory
Turn the [AUD] knob or push it towards up or down.
4Determine the number to put in the memory
Press the [AUD] knob for at least 1 second.
Cancelling the Preset Memory mode
Press the [SEARCH] button.
Preset Tuning
Recalling the stations in the memory.
1Enter Preset Tuning Select mode
Press the [SEARCH] button.
2Select a desired station in the memory
Turn the [AUD] knob or push it towards up or down.
3Recall the station
Press the [AUD] knob.
Cancelling Preset Tuning
Press the [SEARCH] button.
Function of remote control
Direct Access Tuning
Entering the frequency and tuning.
1Enter Direct Access Tuning mode
Press the [DIRECT] button on the remote control.
“– – – –” is displayed.
2Enter the frequency
Press the number buttons on the remote control.
Example:
Desired frequency |
|
Press button |
92.1 MHz (FM) |
|
[0], [9], [2], [1] |
810 kHz (AM) |
[0], [8], [1], [0] |
|
Cancelling Direct Access Tuning
Press the [DIRECT] button on the remote control.
⁄
•You can enter the FM band frequency in steps of a minimum of 0.1 MHz.
14 | KDC-BT742U/ KDC-X493/ KDC-MP442U

Function of KDC-BT742U
Operation of hands-free phoning
Before Use
•For details on the Bluetooth cell-phone with the hands-free function, see <About the Cell-Phone> (page 37).
•You need to register your cell-phone before using it with this unit. For more details, see <Registering Bluetooth device> (page 28).
•If you have registered two or more cell-phones, you need to select one of them. For more details, see <Selecting the Bluetooth device You Wish to Connect> (page 29).
•To use the Phone Book, it must be downloaded to this unit in advance. For details, see <Downloading the Phone Book> (page 29).
•“BT” indicator is lit when a cell-phone is connected to this unit.
Receiving a call
the hands-free talk mode by operating this unit. Operate your cell-phone to return to the hands-free talk mode.
Adjusting the Voice Volume during a Call
Turn the [AUD] knob.
Call waiting
Answering Another Incoming Call with the Current Call Suspended
1Press the [AUD] knob.
2Turn the [AUD] knob or push it towards up or down. Select the “ANSWER” display.
3Press the [AUD] knob.
Answering another Incoming Call after Terminating the Current Call
Press the [SRC] button or press the [ ] button for at least 1 second.
Answering a Phone Call
Press the [AUD] button.
⁄
•The following operations disconnect the line:
-Insert a CD.
-Connect a USB device.
•The name of the calling party is displayed if it has already been registered in the Phone Book.
Rejecting an Incoming Call
Press the [SRC] button or press the [ ] button for at least 1 second.
During a call
Disconnecting a Call
Press the [SRC] button or press the [ ] button for at least 1 second.
Switching to the Private Mode
Press the [38] button.
Switches between Private talk (“PRIVATE TALK”) and Hands-free talk (“HANDS FREE”) each time this button is pressed.
⁄
•Depending on the type of your cell-phone, switching to the private talk mode may select the source that was used before commencing the hands-free connection. If this happens, the source cannot be switched back to
Continuing the Current Call
1Press the [AUD] knob.
2Turn the [AUD] knob or push it towards up or down. Select the “REJECT” display.
3Press the [AUD] knob.
Answering the Waiting Call after Terminating the Current Call
Press the [SRC] button or press the [ ] button for at least 1 second.
Switching between the Current Call and Waiting Call
Press the [AUD] knob.
Each pressing of this knob switches the calling party.
Other functions
Clearing the Disconnection Message
Press the [ ] button.
“HF DISCONCT” disappears.
Switching between Display Modes
Press the [38] button for at least 1 second.
Pressing this button each time switches between name and telephone number.
English | 15
Function of KDC-BT742U
Operation of hands-free phoning
Making a call
1Enter dialing method mode
Press the [ ] button.
2Select a dialing method
Press the [AUD] knob.
“NUMBER DIAL” » “PHONE BOOK1” » “PHONE BOOK2” » “OUT-CALL” » “IN-CALL” » “MISSED CALLS”
Methods of operations in the above modes are described below.
3Exit the dialing method mode
Press the [ ] button.
Dial a number
1Enter dialing method mode
Press the [ ] button.
2Select the number dial mode
Press the [AUD] knob.
Select the “NUMBER DIAL” display.
3Enter a phone number
Press the number ([1] – [0]), #([FM]), *([AM]), or +([¢]) button on the remote controller.
4Make a call
Press the [DIRECT] button on the remote controller.
To erase the entered phone number digit by digit:
Press the [4] button on the remote controller.
⁄
• You can input max 32 digits.
Speed dialing (Preset dial)
1Enter dialing method mode
Press the [ ] button.
2Press the [AUD] knob.
Select the “NUMBER DIAL” display.
3Enter preset dial mode
Press the [SEARCH] button.
4Select the number you want to recall from the memory
16 | KDC-BT742U/ KDC-X493/ KDC-MP442U
Turn the [AUD] knob or push it towards up or down.
5Press the [AUD] knob.
Phone number is displayed.
6Make a call
Press the [AUD] knob for at least 1 second.
⁄
• You need to register the preset dial number. (page 17)
Calling a number in the Phone Book
1Enter dialing method mode
Press the [ ] button.
2Select the Phone Book mode
Press the [AUD] knob.
Select the “PHONE BOOK1” display, proceed to step 3.
Select the “PHONE BOOK2” display, proceed to step 4.
3Select the initial to be searched for
Operation type
Move to the next character.
Move to the next row.
Determine the selected initial.
Operation
Turn the [AUD] knob or push it towards right or left.
Push the [AUD] knob towards up or down.
Press the [AUD] knob for at least 1 second.
4 Select the name
Operation type |
|
Operation |
Move to the next phone |
|
Turn the [AUD] knob or push it towards |
number. |
|
up or down. |
Move to the next name. |
|
Push the [AUD] knob towards right |
|
|
or left. |
5Make a call
Press the [AUD] knob for at least 1 second.
⁄
•During search, a non-accent character such as “u” is searched for instead of an accent character such as “ü”.

Calling a number in the call log
1Enter dialing method mode
Press the [ ] button.
2Select the call log mode
Press the [AUD] knob.
Select the “OUT-CALL” (outgoing call), “IN-CALL” (incoming call), or “MISSED CALLS” (missed call) display.
3Select a name or phone number
Turn the [AUD] knob or push it towards up or down.
4Make a call
Press the [AUD] knob for at least 1 second.
⁄
•The outgoing call list and the incoming call list, and the missed call list are the lists of calls originated from and received at this unit. They are not the ones stored in the cell-phone memory.
Registering to the Preset Dial Number List
1Enter the phone number you wish to register
Enter the phone number with reference to the following:
Dial a number/ Calling a number in the call log/ Calling a number in the Phone Book
2Enter Preset Memory mode
Press the [SEARCH] button.
3Select the number to put in the memory
Turn the [AUD] knob or push it towards up or down.
4Determine the number to put in the memory
Press the [AUD] knob for at least 1 second.
Exit the Preset Memory mode
Press the [SEARCH] button.
Make a voice dialing call
1Enter voice recognize mode
Select “MENU” > “VOICE RECOG”.
For how to select Function Control item, refer to <Function Control> (page 6).
“V-RECOG READY” is displayed.
2Press the [AUD] knob.
“PB NAME” is displayed.
When a beep is heard, utter the name within 1 second.
3“PN TYPE” is displayed.
When a beep is heard, utter the category within 1 second.
4Make a call
Press the [AUD] knob for at least 1 second.
•This step is the same as step 3 of the procedure in <Calling a number in the Phone Book>. You can make a call or select a category.
⁄
•If your voice cannot be recognized, a message is displayed. Pressing the [AUD] knob allows you to retry voice input. (page 44)
•Both the name and category requires registration of a voice tag. (page 30)
•Audio sound is not output during voice recognize.
Display of phone number type (category)
The category items in the Phone Book are displayed as follows:
Display |
|
Information |
“GENERAL” |
|
General |
“HOME” |
|
Home |
“OFFICE” |
|
Office |
“MOBILE” |
|
Mobile |
“OTHER” |
|
Other |
English | 17

Other Functions
Activating Security Code
⁄
•You can set the Security Code with a 4 digit number of your choice.
•The Security Code cannot be displayed or referenced. Make a note of the Security Code and treasure it up.
1Select Security Code item during Menu mode (In Standby mode)
“SECURITY SET” is displayed.
For how to select Function Control items, refer to <Function Control> (page 6).
2Enter Security Code mode
Press the [AUD] knob for at least 1 second.
When “ENTER” is displayed, “CODE” is also displayed.
3Enter Security Code
Operation type |
|
Operation |
Select the digits to enter |
|
Push the [AUD] knob towards right |
|
|
or left. |
Select the Security Code |
|
Turn the [AUD] knob or push it |
numbers |
|
towards up or down. |
4Confirm the Security Code
Press the [AUD] knob for at least 3 seconds.
When “RE-ENTER” is displayed, “CODE” is also displayed.
5Do the step 3 through 4 operation, and reenter the Security Code.
“APPROVED” is displayed.
The Security Code function activates.
⁄
•If you enter the wrong Code in steps 3 through 4, repeat from step 3.
6Exit Security Code mode
Press the [SEARCH] button.
Entering Security Code
The Security Code is required to use the audio unit when the unit is first used after removed from the battery power source or the Reset button is pressed.
1Turn the power ON.
2Do the step 3 through 4 operation, and enter the Security Code.
“APPROVED” is displayed. Now, you can use the unit.
Deactivating Security Code
To deactivate the Security Code function.
1Select Security Code item during Menu mode (In Standby mode)
Select the “SECURITY CLR” display.
For how to select Function Control items, refer to <Function Control> (page 6).
2Enter Security Code mode
Press the [AUD] knob for at least 1 second.
When “ENTER” is displayed, “CODE” is also displayed.
3Enter Security Code
Operation type |
|
Operation |
Select the digits to enter |
|
Push the [AUD] knob towards right |
|
|
or left. |
Select the Security Code |
|
Turn the [AUD] knob or push it |
numbers |
|
towards up or down. |
4Press the [AUD] knob for at least 3 seconds.
“CLEAR” is displayed.
The Security Code function deactivates.
5Exit Security Code mode
Press the [SEARCH] button.
⁄
•If a wrong security code is entered, “ERROR” is displayed. Enter a correct security code.
18 | KDC-BT742U/ KDC-X493/ KDC-MP442U

Manual Clock Adjustment
1Select Clock Adjustment item during Menu mode
Select the “CLOCK ADJUST” display.
For how to select Function Control items, refer to <Function Control> (page 6).
2Enter Clock adjustment mode
Press the [AUD] knob for at least 1 second.
The clock display blinks.
3Adjusting Clock
Adjustment item |
|
Operation |
Hours |
|
Push the [AUD] knob towards up |
|
|
or down. |
Minutes |
|
Push the [AUD] knob towards right |
|
|
or left. |
4Exit Clock adjustment mode
Press the [SEARCH] button.
Function of KDC-X493
When LX AMP unit connecting
AMP Control
You can control the LX AMP connected to the unit.
1Select AMP Control item during Menu mode
Select the “AMS CONTROL” display.
For how to select Function Control items, refer to <Function Control> (page 6).
2Enter AMP Control mode
Press the [AUD] knob for at least 1 second.
3Select the AMP Control item for adjustment
Turn the [AUD] knob or push it towards up or down.
⁄
•For the details on the AMP Control item, see the Instruction manual attached to the LX AMP.
4Adjust the AMP Control item
Push the [AUD] knob towards right or left.
5Exit AMP Control mode
Press the [SEARCH] button.
Demonstration mode setting
Turning the demonstration mode ON/OFF.
1Select Demonstration item during Menu mode
Select the “DEMO MODE” display.
For how to select Function Control items, refer to <Function Control> (page 6).
2Set the Demonstration mode
Press the [AUD] knob for at least 2 seconds.
Pressing this button for 2 seconds or longer toggles the setting between “ON” and “OFF”.
English | 19

Audio Adjustments
Audio Control
You can adjust following Audio Control items ;
Adjustment Item |
|
Display |
|
Range |
Rear volume |
|
“R-VOLUME” |
|
0 — 35 |
Subwoofer level |
|
“SUB-W L” |
|
–15 — +15 |
Bass Boost* |
|
“B.BOOST” |
|
“STEP1”/”STEP2”/“OFF” |
|
|
|
|
(The indicator turns on |
|
|
|
|
according to the setting.) |
System Q* |
|
“NATURAL”/“USER”/ |
|
Natural/User setting/Rock/ |
|
|
“ROCK”/“POPS”/“EA |
|
Pops/Easy/Top 40/Jazz/ |
|
|
SY”/“TOP40”/“JAZZ” |
|
Game |
|
|
/”GAME” |
|
|
Bass level* |
|
“BASS L” |
|
–8 — +8 |
Middle level* |
|
“MID L” |
|
–8 — +8 |
Treble level* |
|
“TRE L” |
|
–8 — +8 |
Balance |
|
“BALANCE” |
|
Left 15 — Right 15 |
Fader |
|
“FADER” |
|
Rear 15 — Front 15 |
Exit Audio Control mode (Volume control mode)
* Function of KDC-X493/MP442U.
⁄
•Source tone memory: You can set Bass, Middle, and Treble for each source.
•“USER”: The ranges selected lastly for Bass level, Middle level, and Treble level are recalled automatically.
1Select the source to adjust
Press the [SRC] button.
2Enter Audio Control mode
Press the [AUD] knob.
3Select the Audio item to adjust
Press the [AUD] knob.
4Adjust the Audio item
Turn the [AUD] knob.
5Exit Audio Control mode
Press any button.
Press a button other than the [AUD] knob or [0] button.
Function of KDC-X493
Adjusting the detail of Audio Control
You can adjust the following Basic Audio Items in datail: Bass level, Middle level, and Treble leval.
Bass level
Adjustment Item |
|
Display |
|
Range |
Bass Center Frequency |
|
“BASS F” |
40/50/60/70/80/100/ |
|
|
|
|
|
120/150 Hz |
Bass Q Factor |
|
“BASS Q” |
1.00/1.25/1.50/2.00 |
|
Bass Extend |
|
“BASS EXT” |
|
OFF/ON |
Middle level |
|
|
|
|
|
|
|
|
|
Adjustment Item |
|
Display |
|
Range |
Middle Center Frequency |
|
“MID F” |
|
0.5/1.0/1.5/2.0 kHz |
Middle Q Factor |
|
“MID Q” |
1.0/2.0 |
|
Treble level |
|
|
|
|
|
|
|
|
|
Adjustment Item |
|
Display |
|
Range |
Treble Center Frequency |
|
“TRE F” |
|
10.0/12.5/15.0/17.5 kHz |
1Select the Basic Audio item
For how to select Basic Audio items, see <Audio Control> (page 20).
2Enter Detail adjustment mode of Audio Control
Press the [AUD] knob for at least 1 second.
3Select the Detail Audio item to adjust
Press the [AUD] knob.
4Adjust the Detail Audio item
Turn the [AUD] knob.
5Exit the Detail Audio Control mode
Press the [AUD] knob for at least 1 second.
⁄
•When you set the Bass Extend to ON, low frequency response is extended by 20%.
•You can exit the Audio Control mode at anytime by pressing any button except for [AUD] knob or [0] button.
20 | KDC-BT742U/ KDC-X493/ KDC-MP442U
Audio Setup
You can set Sound system , such as follows;
Adjustment Item |
|
Display |
|
Range |
Front High Pass |
|
“HPF F” |
|
Through/40* /60* /80/100/ |
Filter* |
|
|
|
120/150/180/220* Hz |
Rear High Pass |
|
“HPF R” |
|
Through/40* /60* /80/100/ |
Filter* |
|
|
|
120/150/180/220* Hz |
Low Pass Filter* |
|
“LPF SW” |
|
50* /60/80/100* /120/ |
|
|
|
|
Through Hz |
Subwoofer Phase* |
|
“SW PHASE” |
|
Reverse (180°)/ Normal (0°) |
Volume offset |
|
“V-OFFSET” |
|
–8 — ±0 (AUX: -8— +8) |
Dual Zone System |
|
“2ZONE” |
|
OFF/ON |
* Function of KDC-X493.
* Function of KDC-MP442U.
⁄
•Volume offset: Sets each source’s volume as a difference from the basic volume.
•Dual Zone System
Main source and sub source (Auxiliary input) output Front channel and Rear channel separately.
-Set up the channel of sub source by “ZONE2” of <Function Control> (page 6).
-Select Main source by [SRC] button.
-Adjust the volume of Front channel by [AUD] knob.
-Adjust the volume of Rear channel by <Audio Control> (page 20) or [5]/[∞] button on the remote control (page 34).
-The Audio Control has no effect on sub source.
1Select the source to adjust
Press the [SRC] button.
2Enter Audio Setup mode
Press the [AUD] knob for at least 1 second.
3Select the Audio Setup item to adjust
Press the [AUD] knob.
4Adjust the Audio setup item
Turn the [AUD] knob.
5Exit Audio Setup mode
Press the [AUD] knob for at least 1 second.
Function of KDC-X493/MP442U
Speaker Setting
Fine-tuning so that the System Q value is optimal when setting the speaker type as follows;
Speaker type |
|
Display |
|
OFF |
|
|
“SP SEL OFF” |
For 5 |
& 4 in. speaker |
|
“SP SEL 5/4” |
For 6 |
& 6x9 in. speaker |
|
“SP SEL 6x9/6” |
For the OEM speaker |
|
“SP SEL OEM” |
|
1Enter Standby
Press the [SRC] button.
Select the “STANDBY” display.
2Enter Speaker Setting mode
Press the [AUD] knob.
3Select the Speaker type
Turn the [AUD] knob.
4Exit Speaker Setting mode
Press the [AUD] knob.
English | 21

Audio Adjustments
Function of KDC-X493/MP442U
Audio Preset Memory
Registering the value setup by Sound Control. The memory cannot be erased by the Reset button.
1Setup Sound Control
Refer to the following operations to setup the Sound Control.
-<Audio Control> (page 20)
-<Audio Setup> (page 21)
2Enter Audio Preset Memory mode (Other than Standby mode)
Select “MENU” > “AUDIO PRESET”.
Press the [AUD] knob for at least 1 second.
For how to select Function Control items, refer to <Function Control> (page 6).
3Select the Audio Preset Memory
Turn the [AUD] knob.
Select the “MEMORY” display.
4Determine whether to put the Audio Preset in the memory
Press the [AUD] knob.
5Put the Audio Preset in the memory
Turn the [AUD] knob to select “YES”, and then press the [AUD] knob.
“COMPLETE” is displayed.
6Exit Audio Preset mode
Press the [SERACH] button twice.
⁄
•Register 1 pair of Audio Preset Memory. You cannot register by the source.
•When you press the Reset, all the sources will be the setting value which is registered.
•The following items cannot be registered.
Volume, Balance, Fader, Volume offset, Dual Zone System, Rear Volume
Function of KDC-X493/MP442U
Audio Preset Recall
Recalling the sound setup registered by <Audio Preset Memory> (page 22).
1Select the source
2Enter Audio Preset Recall mode (Other than Standby mode)
Select “MENU” > “AUDIO PRESET”.
Press the [AUD] knob for at least 1 second.
For how to select Function Control items, refer to <Function Control> (page 6).
3Select the Audio Preset Recall
Turn the [AUD] knob.
Select the “RECALL” display.
4Determine whether to recall the Audio Preset
Press the [AUD] knob.
5Recall the Audio Preset
Turn the [AUD] knob to select “YES”, and then press the [AUD] knob.
“COMPLETE” is displayed.
6Exit Audio Preset mode
Press the [SERACH] button twice.
⁄
•The User memory of “SYSTEM Q” in <Audio Control> (page 20) is changed to the value which was recalled.
•The source tone memory item of <Audio Control> (page
20)is changed to the value which was recalled by the selected source.
22 | KDC-BT742U/ KDC-X493/ KDC-MP442U

Function of KDC-BT742U
Audio Adjustments (DSP)
Cabin selection
You can compensate the delay of the sound arrival time by selecting your environment from the following car types;
Car type |
|
Display |
Not compensating. |
|
“OFF” |
Compact car |
|
“COMPACT” |
Full size car |
|
“F-SIZE” |
Station wagon |
|
“WAGON” |
Minivan |
|
“MINIVAN” |
Sport-utility vehicle |
|
“SUV” |
Minivan Long |
|
“MV-LONG” |
1Enter Cabin select mode
Select “DSP” > “SETUP” > “CABIN”.
For how to select Function Control item, refer to <Function Control> (page 6).
2Select the car type
Turn the [AUD] knob and push the center when the desired item is displayed.
3Exit Cabin select mode
Press the [SEARCH] button.
⁄
•You can compensate the distances in more details by using <DTA> (page 23) function.
Speaker Setting
Setting the speaker to be connected, speaker size, and installation position;
Setting speaker |
|
Display |
|
Range |
||
Front |
Speaker |
|
“LOCATION” |
|
“DOOR”/ “ON DASH”/ |
|
“FRONT” |
Location |
|
|
|
“UND DASH” |
|
|
|
Speaker |
|
“SIZE” |
|
“SMALL” / “MEDIUM”/ “LARGE” |
|
|
Size |
|
|
|
|
|
|
Tweeter |
|
“TWEETER” |
|
“NONE”/ “USE” |
Rear |
Speaker |
|
“LOCATION” |
|
• “DOOR”/ “REAR DECK” |
|
“REAR” |
Location |
|
|
|
• “2ND ROW”/ “3RD ROW” |
|
|
|
|
|
|
|
(Minivan/ Passenger van) |
|
|
Speaker |
|
“SIZE” |
|
“NONE”/ “SMALL” / “MEDIUM”/ |
|
|
Size |
|
|
|
“LARGE” |
Subwoofer |
Speaker |
|
“SIZE” |
|
“NONE”/ “SMALL” / “LARGE” |
|
“SUB-W” |
Size |
|
|
|
|
|
1Enter Speaker Setting mode
Select “DSP” > “SETUP” > “SPEAKER”.
For how to select Function Control item, refer to <Function Control> (page 6).
2Select the item you want to set
Turn the [AUD] knob and push the center when the desired item is displayed.
3Set the value
Turn the [AUD] knob and push the center when the desired item is displayed.
4Exit Speaker Setting mode
Press the [SEARCH] button.
DTA (Digital Time Alignment) setting
Adjusting fine tuning of the speaker position compensation value specified at <Cabin selection> (page 23).
1Enter DTA setting mode
Select “DSP” > “SETUP” > “DTA”.
For how to select Function Control item, refer to <Function Control> (page 6).
2Select the speaker you want to set
Setting speaker |
|
Display |
Front speaker |
|
“FRONT” |
Rear speaker |
|
“REAR" |
Subwoofer |
|
“SUB-W" |
Turn the [AUD] knob and push the center when the desired item is displayed.
3Set the compensation value of the speaker position
Turn the [AUD] knob and push the center when the desired value is displayed.
Adjust between 0 and 14.44 feet.
Refer to <Appendix> (page 38) on how to set the compensation value.
4Exit DTA setting mode
Press the [SEARCH] button.
English | 23

Function of KDC-BT742U
Audio Adjustments (DSP)
X’Over setting
You can set a X’Over value for the speakers;
Setting speaker |
|
Display |
|
Range |
||
Front |
|
High Pass |
|
“FC”/ |
|
THRU (Through) /40 /60 /70 /80 |
“FRONT” |
|
Filter |
|
“HPF F” |
|
/100 /120 /150 / 180/ 220 Hz |
Rear |
|
High Pass |
|
“FC”/ |
|
THRU (Through) /40 /60 /70 /80 |
“REAR” |
|
Filter |
|
“HPF R” |
|
/100 /120 /150 / 180/ 220 Hz |
Subwoofer |
|
Speaker |
|
“FC”/ |
40/ 60/ 70/ 80/ 100/ 120/150 / |
|
“SUB-W” |
|
Size |
|
“LPF SW” |
|
180/ 220/ THRU (Through) Hz |
|
|
Phase |
|
“FC”/ |
|
REVERSE (180°)/ NORMAL (0°) |
|
|
|
|
“SW PHASE” |
|
|
1Enter X’Over setting mode
Select “DSP” > “SETUP” > “X’OVER”.
For how to select Function Control item, refer to <Function Control> (page 6).
2Select the item you want to set
Turn the [AUD] knob and push the center when the desired item is displayed.
3Set the X’Over value
Turn the [AUD] knob and push the center when the desired value is displayed.
4Exit X’Over setting mode
Press the [SEARCH] button.
Equalizer Control
You can adjust following Equalizer Control items. iPod Equalizer can be set after connecting iPod and selecting “iPod” in <System Q>. Select from the 22 equalizer types;
Adjustment Item |
|
Display |
|
Range |
||
Preset |
|
System Q |
|
“EQ” |
|
“NATURAL” (Natural)/ “USER”/ |
memory |
|
|
|
|
|
“ROCK” (Rock)/ “POPS” (Pops)/ |
“PRESET” |
|
|
|
|
|
“EASY” (Easy)/ “TOP40” (Top 40)/ |
|
|
|
|
|
|
“JAZZ” (Jazz)/ “GAME” (Game)/ |
|
|
|
|
|
|
“iPod” |
Equalizer |
|
Center |
|
“F0” |
|
Refer to the followings. |
agjust |
|
Frequency |
|
|
|
|
“MANUAL”/ |
|
Quality |
|
“Q” |
0.25/ 0.50/ 1.00/ 2.00 |
|
“BAND” |
|
Level |
|
“GAIN” |
|
–9/ -7/ -5/ -3/ -2/ -1/ 0/ +1/ |
|
|
|
|
|||
|
|
|
|
|
+2/ +3/ +5/ +7/ +9 |
|
•The frequency which can be selected by each Frequency band is shown below.
Band |
|
Frequency |
“BAND1” |
|
60/ 100/ 160/ 250/ 400 Hz |
“BAND2” |
|
630/ 1k/ 1.6k/ 2.5k Hz |
“BAND3” |
|
4/ 6.3/ 10/ 16 kHz |
24 | KDC-BT742U/ KDC-X493/ KDC-MP442U
1Enter Equalizer Control mode
Select “DSP” > “CONTROL” > “EQ”.
For how to select Function Control item, refer to <Function Control> (page 6).
2Select the item you want to set
Turn the [AUD] knob and push the center when the desired item is displayed.
3Set the value
Turn the [AUD] knob and push the center when the desired item is displayed.
iPod Equalizer
1.Enter iPod Equalizer mode
Press the [AUD] button.
2.Set the value
Turn the [AUD] knob and push the center when the desired item is displayed.
4Exit Equalizer Control mode
Press the [SEARCH] button.
Preset position setting
According to the listening position, select the position from the following settings so that the normal position of the sound environment can be compensated in accordance with the selected position;
Compensation seat |
|
Range |
Not compensating. |
|
“ALL” |
Front-Left seat |
|
“F-L” |
Front-Right seat |
|
“F-R” |
Front seat |
|
“F-ALL” |
1Enter Position setting mode
Select “DSP” > “CONTROL” > “POSITION” > “PRESET”.
For how to select Function Control item, refer to <Function Control> (page 6).
2Select the seat you want to compensate
Turn the [AUD] knob and push the center when the desired item is displayed.
3Exit Position setting mode
Press the [SEARCH] button.

Audio Preset Memory
Registering the value setup by Sound Control.
1Setup Sound Control
Refer to the following operations to setup the Sound Control.
-Cabin selection (page 23)
-Speaker Setting (page 23)
-DTA (Digital Time Alignment) setting (page 23)
-X’Over setting (page 24)
-Equalizer Control (page 24)
-Preset position selection (page 24)
2Enter Audio Preset Memory mode (Other than Standby mode)
Select “DSP” > “PRESET” > “MEMORY”. Press the [AUD] knob for at least 1 second.
For how to select Function Control items, refer to <Function Control> (page 6).
3Select the number to put in the memory
Turn the [AUD] knob to select number, and then press the [AUD] knob.
4Put the Audio Preset in the memory
Turn the [AUD] knob to select “YES”, and then press the [AUD] knob.
“COMPLETE” is displayed.
5Exit Audio Preset Memory mode
Press the [SEARCH] button.
⁄
•Register 6 pairs of Audio Preset Memory.
•“USER 1”: When you press the Reset, all the sources will be the setting value which is registered.
•“USER 1”, “USER 2”:
The memory cannot be erased by the Reset button.
•This function cannot be registered when the iPod Equalizer set in <Equalizer Control> (page 24).
Audio Preset Recall
Recalling the sound setup registered by <Audio Preset Memory> (page 25).
1Select the source
Press the [SRC] button.
2Enter Audio Preset Recall mode (Other than Standby mode)
Select “DSP” > “PRESET”> “RECALL”. Press the [AUD] knob for at least 1 second.
For how to select Function Control items, refer to <Function Control> (page 6).
3Select the number to recall in the memory
Turn the [AUD] knob to select number, and then press the [AUD] knob.
4Recall the Audio Preset
Turn the [AUD] knob to select “YES”, and then press the [AUD] knob.
“COMPLETE” is displayed.
5Exit Audio Preset Recall mode
Press the [SEARCH] button.
⁄
•The User memory of “SYSTEM Q” in <Equalizer Control> (page 24) is changed to the value which was recalled.
•The source tone memory item of <Equalizer Control> (page 24) is changed to the value which was recalled by the selected source.
English | 25
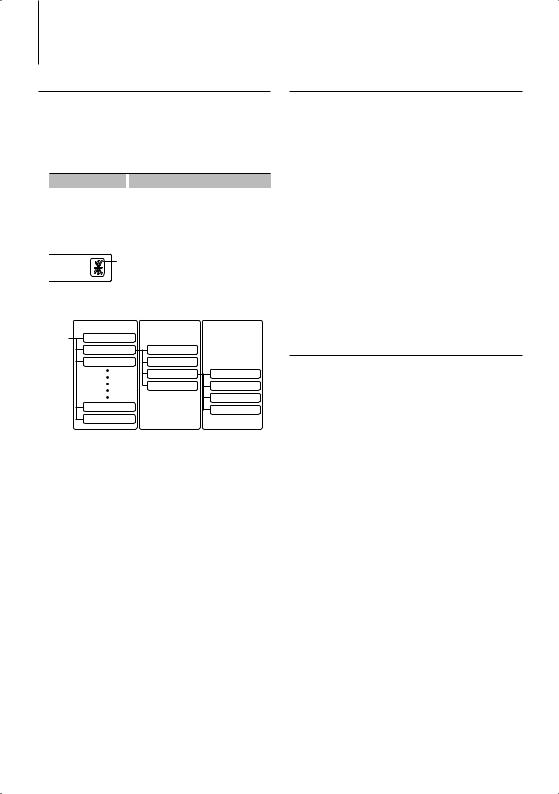
Favorite Control
Preset Memory
Registering the operation procedure to select your favorite broadcast station or iPod Playlists/ Artists, etc.
1Select a desired source to register and setting item.
Source |
|
Setting Item |
TUNER/SIRIUS/XM/HD |
|
Preset Memory |
iPod |
|
List selection screen for Playlists/ Artists/ |
|
|
Albums, etc. |
Hands-free phone |
|
Telephone number retrieval. |
“ ” is displayed when the operation procedure can be registered.
iPod setting
The desired list in the first hierarchy can be registered.
|
1st hierarchy |
2nd hierarchy |
3rd hierarchy |
iPod |
PLAYLISTS |
|
|
|
ARTISTS |
ALL ARTISTS |
|
|
ALBUMS |
ARTISTS 1 |
|
|
|
ARTISTS 2 |
ALL ALBUMS |
|
|
ARTISTS 3 |
ALBUM 1 |
|
|
|
ALBUM 2 |
|
COMPOSERS |
|
ALBUM 3 |
|
|
|
|
|
AUDIOBOOKS |
|
|
2Enter Preset Memory mode
Press the [FAVORITE] button for at least 1 second.
3Select the number to put in the memory
Turn the [AUD] knob.
4Put the Preset in the memory
Press the [AUD] knob.
Cancelling the Preset Memory mode
Press the [FAVORITE] button.
⁄
•Registering the operation procedure to an existing preset number overwrites the existing procedure.
•Register 6 pairs of Favorite Preset Memory.
The memory cannot be erased by the Reset button.
•If the items in the second or lower hierarchy are changed, the list in iPod will be changed by adding or deleting songs after the FAVORITE registration. Due to this, the list registered in this unit will be different from the list in iPod. The FAVORITE registration should be performed again after editing the items in iPod.
Preset Recall
Retrieving an item registered to Favorite.
1Enter Preset Recall mode
Press the [FAVORITE] button.
2Select the number to recall in the memory
Turn the [AUD] knob.
3Recall the Audio Preset
Press the [AUD] knob.
Cancelling the Preset Recall mode
Press the [FAVORITE] button.
⁄
•When iPod is selected for the source, the list selection screen for Playlists/ Artists/ Albums, etc. is displayed. Songs will not be automatically played.
Preset Memory Delete
Deleting an item registered to Favorite.
1Enter Preset Memory Delete mode
Select “MENU” > “FAV DELETE”.
For how to select Function Control item, refer to <Function Control> (page 6).
2Select the preset number to delete or “ALL” to delete all preset memory numbers.
Turn the [AUD] knob, and then press the [AUD] knob.
“DELETE” is displayed.
3Delete the selected item registered to Favorite.
Turn the [AUD] knob to select “YES”, and then press the [AUD] knob.
“COMPLETE” is displayed.
4Exit Preset Memory Delete mode
Press the [SEARCH] button.
26 | KDC-BT742U/ KDC-X493/ KDC-MP442U

Name Setting
Giving a name to Preset Memory registered to Favorite.
1Enter Preset Recall mode
Press the [FAVORITE] button.
2Retrieve the Preset Memory to change.
Turn the [AUD] knob.
3Enter Name set mode
Press the [AUD] knob for at least 1 second.
Select the “NAME SET” display.
4Enter the name
Operation type |
|
Operation |
Move the cursor to the enter |
|
Push the [AUD] knob towards right |
character position |
|
or left. |
Select the characters |
|
Turn the [AUD] knob or push it |
|
|
towards up or down. |
5Exit Name Setting mode
Press the [AUD] knob.
Cancelling the Preset Recall mode
Press the [FAVORITE] button.
English | 27

Function of KDC-BT742U
Bluetooth Setup
Registering Bluetooth device
To make your Bluetooth device (cell-phone) usable with this unit, you need to register it (pairing). You can register up to five Bluetooth devices to this unit.
When registering from Bluetooth devices
1Turn on the control unit.
2Start registering a unit by operating the Bluetooth device
By operating the Bluetooth device, register the hands-free unit (pairing). Select “KENWOOD BT CD/R-3P2” from the list of connected units.
3Enter a PIN code
Input the PIN code registered as mentioned in <Registering PIN Code> (page 28).
Check that registration is complete on the Bluetooth device.
4By operating the Bluetooth device, start handsfree connection.
When registering from this unit
1Enter Bluetooth device registration mode
Select “MENU” > “DVC REGIST”.
Press the [AUD] knob for at least 1 second.
For how to select Function Control item, refer to <Function Control> (page 6).
Search for the Bluetooth device.
When search is completed, “FINISHED” is displayed.
2Select the Bluetooth device
Turn the [AUD] knob or push it towards up or down to select the Bluetooth device.
Press the [AUD] knob to determine the selection.
3Input the PIN code
Operation type |
|
Operation |
Select the numbers. |
|
Turn the [AUD] knob or push it towards |
|
|
up or down. |
Move to the next digit. |
|
Push the [AUD] knob towards right. |
Delete the last digit. |
|
Push the [AUD] knob towards left. |
4Transmit the PIN code
Press the [AUD] knob for at least 1 second.
If “PAIRING OK” is displayed, registration is completed.
5Return to the device list
Press the [AUD] knob.
6Exit Bluetooth device registration mode
Press the [SEARCH] button.
28 | KDC-BT742U/ KDC-X493/ KDC-MP442U
⁄
•This unit allows up to eight digits to be input for a PIN code. If a PIN code cannot be input from this unit, it can be input from the Bluetooth device.
•If there are 5 or more Bluetooth devices registered, you cannot register a new Bluetooth device.
•If the error message appears even though the PIN code is correct, try <Registering Special Bluetooth device> (page 28).
Registering Special Bluetooth device
Allow registration of a special device that cannot be registered normally (pairing).
1Enter special device registration mode
Select “MENU” > “S-DVC SELECT”.
Press the [AUD] knob for at least 1 second.
For how to select Function Control item, refer to <Function Control> (page 6).
A list is displayed.
2Select a device name
Turn the [AUD] knob or push it towards up or down to select a device name.
Press the [AUD] knob to determine the selection.
If “COMPLETE” is displayed, registration is completed.
3Go through the procedure of <Registering Bluetooth device> (page 28) and complete the registration (pairing).
Cancelling special device registration mode
Press the [SEARCH] button.
⁄
•If the device name is not in the list, select “OTHER PHONE”.
Registering PIN Code
By operating the Bluetooth device, specify the PIN code necessary for registering this unit.
1Enter PIN code edit mode
Select “MENU” > “PIN EDIT”.
Press the [AUD] knob for at least 1 second.
For how to select Function Control item, refer to <Function Control> (page 6).
The current setting of PIN code is displayed.

2 Input the PIN code
Operation type |
|
Operation |
Select the numbers. |
|
Turn the [AUD] knob or push it towards |
|
|
up or down. |
Move to the next digit. |
|
Push the [AUD] knob towards right. |
Delete the last digit. |
|
Push the [AUD] knob towards left. |
3Register a PIN code
Press the [AUD] knob for at least 1 second.
If “COMPLETE” is displayed, registration is completed.
4Exit the PIN code edit mode
Press the [SEARCH] button.
⁄
•By default, “0000” is specified.
•A PIN code can be specified with up to eight digits.
Downloading the Phone Book
Download the phone book data from the cellphone to this unit so that you can use the Phone Book of this unit.
To download automatically
If the cell-phone supports a phone book synchronization function, the phone book is downloaded automatically after Bluetooth connection.
⁄
•Setting on the cell-phone may be required.
•If no phone book data is found in the unit even after the compete display, your cell-phone may not support
automatic download of phone book data. In this case, try downloading manually.
To download from the cell-phone manually
1By operating the cell-phone, end the hands-free connection.
2By operating the cell-phone, send the phone book data to this unit
By operating the cell-phone, download the phone book data to this unit.
•During downloading: “DOWNLOADING” is displayed.
•After completion of downloading: “COMPLETE” is displayed.
3By operating the cell-phone, start the handsfree connection.
To clear the downloading completion message
Press any button.
⁄
•Up to 1000 phone numbers can be registered for each registered cell-phone.
•Up to 32 digits can be registered for each phone number along with up to 50* characters representing a name.
(* 50: Number of alphabetic alphabetical characters. Fewer characters can be input depending on the type of characters.)
•To cancel downloading of the phone book data, operate the cell-phone.
Selecting the Bluetooth device You Wish to Connect
When two or more Bluetooth devices have already been registered, you need to select the Bluetooth device you wish to use.
1Enter Bluetooth device selection mode
Select “MENU” > “PHONE SEL”.
Press the [AUD] knob for at least 1 second.
For how to select Function Control item, refer to <Function Control> (page 6).
‘(name)’ is displayed.
2Select the Bluetooth device
Turn the [AUD] knob or push it towards up or down.
3Set up the Bluetooth device
Push the [AUD] knob towards right or left.
‘ (name)’ or ‘-(name)’ is displayed.
“ ”: The selected Bluetooth device is busy.
“-”: The selected Bluetooth device is on standby. “ “ (blank): The Bluetooth device is deselected.
4Exit the Bluetooth device selection mode
Press the [SEARCH] button.
⁄
•If a cell-phone is already selected, deselect it, and then select a different one.
English | 29

Function of KDC-BT742U
Bluetooth Setup
Deleting a Registered Bluetooth device
You can delete a registered Bluetooth device.
1Enter Bluetooth device deletion mode
Select “MENU” > “DEVICE DEL”.
Press the [AUD] knob for at least 1 second.
For how to select Function Control item, refer to <Function Control> (page 6).
‘(name)’ is displayed.
2Select the Bluetooth device
Turn the [AUD] knob or push it towards up or down.
3Delete the selected Bluetooth device
Press the [AUD] knob for at least 1 second.
4Exit the Bluetooth device deletion mode
Press the [SEARCH] button.
⁄
•When a registered cell-phone is deleted, its Phone Book, log, SMS, and voice tag are also deleted.
Displaying the Firmware Version
Display the version of the firmware of this unit.
1Enter Bluetooth Firmware update mode
Select “MENU” > “BT F/W UPDATE”.
Press the [AUD] knob for at least 1 second.
For how to select Function Control item, refer to <Function Control> (page 6).
The firmware version appears.
2Exit Bluetooth Firmware update mode
Press the [SEARCH] button.
⁄
•For how to update the firmware, access our website. http://www.kenwood.com/bt/information/
Adding a voice dialing command
Add a voice tag to the phonebook for voice dialing. You can register up to 35 voice tags.
1Enter voice tag mode
Select “MENU” > “VOICE TAG”.
Press the [AUD] knob for at least 1 second.
For how to select Function Control item, refer to <Function Control> (page 6).
2Select “PB NAME EDIT” mode
Press the [AUD] knob to select “PB NAME EDIT”, and then press the [AUD] knob for at least 1 second.
3Search for the name to register
Select the name to register with reference to 4 in <Calling a number in the PhoneBook> (page 16). If a voice tag has already been registered for a name, “*” is displayed before the name.
4Select a mode
Turn the [AUD] knob or push it towards up or down.
Display |
|
Operation |
“PB NAME REG” |
|
Register a voice tag. |
“PB NAME CHK”* |
|
Play a voice tag. |
“PB NAME DEL”* |
|
Delete a voice tag. |
“RETURN” |
|
Return to step 2. |
*Displayed only when a name for which a voice tag has been registered is selected.
Select “PB NAME REG” (Regist)
5Register a voice tag (first)
Press the [AUD] knob.
“ENTER1” is displayed.
When a beep is heard, utter a voice tag within 2 seconds.
6Confirm the voice tag (second)
Press the [AUD] knob.
“ENTER2” is displayed.
When a beep is heard, utter the same voice tag as that you uttered in step 4 within 2 seconds. “COMPLETE” is displayed.
7End registration
Press the [AUD] knob.
Return to step 2. You can register another voice tag continuously.
⁄
•If your voice cannot be recognized, a message is displayed. Pressing the [AUD] knob allows you to retry voice input. (page 44)
30 | KDC-BT742U/ KDC-X493/ KDC-MP442U
 Loading...