


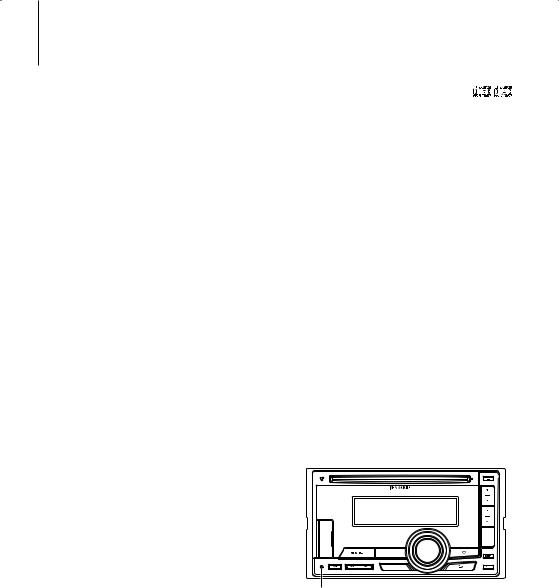
DPX-U6120 DPX-U5120 DPX-MP3120
DUAL DIN SIZED CD RECEIVER
INSTRUCTION MANUAL
© 2010 Kenwood Corporation All Rights Reserved. |
B64-4805-00/01 (M) |

Contents
Before use |
4 |
Component names and functions |
5 |
General operation |
6 |
Before Using |
|
Adjusting the Clock |
|
Common Operation |
|
Function setting Operation |
|
iPod/iPhone Operation |
8 |
Basic Operation |
|
Selecting a song by browsing iPod |
|
Play function |
|
iPod Control by Hand Mode |
|
iPod Setting |
|
Selecting the Search mode |
|
Related Search |
|
Direct Search |
|
Alphabet Search |
|
My Playlist |
|
USB device Operation |
13 |
Basic Operation |
|
File Search |
|
Play function |
|
USB Setting |
|
Music CD/ Audio file Operation |
15 |
Basic Operation |
|
Music Search |
|
Play function |
|
Basic Operation of Disc Changer (Optional) |
|
Direct music search |
|
Direct search in Disc changer (Optional) |
|
Tuner Operation |
17 |
Basic Operation |
|
Tuner Setting |
|
Station Preset Memory |
|
Auto Memory Entry |
|
Preset Tuning |
|
Direct access tuning |
|
Frequency Step Setting |
|
2 | DPX-U6120/ DPX-U5120/ DPX-MP3120
Bluetooth Audio Operation |
19 |
Connecting a Bluetooth Device |
|
Basic Operation |
|
Operation of hands-free phoning |
20 |
Connecting a Bluetooth Device |
|
Receiving a Call |
|
During a Call |
|
Call Waiting |
|
Other Functions |
|
Making a Call |
|
Speed Dialing (Preset Dial) |
|
Calling a Number in the Phone Book |
|
Calling a Number in the Call log |
|
Dial a Number |
|
Make a Voice Dialing Call |
|
Registering to the Preset Dial Number List |
|
Display of Phone Number type (category) |
|
Display Settings |
24 |
Display type select |
|
Display Setting |
|
Text scroll |
|
Information display setting |
|
Selecting text display |
|
Text Display Selection |
|
Illumination Color Selection |
|
Auxiliary Input Display Setting |
|
Clock and Other Functions |
29 |
Clock and Date Adjustment |
|
Dual clock city setting |
|
Clock Adjustment |
|
Initial Settings |
|
Demonstration mode Setting |
|
Muting volume upon reception of Phone call |
|
Audio Adjustments – DPX-U6120 – |
32 |
Audio Control |
|
Preset Equalizer curve Select |
|
Manual Equalizer Control |
|
Listening Position Selection |
|
Listening Position Fine Adjustments |
|
Dual Zone System |
|
Audio Adjustments |
|
– DPX-U5120/ DPX-MP3120 – |
36 |
Audio Control

DSP Setup
Car Type Selection
Speaker Setting
Car Type Fine Adjustments
X’Over Setting
Audio Preset Memory
Audio Preset Recall
Log Function
Log Function recall Log Function item lock
Deleting a Log Function item Log Function category setting Tuner Log Function time setting
37 |
Basic Operations of remote control |
48 |
|
Appendix |
50 |
|
Accessories/ Before installation |
52 |
|
Connecting Wires to Terminals |
53 |
40 |
Installation |
54 |
|
Troubleshooting Guide |
55 |
|
Specifications |
58 |
Bluetooth Setup |
42 |
Bluetooth Setting Registering Bluetooth device Registering PIN Code
Selecting the Bluetooth device You Wish to Connect
Deleting a Registered Bluetooth device Downloading the Phone Book
Adding a Voice Dialing Command Setting a Voice Command for Category
SMS (Short Message Service) |
47 |
Downloading the SMS
SMS (Short Message Service)
English | 3
Before use
Before using this unit for the first time
This unit is initially set on the Demonstration mode. When using this unit for the first time, cancel the Demonstration mode. Refer to <Canceling the Demonstration Mode> (page 6).
2 WARNING
To prevent injury or fire, take the following precautions:
•Stop the car before operating the unit.
•To prevent a short circuit, never put or leave any metallic objects (such as coins or metal tools) inside the unit.
¤ CAUTION
•Adjust the volume so that you can hear sounds outside the car. Driving with the volume too high may cause an accident.
•Wipe off the dirt on the panel with a dry silicon or soft cloth.
Failure to observe this precaution may result in damage to the monitor or unit.
Condensation
When the car is air-conditioned, moisture may collect on the laser lens. This may cause disc read errors. In this case, remove the disc and wait for the moisture to evaporate.
Notes
•If you experience problems during installation, consult your Kenwood dealer.
•When you purchase optional accessories, check with your Kenwood dealer to make sure that they work with your model and in your area.
•Characters that conform to ISO 8859-1 can be displayed.
•To display characters in the following language, additional setting is required.
Chinese: Refer to “Chinese” of <Initial Settings> (page 30).
•The illustrations of the display and the panel appearing in this manual are examples used to explain more clearly how the controls are used. Therefore, what appears on the display in the illustrations may differ from what appears on the display on the actual equipment, and some of the illustrations on the display may be inapplicable.
About discs used with this unit
•This unit can only play the CDs with 

 .
.
•The following discs cannot be used:
-- Discs that are not round
-- Discs with coloring on the recording surface or discs that are dirty
-- Recordable/Rewritable disc that has not been finalized (For the finalization process, refer to your disc writing software, and your disc recorder instruction manual.)
-- 8 cm (3 inch) disc (Attempt to insert using an adapter can cause malfunction.)
Handling discs
•Do not touch the recording surface of the disc.
•Do not stick tape etc. on the disc, or use a disc with tape stuck on it.
•Do not use any accessories for the disc.
•Do not use any solvents to clean discs. Use a dry silicon or soft cloth.
•Clean from the center of the disc and move outward.
•When removing discs from this unit, pull them out horizontally.
•Remove the rims from the center hole and disc edge before inserting a disc.
How to reset your unit
If the unit fails to operate properly, press the Reset button. The unit returns to factory settings when the Reset button is pressed.
Reset button
4 | DPX-U6120/ DPX-U5120/ DPX-MP3120

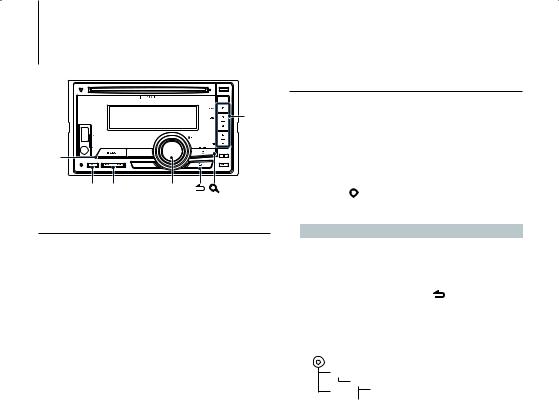
Component names and functions
1 |
|
2 |
|
|
3 |
T |
|
|
R |
|
4 |
E |
|
|
|
5 |
|
|
|
|
W Q P 9 |
8 |
7 6 |
1Disc slot
When inserted a disc (label side up), the source is switched automatically and a song starts playing.
2[0] button
To eject the disc.
3[1] – [6] button
To recall the memorized station.
Switches the play mode between music discs, Audio files, and iPod.
4[DISP] button
To change the display mode.
5[ATT] button
Turning the volume down quickly.
6[  ] button
To enter the music search mode.
7 ] button
To return to previous item.
8[VOL] knob
To adjust volume.
Enters function setting mode and setting item (turn and press the knob). Refer to <Function setting Operation> (page 7) for details.
9 DPX-U6120
[LOG] button
To display a Log Function list
DPX-U5120 DPX-MP3120
[B.BOOST] button
To boost the bass tone in two steps (LV1, LV2, OFF).
P DPX-U6120 DPX-U5120
[iPod] button
Select the iPod source.
DPX-MP3120
[38] button
To start or interrupt playback for CD and Audio file.
Mute the volume. (During Tuner, AUX source)
Q[4] / [¢] button
To select a station, song and setting items.
W[BAND] button
To select the receiving band, and the folder for Audio file.
E[SRC] button
To turn on this unit and select the Source.
To turn off this unit (press the button at least 1 second).
RAuxiliary Input Terminal
Portable audio device can be connected with the
mini-plug (3.5 mm ø).
•Use the mini-plug cable which is stereo type and does not have any resistance.
T DPX-U6120 DPX-U5120
USB Terminal
When connecting, open up the USB terminal lid. A USB device or an iPod can be connected.
English | 5
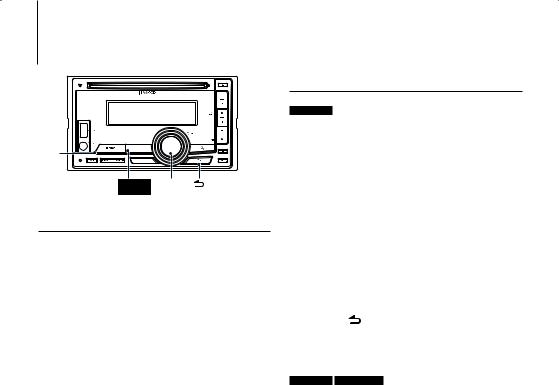
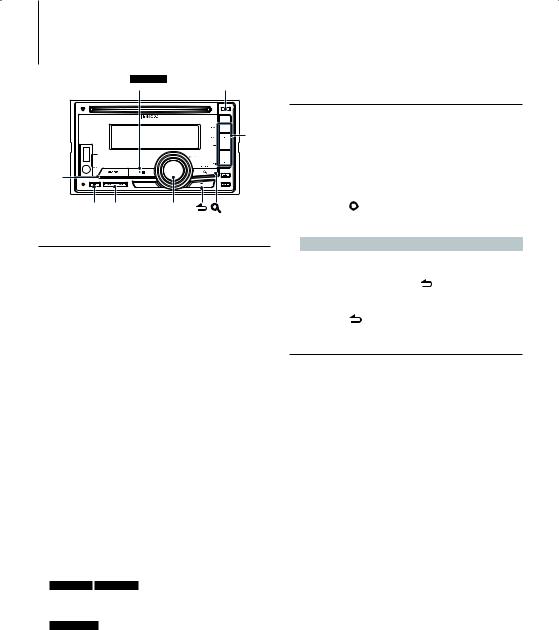
General operation
SRC
DPX-U6120 VOL
DPX-U5120
iPod
Before Using
Canceling the Demonstration Mode
Cancel the demonstration mode when you use it for the first time after installation.
1Press the [VOL] knob to cancel the demonstration mode when the messages “To cancel DEMO press the volume knob”/ “CANCEL DEMO PRESS VOLUME KNOB” are displayed (approx. 15 seconds).
2Turn the [VOL] knob to select “YES” and press the [VOL] knob.
⁄
•Demonstration mode can also be cancelled in “DEMO Mode” of Function setting mode. Refer to <Demonstration mode Setting> (page 31).
Adjusting the Clock
DPX-U6120
1Press the [VOL] knob to enter the Function setting mode.
2The item can be selected and determined as follows.
”Settings” “Clock & Date” “Clock Adjust” To select the item, turn the [VOL] knob. To determine the item, press the [VOL] knob.
3Press [4] or [¢] button to select hour or minute to set.
4Turn the [VOL] knob to adjust the hour and minute.
5Press the [VOL] knob to finish the Clock adjusting.
6
DPX-U5120 DPX-MP3120
1Press the [B.BOOST] button for at least 1 second.
2Turn the [VOL] knob to adjust the hour, and then press the [VOL] knob.
3Turn the [VOL] knob to adjust the minute, and then press the [VOL] knob.
6 | DPX-U6120/ DPX-U5120/ DPX-MP3120
Common Operation
Power and source select
Turns the power ON by pressing the [SRC] button.
When the power is ON, select a source. Press the [SRC] button each time switches between sources.
Tuner (“TUNER”) USB (“USB”) or iPod (“iPod”) (DPX-U6120/ DPX-U5120 only) CD (“CD”) Auxiliary input (“AUX”) Standby (“STDBY”/ “STANDBY”) Tuner...
DPX-U6120 DPX-U5120
Press the [iPod] button to switch the source to iPod.
Press the [SRC] button for at least 1 second to turns the power OFF.
⁄
•The SRC Select mode can be set in “Source Select” of <Initial Settings> (page 30). (DPX-U6120 only)
•When an optional accessory is connected, the source name for each device appears. (DPX-U6120 only)
•When connection of the iPod is recognized, the source display changes from “USB” to “iPod”.
Volume
Turning the [VOL] knob adjusts the sound volume.
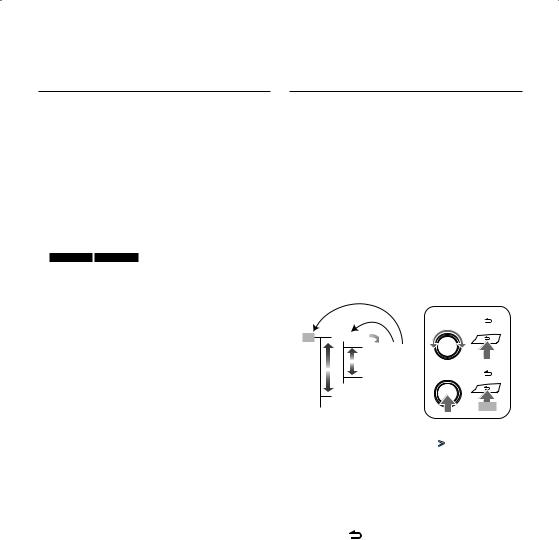
Function setting Operation
The basic operating procedure for using this function is described below. The individual function items are covered in the operating procedures.
1Select the source
Press the [SRC] button.
Function items vary from source to source.
2Enter Function setting mode
Press the [VOL] knob.
3Select the setting item
Turn the [VOL] knob and press it when the desired item is displayed.
Repeat the operation until your desired setup item is selected.
Operation example:
|
3 |
4 |
3[ |
] |
|
|
1[VOL] |
||
Exit Settings 2 |
|
|
|
|
|
Seek Mode |
|
|
|
1 |
1 |
|
|
|
|
Auto Memory 2[VOL] |
4[ |
] |
|
|
… |
|
|
|
Audio Control |
|
|
|
|
… |
|
|
1 sec. |
|
In this manual, the above selection is indicated as
Select “Settings”/ “SETTINGS” > “Seek Mode”/ “SEEK MODE”.
4Make a setting
Turn the [VOL] knob to select a setting value, and then press the [VOL] knob.
5Exit Function setting mode
Press the [ ] button for at least 1 second.
English | 7

Function of DPX-U6120/ DPX-U5120 |
|
|
|
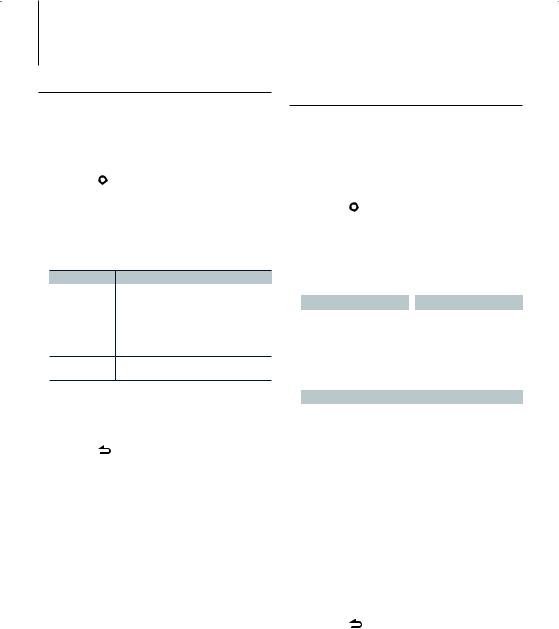
iPod/iPhone Operation |
|
|
|
|
3 Select a song |
|
|
1 – 6 |
Operation type |
Operation |
|
Move between items |
Turn the [VOL] knob. |
||
|
Select an item |
Press the [VOL] knob. |
|
|
Skip Search |
Press the [4] or [¢] button. |
|
SRC |
Return to previous item |
Press the [ |
] button. |
|
For example: Searching by Artist name. |
4 ¢iPod VOL |
Turn the [VOL] knob and press it when the |
|
desired item is displayed. |
|
Select “Artists”/ ”ARTISTS” > Artist name > Album |
Basic Operation |
name > Song title |
|
Playing iPod
• Connect an iPod
When connected, the source is switched
automatically and a song starts playing.
•Select iPod source
Press the [iPod] button.
⁄
•KCA-iP101/iP102 (optional accessory) is recommended to connect an iPod.
Song Select
Press the [4] or [¢] button.
Cancelling Enter Music search mode
Press the [ ] button for at least 1 second.
⁄
•Characters which cannot be displayed are left blank. If non of the characters can be displayed, the browse item name and digits are displayed.
Items |
Display |
|
Items |
Display |
Playlists |
“PLIST***” |
|
Podcasts |
“PDCT***” |
Artists |
“ART***” |
|
Genres |
“GEN***” |
Albums |
“ALB***” |
|
Composers |
“COM***” |
Songs |
“PRGM***” |
|
|
|
|
|
|
|
|
• Set the ratio with “Skip Search” in <iPod Setting> (page 9).
Fast Forwards or Fast Backwards
Hold down the [4] or [¢] button.
Pause and Play
Press the [6] button to pause or resume playback.
Remove iPod
1Select a source other than the iPod
Press the [SRC] button.
2Remove the iPod.
⁄
•Removing the iPod with it selected as a source can damage the data stored in the iPod.
Selecting a song by browsing iPod
Searching for the song you want to play.
1Select iPod source
Press the [iPod] button.
2Enter Music search mode
Press the [ ] button.
Play function
Repeat play
Press the [4] button.
Switches between Repeat (“File Repeat ON”/ “FILE REPEAT”) and off (“File Repeat OFF”/ “REPEAT OFF”) when pressed.
Random play
Press the [3] button.
Randomly plays the music.
Pressing the button toggles the setting between Random play on (“Folder Random ON”/ “FOLDER RANDOM”) and off (“Folder Random OFF”/ “RANDOM OFF”).
Press this button again cancels the Random play.
All Random play
Press the [3] button for at least 1 second.
All songs in iPod are played at random.
Pressing the button toggles the setting between All random play on (“All Random ON”/ “ALL RANDOM”) and off (“All Random OFF”/ “RANDOM OFF”).
Press this button again cancels the All Random play.
8 | DPX-U6120/ DPX-U5120/ DPX-MP3120

⁄
•The time required to turn on the all random function may become longer depending on the number of songs in iPod.
•Turning on the all random function changes the iPod browse item to “Songs”. This browse item will not be changed even if the all random function is turned off.
•If the browse item is changed to search for music while the all random function is on, the all random function is turned off and the songs in the browse item are played at random.
iPod Control by Hand Mode
Allowing you to operate iPod with the control on the iPod.
Press the [iPod] button for at least 1 second.
When the iPod control by hand mode is selected, “iPod by Hand Mode”/”HANDS ON” is displayed.
⁄
•In the iPod Control by hand mode, iPod cannot be operated using this unit.
•This mode is not compatible with music information display. The display will show “iPod by Hand Mode”/ “iPod MODE”.
•iPod can be operated when it conforms to the iPod control function.
iPod Setting
You can select the following iPod Setting items.
1Select iPod source
Press the [iPod] button.
2Enter Function setting mode
Press the [VOL] knob.
3Turn the [VOL] knob and press it when the desired item is displayed.
Select “Settings”/ “SETTINGS”.
4Select the setting item
Turn the [VOL] knob and press it when the desired item is displayed.
Display |
Overview |
|
||
“Settings”/ |
|
|
|
|
“SETTINGS” |
|
|
|
|
|
“Skip Search”/ |
Sets the ratio of skip performed with <Skip |
||
|
“SKIP SEARCH” |
Search> (page 8). |
|
|
|
|
“0.5%”/ “1%”/ “5%”/ “10%” |
||
|
“Delete My |
Deletes the registered My Playlist. |
||
|
Playlist”/ “MPLIST |
Refer to <Deleting a Song from the Playlist> |
||
|
DELETE” |
(page 12) for the operation. |
|
|
|
|
( |
|
: Factory setting) |
5Make a setting
Turn the [VOL] knob to select a setting value, and then press the [VOL] knob.
6 Exit Function setting mode
Press the [ ] button for at least 1 second.
⁄
•The setting of “Skip Search” in <iPod Setting> (page 9) and that in <USB Setting> (page 14) are always the same. Changing the setting of one reflects the other.
Selecting the Search mode
You can select the most suited search method for the desired song from 4 types of the Search mode.
Search mode |
Operation |
Overview |
“Related Search”/ |
Press the |
Searches for music of the same artist or |
“RELATED SRCH” |
[1] button. |
genre as the one being played. |
|
|
Refer to the <Related Search> |
|
|
(page 10). |
“Direct Search” |
Press the |
You can quickly search the desired song |
|
[2] button. |
by specifying its Search item (artist, |
|
|
album, etc.) and initial. |
|
|
Function of DPX-U6120. |
|
|
Refer to <Direct Search> (page 10). |
“Alphabet |
Press the |
You can select an alphabetic character |
Search”/ |
[3] button. |
from the list in the Search item (artist, |
“ALPHABET |
|
album, etc.) selected now. |
SRCH” |
|
Refer to <Alphabet Search> (page 11). |
“Register My |
Press the |
Registers a song to My Playlist. |
Playlist”/ “Recall |
[5] button. |
Refer to <My Playlist> (page 12). |
My Playlist”/ “MY |
|
|
PLAYLIST” |
|
|
1Select iPod source
Press the [iPod] button.
2Enter Music search mode
Press the [  ] button.
3Select the Search mode
Press the [1]/ [2]/ [3]/ [5] button.
Cancelling Music search mode
Press the ] button for at least 1 second.
English | 9
Function of DPX-U6120/ DPX-U5120
iPod/iPhone Operation
Related Search
Searches for music of the same artist or genre as the one being played.
1Select iPod source
Press the [iPod] button.
2Enter Music search mode
Press the [  ] button.
3Enter Related search mode
Press the [1] button.
4Select the Search item
Turn the [VOL] knob and press it when the desired Search item is selected.
Display |
Searches music |
“Search Artist”/ |
Displays the album of the same artist. |
“SRCH ARTIST” |
|
“Search Album”/ |
Displays music in the album in which the one |
“SRCH ALBUM” |
being played is included. |
“Search Genre”/ |
Displays the artist of the same genre. |
“SRCH GENRE” |
|
“Search Composer”/ Displays the album including music created by the “SRCH COMPOSER” same Composer.
After this step, you need to browse. See step 3 of <Selecting a song by browsing iPod> (page 8) to select a song.
Cancelling the Related search
Press the [ ] button for at least 1 second.
⁄
•Related search cannot be performed while playing the Podcast.
•When the music being played has no information on browsing items or no music was found, “Not Found”/ “NOT FOUND” is displayed.
Function of DPX-U6120
Direct Search
You can quickly search the desired song by specifying its Search item (artist, album, etc.) and initial.
1Select iPod source
Press the [iPod] button.
2Enter Music search mode
Press the [  ] button.
3Enter Direct Search mode
Press the [2] button.
4Select the Search item
Turn the [VOL] knob and press it when the desired Search item is selected.
|
Display |
Items |
|
|
Display |
Items |
|
|
“PLAY LIST” |
Playlists |
|
|
“PODCAST” |
Podcasts |
|
|
“ARTIST” |
Artists |
|
|
“GENRE” |
Genres |
|
|
“ALBUM” |
Albums |
|
|
“COMPOSER” |
Composers |
|
|
“SONG” |
Songs |
|
|
|
|
|
5 Select the character to be searched for |
|||||||
|
|
|
|
|
|
||
|
Operation type |
|
Operation |
|
|
||
|
Move between items |
Turn the [VOL] knob. |
|
|
|||
|
Select an item |
|
Press the [VOL] knob. |
|
|
||
|
Move to the next column |
Press the [4] or [¢] button. |
|
||||
Up to 3 characters can be entered.
6Determine the selected initial
Turn the [VOL] knob and press it when the desired item is displayed.
Select “DONE”.
Start search. When search is completed, the music search mode is selected again at the selected character position.
After this step, you need to browse. See step 4 of <Selecting a song by browsing iPod> (page 8) to select a song.
Cancelling the Direct Search
Press the [ ] button for at least 1 second.
⁄
•Characters that can be entered are alphabetical characters (A to Z), numerical characters(0 to 9), and “ * ”.
•“ * ” indicates characters other than alphabetical and numerical characters. You cannot enter any more characters when entering “ * ” in the first character position.
•If the first character string begins with an article “a”, “an”, or “the” in the Direct Search mode, it is searched for in defiance of the article.
10 | DPX-U6120/ DPX-U5120/ DPX-MP3120
Alphabet Search
You can select a song by alphabet. This function searches songs whose name contain the specified character(s) in the list of the selected Search item (artist, album, etc).
1Select iPod source
Press the [iPod] button.
2Enter Music search mode
Press the [  ] button.
3Select search item
Turn the [VOL] knob and press it when the desired item is displayed.
Select the item (artist, album, etc.) you want to search.
4Enter Alphabet Search mode
Press the [3] button.
5Search for song
DPX-U6120
|
Operation type |
Operation |
|
|
Select the character |
Turn the [VOL] knob. |
|
|
Select an item |
Press the [VOL] knob. |
|
|
|
|
|
DPX-U5120 |
|
||
|
|
|
|
|
Operation type |
Operation |
|
|
Select the character |
Turn the [VOL] knob. |
|
|
Move the cursor to the |
Press the [4] or [¢] button. |
|
|
enter character position |
|
|
|
Determine the selected |
Press the [VOL] knob. |
|
|
character |
|
|
Cancelling the Alphabet Search
Press the [ ] button for at least 1 second.
⁄
•The time of search by alphabet may become long depending on the number of songs or items in iPod.
•If the first character string begins with an article “a”, “an”, or “the” in the Alphabet Search mode, it is searched for in defiance of the article.
English | 11

Function of DPX-U6120/ DPX-U5120
iPod/iPhone Operation
My Playlist
Allows you to register your favorite songs in the Playlist of this unit. You can register up to 10 songs in the Playlist.
Registering Songs in the Playlist
1Play the song you want to register
2Register the song
Press the [5] button for at least 2 second.
“## Stored”/ “## STORED” (Registration number) is displayed.
⁄
•Make a Playlist from the songs stored in one iPod. If you attempt to register a song stored in a different iPod, ”No Information”/ “NO INFO” appears and then ”Delete My Playlist All Delete?”/ “MPLIST DELETE” appears. Select “YES” to delete the Playlist when you want to remake it.
•If you attempt to register the eleventh song, ”Memory Full”/ ”MEMORY FULL” appears and you cannot register it accordingly. To register the song, delete an unnecessary song.
•Do not register Podcasts. Songs you do not want to register may be registered, or playback may not be carried out correctly.
Playing the Song in the Playlist
1Enter Playlist mode
Press the [5] button.
2Play the song in the Playlist
Turn the [VOL] knob and press it when the desired item is displayed.
Select the song you want to play.
⁄
•Turning ACC OFF or the power OFF cancels the My Playlist mode.
•The ending of a song may be cut unless the song has a silence of 1 second or longer at the end.
•Random play cannot be performed during playback of a song in the Playlist.
Deleting a Song from the Playlist
1Enter Playlist mode
Press the [5] button.
2Enter Delete Playlist mode
Press the [VOL] knob for at least 1 second.
3Select Delete Playlist mode
Turn the [VOL] knob and press it when the desired item is displayed.
Select ”Delete One”/ “DELETE ONE” or ”Delete All”/ “DELETE ALL”.
12 | DPX-U6120/ DPX-U5120/ DPX-MP3120
4Turn the [VOL] knob to select “YES”, and then press the [VOL] knob.
“Completed”/ “COMPLETED” is displayed.
Deleting the all song from the Playlist (In
Function setting mode)
1Enter Function setting mode
Press the [VOL] knob.
2Enter Delete Playlist mode
Turn the [VOL] knob and press it when the desired item is displayed.
Select “Settings”/ “SETTINGS” > “Delete My Playlist”/ “MPLIST DELETE”.
3Turn the [VOL] knob to select “YES”, and then press the [VOL] knob.
“Completed”/ “COMPLETED” is displayed.
⁄
•If you connect the different iPod from one registered to My Playlist, “Delete One”/ “DELETE ONE” and “Delete All”/ “DELETE ALL” will not appear and all songs be deleted.
Function of DPX-U6120/ DPX-U5120
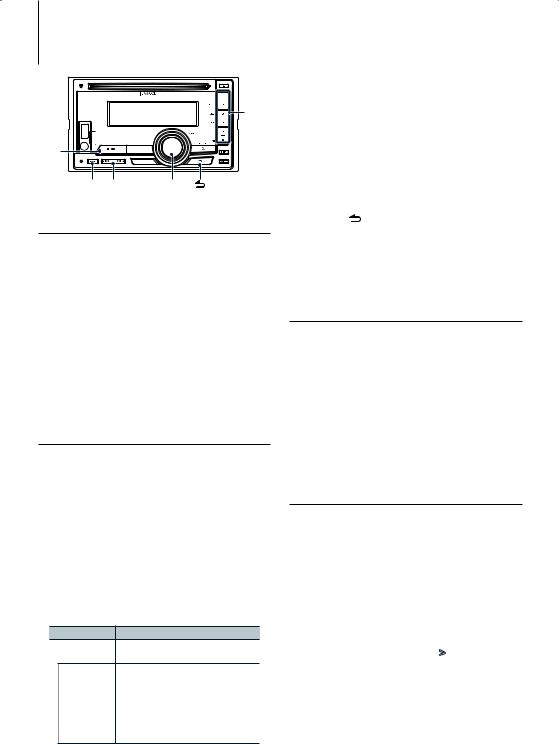
USB device Operation
2 – 6 |
SRC
BAND 4 ¢ VOL
Basic Operation
Playing USB device
• Connect a USB device
When connected, the source is switched automatically and a song starts playing.
•Select USB source
Press the [SRC] button.
Select the “USB” display.
⁄
•CA-U1EX (optional accessory) is recommended to connect a USB device.
Moving to the next folder
Press the [BAND] button.
⁄
•The Music Editor media does not allow you to select a folder.
Song Select
Press the [4] or [¢] button.
Fast Forwards or Fast Backwards
Hold down the [4] or [¢] button.
⁄
• No sound is output while playing Audio file
Pause and Play
Press the [6] button to pause or resume playback.
Remove USB device
1Select a source other than the USB
Press the [SRC] button.
2Remove the USB device.
⁄
•Removing the USB device with it selected as a source can damage the data stored in the USB device.
File Search
Selecting the file you want to listen to from the device being played now.
1Select USB source
Press the [SRC] button.
Select the “USB” display.
2Enter Music search mode
Press the [  ] button.
3Select a file
Operation type |
Operation |
|
Move between items |
Turn the [VOL] knob. |
|
Select an item |
Press the [VOL] knob. |
|
Skip Search (Function of Music |
Press the [4] or [¢] button. |
|
Editor media) |
|
|
Return to previous item |
Press the [ |
] button. |
For example: Searching for ¡".
Turn the [VOL] knob and press it when the desired item is displayed.
Select “Music” > 1 > 2 > ¡"
1
¡!2 ¡" 
 ¡#
¡#
Cancelling Music search mode
Press the [  ] button for at least 1 second.
⁄
• Set the ratio with “Skip Search” in <USB Setting> (page 14).
English | 13

Function of DPX-U6120/ DPX-U5120
USB device Operation
Play function
Scan play
Press the [2] button.
Successively plays the intro of the music in the folder.
When Scan Play is turned on, “File Scan ON”/ “FILE SCAN” is displayed.
Pressing this button again plays songs in the normal mode starting with the song being played now.
Random play
Press the [3] button.
Randomly plays the music in the folder.
When Random Play is turned on, “Folder Random ON”/ “FOLDER RANDOM” is displayed.
Press this button again cancels the Random play.
Repeat play
Press the [4] button.
Switches between File Repeat (“File Repeat ON”/ “FILE REPEAT”), Folder Repeat (“Folder Repeat ON”/ “FOLDER REPEAT”), and OFF (“Folder Repeat OFF”/ “REPEAT OFF”) when pressed.
⁄
•The Music Editor media does not allow you select folder repeat play.
USB Setting
You can select the following USB Setting items.
1Select USB source
Press the [SRC] button.
Select the “USB” display.
2Enter Function setting mode
Press the [VOL] knob.
3Turn the [VOL] knob and press it when the desired item is displayed.
Select “Settings”/ “SETTINGS”.
4Select the setting item
Turn the [VOL] knob and press it when the desired item is displayed.
Display |
Overview |
|
|
|
“Settings”/ |
|
|
|
|
“SETTINGS” |
|
|
|
|
|
“Skip Search”/ |
Sets the ratio of skip performed with <Skip |
||
|
“SKIP SEARCH” |
Search (Function of Music Editor media)> |
||
|
|
(page 13). |
|
|
|
|
“0.5%”/ “1%”/ “5%”/ “10%” |
||
|
|
( |
|
: Factory setting) |
5Make a setting
Turn the [VOL] knob to select a setting value, and then press the [VOL] knob.
6Exit Function setting mode
Press the [ ] button for at least 1 second.
⁄
•The setting of “Skip Search” in <iPod Setting> (page 9) and that in <USB Setting> (page 14) are always the same. Changing the setting of one reflects the other.
14 | DPX-U6120/ DPX-U5120/ DPX-MP3120
Music CD/ Audio file Operation
DPX-MP3120 |
38 |
0
2 – 6 |
SRC
BAND 4 ¢ VOL
Basic Operation
Disc play
•Insert a disc.
When inserted, the source is switched automatically and a song is starts playing. When a CD is inserted, the “IN” indicator is ON.
•Select CD source
Press the [SRC] button.
Select the “CD” display.
Disc ejection
Press the [0] button.
Moving to the next folder
Press the [BAND] button.
⁄
• This operation can be performed only for the Audio file.
Song Select
Press the [4] or [¢] button.
Fast Forwards or Fast Backwards
Hold down the [4] or [¢] button.
⁄
• No sound is output while playing Audio file.
Pause and Play
DPX-U6120 DPX-U5120
Press the [6] button to pause or resume playback.
DPX-MP3120
Press the [38] button to pause or resume playback.
Function of Internal CD source
Music Search
Selecting the music you want to listen to from the disc being played now.
1Select CD source
Press the [SRC] button.
Select the “CD” display.
2Enter Music search mode
Press the [  ] button.
3Search for music
Operation type |
Operation |
|
Move between items |
Turn the [VOL] knob. |
|
Select an item |
Press the [VOL] knob. |
|
Return to previous item |
Press the [ |
] button. |
Cancelling Function setting mode
Press the [ ] button for at least 1 second.
Play function
Scan play
Press the [2] button.
Successively plays the intro of the music in the disc or folder.
When Scan Play is turned on, “Track Scan ON”/ “TRACK SCAN”/ “File Scan ON”/ “FILE SCAN” is displayed.
Pressing this button again plays songs in the normal mode starting with the song being played now.
Random play
Press the [3] button.
Randomly plays the music in the disc or folder. When Random Play is turned on, “Disc Random ON”/ “DISC RANDOM”/ “Folder Random ON”/ “FOLDER RANDOM” is displayed.
Press this button again cancels the Random play.
Repeat play
Press the [4] button.
Switches between Track Repeat (“Track Repeat ON”/ “TRACK REPEAT”) and OFF (“Track Repeat OFF”/ “REPEAT OFF”) when pressed while playing a CD. Switches between File Repeat (“File Repeat ON”/ “FILE REPEAT”), Folder Repeat (“Folder Repeat ON”/ “FOLDER REPEAT”), and OFF (“Folder Repeat OFF”/ “REPEAT OFF”) when pressed while playing an Audio file.
English | 15

Music CD/ Audio file Operation
Function of DPX-U6120
Basic Operation of Disc Changer
(Optional)
Select CD changer source
Press the [SRC] button.
Select the “CD CH” display.
Moving to the next disc
Press the [BAND] button.
Song Select
Press the [4] or [¢] button.
Fast Forwards or Fast Backwards
Hold down the [4] or [¢] button.
Pause and Play
Press the [6] button to pause or resume playback.
Playing the Current Song or Disc Repeatedly. (Repeat play)
Press the [4] button.
Switches between Track Repeat play on (“Track Repeat ON”), Disc Repeat play on (“Disc Repeat ON”), and Repeat play off (“Repeat OFF”) when pressed.
Randomly plays the music in the disc changer. (Magazine random play)
Press the [5] button.
When Magazine random play is turned on, “Magazine Random ON” is displayed.
Press this button again cancels the Magazine random play.
Function of remote control
Direct music search
Searching the music by entering the track number.
1Enter Direct Music search mode
Press the [DIRECT] button on the remote control.
“– –” is displayed.
2Enter the music number
Press the number buttons on the remote control.
3Search the music
Press the [4] or [¢] button on the remote control.
Cancelling Direct music search
Press the [ ] button on the remote control.
16 | DPX-U6120/ DPX-U5120/ DPX-MP3120
Function of DPX-U6120 with disc changer and remote control
Direct search in Disc changer (Optional)
Searching the disc or music by entering the disc or music number.
1Enter Direct search mode
Press the [DIRECT] button on the remote control.
“– –” is displayed.
2Enter the disc or music number
Press the number buttons on the remote control.
3Search the disc
Press the [FM] or [AM] button on the remote control.
4Search the music
Press the [4] or [¢] button on the remote control.
Cancelling Direct search
Press the [ ] button on the remote control.
⁄
• Input “0” to select disc 10.
1 – 6 |
|
“Auto Memory”/ |
Memorizes 6 stations with good reception |
|
||
|
“AUTO MEMORY” |
automatically. |
|
|
|
|
|
Refer to <Auto Memory Entry> (page 17). |
|
||
|
“Forced MONO”/ |
Reduces the noise when stereo broadcasts are |
|||
|
“FORCED MONO” |
received as monaural. |
|
|
|
|
|
“ON”/ “OFF” |
|
|
|
|
|
( |
|
: Factory setting) |
|
5Make a setting
Turn the [VOL] knob.
6Exit Function setting mode
Press the [ ] button for at least 1 second.
Remarks
• Forced MONO
Strong electrical fields (such as from power lines) may cause unstable sound quality when it is set to ON. In such a situation, turn it OFF.
Station Preset Memory
Putting a station in the memory.
1Select the frequency to put in the memory
Press the [4] or [¢] button.
2Select the number to put in the memory
Press the [1] – [6] button for at least 2 seconds.
⁄
•Up to 6 stations with a different band (FM/AM) can be memorized to the [1] – [6] button according to the setting of “Tuner Preset Type”/ “PRESET TYPE” of <Initial Settings> (page 30).
Auto Memory Entry
Putting stations with good reception in the memory automatically.
1Select the radio band you wish to store in the preset memory
2Enter Function setting mode
Press the [VOL] knob.
3Enter Auto Memory Entry mode
Turn the [VOL] knob and press it when the desired item is displayed.
Select “Settings”/ “SETTINGS” > “Auto Memory”/ “AUTO MEMORY”.
4Open Auto Memory Entry
Turn the [VOL] knob and press it when the desired item is displayed.
Select “YES”.
When 6 stations that can be received are put in the memory, auto memory entry closes.
English | 17

Tuner Operation
Preset Tuning
Recalling the stations in the memory.
1Select the radio band
2Recalls the memorized station
Press the [1] – [6] button.
Function of remote control
Direct access tuning
Entering the frequency and tuning.
1Enter Direct access tuning mode
Press the [DIRECT] button on the remote control.
“– – – –” is displayed.
2Enter the frequency
Press the number buttons on the remote control.
Example:
Desired frequency |
|
Press button |
92.1 MHz (FM) |
|
[9], [2], [1] |
810 kHz (AM) |
[8], [1], [0] |
|
3Search the frequency
Press the [4] or [¢] button on the remote control.
Cancelling Direct access tuning
Press the ] button on the remote control.
Frequency Step Setting
Changing the tuning frequency step.
The original setting is FM band 50 kHz, and AM band 9 kHz.
1Turn the power OFF
Press the [SRC] button for at least 1 second.
2Switch the frequency step
While pressing the [1] and [5] buttons, press the [SRC] button.
Release your fingers from the button after the display appears.
The frequency step changes to FM band 200 kHz, and AM band 10 kHz.
⁄
•When the same operation is repeated, the frequency step returns to the original setting.
•When the frequency step is changed, the frequencies in the memory are deleted.
18 | DPX-U6120/ DPX-U5120/ DPX-MP3120
 Loading...