


DPC-X937/DPC-X637/DPC-X537
PORTABLE CD PLAYER
INSTRUCTION MANUAL
This instruction manual is for some models. Model availability and features (functions) may differ depending on the country and sales area.
DEUTSCH
ITALIANO
ESPAÑOL
B60-5378-00 00 MA (E,Y) AP 0304
1

DEUTSCH
ITALIANO
ESPAÑOL
Unpacking
Unpack the unit carefully and make sure that all the accessories are present.
Recharger stand (1 DPC-X937/DPC-X637 only) AC adaptor (1 DPC-X937/DPC-X637 only)
Rechargeable batteries (2 |
DPC-X937/DPC-X637 only) Batteries case (1 DPC-X937/DPC-X637 only) |
External batteries case (1 |
DPC-X937 only) Remote control unit (1) Clip (1) Headphones (1) |
If any accessories are missing, or if the unit is damaged or fails to operate, notify your dealer immediately. If the unit was shipped to you directly, notify your shipper immediately. Kenwood recommends that you retain the original carton and packing materials in case you need to move or ship the unit in the future.
Keep this manual handy for future reference.
For your records
Record the serial number, found on the back of the unit, in the spaces designated on the warranty card, and in the space provided below. Refer to the model and serial numbers whenever you call upon your dealer for information or service on this product.
Model |
|
Serial Number |
2

Contents
Caution : Read the pages marked  carefully to ensure safe operation.
Before applying power ............................................ |
4 |
Safety precautions ................................................ |
4 |
IMPORTANT SAFEGUARDS ................................... |
5 |
Names and functions of parts ....................................... |
8 |
Power Supply .............................................................. |
11 |
When Using Commercially Sold AAA Alkaline Battery |
|
(LR03) .................................................................. |
11 |
Rechargeable battery operation ............................. |
12 |
Using the external battery case ............................... |
14 |
Connections ............................................................. |
15 |
Playback ....................................................................... |
16 |
Hold function ............................................................ |
18 |
Skip function .............................................................. |
18 |
Stopping playback .................................................... |
19 |
Turning the power off ............................................... |
19 |
Repeated playback .............................................. |
20 |
A-B repeat playback .................................................. |
21 |
Using Bookmarks ...................................................... |
23 |
Menu control operations .............................................. |
25 |
Fast forward / fast reverse ....................................... |
26 |
Changing the sound mode ........................................ |
27 |
Selecting Play Mode ................................................. |
28 |
Programming tracks in desired order ................... |
29 |
Random playback .................................................. |
30 |
Intro Scan .............................................................. |
30 |
Alarm mode ............................................................... |
31 |
Sleep mode ............................................................... |
33 |
Sound skip guard function (SHOCK GUARD) .......... |
35 |
Convenient functions .................................................. |
36 |
Activating the operating tone (Beep) ....................... |
36 |
Setting continuous playback ..................................... |
37 |
Listening through the speakers |
|
on the recharger stand ....................................... |
38 |
For pleasant use… ...................................................... |
39 |
In case of difficulty ...................................................... |
41 |
Specifications .............................................................. |
43 |
DEUTSCH
ITALIANO
ESPAÑOL
3

DEUTSCH
Before applying power
 Caution : Read this page carefully to ensure safe operation.
Safety precautions
WARNING : TO PREVENT FIRE OR ELECTRIC SHOCK, DO NOT EXPOSE THIS APPLIANCE TO RAIN OR MOISTURE.
ITALIANO
ESPAÑOL
The marking of products using lasers (For countries other than U.S.A., U.S.-Military and Canada)
CLASS 1
LASER PRODUCT
The marking this product has been classified as Class 1. It means that there is no danger of hazardous radiation outside the product.
Location: Battery cover
CAUTION
INVISIBLE LASER RADIATION
WHEN OPEN. DO NOT STARE
INTO BEAM OR VIEW DIRECTLY
WITH OPTICAL INSTRUMENTS.
Inside this laser product, a laser diode classified as Class 3A laser radiation is contained as alerted by the internal caution label shown above. Do not stare into beam or view directly with optical instruments.
Location: Inside this product
4

IMPORTANT SAFEGUARDS
 Caution : Read this page carefully to ensure safe operation.
Please read all of the safety and operating instructions before operating this unit. For best results,followallwarningsplacedontheunitandadheretotheoperatinganduseinstructions. These safety and operating instructions should be retained for future reference.
1.Power sources – The appliance should be connected to a power supply only of the type described in the operating instructions or as marked on the appliance.
2.Power-cord protection – Powersupply cords should be routed so that they are not likely to be walked on or pinched by items placed upon or against them. Pay particular attention to cords at plugs, convenience receptacles, and the point where they exit from the appliance.
3.Enclosure removal – Never remove the enclosure. If the internal parts are touched accidentally, a serious electric shock might occur.
4.Drop – Do not drop the unit or apply strong shock to it. (Damage due to dropping the unit is not covered by the warranty.)
5.Ventilation – Avoid hindering the ventilation of the appliance by covering it with a cloth, etc.
6.Abnormal smell – If an abnormal smell or smoke is detected, immediately turn the power OFF and pull out the power cord. Contact your dealer or nearest service center.
7.Heat – Avoid placing the appliance under direct sunlight or near a source of heat such as heating equipment. Particularly, never leave it in an automobile or on the dashboard.
DEUTSCH
ITALIANO
ESPAÑOL
5

DEUTSCH
ITALIANO
ESPAÑOL
8.Temperature – The appliance may not function properly if used at extremely low, or freezing temperatures. The ideal ambient temperature is above +5°C (41°F).
9.Water and moisture – The appliance shall not be exposed to dripping and splashing — for example, near a bathtub, washbowl, kitchen sink, laundry tub, in a wet basement, or near a swimming pool, etc. Do not place an object containing liquid, such as a flower vase, on the appliance.
10.Dust and moisture – Avoid places where is dusty or where the humidity is high.
11.Vibrations – Avoid placing the appliance on an unstable place such as a shelf or in a place subject to vibrations.
12.Magnetic fields – Keep the appliance away from sources of magnetic fields such as TV sets, speaker systems, radios, motorized toys or magnetized objects.
13.Cleaning – Do not use volatile solvents such as alcohol, paint thinner, gasoline, or benzine, etc. to clean the cabinet. Use a clean dry cloth.
14.Nonuse periods – The power cord of the unit should be unplugged from the outlet when left unused for a long period of time.
15.Damage requiring service – The appliance should be serviced by qualified service personnel when :
A.The power-supply cord or the plug has been damaged.
B.Objects have fallen, or liquid has been spilled into the appliance.
C.The appliance has been exposed to rain.
D.The appliance does not appear to operate normally or exhibits a marked change in performance.
E.The appliance has been dropped, or the enclosure damaged.
6

16.Servicing – The user should not attempt to service the unit beyond that described in the operating instructions. All other servicing should be referred to qualified service personnel.
17.CAUTION – TO PREVENT ELECTRIC SHOCK DO NOT USE THE AC PLUG WITH AN EXTENSION CORD, RECEPTACLE OR OTHER OUTLET UNLESS THE BLADES CAN BE FULLY INSERTED TO PREVENT BLADE EXPOSURE.
DEUTSCH
ITALIANO
ESPAÑOL
7
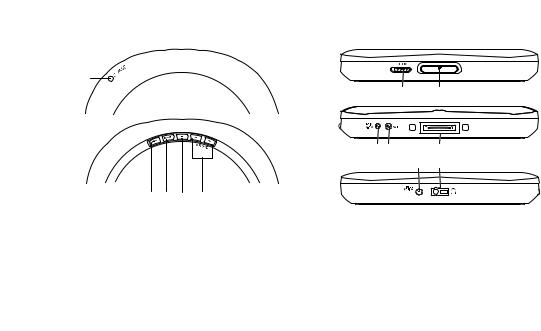
Names and functions of parts
DEUTSCH |
Main Unit |
|
|
|
Top |
|
1 |
ITALIANO |
Rear |
|
|
|
2 3 4 5 |
|
1 CHARGE (Battery charge) indicator |
ESPAÑOL |
2 4(Skip down) key |
3 3/¢(Play/Skip up) key
4 7(Stop/Off) key
5 VOLUME +/-keys
6 HOLD 3switch
7 0 PUSH OPEN key
(Use to open top cover)
Side
67
890
!@
8 DC IN (External power) jack (DPC-X537 only) 9 EXT BATT jack (DPC-X937 only)
0Recharging terminals (DPC-X937/DPC-X637 only)
!LINE OUT (OPTICAL) (Line out/Digital output jack) jack (DPC-X937 only)
@
 (Headphones/ Remote control unit) jack
8

Remote Control
LCD
1 PGM indicator/ RANDOM indicator/ INTRO indicator
2Play indicator/ Repeat mode indicator/ Battery duration indicator/ Bookmark indicator/ S.G.
(Shock Guard) indicator/ 1, ¡ indicator
3 Timer-related indicator
4 Sound Mode indicator
5 Track number indicator
6 Playing time indicator
7 Headphones jack
8 MEMU key/ 7 (Stop/Off) key/ 3/¢ (Play/Skip up/ Fast forward) key/ 4 (Skip down/Fast reverse) key
9 2 HOLD switch
0 REPEAT key
! VOLUME +/- keys
Battery duration indicator
The duration at which the bat-
tery indicator starts to blink is variable depending on the type of battery used.
Battery duration indicator
Battery |
Blinking Timing |
Treatment |
|
Type |
|||
|
|
||
|
|
|
|
Recharge- |
When the batteries is |
In a while, the power |
|
able |
nearly exhausted. |
will be turned off |
|
batteries |
|
automatically. Then |
|
|
|
recharge the batteries. |
|
|
|
|
|
Alkaline |
When the batteries |
Playback is possible |
|
batteries |
are half exhausted. |
while the indicator is |
|
|
|
blinking. |
|
|
|
|
DEUTSCH
ITALIANO
ESPAÑOL
9
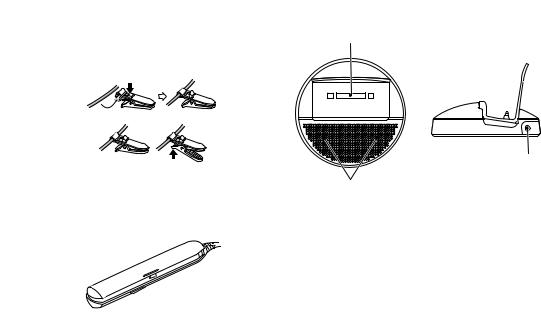
Using the Clip
Attach the clip to the headphone cord as shown below. DEUTSCH
Clip the remote control unit to the edge of your bag or pocket.
Press and release
ITALIANO |
Press and release |
|
|
|
External battery case (DPC-X937 only) |
ESPAÑOL |
|
Recharger stand (DPC-X937/DPC-X637 only)
Recharging terminals
To DC IN jack
jack
Speakers
10
Power Supply
This unit can be powered from the provided rechargeable batteries, commercially sold AAA alkaline batteries or the household power supply.
When Using Commercially Sold AAA Alkaline Battery (LR03)
1Push the 0 PUSH OPEN key and open the top cover.
2 Open the battery cover. |
2 |
1
3 Insert 2 alkaline batteries and close the cover.
÷Make sure the positive ª and |
|
negative · poles are properly |
|
aligned. |
1 |
|
÷Use commercially available AAA (LR03) batteries. The unit may not operate normally if manganese batteries are used.
÷Replace both batteries at the same time.
÷The battery cover may be detached when it is subjected to an excessive force. In this case, attach the battery cover again as shown below.
2
Never use an alkaline battery and the rechargeable battery together.
DEUTSCH
ITALIANO
ESPAÑOL
11

DEUTSCH
ITALIANO
ESPAÑOL
Rechargeable battery operation (DPC-X937/DPC-X637 only)
Always use the specially provided rechargeable battery or a separately purchased NB-3A70. Never use a battery other than a battery authorized by Kenwood.
Charge the battery with the power to the unit turned off. (The battery is not charged while the unit is in operation.)
1Loading the batteries.
1 Push the 0 PUSH OPEN key and open the top cover.
2 Open the battery cover. |
2 |
1
3 Insert 2 rechargeable batteries and close the cover.
÷Make sure the positive ª and negative · poles are properly
aligned. |
1 |
2
÷A small amount of power is used even when the unit is turned OFF. If the unit is not used for a long time, therefore, remove the battery and store it in a safe place.
÷During battery charging or use of the unit, the battery may become warm. This is normal and does not indicate a malfunction.
Never use an alkaline battery and the rechargeable battery together.
Preparation of the recharger stand
1 Connect the AC adaptor to the
DC IN jack of the recharger
stand.
÷Install the recharger stand on a
DC IN
level surface.
÷Keep the recharging terminals and battery terminals always clean.
2 Connect the AC adaptor to the household wall outlet.
÷Disconnect the AC adapter from the wall outlet when the recharger stand is not used.
12

2Charging the rechargeable batteries.
Place the main unit on the recharger stand by aligning the triangular markings on them.
÷The unit can be operated while it is placed on the recharger stand during as well as after charging.
÷Recharging is not possible during playback. Be sure to switch the power OFF before starting recharging.
÷Be sure to close the top cover of the unit before proceeding to recharging.(Close securely by pushing the front right position of the top cover unit it clicks.)
÷The CHARGE indicator lights when charging starts and goes off when it completes.
|
Charging in progress |
Charging completed |
DEUTSCH |
||||
|
|
||||||
|
Lights up |
|
|
|
|
Goes off |
|
|
|
|
|
|
|
||
|
DPC-X937: Recharging completes in about 2.5 hours. |
|
|||||
|
DPC-X637: Recharging completes in about 6 hours. |
|
|||||
÷ If charging doesn't start, wait for at least 3 seconds before |
|
||||||
|
placing the main unit again. |
|
|
|
|
||
÷ |
After the batteries have been charged, remove the AC |
ITALIANO |
|||||
|
adapter. Disconnect the AC adapter from the wall outlet |
||||||
|
|
||||||
|
when the recharger stand is not used. |
|
|||||
÷ When using a rechargeable battery which is new or which |
|
||||||
|
has not been used for more than 2 months, the operating |
|
|||||
|
period may be shorter than nomal. This is due to the prop- |
|
|||||
|
erties of the battery and not a malfunction. After recharg- |
|
|||||
|
ing, use the battery on the unit until it is exhausted. The |
|
|||||
|
original performance of the battery performance can be |
|
|||||
|
recovered by repeating this cycle a few times. |
|
|||||
÷ |
Rechargeable batteries can be recharged. When the |
ESPAÑOL |
|||||
|
|
|
|
|
|
|
|
playable time per recharge reduces, please newly purchase the optional (NB-3A70) rechargeable batteries.
For the U.S.A.
13

DEUTSCH
ITALIANO
ESPAÑOL
Using the external battery case (DPC-X937 only)
1 Attach the external battery case to the main unit
To EXT BATT jack
÷When attaching the external battery case to the main unit, be sure to align the orientation of the plug before inserting it. (See the figure.)
÷Rechargeable batteries inside the unit cannot be charged while the external battery case is attached.
2Open the batteries cover.
3Insert 2 alkaline batteries and close the cover.
÷Make sure the positive ª and negative · poles are properly aligned.
2


 1
1
÷Use two commercially sold AA alkaline batteries with the external battery case.The unit may not operate normally if manganese batteries are used.
÷When carrying the external battery case without attaching it to the main unit, remove the batteries from the case. If the case containing batteries is put in a pocket or bag together with a metallic object such as a key holder, the + and - terminals of the battery case may be shorted due to contact with the metallic object.
÷The battery case can be used simultaneously with the batteries inside the unit to extend the overall playback time.
14
 Loading...