


K 55
English |
2 |
Français |
9 |
Español |
16 |
59634850 09/09

Cordless Electric Broom OPERATOR MANUAL
Specifications |
|
|
2 |
|
|
Proper use |
|
Proper use |
|
|
2 |
|
|
– Use this battery operated appliance |
|
Customer Support |
|
|
2 |
|
|
only for personal use, use only the |
|
|
|
|
|
|
|
accessories and spare parts ap- |
|
MODEL OVERVIEW |
|
|
3 |
||||
|
|
|
|
|
|
proved by KÄRCHER. |
|
IMPORTANT SAFETY INSTRUCTIONS |
4 |
||||||
|
|
– The appliance is not suitable for |
|||||
START UP |
|
|
5 |
|
|
||
|
|
|
|
|
|
cleaning deep-pile carpets and wet |
|
OPERATING INSTRUCTIONS |
6 |
||||||
|
|
floors. |
|||||
Maintenance and Care |
|
|
7 |
|
|
||
|
|
|
|
– The appliance is not suitable for |
|||
Service |
|
|
8 |
|
|
cleaning concrete, gravel, etc. |
|
Troubleshooting |
|
|
8 |
|
|
The manufacturer is not responsible for |
|
Disposing of old device and battery pack |
8 |
|
|
any damages that may occur on ac- |
|||
|
|
|
|
|
|
count of improper use or wrong opera- |
|
|
|
|
|
||||
|
|
|
|
|
|
tions. |
|
Specifications |
|
||||||
|
|
|
|
||||
|
|
|
|
|
|
Customer Support |
|
|
|
|
|
||||
Operating time when |
max. 30 |
min |
|
||||
|
|
In the U.S. or Canada, please call |
|||||
battery is fully charged |
|
|
|
|
|
||
|
|
|
|
|
1-800-537-4129 for warranty issues |
||
(depends on the flooring) |
|
|
|
|
|
||
|
|
|
|
|
|
and visit www.karcherresidential.com |
|
Working voltage of the |
4,8 |
V |
|
|
|||
|
|
|
for technical support and product assis- |
||||
battery |
|
|
|
|
|
||
|
|
|
|
|
tance. |
||
Charging current for |
14 |
h |
|
|
|
||
|
|
|
Please take a moment to register your |
||||
empty battery |
|
|
|
|
|
||
|
|
|
|
|
pressure washer online at |
||
Voltage of the charger |
5,8 |
V |
|
|
|
www.karcher-register.com. Be sure |
|
Charging current |
130 |
mA |
|
|
|
to save your purchase receipt, it will be |
|
|
|
|
|
|
|
required for repairs covered by warran- |
|
Weight (incl. battery) |
4,4 |
lbs |
|
|
|||
|
|
|
|
|
|
ty. |
|
Battery type |
|
NiCd |
|
||||
|
|
|
|
||||
Part No. |
1.258-505.0 |
|
|
|
|||
Serial no. |
|
|
|
|
|
|
|
2 English

MODEL OVERVIEW
1 |
Joint at the appliance |
11 |
Brush roller with cleaning cover (an- |
2 |
ON/OFF foot switch |
|
imal hair brush), can be inter- |
3 |
Rechargeable battery, detachable |
|
changed |
4 |
Unlocking button, battery |
12 |
Unlocking button for the changeable |
5 |
Charging box |
|
brush |
6 |
Charging display |
13 |
Telescopic strut, adjustable height |
7 |
Dirt container, detachable |
14 |
Turning handle |
8 |
Unlocking the lid of dirt container |
15 |
Handle |
9 |
Casing |
16 |
Charger with charging cable |
10 |
Brush roller, changeable |
17 |
Wall mount with fasteners |
For household use only!
English 3
IMPORTANT SAFETY INSTRUCTIONS
When using this product basic precautions should always be followed, including the following:
WARNING
To reduce the risk of fire, electric shock, or injury:
Do not use outdoors or on wet surfaces.
Use only as described in this manual.
Do not use with damaged cord or plug. If appliance is not working as it should, has been dropped, damaged, left outdoors, or dropped into water, return it to a service center or call customer service.
Do not unplug by pulling on cord. To unplug, grasp the plug, not the cord.
Do not handle plug or appliance with wet hands.
Do not put any object into openings. Do not use with any openings blocked; keep free of dust, lint, hair and anything that may reduce air flow.
Keep hair, loose clothing, fingers and all parts of body away from openings and moving parts.
Turn off all controls before unplugging.
Do not use appliance in an enclosed space where oxygen, flammable, explosive or toxic vapors are given off or in an area where flammable dust is present.
Do no allow appliance to be used as a toy. Close attention is necessary when used by children.
Do not use extension cords or outlets with inadequate current carrying capacity.
Do not incinerate or mutilate batteries as they will explode at high temperatures.
Do not pick up anything that is burning or smoking such as cigarettes, matches or hot material.
Do not allow the battery to run down completely before charging. In doing so, serious problems may occur in the battery life cycle.
Do not pick up flammable or combustible liquids such as gasoline or use in areas where they are present.
Store the adapter indoors in a cool dry area not exposed to the weather to avoid electrical shock and/or cleaner damage.
Only use the adapter provided by the manufacturer to recharge the appliance.
Always disconnect cord from electrical outlet before servicing appliance.
Only charge the unit indoors.
4 English
START UP
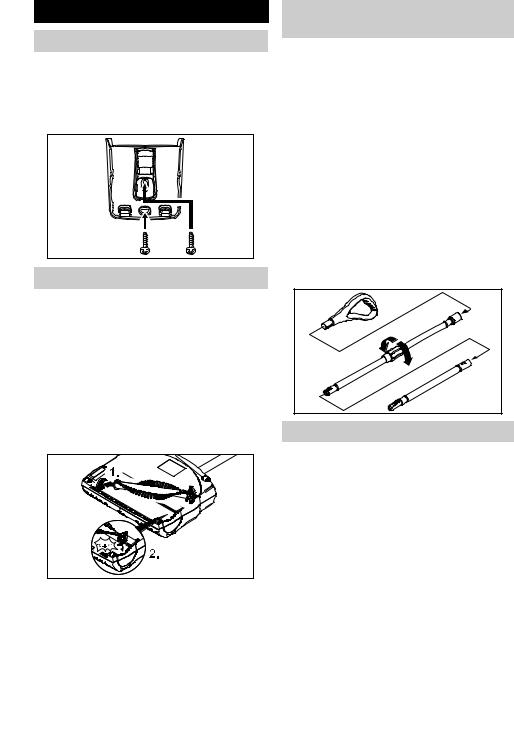
Installing the wall unit
The wall mount is to be used for storing the appliance and the charger.
ÎFix the enclosed wall mount at an easily accessible point near to a socket - the fastener is enclosed.
Insert the brush roller
The brush roller has not yet been inserted in the appliance at the time of delivery. Please insert the brush roller before starting the appliance.
ÎTurn the casing.
ÎInsert the brush roller in the side-in- take.
ÎPress in the holder of the brush roller into the intake and check that it is sitting properly.
Installing the telescopic handle and adjusting the handle height
The telescopic strut consists of 3 parts. While assembling it, make sure that the parts lock into each other.
ÎInsert the handle on the longer strut with turning handle.
ÎInsert together the longer and shorter struts; while assembling it, press the locking button.
ÎInsert the entire strut with the locking button into the joint on the appliance.
ÎLoosen the handle and pull out the strut to the desired working height; turn the handle to the correct position and tighten using the turning handle.
Inserting and charging the battery
The battery has not yet been inserted in the appliance at the time of delivery. Please insert the battery before commissioning the appliance.
ÎRemove the rechargeable battery from its packing.
ÎInsert the battery into the intake until it locks.
ÎCharge the battery: The battery can be charged when it is in the appliance or removed from it. Note: The following section describes the charging process when the battery is in the appliance.
ÎInsert the charger delivered with the appliance into a proper socket.
English 5
ÎImportant note for charging: Always switch off the appliance otherwise the battery will not get charged.
ÎInsert the charging cable in the charging box at the battery.
ÎWhen the operating display glows, it means the charging process has started. The charging time for an empty battery is approx. 14 hours. Note: If the operating display does not glow, switch off the machine because otherwise the charging process cannot start.
ÎRemove the plug from the charger socket and disconnect the charger from mains power after you have finished charging.
OPERATING INSTRUCTIONS
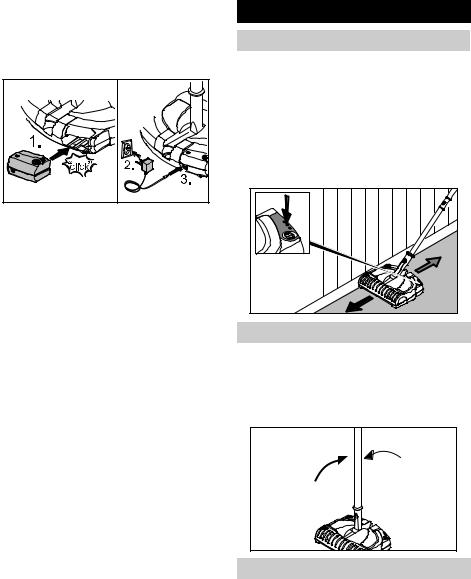
Starting the work
ÎSwitch on the appliance; press the on/off foot switch to do so.
ÎMove the appliance forward and backward to clean it.
ÎUse the right side (the side with an unlocking button for the changeable brush) for cleaning close to the edges.
Interrupting the work
ÎSwitch off the appliance; press the on/off foot switch to do so.
ÎPlace the telescopic strut in an upright position during breaks; there is a stopper that holds it in position.
Finishing your work
ÎSwitch off the appliance when finished.
ÎEmpty dirt container after each cleaning.
6 English
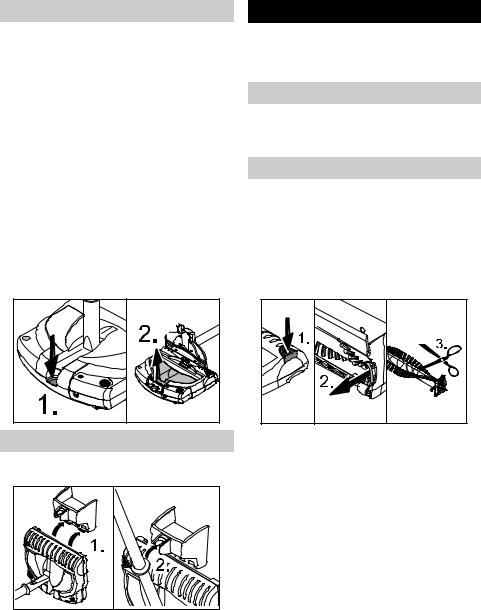
Emptying the dirt container
The dirt container can be removed in 2 ways:
1)Hold the appliance high at the joint with one hand and unlock the lid of the dirt container. Note: Hold the casing firmly so that it doesn't open downward too fast.
2)Place the appliance on the floor and unlock the lid of the dirt container. Note: Hold the telescopic strut firmly so that it doesn't fall down.
Î Unlock lid of the dirt container and pull it upward.
ÎLift the dirt container upward at the handle and empty it.
ÎReinsert the dirt container and close the lid.
Storing the appliance
ÎStore the appliance in the wall mount.
ÎAlternatively, you can also store the device at the handle; if required, turn the handle (refer section "Adjust telescopic strut and handle").
ÎCharge the battery.
Maintenance and Care
Caution
Remove the battery prior to any care and maintenance work.
Cleaning the device
ÎWipe the appliance using a damp cloth. Do not use any aggressive agents, such as cleaning powder.
Change/ clean the brush roller
Brush roller
ÎPress the unlocking button and remove the brush roller.
ÎRemove wound up hair using a knife or scissors. Move the knife along the defined cutting edge and then remove the loosened hair.
ÎInsert the cleaned or new brush roller and ensure that it sits properly.
Clean the brush roller with the cleaning cover (animal hair brush)
Note: Please clean animal hair brush after each use!
ÎPress the unlocking button and remove the brush roller.
Animal hair that has wounded can be removed in the most simple way:
ÎPull out the cleaning cover from the brush roller; the hair that has come off remains stuck there and can be disposed off in the household garbage.
English 7
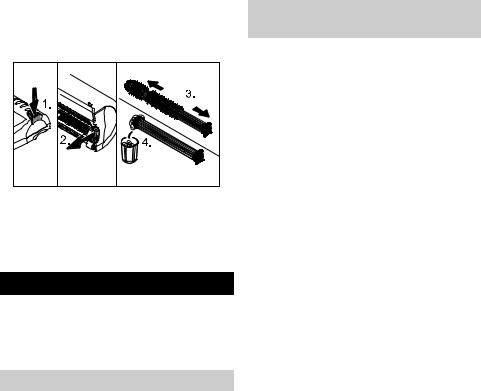
Note: First cut the long animal or human hair that has got wounded with the help of a knife or scissors; then remove the cover.
ÎAfter cleaning, insert back the cover.
ÎInsert the cleaned or new brush roller and ensure that it sits properly.
Service
Risk of injury
Turn off the appliance and remove the mains plug prior to any care and maintenance works.
Troubleshooting
Operating display does not glow
ÎThe appliance is switched on during the charging process.
Switch off the appliance using the On/Off switch.
Appliance does not clean properly
ÎClean or replace the brush rollers (refer chapter "Replace/ clean brush roller").
ÎCharge the battery (refer chapter "Charging the battery“).
Dirt is being thrown out of the appliance
ÎEmpty the full dirt container (refer chapter "Empty dirt container").
Disposing of old device and battery pack
ÎArrange for the proper environmentally friendly disposal of the old device. Please remove the battery pack prior to disposing of the device.
Battery disposal
To preserve natural resources, please recycle or dispose of expired battery pack properly.
THIS PRODUCT CONTAINS A NICKELCADMIUM BATTERY. IT MUST BE DISPOSED OF PROPERLY. LOCAL, SATE, OR FEDERAL LAWS MAY PROHIBIT DISPOSAL OF NICKEL-CADMIUM BATTERIES IN ORDINARY TRASH. CONSULT YOUR LOCAL WASTE AUTHORITY FOR INFORMATION REGARDING AVAILABLE RECYCLING AND/OR DISPOSAL OPTIONS.
ÎRemove the battery pack with its casing and dispose of properly. There is no need to disassemble the plastic casing.
Warning
–Do not open the battery, as there is a risk of an electrical short; also, irritating or caustic vapors can escape.
8 English
 Loading...