


K1400 electric 6/27/02 6/27/02 10:01 AM Page 1
Model K 1400 Part No. 1.421-205.0
High Pressure Washer Operator Manual
Overview . . . . . . . . . . . . . . . . . . . . . . . . . . . . . . . . . .1 Precautions . . . . . . . . . . . . . . . . . . . . . . . . . . . . . . .1-3 Assembly Instructions . . . . . . . . . . . . . . . . . . . . . . .3-4 Operating Instructions . . . . . . . . . . . . . . . . . . . . . . .4-5 GFCI Instructions . . . . . . . . . . . . . . . . . . . . . . . . . . . .5 Using the Accessories . . . . . . . . . . . . . . . . . . . . . . . .5 Working with Detergents . . . . . . . . . . . . . . . . . . . . . . .6 Shut Down and Clean-Up . . . . . . . . . . . . . . . . . . . . . .7 Taking a Break . . . . . . . . . . . . . . . . . . . . . . . . . . . . . .7 Winterizing and Long-Term Storage . . . . . . . . . . . . . .7 Maintenance Instructions . . . . . . . . . . . . . . . . . . . . . .8 Cleaning Tips . . . . . . . . . . . . . . . . . . . . . . . . . . . . .8-9 Optional Cleaning Accessories . . . . . . . . . . . . . . . . . .9 Troubleshooting . . . . . . . . . . . . . . . . . . . . . . . . . .10-11
Specifications
Operating pressure |
1400 PSI |
Water volume |
1.3 GPM |
Voltage |
120 V |
Amp draw |
14 AMPS |
In USA Call:
1-800-537-4129 or visit our website: www.karcher-usa.com
K1400 electric 6/27/02 6/27/02 10:01 AM Page 2
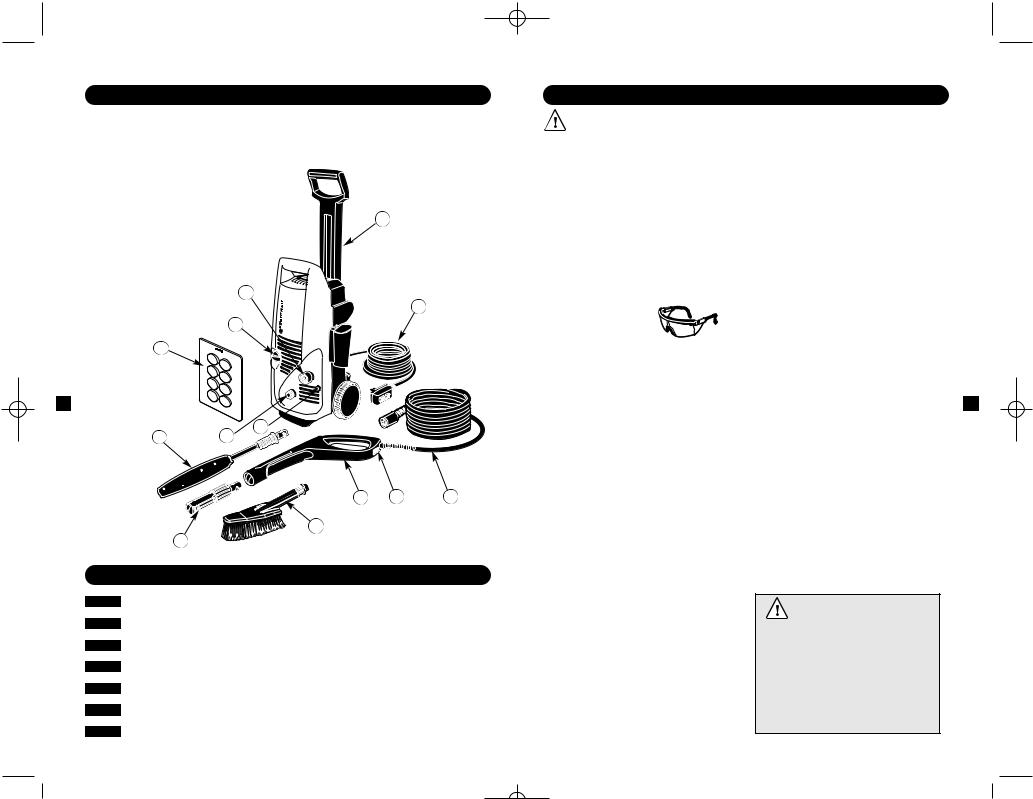
Model K 1400 OVERVIEW |
|
|
IMPORTANT PRECAUTIONS – Read First! |
|
|||
Item |
Description |
|
|
|
Safety Warnings |
and do not yank on any cord to |
|
1. |
Power cord with Ground Fault Circuit Interrupter (GFCI) |
|
|
|
|||
|
|
disconnect. Keep cord away from heat |
|
||||
2. |
Trigger gun |
|
|
When using this product, basic precau- |
|
||
|
|
and sharp edges. Always disconnect the |
|
||||
3. |
Trigger gun safety lock |
|
|
tions should always be followed: |
|
||
|
|
extension cord from the receptacle before |
|
||||
|
|
• |
Read all the instructions before using |
|
|||
4. |
High pressure hose |
|
|
disconnecting the product from the |
|
||
|
|
|
the product. |
|
|||
5. |
Water inlet with filter and |
|
|
extension cord. If you are using an |
|
||
|
• |
High pressure jets can be dangerous |
|
||||
|
garden hose connector |
|
|
extension cord, it should always be |
|
||
|
|
|
|
if subject to misuse. The jet must not |
|
||
6. |
Retractable handle |
|
|
|
completely unwound from the cable drum. |
|
|
|
|
|
be directed at persons, animals, |
|
|||
7. Power cord holder (not pictured) |
6 |
|
|
|
|||
|
electrical devices, or the machine itself. |
Ground Fault Circuit |
|
||||
8. |
Detergent suction |
with filter |
|
|
|||
|
|
|
|||||
9. |
High pressure outlet |
|
|
• |
To reduce the risk of injury, do not |
Interrupter (GFCI) Protection |
|
10. |
On/Off switch |
|
|
|
operate the machine near children. |
This product is supplied with a Ground |
|
|
|
• |
Learn how to stop the machine and |
|
|||
11. Spray wand extension (must be |
|
Fault Circuit Interrupter (GFCI) built into |
|
||||
|
used for attaching |
|
|
|
release pressure quickly. Be thoroughly |
the power cord plug. This device provides |
|
12. |
Wash brush |
5 |
|
|
familiar with the controls. |
additional protection from the risk of |
|
13. |
Quattro-nozzle |
|
• |
Stay alert — watch what you are doing. |
electric shock. If power is interrupted in |
|
|
|
1 |
|
|||||
14. |
Concentrated power |
|
• |
Wear safety goggles. |
the line, the GFCI will automatically re- |
|
|
|
cleaning tabs-sampler |
10 |
|
• |
Do not use acids, |
close the circuit to the load after power is |
|
|
|
|
restored. Depending on the GFCI model, |
|
|||
|
|
|
|
|
solvents, or any |
|
|
|
|
|
|
|
it may be necessary to manually operate |
|
|
|
14 |
|
|
|
flammable material in this product. |
|
|
|
|
|
|
the reset button to restore power to the |
|
||
|
|
|
|
|
These products can cause physical |
|
|
|
|
|
|
|
GFCI load circuit. If replacement of the |
|
|
|
|
|
|
|
injuries to the operator and irreversible |
|
|
|
|
|
|
|
plug or cord is needed use identical |
|
|
|
|
|
|
|
damage to the machine. |
|
|
|
|
|
|
|
replacement parts. |
|
|
|
|
|
|
• Do not operate the product when |
|
||
1 |
|
|
|
|
2 |
||
|
|
|
|
fatigued or under the influence of |
This Product Is |
||
|
|
|
|
|
|
||
|
|
8 |
|
|
alcohol or drugs. |
Double Insulated |
|
|
|
|
• |
Keep operating area clear of all |
|
||
|
13 |
9 |
|
In a double-insulated product, two |
|
||
|
|
|
persons. |
|
|||
|
|
|
|
|
systems of insulation are provided instead |
|
|
|
|
|
|
• |
Do not stand on unstable surfaces. |
|
|
|
|
|
|
of grounding. No grounding method is |
|
||
|
|
|
|
|
Stand with both feet balanced at all |
provided on a double-insulated product, |
|
|
|
|
|
|
times. |
nor should a method for grounding be |
|
|
|
|
4 |
• |
To reduce the risk of electrocution, keep |
added to the product. Servicing a double- |
|
|
|
|
|
|
all connections dry and off the ground. |
insulated product requires extreme care |
|
|
|
12 |
|
|
Do not touch plug with wet hands. |
and knowledge of the system, and should |
|
|
|
|
• The Gun Safety Lock PREVENTS |
be done only by qualified service |
|
||
|
11 |
|
|
personnel. Replacement parts for a |
|
||
|
|
|
|
the trigger from accidentally being |
|
||
|
|
|
|
|
engaged. This safety feature DOES |
double-insulated product must be |
|
|
|
|
|
|
identical to the parts they replace. A |
|
|
|
|
|
|
|
NOT lock trigger in the on position. |
|
|
|
|
|
|
|
double-insulated product is marked with |
|
|
|
|
|
|
Extension Cords |
|
||
|
|
|
|
the words, “DOUBLE INSULATED.” |
|
||
Never point nozzle at people or animals. |
|
Use a sufficient gauge: Up to 25 ft = 12/3 |
Caution |
|
|||
|
AWG; 25 to 50 ft = 10/3 AWG. Use only |
|
|||||
|
|
|
|
|
|||
Never drink alcohol or use drugs while operating this equipment. |
|
extension cords that are intended for |
• Follow the maintenance instruc- |
|
|||
|
|
|
|
outdoor use. These extension cords are |
|
||
|
|
|
|
tions specified in the manual. |
|
||
Never operate while standing in water. |
|
identified by the marking “Acceptable for |
|
||||
|
• This machine has been designed |
|
|||||
|
|
|
|
use with outdoor appliances; store indoors |
|
||
|
|
|
|
for use with cleaning detergent |
|
||
Never touch plug with wet hands. |
|
while not in use.” Use only extension |
|
||||
|
supplied or recommended by the |
|
|||||
|
|
|
|
cords having an electrical rating not less |
|
||
Never let electrical connections rest in water. |
|
manufacturer. The use of other |
|
||||
|
than the rating of the product. Do not use |
|
|||||
|
cleaning detergents may affect |
|
|||||
|
|
|
|
damaged extension cords. Examine |
|
||
Never operate pressure washer without the water turned on. |
|
the operation of the machine and |
|
||||
|
extension cord before using and replace if |
|
|||||
|
void the warranty. |
|
|||||
|
|
|
|
damaged. Do not abuse extension cord |
|
||
Never use hot water. |
|
|
|
|
|||
|
|
|
|
|
|
||

K1400 electric 6/27/02 6/27/02 10:01 AM Page 4
IMPORTANT PRECAUTIONS – continued
• The water supply temperature must not exceed 104°F/40°C.
• Never use the pressure washer to draw in water contaminated with solvents, e.g. paint thinners, gasoline, oil, etc.
• Always prevent debris from being drawn into the unit by using a clean water source.
• Save these instructions!
ASSEMBLY INSTRUCTIONS
3 |
Step 1 Insert wheels into side holes at |
|
Step 2 Place the wheel carriage |
the bottom of the pressure washer and snap |
|
onto the mounting brackets on the sides |
into place. |
|
of the washer and align the four holes. |
|
|
Snap into place. |
|
|
|
|
|
|
ASSEMBLY INSTRUCTIONS – continued
Step 5 Pull out the locking slide from the right side of the trigger gun handle, and insert the small end of the high pressure hose into place. Push the locking slide back into the trigger gun to lock the hose in position.
Step 6 Insert the Spray Wand Extension into the trigger gun. Press in against the spring tension and twist into the lock position. Turn the Spray Wand Extension Collar clockwise until tight. Note: spray wand extension must be attached to use accessories.
Step 7 Attach quattro nozzle for four different spray settings.
OPERATING INSTRUCTIONS
4
Step 1 Connect the high pressure hose |
Step 2 Connect the garden hose to the |
to the high pressure outlet. |
water inlet. |
Step 3 Slide the handle into the top slot of the wheel carriage and snap into place.
Step 4 Slide the trigger gun holder into track on the right hand side of the pressure washer.
Step 3 Connect garden hose to the cold water source and turn water on completely.
Step 4 Plug the power cord into the power outlet. Trigger the gun to eliminate trapped air, wait for a steady flow of water to emerge from the spray nozzle.
 Loading...