


High Pressure Washer
Operator Manual
Overview .......................................... |
|
2 |
Precautions ................................ |
|
3 - 4 |
Assembly Instructions ..................... |
|
4 |
Operating Instructions ..................... |
|
5 |
Using the accessories ..................... |
|
6 |
Working with Detergents ................. |
|
7 |
Shut Down and Clean-Up ............... |
|
8 |
Taking a Break ................................ |
|
8 |
Winterizing and Long-Term |
|
|
Storage ....................................... |
|
8 - 9 |
Cleaning Tips ........................... |
|
9 - 10 |
Optional Cleaning Accessories |
..... 10 |
|
Troubleshooting ....................... |
|
11-12 |
Specifications |
|
|
Working Pressure ............. |
10000 kPa |
|
Max. Pressure .................... |
1750 PSI |
|
Max. Water volume ............. |
1.5 GPM |
|
Voltage ..................................... |
|
120 V |
Amp draw ........................... |
13 AMPS |
|
Please keep the original box, packaging and receipt.
Before operating this unit, please read this manual thoroughly and retain it for future reference.
Part No. 1.423-607.0 |
Manual Part No. 5.961-367.0 06/04EN |
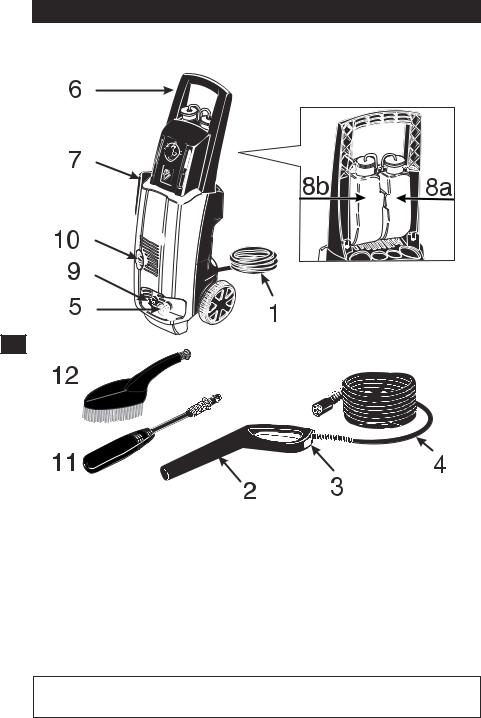
OVERVIEW
For household use only!
2
1. |
Power cord |
7. |
Accessory compartment |
2. |
Trigger gun |
8a. Detergent tank 1 |
|
3. |
Trigger gun safety lock |
8b. Detergent tank 2 |
|
4. |
High pressure hose |
9. |
High pressure outlet |
5. |
Water inlet with filter |
10. On/Off switch |
|
6. |
Transport handle |
11. |
Quattro nozzle |
|
|
12. Washing brush |
|
THE BEST ANTI-FREEZE PROTECTION IS PROVIDED BY USING AND STORING THE MACHINE IN SHELTERED SPACE

IMPORTANT PRECAUTIONS – Read First!
Safety Warnings
When using this product basic precautions should always be followed:
•Read all the instructions before using the product.
•High pressure jets can be dangerous if subject to misuse. The jet must not be directed at persons, animals, electrical devices, or the machine itself.
•To reduce the risk of injury, do not operate the machine near children.
•Learn how to stop the machine and release pressure quickly. Be thoroughly familiar with the controls.
•Stay alert — watch what you are doing.
•Wear safety goggles.
•Do not use acids, solvents, or any other flammable material in this product. These products can cause physical injuries to the operator and irreversible damage to the machine.
•Do not operate the product when fatigued or under the influence of alcohol or drugs.
•Do not stand on unstable surfaces. Stand with both feet balanced at all times.
•To reduce the risk of electrocution, keep all connections dry and off the ground. Do not touch plug with wet hands.
•The Trigger Gun Safety Lock PREVENTS the trigger from accidentally being engaged. This safety feature DOES NOT lock trigger in the on position.
WARNING
•DO NOT SPRAY ELECTRICAL APPARATUS AND WIRING.
•INJECTION HAZARD: EQUIPMENT CAN CAUSE SERIOUS INJURY IF THE SPRAY PENETRATES THE SKIN. DO NOT POINT THE GUN AT ANYONE OR ANY PART OF THE BODY. IN CASE OF PENETRATION SEEK MEDICAL AID IMMEDIATELY.
•THIS SYSTEM IS CAPABLE OF PRODUCING 10000 KPA. TO AVOID RUPTURE AND INJURY, DO NOT OPERATE THIS PUMP WITH COMPONENTS RATED LESS THAN 10000 KPA WORKING PRESSURE (INCLUDING BUT NOT LIMITED TO SPRAY GUNS, HOSE AND HOSE CONNECTIONS).
•BEFORE SERVICING, CLEANING OR REMOVING ANY PARTS, SHUT OFF POWER AND RELIEVE PRESSURE.
Extension Cords
Use a sufficient gauge: Up to 25 ft. = 12/3 AWG. 25 to 50 ft. =10/3 AWG.
Use only extension cords that are intended for outdoor use. These extension cords are identified by a marking “Acceptable for use with outdoor appliances; store indoors while not in use.” Use only extension cords having an electrical rating not less than the rating of the product. Do not use damaged extension cords. Examine extension cord before using and replace if damaged. Do not abuse extension cord and do not yank on any cord to disconnect. Keep cord away from heat and sharp edges. Always disconnect the extension cord from the receptacle before disconnecting the product from the extension cord. If you are using an extension cord, it should always be completely unwound from the cable drum.
Grounding Instructions
This product must be grounded. If it should malfunction or breakdown, grounding
provides a path of least resistance for 3 electric current to reduce the risk of electric
shock. This product is equipped with a cord having an equipment-grounding conductor and a grounding plug. The plug must be plugged into an appropriate outlet that is properly installed and grounded in accordance with all local codes and ordinances.
DANGER- Improper connection of the equipment-grounding conductor can result in a risk of electrocution. Check with a qualified electrician or service personnel if you are in doubt as to whether the outlet is properly grounded. Do not modify the plug provided with the product - if it will not fit the outlet, have a proper outlet installed by a qualified electrician. Do not use any type of adapter with this product.
Caution
•Follow the maintenance instructions specified in the manual.
•This machine has been designed for use with cleaning detergent supplied or recommended by the manufacturer. The use of other cleaning detergents may affect the operation of the machine and void the warranty.

IMPORTANT PRECAUTIONS – continued
Water Supply (Cold Water Only)
•Water hose must be at least 1/2 inch or
5/8 inch in diameter.
•Flow rate of water supply must not fall below 2 GPM (gallons per minute).
•Flow rate can be determined by running the water for one minute into an empty 5-gallon container.
•The water supply temperature must not exceed 104°F/40°C.
•Never use the pressure washer to draw in water contaminated with solvents, e.g. paint thinner, gasoline, oil, etc.
NOTE: Dirt in the feed water will damage the unit. To avoid this risk, we recommend fitting a water filter.
•Always prevent debris from being drawn into the unit by using a clean water source and an accessory water filter if required.
|
|
Save these instructions! |
ASSEMBLY INSTRUCTIONS |
||
|
|
click |
4 |
|
|
Step 1 |
Step 2 |
Step 3 |
A |
B |
Step 4 |
Step 5 |
Step 6 |
Pull out the locking slide from the right side of the trigger gun handle (A), and insert the small end of the high pressure hose into place (B). Push the locking slide back into the trigger gun to lock the hose in position (C).
 Loading...