


CD RECEIVER
RECEPTOR CON CD
RECEPTEUR CD
KD-S11
KD-S11
KD-S11
FRANÇAIS ESPAÑOL ENGLISH
For canceling the display demonstration, see page 7.
Para cancelar la demostración en pantalla, consulte la página 7.
Pour annuler la démonstration des affichages, référez-vous à la page 7.
For installation and connections, refer to the separate manual. Para la instalación y las conexiones, refiérase al manual separado.
Pour l’installation et les raccordements, se référer au manuel séparé.
INSTRUCTIONS
MANUAL DE INSTRUCCIONES
MANUEL D’INSTRUCTIONS
For customer Use:
Enter below the Model No. and Serial No. which are located on the top or bottom of the cabinet. Retain this information for future reference.
Model No.
Serial No.
GET0249-001A
[J]
ENGLISH
Thank you for purchasing a JVC product.
Please read all instructions carefully before operation, to ensure your complete understanding and to obtain the best possible performance from the unit.
INFORMATION (For U.S.A.)
This equipment has been tested and found to comply with the limits for a Class B digital device, pursuant to Part 15 of the FCC Rules. These limits are designed to provide reasonable protection against harmful interference in a residential installation. This equipment generates, uses, and can radiate radio frequency energy and, if not installed and used in accordance with the instructions, may cause harmful interference to radio communications. However, there is no guarantee that interference will not occur in a particular installation. If this equipment does cause harmful interference to radio or television reception, which can be determined by turning the equipment off and on, the user is encouraged to try to correct the interference by one or more of the following measures:
–Reorient or relocate the receiving antenna.
–Increase the separation between the equipment and receiver.
–Connect the equipment into an outlet on a circuit different from that to which the receiver is connected.
–Consult the dealer or an experienced radio/TV technician for help.
IMPORTANT FOR LASER PRODUCTS
1.CLASS 1 LASER PRODUCT
2.CAUTION: Do not open the top cover. There are no user serviceable parts inside the unit; leave all servicing to qualified service personnel.
3.CAUTION: Visible and invisible laser radiation when open and interlock failed or defeated. Avoid direct exposure to beam.
Warning:
If you need to operate the receiver while driving, be sure to look ahead carefully or you may be involved in a traffic accident.
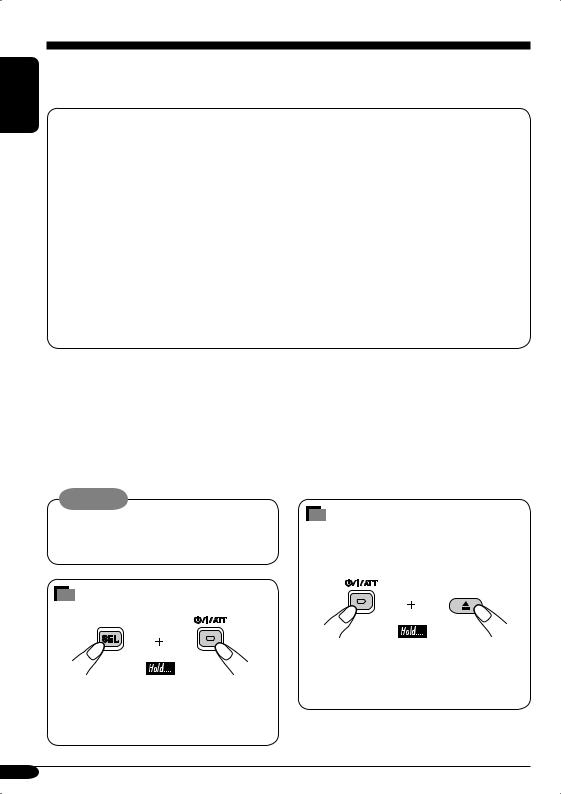
How to reset your unit
•This will reset the microcomputer. Your preset adjustments will also be erased.
•If a disc is loaded, it will eject. Be careful not to drop the disc.
How to forcibly eject a disc
If a disc cannot be recognized by the receiver or cannot be ejected, ejects the disc as follows.
•If this does not work, try to reset your receiver.
•Be careful not to drop the disc when it ejects.
2

Contents
How to reset your unit ........................... |
2 |
How to forcibly eject a disc................... |
2 |
How to read this manual........................ |
4 |
How to use the MODE button ............... |
4 |
Control panel — KD-S11 ........... |
5 |
Parts identification................................. |
5 |
Getting started....................... |
6 |
Basic operations .................................. |
6 |
Canceling the display demonstrations ... |
7 |
Setting the clock .................................... |
7 |
Radio operations ................... |
8 |
Listening to the radio........................... |
8 |
Storing stations in memory.................... |
9 |
Listening to a preset station ................... |
9 |
Disc operations ...................... |
10 |
Playing a disc ..................................... |
10 |
Selecting the playback modes................ |
11 |
Sound adjustments ................ |
12 |
Selecting preset sound modes |
|
(C-EQ: custom equalizer) .................. |
12 |
Adjusting the sound ............................... |
13 |
General settings — PSM ......... |
14 |
Basic procedure ..................................... |
14 |
Detaching the control panel.... |
15 |
Maintenance .......................... |
16 |
More about this receiver ........ |
17 |
Troubleshooting ..................... |
18 |
Specifications ......................... |
19 |
*For safety....
•Do not raise the volume level too much, as this will block outside sounds, making driving dangerous.
•Stop the car before performing any complicated operations.
*Temperature inside the car....
If you have parked the car for a long time in hot or cold weather, wait until the temperature in the car becomes normal before operating the unit.
ENGLISH
3
ENGLISH
How to read this manual
The following methods are used to made the explanations simple and easy-to-understand:
•Some related tips and notes are explained in “More about this receiver” (see page 17).
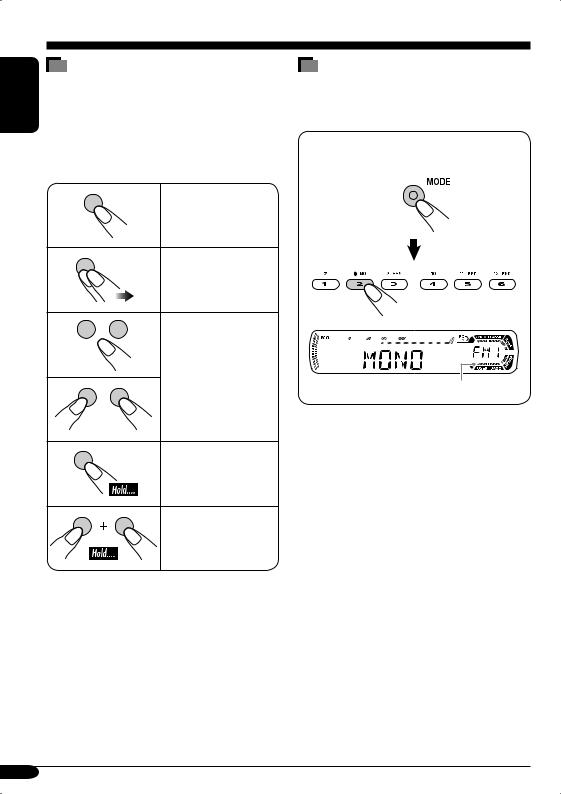
•Button operations are mainly explained with the illustrations as follows:
Press briefly.
Press repeatedly.
Press either one.
Press and hold until your desired response begins.
Press and hold both buttons at the same time.
How to use the MODE button
If you press MODE, the receiver goes into functions mode, then the number buttons work as different function buttons.
Ex.: When number button 2 works as MO (monaural) button.
Time countdown indicator
To use these buttons for original functions again after pressing MODE, wait for
5 seconds without pressing any of these buttons until the functions mode is cleared.
•Pressing MODE again also clears the functions mode.
4
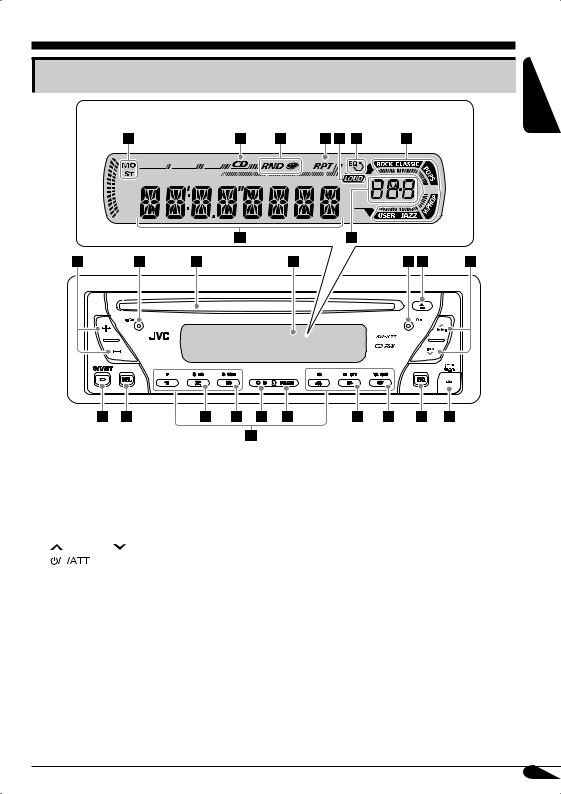
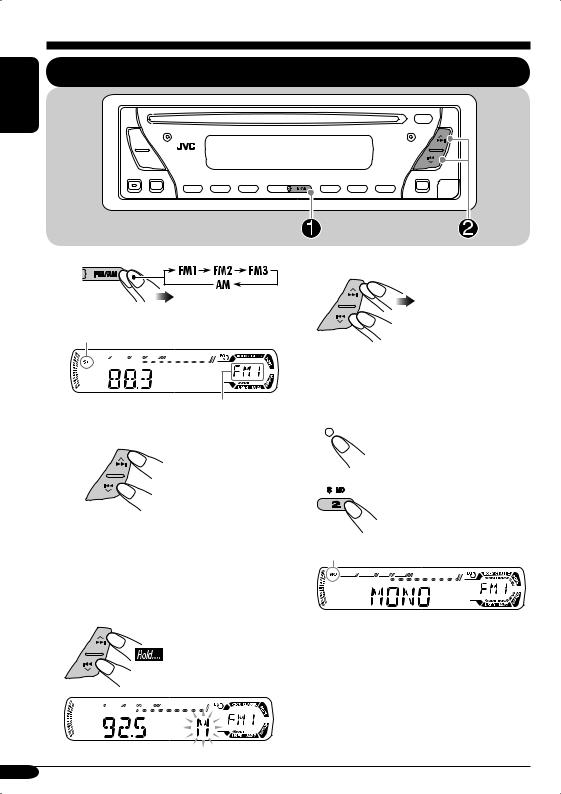
Control panel — KD-S11
Parts identification
Display window
ENGLISH
1 |
+/– buttons |
|
|
2 |
DISP (display) button |
||
3 |
Loading slot |
|
|
4 |
Display window |
||
5 |
MODE button |
|
|
6 |
0(eject) button |
||
7 |
¢/4 |
buttons |
|
8 |
|
(standby/on/attenuator) button |
|
|
|||
|
|||
9 |
SEL (select) button |
||
p MO (monaural) button
qSSM (Strong-station Sequential Memory) button
w CD button
e FM/AM button
r RPT (repeat) button t RND (random) button y EQ (equalizer) button
u  (control panel release) button i Number buttons
Display window
oTuner reception indicators MO (monaural), ST (stereo)
; CD indicator
a RND  (disc random) indicator s RPT (repeat) indicator
d LOUD (loudness) indicator f EQ (equalizer) indicator
gSound mode (C-EQ: custom equalizer) indicators
ROCK, CLASSIC, POPS, HIP HOP, JAZZ, USER
•
 also works as the time countdown indicator.
h Main display
jSource display Volume level indicator
5
Getting started
ENGLISH
~ 


Ÿ 
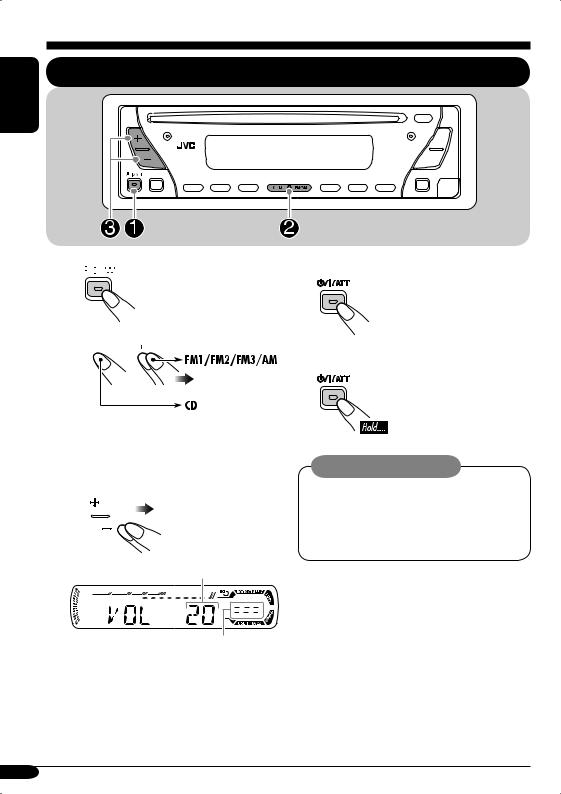
Basic operations
To drop the volume in a moment (ATT)
To restore the sound, press it again.
To turn off the power
You cannot select “CD” as the playback source if there is no disc in the loading slot.
!
Volume level appears.
Volume level indicator
⁄Adjust the sound as you want. (See pages 12 and 13.)
Caution on volume setting:
Discs produce very little noise compared with other sources. Lower the volume before playing a disc to avoid damaging the speakers by the sudden increase of the output level.
6
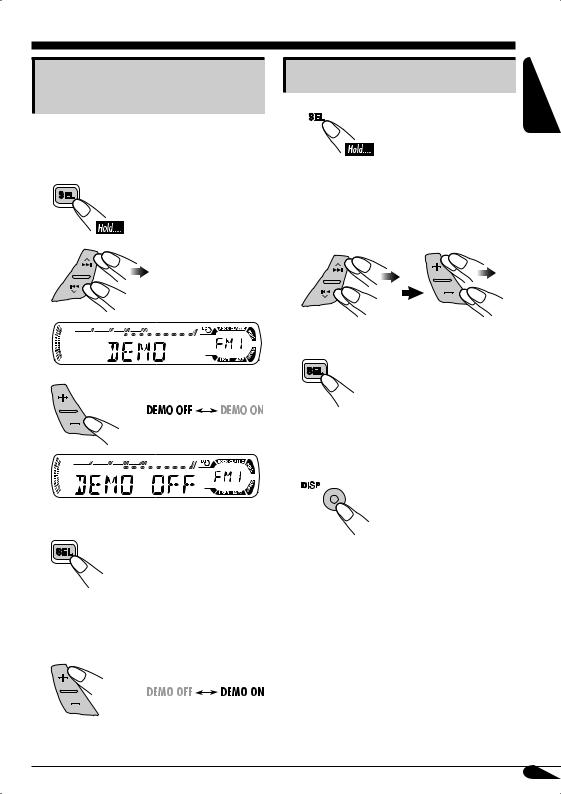
Canceling the display demonstrations
If no operations are done for about 20 seconds, display demonstration starts.
[Initial: DEMO ON]—see page 14.
1
2
3
Setting the clock
1
2Set the hour and minute.
1 Select “CLOCK H” (hour), then adjust the hour.
2Select “CLOCK M” (minute), then adjust the minute.
3 Finish the procedure.
ENGLISH
To check the current clock time when the power is turned off
4 Finish the procedure.
To activate the display demonstration
In step 3 above...
7
Radio operations
ENGLISH
Listening to the radio
~ |
2 Select the desired station frequencies. |
|
Lights up when receiving an FM stereo broadcast with sufficient signal strength.
Selected band appears.
ŸStart searching for a station.
When a station is received, searching stops.
To stop searching, press the same button again.
To tune in to a station manually
In step Ÿ above...
1
When an FM stereo broadcast is hard to receive
1 


2
Lights up when monaural mode is activated.
Reception improves, but stereo effect will be lost.
To restore the stereo effect, repeat the same procedure so that the MO indicator goes off.
8
2
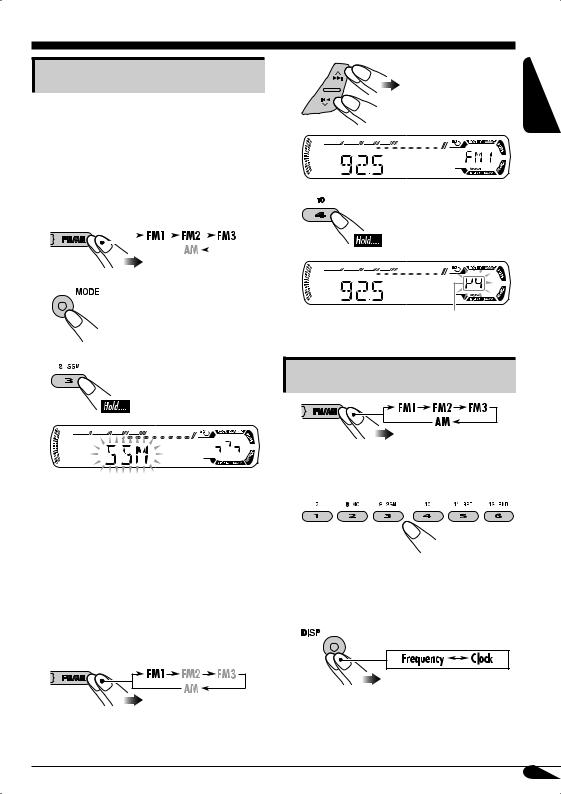
Storing stations in memory
You can preset six stations for each band.
 FM station automatic presetting—
SSM (Strong-station Sequential
Memory)
1 Select the FM band (FM1 – FM3) |
3 |
||||||||||||
you want to store into. |
|
||||||||||||
|
|
|
|
|
|
|
|
|
|
|
|
|
|
|
|
|
|
|
|
|
|
|
|
|
|
|
|
|
|
|
|
|
|
|
|
|
|
|
|
|
|
2
ENGLISH
Preset number flashes for a while.
3
“SSM” flashes, then disappears when automatic presetting is over.
Local FM stations with the strongest signals are searched and stored automatically in the FM band.
Listening to a preset station
1 |
|
2 |
Select the preset station (1 – 6) you |
|
want. |
 Manual presetting
Ex.: Storing FM station of 92.5 MHz into the preset number 4 of the FM1 band.
1 |
To check the current clock time while listening to an FM or AM station
9
Disc operations
ENGLISH
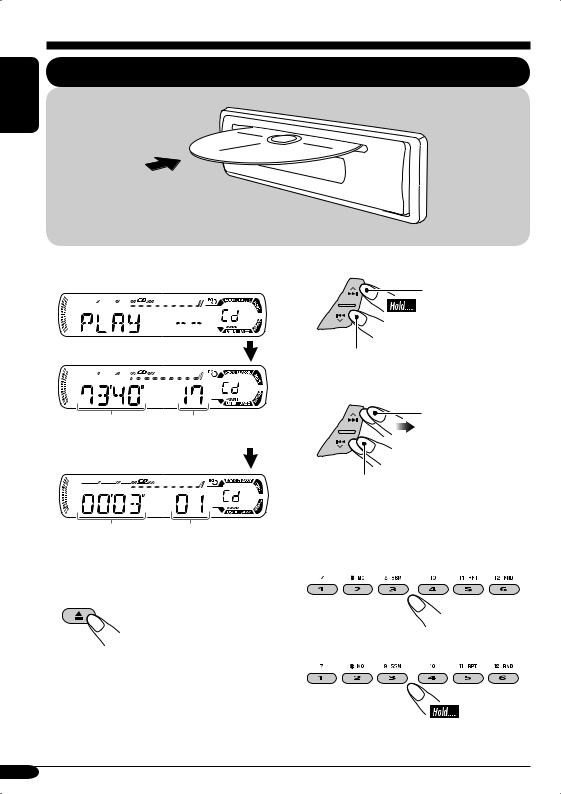
Playing a disc
All tracks will be played repeatedly until you stop playback.
Total playing time of |
Total track number |
the inserted disc |
of the inserted disc |
Elapsed playing |
Current track |
time |
number |
To stop play and eject the disc
To fast-forward or reverse the track
Fast-forwards.
Reverses.
To go to the next or previous tracks
To the following tracks.
To the beginning of the current track, then the previous tracks.
To go to a particular track directly
To select a number from 01 – 06:
To select a number from 07 – 12:
10
 Prohibiting disc ejection
You can lock a disc in the loading slot.
To cancel the prohibition, repeat the same procedure.
To check the current clock time while listening to a disc
Selecting the playback modes
You can use only one of the following playback modes at a time.
1

2Select your desired playback mode.
Repeat play |
Mode |
Plays repeatedly |
TRK RPT: The current track.
• RPT lights up. RPT OFF: Cancels repeat play.
Ex.: When “TRK RPT” is selected
Random play |
Mode |
Plays at random |
DISC RND: All tracks of the current disc.
• RND  lights up. RND OFF: Cancels random play.
Ex.: When “DISC RND” is selected
ENGLISH
11
ENGLISH
Sound adjustments
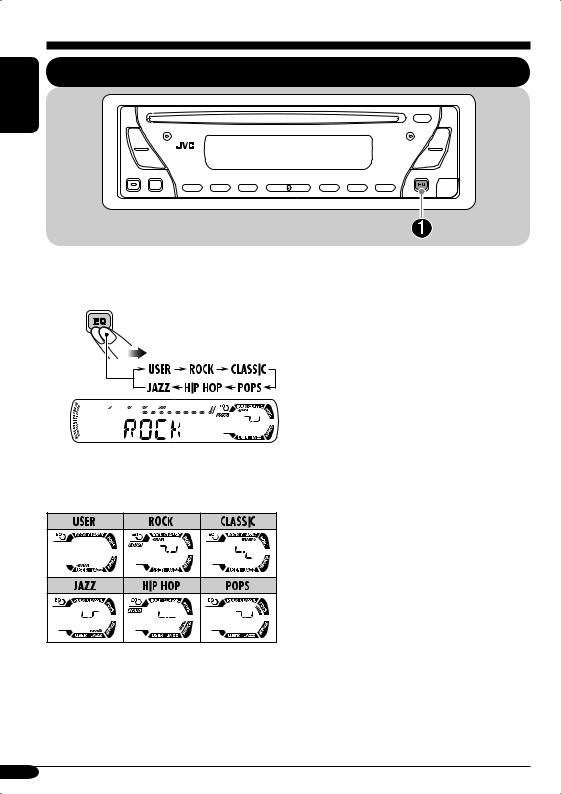
Selecting preset sound modes (C-EQ: custom equalizer)
You can select a preset sound mode suitable to the music genre.
~ |
Ex.: When “ROCK” is selected
Indication pattern for each sound mode:
Indication |
For: |
Preset values |
||||
|
|
|
||||
BAS*1 |
TRE*2 |
LOUD*3 |
||||
|
|
|
||||
|
|
|
|
|
||
USER |
(Flat sound) |
00 |
00 |
OFF |
||
|
|
|
|
|
||
ROCK |
Rock or disco |
+03 |
+01 |
ON |
||
|
|
music |
|
|
|
|
|
|
|
|
|
||
CLASSIC |
Classical |
+01 |
–02 |
OFF |
||
|
|
music |
|
|
|
|
|
|
|
|
|
||
POPS |
Light music |
+04 |
+01 |
OFF |
||
|
|
|
|
|
||
HIP HOP |
Funk or rap |
+02 |
00 |
ON |
||
|
|
music |
|
|
|
|
|
|
|
|
|
||
JAZZ |
Jazz music |
+02 |
+03 |
OFF |
||
|
|
|
|
|
|
|
*1 |
BAS: Bass |
|
|
|
||
*2 |
TRE: Treble |
|
|
|
||
*3 |
LOUD: Loudness |
|
|
|
||
12
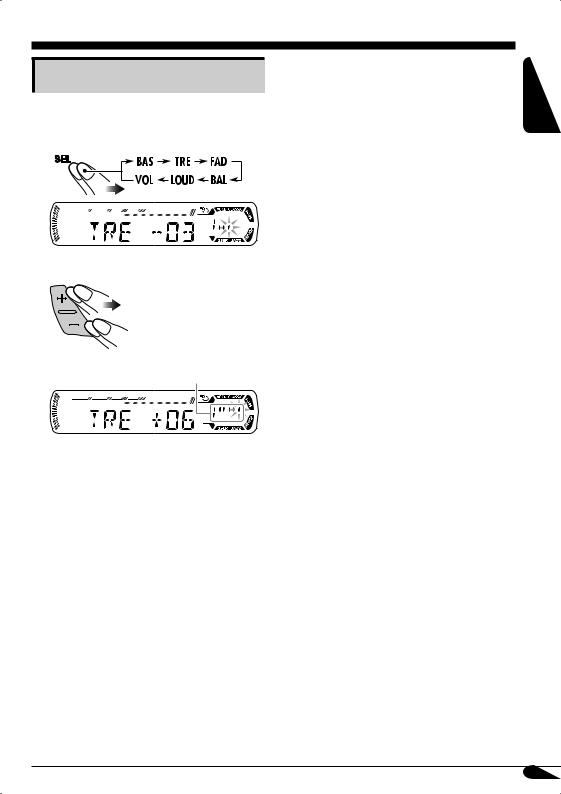
Adjusting the sound
You can adjust the sound characteristics to your preference.
1 
Ex.: When “TRE” is selected
2
Indication pattern changes as you adjust the level.
Indication |
To do: |
Range |
|
|
|
BAS*1 |
Adjust the bass. |
–06 (min.) |
(bass) |
|
to |
|
|
+06 (max.) |
|
|
|
TRE*1 |
Adjust the treble. |
–06 (min.) |
(treble) |
|
to |
|
|
+06 (max.) |
|
|
|
FAD*2 |
Adjust the front |
R06 (Rear |
(fader) |
and rear speaker |
only) |
|
balance. |
to |
|
|
F06 (Front |
|
|
only) |
|
|
|
BAL |
Adjust the left |
L06 (Left |
(balance) |
and right speaker |
only) |
|
balance. |
to |
|
|
R06 (Right |
|
|
only) |
|
|
|
LOUD*1 |
Boost low and |
LOUD ON |
(loudness) |
high frequencies |
J |
|
to produce a well- |
LOUD OFF |
|
balanced sound at |
|
|
low volume level. |
|
|
|
|
VOL*3 |
Adjust the |
00 (min.) to |
(volume) |
volume. |
30 or 50 |
|
|
(max.)*4 |
*1 When you adjust the bass, treble, or loudness, the adjustment you have made is stored for the currently selected sound mode (C-EQ) including “USER.”
*2 If you are using a two-speaker system, set the fader level to “00.”
*3 Normally the +/– buttons work as the volume control. So you do not have to select “VOL” to adjust the volume level.
*4 Depending on the amplifier gain control setting. (See page 14 for details.)
ENGLISH
13
ENGLISH
General settings — PSM
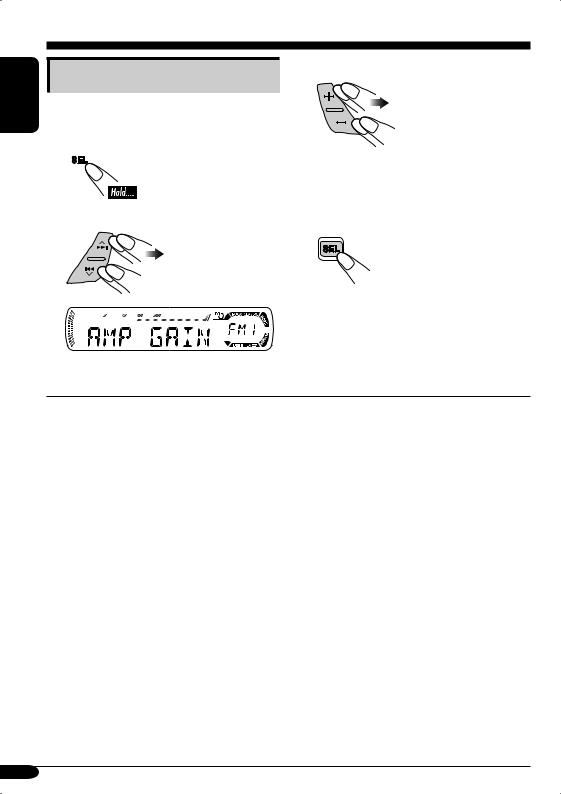
Basic procedure
You can change PSM (Preferred Setting Mode) items listed on the table that follows.
1
2Select a PSM item.
3 Adjust the PSM item selected.
4Repeat steps 2 and 3 to adjust the other PSM items if necessary.
5Finish the procedure.
Ex.: When you select “AMP GAIN”
Indications |
Selectable settings, [reference page] |
DEMO |
DEMO ON: [Initial]; Display demonstration will be activated |
Display demonstration |
automatically if no operation is done for about |
|
20 seconds, [7]. |
|
DEMO OFF: Cancels. |
|
|
CLOCK H |
1 – 12, [7] |
Hour adjustment |
[Initial: 1 (1:00)] |
|
|
CLOCK M |
00 – 59, [7] |
Minute adjustment |
[Initial: 00 (1:00)] |
|
|
AMP GAIN |
You can change the maximum volume level of this receiver. |
Amplifier gain control |
LOW PWR: VOL 00 – VOL 30 (Select this if the maximum power |
|
of the speaker is less than 45 W to prevent them from |
|
damaging the speaker.) |
|
HIGH PWR: [Initial]; VOL 00 – VOL 50 |
|
|
AREA |
AREA EU: Select this when using the receiver in an area other |
Tuner channel interval |
than North and South America. (FM: 50 kHz—manual |
|
tuning, 100 kHz—auto search; AM: 9 kHz) |
|
AREA US: [Initial]; Select this when using the receiver in North |
|
or South America. (FM: 200 kHz; AM: 10 kHz) |
|
|
14
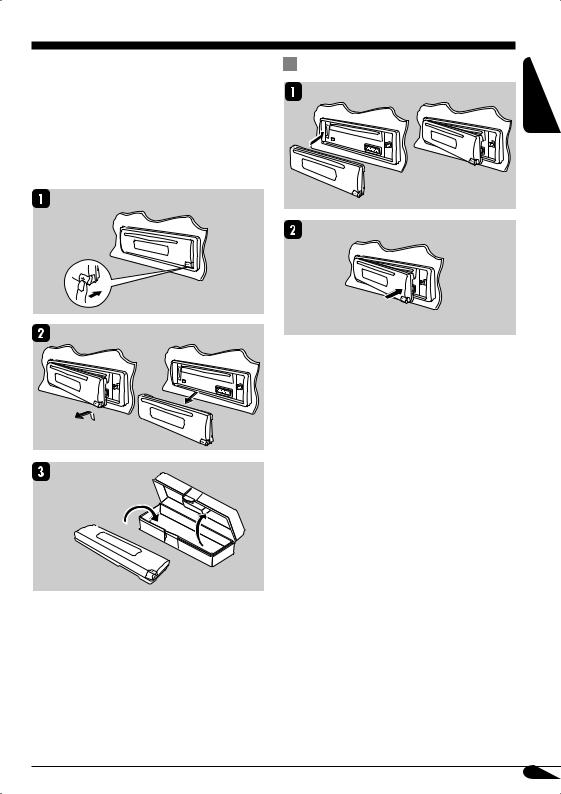
Detaching the control panel
When detaching or attaching the control panel, |
Attaching the control panel |
be careful not to damage the connectors on |
|
the back of the control panel and on the panel |
|
holder. |
|
 Detaching the control panel
Before detaching the control panel, be sure to turn off the power.
ENGLISH
15
ENGLISH
Maintenance
 How to clean the connectors
Frequent detachment will deteriorate the connectors.
To minimize this possibility, periodically wipe the connectors with a cotton swab or cloth moistened with alcohol, being careful not to damage the connectors.
Connector
 Moisture condensation
Moisture may condense on the lens inside the CD player in the following cases:
•After starting the heater in the car.
•If it becomes very humid inside the car. Should this occur, the CD player may malfunction. In this case, eject the disc and leave the receiver turned on for a few hours until the moisture evaporates.
 To keep discs clean
A dirty disc may not play correctly. If a disc does become dirty, wipe
it with a soft cloth in a straight line from center to edge.
•Do not use any solvent (for
example, conventional record cleaner, spray, thinner, benzine, etc.) to clean discs.
 To play new discs
New discs may have some rough spots around the inner and outer edges. If such a disc is used, this receiver may reject the disc.
To remove these rough spots, rub the edges with a pencil or ball-point pen, etc.
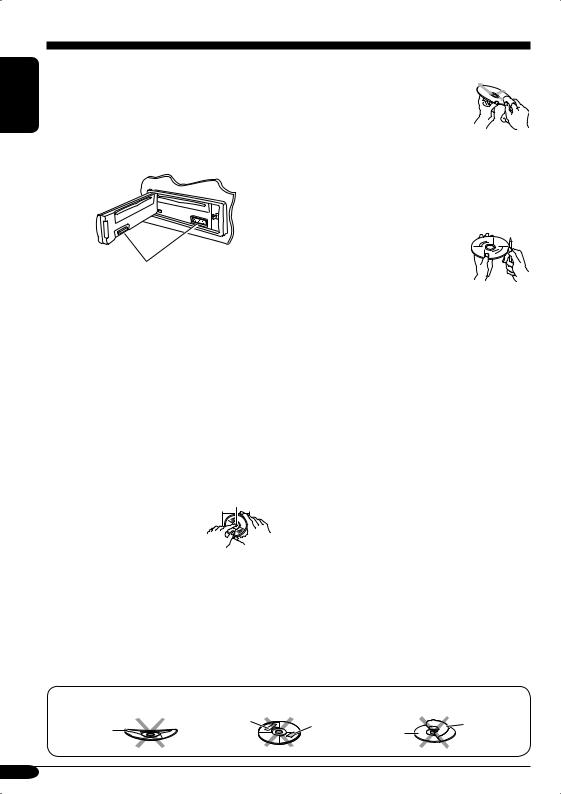
 How to handle discs
When removing a disc from Center holder its case, press down the center 
holder of the case and lift the disc out, holding it by the edges.
• |
Always hold the disc by the edges. Do not |
|
|
|
|
touch its recording surface. |
|
|
|
When storing a disc into its case, gently insert |
|
|
|
|
the disc around the center holder (with the |
|
|
|
|
printed surface facing up). |
|
|
|
|
• |
Make sure to store discs into the cases after |
|
|
|
|
use. |
|
|
|
|
Do not use the following discs: |
|
|
|
|
Sticker |
Sticker |
|
Stick-on |
|
Wrap disc |
residue |
Disc |
label |
16

More about this receiver
Basic operations 
Turning off the power
•If you turn off the power while listening to a disc, disc play will start from where playback has been stopped previously, next time you turn on the power.
Tuner operations 
Storing stations in memory
•During SSM search...
–All previously stored stations are erased and stations are stored newly.
–Received stations are preset in No. 1 (lowest frequency) to No. 6 (highest frequency).
–When SSM is over, the station stored in No. 1 will be automatically tuned in.
•When storing a station manually, a previously preset station is erased when a new station is stored in the same preset number.
•Some CD-Rs or CD-RWs may not play back on this receiver because of their disc characteristics, and for the following causes:
–Discs are dirty or scratched.
–Moisture condensation occurs on the lens inside the receiver.
–The pickup lens inside the receiver is dirty.
–CD-R or CD-RW on which the files are written with “Packet Write” method.
–There are improper recording conditions (missing data, etc.) or media conditions (stain, scratch, warp, etc.).
•CD-RWs may require a longer readout time since the reflectance of CD-RWs is lower than that of regular CDs.
•Do not use the following CD-Rs or CD-RWs:
–Discs with stickers, labels, or protective seal stuck to the surface.
–Discs on which labels can be directly
printed by an ink jet printer.
Using these discs under high temperatures or high humidity may cause malfunctions or damage to discs.
Disc operations 
General
•This receiver has been designed to reproduce CDs, and CD-Rs (Recordable)/ CD-RWs (Rewritable) in audio CD (CD-DA) format.
•When a disc has been loaded, selecting “CD” for the playback source starts disc play.
Changing the source
•If you change the source, playback also stops (without ejecting the disc).
Next time you select “CD” for the playback source, disc play starts from where it has been stopped previously.
Inserting a disc
•When a disc is inserted upside down, the disc automatically ejects.
•Do not insert 8 cm (3-3/16") discs (single CD) and unusual shape discs (heart, flower, etc.) into the loading slot.
Playing a CD-R or CD-RW
•Use only “finalized” CD-Rs or CD-RWs.
•This receiver can play back multi-session discs; however, unclosed sessions will be skipped while playing.
Ejecting a disc
•If the ejected disc is not removed within
15 seconds, the disc is automatically inserted again into the loading slot to prevent it from dust. (Disc will not play this time.)
General settings—PSM 
•If you change the “AMP GAIN” setting from “HIGH PWR” to “LOW PWR” while the volume level is set higher than “VOL 30,” the receiver automatically changes the volume level to “VOL 30.”
ENGLISH
17
 Loading...