


INSTRUCTIONS
CENTER & SURROUND SPEAKER SYSTEM
SP-X60 |
CENTER SPEAKER SYSTEM : SP-XC60 |
SURROUND SPEAKER SYSTEM : SP-XS60 |
MITTENLAUTSPRECHERSYSTEM : SP-XC60 RUNDUMLAUTSPRECHERSYSTEM : SP-XS60 ENCEINTE CENTRALE : SP-XC60 ENCEINTES SURROUND : SP-XS60 MIDDENLUIDSPREKERSYSTEEM : SP-XC60
SURROUNDLUIDSPREKERSYSTEEM : SP-XS60 SISTEMA DE ALTAVOZ CENTRAL : SP-XC60 SISTEMA DE ALTAVOCES PERIMÉTRICOS : SP-XS60
Thank you for purchasing JVC speakers.
Before you begin using them, please read the instructions carefully to be sure you get the best possible performance. If you have any questions, consult your JVC dealer.
Vielen Dank für den Kauf dieser JVC-Lautsprecher.
Lesen Sie bitte diese Bedienungsanleitung vor Ingebrauchnahme sorgfältig durch, um stets optimale Ergebnisse zu erzielen. Wenden Sie sich bei etwaigen Fragen bitte an Ihren JVC Händler.
Nous vous remercions pour l’achat de ces enceintes JVC.
Avant de les utiliser, lire ces instructions avec attention pour en obtenir les meilleures performances possibles. En cas de questions, consulter votre revendeur JVC.
Dank u voor de aanschaf van deze luidsprekers.
Lees alvorens over te gaan tot aansluiten, deze gebruiksaanwijzing door zodat u de best mogelijke prestaties zult verkrijgen. Neem kontakt op met de JVC dealer indien u vragen heeft.
Le estamos muy agradecidos por haber adquirido estos altavoces de JVC.
Antes de utilizarlos, sirvase leer las instrucciones detenidamente a fin de obtener el mejor rendimiento posible. Si tienenaluna pregunta, acuda a su agente de JVC.
SISTEMA DIFFUSORE CENTRALE : SP-XC60 SISTEMA DIFFUSORI SURROUND : SP-XS60 MITTHÖGTALARE : SP-XC60 SURRONDHÖGTALARE : SP-XS60 CENTERHØJTTALERSYSTEM : SP-XC60 SURROUNDHØTTALERSYSTEM : SP-XS60 KESKIKAIUTIN : SP-XC60 YMPÄRISTÖTILAKAIUTTIMET : SP-XS60
Grazie per aver acquistato questi altoparlanti della JVC.
Prima di cominciare l’uso degli altoparlanti, leggete attentamente le istruzioni per assicurare le migliori prestazioni. Qualora sorgessero dei dubbi, rivolgetevi al vostro rivenditore JVC.
Tack för ditt val av dessa JVC-högtalare.
Innan du kopplar in högtalarna i din ljudanläggning bör du för att få maximala prestanda från högtalarna läsa igenom bruksanvisningen noggrant. Kontakta din JVC-återförsäljare om du har frågor eller känner dig osäker.
Tak for købet af JVC-højttalerne.
Gennemlæs venligst vejledningen omhyggeligt før de tages i brug, så De kan opnå den bedst mulige ydelse. Forhør hos Deres JVC forhandler hvis De har nogen spørgsmål.
Kiitos siitä ettë päädyit valinnassasi JVC-kaiuttimiin.
Ennen kuin alat käyttää niitä, lue käyttöohje huolellisesti, jotta ne toimisivat parhaalla mahdollisella tavalla. Jos Sinulla on kysyttävää ota yhteys JVC-edustajaan.
— SAFETY INSTRUCTIONS —
“SOME DOS AND DON’TS ON THE SAFE USE OF EQUIPMENT”
This equipment has been designed and manufactured to meet international safety standards but, like any electrical equipment, care must be taken if you are to obtain the best results and safety is to be assured.
Do read the operating instructions before you attempt to use the equipment.
Do ensure that all electrical connections (including the mains plug, extension leads and interconnections between pieces of equipment) are properly made and in accordance with the manufacturer’s instructions. Switch off and withdraw the mains plug when making or changing connections.
Do consult your dealer if you are ever in doubt about the installation, operation or safety of your equipment.
Do be careful with glass panels or doors on equipment.
DON’T continue to operate the equipment if you are in any doubt about it working normally, or if it is damaged in any way — switch off, withdraw the mains plug and consult your dealer.
DON’T remove any fixed cover as this may expose dangerous voltages.
DON’T leave equipment switched on when it is unattended unless it is specifically stated that it is designed for unattended operation or has a standby mode.
Switch off using the switch on the equipment and make sure that your family know how to do this.
Special arrangements may need to be made for infirm of handicapped people.
DON’T use equipment such as personal stereos or radios so that you are distracted from the requirements of traffic safety. It is illegal to watch television whilst driving.
DON’T listen to headphones at high volume as such use can permanently damage your hearing.
DON’T obstruct the ventilation of the equipment, for example with curtains or soft furnishing.
Overheating will cause damage and shorten the life of the equipment.
DON’T use makeshift stands and NEVER fix legs with wood screws
— to ensure complete safety always fit the manufacturer’s approved stand or legs with the fixings provided according to the instructions. DON’T allow electrical equipment to be exposed to rain or moisture.
ABOVE ALL
–NEVER let anyone, especially children, push anything into holes, slots or any other opening in the case.
–this could result in a fatal electrical shock;
–NEVER guess or take chances with electrical equipment of any kind
–it is better to be safe than sorry!
|
LVT0349-001A |
1 |
[E] |
Connection |
Collegamento |
Anschluß |
Ansluiting |
Raccordement |
Tilslutning |
Aansuluiting |
Liitäntä |
Conexión
SP-XC60 |
SP-XS60 |
Press |
Black |
Black stripe |
Appuyer |
Noir |
Schwarzer Streifen |
Drücken |
Schwarz |
Raie noire |
Indrukken |
Zwart |
Zwarte streep |
Presioar |
Negro |
Banda negra |
Premere |
Nero |
Righe nere |
Tryck |
Svart |
Svart rand |
Trk |
Sort |
Sort stribe |
Paina |
Musta |
Nusta juova |
|
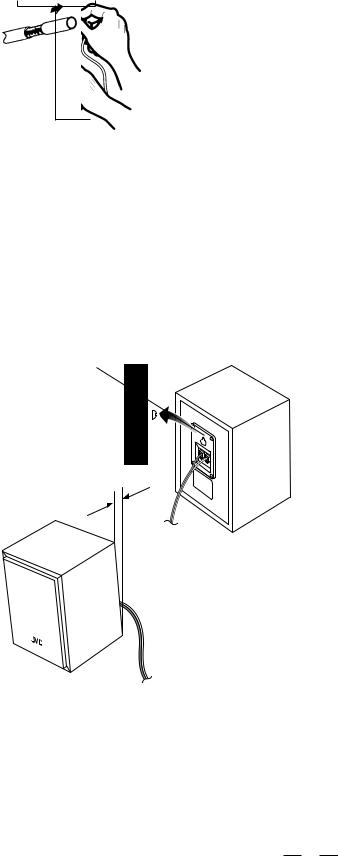
1.Remove the ending part of the vinyl covering from the cut.
2.Twist the wires.
1.Entfernen Sie dan Endstück der Vinylhüle von dem geschnittenen Teil.
2.Drehen Sie die Kabel.
1.Enlever la partie d'extémité du recouvrement vinylique de la partie déoupée.
2.Tordre les fils.
1.Snijd het laatste gedeelte van de vinylmantel af en verwijder.
2.Draai de draadkernen ineen.
1.Remover la parte de extremidad de la cubierte de plástica de la parte cortada.
2.Torcer los alambres.
1.Rimuovere la parte di estremità della copertura in plastica dalla parte tagliata.
2.Torcere i fili.
1.Dra loss den avskurna delen av isoleringen från kabeländen.
2.Tvinna trådarna.
1.Fjern enden af vinyl-isoleringen, hvor den er klippet af.
2.Sno trådene.
1.Irrota muovipeiteen loppupåå uurteesta.
2.Kierrä johdot.
Wall mounting hole Wandanbringungsloch
Orifice de montage mural
Bevestigingsgat muur
Orificio para montaje |
|
|
en una pared |
|
|
Foro di montaggio a |
||
|
||
muro |
|
|
Väggmonteringshål |
|
|
Monteringshul i |
1 – 1.5 cm |
|
væggen |
||
Seinäasennusaukko |
|
•Pull aside the speaker cord from the space between the wall and the speaker. This will stabilize the speaker.
•Ziehen Sie das Lautsprecherkabel aus dem Raum zwischen der Wand und dem Lautsprecher. Hierdurch wird der Lautsprecher stabilisiert.
•Eloigner le cordon d’enceinte de l’espace entre le mur et l’enceinte. Cela stabilisera l’enceinte.
•Trek het luidsprekersnoer opzij uit de ruimte tussen de muur en de luidspreker. Hierdoor wordt de luidspreker gestabiliseerd.
•No pase el cable del altavoz entre éste y la pared. Esto estabilizará el altavoz.
• Allontanare il cavo di altoparlante d a l l o s p a z i o t r a m u r o e altoparlante. Questo serve a stabilizzare l’altoparlante.
•Dra undan högtalarkabeln från mellanrummet mellan väggen och högtalaren för att stabilisera högtalaren.
•Træk højttalerkablet væk fra pladsen mellem væggen og højttaleren. Dette vil stabilisere højttaleren.
•Vedä kaiutinjohto seinän ja k a i u t t i m e n v ä l i s t ä . T ä m ä vakiinnuttaa kaiuttimen.
CONNECTION
•Connect the CENTER speaker terminals of the amplifier to the terminals of the SP-XC60 using the attached speaker cords as shown in the figure making sure polarity is correct; (+) to (+) and (–) to (–).
Connect the black speaker wire to the (–) terminal.
•Connect the LEFT SURROUND speaker terminals of the amplifier to the LEFT terminals of the SP-XS60 and RIGHT to RIGHT using the attached speaker cords as shown in the figure making sure polarity is correct; (+) to
(+) and (–) to (–).
Connect the black stripe speaker wire to the (–) terminal.
•Turn off power of all equipment before connecting the speakers to the amplifier.
•The nominal impedance of the SP-XC60/SP-XS60 is 8 ohms. Select for use an amplifier to which a speaker system with the load impedance of 8 ohms can be connected.
•The maximum power handling capacity is shown in the SPECIFICATIONS. Excessive input to the speaker will result in abnormal noise and possible damage. The following cases described below may cause an overload of the speakers. Be sure to lower the amplifier volume beforehand.
1)Noise during FM tuning.
2)High level signals containing high frequency components prouduced by a tape deck in the fast forward mode.
3)Click noise produced when turning power of other components on and off.
4)Click noise produced when connecting or disconnecting cords with the power on.
5)Click noise when the cartridge is replaced with the power on .
6)Click noise produced when operating amplifier switches.
7)Continuous high frequency oscillation or high pitch musical instrument sound.
8)Howling or feed back when using a microphones.
SPEAKER FOR A/V COMBINATION
SP-XC60 have a magnetically-shielded design for placement adjacent to TVs and monitors without causing color aberrations. However, color may be affected as a result of how the speaker system is installed. Therefore, be careful of the following:
1.When placing these speakers near a TV set, turn off the TV’s main power switch or unplug it before installing the speakers.
Wait at least 30 minutes after the system is installed before turning on the TV’s power.
2.If another speaker system has been set up near the TV set, that system may cause color unevenness in the TV’s picture.
3.In spite of the shielded design of these speakers, some types of TV’s may be affected by them. If this happens, move the speakers a short distance form the TV set.
HOW TO INSTALL SURROUND SPEAKERS
•This equipment is not magnet-proof. If it is placed near a TV set, color on a TV screen may become uneven. If the case of installation, therefore, locate it at sufficient distance from the TV set.
•The speakers of this system are designed to stand on the side or on the bottom, whichever you prefer.
•When setting the speaker on such as a high shelf, be sure to fix them to the shelf by using such as metal braces: this a precaution against the speakers falling off due to shelf trembling.
•You may hitch the speakers to the wall, holding them horizontally or vertically. The back of each speaker has a hole for catching the hook.
SPECIFICATIONS
SP-XC60 |
|
Type |
: 2-way 3-speaker bass-reflex |
|
type |
|
(Magnetically-shielded type) |
Speakers |
: 9 cm (3-9/16") cone × 2 |
Woofer |
|
Tweeter |
: 5 cm (2") cone × 1 |
Power Handling Capacity |
: 120 W |
Impedance |
: 8 Ω |
Frequency Range |
: 65 Hz - 20,000 Hz |
Sound Pressure Level |
: 88 dB/w·m |
Dimensions (W × H × D) |
: 390 × 146 × 141 mm |
|
(15-3/8" × 5-3/4" × 5-9/16") |
Mass |
: 3.0 kg (6.7 lbs) |
Accessories |
: Speaker cord (3m)… 1 |
SP-XS60 |
|
Type |
: Full range Acoustic-suspension type |
Speaker |
|
Full range |
: 10cm (4") cone x 1 |
Power Handling Capacity |
: 100 W |
Impedance |
: 8 Ω |
Frequency Range |
: 75 Hz – 20,000 Hz |
Sound Pressure Level |
: 85 dB/w·m |
Dimensions (W x H x D) |
: 147 x 215 x 141 mm |
|
(5-13/16" x 8-1/2" x 5-5/8") |
Mass |
: 1.6 kg (3.6 lbs) each |
Accessories |
: Speaker cord (6m)… 2 |
Design and specifications subject to change without notice.
2
 Loading...