


SP-THG61C
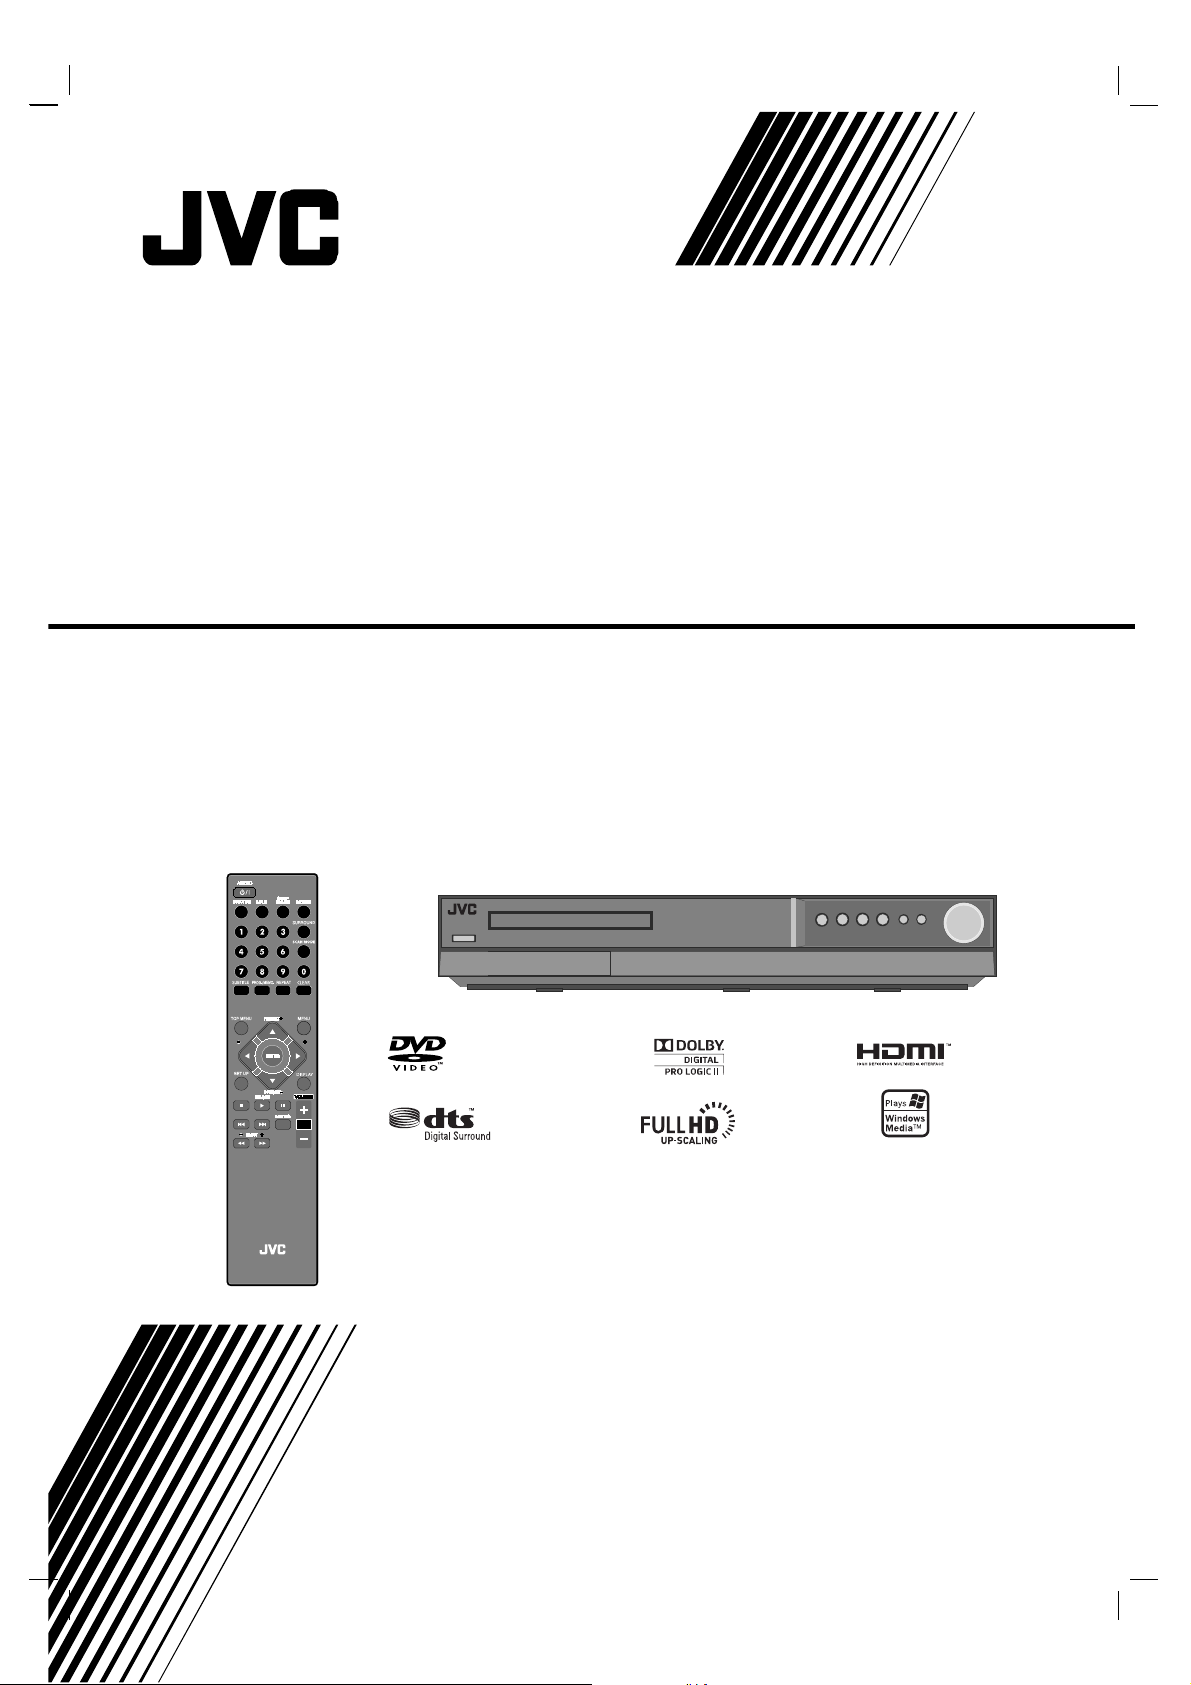
TH-G31
Consists of XV-THG31 SP-THG51F,
SP-THG61C and SP-THG50W
DVD DIGITAL THEATER SYSTEM
INSTRUCTIONS
LVT2051-002A
[C]
HT994PJ-A0_BCANLLK_Eng
TUNING TUNING

G-1
This lightning flash with arrowhead symbol within
an equilateral triangle is intended to alert the user
to the presence of uninsulated dangerous voltage
within the product’s enclosure that may be of
sufficient magnitude to constitute a risk of electric
shock to persons.
The exclamation point within an equilateral
triangle is intended to alert the user to the
presence of important operating and maintenance
(servicing) instructions in the literature
accompanying the product.
WARNING: Do not install this equipment in a confined space
such as a bookcase or similar unit.
CAUTION: Do not block any ventilation openings. Install in
accordance with the manufacturer's instructions.
Slots and openings in the cabinet are provided for ventilation
and to ensure reliable operation of the product and to protect
it from over heating.
The openings shall be never be blocked by placing the
product on a bed, sofa, rug or other similar surface. This
product shall not be placed in a built-in installation such as a
bookcase or rack unless proper ventilation is provided or the
manufacturer's instruction have been adhered to.
CAUTION:
This product employs a Laser System.
To ensure proper use of this product, please read this
owner’s manual carefully and retain it for future reference.
Shall the unit require maintenance, contact an authorized
service center.
Use of controls, adjustments or the performance of
procedures other than those specified herein may result in
hazardous radiation exposure.
To prevent direct exposure to laser beam, do not try to open
the enclosure. Visible laser radiation when open. DO NOT
STARE INTO BEAM.
CAUTION: The apparatus shall not be exposed to water
(dripping or splashing) and no objects filled with liquids, such
as vases, shall be placed on the apparatus.
FCC WARNING: This equipment may generate or use
radio frequency energy. Changes or modifications to this
equipment may cause harmful interference unless the
modifications are expressly approved in the instruction
manual. The user could lose the authority to operate this
equipment if an unauthorized change or modification is
made.
REGULATORY INFORMATION: FCC Part 15
This equipment has been tested and found to comply with
the limits for a Class B digital device, pursuant to Part 15 of
the FCC Rules.
These limits are designed to provide reasonable protection
against harmful interference in a residential installation. This
equipment generates, uses and can radiate radio frequency
energy and, if not installed and used in accordance with the
instructions, may cause harmful interference to radio
communications.
However, there is no guarantee that interference will not
occur in a particular installation. If this equipment does
cause harmful interference to radio or television reception,
which can be determined by turning the equipment off and
on, the user is encouraged to try to correct the interference
by one or more of the following measures:
• Reorient or relocate the receiving antenna.
• Increase the separation between the equipment and
receiver.
• Connect the equipment into an outlet on a circuit
different from that to which the receiver is connected.
• Consult the dealer or an experienced radio/TV
technician for help.
CAUTION concerning the Power Cord
Most devices are recommended be placed on a
dedicated circuit;
That is, a single outlet circuit which powers only that
electronic device and has no additional outlets or branch
circuits. Check the specification page of this owner's manual
to be certain.
Do not overload wall outlets. Overloaded wall outlets, loose
or damaged wall outlets, extension cords, frayed power
cords, or damaged or cracked wire insulation are dangerous.
Any of these conditions could result in electric shock or fire.
Periodically examine the cord of your appliance, and if its
appearance indicates damage or deterioration, unplug it,
discontinue use of the appliance, and have the cord replaced
with an exact replacement part by an authorized servicer.
Protect the power cord from physical or mechanical abuse,
such as being twisted, kinked, pinched, closed in a door, or
walked upon. Pay particular attention to plugs, wall outlets,
and the point where the cord exits the appliance.
To disconnect power from the mains, pull out the mains cord
plug. When installing the product, ensure that the plug is
easily accessible.
CAUTION
RISK OF ELECTRIC SHOCK
DO NOT OPEN
WARNING: TO REDUCE THE RISK OF FIRE OR
ELECTRIC SHOCK, DO NOT EXPOSE THIS
APPARATUS TO RAIN OR MOISTURE AND OBJECTS
FILLED WITH LIQUIDS, SUCH AS VASES, SHOULD
NOT BE PLACED ON THIS APPARATUS.
CAUTION: TO REDUCE THE RISK
OF ELECTRIC SHOCK
DO NOT REMOVE COVER (OR BACK)
NO USER-SERVICEABLE PARTS INSIDE
REFER SERVICING TO QUALIFIED SERVICE
PERSONNEL.
G-2
1. Read these instructions. - All these safety and
operating instructions should be read before the product
is operated.
2. Keep these instructions. - The safety, operating and
use instructions should be retained for future reference.
3. Heed all warnings. - All warnings on the product and in
the operating instructions should be adhered to.
4. Follow all instructions. - All operating and use
instructions should be followed.
5. Do not use this apparatus near water. - For example:
near a bath tub, wash bowl, kitchen sink, laundry tub, in
a wet basement; or near a swimming pool; and other
areas located near water.
6. Clean only with dry cloth. - Unplug this product from
the wall outlet before cleaning. Do not use liquid
cleaners.
7.
Do not block any ventilation openings. Install in
accordance with the manufacturer’s instructions. -
Slots
and openings in the cabinet are provided for ventilation
and to ensure reliable operation of the product and to
protect it from over- heating. The openings should never
be blocked by placing the product on a bed, sofa, rug or
other similar surface. This product should not be placed
in a built-in installation such as a bookcase or rack
unless proper ventilation is provided or the
manufacturer’s instructions have been adhered to.
8. Do not install near any heat sources such as
radiators, heat registers, stoves, or other apparatus
(including amplifiers) that produce heat.
9. D
o not defeat the safety purpose of the polarized or
grounding-type plug. A polarized plug has two
blades
with one wider than the other. A grounding
type plug
has two blades and a third grounding prong. The wide
blade or the third prong are provided for your safety.
If the provided plug does not fit into your outlet,
consult an electrician for replacement of the obsolete
outlet.
10. Protect the power cord from being walked on or
pinched particularly at plugs, convenience
receptacles, and the point where they exit from the
apparatus.
11. Only use attachments/accessories specified by the
manufacturer.
12. Use only with the cart, stand, tripod, bracket, or
table specified by the manufacturer, or sold with
apparatus. When a cart is used, use caution when
moving the cart/product combination to avoid
injury from tip-over.
13. Unplug this apparatus during lightning storms or
when unused for long periods of time.
14.
Refer all servicing to qualified service personnel.
Servicing is required when the product has been
damaged in any way, such as power-supply cord or
plug is damaged, liquid has been spilled or objects
have fallen into the apparatus, the product has
been exposed to rain or moisture, does not operate
normally, or has been dropped.
IMPORTANT SAFETY INSTRUCTIONS
CAUTION:
PLEASE READ AND OBSERVE ALL WARNINGS AND INSTRUCTIONS IN THIS OWNER’S MANUAL. AND
THOSE MARKED ON THE PRODUCT. RETAIN THIS BOOKLET FOR FUTURE REFERENCE.
This product has been designed and manufactured to assure personal safety. Improper use can result in electric shock or
fire hazard. The safeguards incorporated in this product will protect you if you observe the following procedures for
installation, use, and servicing.
This product does not contain any parts that can be repaired by the user.
DO NOT REMOVE THE CABINET COVER, OR YOU MAY BE EXPOSED TO DANGEROUS VOLTAGE. REFER
SERVICING TO QUALIFIED SERVICE PERSONNEL ONLY.

1
Introduction . . . . . . . . . . . . . . . . . . .2-5
About the
Symbol Display . . . . . . . . . . . . . .2
Symbol Used in this Manual . . . . . . . . . . . . . . .2
Screen Saver . . . . . . . . . . . . . . . . . . . . . . . . . . .2
Notes on Discs . . . . . . . . . . . . . . . . . . . . . . . . . .2
Handling Discs . . . . . . . . . . . . . . . . . . . . . . . .2
Storing Discs . . . . . . . . . . . . . . . . . . . . . . . . .2
Cleaning Discs . . . . . . . . . . . . . . . . . . . . . . . .2
Types of Playable Discs . . . . . . . . . . . . . . . . . .3
Regional Code . . . . . . . . . . . . . . . . . . . . . . . . . .3
Front Panel . . . . . . . . . . . . . . . . . . . . . . . . . . . . .4
Remote Control . . . . . . . . . . . . . . . . . . . . . . . . .5
Remote Control operation . . . . . . . . . . . . . . .5
Remote Control Battery installation . . . . . . . .5
Installation and Setup . . . . . . . . .6-13
TV Connection . . . . . . . . . . . . . . . . . . . . . . . . . .6
Video connection . . . . . . . . . . . . . . . . . . . . . .6
Component Video connection . . . . . . . . . . . .6
Antenna Connection . . . . . . . . . . . . . . . . . . . . .6
Optional Equipment Connection . . . . . . . . . . .7
AUX IN connection (A) . . . . . . . . . . . . . . . . . .7
OPTICAL IN connection (O) . . . . . . . . . . . . . .7
AUDIO IN connection (D) . . . . . . . . . . . . . . . .7
HDMI Connection . . . . . . . . . . . . . . . . . . . . . . . .8
About HDMI . . . . . . . . . . . . . . . . . . . . . . . . . .8
Resolution setting . . . . . . . . . . . . . . . . . . . . . .8
Available resolution according to connection .8
Speaker System Connection . . . . . . . . . . . . . .9
Displaying Disc Information on-screen . . . . .10
Initial Settings . . . . . . . . . . . . . . . . . . . . . . .10-13
OSD Initial language settings . . . . . . . . . .10
General Operation . . . . . . . . . . . . . . . . . .11
Language . . . . . . . . . . . . . . . . . . . . . . . . .11
• Menu language . . . . . . . . . . . . . . . . . . .11
• Disc Audio / Subtitle / Menu . . . . . . . . .11
DISPLAY . . . . . . . . . . . . . . . . . . . . . . . . . . . .11
• TV Aspect . . . . . . . . . . . . . . . . . . . . . . .11
• Display Mode . . . . . . . . . . . . . . . . . . . . .11
AUDIO . . . . . . . . . . . . . . . . . . . . . . . . . . . . .12
• Dynamic Range Control (DRC) . . . . . . .12
•Vocal . . . . . . . . . . . . . . . . . . . . . . . . . . .12
• HD AV Sync . . . . . . . . . . . . . . . . . . . . .12
5.1 SPEAKER SETUP . . . . . . . . . . . . . .12-13
LOCK (PARENTAL CONTROL) . . . . . . . . . .13
• Initial Setting the Area Code . . . . . . . . .13
• Rating . . . . . . . . . . . . . . . . . . . . . . . . . .13
• Password . . . . . . . . . . . . . . . . . . . . . . . .13
• Area Code . . . . . . . . . . . . . . . . . . . . . . .13
OTHERS . . . . . . . . . . . . . . . . . . . . . . . . . . .13
Operations . . . . . . . . . . . . . . . . .14-21
General Features . . . . . . . . . . . . . . . . . . . . . . .14
Additional Features . . . . . . . . . . . . . . . . . . . . .15
Playing an Audio CD or MP3/WMA file . . . . .16
Programmed Playback . . . . . . . . . . . . . . . . . .17
Repeat Programmed Tracks . . . . . . . . . . . .17
Erasing a Track from Program List . . . . . . .17
Erasing the Complete Program List . . . . . . .17
Viewing a JPEG file . . . . . . . . . . . . . . . . . . . . .18
Slide Show . . . . . . . . . . . . . . . . . . . . . . . . . .18
Still Picture . . . . . . . . . . . . . . . . . . . . . . . . . .18
Moving to another file . . . . . . . . . . . . . . . . . .18
Rotating the picture . . . . . . . . . . . . . . . . . . .18
Listening to music during slide show . . . . . .18
Presetting the Radio Stations . . . . . . . . . . . . .19
To tune in a station with a weak signal . . . .19
To clear all the stored stations . . . . . . . . . .19
Listening to the Radio . . . . . . . . . . . . . . . . . . .19
To turn off the radio . . . . . . . . . . . . . . . . . . .19
To listen to non-preset radio stations . . . . .19
To select a preset radio station directly . . . .19
Sleep Timer Setting . . . . . . . . . . . . . . . . . . . . .20
Dimmer . . . . . . . . . . . . . . . . . . . . . . . . . . . . . . .20
Muting . . . . . . . . . . . . . . . . . . . . . . . . . . . . . . . .20
Setting the disc ejection lock . . . . . . . . . . . . .20
Enjoying audio form an external source . . . .20
Setting the surround mode . . . . . . . . . . . . . . .20
Reference . . . . . . . . . . . . . . . . . . .21-24
Language Codes . . . . . . . . . . . . . . . . . . . . . . . .21
Area Codes . . . . . . . . . . . . . . . . . . . . . . . . . . . .21
Troubleshooting . . . . . . . . . . . . . . . . . . . . . .22-23
Specifications . . . . . . . . . . . . . . . . . . . . . . . . . . .24
Contents
Operation Reference
Installation and Setup
2
To ensure proper use of this product, please read this
owner’s manual carefully and retain it for future
reference.
This manual provides information on the operation
and maintenance of your DVD player. Should the unit
require service, contact an authorized service location.
About the
Symbol Display
“
” may appear on your TV display during operation
and indicates that the function explained in this
owner’s manual is not available on that specific DVD
video disc.
Symbol Used in this Manual
Note:
Indicates special notes and operating features.
Tip:
Indicates tips and hints for making the task easier.
A section whose title has one of the following symbols is
applicable only to the disc represented by the symbol.
All discs and file listed below
DVD and finalized DVD±R/RW
Audio CDs
MP3 files
WMA files
JPEG files
Screen Saver
The screen saver activates when there is no
operation made for approximately 5 minutes since a
still picture was last displayed.
To cancel the screen saver, push any key.
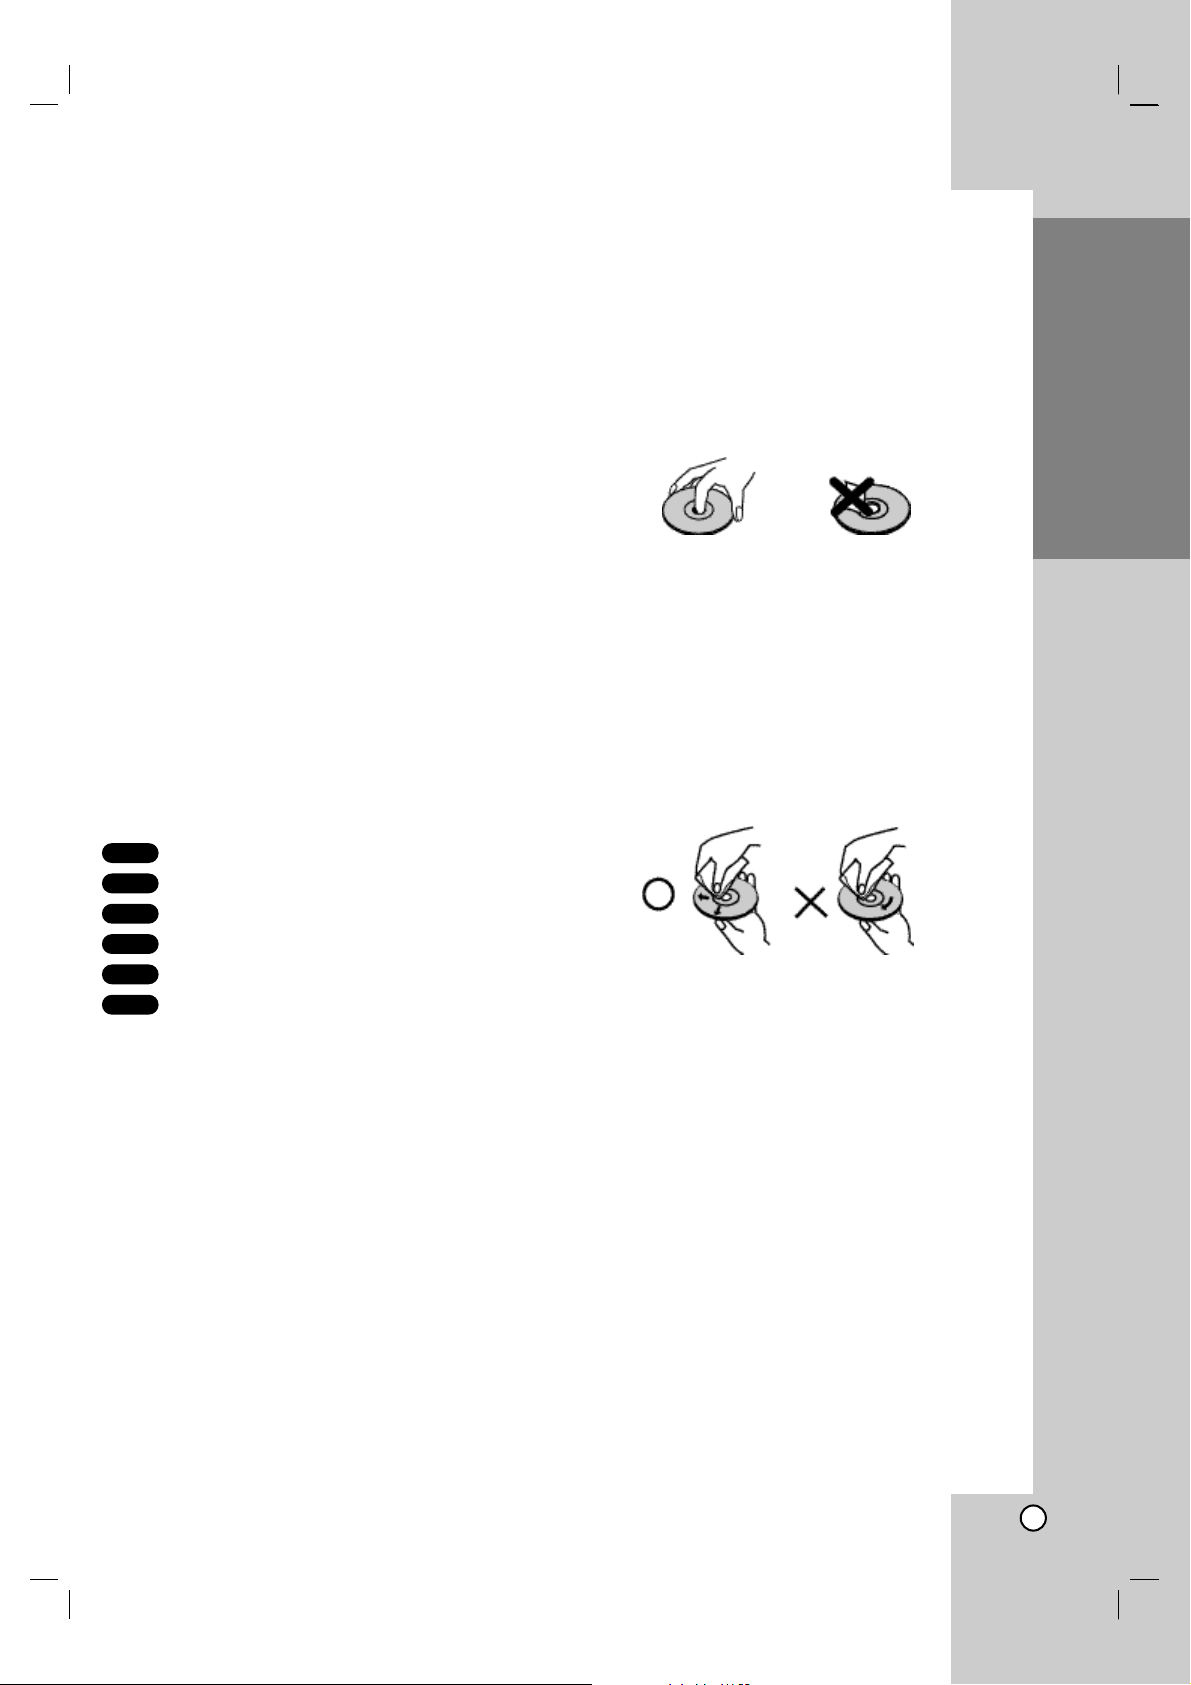
Notes on Discs
Handling Discs
Do not touch the playback side of the disc. Hold the
disc by the edges so that fingerprints do not get on
the surface. Never stick paper or tape on the disc.
Storing Discs
After playing, store the disc in its case. Do not expose
the disc to direct sunlight or sources of heat and never
leave it in a parked car exposed to direct sunlight.
Cleaning Discs
Fingerprints and dust on the disc can cause poor
picture quality and sound distortion. Before playing,
clean the disc with a clean cloth. Wipe the disc from
the center out.
Do not use strong solvents such as alcohol, benzine,
thinner, commercially available cleaners, or anti-static
spray intended for older vinyl records.
JPEG
WMA
MP3
ACD
DVD
ALL
Introduction
Introduction

3
Types of Playable Discs
DVD
(8 cm / 12 cm disc)
Audio CD
(8 cm / 12 cm disc)
In addition, this unit plays DVD±R/RW and CD-R/RW,
Dual disc that contains audio titles, MP3, WMA, and/or
JPEG files.
Notes:
• Depending on the conditions of the recording
equipment or the CD-R/RW (or DVD±R/RW) disc
itself, some CD-R/RW (or DVD±R/RW) discs
may not be played on the unit.
• Do not use irregularly shaped CDs (e.g., heart-
shaped or octagonal) since they may result in
malfunctions.
• This unit requires discs and recordings to meet
certain technical standards in order to achieve
optimal playback quality. Pre-recorded DVDs are
automatically set to these standards. There are
many different types of recordable disc formats
(including CD-R containing MP3 or WMA files) and
these require certain pre-existing conditions (see
above) to ensure compatible playback.
Customers should note that permission is
required in order to download MP3 / WMA files
and music from the Internet. Our company has
no right to grant such permission. Permission
should always be sought from the copyright
owner.
Regional Code
This unit has a regional code printed on the rear of the
unit. This unit can play only DVD discs labelled as the
same as the rear of the unit or “ALL”.
Notes on Regional Codes
• Most DVD discs have a globe with one or more
numbers in it clearly visible on the cover. This
number must match your unit’s regional code or the
disc cannot play.
• If you try to play a DVD with a different regional
code from your player, the message “Check
Regional Code” appears on the TV screen.
Notes on Copyrights:
It is forbidden by law to copy, broadcast, show,
broadcast via cable, play in public, or rent copyrighted
material without permission. This product features the
copy protection function developed by Macrovision.
Copy protection signals are recorded on some discs.
When recording and playing the pictures of these
discs picture noise will appear. This product
incorporates copyright protection technology that is
protected by method claims of certain U.S. patents
and other intellectual property rights owned by
Macrovision Corporation and other rights owners.
The Use of this copyright protection technology must
be authorized by Macrovision Corporation, and is
intended for home and other limited viewing uses only
unless otherwise authorized by Macrovision
Corporation. Reverse engineering or disassembly is
prohibited.
CONSUMERS SHOULD NOTE THAT NOT ALL HIGH
DEFINITION TELEVISION SETS ARE FULLY
COMPATIBLE WITH THIS PRODUCT AND MAY
CAUSE ARTIFACTS TO BE DISPLAYED IN THE
PICTURE. IN CASE OF 525 PROGRESSIVE SCAN
PICTURE PROBLEMS, IT IS RECOMMENDED THAT
THE USER SWITCH THE CONNECTION TO THE
‘STANDARD DEFINITION’ OUTPUT. IF THERE ARE
QUESTIONS REGARDING OUR TV SET
COMPATIBILITY WITH THIS MODEL 525p DVD
PLAYER, PLEASE CONTACT OUR CUSTOMER
SERVICE CENTER.
Operation Reference
Installation and Setup
4
Introduction
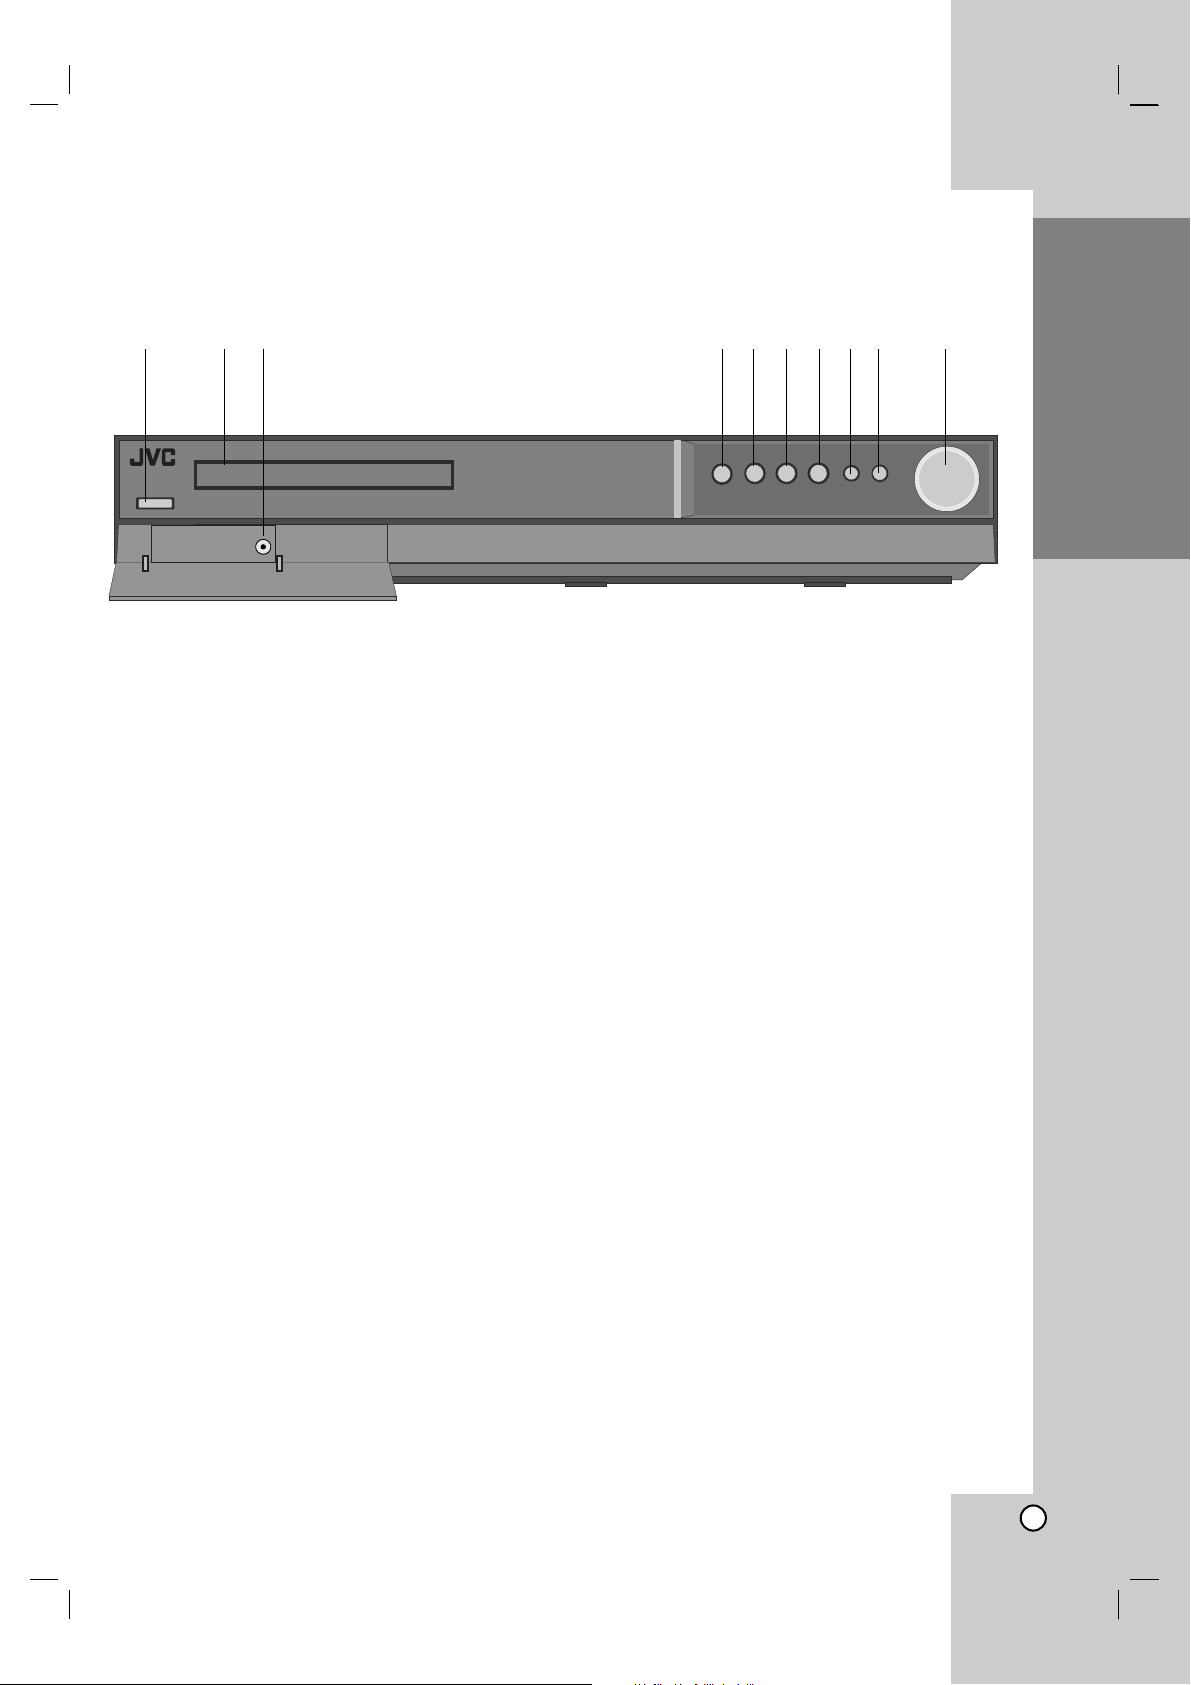
Front Panel
a
11//''
(STANDBY/ON)
Switches the unit ON and OFF.
b Disc Tray
Insert a disc here.
c AUDIO IN
The AUDIO IN port means you can connect a
audio device to play through the surround
sound
speakers.
d Z (OPEN/CLOSE)
Opens or closes the disc tray.
e x (STOP)
Stops playback.
f B (PLAY)
Starts playback.
SOURCE
Press and hold down this button about 3 seconds,
then press repeatedly to select other function
g
XX
(PAUSE)
Pause playback.
FM MODE
This will change the tuner from stereo to mono
and usually improve the reception.
h . (SKIP)
Returns to the beginning of current chapter or
track or go to the previous chapter or track.
(SCAN)
During playback, press and hold this button
repeatedly to select the required scan speed.
- TUNING
Tunes in the desired radio station.
i > (SKIP)
Go to the next chapter or track.
(SCAN)
During playback, press and hold this button
repeatedly to select the required scan speed.
+ TUNING
Tunes in the desired radio station.
j VOLUME controller
abc defghij
5
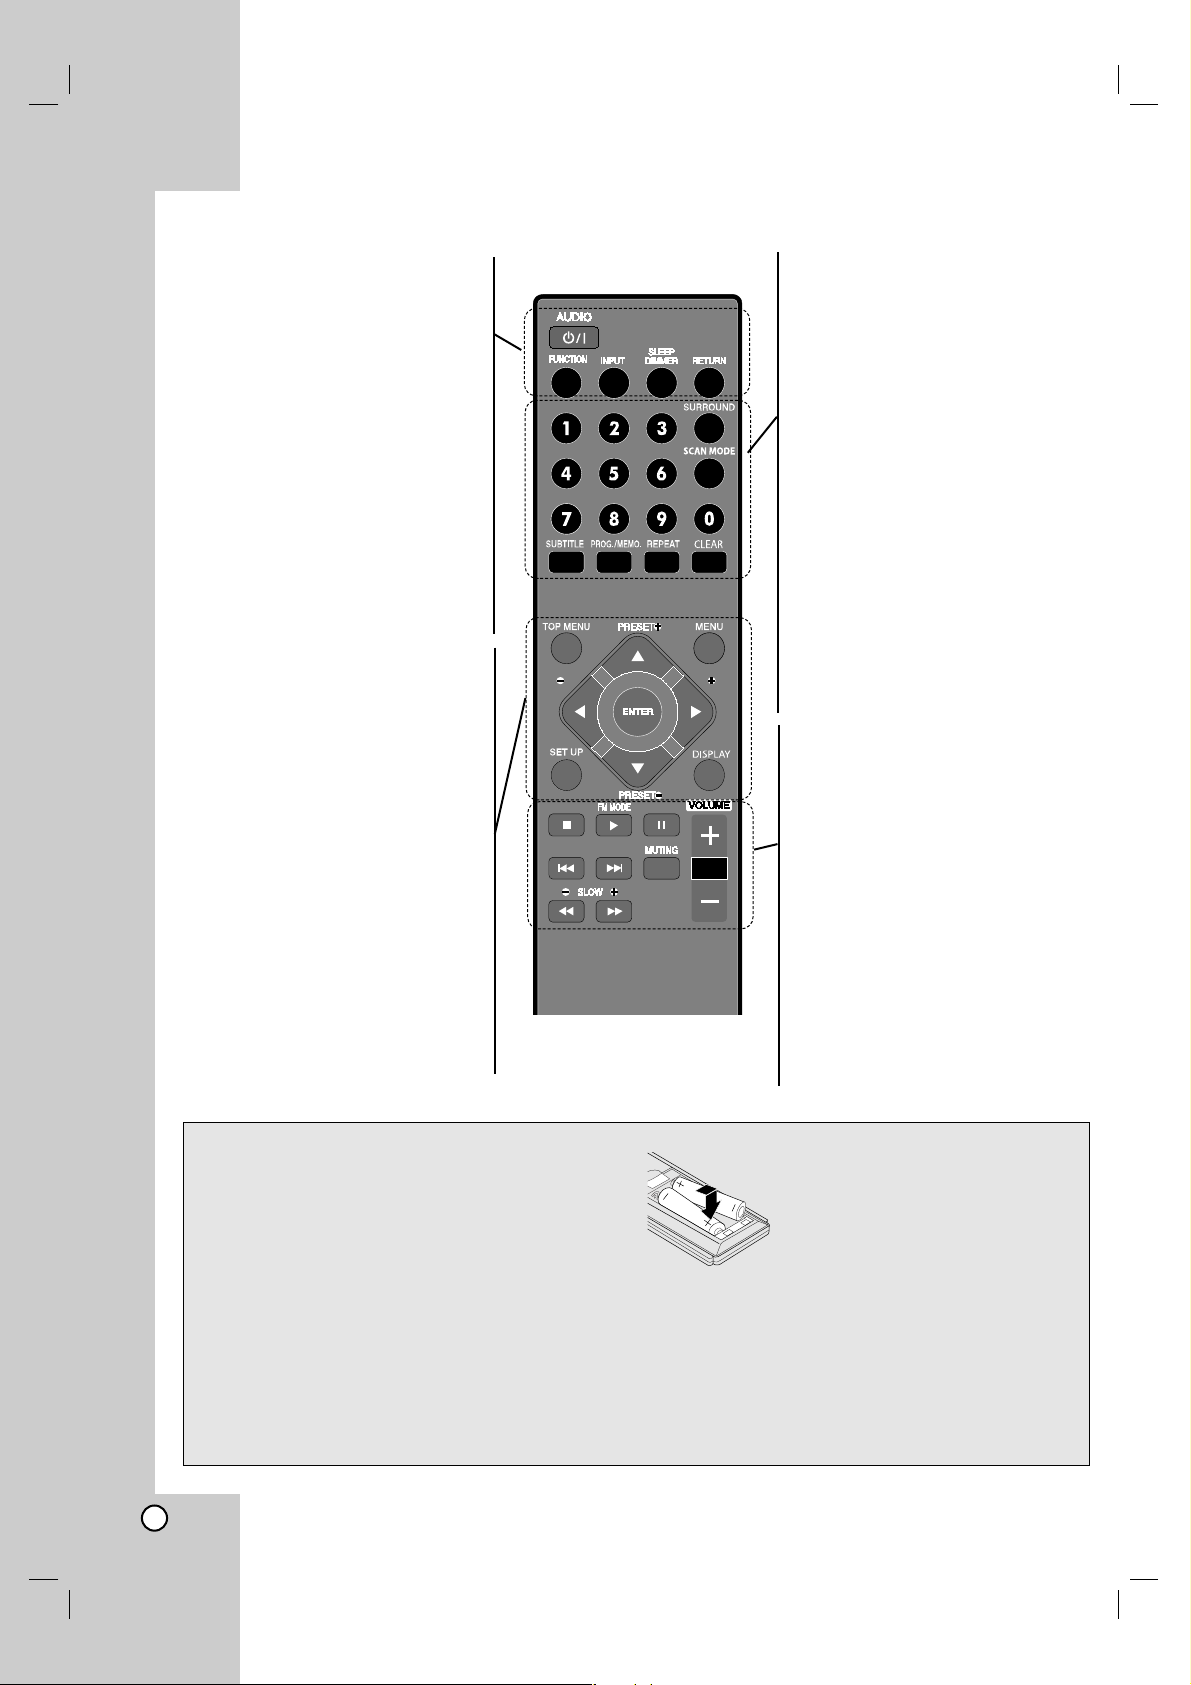
Remote Control
Remote Control operation
Point the remote control at the remote sensor and
press the buttons.
Cautions:
• Do not mix old and new batteries and never mix
different types of batteries such as standard,
alkaline, etc.
• Do not put the batteries in the place where young
children can reach.
• Battery shall not be exposed to excessive heat
such as sunshine, fire or the like.
• When discarding batteries, environmental problems
must be considered and local rules or laws
governing the disposal of these batteries must be
followed strictly.
Remote Control Battery installation
Detach the battery cover on the rear
of the remote control, and insert two
batteries (size AAA) with 3 and #
aligned correctly.
AUDIO (
11//''
)
Switches the unit ON and OFF.
FUNCTION
Selects the function (DVD/CD, FM)
INPUT
Changes the input source ( AUX,
AUX OPT, AUDIO IN,)
SLEEP
Sets the System to turn off
automatically at a specified time.
DIMMER
Changes brightness of the display
window on the front panel during in
power-on status.
RETURN
Press to move back wards in the
menu.
TOP MENU
If the current DVD title has a menu,
the title menu appears on the
screen. Otherwise, the disc menu
may appear.
MENU
Accesses the menu on a DVD disc.
SET UP
Accesses or removes setup menu.
DISPLAY
Accesses On-Screen display.
b/B/v/V (left/right/up/down)
Selects an option in the menu.
ENTER
Acknowledges the menu selection.
PRESET (
##
/
33
)
Selects program of Radio.
TUNING. (
##
/
33
)
Tunes in the desired radio station.
0-9 numerical buttons: Selects
numbered options in a menu.
SURROUND
Selects the surround mode.
SCAN MODE
Sets the output resolution for HDMI
and COMPONENT VIDEO OUT
jacks.
SUBTITLE
Selects a subtitle language (DVD).
PROG./MEMO.
Accesses or removes Program
menu.
Enter a radio station’s frequency into
the tuner.
REPEAT
Repeats chapter, track, title, all
CLEAR
Removes a track number on the
Program List.
SCAN/SLOW(bb/BB)
Searches backward or forward.
Reverse/ Forward slow playback.
SKIP (
..
/
>>
)
STOP (
xx
)
PLAY (B)
FM MODE
This will change the tuner from
stereo to mono and usually improve
the reception.
PAUSE (
XX
)
VOLUME (-/+)
Adjusts speaker volume.
MUTING
To mute the sound
TUNING TUNING
Operation Reference Introduction
6
Installation and Setup
TV Connection
Make one of the following connections, depending on
the capabilities of your existing equipment.
Tips:
Depending on your TV and other equipment you
wish to connect, there are various ways you could
connect the
DVD/CD Receiver
. Use one of the
connections described below.
Please refer to the manuals of your TV, VCR,
Stereo System or other devices as necessary to
make the best connections.
Caution:
Make sure the DVD/CD Receiver is connected
directly to the TV. Select the correct AV input on
your TV.
Do not connect your
DVD/CD Receiver
to TV via
your VCR. The DVD image could be distorted by
the copy protection system.
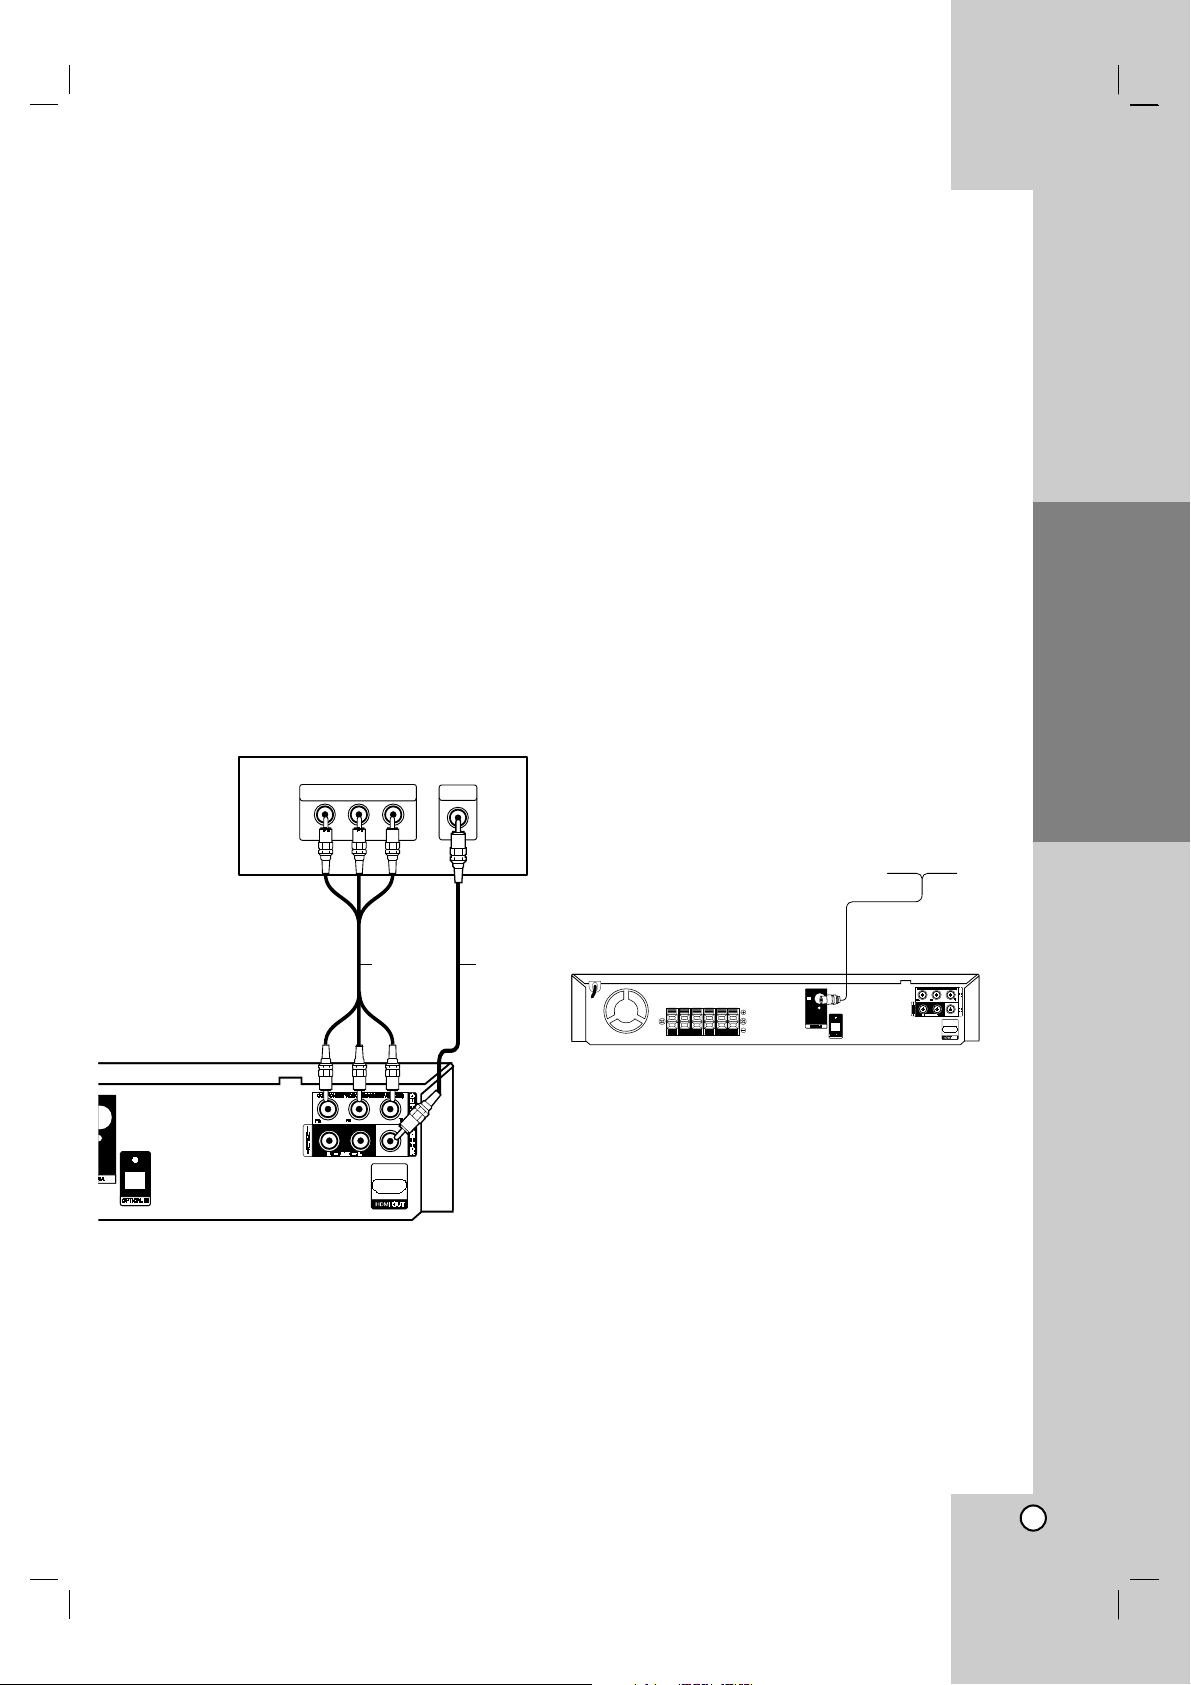
Video connection
Connect the MONITOR OUT jack from the DVD/CD
Receiver to the VIDEO IN jack on the TV using the
video cable (V).
Component Video connection
Connect the COMPONENT VIDEO OUT jacks from
the DVD/CD Receiver to the corresponding jacks on
the TV using an Y P
B P
R cable (C).
If your television is a high-definition or “digital
ready” television, you may take advantage of the
DVD/CD Receiver
’s progressive scan output for the
highest video resolution.
If your TV does not accept your resolution setting,
abnormal picture appears on the screen. Please
read owner’s manual for TV then set the resolution
that your TV can accept.
Antenna Connection
Connect the supplied FM antenna for listening to the
radio.
Connect the FM Wire antenna to the FM antenna
connector.
Notes:
Be sure to fully extend the FM wire antenna.
After connecting the FM Wire antenna, keep it as
horizontal as possible.
Installation and Setup
Y
COMPONENT VIDEO /
PROGRESSIVE SCAN INPUT
VIDEO
INPUT
Rear of DVD/CD Receiver
Rear of TV
V
C
(supplied)
(not supplied)
FM Wire Antenna
(supplied)
 Loading...