


LT-17E31 BUG
LT-17E31 SUG
LT-23E31 BUG
LT-23E31 SUG
LCD FLAT TELEVISION
LCD-FLACHBILD-FERNSEHER TELEVISEUR A ECRAN PLAT – LCD PLATTE LCD-TELEVISIE TELEVISOR PLANO LCD
TELEVISORE SCHERMO PIATTO LCD
TELEVISÃO DE ECRÃ PLANO DE CRISTAIS LÍQUIDOS
ENGLISH
DEUTSCH
FRANÇAIS NEDERLANDS CASTELLANO ITALIANO PORTUGUÊS
Thank you for buying this JVC LCD flat television.
To make sure you understand how to use your new TV, please read this manual thoroughly before you begin. (“LCD” stands for Liquid Crystal Display.)
WARNING: TO PREVENT FIRE OR SHOCK HAZARD, DO NOT EXPOSE THIS APPLIANCE TO RAIN OR MOISTURE.
WARNING
Always use the provided AC adapter and power cord.
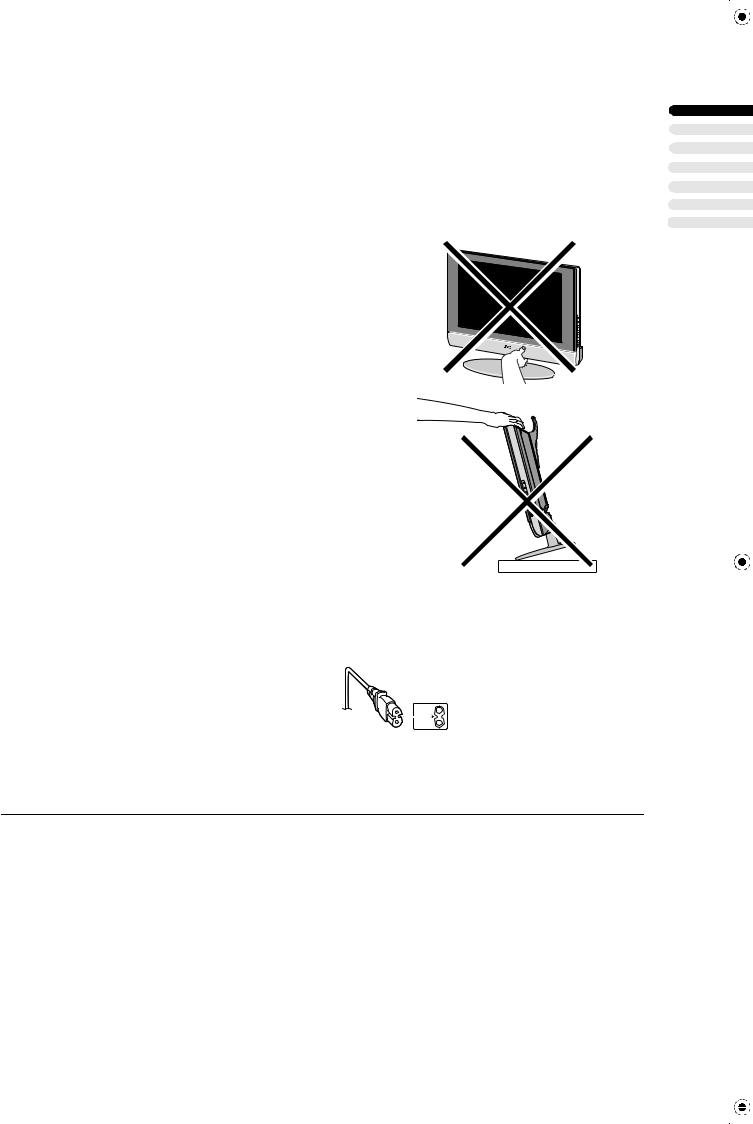
WARNING
•Fingers may be trapped under the TV causing injuries. Hold the TV at the bottom in the middle, and do not allow it to tilt up or down.
•The TV may fall causing injuries. Hold the bottom of the stand with your hand and tilt the TV up and down.
• Do not allow children to hang from the TV, place their elbows on the TV or lean against the TV. Doing so may cause the TV to fall over and lesd
to injuires.
ENGLISH
CAUTION:
•To avoid electric shock or damage to the unit, first firmly insert the small end of the power cord into the AC Adpater unit it is no longer wobbly, and then plug the larger end of power cord into an AC outlet.
CAUTION:
•Operate only from the power source specified(AC 100 – 240 V, 50/60 Hz) on the AC adapter.
•Avoid damaging the AC plug, AC adapter and power cord.
CAUTION ON HEATING OF AC ADAPTER:
•In using, the AC adapter get heat on the sunface of case. It is normal, not defective.
NOTES:
•The rating plate (serial number plate) and safety caution are on the back of the main unit.
•The rating information and safty causion of the AC Adapter are on its upper and lower sides.
•When you are not using this unit for a long period of time, it is recommended that you disconnect the power cord from the main outlet.
•Don't be covered with any material on case of AC adapter while it is in operation.
1
Point defects
LCDs use collections of fine pixels to display images. While there is no problem with more than 99.99% of these pixels, please understand that a very small number of pixels may not light or may light all the time.
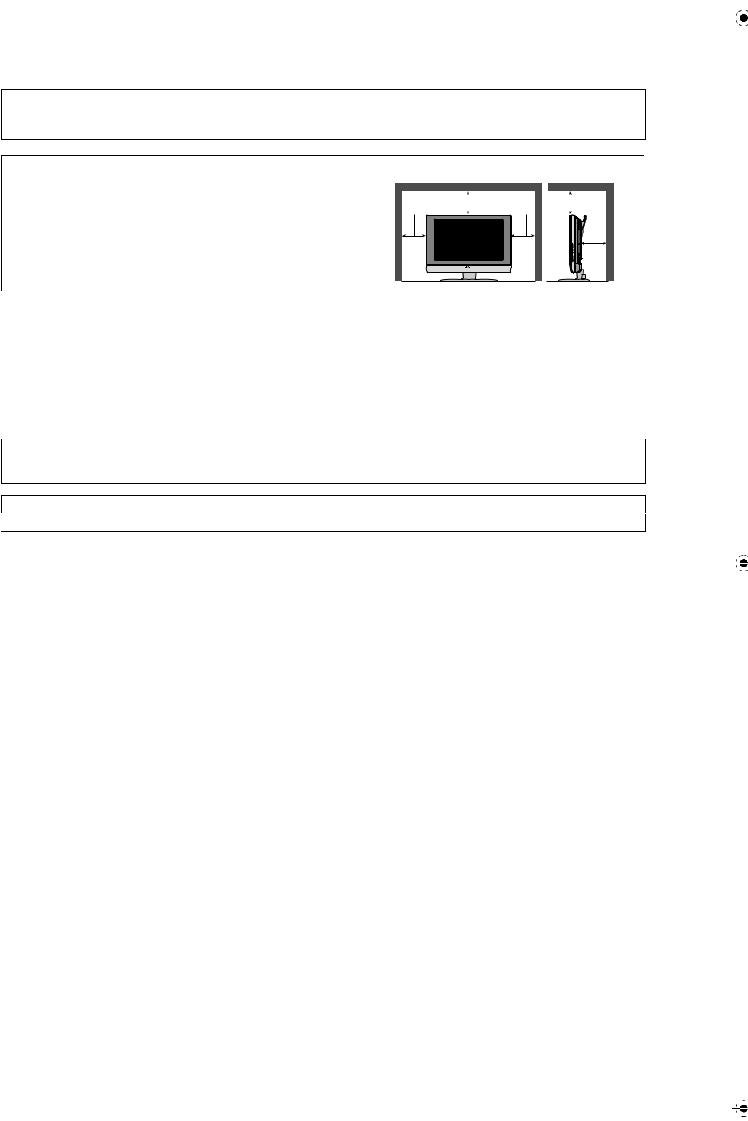
Distance recommendations
Avoid improper installation and never position the unit where good ventilation is impossible.
When installing this TV, distance recommendations must be maintained between the set and the wall, as well as inside a tightly enclosed area or piece of furniture.
Keep to the minimum distance guidelines shown for safe operation.
150 mm |
200 mm |
150 mm |
200 mm |
|
|

 50 mm
50 mm
Failure to take the following precautions may cause damage to the television or remote control.
DO NOT block the TV’s ventilat ion openings or holes.
(If the ventilation openings or holes are blocked by a newspaper or cloth, etc., the heat may not be able to get out.) DO NOT place anything on top of the TV.
(such as cosmetics or medicines, flower vases, potted plants, cups, etc.)
DO NOT allow objects or liquid into the cabinet openings.
(If water or liquid is allowed to enter this equipment, fire or electric shock may be caused.) DO NOT place any naked flame sources, such as lighted candles, on the TV.
DO NOT subject the TV to direct sunlight.
The surface of the TV screen is easily damaged. Be very careful with it when handling the TV.
Should the TV screen become soiled, wipe it with a soft dry cloth. Never rub it forcefully.
Never use any cleaner or detergent on it.
If there is a fault, unplug the unit and call a service technician. Do not attempt to repair it yourself or remove the rear cover and the  AC adapter.
Cleaning the screen
The screen is coated with a special thin film to reduce reflection. If this film is damaged, uneven colors, discoloration, scratches, and other problems that can not be repaired may occur. Pay attention to the following when handling the screen.
•Do not use glue or adhesive tape on the screen.
•Do not write on the screen.
•Do not allow the screen to come in contact with any hard objects.
•Do not allow condensation to form on the screen.
•Do not use alcohol, thinner, benzene or other solvents on the screen.
•Do not rub the screen hard.
2

CONTENTS |
|
Setting up your TV.................................. |
4 |
Installation.......................................................... |
4 |
Using the stand .................................................. |
4 |
Putting the batteries into the Remote control..... |
5 |
Remove the terminal cover ................................ |
5 |
Connecting the aerial and video cassette |
|
recorder (VCR)................................................... |
6 |
Connecting the power cord to the AC outlet ...... |
6 |
Initial settings ......................................... |
7 |
TV buttons and functions ...................... |
9 |
Turn the TV on from standby mode ................... |
9 |
Choose a TV channel ........................................ |
9 |
Watch images from external devices ................. |
9 |
Adjust the volume .............................................. |
9 |
Using the Menu.................................................. |
9 |
Remote control buttons and |
|
functions............................................ |
10 |
Turn the TV on or off from standby mode ........ |
10 |
Choose a TV channel ...................................... |
10 |
Adjust the volume ............................................ |
11 |
Watch images from external equipment .......... |
11 |
Displaying the source information..................... |
11 |
ZOOM function................................................. |
12 |
Sleep timer funtion........................................... |
13. |
Picture mode.................................................... |
13. |
Using the PCPIP function ............................... |
13 |
Operating a JVC brand VCR or DVD player .... |
14 |
Teletext function................................... |
15 |
Basic operation ................................................ |
15 |
Hold.................................................................. |
15 |
Sub-page ......................................................... |
16 |
Reveal.............................................................. |
16 |
Size .................................................................. |
16 |
Index ................................................................ |
16 |
Cancel.............................................................. |
16 |
Using the TV’s menu............................ |
17 |
Basic operation ................................................ |
17 |
Picture setting....................................... |
18 |
PICTURE MODE ............................................. |
18 |
Picture Adjustment........................................... |
18 |
COLOUR TEMP............................................... |
18 |
RESET.............................................................. |
18 |
Sound setting........................................ |
19 |
Sound Adjustment........................................... |
199 |
HYPER SOUND .............................................. |
199 |
FEATURES............................................ |
20 |
BLUE BACK .................................................... |
201 |
CHILD LOCK................................................... |
201 |
EXT-2 OUTPUT............................................... |
200 |
INSTALL................................................ |
21 |
MANUAL.......................................................... |
213 |
PROGRAM..................................................... |
213 |
To edit the PROGRAM menu.......................... |
224 |
PC MENU............................................... |
25 |
PC PICTURE POSITION................................. |
253 |
PC PICTURE................................................... |
253 |
SOUND............................................................ |
254 |
PC support mode list........................................ |
264 |
Additional preparation......................... |
27 |
Connecting external equipment ...................... |
278 |
Troubleshooting................................... |
29 |
Specifications....................................... |
31 |
ENGLISH
3
Setting up your TV
Installation
Cautions for installation
•Install the TV in a corner on a wall or on the floor so as to keep cords out of the way.
•The TV will generate a slight amount of heat during operation. Ensure that sufficient space is available around the TV to allow satisfactory cooling. See “Distance recommendations” on page 2.
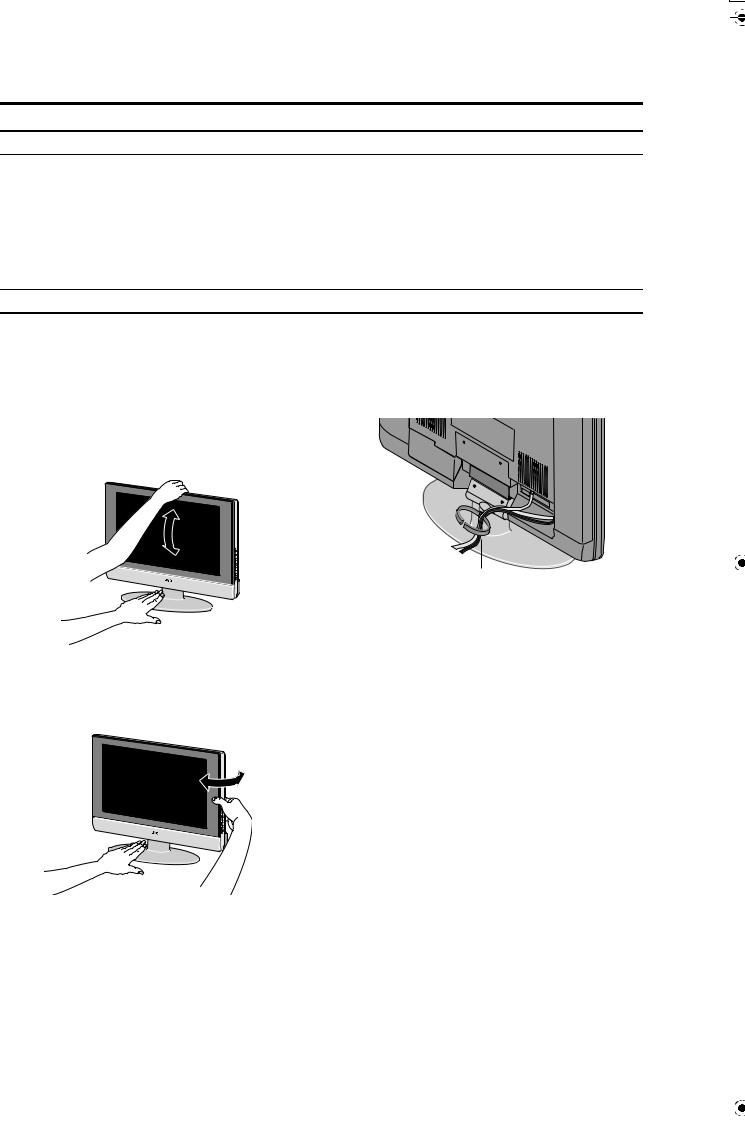
Using the stand
This TV comes with a Table Top Stand already attached.
This stand can be used to adjust the direction of the TV screen 5° up, 10° down, and 20° to the left or right.
Tilt the TV up and down:
While holding the bottom of the stand with one hand, use your other hand to hold the middle of the top of the TV and slowly tilt the TV up and down.
•As a safety measure, the stand is constructed so that it requires a certain amount of force to tilt the TV.
Rotate the TV to the left and right:
While holding the bottom of the stand with one hand, use your other hand to hold the edge of the panel and slowly adjust the direction of the TV screen.
Cable holder
A cable holder which is used to keep the connection cables tidy is attached to the back of the stand.
cable holder
4
Setting up your TV
Putting the batteries into the Remote control
Use two AA/R6 dry cell batteries.
Insert the batteries from the - end, making sure the + and - polarities are correct.
•Follow the warnings printed on the batteries.
•Battery life is about six months to one year, depending on your frequency of use.
•The batteries we supply are only for setting up and testing your TV, please replace them as soon as you need to.
•If the remote control does not work properly, replace the batteries.
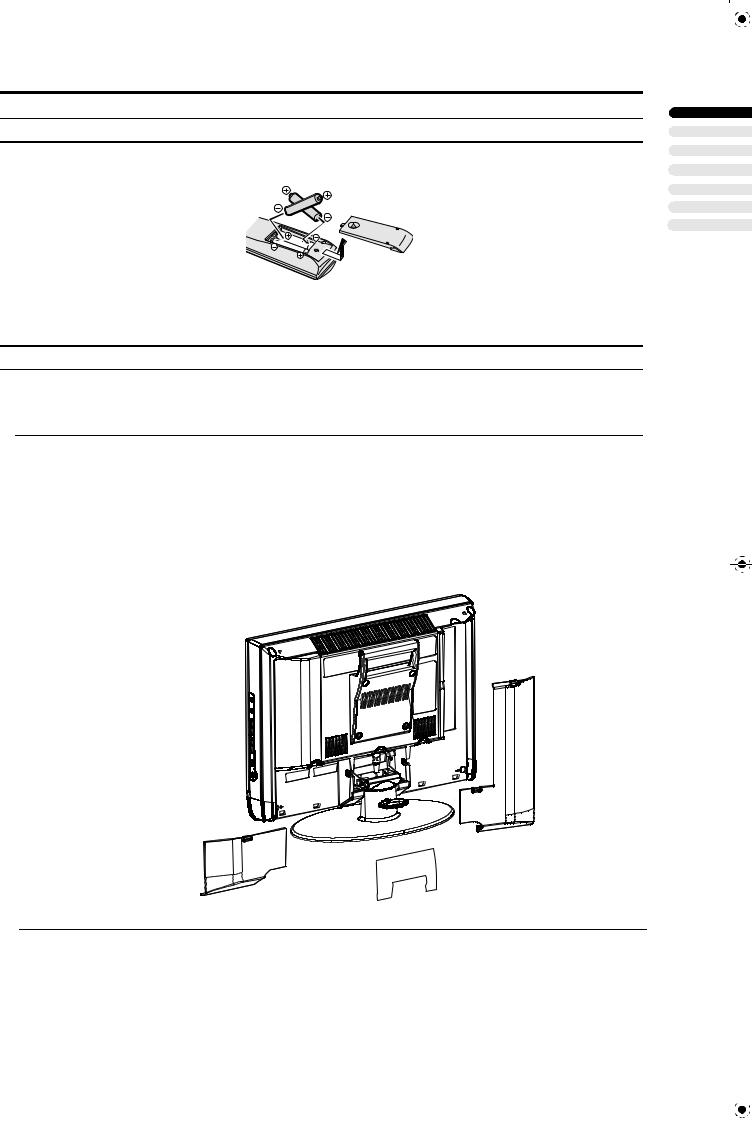
Remove the terminal cover
There are connection terminals behind the covers of the rear of the TV. Remove the cover before connecting a DVD or VCR.
The covers can be removed by removing the hook at the top and then pulling out while lifting slightly. To replace the covers, first connect the hook at the bottom of the cover to the TV and then insert the hook at the top.
•Leave the covers off if they do not fit properly. Do not force to replace the covers. Doing so may cause damages of the connection cables and the covers.
•Leave these covers off when mounting the TV on a wall.
•100mm mount based on VESA regulation is equipped.
•The handle and the stand can be left by loosing the screws with a screwdriver when mounting the TV on a wall.
•Spread a soft cloth on a flat table and then place the TV on the cloth with the screen facing downwards when you leave the handle and the stand.
ENGLISH
5

Setting up your TV
Connecting the aerial and video cassette recorder (VCR)
•The connecting cables are not provided.
•For further details, refer to the manuals provided with the devices to be connected.
If you are connecting a VCR, follow  in the diagram below.
If you are not connecting a VCR, follow .
• You can watch a video using the VCR without doing . For details, see your VCR instruction manual.
•To connect the PC, please see "Connecting the PC" on page 28.
•To connect more equipment, please see “Connecting external equipment” on page 27.
•To connect additional audio equipment, see “Connecting Speakers/Amplifier” on page 28.
without terminal covers
Aerial 


75-ohm Coaxial Cable
75-ohm Coaxial Cable
VCR
To Aerial
Output
Connecting the power cord to the AC outlet
If you are connecting a AC adapter, follow
 in the diagram below.
• Connect to the TV and to the AC outlet.
Caution
•Operate only from the power source specified (AC 100
–240 V, 50/60 Hz) on the unit.
•Remove the AC plug from the outlet to completely disconnect the TV from the power supply.
21-pin SCART Cable
6
Initial settings
When the TV is first turned on, it enters the initial setting mode. Follow the instructions on the on-screen display to make the initial settings.
|
VCR/TV/DVD |
|
Switch |
|
Yellow button |
|
Blue button |
|
OK |
|
BACK |
___PC |
___ |
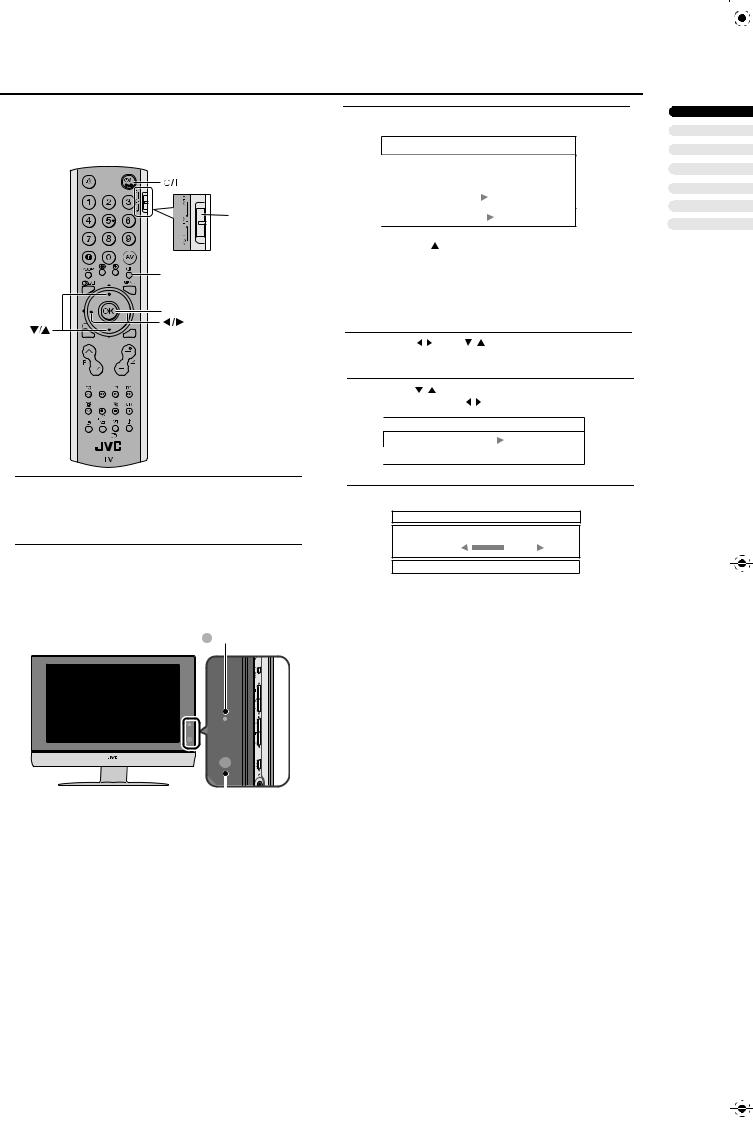
1Make sure to set the VCR/TV/DVD switch to the TV position.
•You cannot turn the TV on when the VCR/TV/DVD switch is set to the VCR or DVD position.
2Press the 
 button on the remote control
After a short interval the power lamp changes from red to green.
•Check that the AC plug on the power cord from the TV is connected to AC outlet.
 Power lamp
Remote control sensor
sensor
3 AUTO PROGRAM menu appears.
AUTO PROGRAM
 LANGUAGE ENGLISH
COUNTRY UK
A .P .S
 : SELECT
  :MOVE
:MOVE
4Press the  / buttons to choose the
LANGUAGE.
5Press the  /
/ buttons to choose the ENGLISH.
The on-screen display will then be in English.
6 |
Press the |
/ |
and |
/ buttons to choose the. |
|
country where you are. |
|||
7 |
Press the |
/ |
buttons to choose the |
|
|
A.P.S. Then press |
/ buttons. |
||
A.P.S.
 START
START
OK : START
8 Press the OK button to start A.P.S.
A.P.S.
A.P.S. IS RUNNING
MENU : EXIT
The AUTO PROGRAM menu appears and received TV channels are automatically stored in the programme
numbers.
•To cancel the AUTO PROGRAM function: Press the MENU button.
After the TV channels have been registered in the programme numbers, the PROGRAM menu appears
•If you want to, you can now edit the programme numbers using the PROGRAM function.
For details, see “To edit the PROGRAM menu” on page 22.
ENGLISH
7

Initial settings
Now, the initial settings are complete, and you can watch the TV
•If your TV can detect the TV channel name from the TV channel broadcast signal, the TV channel name is assigned to the programme number to which the
TV channel has been set. However, which TV channels are set to which programme numbers will depend
on the area in which you live.
•If a TV channel you want to view is not set to a programme number, you can set it using the MANUAL function. For details, see “To edit the
PROGRAM menu" on page 22.
•The AUTO PROGRAM function does not set the programme number PR 0 (AV) for your video cassette recorder. You will need to set this using the MANUAL function.
•In some areas you may get TV reception from more than one transmitter, for example different ITV regions. In this case each TV channel could be set twice. If this happens, the first set of channels will have the stronger signal. If you want to delete the second set of channels, you will have to do it manually (see page 21).
8
TV buttons and functions
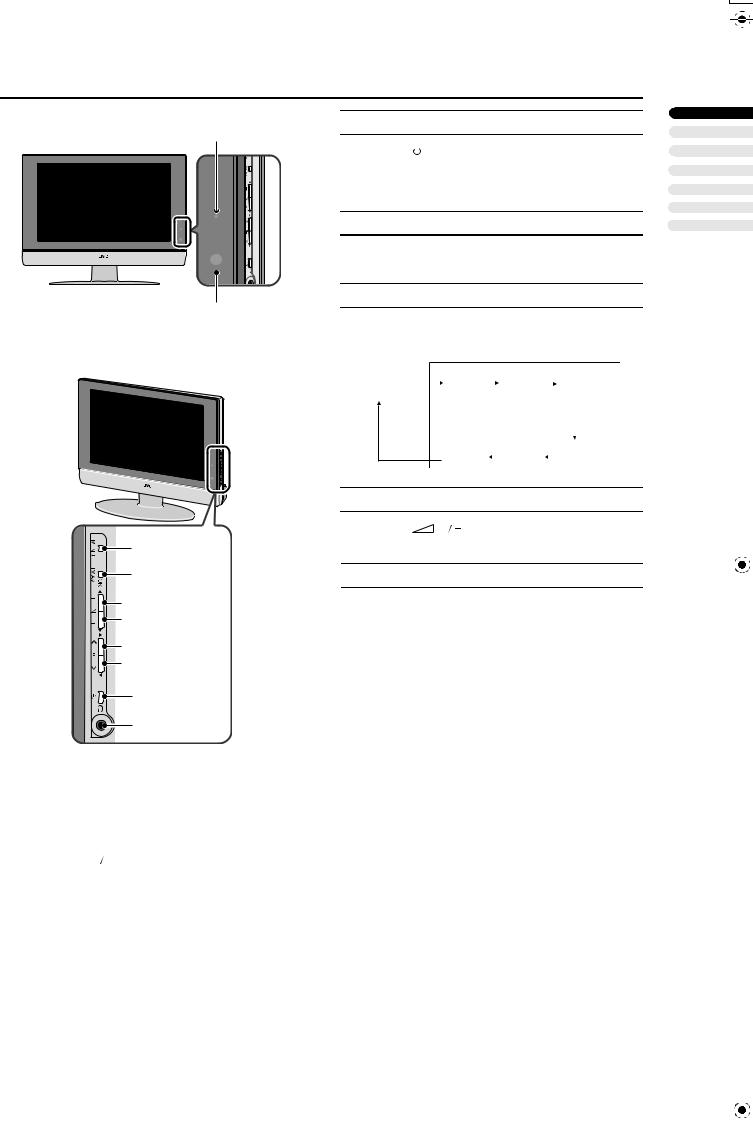
Turn the TV on from standby mode
1
Press the  button or P
  /
/ buttons to turn the TV
on from standby mode
• Check that the AC plug on the power cord from the TV is connected to correctly AC outlet.
Choose a TV channel
Press the P  /
/ buttons to choose a programme number or an EXT terminal
Watch images from external devices
2
Press the TV/AV button to choose a TV/AV terminal
3
4
 5
5
 6
6
7
8
1Power lamp
2Remote control sensor
3MENU button
4TV/AV OK button
5 (Volume)
 button
6P  /
/ buttons
7Standby botton
8Headphone jack (mini jack)
TV mode |
|
|
|
|
|
|
EXT modes |
|
|
||
|
|
|
|
|
|
|
|
|
|
|
|
Last |
|
|
|
|
|
|
|
|
|
|
|
program |
|
|
|
EXT-1 |
|
|
EXT-2 |
|
|
EXT-2 S |
|
number |
|
|
|
|
|
|
|
|
|
|
|
|
|
|
|
|
|
|
|
|
|
|
|
|
|
|
|
|
|
|
|
|
|
|
|
PC |
|
|
|
EXT-3 S |
|
|
|
EXT-3 |
|
|
|
|
|
|
|||
|
|
|
|
|
|
|
|
|
Adjust the volume
Press the  buttons
The volume level indicator appears.
Using the Menu
Use the MENU button.
Refer to “Using the TV’s menu” (see page 17) for details of using the menu.
ENGLISH
9
 Loading...