


IMPRESSA E40 IMPRESSA E45 IMPRESSA E60
IMPRESSA E65
Instructions for use
Art. Nr. 62902
5/05

Jura Impressa E40/E45/E60/E65
English. . . . . . . . . . . . . . . . . . . . . . . . . . . . . . . . . . . . . . . . . . . . . . . . . . . . . . . . . . . . . . . . . . . . . . . . . . . . . . . . . . . . . . . . . . . . . . . . . . . . . . . . . . . . . . . . 5 – 19
|
|
= Note |
|
= Important |
|
= Tip |
Jura Elektroapparate AG, CH-4626 Niederbuchsiten, |
|
|
|
|
||||
|
|
|
|
Internet http://www.juraworld.com |
|||
|
|
|
|
||||
|
|
|
|

|
|
Fig. 1 |
|
|
|
Fig. 2 |
|
|
|
Fig. 3 |
|
|
|
|
|
|
|
|
|
|
|
|
|
Fig. 4 |
|
|
|
Fig. 5 |
|
|
|
Fig. 6 |
|
|
|
|
|
|
|
|
|
|
|
Fig. 7 |
|
Fig. 8 |
|
Fig. 9 |
2
1
9 |
10 |
|
8 |
11 |
|
7 |
12 |
|
|
||
6 |
13 |
|
5 |
||
|
||
4 |
14 |
|
3 |
||
|
||
2 |
|
|
1 |
|
|
|
15 |
|
|
16 |
|
|
17 |
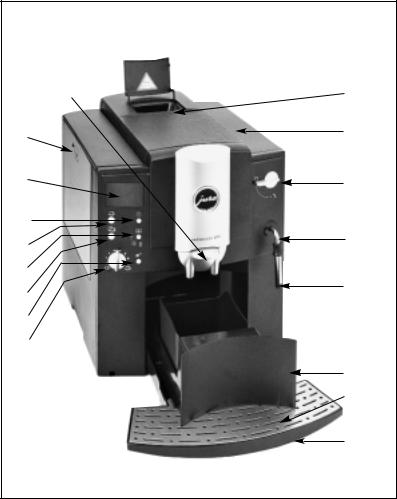
Operating elements
Jura Impressa E40/E45/E60/E65
1Water quantity switch
2Powder coffee selection switch
3Coffee key for 2 cups
4Maintenance key (for functions such as: rinsing, cleaning, de-scaling, filter)
5Coffee key for 1 cup
6ON/OFF switch
7Display with symbols
8Water tank with carrying handle
9Height-adjustable coffee spout
10Pre-ground coffee filler funnel
11Cover for beam container
12Selector switch for hot water/steam
13Pivoting nozzle for hot water/steam
14Frothing aid
15Container for coffee grounds
16Drip tray cover
17Drip tray
Contents
Jura Impressa E40/E45/E60/E65
1. |
Description.................................................... |
page |
6 |
|
8.2 |
Return to stand-by .................................. |
page 11 |
|
|
|
|
1.1 |
Symbols ................................................. |
page |
6 |
9. |
Drawing off hot water...................................... |
page 11 |
|
|
|
2. |
Safety instructions .......................................... |
page |
7 |
|
9.1 |
Drawing off hot water E45 ......................... |
page 12 |
|
|
|
|
2.1 |
Warnings................................................ |
page |
7 |
10. |
Switching machine off ..................................... |
page 12 |
|
|
|
|
2.2 |
Safety precautions .................................... |
page |
7 |
11. |
Care and maintenance...................................... |
page 12 |
|
|
|
3. |
Preparation of the machine ............................... |
page |
7 |
|
11.1 |
Fill water ........................................... |
page 12 |
|
|
|
3.1 |
Checking the mains voltage......................... |
page |
7 |
|
11.2 |
Empty grounds container ......................... |
page 12 |
|
|
|
|
3.2 |
Checking the fuse ..................................... |
page |
7 |
|
11.3 |
No drip tray ......................................... |
page 12 |
|
|
|
3.3 |
Filling the water tank ................................ |
page |
7 |
|
11.4 |
Clean unit ............................................ |
page 12 |
|
|
|
3.4 |
..................................Adding coffee beans |
page |
7 |
|
11.5 |
...........................................Unit scaled |
page 12 |
|
E |
|
3.5 |
.................................Adjusting the grinder |
page |
8 |
|
11.6 |
...................Use of Claris filter cartridges |
page 12 |
|
|
|
3.6 |
Adjusting the water hardness....................... |
page |
8 |
|
11.7 |
Insert filter .......................................... |
page 13 |
|
|
|
3.7 |
...................Adjustable automatic switch-off |
page |
9 |
|
11.8 |
........................................Replace filter |
page 13 |
|
|
4. |
....................................First start of operation |
page |
9 |
|
11.9 |
.....................General cleaning instrictions |
page 13 |
|
|
|
|
4.1 |
Fill system with water ............................... |
page |
9 |
|
11.10 Empty system ....................................... |
page 14 |
|
|
|
5. |
Rinsing the machine ........................................ |
page 10 |
12. |
Cleaning ....................................................... |
page 14 |
|
|
|||
6. |
Adjusting the water quantity.............................. |
page 10 |
13. |
Decalcifying .................................................. |
page 15 |
|
|
|||
7. |
Drawing off espresso/normal coffee ..................... |
page 10 |
14. |
Disposal ....................................................... |
page 16 |
|
|
|||
|
7.1 |
Drawing off espresso/strong coffee ................ |
page 10 |
15. |
Tips for perfect coffee...................................... |
page 16 |
|
|
||
|
7.2 |
Drawing off espresso/extra coffee ................. |
page 10 |
16. |
Messages ...................................................... |
page 17 |
|
|
||
|
7.3 |
Drawing off powder coffee .......................... |
page 10 |
17. |
Problems ...................................................... |
page 18 |
|
|
||
8. |
Drawing off steam .......................................... |
page 11 |
18. |
Legal information ........................................... |
page 19 |
|
|
|||
|
8.1 |
Drawing off steam with the Profi-Auto- |
|
|
19. |
Technical data ............................................... |
page 19 |
|
|
|
|
Cappuccino/Caffè Latte (optional E45)................. |
page 11 |
|
|
|
|
|
|
||
5
Important information for the user
Thank you for choosing this Jura product.
Please study these instructions carefully before using your new machine for the first time and keep them in a safe place for easy reference in future.
Should you require further information or should particular problems occur that are not dealt with in sufficient detail for you in these operating instructions, please contact your local dealer or us for the information you require.
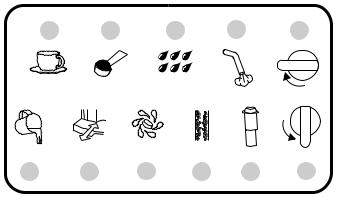
1.1 Symbols
1COFFEE READY
2COFFEE POWDER
3RINSE MACHINE
4STEAM / HOT WATER
5CLOSE TAP
6FILL WATER
7EMPTY GROUNDS CONTAINER / DRIP TRAY MISSING
8CLEAN MACHINE
9MACHINE SCALED
10REPLACE FILTER
11OPEN TAP
1. Description
This fully automatic espresso/coffee machine impresses because of its compactness and can prepare 1 or 2 cups of excellent, profes- sional-quality espresso/coffee with guaranteed froth. The unique Jura pre-brew system (Intelligent Pre Brew Aroma System I.P.B.A.S©) ensures full use of the coffee aroma. The machine works fully automatically at the push of a button. With the coffee aroma, you have the choice between normal, strong and extra strong, depending on taste. The integrated grinder grinds the beans to the required fineness. A separate filler funnel makes it possible to use additional, pre-ground sorts of coffee. The water quantity can be set individually. Electronic filling controls for the water tank and container for coffee grounds simplify operation. Thanks to the integrated rinsing, cleaning and de-scaling programmes, care and maintenance are also quick and easy.
1 |
2 |
3 |
4 |
5 |
6 8
6
 Loading...