


PowerPlus Speakers
Installation Manual
|
|
|
|
|
PowerPlus 525 |
PowerPlus 652 |
PowerPlus 652C |
PowerPlus 682 |
PowerPlus 693 |
|
|
|
|
|
|
|
|
|
|

INTRODUCTION
Thank you!
Thank you for purchasing this quality Jensen product! Your new PowerPlus speaker system is the ultimate complement to your car stereo system. The PowerPlus series, featuring polypropylene cones, black foam surrounds, tweeters with acoustic equalizer, and neodymium magnets, offers unparalleled audio reproduction. The PowerPlus series will deliver the natural sound you have come to expect from Jensen.
The speaker system should be connected to your car radio or an additional car stereo amplifier, which we recommend for even better sound quality. Technical data plus installation tips and further advice are contained in this instruction manual.
Highlighted Features
Warp resistant, low-resonance steel basket
Polypropylene cone for less distortion and weatherability
Additional voice-coil ventilation
13mm Tweeter with acoustic equalizer and neodymium magnet
Designer loudspeaker covers
.110 / .205 terminal strip
Para obtener instrucciones en Español, diríjase a la página 7. Pour des instructions en Francais, référez-vous à la page 13.
1

PowerPlus Speakers
INTRODUCTION
Welcome to Jensen!
This manual is designed to provide information for the owner, salesperson and installer. For those of you who want quick information on how to install this product, please turn to the Installation Section of this manual. Other information can be located by using the Table of Contents. We at Jensen have worked very hard to make sure all the information in this manual is current. But, as we are constantly finding new ways to improve our product, this information is subject to change without notice.
Installation ....................................................................... |
Page 3 |
Specifications .................................................................. |
Page 5 |
Warranty.......................................................................... |
Page 6 |
If, after reading your manual, you still have questions regarding this product, we recommend that you see your Jensen dealer. If you need further assistance, you can call us direct at 1-800-323- 4815.
Be sure to have your model number and date of purchase available when you call. Please read your warranty clearly and retain your receipt for possible future use.
Preparation
Disconnect battery cable from negative ( - ) battery terminal.
WARNING: Check vehicle's owner's manual before disconnecting the battery. Disconnecting the battery in some vehicles may require an anti-theft code when reconnecting. Some vehicles may run rough after reconnecting the battery and require that the on-board computer be reset at the dealership. Check with your local dealer if you are uncertain.
Check all safety regulations in your vehicle's owner's manual.
To ensure an obstacle-free fit, check and double check mounting depth of the speakers against available depth, as well as the location of window mechanics, door handles, and window handles.
If using provided grilles, be sure mounting location is sufficient distance from door and/or window handles.
Required Tools
The following is a list of tools needed for installation:
#2 Philips screwdriver
Battery post wrench
Hand held drill w/assorted bits
Wire strippers
Wire crimpers
Wire cutters
Since some of these Jensen full range speakers are most often used as direct replacements for stock speakers, some of the following instructions will not apply. For custom installations see your authorized Jensen dealer.
2
INSTALLATION
Basic Installation Steps
Step 1: Remove existing speaker.
Step 2: Position new speaker and align with existing mounting holes.
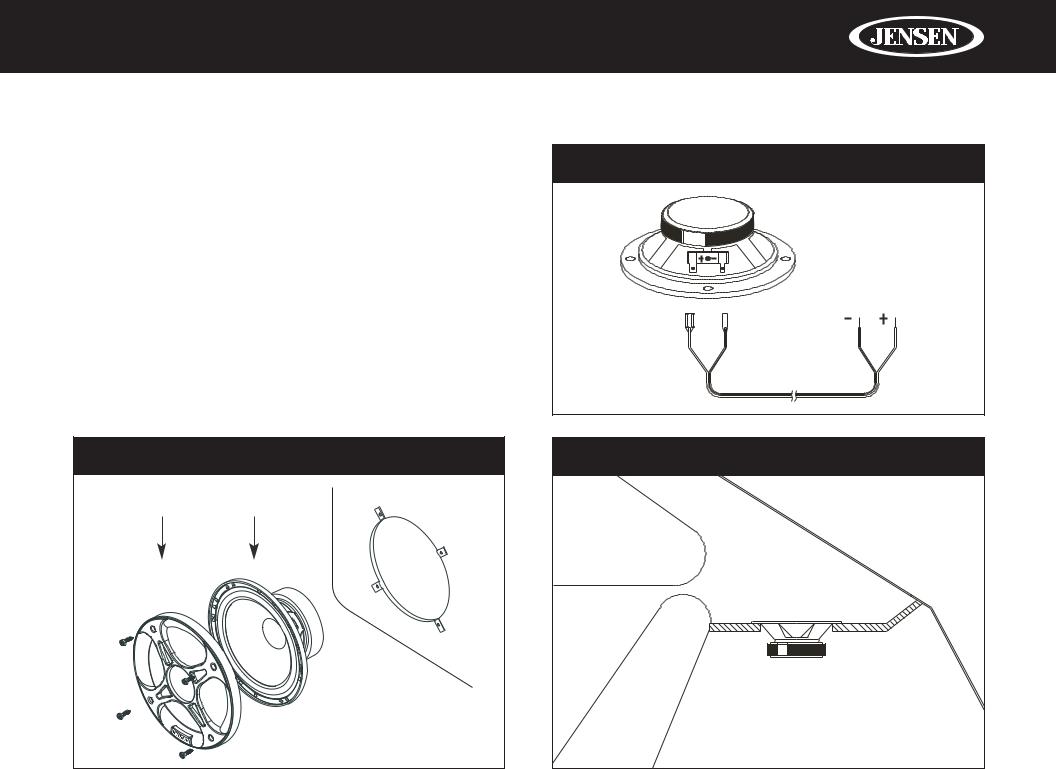
Step 3: Attach the positive (+) and negative (-) speaker terminals (see FIGURE 2). Be sure to observe proper polarity when connecting the wires (the striped wire is the negative lead).
Step 4: If not using factory grilles, attach grille.
Step 5: Mount speaker (using factory hardware when possible).
Step 6: Reconnect negative battery terminal.
FIGURE 1 - DOOR PANEL INSTALLATION
Grille |
Speaker |
Door Panel |
FIGURE 2 - CONNECTING SPEAKER WIRES
FIGURE 3 - REAR DECK INSTALLATION |
3

PowerPlus Speakers
INSTALLATION
Installing the Tweeter for the 652C
The separate tweeters included with the 652C have a variety of mounting applications. During installation, make sure the tweeter is positioned and aimed towards the listener's ears.
|
There is a protective element integrated into the |
|
NOTE |
crossover of your PowerPlus tweeter, which has |
|
high impedance in cases of overload and reduces |
||
|
||
|
the current flowing through the tweeter. If the |
|
|
tweeter is deactivated, please turn down the |
|
|
volume and wait for a moment. After cooling down, |
|
|
the tweeter will re-activate and become ready for |
|
|
operation again. |
|
|
|
FIGURE 4 - SURFACE MOUNTING
FIGURE 6 - WIRING THE SPEAKER/TWEETER |
FIGURE 5 - FLUSH MOUNTING
4

SPECIFICATIONS
|
PP525 |
PP652 |
PP652C |
PP682 |
PP693 |
Midrange Diameter |
5" |
6.5" |
6..5" |
6" x 8" |
6" x 9" |
Frequency Response |
90Hz - 20kHz (-3dB) |
70Hz - 20kHz (-3dB) |
70Hz - 20kHz (-3dB) |
75Hz - 20kHz (-3dB) |
50Hz - 20kHz (-3dB) |
Crossover Frequency |
4kHz |
3kHz |
3kHz |
3kHz |
3kHz |
Power Handling |
50 Watts Nominal |
60 Watts RMS |
60 Watts RMS |
55 Watts Nominal |
80 Watts Nominal |
|
250 Watts Peak |
300 Watts Peak |
300 Watts Peak |
275 Watts Peak |
400 Watts Peak |
Sensitivity |
90dB (1 watt @ 1 meter) |
91dB (1 watt @ 1 meter) |
91dB (1 watt @ 1 meter) |
91dB (1 watt @ 1 meter) |
91dB (1 watt @ 1 meter) |
Mounting Depth |
49mm (2") |
56mm (2.25") |
56mm (2.25") |
56mm (2.25") |
74mm (3") |
Impedence |
4 ohms |
4 ohms |
4 ohms |
4 ohms |
4 ohms |
5
 Loading...