


JENN-AIR GAS COOKTOPS
USE & CARE
GUIDE
TABLE OF CONTENTS |
|
Important Safety Instructions ..................................... |
1-4 |
Using Your Cooktop ...................................................... |
5-6 |
Care & Cleaning .................................................................. |
7 |
Troubleshooting .................................................................. |
8 |
Warranty & Service ............................................................. |
9 |
Guide de l’utilisation et entretien ................................ |
10 |
Guía de Uso y Cuidado ................................................... |
19 |
Form No. A/01/08 |
Part No. 8111P537-60 |
©2006 Maytag Appliances Sales Co. All rights reserved. |
Litho U.S.A. |

Installer: Please leave this manual with this appliance.
Consumer: Please read and keep this manual for future reference. Keep sales receipt and/or canceled check as proof of purchase.
Model Number _______________________________
Serial Number _______________________________
Date of Purchase _____________________________
If you have questions, call: Jenn-Air Customer Assistance 1-800-JENNAIR (1-800-536-6247)
1-800-688-2080 (U.S. TTY for hearing or speech impaired) (Mon.-Fri., 8 am-8 pm Eastern Time)
Internet: http://www.jennair.com
In our continuing effort to improve the quality and performance of our cooking products, it may be necessary to make changes to the appliance without revising this guide.
For service information, see page 9.
IMPORTANT SAFETY
INSTRUCTIONS
Warning and Important Safety Instructions appearing in this guide are not meant to cover all possible conditions and situations that may occur. Common sense, caution, and care must be exercised when installing, maintaining, or operating the appliance.
Always contact your dealer, distributor, service agent, or manufacturer about problems or conditions you do not understand.
Recognize Safety Symbols, Words, Labels
 WARNING
WARNING – Hazards or unsafe practices which COULD result in severe personal injury or death.
 CAUTION
CAUTION – Hazards or unsafe practices which COULD result in minor personal injury.
Read and follow all instructions before using this appliance to prevent the potential risk of fire, electric shock, personal injury or damage to the appliance as a result of improper usage of the appliance. Use appliance only for its intended purpose as described in this guide.
To ensure proper and safe operation: Appliance must be properly installed and grounded by a qualified technician. Do not attempt to adjust, repair, service, or replace any part of your appliance unless it is specifically recommended in this guide. All other servicing should be referred to a qualified servicer. Have the installer show you the location of the gas shut off valve and how to shut it off in an emergency.
Always disconnect power to appliance before servicing.
 WARNING
If the information in this manual is not followed exactly, a fire or explosion may result causing property damage, personal injury or death.
–Do not store or use gasoline or other flammable vapors and liquids in the vicinity of this or any appliance.
–IF YOU SMELL GAS:
•Do not try to light any appliance.
•Do not touch any electrical switch.
•Do not use any phone in your building.
•Immediately call your gas supplier from a neighbor’s phone. Follow the gas supplier’s instructions.
•If you cannot reach your gas supplier, call the fire department.
–Installation and service must be performed by a qualified installer, service agency or the gas supplier.
 WARNING
Gas leaks may occur in your system and result in a dangerous situation. Gas leaks may not be detected by smell alone. Gas suppliers recommend you purchase and install an UL approved gas detector. Install and use in accordance with the manufacturer’s instructions.
1

IMPORTANT SAFETY INSTRUCTIONS
To Prevent Fire or
Smoke Damage
 CAUTION
NEVER leave any items on the cooktop. The hot air may ignite flammable items and may increase pressure in closed containers which may cause them to burst.
Be sure all packing materials are removed from the appliance before operating it.
Keep area around appliance clear and free from combustible materials, gasoline, and other flammable vapors and materials.
If appliance is installed near a window, proper precautions should be taken to prevent curtains from blowing over burners.
Many aerosol-type spray cans are EXPLOSIVE when exposed to heat and may be highly flammable. Avoid their use or storage near an appliance.
Many plastics are vulnerable to heat. Keep plastics away from parts of the appliance that may become warm or hot. Do not leave plastic items on the cooktop as they may melt or soften if left too close to a lighted surface burner.
To eliminate the hazard of reaching over hot surface burners, cabinet storage should not be provided directly above a unit. If storage is provided, it should be limited to items which are used infrequently and which are safely stored in an area subjected to heat from an appliance. Temperatures may be unsafe for some items, such as volatile liquids, cleaners or aerosol sprays.
A faint gas odor may indicate a gas leak. If a gas odor is detected, shut off the gas supply to the cooktop. Call your installer or local gas company to have the possible leak checked. Never use a match or other flame to locate a gas leak.
Child Safety
 CAUTION
NEVER store items of interest to children in cabinets above an appliance. Children climbing on the appliance to reach items could be seriously injured.
NEVER leave children alone or unsupervised near the appliance when it is in use or is still hot.
NEVER allow children to sit or stand on any part of the appliance as they could be injured or burned.
Children must be taught that the appliance and utensils on it can be hot. Let hot utensils cool in a safe place, out of reach of small children. Children should be taught that an appliance is not a toy. Children should not be allowed to play with controls or other parts of the unit.
About Your Appliance
 WARNING
NEVER use this appliance as a space heater to heat or warm a room. Doing so may result in carbon monoxide poisoning and overheating of the oven.
NEVER cover any slots, holes or passages with materials such as aluminum foil. Doing so blocks air flow and may cause carbon monoxide poisoning. Aluminum foil may also trap heat causing a fire hazard.
NEVER obstruct the flow of combustion and ventilation air by blocking the oven vent or air intakes. Doing so restricts air to the burners and may result in carbon monoxide poisoning.
Do not use the cooktop as a storage area for food or cooking utensils.
Potentially hot surfaces include cooktop, and areas facing the cooktop.
In Case of Fire
Turn off appliance and ventilating hood to avoid spreading the flame. Extinguish flame then turn on hood to remove smoke and odor.
•Smother fire or flame in a pan with a lid or cookie sheet.
•NEVER pick up or move a flaming pan.
Do not use water on grease fires. Use baking soda, a dry chemical or foam-type extinguisher to smother fire or flame.
Cooking Safety
Always place a pan on a surface burner before turning it on. Be sure you know which knob controls which surface burner. Make sure the correct burner is turned on and that the burner has ignited. When cooking is completed, turn burner off before removing pan to prevent exposure to burner flame.
Always adjust surface burner flame so that it does not extend beyond the bottom edge of the pan. An excessive flame is hazardous, wastes energy and may damage the appliance, pan or cabinets above the appliance.
2

IMPORTANT SAFETY INSTRUCTIONS
NEVER leave a surface cooking operation unattended especially when using a high heat setting or when deep fat frying. Boilovers cause smoking and greasy spillovers may ignite. Clean up greasy spills as soon as possible. Do not use high heat for extended cooking operations.
NEVER heat an unopened container on the surface burner. Pressure build-up may cause container to burst resulting in serious personal injury or damage to the appliance.
Use dry, sturdy potholders. Damp potholders may cause burns from steam. Dishtowels or other substitutes should never be used as potholders because they can trail across hot surface burners and ignite or get caught on appliance parts.
Always let quantities of hot fat used for deep fat frying cool before attempting to move or handle.
Do not let cooking grease or other flammable materials accumulate in or near the appliance, hood or vent fan. Clean hood frequently to prevent grease from accumulating on hood or filter. When flaming foods under the hood turn the fan on.
NEVER wear garments made of flammable material or loose fitting or long-sleeved apparel while cooking. Clothing may ignite or catch utensil handles.
Utensil Safety
Use pans with flat bottoms and handles that are easily grasped and stay cool. Avoid using unstable, warped, easily tipped or loose-handled pans. Also avoid using pans, especially small pans, with heavy handles as they could be unstable and easily tip. Pans that are heavy to move when filled with food may also be hazardous.
Be sure utensil is large enough to properly contain food and avoid boilovers. Pan size is particularly important in deep fat frying. Be sure pan will accommodate the volume of food that is to be added as well as the bubble action of fat.
To minimize burns, ignition of flammable materials and spillage due to unintentional contact with the utensil, do not extend handles over adjacent surface burners. Always turn pan handles toward the side or back of the appliance, not out into the room where they are easily hit or reached by small children.
Never let a pan boil dry as this could damage the utensil and the appliance.
Only certain types of glass, glass/ceramic, ceramic or glazed utensils are suitable for cooktop usage without breaking due to the sudden change in temperature.
Follow manufacturer’s instructions when using glass.
This appliance has been tested for safe performance using conventional cookware. Do not use any devices or accessories that are not specifically recommended in this guide. Do not use eyelid covers for the surface units or stovetop grills. The use of devices or accessories that are not expressly recommended in this manual can create serious safety hazards, result in performance problems, and reduce the life of the components of the appliance.
Cleaning Safety
Turn off all controls and wait for appliance parts to cool before touching or cleaning them. Do not touch the burner grates or surrounding areas until they have had sufficient time to cool.
Clean appliance with caution. Use care to avoid steam burns if a wet sponge or cloth is used to wipe spills on a hot surface. Some cleaners can produce noxious fumes if applied to a hot surface.
Important Safety Notice and Warning
The California Safe Drinking Water and Toxic Enforcement Act of 1986 (Proposition 65) requires the Governor of California to publish a list of substances known to the State of California to cause cancer or reproductive harm, and requires businesses to warn customers of potential exposures to such substances.
Users of this appliance are hereby warned that the burning of gas can result in low-level exposure to some of the listed substances, including benzene, formaldehyde and soot, due primarily to the incomplete combustion of natural gas or liquid petroleum (LP) fuels. Properly adjusted burners will minimize incomplete combustion. Exposure to these substances can also be minimized by properly venting the burners to the outdoors.
IMPORTANT NOTICE REGARDING PET BIRDS:
Never keep pet birds in the kitchen or in rooms where the fumes from the kitchen could reach. Birds have a very sensitive respiratory system. Fumes released during an oven self-cleaning cycle may be harmful or fatal to birds. Fumes released due to overheated cooking oil, fat, margarine and overheated non-stick cookware may be equally harmful.
3
IMPORTANT SAFETY INSTRUCTIONS
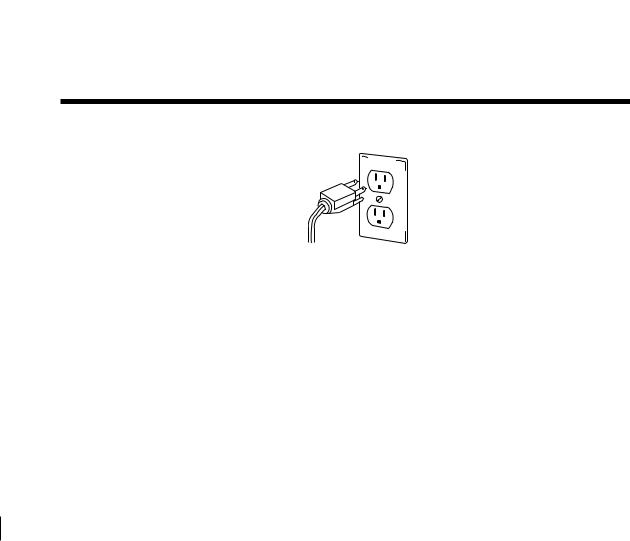
Electrical Connection
Appliances which require electrical power are equipped with a threeprong grounding plug which must be plugged directly into a properly grounded three-hole 120 volt electrical outlet.
Always disconnect power to appliance before servicing.
The three-prong grounding plug offers protection against shock hazards. DO NOT CUT OR REMOVE THE THIRD GROUNDING PRONG FROM THE POWER CORD PLUG.
If an ungrounded, two-hole or other type electrical outlet is encountered, it is the personal responsibility of the appliance owner to have the outlet replaced with a properly grounded three-hole electrical outlet.
Save These Instructions for Future Reference
4

USING YOUR COOKTOP
Surface Controls
 CAUTION
•If flame should go out during a cooking operation, turn the burner off. If a strong gas odor is detected, open a window and wait five minutes before relighting the burner.
•Be sure all surface controls are set to the OFF position prior to supplying gas to the cooktop.
•NEVER touch cooktop until it has cooled. Expect some parts of the cooktop, especially around the burners, to become warm or hot during cooking. Use potholders to protect hands.
Surface Control Knobs
Use to turn on the surface burners. An infinite choice of heat settings is available from Lo to Hi. At the Hi setting a detent or notch may be felt.
Pilotless
Ignition
Pilotless ignition eliminates the need for a constant standing pilot light. Each surface burner has a spark ignitor. Use care when cleaning around the surface burner.
If the surface burner does not light, check if ignitor is broken, soiled or wet.
Setting the Controls
Your cooktop has sealed gas burners with automatic reignition. If the burner flame should go out, the system will automatically spark to re-ignite the burner.
1.Place a pan on the burner grate. (To preserve the grate finish, do not operate the burners without a pan on the grate to absorb the heat from the burner flame.)
2.Push in knob and turn immediately counterclockwise to the desired setting.
•A clicking (spark) sound will be heard and the burner will light. (All ignitors will spark when any surface burner knob is turned on. However, only the selected burner will light.)
Operating During a
Power Failure
1.Hold a lighted match to the desired surface burner head.
2.Push in and turn the control knob slowly to the desired setting.
 CAUTION
•When lighting the surface burners, be sure all of the controls are in the OFF position. Strike the match first and hold it in position before turning the knob.
•Do not leave the cooktop unattended when cooking during a power failure. The automatic re-ignition feature will not operate during a power failure.
Suggested Heat Settings
The size and type of cookware will affect the heat setting. For information on cookware and other factors affecting heat settings, refer to “Cooking Made Simple” booklet.
SETTINGS |
USES |
Hi |
Use Hi to bring liquid to a boil, or reach |
|
pressure in a pressure cooker. Always |
|
reduce setting to a lower heat when |
|
liquids begin to boil or foods begin to |
|
cook. |
|
An intermediate flame size is used to |
|
continue cooking. Food will not cook any |
|
faster when a higher flame setting is |
|
used than needed to maintain a gentle |
|
boil. Water boils at the same tempera- |
|
ture whether boiling gently or vigorously. |
Lo |
Use Lo to simmer foods, keep foods |
|
warm and melt chocolate or butter. |
|
Some cooking may take place on the |
|
Lo setting if the pan is covered. It is |
|
possible to reduce the heat by rotating |
|
the knob toward OFF. Be sure flame is |
|
stable. |
5
USING YOUR COOKTOP
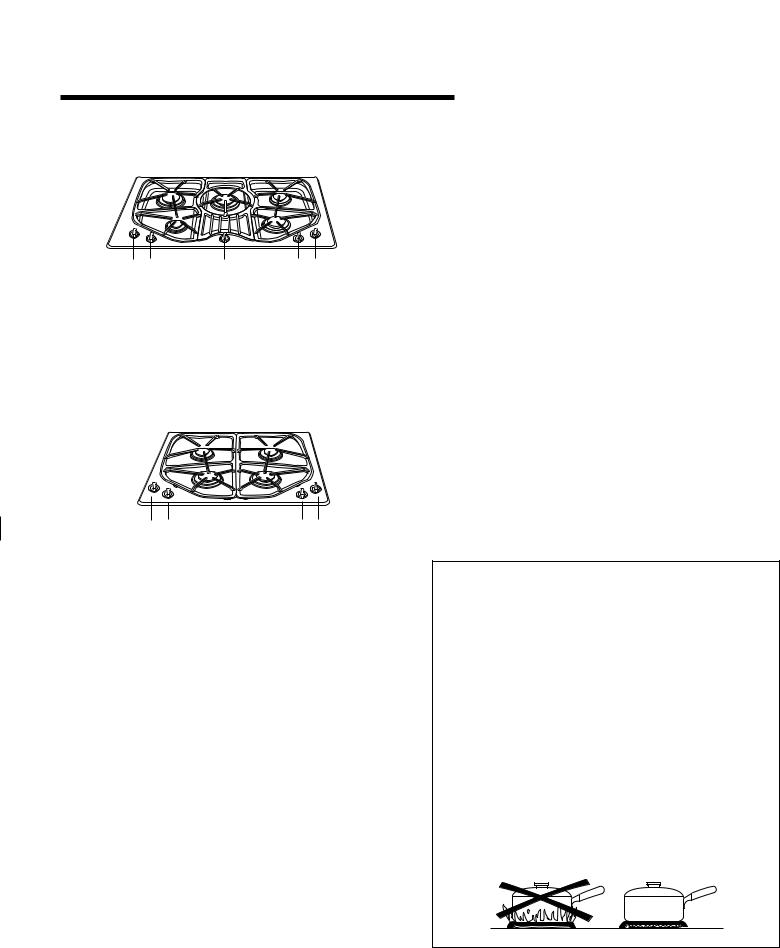
Cooktop at a Glance
MODEL JGC8536
1 |
2 |
3 |
4 |
5 |
1.Left rear surface burner (9,200 BTUs).
2.Left front surface burner (5,000 BTUs on Hi, 650 BTUs on
Lo).
3.Center surface burner (15,000 BTUs).
4.Right front surface burner (12,500 BTUs).
5.Right rear surface burner (5,000 BTUs on Hi, 650 BTUs on
Lo).
MODEL JGC8430B
1 2 |
3 |
4 |
1.Left rear surface burner (10,500 BTUs).
2.Left front surface burner (5,000 BTUs on Hi, 650 BTUs on
Lo).
3.Right front surface burner (15,000 BTUs).
4.Right rear surface burner (9,200 BTUs).
To prevent the cooktop from discoloring or staining:
•Clean cooktop after each use.
•Wipe acidic or sugary spills as soon as the cooktop has cooled as these spills may discolor the surface.
Sealed Burners
The sealed burners are secured to the cooktop and are not designed to be removed. Since the burners are sealed into the cooktop, boilovers or spills will not seep underneath the cooktop.
However, the burners should be cleaned after each use. The head portion of the burner is easily removed for cleaning. (See page 7 for cleaning directions.)
Burner caps must be correctly placed on the burner base for proper operation of the burner.
High Performance Burner*
There is one high speed burner on your cooktop, located in the center or right front position. This burner offers higher speed cooking that can be used to quickly bring water to a boil and for large-quantity cooking.
Simmer Burners*
These burners are located in the left front position and/or the right rear position. The simmer burner offers a lower BTU flame for delicate sauces or melting chocolate.
* BTU ratings will vary when using LP gas.
Burner Grates
The grates must be properly positioned before cooking. Improper installation of the grates may result in chipping of the cooktop. To ensure proper positioning, align bumpers on grate bottom with the indentations in the cooktop.
Do not operate the burners without a pan on the grate. The grate’s porcelain finish may chip without a pan to absorb the heat from the burner flame.
Although the burner grates are durable, they will gradually lose their shine and/or discolor, due to the high temperatures of the gas flame.
Notes :
•A properly adjusted burner with clean ports will light within a few seconds. If using natural gas, the flame will be blue with a deeper blue inner cone.
If the burner flame is yellow or is noisy, the air/gas mixture may be incorrect. Contact a service technician to adjust. (Adjustments are not covered by the warranty.)
With LP gas, some yellow tips on the flames are acceptable. This is normal and adjustment is not necessary.
•With some types of gas, you may hear a “popping” sound when the surface burner is turned off. This is a normal operating sound of the burner.
•To improve cooking efficiency and to prevent possible damage to the cooktop or pan, the flame must be adjusted so it does not extend beyond the edge of the pan.
6

CARE & CLEANING
Cleaning Procedures
 CAUTION
•Be sure appliance is off and all parts are cool before handling or cleaning. This is to avoid damage and possible burns.
•To prevent staining or discoloration, clean appliance after each use.
•If a part is removed, be sure it is correctly replaced.
* Brand names for cleaning products are registered trademarks of the respective manufacturers.
**To order direct, call 1-800-JENNAIR (1-800-536-6247).
PART |
PROCEDURE |
Removable |
• Allow burner to cool. Remove burner cap and wash in soapy water with a plastic scouring pad. For |
Burner Caps |
stubborn soils, clean with a soap-filled, nonabrasive pad or Cooktop Cleaning Creme (Part #20000001)** |
|
and a sponge. |
|
• Do not clean in dishwasher or self-cleaning oven. |
|
|
Sealed Gas |
• Clean frequently. Allow burner to cool. Clean with soap and plastic scouring pad. For stubborn soils, clean |
Burner |
with a soap-filled, nonabrasive pad. |
|
• Be careful not to get water into the center of the burner. |
|
• Use care when cleaning the ignitor. If the ignitor is wet or damaged the surface burner will not light. |
|
• To ensure even cooking performance, keep burner ports free of food soils/debris. |
|
|
Burner Grates |
• Wash grates with warm, soapy water and a nonabrasive, plastic scrubbing pad. For stubborn soils, clean |
|
with a soap-filled, nonabrasive pad or a sponge and Cooktop Cleaning Creme (Part #20000001)** and a |
|
sponge. If soil remains, reapply Cooktop Cleaning Creme, cover with a damp paper towel and soak for 30 |
|
minutes. Scrub again, rinse and dry. |
|
• The grates are made of porcelain on cast iron and are very durable, however, they will gradually lose |
|
their shine and/or discolor. This is due to exposure to high temperatures from the gas flame. |
|
• Do not clean in dishwasher or self-cleaning oven. |
|
|
Control Knobs |
• Remove knobs in the OFF position by pulling up. |
|
• Wash, rinse and dry. Do not use abrasive cleaning agents as they may scratch the finish. |
|
• Turn on each burner to be sure the knobs have been correctly replaced. |
|
|
Cooktop and |
Porcelain enamel is glass fused on metal and may crack or chip with misuse. It is acid resistant, not acid proof. |
Porcelain |
All spillovers, especially acidic or sugary spillovers, should be wiped up immediately with a dry cloth. |
Enamel |
• When cool, wash with soapy water, rinse and dry. |
|
• Never wipe off a warm or hot surface with a damp cloth. This may cause cracking or chipping. |
|
• Never use oven cleaners, abrasive or caustic cleaning agents on exterior finish of range. |
|
|
Cooktop- |
• DO NOT USE ANY CLEANING PRODUCT CONTAINING CHLORINE BLEACH. |
Stainless Steel |
• ALWAYS WIPE WITH THE GRAIN WHEN CLEANING. |
(select models) |
• DO NOT USE ORANGE OR ABRASIVE CLEANERS. |
|
• Daily Cleaning/Light Soil –– Wipe with one of the following - soapy water, white vinegar/water solution, |
|
Formula 409 Glass and Surface Cleaner* or a similar glass cleaner - using a sponge or soft cloth. Rinse |
|
and dry. To polish and help prevent fingerprints, follow with Stainless Steel Magic Spray* (Part No. |
|
20000008)**. |
|
• Moderate/Heavy Soil –– Wipe with one of the following - Bon Ami, Smart Cleanser, or Soft Scrub* - |
|
using a damp sponge or soft cloth. Rinse and dry. Stubborn soils may be removed with a damp multi- |
|
purpose Scotch-Brite* pad; rub evenly with the grain. Rinse and dry. To restore luster and remove streaks, |
|
follow with Stainless Steel Magic Spray*. |
|
• Discoloration –– Using a damp sponge or soft cloth, wipe with Cameo Stainless Steel Cleaner*. Rinse |
|
immediately and dry. To remove streaks and restore luster, follow with Stainless Steel Magic Spray*. |
|
|
7

TROUBLESHOOTING
PROBLEM |
SOLUTION |
Surface burner fails to light. |
• Check to be sure plug is securely inserted into receptacle. |
|
• Check or re-set circuit breaker. Check or replace fuse. |
|
• Check power supply. |
|
• Check to be sure burner is correctly rated for your kind of gas. |
|
• Check to be sure burner ports or ignition ports are not clogged. |
|
• Check to be sure ignitor is dry and clicking. Burner will not light if ignitor is damaged, |
|
soiled or wet. If ignitor doesn’t click, turn control knob OFF. |
|
• Check to be sure burner cap is correctly seated on the burner base. |
|
|
Surface burner flame lifts |
• Check to be sure a pan is sitting on the grate above. |
off ports. |
• Contact an authorized Jenn-Air servicer. |
|
|
The flame is uneven. |
• Burner ports may be clogged. |
|
• Flame may need to be adjusted. Contact an authorized Jenn-Air servicer. |
|
|
Surface burner flame is |
• Some yellow tips on the flame are acceptable when using LP gas. |
yellow in color. |
• Contact an authorized Jenn-Air servicer. |
|
|
8

JENN-AIR® COOKING APPLIANCE WARRANTY
LIMITED WARRANTY
For one year from the date of purchase, when this major appliance is operated and maintained according to instructions attached to or furnished with the product, Jenn-Air brand of Whirlpool Corporation or Whirlpool Canada LP (hereafter “Jenn-Air”) will pay for factory specified parts and repair labor to correct defects in materials or workmanship. Service must be provided by a Jenn-Air designated service company. This limited warranty is valid only in the United States or Canada and applies only when the major appliance is used in the country in which it was purchased. Outside the 50 United States and Canada, this limited warranty does not apply. Proof of original purchase date is required to obtain service under this limited warranty.
SECOND THROUGH FIFTH YEAR LIMITED WARRANTY ON CERTAIN COMPONENT PARTS
In the second through fifth years from the date of purchase, when this appliance is operated and maintained according to instructions attached to or furnished with the product, Jenn-Air will pay for factory specified parts for the following components (if applicable to the product) if defective in materials or workmanship:
■ |
Electric element |
■ |
Electronic controls |
■ Touch Pad and microprocessor |
■ |
Magnetron tube |
|
■ |
Glass ceramic cooktop: if due to thermal breakage |
■ |
Sealed gas burners |
ITEMS EXCLUDED FROM WARRANTY
This limited warranty does not cover:
1.Service calls to correct the installation of your major appliance, to instruct you on how to use your major appliance, to replace or repair house fuses, or to correct house wiring or plumbing.
2.Service calls to repair or replace appliance light bulbs, air filters or water filters. Consumable parts are excluded from warranty coverage.
3.Repairs when your major appliance is used for other than normal, single-family household use or when it is used in a manner that is contrary to published user or operator instructions and/or installation instructions.
4.Damage resulting from accident, alteration, misuse, abuse, fire, flood, acts of God, improper installation, installation not in accordance with electrical or plumbing codes, or use of consumables or cleaning products not approved by Jenn-Air.
5.Cosmetic damage, including scratches, dents, chips or other damage to the finish of your major appliance, unless such damage results from defects in materials or workmanship and is reported to Jenn-Air within 30 days from the date of purchase.
6.Any food loss due to refrigerator or freezer product failures.
7.Costs associated with the removal from your home of your major appliance for repairs. This major appliance is designed to be repaired in the home and only in-home service is covered by this warranty.
8.Repairs to parts or systems resulting from unauthorized modifications made to the appliance.
9.Expenses for travel and transportation for product service if your major appliance is located in a remote area where service by an authorized Jenn-Air servicer is not available.
10.The removal and reinstallation of your major appliance if it is installed in an inaccessible location or is not installed in accordance with published installation instructions.
11.Major appliances with original model/serial numbers that have been removed, altered or cannot be easily determined. This warranty is void if the factory applied serial number has been altered or removed from your major appliance.
The cost of repair or replacement under these excluded circumstances shall be borne by the customer.
DISCLAIMER OF IMPLIED WARRANTIES; LIMITATION OF REMEDIES
CUSTOMER'S SOLE AND EXCLUSIVE REMEDY UNDER THIS LIMITED WARRANTY SHALL BE PRODUCT REPAIR AS PROVIDED HEREIN. IMPLIED WARRANTIES, INCLUDING WARRANTIES OF MERCHANTABILITY OR FITNESS FOR A PARTICULAR PURPOSE, ARE LIMITED TO ONE YEAR OR THE SHORTEST PERIOD ALLOWED BY LAW. JENN-AIR SHALL NOT BE LIABLE FOR INCIDENTAL OR CONSEQUENTIAL DAMAGES. SOME STATES AND PROVINCES DO NOT ALLOW THE EXCLUSION OR LIMITATION OF INCIDENTAL OR CONSEQUENTIAL DAMAGES, OR LIMITATIONS ON THE DURATION OF IMPLIED WARRANTIES OF MERCHANTABILITY OR FITNESS, SO THESE EXCLUSIONS OR LIMITATIONS MAY NOT APPLY TO YOU. THIS WARRANTY GIVES YOU SPECIFIC LEGAL RIGHTS, AND YOU MAY ALSO HAVE OTHER RIGHTS WHICH VARY FROM STATE TO STATE OR PROVINCE TO PROVINCE.
If outside the 50 United States and Canada, contact your authorized Jenn-Air dealer to determine if another warranty applies.
If you need service, first see the “Troubleshooting” section of the Use & Care Guide. After checking “Troubleshooting,” you may find additional help by checking the “Assistance or Service” section or by calling Jenn-Air. In the U.S.A., call 1-800-688-1100. In Canada,
call 1-800-807-6777. |
9/07 |
 Loading...