


English
®
JBL CINEMA SOUND POWERED
CS3/CS5 DVD RECEIVER
OWNER’S GUIDE
TABLE OF CONTENTS
3Introduction
4Safety Information
4Unpacking
5Terminology
6Features
7Front-Panel Controls
8Front-Panel Display
9Rear-Panel Connections
11Remote Control
13Basic Information
13About This Manual
13Regional Coding
System Connection
14Installation and Connections
14Audio Connections
14Video Connections
15Optional Audio Connections
15Speaker Placement
16Connecting AC Power
16 First Turn-On
Playback Basics
16Basic Playback
17Disc Playback Features
17 Skipping Tracks or Titles/Chapters
17 Fast-Motion Playback/Fast Search
17 Freeze Frame and Frame Advance (With DVD Only)
17 Slow-Motion Playback (With DVD Only)
17 About DivX Movie Files
17 Surround Modes
System Setup
18System Defaults
18Setup Menu
18System Settings
19Display Language
19Preferred Subtitle Language
19Panel Time-Out
19Status Bar Time-Out
19Parental Control
19Disc Recognition
19PBC Support
19Screen Saver
19Show Angle Icon
19Audio Settings
19Preferred Audio Language
19Dynamic Range
19Delay Unit
19Tone Control
19Bass Level
19Treble Level
19DVD Sound Mode
20Audio Adjustment
20 Delay
20Output Level Adjustment
20Video Settings
20Aspect Ratio
20TV Standard
20Scan Type
20Video Output
20SCART Output
20Video Mode
21Video Resolution
21 Video Adjustment
Test Screen
22 Test Screen
22 TV Picture Adjustment With Test Screen
Player/Radio Menu
23 Using the Status Bar Menu
23 Player Menu
23 Information Displays
23 Programmed Play
Radio Menu
24Rearranging the Station List
24Selecting Presets
25Removing Presets
25 Auto Preset Function
25 RDS Station ID
25 Surround Mode for Tuner
TV Menu, AUX Menu, Digital In Menu
26TV Menu
26AUX Menu
26Digital In Menu
27Surround Modes
USB Menu
28 USB Menu
Remote Control
29 Learning Codes From a Remote Control
29 Erasing Learned Codes
29 Macro Programming
DVD Languages Codes
31 Languages Codes
Troubleshooting
32 Troubleshooting
Glossary
34 Glossary
Specifications
35 Specifications
Typographical Conventions
In order to help you use this manual with the remote control, frontpanel controls and rear-panel connections, certain conventions have been used.
Example – (bold type) indicates a specific remote control or frontpanel button, or rear-panel connection jack
EXAMPLE – (OCR type) indicates a message that is visible on the front-panel information display
– (number in a square) indicates a specific front-panel control
– (number in a circle) indicates a rear-panel connection
0– (number in an oval) indicates a button or indicator on the remote
A– (letter in a square) indicates an indicator on the front-panel display
The appearance of the text or cursor for your receiver’s on-screen menus may vary slightly from the illustrations in this manual. Whether the text appears in all uppercase or upperand lowercase characters, performance and operation remain the same.

INTRODUCTION
Thank you for choosing JBL®!
With the purchase of a JBL Cinema Sound CS3/CS5, you are about to begin many years of listening enjoyment.
Designed to provide all the excitement and detail of movie soundtracks and every nuance of musical selections, the CS3/CS5 is truly a multichannel system for the new millennium.
CS3/CS5 DVD receivers have been engineered so that it is easy to take advantage of all the power of their digital technology. To obtain the maximum enjoyment from your new system, we urge you to read this manual. A few minutes spent learning the functions of the various controls will enable you to enjoy all the power JBL Cinema Sound is able to deliver.
If you have any questions about this product, its installation or its operation, please contact your retailer or custom installer. They are your best local sources of information.
Description and Features
The CS3/CS5 is among the most versatile home cinema systems available, incorporating an audio/video receiver, a DVD-Audio player and a complete 5.1 loudspeaker system in one complete system solution. In addition to Dolby® Digital and DTS® decoding for digital sources, the Dolby Pro Logic® II mode for Matrix surround-encoded or Stereo recordings is available for use with sources such as CD, VCR, TV broadcasts and the system’s own FM tuner.
To enable you to get the maximum quality from DVDs, the CS3/CS5 is equipped with the latest in design techniques, including advanced 10-bit video digital-to-analog converters (DAC) and video (composite), S-video and RGB video (RGB via SCART) outputs, to ensure that you get all the quality inherent in today’s DVD medium. For optimal playback of NTSC and PAL DVDs with compatible highdefinition display devices, the CS3/CS5 DVD receiver is equipped with an HDMI™ output and progressive-scan component video outputs.
Along with conventional video and CD audio discs, the CS3/CS5 is also compatible with MP3, CD-R and CD-RW as well as DivX® and VCD discs.
As portable USB devices increase in popularity, JBL’s CS3/CS5 is among the first integrated home theater systems that allow mobile interconnectivity by playing compatible music or image files from portable devices via two USB On-the-Go inputs.
A wide range of programming features makes it easy to program an evening’s worth of entertainment. When playing DVDs, easy-to- understand on-screen menus and icons make it simple to change languages, soundtracks, subtitles or aspect ratio, while a parentallock function enables you to control which discs may be viewed by younger members of the household.
DVD players are among the fastest growing consumer electronics products ever brought to market, but this may, nevertheless, be the first DVD player you’ve owned. Although many of the features of the DVD resemble those of standard CD players, there are a number of functions with which you may be unfamiliar. To ensure that you are able to take advantage of all the power and flexibility the DVD has to offer, we encourage you to review this quick setup manual. That small investment of your time will pay major dividends in the enjoyment you will get from proper use of your DVD receiver.
■Plays a wide range of video and audio formats, including DVDVideo discs, VCD, standard CD audio discs, CD-R/RW, DVD- R/RW, DVD-+R/RW, audio discs and MP3 discs
■DVD-Audio playback for richer detail, expanded dynamic range and improved realism
■HDMI™ output for digital audio and video connection to an HD-Ready screen
■Extensive bass management options for DVD-Audio with speaker setup, output level adjustment and delay settings
■High-quality video playback, 10-bit DACs, progressive scan and component video outputs
■Easy-to-use on-screen navigation system
■Playback of MP3 and WMA audio discs and JPEG image files
■Simultaneous playback of MP3 and JPEG files
■Sideand rear-panel USB On-the-Go connections for playing compatible music or image files from portable devices
■Extensive programming capability for audio and video discs
■Parental-lock controls prevent unauthorized viewing of restricted movies
■Playback of DivX® compressed video files
■Multiple options for language, soundtrack and subtitle selection
■Multiple-angle capabilities with specially encoded DVD discs
■Ergonomically designed remote control
■Multiple digital inputs and outputs
■Multiple analog inputs and outputs
■High-definition on-screen menu and display system
■Subwoofer trigger to control subwoofer on/off
IMPORTANT NOTES:
This manual should be read in conjunction with the owner’s manual of the accompanying loudspeaker system. The instructions found therein should be followed with respect to loudspeaker operation and safety.
Use the CS3/CS5 receiver only with the loudspeaker system supplied. Failure to do so may cause damage to either the receiver or the loudspeakers and will invalidate any warranty.
All of the optional system settings have been preset at our factory for correct operation of the system. All you have to do is insert a disc, sit back, and enjoy a great home theater experience.
You may want to change some of the optional settings. A description of all the optional settings and instructions for changing them are found in the second half of the manual.
NOTE: This player is designed and manufactured for compatibility with Region Management Information that is encoded on
most DVD discs. This player is designed only for playback of discs with Region Code 2, or for discs that do not contain 2 Region Code information. If there is any other Region Code on a disc, that disc will not play on the DVD.
English
3
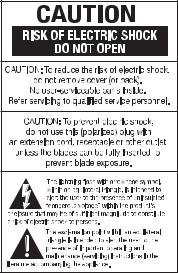
SAFETY INFORMATION
This system was designed to provide you with many years of reliable operation with a minimum of care and maintenance. Every component in your system was in perfect working condition when it left our factory. If you experience any problems with the set-up or operation of this system, please review the Troubleshooting guide at the end of this manual before you contact your authorized
JBL dealer.
Important Safety Information
Verify Line Voltage Before Use
Your CS3/CS5 has been designed for use with 220–240-volt AC current. Connection to a line voltage other than that for which it is intended can create a safety and fire hazard, and may damage the unit.
If you have any questions about the voltage requirements for your specific model, or about the line voltage in your area, contact your dealer before plugging the unit into a wall outlet.
Do Not Use Extension Cords
To avoid safety hazards, use only the power cord attached to your unit. We do not recommend that extension cords be used with this product. As with all electrical devices, do not run power cords under rugs or carpets or place heavy objects on them. Damaged power cords should be replaced immediately by an authorized service depot with a cord meeting factory specifications.
Handle the AC Power Cord Gently
When disconnecting the power cord from an AC outlet, always
pull the plug, never pull the cord. If you do not intend to use the unit for any considerable length of time, disconnect the plug from the AC outlet.
Do Not Open the Cabinet
There are no user-serviceable components inside this product. Opening the cabinet may present a shock hazard, and any modification to the product will void your guarantee. If water or any metal object such as a paper clip, wire or a staple accidentally falls inside the unit, disconnect it from the AC power source immediately, and consult an authorized service station.
Installation Location
■To ensure proper operation and to avoid the potential for safety hazards, place the unit on a firm and level surface. When placing the unit on a shelf, be certain that the shelf and any mounting hardware can support the weight of the product.
■Make certain that proper space is provided both above and below the unit for ventilation. If this product will be installed in a cabinet or other enclosed area, make certain that there is sufficient air movement within the cabinet. Under some circumstances a fan may be required.
■Do not place the unit directly on a carpeted surface.
■Avoid installation in extremely hot or cold locations, or an area that is exposed to direct sunlight or heating equipment.
■Avoid moist or humid locations.
■Do not obstruct the ventilation slots on the top of the unit, or place objects directly over them.
Cleaning
When the unit gets dirty, wipe it with a clean, soft, dry cloth. If necessary, wipe it with a soft cloth dampened with mild soapy water, then a fresh cloth with clean water. Wipe dry immediately with a dry cloth. NEVER use benzene, aerosol cleaners, thinner, alcohol or any other volatile cleaning agent. Do not use abrasive cleaners, as they may damage the finish of metal parts. Avoid spraying insecticide near the unit.
Moving the Unit
Before moving the unit, be certain to disconnect any interconnection cords with other components, and make certain that you disconnect the unit from the AC outlet.
Unpacking
The carton and shipping materials used to protect your new receiver during shipment were specially designed to cushion it from shock and vibration. We suggest that you save the carton and packing materials for use in shipping if you move, or should the unit ever need repair.
To minimize the size of the carton in storage, you may wish to flatten it. This is done by carefully slitting the tape seams on the bottom and collapsing the carton. Other cardboard inserts may be stored in the same manner. Packing materials that cannot be collapsed should be saved along with the carton in a plastic bag.
If you do not wish to save the packaging materials, please note that the carton and other sections of the shipping protection are recyclable. Please respect the environment and discard those materials at a local recycling center.
Copyright
Audio-visual material may consist of copyright works which must not be recorded without the permission of the owner of the copyright.
Please refer to relevant laws covering copyright protection.
Copy Protection
This DVD player supports Macrovision copy protection. On DVD discs that include a copy protection code, if the contents of the DVD disc are copied using a VCR, the copy protection code prevents the videotape copy from playing normally.
For Optimal Performance
The receiver is a precision device that is constructed using extremely accurate technology. Soiling or friction affecting the pickup lens or disc drive can impair the image quality. In the worst case, neither video nor audio will be played back. To obtain optimal picture quality, the player should be checked (cleaning and replacement of some parts) every 1,000 hours. Note that this period varies, depending on the
environment (temperature, humidity, dust) in which the
player is used. Do not attempt to clean the pickup
lens yourself.
4

TERMINOLOGY
Since they share some of the characteristics and technology of CD players, many of the terms and operational concepts used in a DVD player are similar to what you may be familiar with from CD players and changers, or older video disc formats such as Laser Disc.
How-ever, if this is your first DVD product, some of the terms used to describe the features of a DVD player may be unfamiliar. The following explanations should solve some of the mysteries of DVD, and help you to enjoy all the power and flexibility of the DVD format and the DVD.
With the arrival of DVD, disc data capacity has increased dramatically. On a DVD Video disc most of this capacity is taken up by MPEG 2 video and the multichannel movie soundtrack in Dolby Digital and/or DTS. This information is compressed.
Aspect Ratio: This is a description of the width of a video image in relation to its height. A conventional video screen is four units wide for every three units of height, that’s why the ratio is called ”4:3.” Newer wide aspect ratio video displays are 16 units wide for every nine units of height, making them more like the screen in a movie theater. The program material on a DVD may be recorded in either format and, in addition, you may configure the DVD to play back in either format, depending on the features recorded on a disc.
High-Definition Multimedia Interface (HDMI): HDMI has emerged as the digital standard for connecting high-definition devices, displays and components, and provides for the pristine transmission of high-definition digital video and digital audio via a single cable. HDMI is the first and only digital interface for consumer electronics devices that can carry uncompressed highdefinition video, compressed or uncompressed multichannel audio and command data, allowing customers to obtain pure digital picture and sound directly from the source (as it was meant to be seen and heard).
USB On-the-Go: Due to its widespread acceptance, USB is becoming the de facto industry standard for connecting peripherals to PCs and laptops. Many of the new peripherals using USB are also portable devices.
As these portable devices increase in popularity, there is a growing need for them to communicate directly with each other when a PC is not available – for instance, in consumer electronics products.
The USB On-the-Go technology addresses this need for mobile interconnectivity.
Title: For a DVD, a title is defined as an entire movie or program. There can be as many chapters within a title as the producers decide to include. Most discs include only one title, but some may have more than one, to give you a “Double Feature” presentation.
Chapter: DVD programs are divided into chapters and titles. Chapters are the subsections programmed into a single title on a disc, and may be compared to the individual tracks on an audio CD.
RGB Video: This is a new form of video signal that eliminates many of the artifacts of traditional composite video signals by splitting the signal into the three fundamental colors Red, Green and Blue (RGB). With an RGB connection (via SCART), you will see greater picture resolution and eliminate many picture imperfections such as the moiré patterns often seen on checkered patterned cloths. However, in order to benefit from RGB video, you must have a video display with an RGB compatible SCART input.
Progressive Scan: DVD offers progressive scan video outputs for use with compatible high-resolution televisions and projectors. Before DVD, no consumer medium could store, transmit or display video with full resolution. To conserve bandwidth, analog compression (interlacing) is employed: first the odd-numbered lines of a frame are displayed, followed by the even-numbered lines. The result is that only half of the video image is drawn at one time; the viewer’s brain must reassemble the complete image. This is
acceptable, if the monitor is not too large and if there is not too much motion in the image. Large displays and fast-moving images reveal the limitations of this system. Thanks to DVD’s immense data capacity, images are now stored intact (progressively), so that all the lines in each frame (odd and even) are shown at the same time. But because most TVs cannot handle a progressive signal, conventional DVD players generate an interlaced output for compatibility. This JBL DVD player is among the select few DVD players with true progressive scan video output (NTSC and PAL) for use with compatible TVs and CRT projectors, and with all plasma, LCD and DLP display devices via the component video output. The result is 40% greater light output than a conventional TV and a stunningly detailed high-definition image, along with an almost complete absence of visible scanlines and motion artifacts. Of course, traditional Y/Pr/Pb component video, SCART, S-video and composite video outputs are included for use with conventional televisions and projectors.
Multiple-Angle: DVDs have the capability to show up to four different views of the same scene in a program. When a disc is encoded with multiple-angle information, pressing the Angle button will enable you to switch between these different views. Note that at present, few discs take advantage of this capability and, when they do, the multiple-angle technology may only be present for short periods of time within the disc. Producers will usually insert some sort of icon or graphic in the picture to alert you to the availability of multiple viewing angles.
Reading: This is a message that you will see after you´ve loaded the disc and the tray has closed. It refers to the fact that the player must first examine the contents of the disc to see if it is a CD or DVD, and then extract the information about the type of material on the disc, such as languages, aspect ratios, subtitles, number of titles and more. The slight delay while the contents of the disc are read is normal.
Resume: The operation of the Stop button on the DVD works differently from what you are used to on CD players. On a traditional CD player, when you press the Stop button, the unit does just that – it stops playback. On a CD player, when you press the start button again, the disc starts from the beginning. With the DVD, however, you have two options when playing DVD discs. Pressing Stop once will stop playback, but it actually puts the unit in the Resume mode. This means that you can turn the machine off and, when you press play the next time, the disc will resume or continue from the point on the disc where the Stop button was pressed. This is helpful if you are watching a movie and must interrupt your viewing session but wish to pick up where you left off. Pressing the Stop button twice will stop the machine in a traditional manner and, when the disc is played again, it will start from the beginning.
In resume mode, the cover of the DVD will be displayed, if available. Otherwise, the JBL screen will appear.
DivX: DivX is the name of a revolutionary new video codec which is based on the MPEG-4 compression standard for video. This DVD player will playback discs created with DivX software. The DVD player’s playback functionalities of DivX video discs will vary depending on the DivX software version used for creating your movies. For more information about the different software versions of DivX, please go to www.divx.com
English
5
FEATURES
High-Quality Video
•High-Definition Multimedia Interface (HDMI) for a single wire, digital connection to your HD-Ready screen.
•Advanced, sophisticated 10-bit MPEG-2 video decoding circuits.
•Progressive-scan component video ouputs (NTSC and PAL).
•Direct RGB output via SCART (selectable) for optimal video performance when HDMI or component video connections are not available. SCART connector also configurable for composite video output.
•Test-screen videos available for testing video performance and setup.
•Pure PAL with NTSC disc due to true NTSC/PAL conversion.
•Dual-layer compatibility for extended play DVD.
•Playback of JPEG image files.
High-Quality Digital Audio
•High-quality 5.1 digital surround sound from DVD-Audio, DTS or Dolby Digital discs.
•With linear PCM audio at 16-24 bits and 44–96kHz, audio quality exceeding that of CD becomes possible.
•Coaxial digital audio output.
Many Convenient Features
•On-screen menu icons for disc information or player information and access to many major functions of this unit.
•Thumbnails for easy search of image files.
•Subtitles may be displayed in one of numerous languages.*
•The multi-angle function allows you to choose the viewing angle of scenes which were shot from a number of different angles (limited to DVDs recorded with multiple camera angles).
•Multiple options for dialog language and soundtrack selection (limited to DVDs recorded with multiple dialogue languages or soundtracks).
•Intuitive menu operating system.
•Four-step Zoom during Play and Pause.
•Backlit, ergonomically designed remote control.
•Future software upgrades; visit www.jbl.com.
* The number of languages recorded depends on the software.
Compatible With CD as Well as DVD
•The CS3/CS5 will play any conventional Audio CD or recordable (CD-R) or erasable CD (CD-RW), MP3, WMA (v9) or any DivX or VCD or DVD-Audio and DVD-Video with the Region Code 0 or 2.
Disc Formats Supported by This Player
The unit can play the following disc formats (8cm and 12cm size):
•DVD
•DVD-AUDIO
•DVD-R
•DVD-RW
•DVD+R
•DVD+RW
•CD
•CD-R
•CD-RW
•VCD
•S-VCD
•WMA (v9)
NOTE: Due to differences in the format of certain discs, it is possible that some discs may include a mix of features that are not compatible with the DVD. Similarly, although the DVD is capable of a wide range of features, not all discs include every capability of the DVD system. For example, although the DVD is compatible with multi-angle discs, that feature is only possible when the disc is specially encoded for multipleangle play. In addition, the DVD is capable of playing back both Dolby Digital and DTS soundtracks, but the number and types of tracks available will vary from disc to disc. To make certain that a specific feature or soundtrack option is available, please check the options noted on the disc jacket.
•Playback capability for CD-R, CD-RW, WMA, JPEG, MP3, DivX, VCD/SVCD, DVD-R, DVD+R, DVD-RW and DVD+RW discs may vary due to variations in the quality of the disc and the recorder used to create the disc.
•The CS3/CS5 is compatible with most discs recorded with files encoded using MP3 or Windows Media® 9, as well as JPEG still images. However, note that variations in the encoder or codec used and the bit rate of the encoding may affect the CS’s ability to play back a specific disc. As a result, we cannot guarantee complete compatibility with all encoders and versions of the codecs. For best results, we recommend that MP3 files be encoded at bit rates ranging between 32kbps and 320kbps. WMA files should be encoded at bit rates between 64kbps and 320kbps. Although the CS system is capable of playing some WMA 9 files, not all features of version 9 are supported. JPEG files should contain no more than 5 megapixels, and the file size should be no larger than 5Mb.
Upgradeability via Internet
The ”firmware” controlling the functionality of the JBL CS system is fully upgradeable. In the event of future improvements to its operations and features, it will be possible to download firmware upgrades from www.jbl.com. All you have to do is create a CD-R with the data and insert it in the DVD for an automatic upgrade.
Packing List
(1) JBL CS3/CS5 DVD player/receiver
(1) JBL CS460/CS680 home theater speaker system
(1) Remote control
(3) AAA batteries
(1) A/V cable for stereo analog audio and composite video
(1) S-video cable
(1) Remote extension cable
(1) Owner’s manual
6
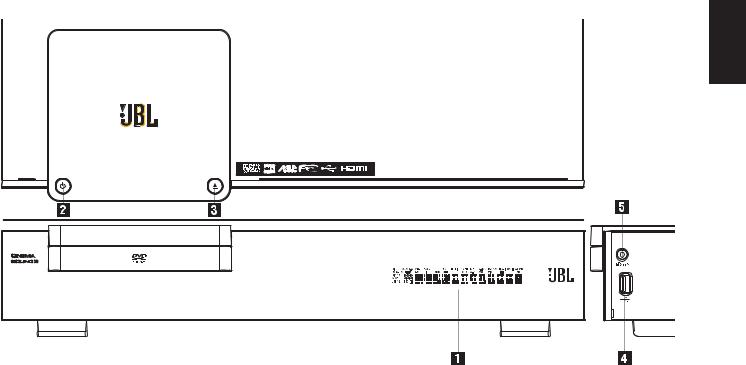
FRONT-PANEL CONTROLS
English
Main Information Display |
3 USB On-the-Go Input |
1 Power On/Off (Standby) |
4 Headphone Jack |
2 Open/Close |
|
Main Information Display: This display delivers messages and status indications to help you operate the CS3/CS5 receiver.
1 Power On/Off (Standby): Press the button once to turn the CS3/CS5 receiver on, press it again to put the unit in the Standby mode. Note that when the CS3/CS5 receiver is switched on, the power indicator around the button turns blue.
2 Open/Close: Press this button to open or close the disc tray.
3 USB On-the-Go Input: This input may be used to temporarily connect a USB thumb device or portable hard disk for direct playback of audio, image of video files or a USB hub. The USB inputs are designed to power a single USB device at a time. If additional hard disks are connected through a hub, it is necessary that additional external power supplies are used to power the hub and hard disks.
4 Headphone Jack: This jack may be used to listen to the system’s output through a pair of headphones. Be certain that the headphones have a standard 3.5mm stereo phone plug. Note that the main room speakers will automatically be turned off when the headphone jack is in use.
7
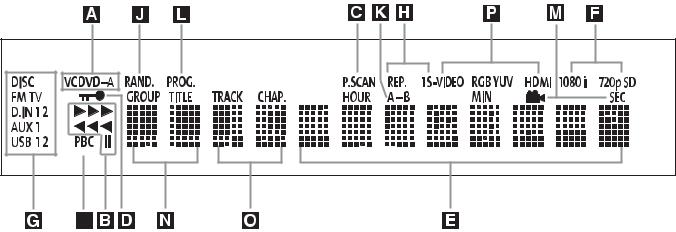
FRONT-PANEL DISPLAY
ADisc Type Indicators
BPlayback-Mode Indicators
CProgressive Scan Indicator
DParental Lock Indicator
ETime Indicators
FVideo Format Indicators
GSource Indicators
HRepeat Indicators
ADisc Type Indicators: The CD, DVD or DVD-Audio indicator will light to show the type of disc currently being played.
BPlayback-Mode Indicators: These indicators light to show the current playback mode:
N Lights when a disc is playing in the normal mode.
H Lights when the disc is in the Fast Search Forward mode.
1 Lights when the disc is paused.
G Lights when the disc is in the Fast Search Reverse mode.
CProgressive Scan Indicator: This indicator lights when the unit sends out a progressive scan signal.
DParental Lock Indicator: This indicator lights when the parentallock system is engaged in order to prevent anyone from changing the rating level without a code.
ETime Indicators: These positions in the indicator will show the running time of a DVD in play. When a CD is playing, these indicators will show the current track time, time remaining in the current track, or the total remaining time on the disc.
NOTE: The Indicators NOEwill also display text messages about the DVD’s status, including Reading when a disc is loading, STANDBY when the unit is turned off, and Disc Error when a disc not compatible with the DVD is put into the play position.
FVideo Format Indicators: These indicators will represent the video format currently playing.
GSource Indicators: These indicators will light to show which source is currently selected.
IVCD Playback Control Indicator
JRandom Indicator
KA-B Repeat Indicator
LProgram Indicator
MAngle Indicator
NTitle Indicators
OChapter/Track Number Indicators
PVideo Output Indicators
HRepeat Indicators: These indicators light when any of the Repeat functions are in use.
IVCD Playback Control Indicator: This indicator lights when the playback control function is turned on with VCDs.
JRandom Indicator: This indicator lights when the unit is in the Random Play mode.
KA-B Repeat Indicator: This indicator lights when a specific passage for repeat playback has been selected.
LProgram Indicator: This indicator lights when the programming functions are in use.
MAngle Indicator: This indicator blinks when alternative viewing angles are available on the DVD currently playing.
NTitle Indicators: These two positions in the display will show the current title number when a DVD is playing.
OChapter/Track Number Indicators: When a DVD is playing, these two positions in the display will show the current chapter. When a CD is playing, they will show the current track number.
PVideo Output Indicators: These indicators will represent the active video output.
8
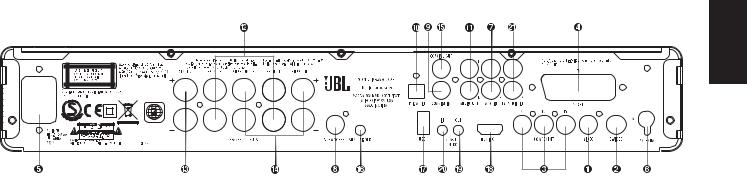
REAR-PANEL CONNECTIONS
English
Composite Video Output |
Subwoofer Output |
Coaxial Digital Output |
S-Video Output |
Coaxial Digital Input |
Subwoofer Trigger Output |
Component Video Outputs |
Optical Digital Input |
USB On-The-Go Input |
SCART TV Output |
Analog Audio Outputs |
HDMI Output |
AC Power Cord |
Front Speaker Outputs |
Remote IR Output |
FM Antenna |
Center Speaker Outputs |
Remote IR Input |
Audio In |
Surround Speaker Outputs |
TV Audio In |
Composite Video Output: Connect this jack to the video input on a television or video projector.
S-Video Output: Connect this jack to the S-video input on a television or video projector.
Component Video Outputs: These outputs carry the component video signals for connection to display monitors with component video inputs. For standard analog TVs or projectors with inputs marked Y/Pr/Pb or Y/Cr/Cb, connect these outputs to the corresponding inputs. If you have a high-definition TV or projector that is compatible with high-scan-rate progressive video, connect these jacks to the “HD Component” inputs. Note that if you are using a progressive scan display device, then ”Progressive” must be selected in the Video Setup menu, in order to take advantage of the progressive-scan circuitry. See page 20 for more information on progressive-scan video.
IMPORTANT: These jacks should NOT be connected to standard composite video inputs.
SCART Out (TV): If your TV has a SCART socket, you can connect a SCART cable to your TV and to your DVD player for improved video quality. The SCART cable carries both audio and video. You can select composite video or RGB video for that SCART connector’s video output signal.
AC Power Cord: Connect this plug to an AC outlet. If the outlet is controlled by a switch, make sure it is in the On position.
FM Antenna: Connect to the supplied FM antenna.
Audio In: Connect to a line-level analog audio source: TV, tape player, Minidisc, PC, etc.
Subwoofer Output: Connect to the SUB/LFE input on the subwoofer.
Coaxial Digital Input: Connect the coax digital output from a DVD player, HDTV receiver, LD player, MD player, satellite receiver or CD player to this jack. The signal may be either a Dolby Digital signal, DTS signal or a standard PCM digital source. Do not connect the RF digital output of an LD player to these jacks.
Optical Digital Input: Connect the optical digital output from a DVD player, HDTV receiver, LD player, MD player, satellite receiver or CD player to this jack. The signal may be either a Dolby Digital signal, DTS signal or a standard PCM digital source.
Analog Audio Outputs: Connect these jacks to the analog audio input on a TV set or external audio system for analog audio playback or to the RECORD/INPUT jacks of an audio recorder for recording.
Front Speaker Outputs: Connect these outputs to the matching + or – terminals on your left and right speakers. In conformance with the new CEA color code specification, the White terminal is the positive (+) terminal that should be connected to the red (+) terminal on Front Left speaker with the older color coding, while the Red terminal is the positive (+) terminal that should be connected to the red (+) terminal on Front Right speaker. Connect the black (–) terminals on the CS to the black (–) terminals on the speakers. See page 14 for more information on speaker polarity.
Center Speaker Outputs: Connect these outputs to the matching + and – terminals on your center channel speaker. In conformance with the new CEA color code specification, the Green Terminal is the positive (+) terminal that should be connected to the red (+) terminal on speakers with the older color coding. Connect the black
(–) terminal on the CS to the black negative (–) terminal on your speaker. See page 14 for more information on speaker polarity.
Surround Speaker Outputs: Connect these outputs to the matching + and – terminals on your surround channel speakers. In conformance with the new CEA color-code specification, the Blue terminal is the positive (+) terminal that should be connected to the red (+) terminal on the Surround Left speaker with older color coding, while the Gray terminal should be connected to the red (+) terminal on the Surround Right speaker with the older color-coding. Connect the black (–) terminal on the CS to the matching black negative (–) terminals for each surround speaker. See page 14 for more information on speaker polarity.
NOTE: You’ll find more details about all audio/video connections under Setup and Connections on the following pages.
Coaxial Digital Output: Connect this jack to the matching digital input connector on a digital recorder (e.g., CD-R or MiniDisc recorder).
9
REAR-PANEL CONNECTIONS
Subwoofer Trigger Output: Connect this trigger output to the trigger input of the JBL subwoofer, so that the subwoofer will switch on and off at the same time as the rest of the system.
USB On-the-Go Input: This input may be used to temporarily connect a USB thumb device or portable hard disk for direct playback of audio, image of video files, a digital photo camera or a USB hub.
HDMI Output: Connect this output to the HDMI input of a highdefinition LCD, plasma or video projector for the best possible picture quality.
Remote IR Output: This connection permits the IR sensor in the receiver to serve other remote controlled devices. Connect this jack to the “IR IN” jack on JBL or other compatible equipment.
Remote IR Input: If the CS3/CS5’s front-panel IR sensor is blocked due to cabinet doors or other obstructions, an external IR sensor may be used. Connect the output of the sensor to this jack.
TV Audio Input: If your screen is connected to the CS by an HDMI, component, S-video or composite cable, connect the analog output of your TV to this input. If you have your TV connected to the CS with a SCART cable, an audio connection to the TV input is not necessary.
10

REMOTE CONTROL
0 Power On/Source Selection Buttons
1 Power Off Button
2 Subtitle Button
3 Title Button
4 Angle Button
5 Audio Button
6 Enter Button
7 Open/Close Button
8 Setup/OSD Button
9 Arrow Buttons
A Mute Button
B Menu Button
C Pause Button
D Status Button
E Skip/Step (Previous) Button
F Skip/Step (Next) Button
G Play Button
H Search/Slow Reverse Button
I Stop Button
J Search/Slow Forward Button
K Macro Buttons
L Pic +/Pic – Buttons
M Zoom Button
N Playlist Button
O Random Button
P A-B Repeat Button
Q Volume Up/Down Buttons
Light Button
Numeric Keys
Repeat Button
Clear Button
Video Output Button
Video Format Button
Learn Button
Screen Power Buttons
Info Button
Teletext Buttons
Picture in Picture Button
Screen Format Button
IR Transmitter Window
Program Indicator
Mode Button
English
11
 Loading...