Janome DC 3050 User Manual
INSTRUCTION BOOK
Model DC 3050

IMPORTANT SAFETY INSTRUCTIONS
When using an electrical appliance, basic safety precautions should always be followed, including the followings:
Read all instructions before using this appliance.
DANGER— To reduce the risk of electric shock:
1.An appliance should never be left unattended when plugged in. Always unplug this sewing machine from the electric outlet immediately after using and before cleaning.
2.Always unplug before replacing a sewing machine bulb. Replace bulb with same type rated 12 Volts, 5 Watts.
WARNING— To reduce the risk of burns, fire, electric shock, or injury to persons:
1.Do not allow to be used as a toy. Close attention is necessary when this sewing machine is used by or near children.
2.Use this appliance only for its intended use as described in this owner’s manual.
Use only attachments recommended by the manufacturer as contained in this owner’s manual.
3.Never operate this sewing machine if it has a damaged cord or plug, if it is not working properly, if it has been dropped or damaged, or dropped into water.
Return this sewing machine to the nearest authorized dealer or service center for examination, repair, electrical or mechanical adjustment.
4.Never operate the appliance with any air opening blocked. Keep ventilation openings of this sewing machine and foot controller free from accumulation of lint, dust and loose cloth.
5.Never drop or insert any object into any opening.
6.Do not use outdoors.
7.Do not operate where aerosol (spray) products are being used or where oxygen is being administered.
8.To disconnect, turn all controls to the off (“O”) position, then remove plug from outlet.
9.Do not unplug by pulling on cord. To unplug, grasp the plug, not the cord.
10.Keep fingers away from all moving parts. Special care is required around the sewing machine needle.
11.Always use the proper needle plate. The wrong plate can cause the needle to break.
12.Do not use bent needles.
13.Do not pull or push fabric while stitching. It may deflect the needle causing it to break.
14.Switch this sewing machine off (“O”) when making any adjustment in the needle area, such as threading the needle, changing the needle, threading the bobbin or changing the presser foot, and the like.
15.Always unplug this sewing machine from the electrical outlet when removing covers, lubricating, or when making any other adjustments mentioned in this owner’s manual.
SAVE THESE INSTRUCTIONS
The design and specifications are subject to change without a prior notice.
TABLE OF CONTENTS
KNOW YOUR MACHINE |
|
Name of Parts ........................................................... |
2 |
Standard Accessories ............................................... |
3 |
Extension table.......................................................... |
3 |
GETTING READY TO SEW |
|
Connecting the Power Supply .................................. |
4 |
Controlling Sewing Speed ........................................ |
4 |
Speed control slider ................................................ |
4 |
Foot control ............................................................. |
4 |
Function Buttons and Keys ....................................... |
5 |
Reverse button ....................................................... |
5 |
Auto-Lock button ..................................................... |
5 |
Up/Down needle button .......................................... |
5 |
Mode key ................................................................ |
6 |
Direct pattern selection ........................................... |
6 |
Dropping the Feed Dog ............................................ |
7 |
Changing the Presser Foot ....................................... |
7 |
Detaching and Attaching the Foot Holder ................. |
7 |
Raising and Lowering the Presser Foot ................... |
8 |
Balancing Thread Tension ........................................ |
8 |
Auto tension ............................................................ |
8 |
Manual tension adjustment ..................................... |
8 |
Changing Needles .................................................... |
9 |
Winding the Bobbin ................................................. |
10 |
Removing the bobbin ............................................ |
10 |
Setting the spool of thread .................................... |
10 |
Additional spool pin ............................................... |
10 |
Threading for bobbin winding ............................... |
10 |
Inserting the bobbin ............................................... |
11 |
Threading the Machine ........................................... |
12 |
Built-in Needle Threader ......................................... |
13 |
Drawing Up the Bobbin Thread .............................. |
13 |
Button Sewing ........................................................ |
27 |
Darning .................................................................. |
28 |
To sew a shorter darning ..................................... |
28 |
To adjust the evenness of darning ....................... |
28 |
Zipper Sewing ........................................................ |
29 |
Attaching the zipper foot ...................................... |
29 |
Fabric preparation for zipper sewing .................... |
29 |
To sew .................................................................. |
29 |
Blind Hem ............................................................... |
30 |
DECORATIVE STITCHES |
|
Knit stitch ................................................................ |
32 |
Shell Tucking .......................................................... |
32 |
Satin Stitches ......................................................... |
32 |
Applique Sewing .................................................... |
33 |
Scallop Stitch ......................................................... |
33 |
Patchwork .............................................................. |
33 |
Smocking ............................................................... |
34 |
Fagoting ................................................................. |
34 |
Cross Stitch ............................................................ |
34 |
Pattern Combination .............................................. |
35 |
Correcting Distorted Stretch Patterns .................... |
36 |
CARE AND MAINTENANCE |
|
Replacing the Light Bulb ........................................ |
36 |
Cleaning the Hook Race ........................................ |
37 |
Inserting the bobbin holder ..................................... |
37 |
Problems and Warning Signals .............................. |
38 |
Troubleshooting ..................................................... |
39 |
BASIC STITCHES |
|
Straight Stitch ......................................................... |
14 |
To sew ................................................................... |
14 |
Changing sewing direction ................................... |
14 |
Securing a seam ................................................... |
14 |
Altering the stitch length ....................................... |
15 |
Altering the needle drop position .......................... |
15 |
Using the seam guide lines .................................. |
16 |
To sew from the edge of thick fabric ..................... |
16 |
Variety of Straight Stitches and |
|
Recommended Feet ............................................... |
17 |
Zigzag Stitches ....................................................... |
18 |
Altering the stitch width ......................................... |
18 |
Altering the stitch length ....................................... |
18 |
Variety of Overcasting Stitches ............................... |
19 |
Overcasting with zigzag stitch .............................. |
19 |
Multiple zigzag stitches (Tricot stitch) ................... |
19 |
Overcasting stitch ................................................. |
19 |
Double overedge stitch ......................................... |
20 |
Buttonholes ............................................................. |
21 |
Variety of buttonholes ............................................. |
21 |
Square buttonhole .................................................. |
21 |
Altering the buttonhole width ................................ |
24 |
Altering buttonhole stitch density .......................... |
24 |
Double layer buttonhole .......................................... |
24 |
Round end and keyhole buttonholes ...................... |
25 |
Altering the buttonhole width ................................ |
25 |
Corded buttonhole .................................................. |
26 |
1
|
7 |
|
6 |
|
8 |
|
|
1 0 |
9 |
|
|
|
|
|
|
1 1 |
|
|
5 |
1 2 |
|
|
4 |
|
|
|
|
1 3 |
|
|
3 |
1 4 |
|
|
2 |
|
|
1 |
|
1 5 |
|
|
|
|
|
|
|
|
|
|
2 3 |
|
|
|
2 2 |
|
|
|
2 1 |
|
|
|
1 9 |
|
|
|
2 0 |
|
1 6 |
1 8 |
|
|
|
1 7 |
|
|
2 4 |
|
|
|
2 5 |
|
|
|
2 6 |
|
|
|
2 9 |
2 8 |
3 8 |
2 7 |
|
|
|
|
3 0 |
|
|
3 7
3 1
3 6
3 2
3 5
3 3 |
3 4 |
4 0
3 9
KNOW YOUR MACHINE
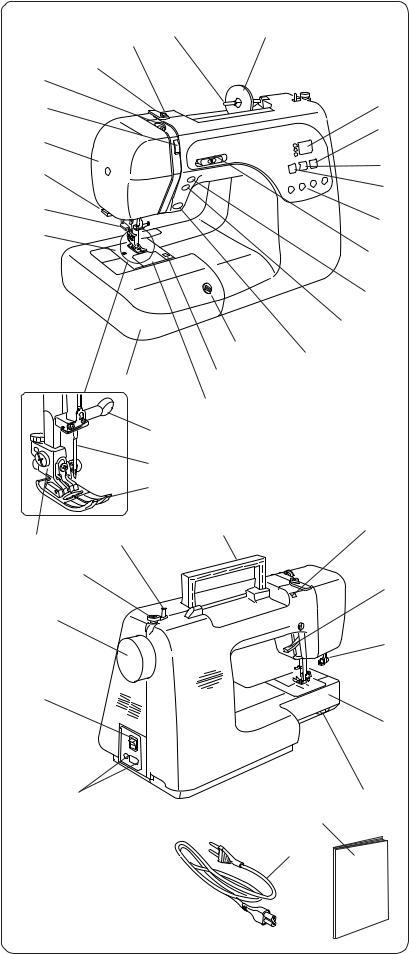
Name of Parts
1.Direct pattern selection buttons
2.Mode selection button
3.Plus (+) button
4.Minus (–) button
5.Indicator window
6.Spool holder (large)
7.Spool pin
8.Bobbin winding thread guide
9.Thread guide
10.Thread take-up lever
11.Tension regulating dial
12.Face plate
13.Thread cutter
14.Needle threader
15.Needle plate
16.Extension table (accessory storage)
17.Hook cover plate
18.Hook cover plate release button
19.Stitch balance adjusting dial
20.Reverse button
21.Auto-lock button
22.Up/down needle button
23.Speed control slider
24.Needle clamp screw
25.Needle
26.Zigzag foot A
27.Foot holder
28.Carrying handle
29.Bobbin winder spindle
30.Bobbin winder stopper
31.Hand wheel
32.Power switch
33.Machine sockets
34.Drop-feed lever
35.Free arm
36.Buttonhole lever
37.Presser foot lifter
38.Hole for additional spool pin
39.Power supply cord
40.Instruction book
2
q
w
1 |
2 |
3 |
4 |
5 |
6 |
7 |
8 |
9 |
1 0 |
1 1 |
1 2 |
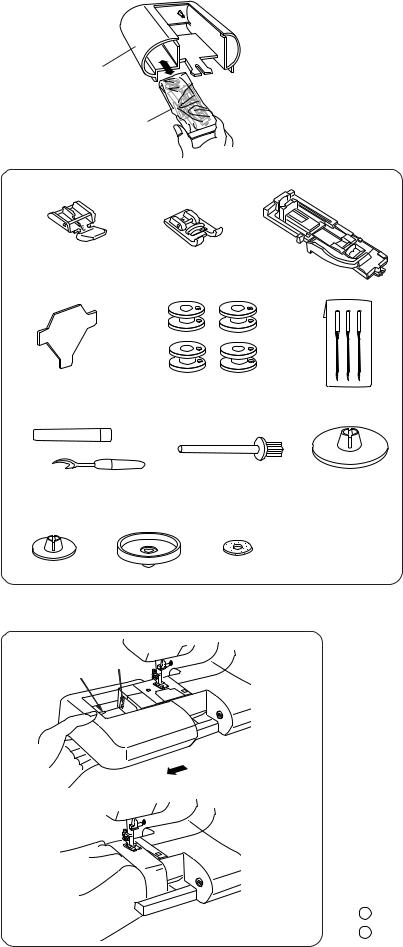
Standard Accessories
The standard accessories are stored in the extension table.
q Extension table
wStandard accessories
1.Zipper Foot E
2.Satin Stitch Foot F
3.Automatic Buttonhole Foot R
4.Screwdriver
5.Bobbins
6.Set of Needles
7.Seam Ripper
8.Additional spool pin
9.Spool Holder (Large)
10.Spool Holder (Small)
11.Spool stand
12.Felt
|
|
Extension table |
|||
|
w |
The extension table provides an added sewing |
|||
q |
surface and can be easily removed for free arm |
||||
|
|||||
|
|
sewing. |
|||
|
|
• |
Detaching extension table |
||
|
|
|
Pull the table away from the machine, as |
||
|
|
|
illustrated. |
||
|
|
• |
Free arm sewing |
||
|
|
|
Free arm sewing is useful for darning socks or |
||
|
|
|
mending knees, elbows or areas of wear in |
||
|
|
|
children’s clothes. |
||
|
|
• |
Attaching extension table |
||
|
|
|
Push the extension table until it snaps into the |
||
|
|
|
machine. |
||
|
|
|
1 |
Projection |
|
|
|
|
2 |
Hole |
|
3
|
|
|
GETTING READY TO SEW |
|
|
|
Connecting the Power Supply |
|
|
|
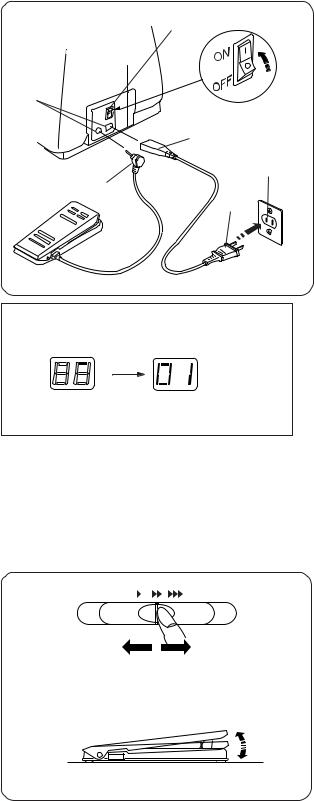
Turn off the power switch. |
|
q |
|
Insert the foot control plug into the machine socket. |
|
|
Insert the machine plug into the machine socket. |
|
|
|
|
|
|
|
|
Insert the power supply plug into the wall outlet. |
|
|
|
Turn on the power switch. |
e |
|
|
q Power Switch |
|
|
|
w Foot Control Plug |
|
r |
|
e Machine Socket |
|
|
r Machine Plug |
|
|
|
|
|
|
|
y |
t Power Supply Plug |
|
|
y Wall Outlet |
|
|
w |
|
|
|
|
|
|
|
t |
|
For Your Safety: |
|
|
|
While in operation, always keep your eyes on the |
|
|
|
sewing area, and do not touch any moving parts such |
|
|
|
as the thread take-up lever, handwheel or needle. |
|
|
|
Always turn off the power switch and unplug from the |
|
|
|
power supply: |
|
|
|
- when leaving the machine unattended. |
|
|
|
- when attaching or removing parts. |
q |
w |
|
- when cleaning the machine. |
|
|
|
Do not place anything on the foot control, otherwise |
|
|
|
the machine will run intermittently. |
|
|
|
When the power is turned on, the indicator window will |
|
|
|
show a test pattern then will indicate 01. |
Operating Instructions:
The symbol "O" of a switch indicates the "off" position of a switch.
For appliances with a polarized plug (one blade wider than the other). To reduce the risk of electric shock, this plug is intended to fit in a polarized outlet only one way. If it does not fit fully in the outlet, reverse the plug. If it still does not fit, contact a qualified electrician to install the proper outlet. Do not modify the plug in any way.
Controlling Sewing Speed
Speed control slider
You can limit the maximum sewing speed with the speed control slider according to your sewing needs.
To increase sewing speed, slide it to the right.
To decrease sewing speed, slide it to the left.
Foot control
Pressing on the foot control can vary sewing speed. The harder you press the foot control, the faster the machine runs.
NOTES:
The machine runs at the maximum speed set by the speed control slider when the foot control is fully depressed.
Keep the foot control free from accumulation of lint, dust and loose cloth.
Do not place anything on the foot control.
Operating Instructions:
Foot controller Model 21371 is for use with sewing machine model DC3050.
4
r
e w
w
q |
t |
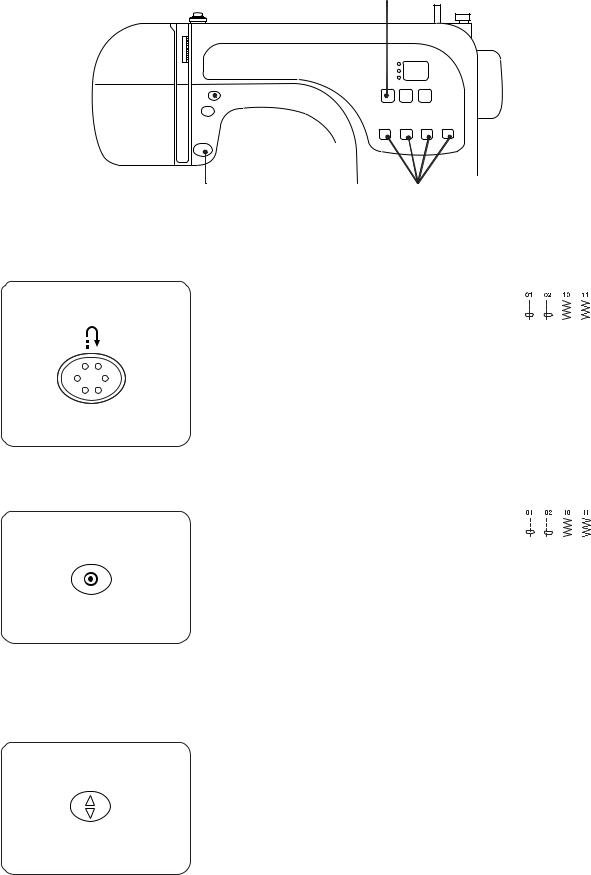
Function Buttons and Keys
q |
q Reverse button |
|
|
When stitch pattern 01, 02, 10 or 11 |
has been |
selected, the machine will sew in reverse while the reverse button is pressed.
If you press the reverse button when sewing any other stitches, the machine will immediately sew locking stitches and automatically stop.
|
w Auto-Lock button |
|
w |
When stitch pattern 01, 02, 10 or 11 |
has been |
selected, the machine will immediately sew locking stitches and automatically stop when the auto-lock button is pressed.
When sewing any other stitches, the machine will sew locking stitches at the end of the pattern being sewn and automatically stop.
e |
e Up/Down needle button |
|
Press this button to bring the needle up or down. |
||
|
||
|
The machine will stop with the needle up or down |
|
|
depending on the needle position determined by this |
|
|
button. |
5
r |
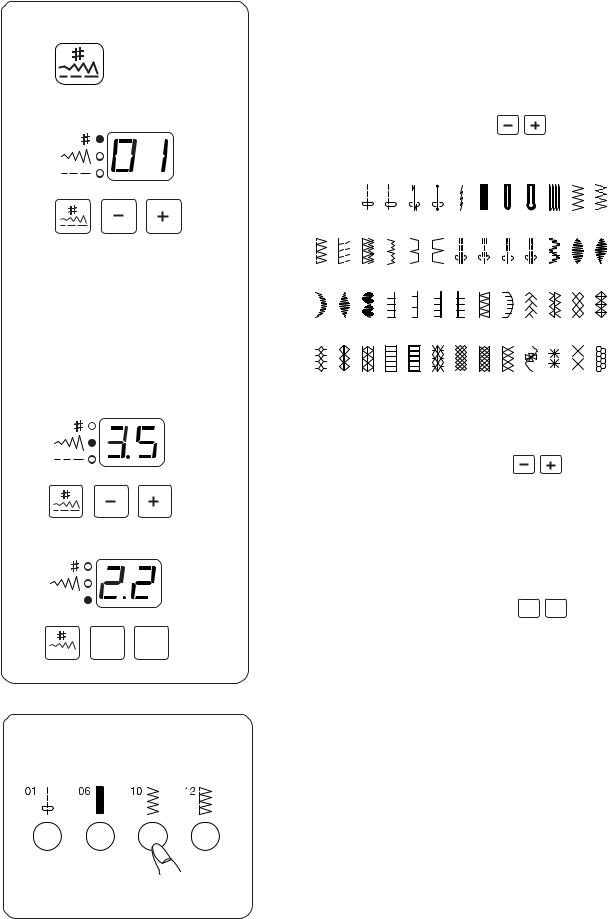
r Mode key |
|
|
|
|
|
|
|
|
|
|||
|
|
|
|
|
|
|
|
|
|
|
|
|
|
|
Each time you press this key the mode will change in |
||||||||||||
|
the following order: |
|
|
|
|
|
|
|
|
||||
|
(1) Pattern selection mode |
|
|
|
|
|
|
||||||
(1) |
The green light on the top will be on. |
|
|
|
|||||||||
|
To select the pattern, press the |
|
|
key until the |
|||||||||
|
pattern number of the desired stitch is indicated (see |
||||||||||||
|
the stitch chart below). |
|
|
|
|
|
|
|
|||||
|
|
|
01 |
02 |
03 |
04 |
05 |
06 |
07 |
08 |
09 |
10 |
11 |
|
|
|
A A A A A R R R R A A |
||||||||||
|
12 |
13 |
14 |
15 |
16 |
17 |
18 |
19 |
20 |
21 |
22 |
23 |
24 |
|
C A C G G F |
A F |
F |
A F |
F F |
||||||||
|
25 |
26 |
27 |
28 |
29 |
30 |
31 |
32 |
33 |
34 |
35 |
36 |
37 |
|
F |
F |
F |
F |
F |
F |
F |
F |
A |
F |
F |
F |
A |
|
38 |
39 |
40 |
41 |
42 |
43 |
44 |
45 |
46 |
47 |
48 |
49 |
50 |
|
A |
A |
A |
F |
A |
F |
F |
F |
F |
F |
F |
F |
F |
(2) |
(2) Stitch width adjusting mode |
|
|
|
|
||||||||
|
The green light in the middle will light up. |
|
|
||||||||||
|
The stitch width of the selected pattern will be |
|
|||||||||||
|
indicated. |
|
|
|
|
|
|
|
|
|
|
||
|
To alter the stitch width, press the |
|
|
key. |
|
||||||||
(3) |
|
|
|
|
|
|
|
|
|
|
|
|
|
|
|
(3) Stitch length adjusting mode |
|
||||
|
|
|
|
|
|
|
|
|
|
|
|
|
|
|
|
The green light on the bottom will light up. |
|
||||
|
|
|
|
|
|
|
|
|
|
|
|
|
|
|
|
The stitch length of the selected pattern will be |
|||||
|
|
|
|
|
|
|
|
|
|
|
|
|
|
|
|
indicated. |
|
||||
|
|
|
|
|
|
|
|
|
|
|
|
|
|
|
|
To alter the stitch length, press the |
|
|
|
|
key. |
|
|
|
|
|
|
|
|
|
|
|
|
|
|
|
|
||||||
|
|
|
|
|
|
|
|
|
|
|
|
|
|
|
|
||||||
|
|
|
|
|
|
|
|
|
|
|
|
|
|
|
|
|
|
|
|
|
|
|
|
|
|
|
|
|
|
|
|
|
|
|
|
|
|
|
|
|
|
|
|
|
|
|
|
|
|
|
|
|
|
|
|
|
|
|
|
|
|
|
|
|
|
t Direct pattern selection
t
The 4 most commonly used stitches can be directly selected by pressing the button under the pattern icon.
6
q
e
w
r
q
w  e r
e r
q
w
q
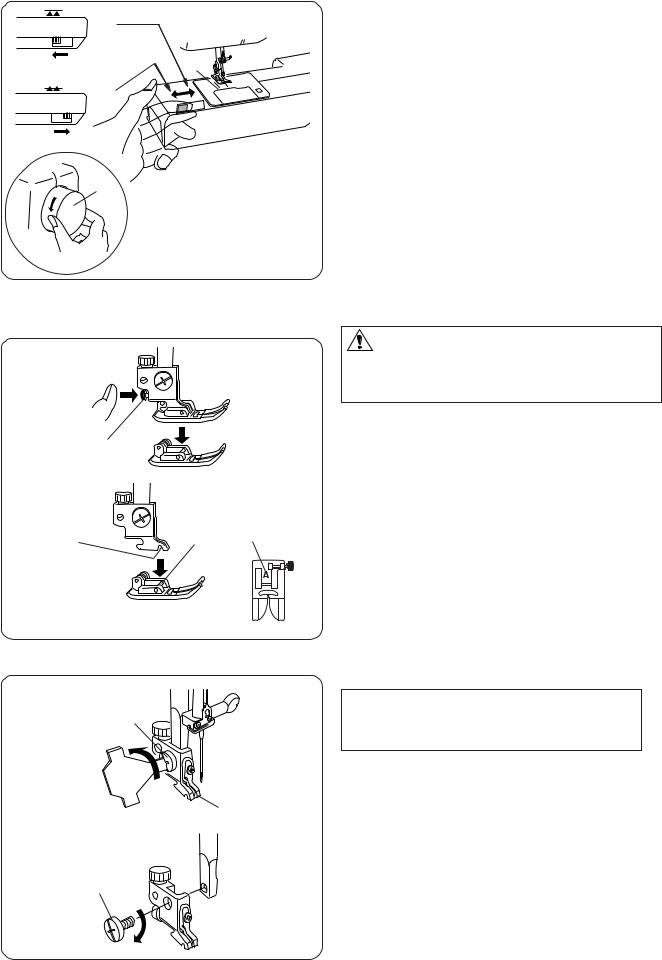
Dropping the Feed Dog
The feed dog can be lowered with the drop-feed lever for sewing on buttons etc.
Shift the drop-feed lever to the right to lower the feed dog.
Shift the lever to the left to raise the feed dog, it will return to the up position when the machine is started.
q Down position w Up position e Feed dog
r Hand wheel
NOTE:
The feed dog should be in the up position for regular sewing. Turn the handwheel toward you to check if the feed dog comes up after setting the lever in the up position.
Changing the Presser Foot
CAUTION:
Turn OFF the power switch before changing the foot. Always use the proper foot for the selected pattern. The wrong foot can cause the needle to break.
To snap off:
Raise the needle and presser foot.
Press the red button on the back of the foot holder and the foot will drop.
q Red Button
To snap on:
Place the presser foot so the pin on the foot lies just under the groove of the foot holder.
Lower the foot holder to lock the foot in place. w Groove
e Pin
Each foot is marked with a letter for identification. r Identification Letter
Detaching and Attaching the Foot Holder
 WARNING:
Turn OFF the power switch before detaching or attaching the foot holder.
To detach:
Raise the presser bar and turn the setscrew counterclockwise to remove the foot holder.
q Setscrew w Foot holder
To attach:
Align the hole in the foot holder with the threaded hole in the presser bar and insert the setscrew through the hole.
Tighten the setscrew by turning it clockwise.
7
e 
 w
w
|
w |
e |
q |
|
q
w |
|
t |
y |
e |
|
r
y
t
t |
y |
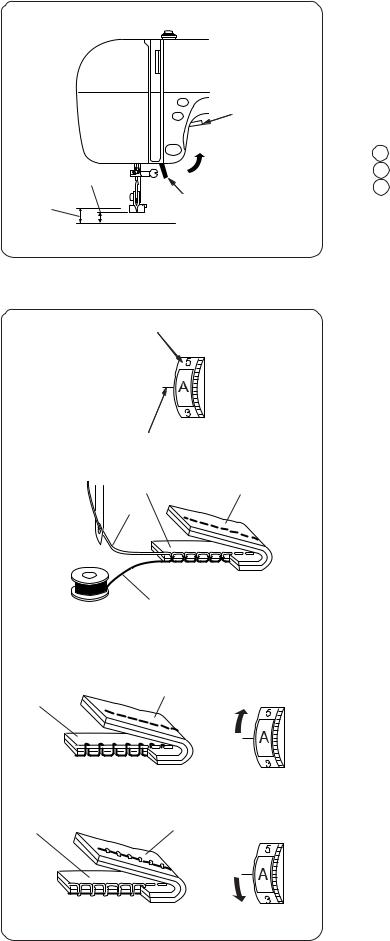
Raising and Lowering the Presser Foot
The Presser foot lifter raises and lowers the presser foot.
You can raise the presser foot about 6 mm (1/4") higher than the normal up position by exerting more pressure when lifting the presser foot lifter. This allows for easy removal of the presser foot and helps you to place thick fabric under the foot.
1Presser foot lifter
2Normal up position
3Extra lift
Balancing Thread Tension
Auto tension
This machine features an Auto setting in the tension control, which covers a wide range of sewing conditions. Set the tension regulating dial at "A" for general sewing, unless specifically indicated in this manual.
q Tension regulating dial w Setting mark
Balanced tension:
The ideal straight stitch has threads locked between two layers of fabric.
For an ideal zigzag stitch, the bobbin thread does not show on the right side of the fabric, and the needle thread shows slightly on the wrong side of the fabric.
e Needle thread r Bobbin thread
t Right side of the fabric y Wrong side of the fabric
Manual tension adjustment
Manual tension adjustment may be needed depending on the sewing materials, layers of fabric and other sewing conditions.
Needle thread tension is too tight:
-if the bobbin thread appears on the right side of the fabric.
Loosen the needle thread tension by moving the dial to a lower number.
Needle thread tension is too loose:
-if the needle thread appears on the wrong side of the fabric.
Tighten the needle thread tension by moving the dial to a higher number.
8
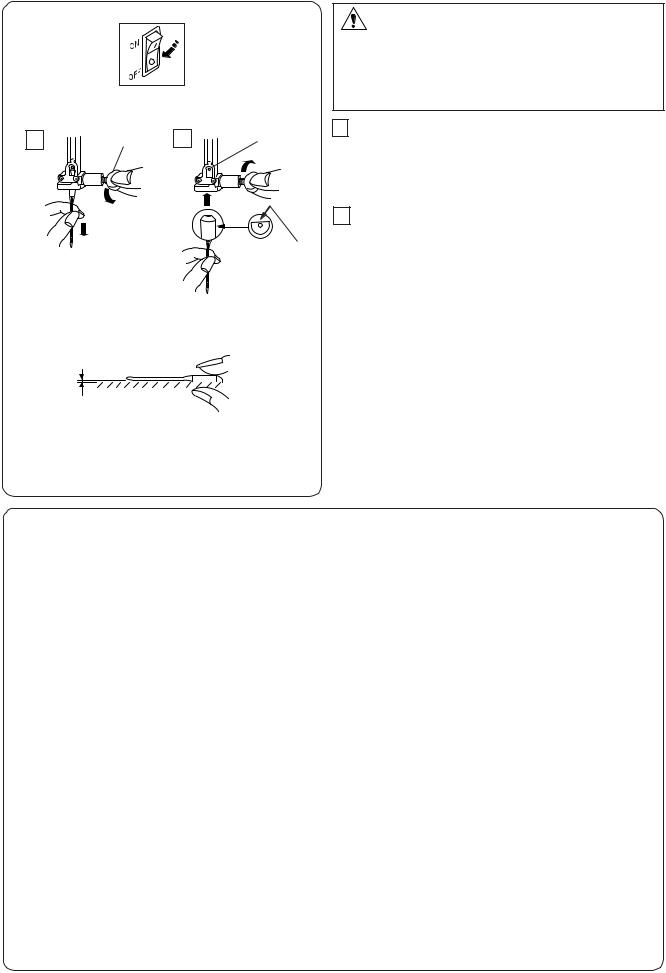
Changing Needles
|
|
|
|
|
CAUTION: |
|
|
|
|
Always make sure to turn the power switch off and |
|
|
|
|
|
disconnect the machine from power supply before |
|
|
|
|
|
changing the needle. Raise the needle by pressing |
|
|
|
|
|
the up/down needle button and lower the presser foot. |
|
|
|
|
|
Turn off the power switch. |
|
1 |
q |
2 |
w |
1 |
Loosen the needle clamp screw by turning it |
|
counterclockwise. |
||||
|
|
|
|
|
Remove the needle from the clamp. |
|
|
|
|
|
q Needle clamp screw |
|
|
|
|
2 Insert a new needle into the needle clamp with the |
|
|
|
|
|
|
flat side of the needle to the rear. |
eWhen inserting the needle into the needle clamp,
push it up against the stopper pin and tighten the needle clamp screw firmly.
|
|
|
|
w Stopper pin |
|
|
|
|
e Flat side |
|
|
|
|
To check needle straightness, place the flat side of the |
|
|
|
|
needle onto something flat (a needle plate, glass etc.) |
|
|
|
|
The gap between the needle and the flat surface |
r |
|
|
|
should be consistent. |
|
|
|
Never use a blunt needle. |
|
|
|
|
|
r Gap |
WEIGHT |
FABRIC |
TYPE of NEEDLE |
NEEDLE SIZE |
||
|
|
|
|
||
Very Light |
Chiffon, Georgette, Fine Lace, Organdy |
Universal |
9 (65) |
||
|
Net, Tulle |
Ball Point |
9 (65) |
||
Light |
Batiste, Voile, Lawn, Pure Silk, Crepe de Chine, |
Blue Tipped Needle |
11 (75) |
||
|
Sheer Crepe, Chambray, Handkerchief Linen, |
Universal |
11 (75) |
||
|
Gingham, Challis, Percale, Wool Crepe, Peau de |
|
12 |
(80) |
|
|
Soie, Taffeta, Satin, Silk Surah, Satin-backed |
|
|
|
|
|
Crepe, Qiana |
|
|
|
|
|
|
|
|
||
|
Single Knits, Jersey, Swimwear, and Tricot |
Blue Tipped Needle |
11 (75) |
||
|
|
Ball Point |
11 (75) |
||
|
|
|
|
||
|
Leather Suede |
Wedge Point |
11 (75) |
||
|
|
Leather Needle |
|
|
|
|
|
|
|
|
|
Medium |
Flannel, Velour, Velvet, Muslin, Velveteen, |
Universal |
14 |
(90) |
|
Poplin, Corduroy, Broadcloth, Linen, Chintz, |
|
|
|
||
|
Gabardine, Felt, Terry, Burlap, Quilted Fabrics |
|
|
|
|
|
|
|
|
|
|
|
Double Knits, (synthetic and natural) Stretch |
Ball Point |
14 |
(90) |
|
|
Velour, Stretch Terry, Sweater Knits |
|
|
|
|
|
|
|
|
|
|
|
Leather, Vinyl, Suede |
Wedge Point |
14 |
(90) |
|
|
|
Leather Needle |
|
|
|
|
|
|
|
|
|
Heavy |
Denim, Sailcloth, Ticking |
Denim Needle |
16 |
(100) |
|
|
|
|
|
||
Double Faced Wool, Heavy Coating, Fake Fur, |
Universal |
16 |
(100) |
||
|
|||||
|
Drapery Fabrics |
|
|
|
|
|
|
|
|
|
|
|
Leather, Suede |
Wedge Point |
16 |
(100) |
|
|
|
Leather Needle |
18 |
(110) |
|
|
|
|
|
|
|
Very Heavy |
Canvas, Duck, Upholstery Fabrics |
Universal |
16 |
(100) |
|
|
|
|
|
|
|
|
Topstitching for Special Finishes |
Topstitching Needle |
14 |
(90) |
|
9
1 |
q |
2 |
e
w
q
w
q
r w
w
e
2
1
q
2 |
3 |
w
4 |
5 |
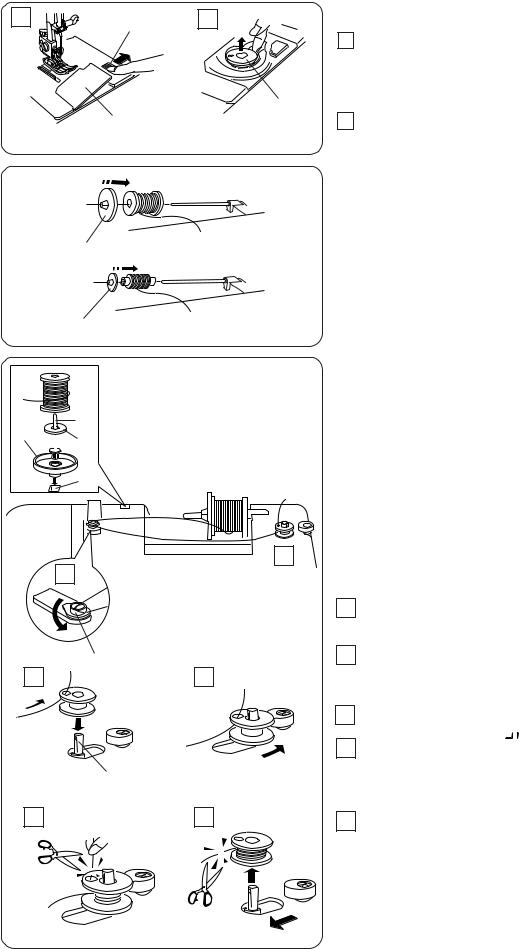
Winding the Bobbin
Removing the bobbin
1Slide the hook cover plate release button to the right, and remove the hook cover plate.
q Hook cover plate release button w Hook cover plate
2Lift out the bobbin from the bobbin holder.
e Bobbin
Setting the spool of thread
Lift up the spool pin. Place the spool of thread on the spool pin with the thread coming off the spool as shown.
q Large spool holder
Attach the large spool holder, and press it firmly against the spool of thread.
Use the small spool holder to hold narrow or small spools of thread.
w Small spool holder
Additional spool pin
Use the additional spool pin when you need to wind the bobbin without unthreading the machine while working on a sewing project.
Insert the additional spool pin into the spool stand and then into the hole in the machine.
Place the felt on the spool pin and place a spool of thread on it as shown.
q Additional spool pin w Felt
e Hole
r Spool stand
Threading for bobbin winding
1Set the speed control lever at 
 . Guide the thread around the thread guide.
q Thread guide
2Pass the thread through the hole in the bobbin from the inside to the outside. Put the bobbin on the bobbin winder spindle.
w Bobbin winder spindle
3Push the bobbin winder spindle to the right. The indicator will show  .
.
4Hold the free end of the thread in your hand and depress the foot control.
Stop the machine after the bobbin has spun several times, and cut the thread close to the hole in the bobbin.
5Depress the foot control again. When the bobbin is fully wound, it will stop automatically.
Release the foot control and return the bobbin winder spindle to its original position by moving it to the left, and cut the thread with a pair of scissors. Remove the bobbin from the bobbin winder spindle.
NOTE:
The machine will not sew until the spindle has been returned to the left.
10

|
|
Inserting the bobbin |
|
1 |
q |
1 Place the bobbin in the bobbin holder with the |
|
thread running off counterclockwise. |
|||
|
|
||
|
|
q Thread |
|
|
|
w Bobbin holder |
w
2 |
2 Guide the thread into the notch on the front of the |
|
bobbin holder. |
|
e Notch on the front |
|
e |
3 |
3 Draw the thread to the left, sliding it between |
|
the tension spring blades. |
|
r Spring blades |
|
r |
4 |
4 Continue to draw the thread lightly until the thread |
|
slips into the notch on the side. |
|
t Notch on the side |
t
5 |
y |
5 |
Pull out about 10 cm (4") of thread to the rear. |
Reattach the hook cover plate.
NOTE:
A threading chart is shown on the hook cover plate for your reference.
y Threading chart
11
 Loading...